
You wipe on a boss fight because your familiar ran out of stamina mid-flight, or your whole party goes down and nobody had a resurrection item on hand. Cooking fixes both problems, and it’s one of the most underused systems in DragonSword Awakening. This guide breaks down which recipes actually matter, where to cook them, and the ingredient mistakes that waste your materials before you even get a dish out of the pot.
Overview: Recipe Discovery System
Recipes come from two sources. NPCs hand out random tasks that reward specific recipes on completion, and you can also just mix three ingredients together at a fireplace to discover something new. The second method is trial and error by design — the game doesn’t tell you combinations upfront.
That said, you don’t have to guess blind. The community has already put together a full spreadsheet covering every known recipe, listing the cooking method, required ingredients, and effect for each one. Pair that with the recipe breakdown on raiderking.com and you’ve got a reference that saves hours of random mixing. Bookmark both before you start cooking seriously.
Best Recipes: Mushroom Tea & Stamina Recipes
Mushroom Tea is the recipe worth prioritizing early. It needs 1 Herb, 1 Mushroom, and 2 Time Mushroom, and its effect is straightforward: it resurrects an ally. In any fight where your party is at risk of a wipe, having a stack of these in your inventory turns a loss into a comeback.
Stamina recipes deserve just as much attention, even though they’re less flashy. Flying longer, swimming deeper, and fishing for underwater treasure all drain stamina fast, and the game gates a lot of exploration behind how long you can stay airborne or submerged. The recipe document lists several stamina-recovery dishes, but each one calls for a specific cooking method — grilling, boiling, or slicing. Pick the wrong method and you won’t get the dish you’re after, even with the right ingredients loaded in.
Where to Cook: Fireplaces & NPC Vendor
Fireplaces are scattered around the map — beaches, towns, most hub areas have one. If you’re picking a home base for cooking runs, set up next to the NPC named Arena. Arena sells cooking ingredients like rice, and buying what you need from a vendor is almost always faster than grinding for it in the field.
Check NPC shops before you go hunting for materials manually. It’s a small habit that saves real time once you’re crafting multiple recipes per session.
The stove interface itself has two tabs: Ingredients and Cookbook. Ingredients is where you load up what you’re cooking with. Cookbook stores every recipe you’ve already discovered — once something’s unlocked, you can recraft it anytime as long as you have the materials, no need to rediscover it.
Cooking Interface & Ingredient Nuances
Before you commit ingredients to a slot, check the material info at the bottom of the screen. It confirms exactly what category that item falls into, and this matters more than it sounds.
Fish and seafood are separate ingredient categories in this game — they are not interchangeable. A crab counts as seafood, not fish. If a recipe calls for fish, any fish works: trout, salmon, whatever you’ve got. If it calls for seafood, fish won’t substitute — you need something like crab. Load the wrong category and the recipe simply won’t process the way you expect, and you’ve burned ingredients for nothing.
Example: Assorted Sashimi Recipe
Here’s a full walkthrough using Assorted Sashimi, a solid stamina-saving dish that uses the slice method.
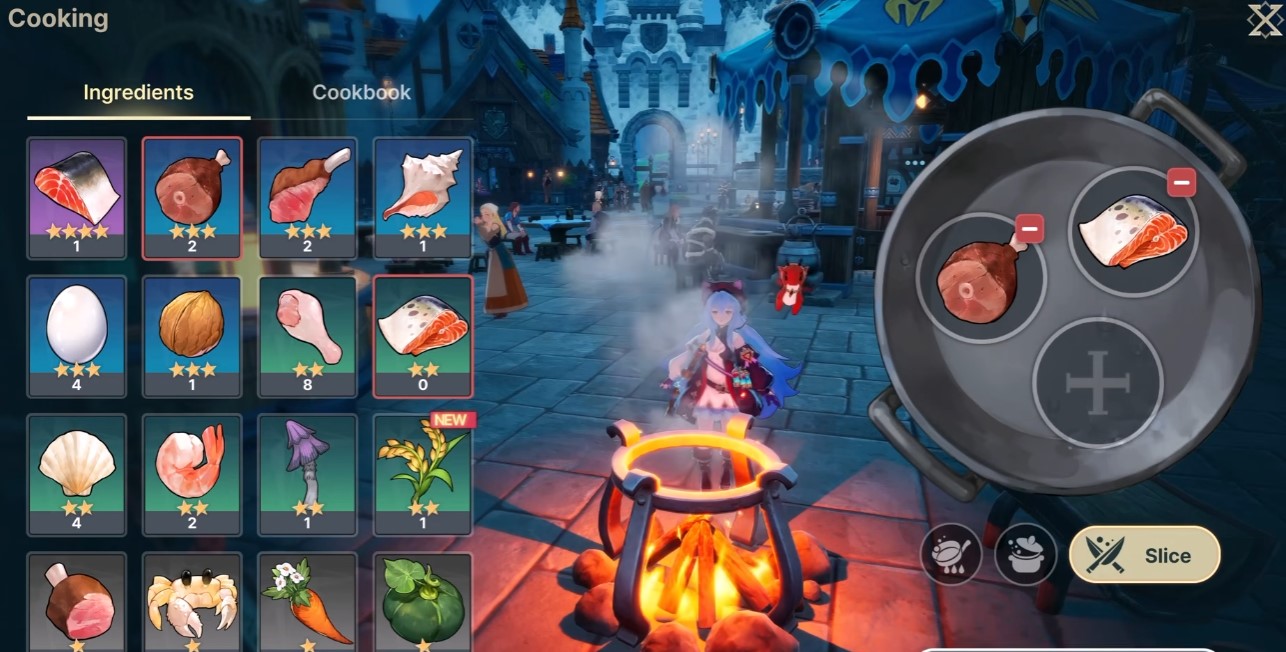
Ingredients: 1 Meat, 1 Fish
Effect: Reduces stamina consumption while flying or swimming on a familiar for 1 minute
Steps:
- Open the stove
- Go to the Ingredients tab
- Assign 1 Meat (any type works)
- Assign 1 Fish (any fish works)
- Select the slice cooking method
- Cook
That’s the whole process. The method selection is the step people skip, and it’s the one that determines whether you actually get Assorted Sashimi or something else entirely.
Common Mistakes to Avoid
Most failed cooking attempts trace back to one of three errors:
- Wrong cooking method — boiling when the recipe wants slicing, or grilling when it wants boiling
- Confusing fish with seafood — treating crab as a fish substitute, or vice versa
- Skipping the material info tag — assuming an ingredient’s category instead of checking it
All three are avoidable. Read the recipe requirements fully, verify the tag on every ingredient before locking it in, and confirm the cooking method matches what the recipe expects. It takes an extra few seconds and it stops you from wasting stacks of materials you spent time gathering.
Early Ingredient Locations: Crabs, Eggs, Herbs
Three ingredients show up in enough early recipes that it’s worth knowing exactly where to farm them.
Crabs (seafood): Found around beach areas. There’s a specific hook location early in the game where crabs spawn reliably in numbers — worth marking once you find it.
Eggs: Show up in a couple of marked areas on the map. Not as common as herbs, but predictable once you know the spots.
Herbs: The easiest of the three to find — anywhere with a decent tree density tends to have herbs scattered around.
Stock up on all three before you commit to a cooking session. Running back and forth mid-session because you’re one herb short is the most avoidable time sink in this entire system.
More Guides:
- DragonSword: Awakening – Beginners Guide and Tips
- DragonSword: Awakening – How to Farm Free Rice Early
- DragonSword: Awakening – How to Restore the Statue of Organa and Unlock the Goddess’s Blessings


