This guide offers a range of general, useful information about the game, as well as various little tips & tricks I’ve learned along the way – to help you become more efficient and successfully fight off the nightmare hordes!
Some of the suggestions in this guide have been put together based on my own game play experience – for which I can comfortably play at Horrific level (currently playing through Nightmare).
There are of course ‘other’ play styles you can use to achieve victory, this is merely my own. Hopefully though you’ll learn a thing or two from this guide 🙂
Last Updated for Patch 0.3.0.234
My Playstyle
Just reiterating that this is my specific way of playing AoD (which I can comfortably do at Horrific level) – there are of course other strategies that you can secure victory with, I am merely outlining my own, which I enjoy and find to be quite safe/effective.
As soon as the game starts, map out your immediate surroundings for ideal resource locations, some open areas which you can eventually place farms, identify any potential choke points for the first Death Night and so on.
- Wood –
At the beginning,. you should be aiming for locations that offer 15 wood at a minimum, and if you can generate an income of at least 45+ wood/tick during the first keep phase, you’re off to a good start. - Stone –
While scouting for wood, you should also be scouting for stone and, as soon as you have enough wood you should place a quarry down. This is arguably the most valuable resource throughout the game, you should be after locations offering 8 stone at a minimum, though if you’re forced to settle for less, do(or restart the game). During the first keep phase, a stone income of at least 20-24 would be ideal – but should be quickly improved upon as you upgrade your keep. - Iron –
Iron isn’t needed at all during the first keep phase, but if you stumble across a location (even if it is just offering 4), grab it. By the time you progress to a point where you need iron to research or advance, this early quarry will likely have prevented you from hitting a temporary progression wall.
The general goal is to upgrade your Keep as quickly as you can (with the imminently approaching Death Night), so once you’ve established your stone camp(s), you should hang on to enough gold/wood so you can upgrade as quickly as possible.
A choke point for this first wave can make life easier, but once you’re confident you can make do without one. For Easy -> Horrific difficulties, I found that 1 Ballista was all that was needed (alongside my hero and 7-10 Archers). There is also quite a lot of value to the ‘ignite walls‘ ability for this first wave, as it
A) naturally kills off a small portion of the overall wave and
B) buys your hero/archers & ballista time to pick off additional enemies.
I will typically place 4-6 lone tier-1 walls in a line towards my ballista (like breadcrumbs) and ignite them one by one as the wave begins hitting them.
So with that in mind, when you upgrade your keep for the first time, your research order should be:
- Towers > Ballista > Ignite Walls
Then afterwards you can go on to upgrade housing/farms, OR Tier-2 walls/gate if you feel they will be necessary for the defence.
At the beginning of the game I’ll typically explore the inner third of the map surrounding my keep, so that I’m able to scout out resource locations as well as reveal some nice open areas for which I can expand & place farms.
Once the first crystal/death night is revealed, I will move in that direction to identify the most suitable choke point (see section below for more info). After which I will continue exploring the outer edges of the map to A) locate gold mines and B) hopefully come across a dormant crystal, allowing me to identify a choke point and set up some initial defences early.
Starting out, I will have my original 2 Soldiers, and build up a force of up to 10 Archers to clear the map. Eventually when I’m able, I will gradually swap this force out for 10-15 Sentinels, backed up by 15-20 Arablests. It may seem like a lot, but this force allows me to:
- Clear wide areas of nightmares quickly (such as where the crystals spawn)
- Take down the harder elite nightmares without much fuss.
- Micro the Arablests into groups of 5 – to take down multiple ‘Spider’ nightmares simultaneously.
- Support my defences during a death night (see below section for more info)
- Split up this force ‘if’ needed for each of the defence points for the Final Stand.
I’ll also note that with this force, I don’t haven’t found a need to build siege units – though obviously they can have substantial defensive value with the right skill tree.
What about my starting units?
With the Archers/Soldiers I started out with, I’ll then use them in groups of two, to patrol my outlying farms/housing – protecting against the randomised nightmare spawns.
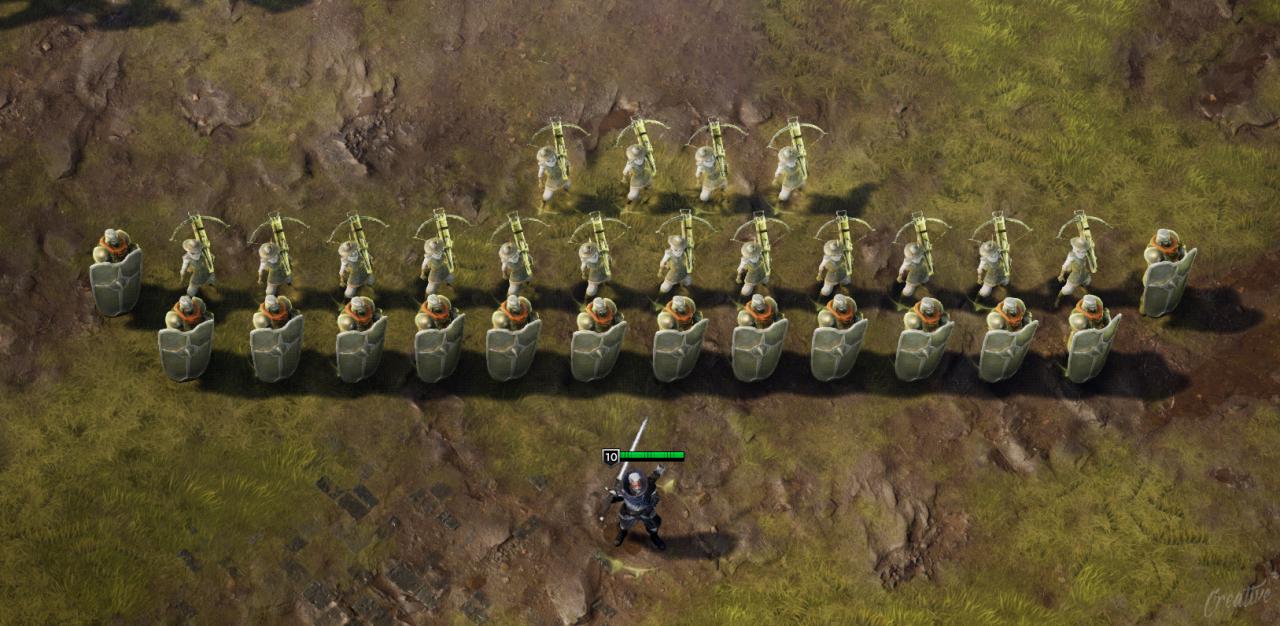 What my map clearing & defensive army will eventually look like.
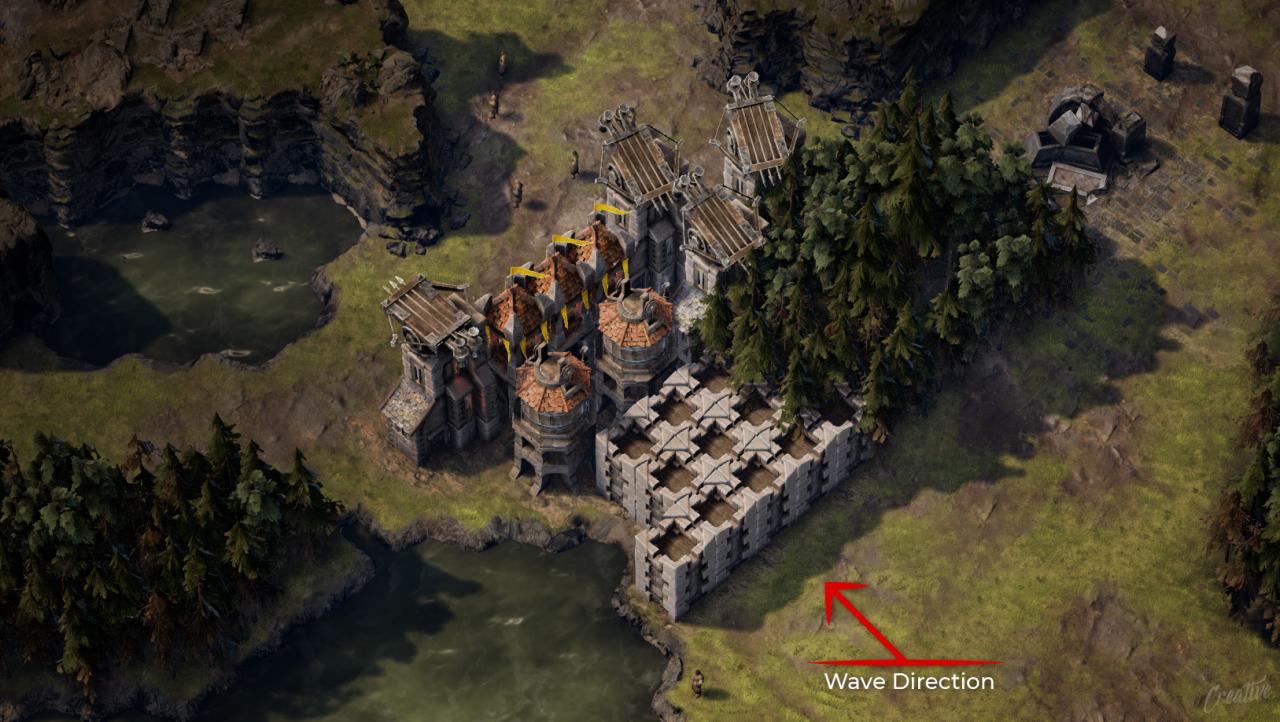
A ‘choke point‘ is a narrow location that the nightmares will funnel through to get to your base. Below is an optimal example of a choke point, as well as how my defences against each crystal location will personally look, from Wave 5 onwards.
- 2x Bellow Towers ~ – as it takes two shots to kill the ‘basic’ nightmares. It’s important to place these towers in front as they have the smallest range.
- 2-3 Archer Towers ~ Filled with Arablests. When the ‘tank’ nightmares come, this is by far the most effective way to take them down.
- 3-4 Ballista Towers ~ To support the Bellow Towers in clearing the masses, as well as supporting the Archer Towers with the tank nightmares if micro’d.
As mentioned above regarding ‘UNITS‘, I will typically have my hero and my army in close proximity to my defences during a death night. So, observing the adjacent pathway in the north-eastern corner, I will typically have my hero, sentinels and arablests formed here. To alleviate the pressure on my defences (if needed) – I will pick a tank-free moment to attack the wave with my hero, and lure them back to my army to create a ‘break’ in the attack. This results in a decent portion of the overall attack wave being redirected and safely dispatched.
Creating this ‘break’ in the attack also allows me to briefly repair my walls if needed (as mentioned in the ‘Tips‘ section).
– – – – – – – – – – – – – – – – – – – – – – – – –
Lastly, I just thought I’d mention that depending on the width of the choke point you’re forced to work with, you may need to set up a secondary set of defences closer to your base, for the Final Stand. For example in the below image, I could do so in the northern section, between the two cliffs.
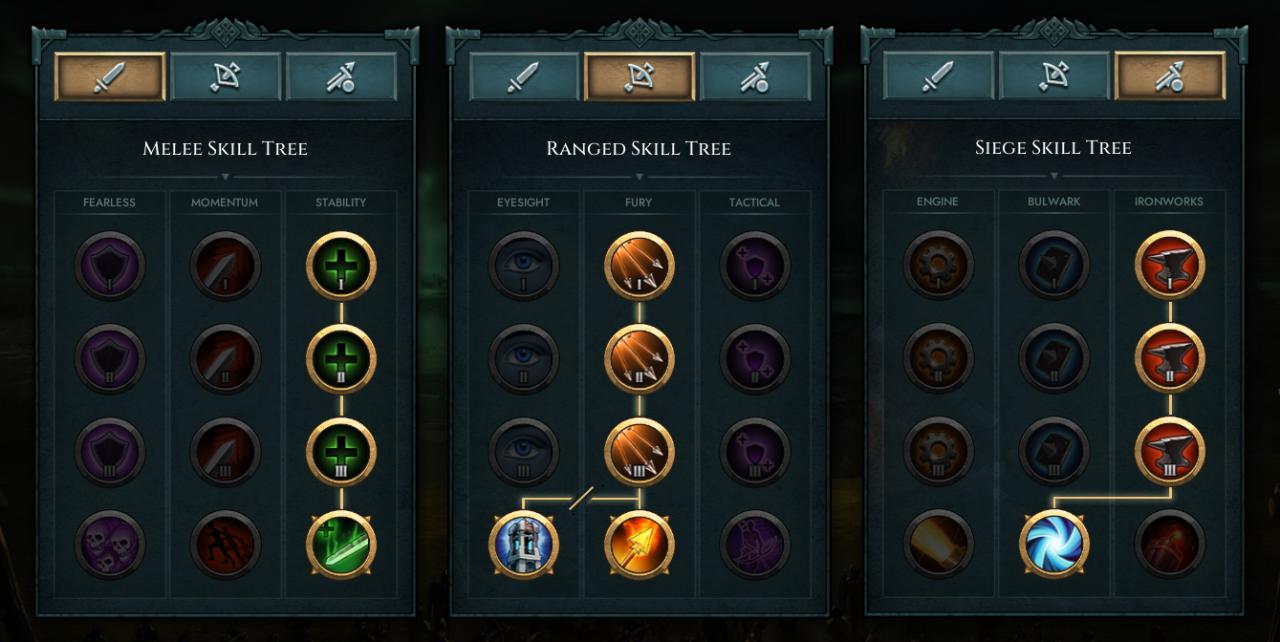
Skill Trees
Below is a shot of my preferred tree upgrades. I opt to run an army comprised of Sentinels & Arablests (both for map clear & defence) so the general reasoning for my below build is as follows –
Sentinels are designed to soak as many hits as possible, so committing to the ‘Stability’ column is only logical, and Wolf Blade reflects damage back at the enemy – which adds a nice bit of lethality to them.
With such a solid front line (the Sentinels), I feel its best to compliment that with high-damage Arablests. ‘Fire Arrows‘ are great at assisting with map clearing, while ‘Critical Cover is considerably better suited for Death Nights, specifically with taking down the ‘tank’ Nightmares.
Personally, I haven’t found a need for siege units – my army gets the job done quite well without. However, the siege units in this game are designed to disrupt the momentum of groups of enemies, which is why in my testing, I found committing to the ‘Ironworks‘ column and investing in ‘Concussive Shot‘ to be the most beneficial at kneecapping a Death Night wave.
Game Difficulties & Death Nights
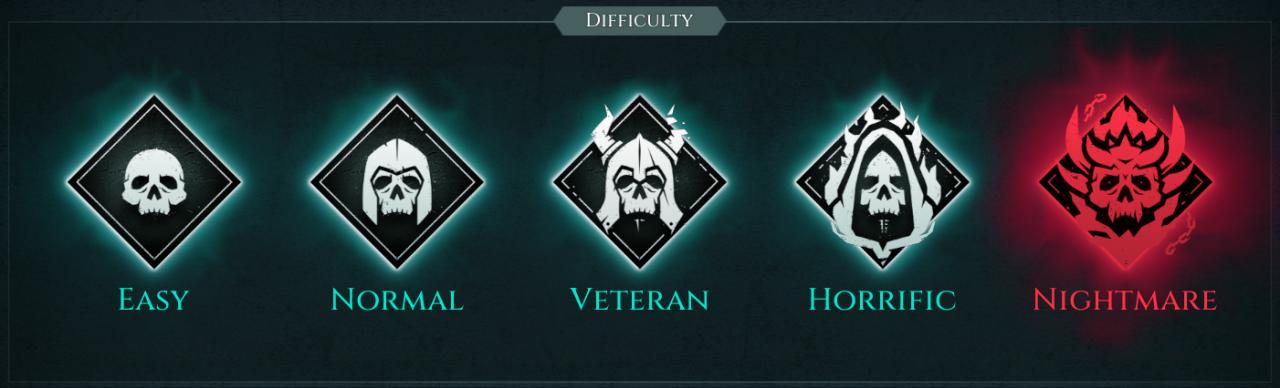 There are a few differences between the difficulties as they get harder, being:
- Reduced manual saves
- Reduced day/night cycles between Death Nights
- Increased nightmares during Death Nights.
- Increased ‘unique‘ nightmares through out the map, particularly at ‘points of interest’, resource locations & death nights.
- Single-life Hero (Nightmare only).
- No game pause (Nightmare only).
Regarding the ‘increased nightmares during death nights‘ point, the below numbers show the number of spawns there are per wave & difficulty, so you have an idea of what to expect and can better prepare your defence.
I’m not sure if these numbers are exactly the same for each player, but these are the numbers I personally dealt with in each difficulty.
Blessings
Below is a list of the current blessings in game which I’ve ordered according to how useful I perceive them to be in game.
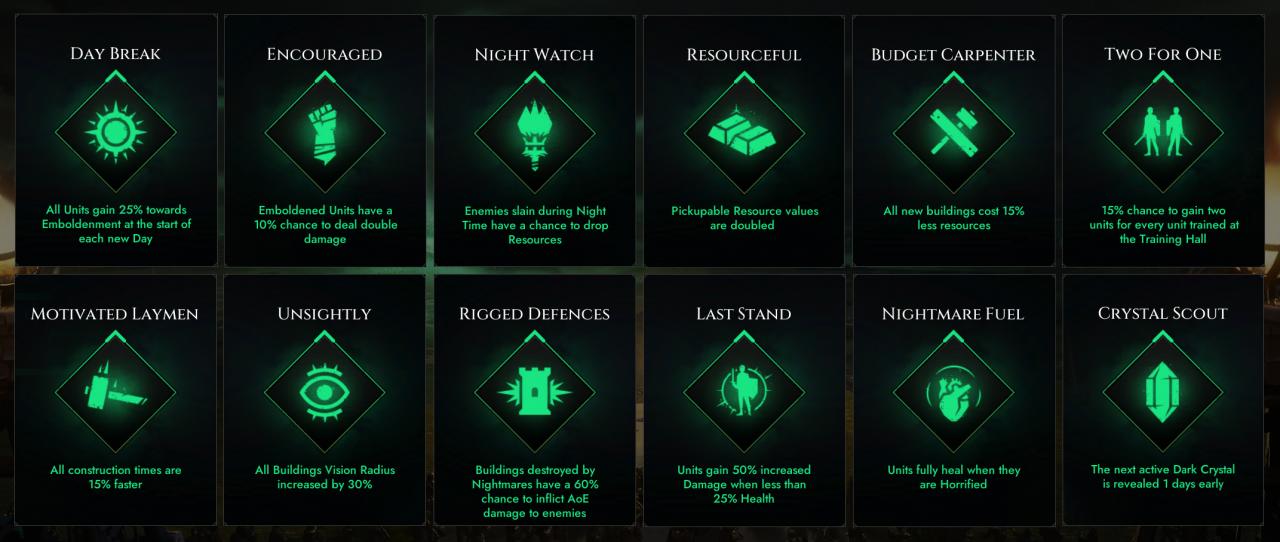
‘Emboldened ‘ units are immune to horror and gain a 10% hp, 25% damage boost. This is a fantastic, passive blessing which will quickly strengthen new units you create, allowing you to more effectively explore & clear the map.
Fairly self-explanatory, actively supports the Day Break blessing quite nicely.
Quite a profitable blessing for when death nights come around. Make sure you’re not at/near your resource cap before picking these drops up.
Obviously works quite well with the Night Watch blessing, though still viable on its own.
Although this blessing doesn’t apply to the skill tree upgrades, units, researches etc – it will still save you you a considerable amount of resources throughout the game – allowing you to strengthen your defences further.
A pretty simple blessing, but one that help bring about an established army sooner (and save a little on resources in the process).
This speed boost won’t be enough to react to imminent problems in time, but generally speaking every little will help, and this blessing will help speed up the expansion of your base (provided you have optimal resource rates).
Helps light up the map and reduce the amount of light towers needed, allowing you to refocus your resources. This will mean you’ll likely have a reduced amount of areas that offer the removal of the horror debuff – though this is not an issue if you’ve prioritised the top two blessings in this list.
This blessing can be handy for the 4th Death Night onwards, when you will inevitably lose some walls/defences to the nightmares. If they’re going to destroy some of your structures, may as well make them pay for it.
I personally don’t like having units in the thick of things if they are operating on such low health, so I would sooner pull them from the fight, until they (quickly) regenerate their HP, making this blessing fairly redundant.
With the first two blessings at the top of this list selected, the high majority of your units will be emboldened & immune to horror, making this blessing fairly redundant and have very low impact.
In my opinion, the only Dark Crystal worth getting a days’ notice on would be the first one (which obviously isn’t possible) – since you’re working quickly to establish resources and your base.. So this blessing is reasonably pointless.
Other –
I believe there’s also a blessing to double the XP your hero receives. I would place prioritise this after ’10. Last Stand’ – provided your hero doesn’t die more than once, you’ll get to level 10 before the Final Stand (assuming high participation with the hero), and the hero simply doesn’t impact the game to a degree that warrants being higher up this list.
Tips & Tricks
Below is just a quick list of tips & tricks I thought would aid your playthrough, though some will be obvious to you.
-
Final Stand Preparation
After the completion of the 5th Death Night, you will receive 10 minutes to prepare your defences for the Final Stand. However if you are just starting to fortify your defences at each of the five points during this time, then chances are you will not have enough time.
During the Final Stand, each of your five defensive points will be attacked by a wave comparably the size of the one in the 4th Death Night. So while your last two points will likely be able to defend against that, you first three points will need additional reinforcement.
It’ll be considerably less stressful if you slowly start reinforcing each defensive point ‘after’ you’ve defended it against its individual Death Night. That way you can use the final 10 minutes to do some final little preparations (a couple more walls, perhaps some extra units) – as opposed to a mad scramble to quickly build up three defensive points.
-
Standalone Trees
In open areas where there are single/small groups of trees, build tier 1 walls over them and then sell them = allowing you to maximise your farms’ output etc.
-
Structure Repair During a Death Night
The ability to repair(& build) structures, seems to be disabled when nightmares are in very close proximity. During a Death Night (assuming you have two Bellow Towers), you can actually begin repairing your walls for 3-5 seconds after your Bellow Towers clear the nearby Nightmares.
Alternatively, you can also engage the nightmares with your hero/army briefly, giving your walls time to repair – then you can retreat behind the walls with them once more. Doing this repeatedly throughout a Death Night has quite often meant I’ve survived the night without a single structure lost.
-
Selling Near-death Structures
At various points in the game, you’re going to lose structures, but instead of just accepting that complete financial loss, you can actually sell them off. Currently, the sell value of a structure is not impacted by its HP (I imagine it may be patched in future).
-
Indefinite Expansion
Particularly with harder difficulties – don’t stop expanding until the Final Stand. More farms, houses, units & resources. At some point you’ll get to a resource rate which can sustain regular and consistent growth (at which point you can consider no more quarries), however you should always strive to prepare as best you can to survive until the end.
So if you’ve already set up defences at awesome choke points, set up secondary defences closer to your base – just in case they get through. Aside from that, keep building units. We all know that the more successfully you can beat the game, the more satisfying it is. I personally enjoy building a substantial force and sending them out to meet the wave of Nightmares head on (outside the safety of my walls) once I know I’ve won.
-
Resource Caps
Aside from wood (which I always seem to have an abundant supply of), you should not allow your resources to max out, otherwise this will likely set you up for difficulties later in the game. If you have plenty of gold, see what upgrades you can research, too much stone/iron? Consider more walls or defences, and certainly keep building farms/houses until the Final Stand.
-
Treasury
Having a Treasury will increase the income of nearby Tier-1 Housing by 30%, T2 Housing by 25% and T3 Housing by 20%. It is typically quite valuable to get (the earlier the better) despite the up front cost of one. I will typically only bother getting one Treasury, which I eventually surround with 24 Houses at a minimum.
Resources & Timings
I thought it beneficial to have a general idea of how often your resources are coming in.
At the beginning of the game, gold will replenish every 24 seconds. However, seemingly as you upgrade your keep, this will slow down to 34 seconds.
Gold harvested from refined quarries will replenish every 90 seconds, and are tracked separately from your Keep/Housing income.
Lumber Yards have no refined version, so they replenish every 50 seconds at all stages of the game.
Stone will replenish from refined quarries every 55 seconds (~65s for unrefined).
Iron will replenish from refined quarries every 75 seconds – a little slower than that for unrefined.