Fight your way through the evil orcs and other fiends with the official strategy guide to the all new campaign for Legends of Middle-Earth mod! This guide was written by the mod’s creator/director, Venlesh!
Introduction
This guide will highlight all the tips, tricks, secrets, and strategies you can find throughout the campaign!
I. Battle of the Moors
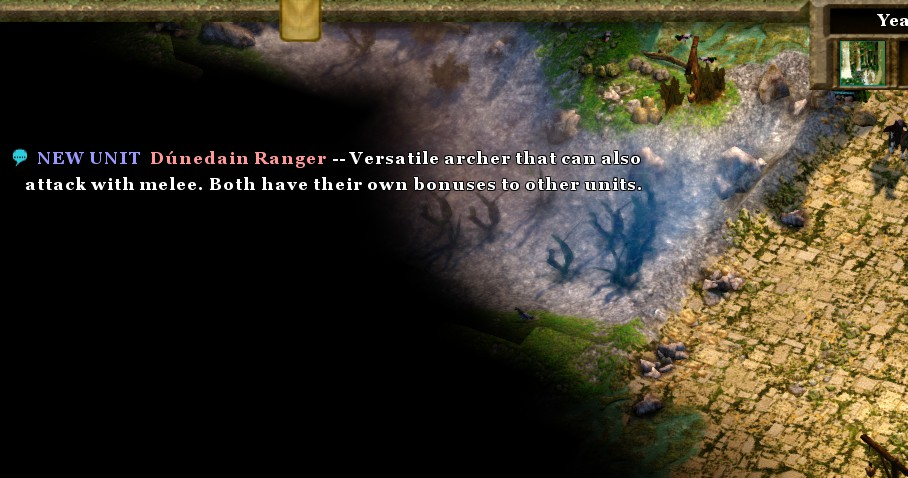
Once the level has given you control, you may notice the notification about the new unit you’ve gained; this will happen routinely as you play through the campaign. Throughout the campaign, you will continue to unlock more and more of the Dunedain faction to use in your struggles.
At the start of the level, your left only with a few Rangers, but the Dunedain hero unit, Halbarad will arrive shortly. As a hero unit, Halbarad will be extra useful against myth units, and is far more durable than the average unit.
The two orc camps, the North and South Moors will attack the player constantly. The North camp will send either archers, or slingers to constantly harass the player. It is advised to wall off the easy routes into your base while you stockpile resources to age up with. You have down time to gather your bearings as well, since Halbarad is always fashionably late to the scene.
The South Camp is far more dangerous, and it is advised you get rid of the annoying North Camp before focusing on them. Their attacks are far more dangerous, as they will build up a reserve of Orc Infantry before attempting to siege the player’s base. Luckily, both Dunedain Rangers, and Dunedain Riders are pretty effective at dispatching Orcish infantry, and infantry in general.
Dunedain Rangers get a special damage bonus against infantry when attacking with their melee attack!
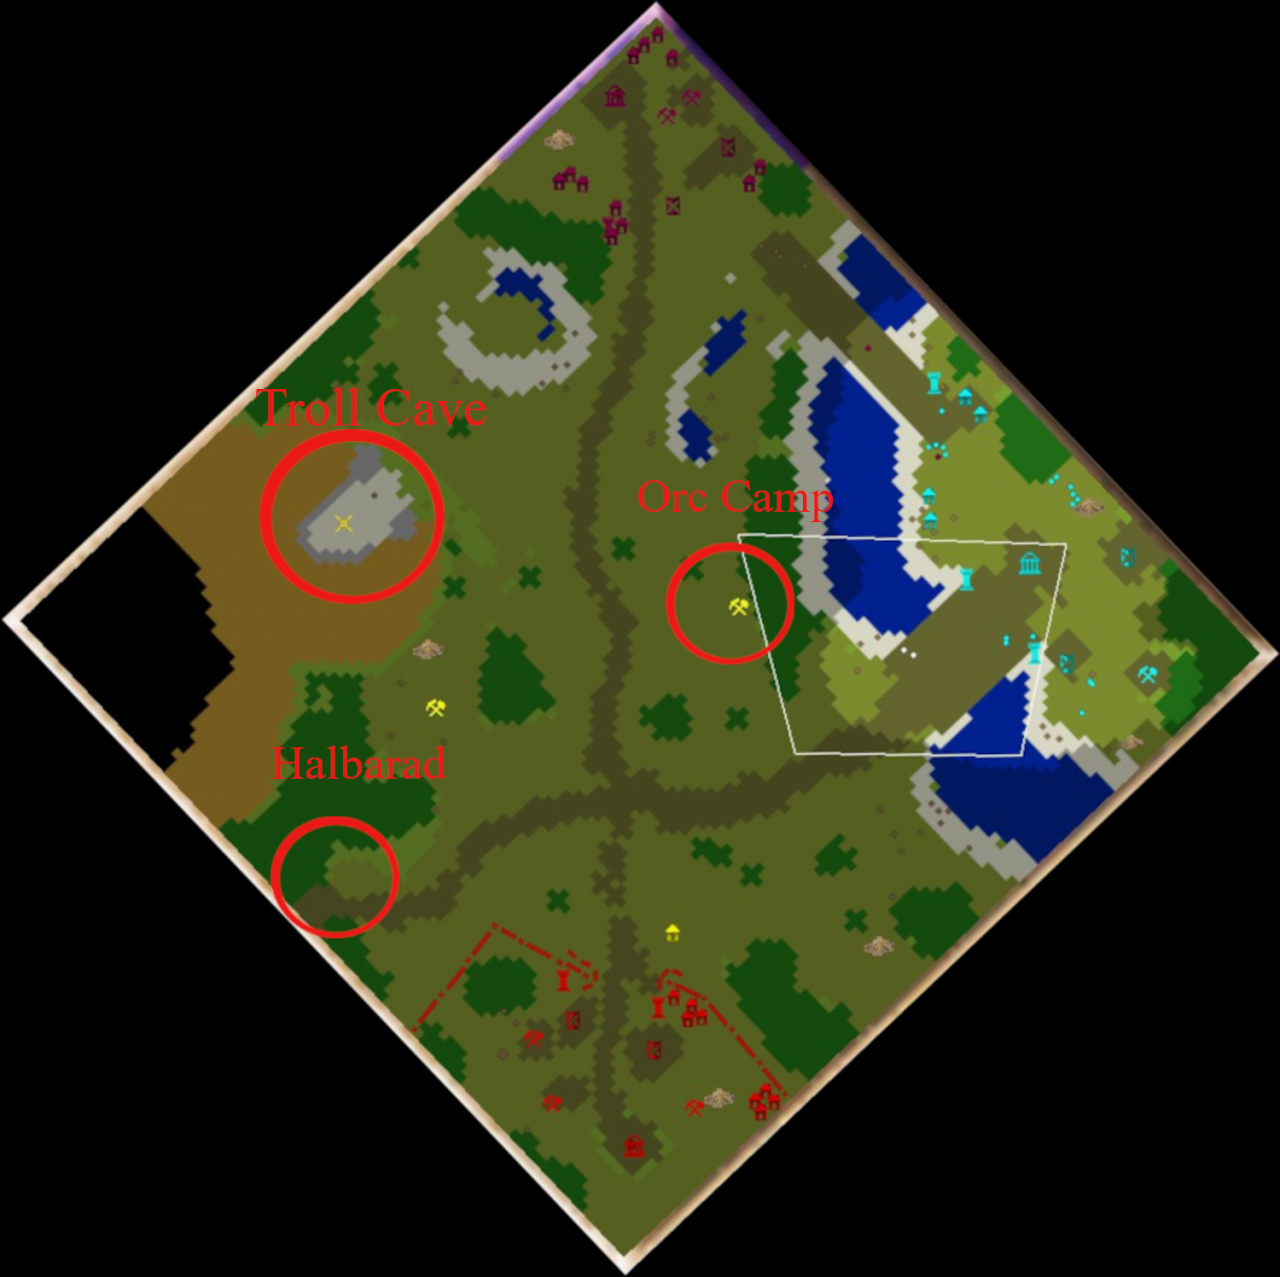
The western side of the map, a cave filled with trolls guard a Relic that can be especially useful for this level. Be careful when attempting to attack the Troll Cave, as you may end up walking right into an orc patrol! The Trolls don’t seem to mind the orcs — but they hate you!
Beware other various small orc camps around the map that can hamper your attack plans, or make fights more difficult if you run into them.
With enough determination, it’s only a matter of time before you’ve built up your forces enough to deal with the orcish bases one at a time! Congratulations, you’ve won your first victory!
II. The Defence of Bree
Starting in this level, the player can now use the Dunedain Archer! The Ranger and Archer can be used in entirely different situations. On top of costing different resources (The Archer needs Wood, while the Ranger needs Food), the Archer is more accurate, and can shoot from farther away, dealing more reliable pierce damage. While the Ranger might be a stand-in for the Archer, they’re definitely no replacement; and in this level, we’ll be using the Ranger to play the role of our infantry tanks! Unfortunately for this level, we only have access to the Ranger Den, meaning we will have no cavalry to help us out.
Attacking the fortress will probably only get you killed, or weakened, so it’s best to stay clear of it at all costs — though Halbarad will comment on it if you try.
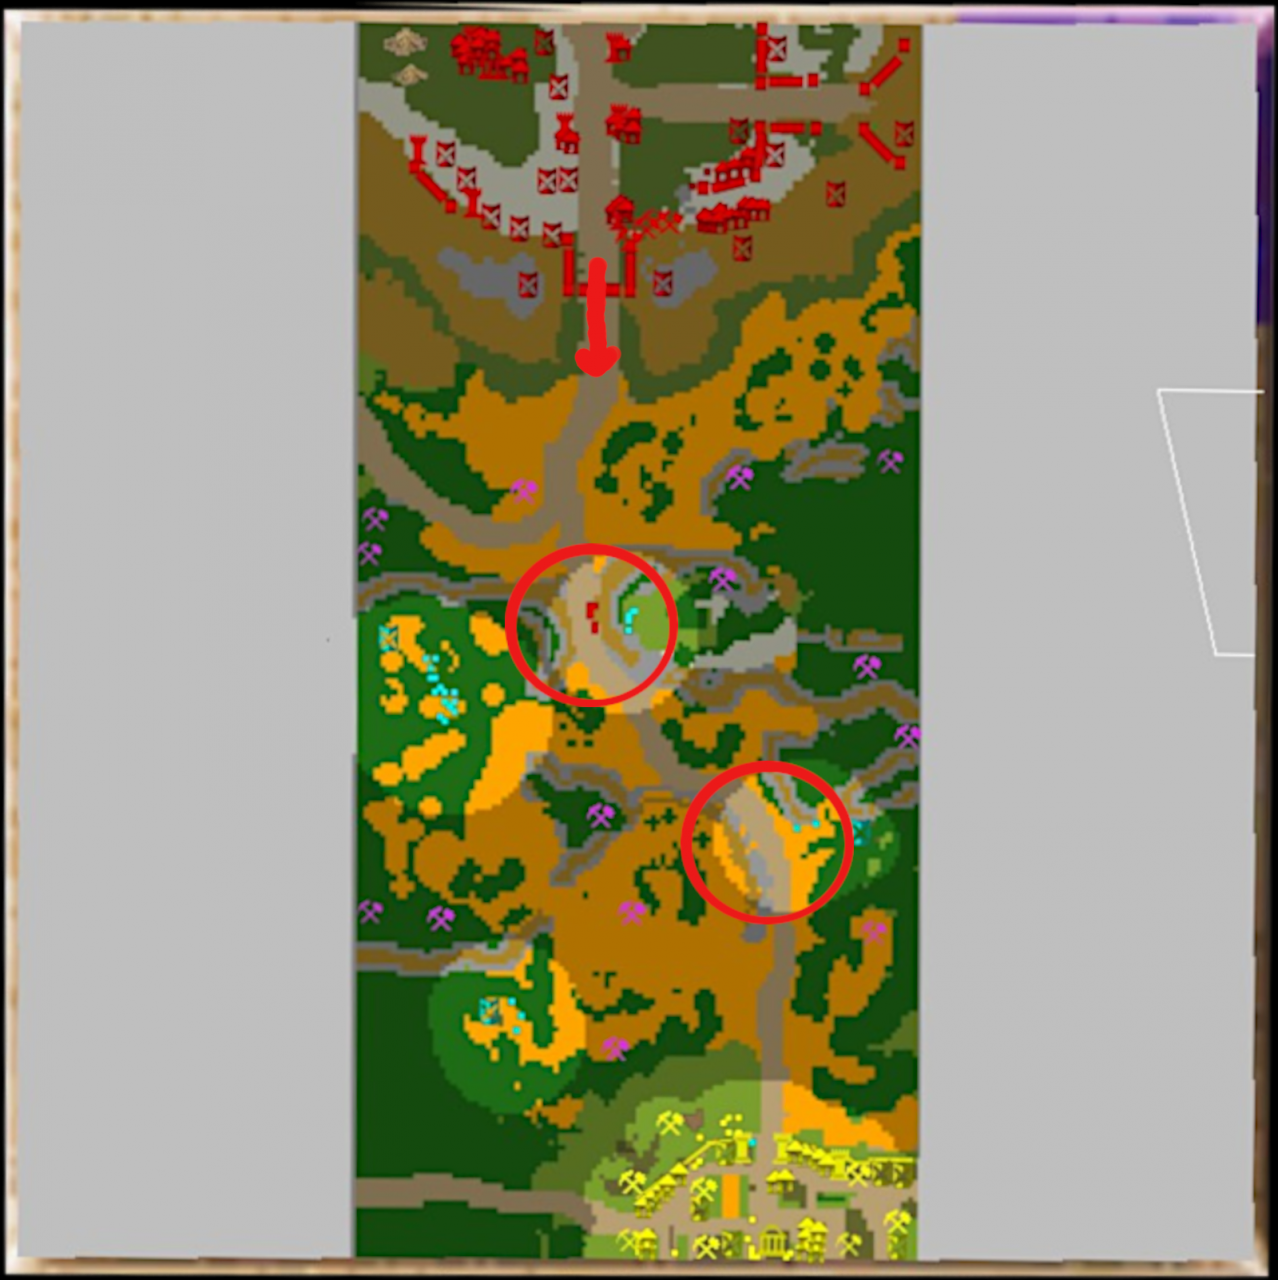
Orc waves will leave the fortress of Fornost at the top of the map, and follow the road to Bree from there. It’s up to us to stop them from reaching it, which we can best do from one of two chokepoints, though if all else fails, we can fall back to Bree itself, and try to make our last stand from there.
To keep training new soldiers, we’ll need to gather resources, but since we have no villagers, we’ll have to scavenge from Shrines across the map. Below is a map showing all of the Shrine locations on the map. There are 14 Shrines to be destroyed across the map.

The best way to destroy the Shrines is to send all three of your hero units to blow them up, and their Barrow Wight guardians. The Barrow Wights are no joke, and will instantly kill any normal unit that challenges them with their special attack, which will turn them into a Lesser Wight Minion! The best strategy is to only pull your heroes back when you spot myth units in the advancing waves.
While small bands of orcs will constantly feed into your chokepoints, bigger waves will periodically leave the fortress, causing a real problem when they start getting tougher! Here is the order of the waves, and how they will act:
- Wave 1: Orc Infantry
- Wave 2: Orc Infantry
- Wave 3: Orc Infantry, Javelineers, and Warg Riders (Use Archers against all of these!)
- Wave 4: Orc Infantry, 2 Ballistae (Use heroes, or move your Rangers into melee to attack the ballistae)
- Wave 5: Orc Infantry, Archers
- Wave 6: Orc Infantry, Wargs (Use your heroes against the Wargs!)
- Wave 7: Orc Infantry, Archers, 1 Ballista *THIS WAVE DOES NOT STOP!
- Wave 8: Orc Infantry, Wargs
- Wave 9: Warg Riders, 2 Cave Trolls *THIS WAVE DOES NOT STOP!
- Wave 10: Javelineers, Wargs, 3 Cave Trolls
- Wave 11: Orc Infantry, Archers, 2 Ballistae
- Wave 12: Orc Infantry (A big wave!)
- Wave 13: Orc Infantry, Archers, Javelineers, 3 Cave Trolls
- Wave 14: Orc Infantry, Archers, Warg Riders, 3 Ballistae (big wave!)
- Wave 15: Orc Infantry, Javelineers, 1 Armoured Troll
Bonus Troops:
Throughout the level, if you meet certain conditions, you will be rewarded with some extra troops. They will always spawn in Bree for you to command.
Keep your wits about you, and Frodo will be there in no time!
III. Lake Evendim
The main goal of the map is get into a position to siege the Ruins of Annuminas, which orcs have entrenched themselves deeply into. With only a handful of rangers, this will never be possible, which is why we need to steal some Orcish siege weapons which can be found in various orc camps along the road to the city ruins.
The Dunedain Tracker
The Tracker is a unique Dunedain unit that normally spawns at the start of the game. He is a Hero unit, allowing him to pick up relics, and be effective against myth units. He can also learn a series of different abilities, and will start the game with the Tracker Flare ability, which will allow him to use an undetectable flare to gain LoS of an area for a short time. Only one flare can be active at a time, and it also generates light for the player, perfect for the dark lighting in this level. The Tracker can also learn a passive ability called “Critical Instincts” which will give him a 33% chance to deal a critical attack (which deals double damage). It can later be upgraded further to deal triple damage.
With that preface out of the way, let’s begin our goal to thwart the orcs of their conquest of Eriador! First things first, it is highly recommended that you switch your Rangers to melee mode (you can freely swap between the two), and set everyone’s attack stance to Passive, to avoid them going out of their way to attack things and accidentally alerting the guards.
If the guards are alerted, you’ll be in for a huge fight, as hordes of orcs will swarm your position, so it’s best to avoid being spotted by torchbearing sentries at all costs! If you are spotted, your best plan is to try and retreat into the shadows, where you might lose them, or you can pick a good chokepoint to fight them on your terms with.
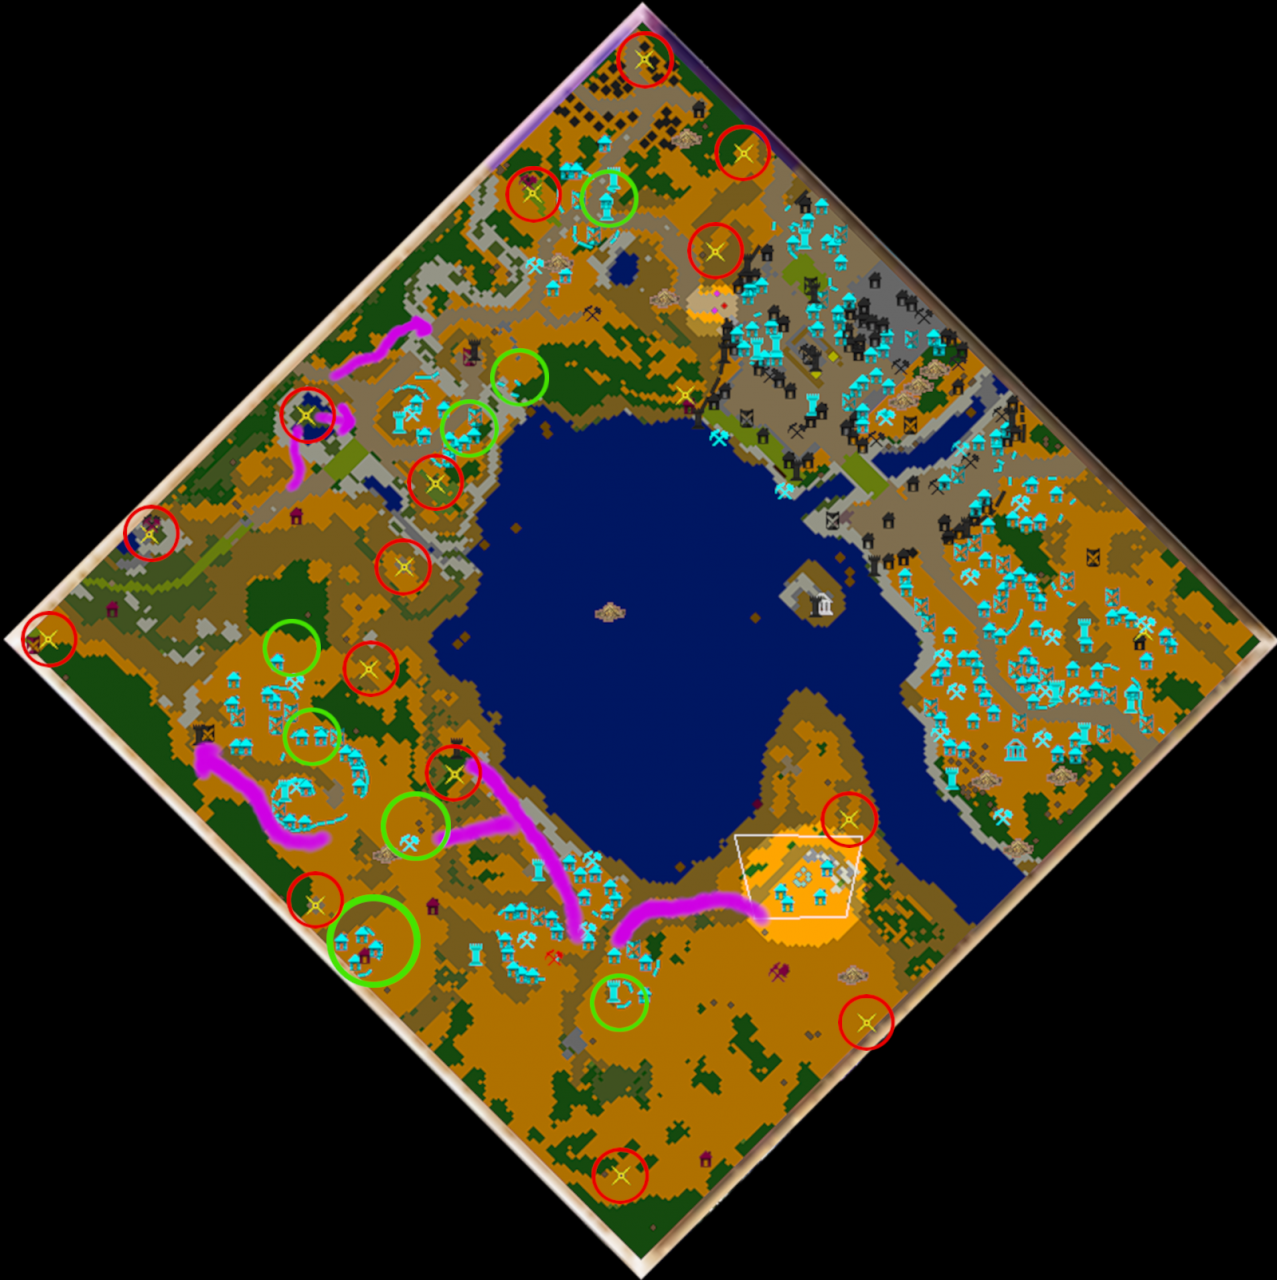
Red Circle: Relics
Green Circle: Siege Camp
Purple Lines: Hidden Pathways
This level is all about exploration, so you have to keep an eye out for relics which will grant massive buffs and bonuses to your units. Exploration is key to success!
Stealing Siege Weapons:
You will not be able to finish this level without using Orcish siege weapons to your advantage. Luckily, the orcs are storing them in various camps along the journey. To steal them, all you need to do is kill the guards near the pen, to help with this, let’s learn a bit about what each Orc’s player colour means:
Purple: A sentry, if they spot you, or are attacked, they will run back to camp which will signal a horde onto you. Sentries have very low armour/HP so it is advised to shoot them down quickly if you think you can’t sneak around them.
Red: The Orcish army. These orcs will attack you on sight, and have no special meaning.
Cyan: The name is for “Orcish Buildings” this player colour is not immediately hostile towards you, and it is possible to walk passed anyone with this colour without alerting other orcs.
Yellow: Orc reinforcements. These orcs will attack you, but they have very low line of sight, making it hard for them to see you. Use this to your advantage when sneaking around!
Once you have killed the guards around a siege pen, the siege weapons will move off, but don’t worry, they’ll be back in just a little while, so you don’t need to worry about them.
Some relics are guarded by bosses, making taking them a bit harder.
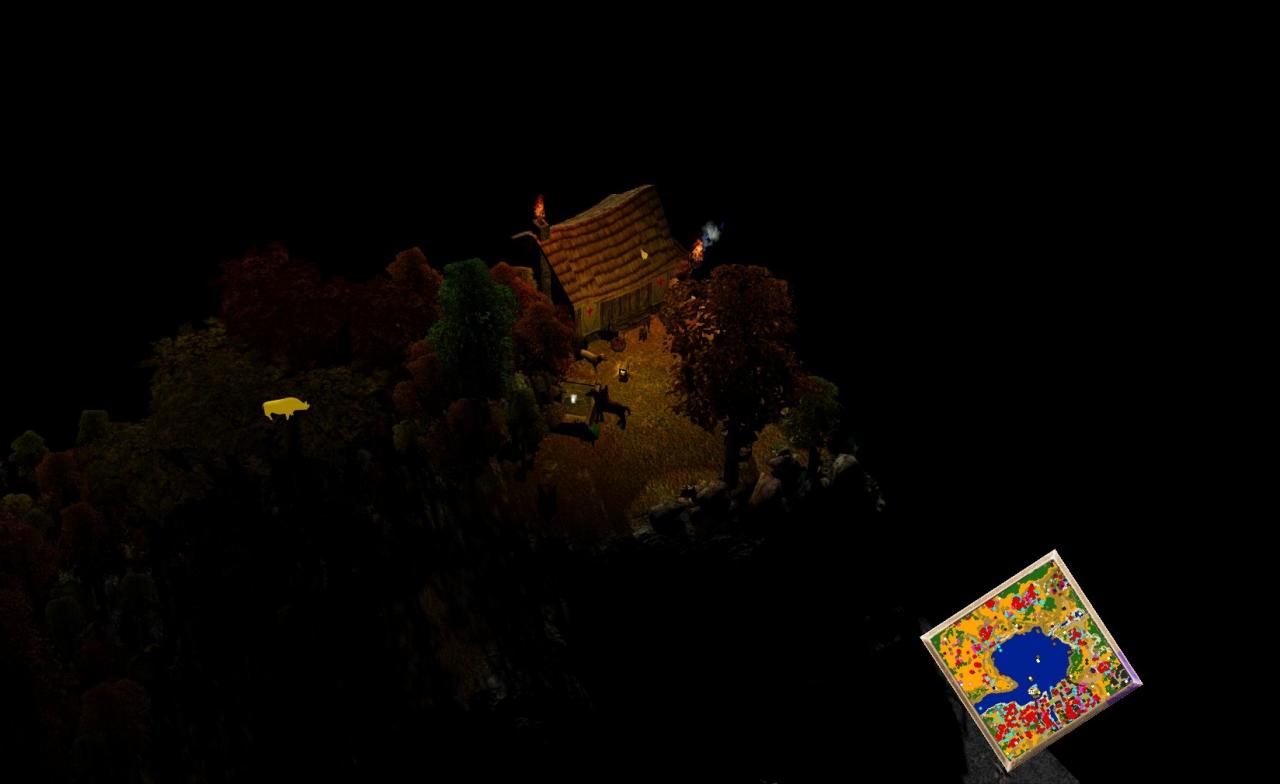
Wraith:
Encountered near the start of the mission, simply backtrack up the cliff behind you where the cutscene took place and grab the Relic. BEWARE the Wraith’s Minion attack! This will instantly kill an non-hero unit, so only take Halbarad and your Tracker to the encounter!
Witch:
The Witch is a standard mini-boss that you cannot avoid as part of the level, but we’ll talk about her here, instead of later. The Witch shares the same instant unit killing ability as the Wratih, so it’s important to kill her quickly! She is still heavily vulnerable to damage by Hlabarad and the Tracker. So it is always recommended to focus her over the many spiders she spawns.
Once she’s dead, you’ll be able to snatch a Relic in the northern part of her lair.
Elemental:
This encounter can be found by bridge around where the map begins to crest northeast. SImply leave the fight up to Halbarad and Tracker and let your rangers watch. As a bonus, you can continue around the bridge to avoid having to fight a Warg Rider.
Wyvern:
The wyvern is NOT TO BE TAKEN LIGHTLY! This foe will absolutely shred almost any unit it gets its teeth on! Do not attempt to fight this boss until you have triggered the second half of the mission, and are given control of all the siege units you’ve gathered up to this point! The relic he gives is well worth the battle!
SUPER SECRET AREA
Just before fighting the Witch, follow the Orc Camp to the western corner of the map to Roger’s Hazelnut Orchard! Pick up the Relic there and be rewarded with Rosie, the loyalest of Dogs!
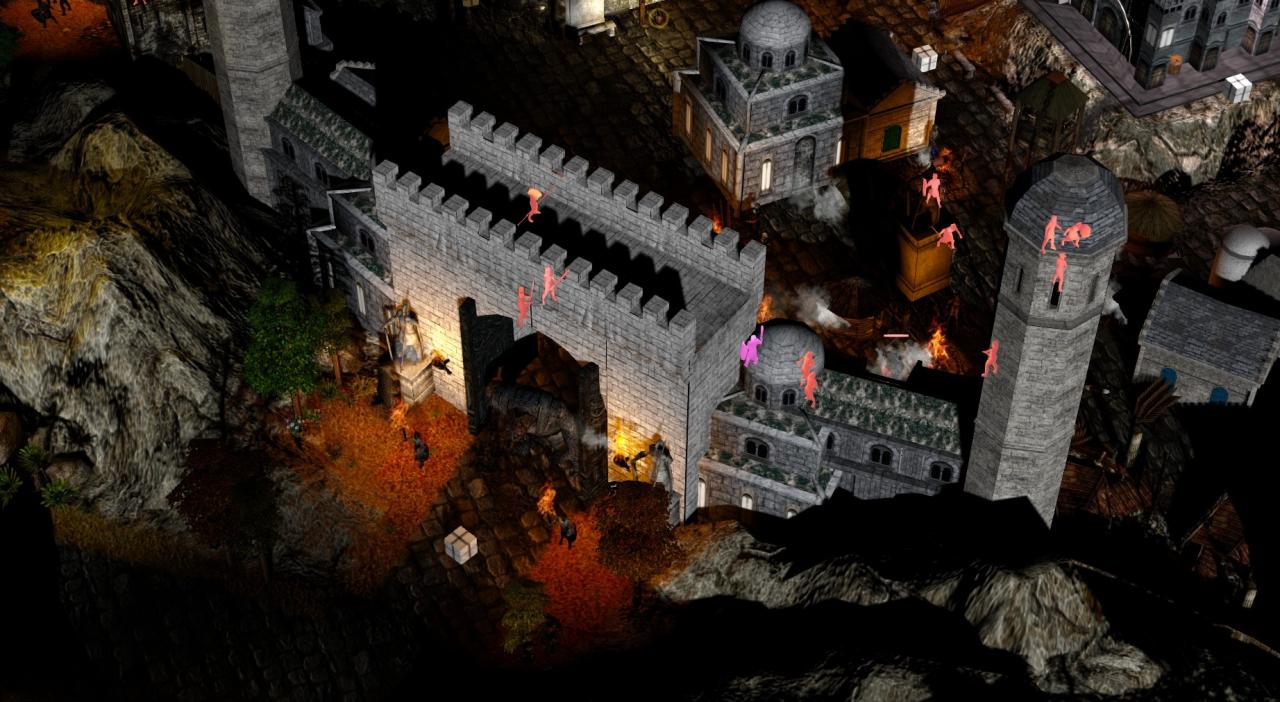
The siege is on! Hopefully, you’ve been gathering siege weapons and are ready to attack Annuminas head on! Now that you have control of a small siege army, now is a good time to challenge the Wyvern in the northern corner of the map for his Relic. Kite the wyvern (use your men to distract him without letting them get hit) while your siege weapons deal all the damage. After that, we’re truly ready for the siege!
Using your army of Elks, Rangers, and more, barrel through the city streets, slaying all the orcs in your way. It is highly recommended to prioritize Trolls, as they are still capable of dealing damage even with the Relic that grants 100% armour. Take your time, there’s no need to rush. Now is the time to flip the tables on the orcs that have forced you to skulk around all level. Make your way to their Iron Halls and raze it! Once that’s over, your job is done…. Until something comes to ruin the fun.
Final Boss Fight: The Nazgul
Swirling in as the sun rises, the Nazgul will fly around the city ruins, attempting to damage your units. Use your siege weapons, or Rangers,to bring him down, where Halbarad will engage him one-on-one in a duel! With the dust settling, Halabarad’s job here is now complete! Eriador is free of the Orcish scourge!
IV. The North Downs
Objective 1: Unite the Rangers
As we learned from the previous level, the Tracker is a very powerful hero unit that can learn a lot of abilities throughout the game. While not necessary, the Tracker Flare ability will greatly help scout out the woods to help avoid any unnecessary scuffles with any rogue orcs.
Before you go anywhere, however, make sure you click on your Ranger Den and research the Tracker’s “Critical Instincts” passive ability.
Once that’s out of the way, we’ll progress through the forest in a natural manner. All of the Dens are laid out in a way that’s very easy to progress through. Once we’ve gathered all of the rangers, we’ll have a sizable force on our hands, and Halbarad will summon us to the local town on the map.
Objective 2: Defend the Town
Once you’ve arrived, you’ll gain control of the local Dunedain held up in the town, including Halbarad (who I know you missed). A small Orcish battalion will launch forward, and it’s up to us to defend the town! Make sure you send your rangers into melee, while your archers do their job from a distance. There’s even an Orc Sentry with them, though they’re completely harmless in this level (feel free to take absolute joy in slaying the little monsters for all the grief they’ve given you last level). From here, we’re given control of the town, and it’s time to take the fight to the orcs!
Objective 3: Disable the Outward Base
Before we can launch a full attack on the Fortress of Fornost, we’ll have no choice but to throw down the big bases outside of the fortress. The Fortress will continue to send raiding parties your way, and you’ll want to build up a little and explore the map before you start getting aggressive. While you’re building up, you should send Halbarad and your Tracker a Relic scavenger hunt.
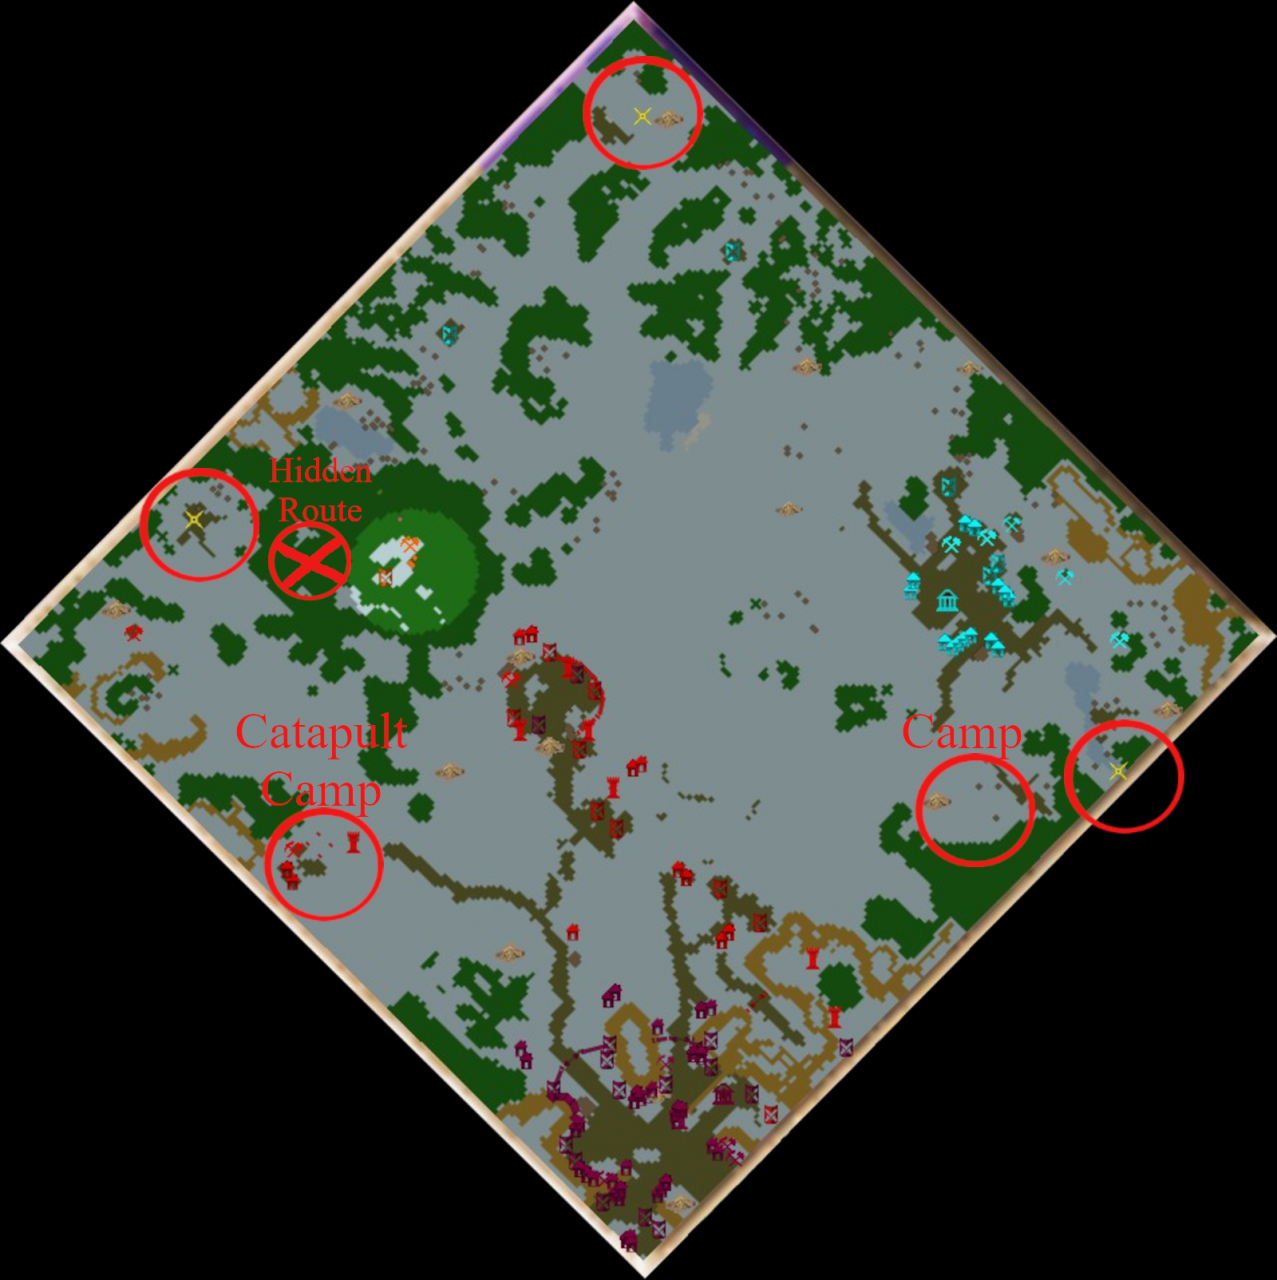
There are about 3 Relics on the map, all of which are very useful for the Dunedain on this map. Furthermore, if you backtrack through the forests, you can find a hidden entrance that leads behind the blockade-esque base entrenched in the center map. While your back here, you can take a small camp by surprise that has several catapults fenced up. Since you’re able to reach Age 3 in this map, you can begin training your own catapults from the Fort, but it’s nice to have some free of charge. When Aging up to the Fading Years, choose Vaire, for nothing else but her Unweaving Power! This will come in handy very shortly.
SUPER SECRET AREA:
While backtracking through the forest, continue upwards into the western corner of the map (complete coincidence to the last level) to discover the Secret Area: The Ruins of Adunndir Tower! As a player, you simply cannot afford to miss out on the boon the tower provides. Investigate to claim 4 chests each containing 350 Gold for a total of 1,400 Gold. You’ll also find to powerful artefacts!
The Orb of the North:
 This artefact contains the essence of Ancient Arnor! Its power will grant Halbarad and his Tracker +12 attack damage!
Ancient Tome:
 This old book contains knowledge lost in today’s era, and will half the cooldown of Halbarad’s lifesteal special attack (from 6 seconds to 3)
After receiving these items, you will also get the text “The word ‘x’ burns into Halbarad’s mind”. This is a subtle hint to the player. In the next level (the final level), open your chat and type “numenor”, and “adunndir” respectively, to be granted these bonuses again in the next level!
Also new this level is the Lancer, a simple infantry unit, whose effectiveness against cavalry is completely unmatched. As you’ve no doubt learned by now, Warg Riders can wreak absolute havoc on your Rangers and Archers. With Lancers, you can stick a Spear right in their faces!
Once you’ve built yourself up enough, and survived the Orcish harassment, it’s time to deal out some pain, and crush that outlying base. Overall, the base is not very difficult to crush, there’s just a lot of towers, and Warg Riders to deal with. Make sure you hold on to all of those Unweaving powers!
Objective 4: Destroy the Fornost Town Center
We’ve seen objectives like this before, destroying Town Centers, but now we’ve got real threats to contend with, and a fortress to break into! First things first, we’ll need some siege engines! If you haven’t been using catapults thus far, you definitely need to start if you want a chance of getting into Fornost.
When approaching the gates to Fornost, use your Unweaving power on the Tower of the Teeth that are standing watch on the cliffs. This cause them to desconstruct, rendering them instantly harmless!
From there, it’s all about marching into the base, and keeping your siege weapons safe! Keep Unweaving those towers as the power comes off cooldown, and you’ll have secured your victory against Fornost!
V. The Road to Rivendell
Finally, the entire Dunedain technology tree has been opened to player, and they will be able to advance fully to the Fourth Age. While bigger than the previous level, this level is far less complex, as all the player needs to do, is open the way to Rivendell in the southeastern corner of the map, by first destroying the Orc base that holds the river.
Helping the orcs out are another player, Orc Marauders, who occupy a large space on the eastern side of the map. The Marauders (Yellow) will prove to be one of Halbarad’s greatest adversaries yet, as they will also make full use of the Orc tech tree that we have yet to encounter.
Before you do anything in this level, remember the codes from the previous level’s secret area. They are “adunndir”, and numenor. These invaluable bonuses will increase your heroes’ attack damage, and decrease Halbarad’s special attack cooldown.
Here are some of the new units the Marauders might use:
- Soldiers:
- Uruk-Hai Swordsman
- Uruk-Hai Crossbowman
- Uruk-Hai Pikeman
- Myth units:
- Uruk-Hai Berserker
- Dragons
Uruk-Hai units are a mid-late game unit that the orcs unlock which will help them progress more prominently throughout the lifetime of a game. They’re faster, bulikier, and hit much harder than the average orc unit. On the flip side, however, they’re far more expensive.
- The Swordsman
The powerful and ruthless Uruk-Hai Swordsman is a pure and simple upgrade to the whelpish Orc Infantry. While expensive, their armour and heavy attack damage are a completely net positive trade off. They are infantry units, however, so archers and rangers will be able to put a stop to them. - The Crossbowman
Uruk-Hai Crossbowman, in particular, are the best archer unit in the game, able to out range, and out damage just about any other archer unit in the game. It is recommended to quickly close the distance, where they will not be able to flee afterwards.
- The Pikeman
Uruk-Hai Pikeman have a long attack range, and deal pierce damage, much like the Lancer unit does, they also are a heavy counter to all cavalry units, and will be able to take them down with ease. It is recommended to keep all of your cavalry away from this unit. - The Berserker
The Uruk-Hai Berserker is a very unique myth unit that has two abilities: Lifesteal, and Berserk, both of which work very well together.
Lifesteal allows the Berserker to gain a percentage of damage dealt to its enemy as health. Berserk allows the Berserker to attack faster the lower its health gets. When fighting a Berserker, it’s very important to keep your distance at all costs, unless a hero unit is attacking it. - Dragons
Dragons are a powerful age 4 myth unit that can only be attacked by ranged units, which shouldn’t prove much of a problem for the Dunedain. Their true strength lies in their ability to deal splash damage, or in other words, hit multiple units with one attack.With these introductions out of the way, let’s get to disposing of these pesky marauders!
The Map Legend:
There are several side objectives for this map, including hunting down monster camps (which will often reward you with relics), and finding the scattered Borderlands Ranger groups, which will join your cause. It is possible to recruit several Trackers this level.
Red: Monster Camps
Purple: Ranger Recruit Camps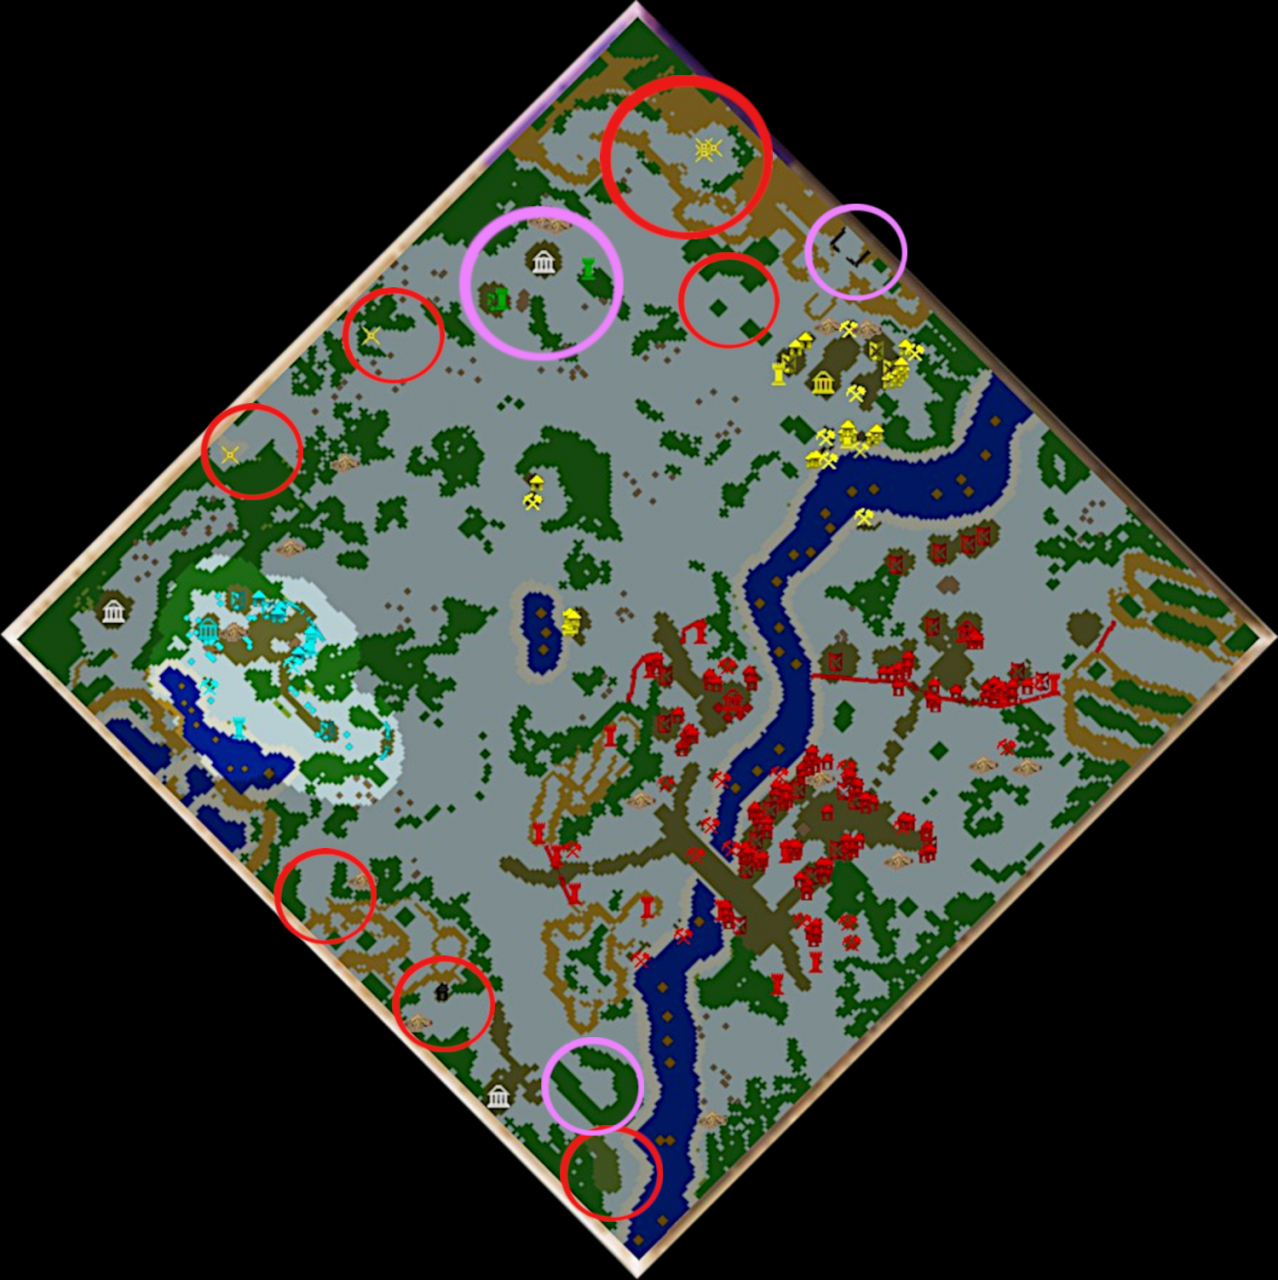
With a ton of Relics to find, there are also two artefacts to discover in this level!
 First Age Boots:These boots are found on a small island in the southwestern side of the map.You will need to construct a Dock and ferry your units over to challenge the Wargs and Barrow Wights for the artefact. REMEMBER the Barrow Wight special attack which will instantly kill non-hero units! Recovering the boots will grant Halbarad +1 movement speed and +12 Attack damage!
 Medallion of Courage: This medallion can be found in the Eagle Nest near the northeastern side of the map. Along with a handful of Relics to be looted from the usurper Griffons that have taken up residence. The Medallion will provide a big boost to all of Halbarad’s stats including: +250 HP, +20 attack damage, and +1.5 LoS.
Searching for lost rangers is the first thing you should do at the start of the game. While you’re out exploring, build a dock and take advantage of the vast amount of fish at your disposal by the waterfall.
The northern Ranger spot will give the player a small base, including several rangers, a Ranger Den, and Tower. The player will have to build their own Town Center over the Settlement there, but it will give the player an abundance of gold mines to easily operate from. Do not delay when searching for Ranger reinforcements! The Marauders will eventually expand and kill the Rangers nearby. Behind the Marauder base is a prison containing several rangers, and 2 Dunedain Trackers! If you can sneak behind the base before it’s grown too large, make sure you grab those Rangers!
Finally, in the southern Ranger camp, is a Tracker, a ranger, and a hunting dog, which will make a fine addition to your Tracker collection.
Once you’ve obtained your entourage of Trackers, you can begin taking control of the map, wiping out stray camps of orcs nearby, and culling some of those monster dens for some Relic rewards. On the flip side, for some safe expansion, cut down the trees to the north of your starting base to reveal a Settlement, completely free for the taking!
Once you’ve broken down the Marauders, you can finally focus on the task at hand, the massive orc base on the river! The best way is to simply take the land bridge over the river, and confronting the Troll Warlord, Miszhdah, who will prove to be a major threat. While destroying the base is the primary objective, we will eventually turn our attention towards Miszhdah.
VI. Conclusion + Extra Lore
Thanks for checking out this fun strategy guide for the Adventures in Middle-Earth campaign! Hopefully we all had some fun! It was a blast writing this whole thing! Stick around for some extra lore about the events and characters in this campaign.
As stated, this campaign happens to coincide with The War of the Ring, or the events of The Lord of the Rings. As witnessed in “The Defence of Bree” level, we get to see some of the direct implications of Halbarad’s actions during the War, and how he helped The Fellowship along in their journey. So let’s get to know a little bit more about the characters who joined in during this campaign:
Halbarad:
A skilled ranger, Halbarad presumably took control of the Dunedain Rangers in the absence of Aragorn. While Aragorn was not strictly a Chieftain, or ruler amongst the Dunedain, it’s very clear his word and orders were heavily respected among existing rangers.
When Galadriel summoned Halbarad to Rivendell, he was given the Banner of Elessar to give to Aragorn. He and his rangers, known as the Grey Company, marched south towards Rohan and met with Aragorn, who took the haunted path through the mountains. During the Battle of Pelennor Fields, Halbarad was slain, holding Aragorn’s banner high until the end.
Elladan, and Elrohir:
The enigmatic Sons of Elrond, and brothers of Arwen Undomiel. Together, these two marched with Halbarad on the road to the Dimholt during the events of The Return of the King. Their bond with Aragorn goes even as far back as his father, Arathorn II, of whom which they were present when he was slain in battle. The two brothers took part in the Battle of Pelennor Fields, and the Battle of the Morannon, where Gandalf and Aragorn has pinned all of their final hopes on Frodo’s mission to destroy the One Ring.
Galadriel:
Though not truly appearing in person, Galadriel helped guide Halbarad’s movements across the north, and ultimately led him back to his fellow ranger, Aragorn. Galadriel is both revered, and feared for mysterious powers as one of the most powerful Elves to grace Middle-Earth. She openly bears one of the Rings of Power forged by Sauron and Celebrimbor, and uses it to defend her homelands.