How to make your own Theme to customize the asethetics of aseprite how you please.
Getting Started
Hello and welcome to my guide on how to adjust a theme in aseprite. In Aseprite Themes determine the look of the program using this tutorial you will be able to personalize aseprite for your style. Themes don’t affect the colors used on the canvas such as the checkerboard indicating the transparent background and grid those can be adjusted in their own sections in the Preferences menu. You will need a program like Winrar to make Zip files. I am a dummy at any sort of coding so this is mostly just a “replace this number with a different number for this effect” sort of tutorial nothing too whacky.
———————————————————————-
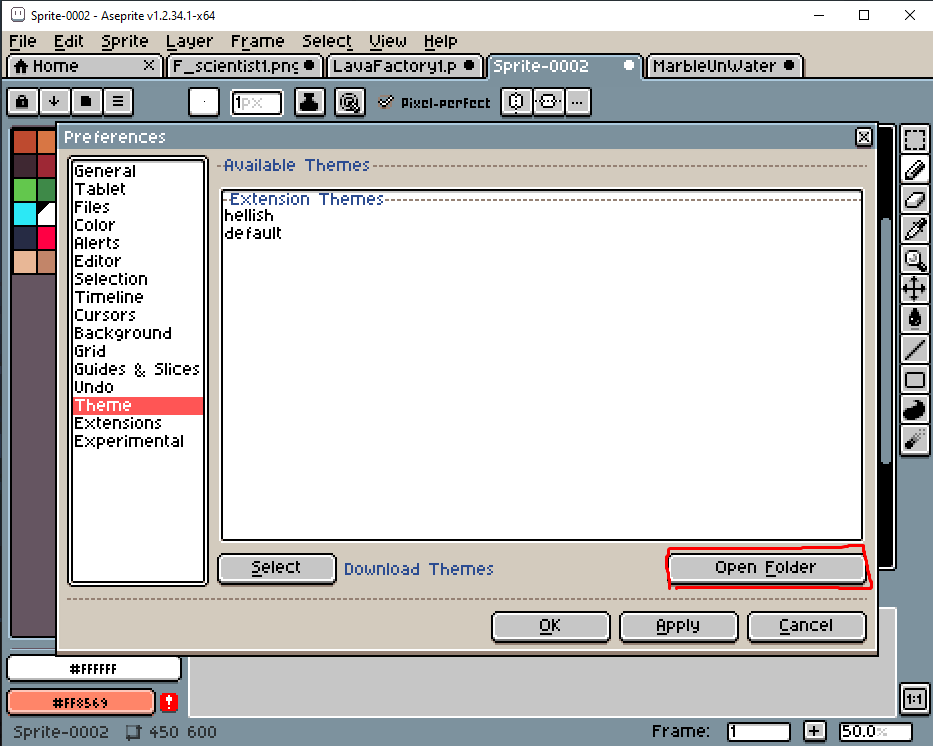
Anyways, first to make your own theme we will simply make a copy of the default aseprite theme. The easiest way to do this is navigating to the Themes menu (Edit->Preferences->Themes), then you select “default” and click Open Folder.
———————————————————————-
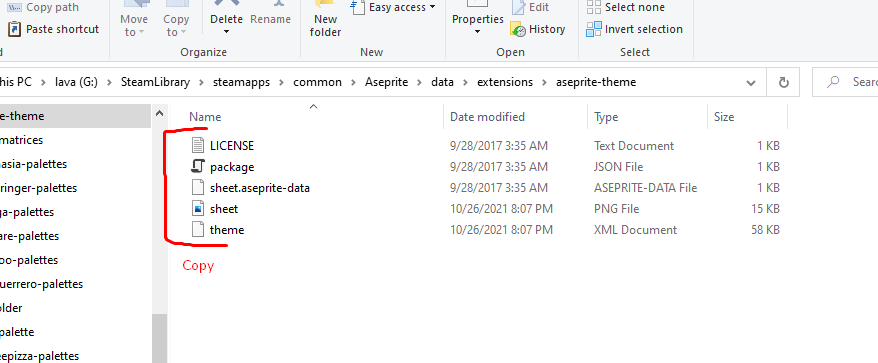
Copy all the files then navigate to someplace accessible like documents/downloads/pictures. There you will make your own folder you can name it anything you wish tho I recommend adhering to the naming scheme that aseprite seems to have (“nameoftheme-theme”).
———————————————————————-
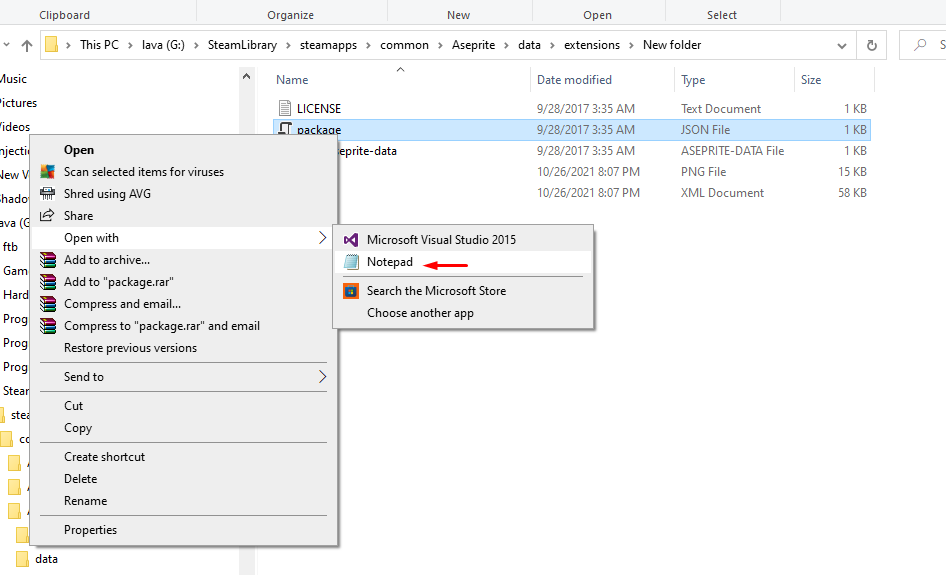
The files are as follows: the “LICENSE” file is a text file that you don’t really need to mess with unless you’re planning on like, distributing/selling your theme probably. The “package” file is sorta like project info about your theme. The “sheet.aseprite-data” file is a file that aseprite generates you don’t need to mess with this at all I believe. The “sheet” file is an image of all the icons/ui elements, everything here can be recolored or completely redrawn to your heart’s content! Then lastly the “theme” file is what you use to adjust colors, sizes, fonts, size of icons/ui elements, the location of icons/ui elements on the “sheet” file and their names, and I’m sure a lot more. First tho we should focus on the “package” file to start off. Select it then right click and Open with Notepad or an equivalent. (special tip, you can adjust the size of text in Notepad by holding down Ctrl and scrolling)
———————————————————————-
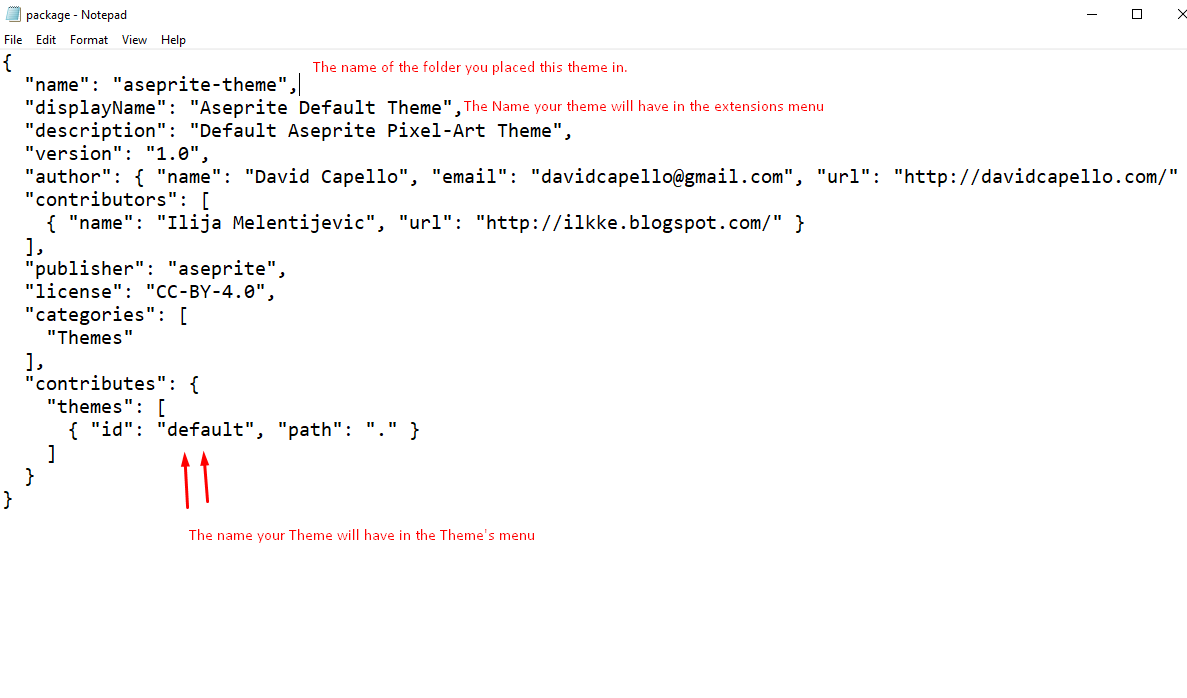
You will be met with some code, but not too much luckily. When changing text be sure to not delete commas and quotation marks. Luckily we are changing a copy of the default so the actual default file should always be there to fall back on. Anyways first you will want to rename “aseprite-theme” to the name of the folder these files are in. Then “Aseprite Default Theme” to the name of your theme. You can adjust the rest of the things too but they’re mostly only important if you’re distributing or sharing your theme with others. Lastly you will see a “default” next to the words “id” and “path”, this is actually something you need to rename, change it to the name of your theme. Then save the file and exit.
———————————————————————-
How to add a Theme you’ve made to Aseprite
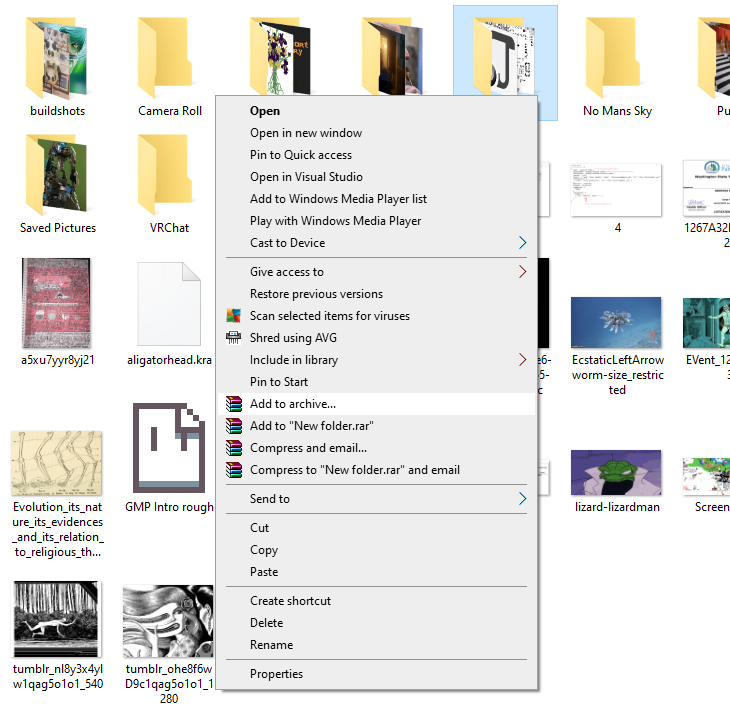
At any point now you can compress the theme-you-made’s folder into a zip using winrar and add it to aseprite as a new extension/theme. I recommend testing your theme very often as you’re making it which can be a pain. But better than adjusting something wrong and not knowing what it was. So before I showcase how to visually adjust your theme I will show you how to add your theme to aseprite so that you can see how it looks as you’re making it later on. First you’ll need to turn it into a ZIP, to compress it you just right click on the folder with winrar installed and click “Add to archive…” all you should need to do is select ZIP under archive format. This should make a ZIP copy of your project. You don’t need to worry about the name of the ZIP so even if it’s named mytheme(19645) it will be fine because of what we adjusted in the “package” file.
———————————————————————-
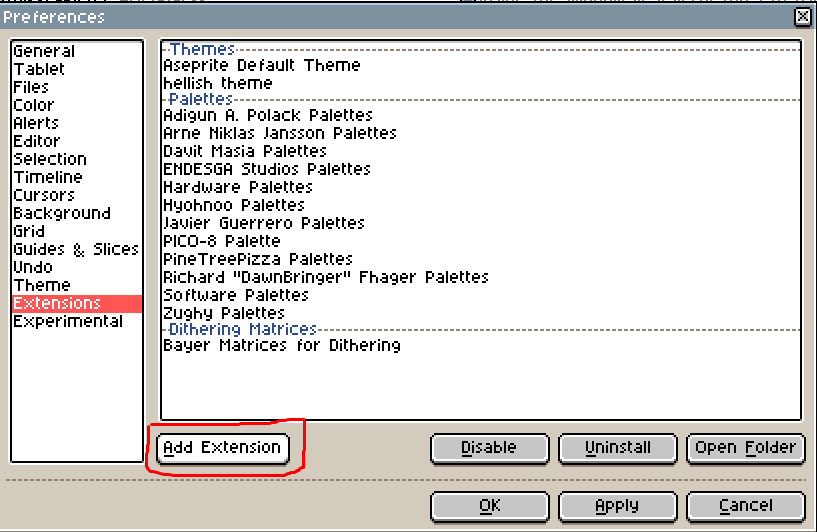
After that to install a theme in aseprite you navigate to the Extensions menu (Edit->Preferences-> Extensions) and click add Extension. Then navigate to the easy to locate folder you placed your zip/project folder in and double click your ZIP to add it as an extension. Then to apply your theme you switch over to the “Theme” menu and double click it from the list (the double clicking is very important if you select the theme and push ok or apply it will not change the theme, this lil quirk made me think I was not making my own theme correctly for like an hour). Then remember to go back to the extensions menu and uninstall your theme if it’s not ready.
———————————————————————-
Editing the Default Theme Template
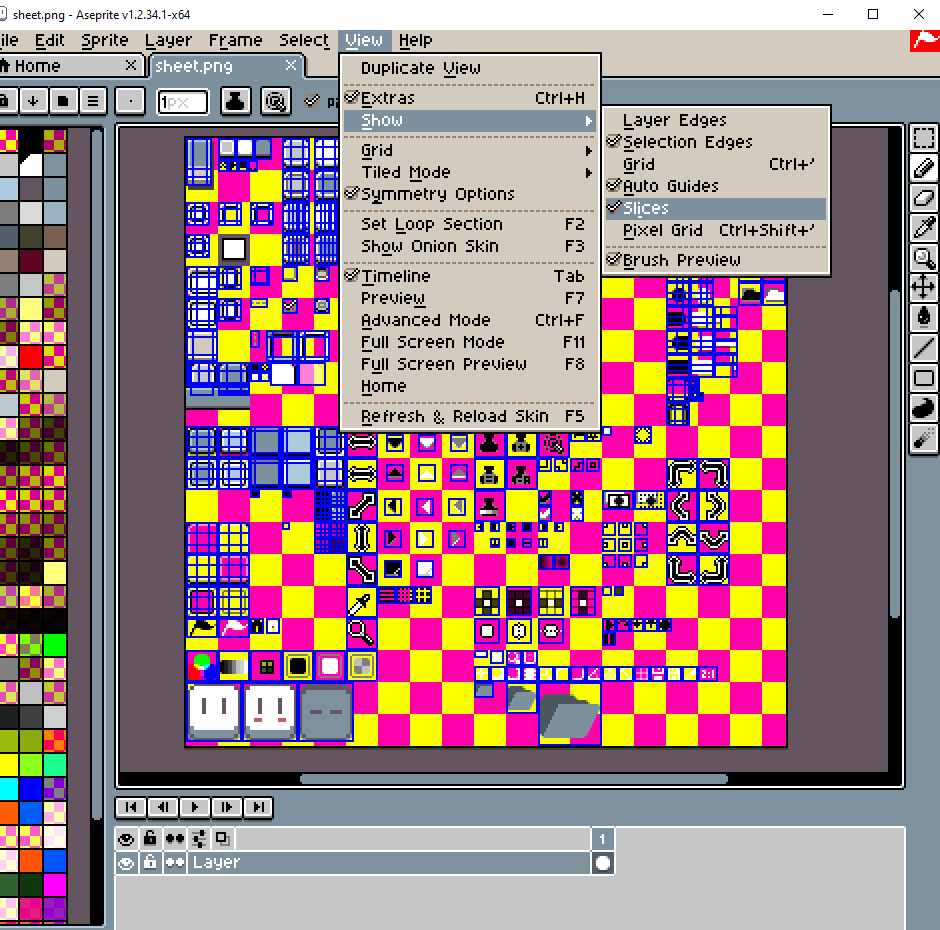
Now you should be all ready to actually change things for your theme. Go back to your unzipped version of your project. First the “sheet” file, do not open this file in MS paint as ms paint does not support transparency. You will want to adjust this file in aseprite of course! First off you will notice lots of lines that indicate slices (if you don’t wish to see them you can goto view->show->Slices). The creator of aseprite included this for us and they’re showing the size of the sprites for each icon/9splice/ect. Try to stay within the boxes indicated by them for simple recolor themes. You can also make your own sprite sheet and when we get to the “theme” file you can redirect the locations of what you’re replacing to that image instead of this one. You will probably recognize most of the icons here if you’ve used aseprite a lot, look for anything with rounded edges on the ui If it has rounded edges it’s likely a 9 splice and indicated on this sheet. Note that some of the colors have transparency to them that might not show well on aseprite’s default grey checkerboard.
———————————————————————-
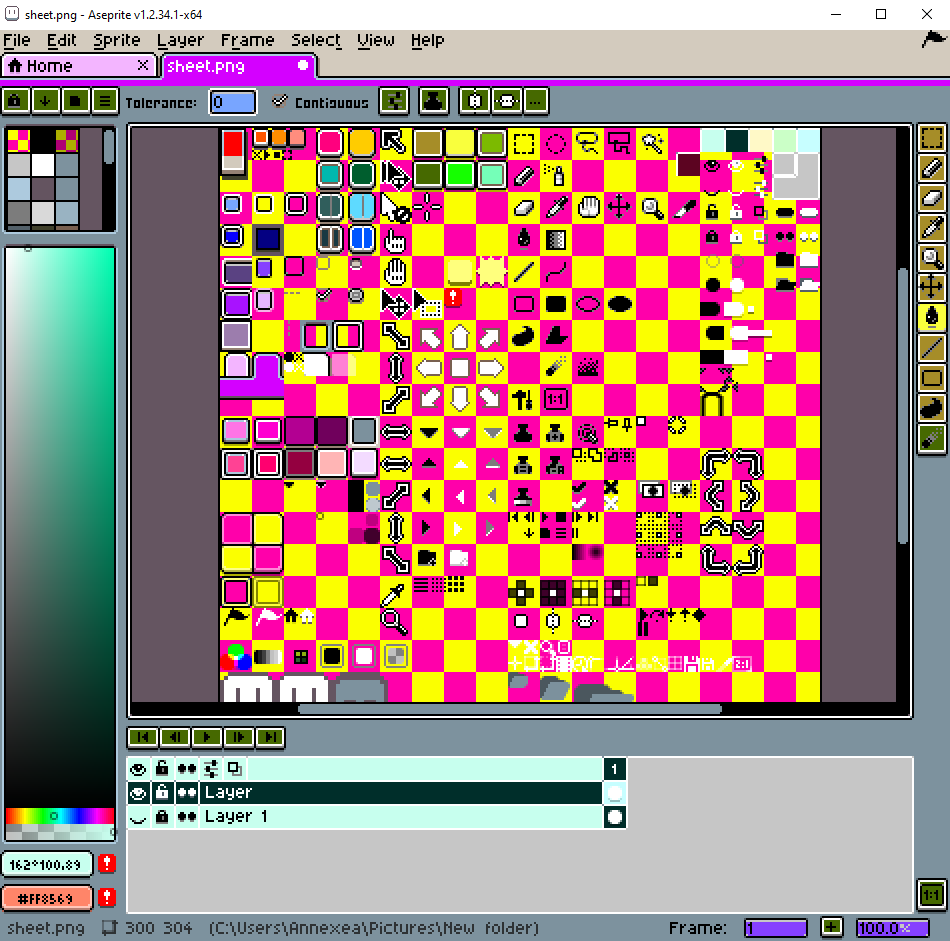
Here are some included images to get an idea of where some of the 9splices on the sheet might be located. There is a 9splice for buttons in an unpressed, hovered over, and pressed states so keep that in mind. Scrollbars, selections in dropdown menus, and input boxes also have their own colors. What exactly each splice is used for is in the “theme” file if you wish to adjust colors from a more programmer-style direction.
———————————————————————-

It can be hard to guess what goes where in the sprite sheet so making things an eye shattering color can help troubleshoot quite a bit. You can also look at the Parts section of the “Theme” file to find the names and x/y coordinate of the upper left corner of each sprite, but the names aren’t always very clear on what goes where in aseprite.
———————————————————————-
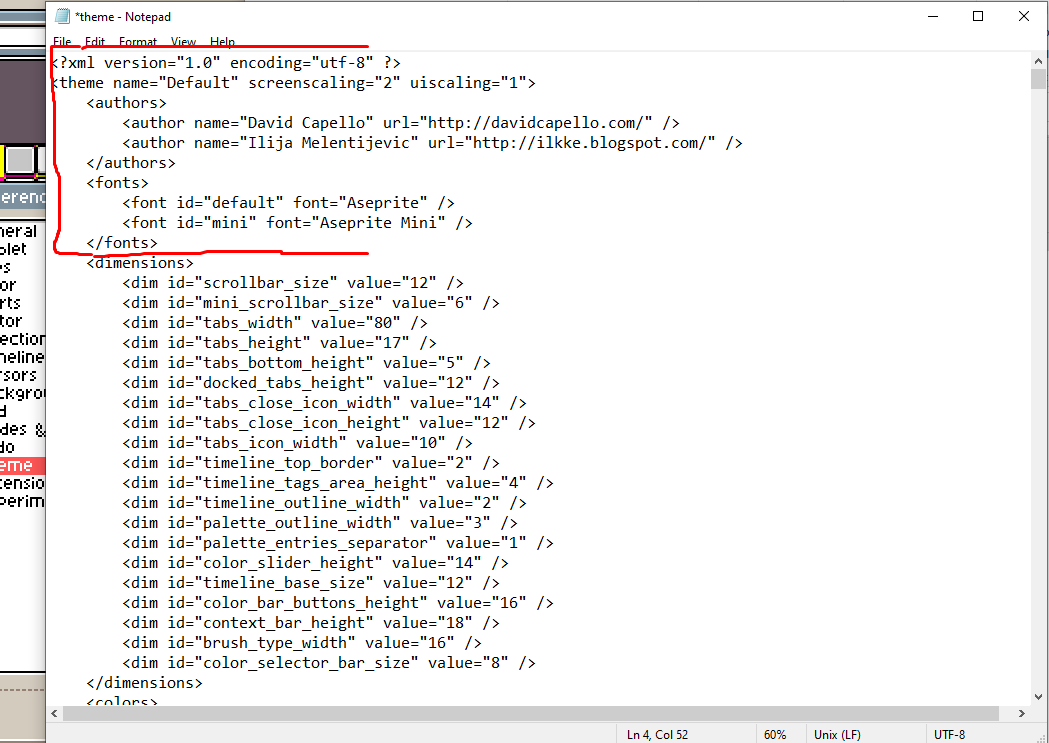
The “theme” file is opened similarly to the “package” file. You select and open in Notepad. This file is where you do all the other adjustments and can be very overwhelming. I will do my best to break it down. First you can adjust your theme’s name (for organizational purposes) and the screen scaling & ui scaling. Screen scaling adjusts the Canvas I believe and UI scaling adjusts the UI window around. What you put here is only stored as whole values and is then multiplied to the original scale… example: Screen scaling 1 would translate to 100% magnification, Screen scaling 1.9 would translate to 100% magnification, screen scaling 2 would translate to 200% magnification. Not exceptionally useful for the average monitor but likely useful if you’re using a projector while laying in bed and whatnot. Next another spot to slip in your name as credit for making this theme.
———————————————————————-
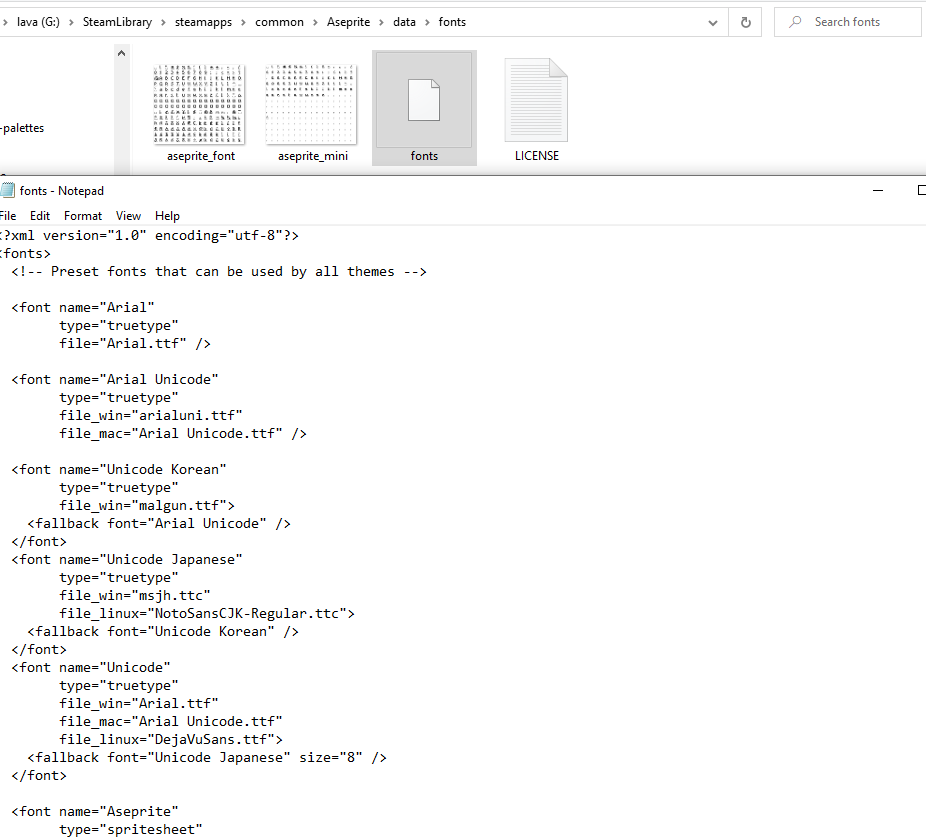
Then the option to change the font used in aseprite. The default font options to slip in here are limited, if you want to change the font navigate to the fonts folder in aseprite’s data folder (Aseprite\data\fonts) There you will see 2 images that display the aseprite’s custom default font and a file named ”fonts”. Opening the “fonts” file with notepad will show you your default options for what you can change the font to. If it’s not in this list you can’t use it in aseprite. If you’re dead set on making your own font you can probably make a copy of the spritesheets for aseprite’s custom font and use them as a guide for making a new font. I don’t know much about making custom fonts tho sorry. For adding an existing installed font to this list simply copy and paste the Arial entry and replace “Arial” with the file name of the installed font in your operating system’s “fonts” file then write out the font name in the “theme” file. Be sure to restart aseprite if you installed the font with aseprite open.
———————————————————————-
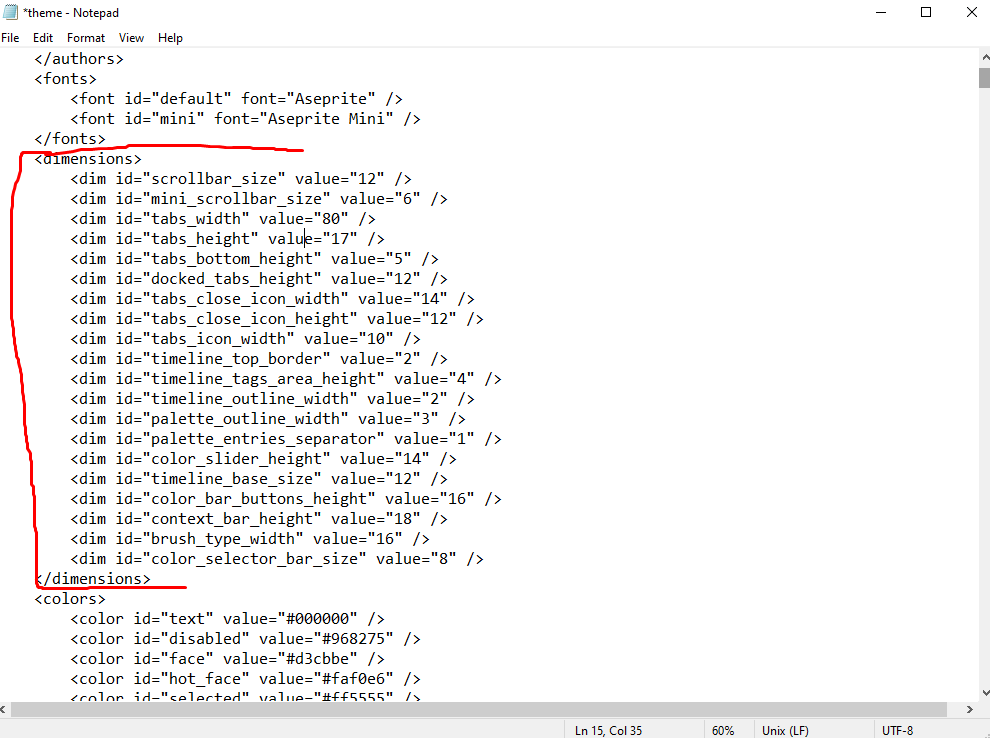
Next is the dimensions for ui elements in what I believe to be pixels. The ui elements are all pretty well labeled so they should be pretty easy to figure out apart.
———————————————————————-
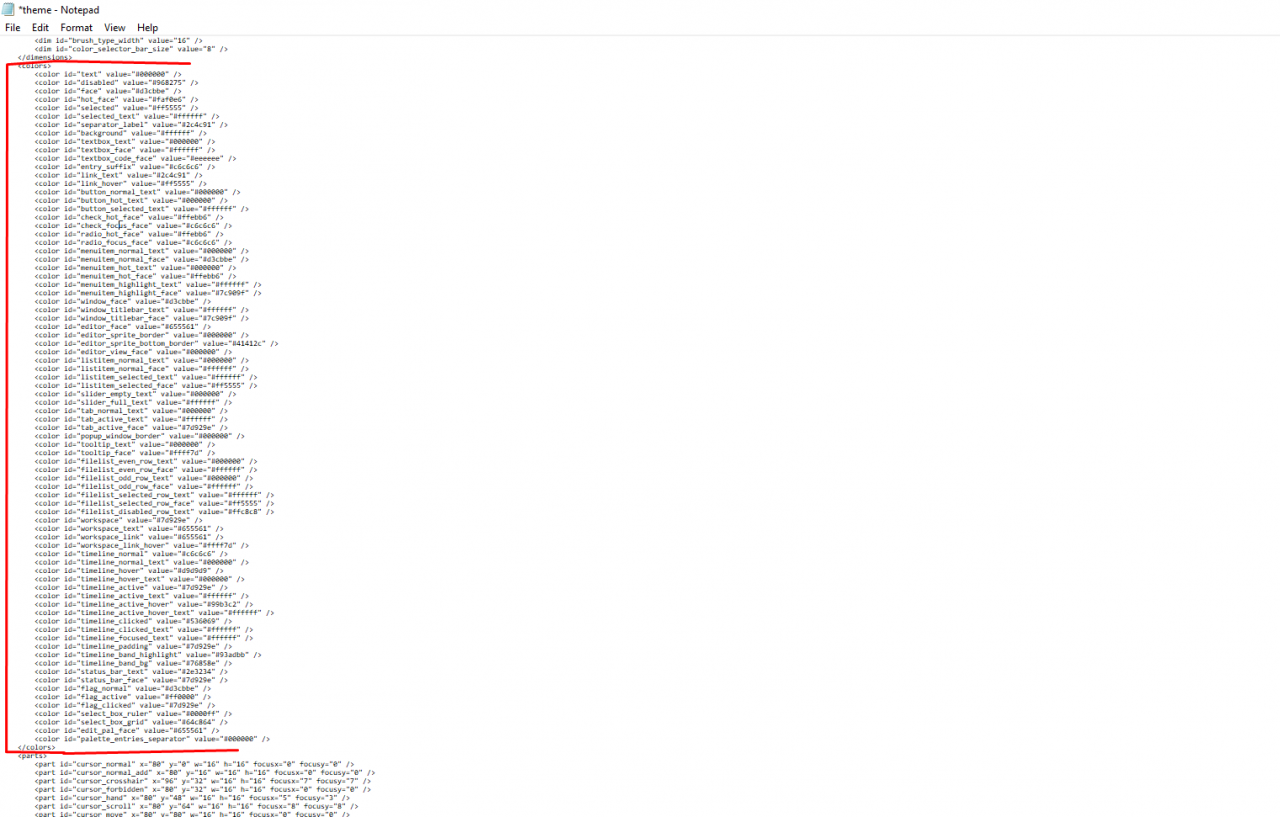
After that, Colors. I will be honest it is very hard to tell what goes where for me. It will probably take a long time to adjust this. What you see here is a list of sections of the ui that are being assigned a hex color code.
———————————————————————-
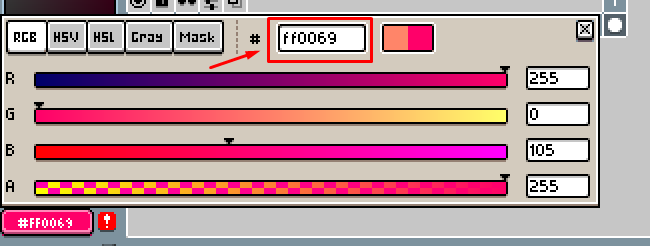
You can easily figure out the hex color codes for colors in aseprite luckily and copy the hex codes from there to your file.
———————————————————————-
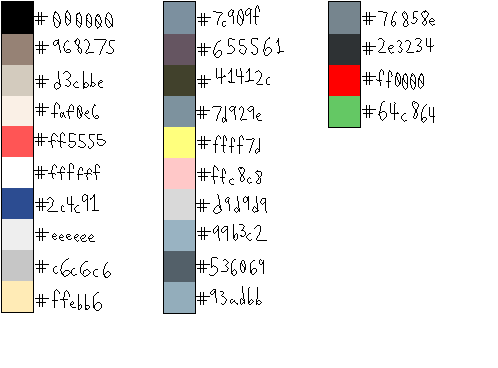
Here is a list of the default colors in the file to help visualize what colors you might be able to swap. One helpful thing I found was pushing ctrl + F to open the find menu in notepad and searching exact hex colors if I wanted to say change all the things that are white to black and all of the things that are black to white. Lastly there is obviously a naming scheme and areas of the ui seem to be grouped together. Faces are like the background color for sections of the ui and hot faces are I believe clickable parts? Hot text is clickable text, radio refers to radio menus I believe, “ selected”s are obviously selected ui elements, hover for color when hovered over, and so on.
———————————————————————-
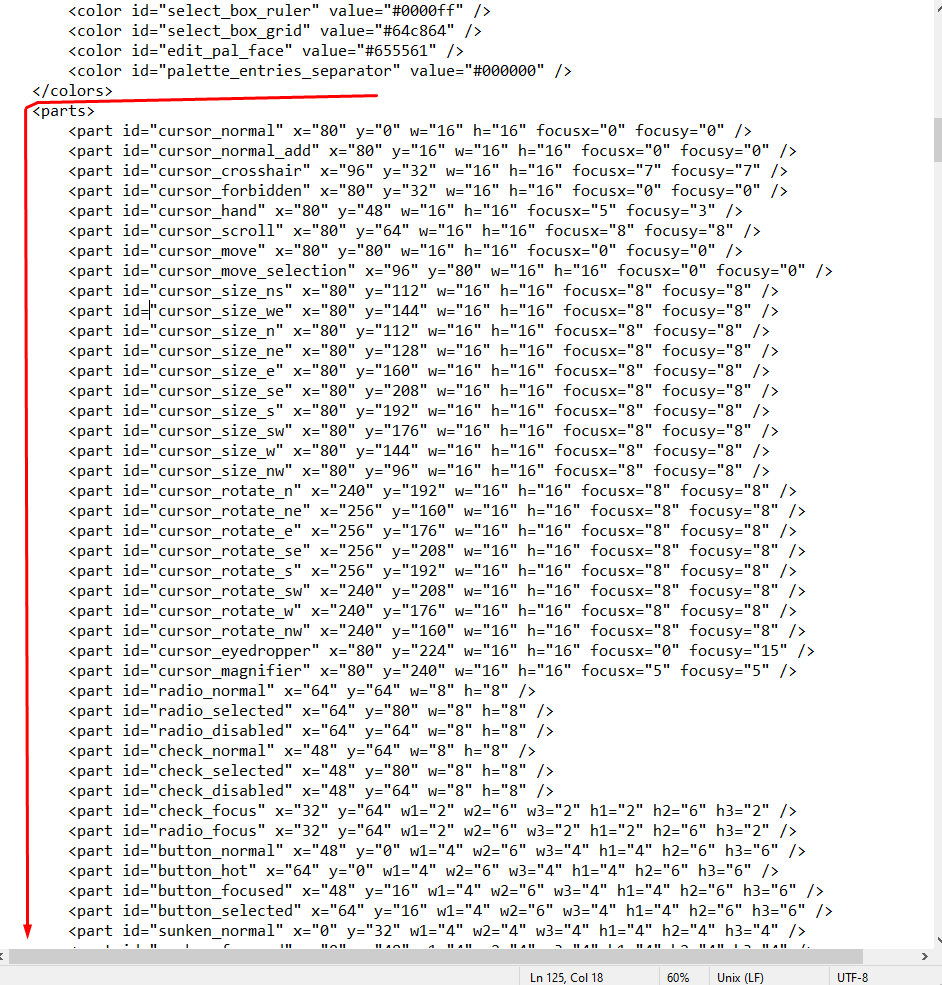
Parts are all the icons/ui elements on the “sheet” file. First it will give its x and y coordinate on the spritesheet where the icon starts then give a height and width in pixels for that icon. This you would change if you made bigger/smaller icons. The ones that have multiple widths and heights are spliced icons/elements (like 9 splices) you are the identifying length of each section.
———————————————————————-
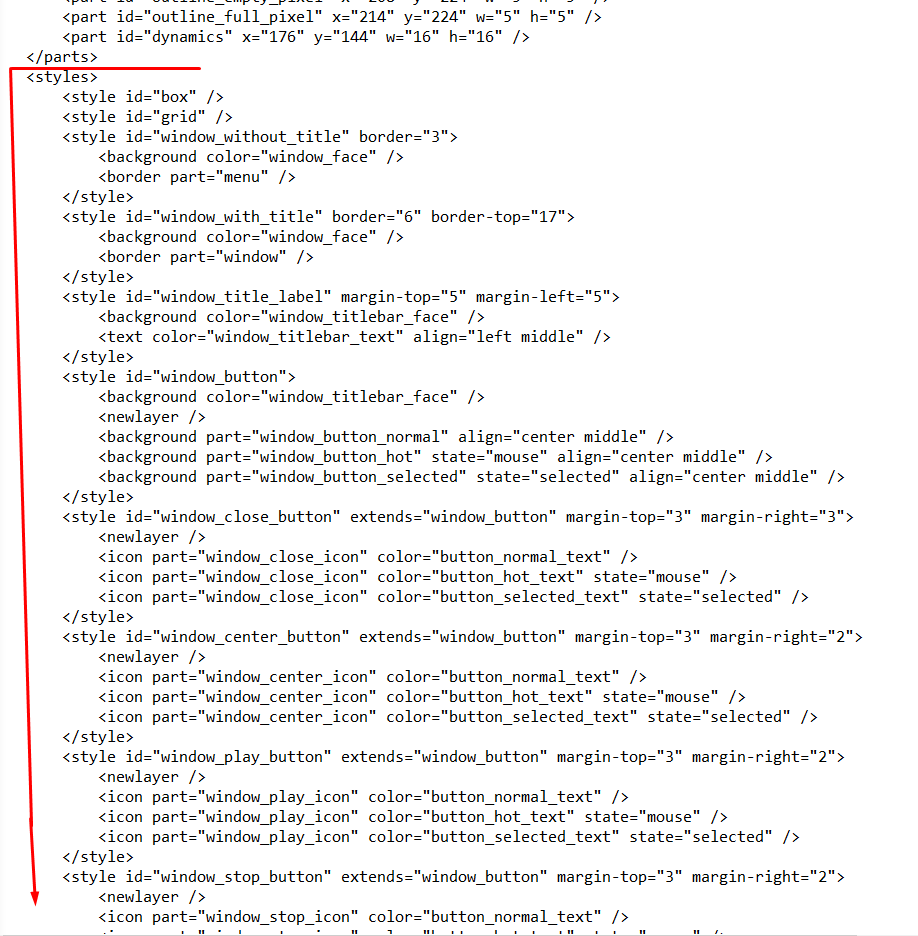
Lastly is the style section. This is deciding what elements go where from what you’ve defined in all the other sections. It can be useful for figuring out where a color or part is going. You can also adjust the padding, margin length, and text alignment here.