This guide is specifically geared towards teaching players all of the things they can do with bombs, as well as to how to make their lives a little bit easier dealing with the chaotic battlefield.
INTRO: What to Expect
Bombergrounds: Reborn’s melee and ability-centered meta has been quite a controversial topic upon both casual and competitive players, but what remains true is that a lot players aren’t taking full advantage of bombs, which is still a pretty important part of their arsenal. This guide is made specifically to lecture readers of most skill levels about some community-based terminology as well as:
Basic gameplay details & strategies
• Star level buffs & bomb size ✔
• Bat charge level, & how far they send bombs ✔
• Basic bomb chains ✔
“Advanced” gameplay revolving around bombs
• Hitting two bombs at the same time ✔
• Bombsplitting ✘
• Hitting bombs out of corners/walls ✔
• Bomb traps ✔
• Bomb snipes ✔
Extra tips & other information
• Countering aggressive playstyles ✔
• Aiming with mouse ✘
• Special ability knockback & stunning ✘
• Bomb snipes with projectiles ✘
• Capabilities of using ranged abilities diagonally ✘
INTRO: Disclaimers
Listing a couple things to keep in mind before you read:
– This guide isn’t entirely done yet, but it’s in a publishable state. I marked every category finished in the What to Expect section with checkmarks, and the categories that are in progress with crosses.
– This guide assumes that you already have a fundamental understanding of the basic controls and the objective of the game, and serves as a list of ideas you can do to expand your skillset a little further.
– Explanations don’t go into too many numbers or statistics because the best thing for you to do is to try these things for yourself in game. It’s the only way you’ll be able to notice significant improvement as a player. Some of these things are purely dependent on your ability to read the scenario that you’re in fast enough, and others need proper muscle memory to be able to pull off.
– The “advanced” section of the guide includes tricks that are very simple to pull off, but I labeled them as advanced anyway because these aren’t immediately apparent to newer players that they are strategies that they can use to their advantage, even if they’ve done it a couple of times before.
– This game is still in development, and things may change depending on how things go in the future. Feel free to list in the comments if anything I missed or changed since the guide’s last update.
I should mention that this is my first guide. It’s not entirely done yet, but I’ve been working on it over a pretty long time during my spare time to get it up to a releasable state, so please leave feedback on how to improve it more and make it more accessible if you have more to add. Thank you!
Also, mega thank you to Ardeiia for supplying most of these gameplay clips! And for reducing the amount of crude MS paint drawings I would have needed to make in this guide too.
BASICS: Star Level & Bomb Range
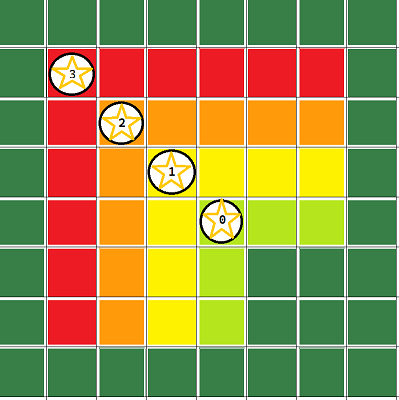
• Max HP (+5 per star)
• Bomb damage + blast range + max capacity
• Melee damage + melee range + charge speed
• Movement speedIn the context of this guide, the most important part is that it increases the max amount of bombs you can use by 1 and increases the explosion range of your bombs by 1, making it so that you don’t have to waste as many bombs to get a far reach. The minimum star level is 0, and the maximum is 3. Getting past level 0 via farming boxes enough for 10+ stars should be one of your priorities at the start of any match.
BASICS: Bat Swings & Bomb Distance
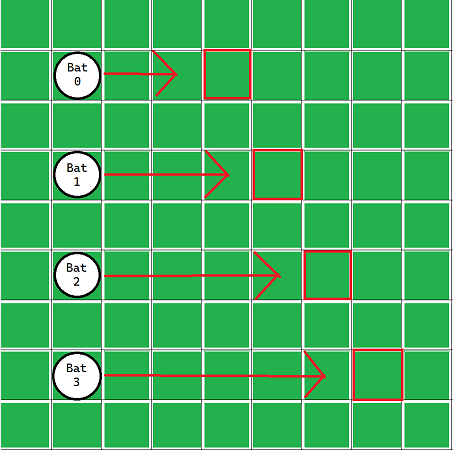
Hitting bombs with your bat is a rudimentary mechanic of the game that I’m sure everyone knows how to do, but the majority does not knows how to control precisely their favor.
When you charge your swing, there are 3 bars you will see in-game that fill up over a short period of time. An uncharged swing will send your bomb 3 tiles, and that distance increases by 1 up to 6 tiles. While increasing your star level reduces the time it takes to charge your bat, it does not further the distance in which the bomb gets sent.
If a water tile is 0-1 tile(s) before the landing position of the bomb, the bomb will drop into said water tile instead. Otherwise, it will go the same distance as normal.
BASICS: Simple Chain Explosions
Bomb chains (or just “chains,”) are referred to bombs that are within the blast range of each other. When set off, they create a chain explosion that is a combined range of the bombs impacted (with potential overlap). This is where the essence and chaotic nature of the game lies, and can be used in lots of offensive and defensive ways.
You can put two bombs right next to each other, but it’s better in most scenarios to take advantage of the range your bombs have. You should have them spread apart enough to have more space to work with and to cover a greater vicinity. In this section’s video example, you can see Catty taking advantage of their max star level to reach tons of distance, stunning the enemy, and eventually placing a couple more bombs just before their previous one exploded. This is a basic and greatly effective way of dealing good damage & using your bomb’s range to your benefit, but it’s important to not get caught in the explosions yourself.
Random Tip: It’s possible to decrease a higher level bomb’s blast range and damage by blocking it via placing a bomb 2 levels weaker next to it. It can get you out in sticky situations.
ADV: Hitting 2+ Bombs at Once
ADV: Hitting Bombs Out of Corners
As we clarified previously, the bat’s range goes in an arc, making it so it’s possible to hit bombs at the same column or row as you in the same direction, thus making it so bombs can be hit out of corners or walls easily. To do it, back into a wall and light tap the opposite direction just before you swing your bat. This is possible with any star level, but it’s easiest to pull off at level 0 due to the small size. This can be used an alternative way to snipe opponents you can’t get to easily, as well as getting out of bomb traps.
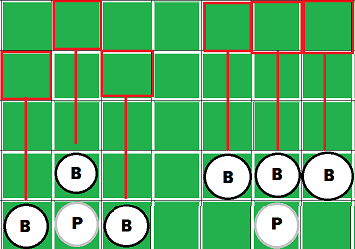
ADV: Bomb Traps
Bombtrapping is the act of obstructing a player’s movement with only bombs, making it so it’s highly likely for them to get damaged or even fall off the disappearing arena in the process. Usually you’ll want to stun before you attempt to bombtrap someone, but some characters, such as Catty, can do very easy bomb traps via using their ability to push opponents around into small crevices. Few setups are guaranteed; most setups require some nuance to get out of them without using your character’s ability. Most players can’t get out of traps very well, but they will use their ability.
Here are two video examples of bombtrapping and getting out of the trap in question, you can see Catty accidentally bombtrapping themselves, but they can easily bat the bomb from the wall (see the Hitting Bombs Out of Corners section) to give themselves a quick route to get out. More complex bomb traps require quicker thinking and movement, thus it’s pretty essential that you’re able to get out as fast as you can without taking too much damage.
ADV: Bomb Snipes
Snipes are able to be dodged from unpredictable movement and can be reflected with a very well timed bat swing. The timing itself depends on the latency of the match, but you want to do it earlier than when the bombs visually get in your bat arc’s range on your screen.There are quite a few types of bomb snipes, which we’ll be going over all of them one by one.
Basic bomb snipes are simply snipes where the bomb lands on the tile designated by walls or the charge level of your bat.
They’re the easiest to do, as they don’t require much timing, but it’s important to have knowledge on how far the bomb will go when you hit it with your bat. I would suggest checking out the Bat Swings & Bomb Distance section if you haven’t yet, as it already goes further into detail on how far bombs go.
Close ranged bomb snipes are snipes where the bomb is hit and explodes earlier than the destination.
There are 1-tile and 2-tile snipes, in which the timing is strongly dependent on your current charge level of the bat, and the latency of the lobby you’re currently in. However, you’ll almost always want to hit it while the bomb is close to exploding (rapidly pulsating) regardless.
It’s important to keep in mind that fully charging your bat and trying to land a 1-tile snipe will require more precision than doing a 1-tile snipe with no charging at all. Close ranged bomb snipes also apply to 3-5 tile snipes while your bat is charged at the max, but in most scenarios you’ll be better off doing a basic bomb snipe instead.
The best way to practice the timing is by going in an desolate corner in a Battle Royale match and attempting to hit and explode the bomb 1 or 2 tiles next to you.
Should be a self-explanatory header–you can snipe by hitting two or more bombs right at your opponent. See the Hitting 2+ Bombs at Once category for additional context. Something to keep in mind is that instead of directly tossing the bomb on the opponent, you can use your bomb’s range to your advantage. With level 3 bombs, you can snipe a bomb 5 tiles from your opponent and still get them if they’re in blast radius regardless. With multi-bomb snipes, you can cover a further distance with lower level bombs by sniping them all at once, so it’s easily something that’s helpful.
Chain Extenders
Bomb sniping can be used to create more complex and effective bomb chains. For more information on bomb chains, the Simple Chain Explosions section is there to read. If your opponent is good at dodging bomb chains, you might want to be more aggressive and hit more bombs towards them to where they’ll trip up more often. You don’t need to wait for the bomb you’re about to bat to get close to exploding if you chain bombs beforehand that’ll reach your last bomb’s destination.
EXTRA: Counterplaying Aggressive Playstyles
Players that you wish to run away from can be easily obstructed via placing two bombs, similarly in the video example. This makes it so that they would have to go around the bombs in question or spend the extra time batting them away one by one, which makes it so you can get more distance away from them. Your opponent will never be able to get you if they aren’t on an adjacent tile, so maneuver the best as you can as you can to avoid the range of their bat.
You can effectively stall the match until sudden death depending on the character you’re up against & the environment by using this & all the other techniques listed in this guide.
Vivi, Konnie, and Iggy all have ranged abilities that may seem difficult to not get hit by, but you can reduce your chances of getting hit if you use your bombs to directly block their projectiles, making it so that they’re more vulnerable as a result. They only hit one thing at a time. For example, If you’re on the same tile as a bomb that you placed, you can move slightly back in the direction which the projectile is going to make sure the projectile hits the bomb instead of you.
If you need advice on how to predict when someone is about to use their ability, it’s important to have a general estimate on their movement cooldown time & their movements. If you notice them approaching you after running away for some time, it could be that their ability is charged up, so stay on the defensive until you bait it out of them. If they’re being aggressive and you know well their ability isn’t charged yet, you can do more risky plays without getting punished for them too much.
Another note related to this category: If you see someone attempting to bomb snipe, you can always place or bat a bomb their way so their bomb won’t end up going where it would’ve gone. This may also lead to them getting damaged by their own bombs if they aren’t standing off to the side, which is always a plus.
By Plushu