Achievements organized for your planning pleasure plus some tips on the game.
How to play and some tips
You can pause time with space to review your situation.
Each race has different skills for their types of units and different spells that play into their playstyle.
Population growth will win the game, its needed for everything from making food, to making money and getting resources to upgrade structures and recruiting more heroes a.k.a offensive units.
Do the tutorial, it will teach you how to cast spells, build structures, bridges and offensive units, as well as how to right click to use flags to tell your troops to explore, discover new resources (geology), explore and raid. The human campaign missions also work as tutorials.
Make note that you can only build a maximum amount of the same building on each island, not sure about the limit but the island size matters and when you try to build it will be black, so you need to look for new land. Also, the island biome matters, building farms on desert islands will only yield 50% production.
If you use your mouse wheel to zoom out during gameplay, if you do it enough, the map will change to this:
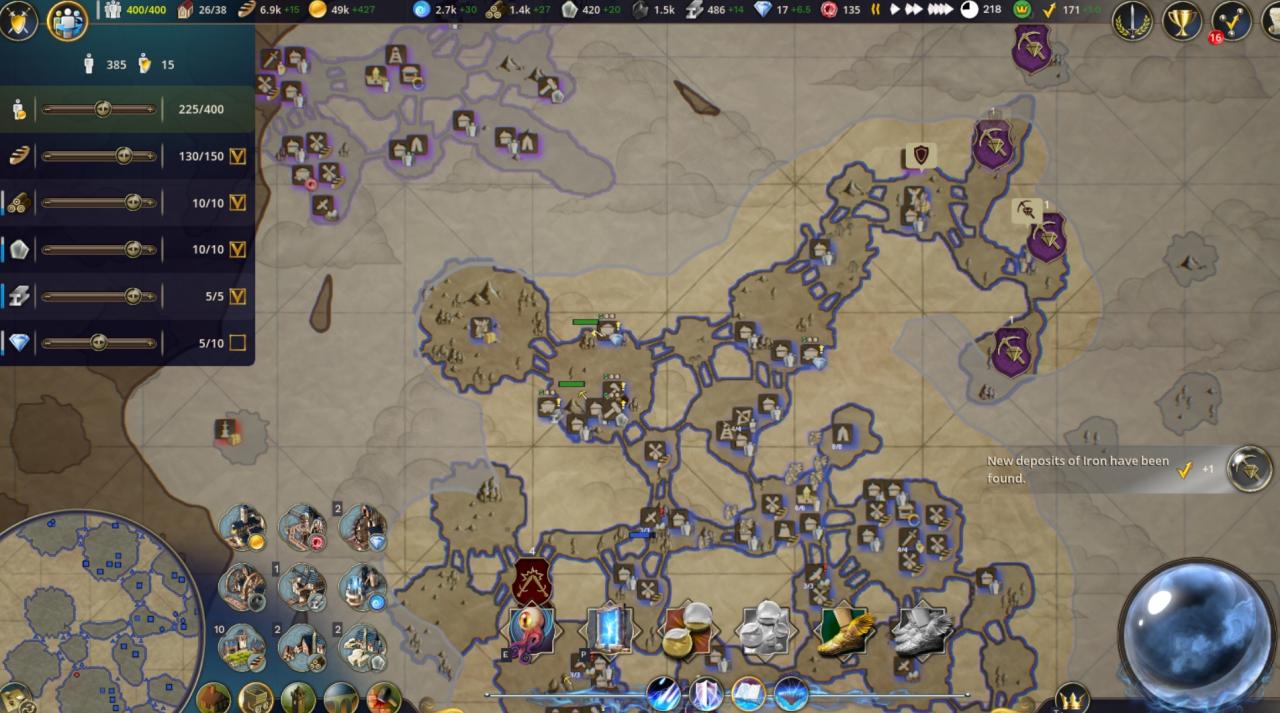
This map is useful in the campaign to quickly view objective areas (purple circles).
Resources are limited, you can empty an island’s stone and wood very quickly, this is good, you need to get those before the enemy. The exception to this is mana, which your castle generates a bit but if you need fast mana, use stonemasons to find it in rocks. You can always get more through the marketplace using gold.
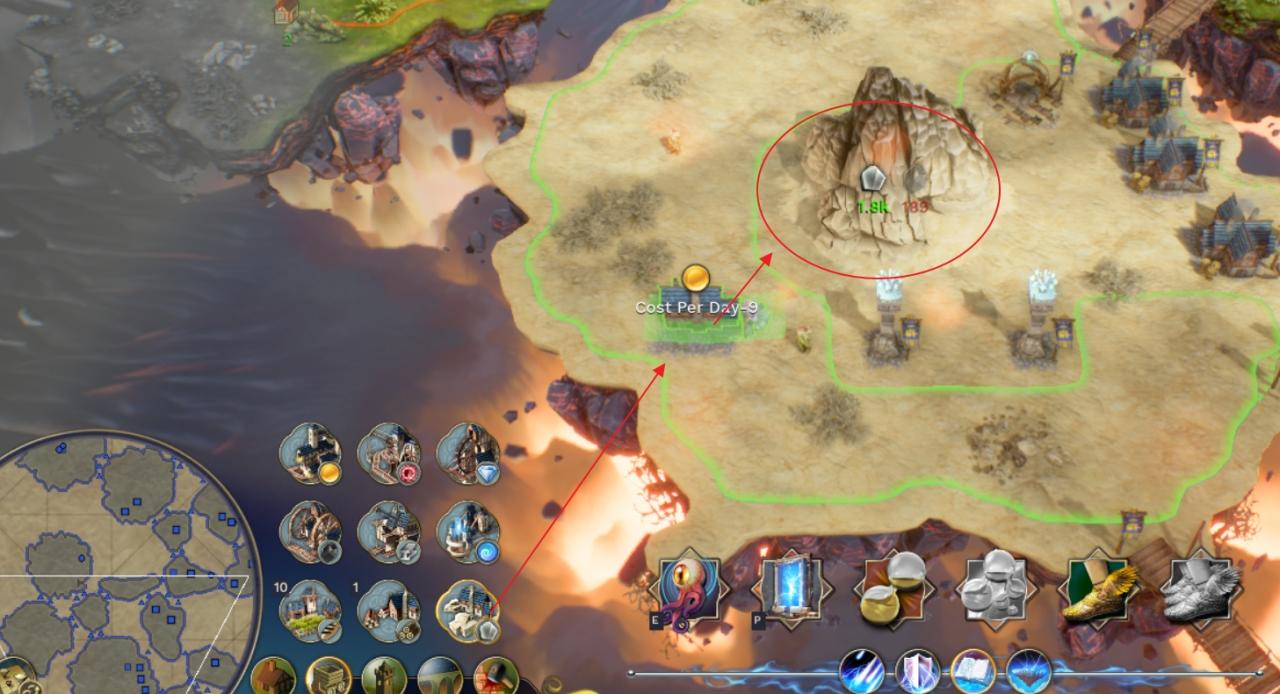
You can see how many resources an island has by selecting to build the structure and mousing over it.
If an structure has gotten all the resource it was getting from an island, it will “die”, its HP will become zero and it will be greyed out, you can leave it there, it will disappear by itself eventually and the workers that were on it will go to the castle to produce gold coins.
Putting more workers on the production structure will make it go faster but it wont increase the limit of the resource on the island, so putting more workers on those will only be useful if you need a resource fast to build up your empire. On the other hand, these structures cost gold per day so it might be a good idea to quickly deplete the resource to save gold in the long run.
Gold comes mostly from your unassigned workers, the ones not doing stonemasonry, farming or mining, you can also find gold mines to get Gold but its rarer.
Do note that if you find coal or some other rare resource like rubies, you need to build the appropriate resource structure (like a coal mine) near where you found it, don’t worry if you forget, just pause the game, select the mine you want and look around for green areas where you can put it down.
Structures like barracks where you recruit heroes have “slots” think of them like beds, a Tier 1 Knight’s Garrison has 2 recruit slots and you can only recruit 2 heroes from it, you can build more garrisons to get more heroes.
You can also recruit from the unit menu (top left, swords and shield), this is super useful if you forget the position of your nests and want to recruit more.
Be mindful where you put structures, since they can be destroyed by your enemies, so make sure to protect them if you’re putting them between you and an enemy’s territory.
If you see a blue bar above a structure, its damaged.
There is a progress skill that autorepairs, but if you don’t have it, be mindful.
Upkeep costs of structures will rise the farther you put structures from your castle island, so, a cottage four islands away from your castle will cost more per day than a cottage only 2 islands away, knowing this, its better to connect your empire around your castle island as much as you can, rather than one long line of islands. You add an island to your empire by building a bridge to it.
Reputation (crown, top right) is important to boost pop growth and gold income, you can get more by having enough housing and food for everyone, having good relations with neighbors and not being in war. Overpopulation might be a problem to this but there are progress perks for that.
Progress points can be exchanged for empire boosts in the path of progress screen (right to the medal, top right), you can build a scholar structure and assign workers there to speed it up.
You can buy skills from different structures, these skills are like items that are equipped by your offensive units, each time you buy a skill, it goes into storage until a hero picks it up and equips it.
You can pause the game to use the marketplace.
Fog of war will prevent a lot of your spells, use exploration (right click) or the magic eye spell on the fogged area, then you can use spells like Arcane Currents to bring islands closer.
If you need to fight: spellweaving, web of wizardry, grand healer, chronomage, all of these are great upgrades to have in your path of progress, if you are on the defense, getting some scholars to get progress points faster is a good strategy.
You have a limited range from your castle to cast spells, however, if you conquer certain structures in the wild, like mausoleums or wells, you can cast spells around them, you can also move the island they are on, moving your spell effect area with it. But the best way to extend your spell range is to build wizard towers at the edge of it.
Building Achievements
—————————-

Floating Village
Build 10 structures (bridges not included).

Floating Town
Build 100 structures (bridges not included).

Floating Empire
Build 1000 structures (bridges not included).
—————————-

Bridge Builder
Build 10 bridges.

Borders Expander
Build 100 bridges.

Restorer of Driftland
Build 1000 bridges.
Bridges allow you to connect your islands together.
—————————-

Worldwide Empire
Create an Empire of at least 20 islands.
You only need to link your castle island to other islands using bridges, the first human campaign scenario has enough islands for this achievement, just explore an out of reach island, then build bridges to it. If you are having trouble seeing islands, turn on geology (right click, select geology) and new islands will be highlighted.
Resource Achievements
You should have around 70% done towards the biggest ones after you complete all campaigns, I highly recommend you leave the last grind until you complete the story.
———————————-

Curious Prospector
Open 20 treasures.

Treasure Hunter
Open 200 treasures.

Legendary Explorer
Open 2000 treasures.
Your explorers and heroes automatically try and open most chests, some, you need to right click and you can manually pay 10 gold for someone to open them but if you dont, someone will eventually do it on their own. Use the explore command or the eye spell to discover chests on new islands.
This grind can be reloaded, meaning you can make a save with around 10 or 12 heroes, saved mana and a lot of undiscovered islands, make a save, then spam eyes on all the islands and wait for your heroes to get the chests, the achievement counter will go up. Reload and do it again. You can make your own custom map for this, I think.
The dark elf 3rd campaign quest is also good for it or the wild elf scenario where you raid a dragon’s treasure.
———————————-

Coal and Iron
Discover 10 resources with Geology.

Gold and Mana
Discover 100 resources with Geology.

Rubies and Crystals
Discover 1000 resources with Geology.
By right clicking on an island, you can select geology so one of your explorers can start surveying the area, I think you get a few hidden resources discovered, at least one but normally its a few.
This discovery can only be done once per floating island, so getting 1k will take a while and several playthroughs, although, you can make a save before ordering dozens of explorations, wait for them to finish, then reload. The achievement counter will increase each time. The counter doesnt go 1 per island, it actually goes up by 3 or 5 each time.
———————————-

Raven Hatcher
Make your Heroes tame 5 flying beasts.

Eagle Tamer
Make your Heroes tame 50 flying beasts.

Master of Dragons
Make your Heroes tame 500 flying beasts.
To tame a flying beast you need to conquer a nest then click on the nest to recruit a flying beast, after that, an available hero that does not have a flying mount yet will go and tame the flying beast you just recruited.
You can find nests in most scenarios.
One recruited flying beast + 1 unmounted hero will give you a taming event.
Like the rest, you can have a save with six or so nests and the extensive breeding progress, create enough hero recruiting structures for each of your flying beasts but dont recruit yet. Make a save.
Use the sword and shield icon in your top left and recruit everything, this way you will boost this group of achievement and the ones described below. Reload when its all done.
Dwarves do not tame flying creatures.
———————————-
Heroes are usually attack units, from knights to marksmen, etc.
You can recruit these in the multiple barrack buildings that are available.

Band of Heroes
Recruit 10 Heroes in total.

Division of Heroes
Recruit 100 Heroes in total.

Legion of Heroes
Recruit 1000 Heroes in total.
Again, you can save a bunch of resources, then make a lot of hero recruitment centers, save, recruit about 20 or 40, reload.
Victory achievements
It is possible to do all achievements on the easiest difficulty: Apprentice
————————–

Educated Ruler
Complete the Tutorial.
This achievement will actually pop up before you win the tutorial stage.
When you win it, by destroying the enemy purple circle “camps”, you will get the achievement below and the one for 1 Human side win.

The taste of victory
Win your first Single Player game.

Sociable mage
Win a Multiplayer Game
You can get this by hosting a game and winning against an AI player.

The Grand Graveyard
Have 100 of enemy Heroes killed in total.
Barbarians or enemies spawned by purple circle locations do not count, you need to kill enemy player AI units. (or multiplayer)
————————–
Any game counts towards these but only if you play the appropriate race, ofc.
While completing the five race scenarios of each race campaign, you should unlock the 1,3,5 battles won and the campaign achievos.
The final locked campaign is for the Wild Elves

Human Adept
Win your 1st Single Player game as Humans.

Human Leader
Win your 3rd Single Player game as Humans.

Human Overlord
Win your 5th Single Player game as Humans.
————————–

Dark Elven Adept
Win your 1st Single Player game as Dark Elves.

Dark Elven Leader
Win your 3rd Single Player game as Dark Elves.

Dark Elven Overlord
Win your 5th Single Player game as Dark Elves.
————————–

Dwarven Adept
Win your 1st Single Player game as Dwarves.

Dwarven Leader
Win your 3rd Single Player game as Dwarves.

Dwarven Overlord
Win your 5th Single Player game as Dwarves.
————————–

Wild Elven Adept
Win your 1st Single Player game as Wild Elves.

Wild Elven Leader
Win your 3rd Single Player game as Wild Elves.

Wild Elven Overlord
Win your 5th Single Player game as Wild Elves.
————————–
From the main menu, you can begin a race-dependent campaign, once you complete all 3, the final campaign will be unlocked and playable. Each starting race campaign has 5 scenarios you must beat. The final one has six.
You can play in the easiest difficulty and still unlock all these.

Brotherly bond
Win a Human Campaign

Darkness in the heart
Win a Dark Elf Campaign

Rightful owner
Win a Dwarves Campaign
————————–

Seeker of the Truth
Unlock the Final Campaign

Side to Side
Win the Final Campaign