Greetings, this guide will be a collection of general information I’ve gathered during my playtime, alongside some tips and my personal preferences. I hope it will be a useful starting point for new players.
What are Freebooters and Mercenary?
The Mercenary is your main character. Most of the quests can only be done with your Mercenary character (more on quests later). You can equip your mercenary with any gear you want from your stash and bring any consumables like healing vials or food with you into the raid.
Extraction
You have a single extraction point on the island and it is a boat on the shore which will always be on the further end of the island from where you spawn. For example if you spawned at the southern end of the island, your extraction would be near the northern end. There will be a bonfire near the boat and the smoke reaches high enough to be seen from distance.
Once you spawn you should keep your back to the water and note the direction on your compass. That’s the general direction you will want to go when looking for extraction.
NPCs on the ship*
- KWAHU (Barkeeper): Sells food and food related stuff. (East, below deck)
- OJORE (Weaponsmith): Weapons, weapon kits, weapon recipes etc. (Northeast, below the tavern)
- STRAPS (Armorsmith): Armor related stuff and refining ingredients like acid solvent, fluxing agent etc (Northeast, below the tavern)
- GOTTO (Scholar): Runes and seals for equipment enchantments. (West, below deck)
- BUANA (Alchemist): Medical and alchemy stuff (West, above deck)
- CHING (Shipmaster): Bags, contracts**, drinks.
*: There are 2 NPCs on land but they are not for early game.
**: Contracts allow you to recruit AI controlled allies but I’ve never used them.
Crafting Stations
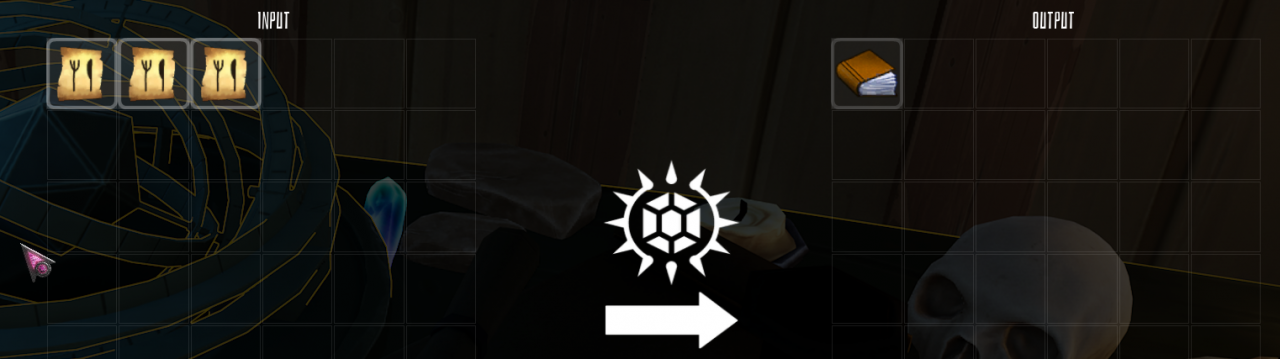
You can find pages containing recipes and if you complete a set you can craft them into a single slot book in the artificer station to save space.
The pages are not required for the crafts themselves so they are obsolete if you already know what you need or look up recipes online. While interacting with a station, just above your inventory, there is a swap button, you can access your stash so you don’t have to pull materials into your inventory everytime you want to craft something.
Top right of the screen you will see the materials you need to upgrade the station, some recipes will require higher level stations to craft.
Quests
I will split the quest types into 2: Gather Item quests and Mercenary quests.
The reason behind this seperation is simple, Gather Item parchments can stay in your stash and you can move them to your inventory after gathering the required items and turn them in. This means you could use your Freebooter to gather those items and complete the quest in your ship afterwards.
The Mercenary quests are the ones with objectives like “explore X” or “kill zombies”. These parchments need to be in your inventory at the time of exploration or kill to progress the quest. Which means two things, (i) you have to play as The Mercenary to be able to bring the parchments into the raid and (ii) if you die you will lose the parchment which means you need to get a new one from the NPC and start over.
For the crafting related quests you should make sure you have room in your inventory when you are turning them in, especially in the beginning. The first couple quests that teach you about crafting will reward you the materials you need for the next one, if your inventory is full these rewards will go to stash and you will have to find them manually.
Container Items
Backpacks can hold anything so they would be the best to bring into a raid. Another good one for raiding is the document case that Gotto (the scholar) sells, you can keep your quest parchments in it and any new recipes you find can go in there as well.
Gear
As far as I can tell there are no set bonuses for wearing one type of armor on each slot, here are the main characteristics of the different types:
- Light Armor: These will generally reduce projectile and blunt damage while increasing dodge speed and stamina efficiency.
- Medium Armor: This seems to be bit more rare than the other 2 types or I’ve been unlucky finding them. They seem to have base damage reduction and broken bones resistance as main stats.
- Heavy Armor: These will always reduce your dodge speed but provide high blade and some projectile damage reduction. You will also see bleed resistance on some.
- Shields: Having a shield equipped reduces your move speed and stamina efficiency but increases your block resistance while also letting you block projectiles.
Weapons are easier. Big means slow but more damage, small means fast but low damage. If it’s sharp it deals blade damage and has a chance to cause bleeding if not it will deal blunt damage and have a chance to break bones. The crossbows deal projectile damage.
One important thing, the secondary weapon damages are about half of any primary weapon. Even with increased attack speed I do not think they are worth choosing over any primary weapon unless you are using crossbows.
Finally, the clothes have no impact on any stats, you can go in naked and find royal clothes then sell them.
Consumables and Food
What’s more important in my opinion is the food choice. I favor dried fish because it increases the maximum stamina for the duration. My 2nd choice would be dried meat for a similar reason as it increases maximum health for the duration. You can find these in raid or buy them from Kwahu the Barkeeper. Once you start cooking you will find different food with similar buffs. Experiment to find out what works best for you.
I’d recommend carrying one of each and eat both when you are hungry enough then for the next 5 minutes you will be ready to fight with 2 food buffs on you. I usually extract when these buffs wear off. I should warn you if you try to eat too much too soon you will get a debuff that decreases your stamina for 400 seconds.
Medical consumables are self explanatory, if you are bleeding use a bandage and the splints are for broken bones. These debuffs stack so you might need to use multiple meds to completely get rid of them.
Combat
Attack is countered by Block
Block is countered by Kick
Kick is countered by Attack (kind of)
Important things to note are:
- Block alone is not exactly the counter of Attack, if you only Block you will run out of stamina and die anyways. For Block to be effective you need to time it right when the enemy attacks which will turn it into a Parry. Parry will stagger your opponent and allow for counter attacks.
- Kick will interrupt a charged Attack as well as Block but is ineffective against regular Attack.
- You can cancel a charged Attack into a Kick or Block
- The most important thing in a fight, in my opinion, is knowing the reach of your weapon vs. the reach of your enemy’s weapon. You will need to experience this yourself to get a feel of it.
- There is friendly fire so don’t hit your friends.
Finally there is the option to Dodge. Dodge beats all.
The dodge key, when pressed alone, will make you dodge backwards. It is possible to dodge sideways by holding a direction key as you dodge. Dodging forward doesn’t exist.
You can dodge backwards to create some breathing room to recover stamina or to start running away. Dodging sideways is mostly good to confuse the enemy or to flank them if you outnumber them.
Heavy armor will reduce the speed of your dodge animation and some light armor pieces can increase your dodge speed.