This guide is essentially a complete ‘walkthrough’ to first ascension, offering different tricks to speed up your progress more than a blind playthrough would give.
The guide also contains Ascension information on the last section if that’s what you want.
This guide was done BEFORE features such as pets/dungeon/multiplayer content, so if you are reading this and you see those released – be aware there might have been changes to the game since at the moment of the guide it was in very active development.
Also some things might get nerfed/changed for same reason, so be careful when using this guide far in the future.
Needless to say that each new content that releases will be making everything easier and numbers can get much more forgiving, but I wouldn’t know the future.
Before the first reincarnation there are very few tips one can give since it’s mostly linear progression.
If you have time – clicking anywhere from time to time lets you upkeep the x1.5 atk speed bonus(this can get much more idle friendly in Ascension 1+).
There is also a ‘secret’ achievement in almost every stage, they are in ‘stage order’ on page 3+ of achievements and you can get hints there as well… if you miss one then it’s in stage you have already been to. Get those done since it’s a slight stat boost.
The only noteworthy one is one stage simply having some idle RNG one, which is the rare yellow butterfly one which you will likely get passively as you idle.
I will first start with premium currency – Souls.
Currently there are 3 main ways to get it:
1) ‘codes’ from the dev, which you can enter. Those can be found either on DEV steam topic or discord.
Make sure to enter code ‘daily’ to get 500 souls + 1 random pot every day.
2) Daily quests
3) Up to 500 from whack(auto whack also counts) daily. It can give you 50 for each whack run instead of a buff.
Best ways to spend Souls approx priority:
1) Discount for ‘% bonus’ of something. You will get all of those eventually, so taking one at a discount makes sense.
2) A good ‘quality of life’, especially if it’s discounted – best are Auto Whack Auto(allows you to whack overnight/offline) and Auto recycle(getting mats once your inventory is full is very good) > Auto Potato/Skull timers(become a must for those who idle a lot after a few ascensions IMO, only lower priority due to not making too much impact early on)
3rd most important quality of life that you DON’T want during Ascension 0 but becomes very important later on is auto recycle materials – the QoL itself is useless but it gives a +5 improvement to material conversion ratio. Useful when you get other sources of mat convert.
3) The non discounted % bonuses… class exp out of early ones is probably best.
Brew/Calcium/Milk(in approx this order IMO) is the next priority and even better but is unlocked later into the game. Those provide the least diminishing returns to your investment.
I think confection/poop are the most ‘meh’, since those have highly diminishing returns. Worm drop chance is only 10% sadly, otherwise would have been pretty good.
Whack score is… hard to judge.. but it’s pretty decent IMO. early on it will only profit active whackers though. A1+ it becomes much more balanced for everyone, although those who mostly idle will profit much more from auto whack auto QoL improves.
My own purchases during Ascension 0 were discount class exp > non discounted auto whack auto > brew exp > calcium.
That being said I considered myself active enough not to require auto recycle, which is IMO a higher priority if you idle a lot.
A1+ prem:
1) +25% item rating for 15k souls. Top tier, almost 0 diminishing returns.
2) Whack auto +25% value/buff duration for 10k – HUGE value for idlers.
3) Auto whack auto 5 minutes faster for 10k – great
4) Worm quantity found 25% – great value, 10k
5) Click atk speed decrease 5x slower – good paired with A1 whack bonuses for it.
A5 prem:
Reinc exp % – best value.
Now there are 3 categories of game I will describe:
1) Talent tree – you start game on jack of all trades class, so stat boosts you can take are mostly balanced.
I would say for first reincarnation your priority is mostly efficient small nodes since you won’t get enough talents to do anything big that matters:
Con/Str nodes + Fighting proficiency > Class exp nodes > Skulls/Potatoes > Everything else
2) ‘Whack’ minigame – the most idle unfriendly element of the game for a very long time.
The more active you are – the more you will profit from whack overall.
NOTHING in whack resets, EVER. So you might think it makes a lot of sense to rush it.. BUT you also get improvements to the score you will gain, so you should wait at least midway into first ascend if you want to get more value for your time.
The whack itself gives you a buff for it’s completion, duration of which increases with high score.
Eventually you can stack multiple buffs easily, so it’s well worth it and rewards active play on your part.
Early on it’s best to focus entirely on increasing the profit you gain from it. If you are playing mostly ‘idle’ish, then you will want to get auto whack auto ASAP to get at least some progress towards this.
There are also purchasable rewards for other game sections.. early on it’s mostly QoL but later on it gives discount to one of most important sections of late game.
3) Worm breeding – this early into the game(when you unlock it) I would mostly ignore this section beyond throwing a few worms into attack/hp.
Basically you have worms who create poop and eventually larva.
Worms are temporary but you have a ‘starter’ amount, so you never have 0. Getting more however doesn’t help you long term.
This section becomes more important later on but for now all you need to know is that all bonuses towards it suck for now… so talents related to it are mostly a waste(those technically remain a waste forever).
Now onto main question – how long will first Ascension take you with this guide?
Well, here was my time while writing this guide.
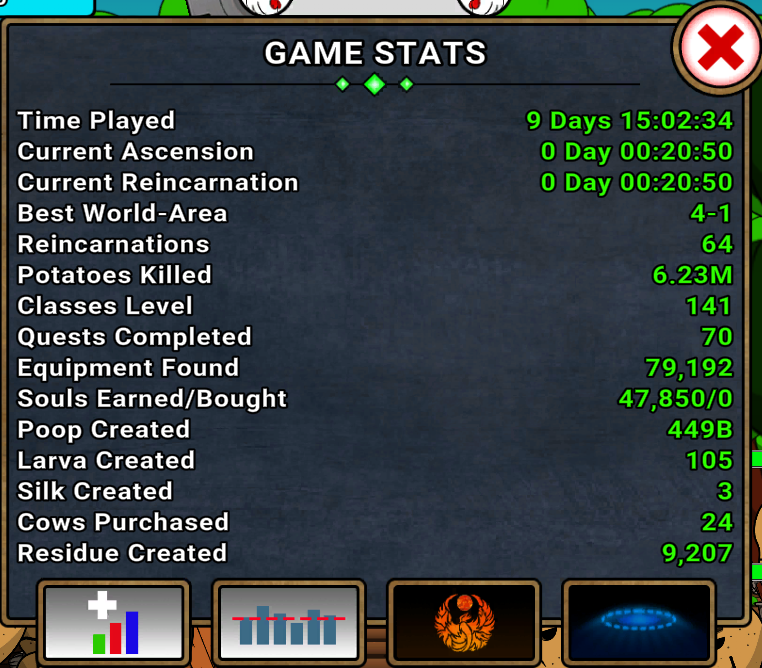
About my playstyle:
1) This was not my first A0>A1, it’s my second one that I did for the sake of the guide, so I knew exactly what I was doing but all that info is also in the guide.. so yeah, it’s not much of an advantage over you reading this guide.
2) I didn’t use potions(at all) to make sure people have breathing room if they miscalculated something around my recommended stats for some challenge or such.
Neither did I use whack buff help to clear the challenges.
It’s highly recommended to use those yourself, sometimes those can save you a good 30-60 minutes or so.
3) It’s a very active playstyle(being able to check game at least from time to time for ~12-16 out of 24 hours a day)
Last ~1 day however was pretty inactive since there was no real need to be active as any speed up I could do would only save a few hours and I didn’t want to bother.
4) My last run was an overkill by 50 levels. My last run was an overnight which resulted passively in an overkill by ~40 levels so I decided to just finish the remaining 10 for the sake of testing how getting 50 level overkill works.
So I would say my correct time would be ~4 hours faster.
5) I did not whack too actively. I did do a bit when gains felt meaningful, but not too long. But I tried clicking auto manually when I could.
6) I did use premium currency from codes and dailies to buy upgrades. You can see my purchases for A0
I would say ~14-15 days is reasonable with mostly idle playstyle, ~10-11 days is reasonable with active playstyle and potion using at key points(beating challenges quite a bit faster via atk/hp potion, class exp pot when mostly pushing class levels etc) even if you make some mistakes.
~8-8.5 days is my theoretical approximation of complete no life min max doing stuff pretty optimally.
First Reincarnation
Reincarnation unlocks when you reach 1-8-50 and is when game starts opening up.
I will answer questions that new players usually want to know:
1) When to reincarnate? Either Instantly or if you overkill unlocked it a bit – snipe(farm out even if you can only beat a few waves while actively browsing for stats you want to have good %, in case of reinc gear you would be looking at reinc exp %) gear from 1-9 since it gives reinc % so you get a bit more value into it.
2) What class to choose first? Farmer again at least 1 more time. Reason is that max class level gives an extra class exp multiplier. Hence you want to do a 1 run where you are much more powerful and snipe some good gear so later runs are faster.
3) What Reinc talents to get first?
Priority is last two traits(stats/higher rarity items) – get those ASAP.
The other talents honestly depend on you.
I overall don’t recommend potato/skull auto early on since those cost too many points for too little gain unless you are ultra inactive and are very unoptimal.
The auto stage is very good unless you are paying close attention to the game full time and you will certainly get it sooner or later.
The auto whack is ultra useful if you can afford buying ‘auto whack auto’ from premium shop but even without that is likely mandatory.
General Gear Farming
If it gets too complex – don’t worry, check back on it a bit later and you will likely understand it better, I was not too sure where exactly put this section but decided to do it earlier rather than later.
Also be aware this advice stands for Ascension 0 – progression in A1+ is different and will change how you handle the gear.
1) When to upgrade gear?
Generally speaking your last run before going to sleep should be ‘freeloader’ class for max item drop chance, after each of those you will want to upgrade the gear.
Ideally wake up in a way that you have at least ~30 minutes to actively farm gear(and ideally a bit more to reincarnate and start another run to reach somewhere with it before going idle again) after waking up.
Which zone to farm? Generally speaking if you can beat ~15 waves as freeloader it’s good enough. Don’t forget the potato/skull upgrade spending after your overnight sleep.
For equipment – always farm medium zone once you have that difficulty unlocked, since those require much less ‘power’ to get better item rating, the reason for that being them having 200 waves, which means early waves are quite easy to balance it out.
Big ‘spikes’ of gear improvement come from being able to get new bonus on gear that you didn’t see before. This is what my guide will focus on but I will also make a list near the end of this section.
Depending on your activity each such ‘night’ during A0 will increase your previous ‘base’ item rating by ~50-100%.. but most importantly entirely new ‘useful’ stats are what often makes the biggest difference.
2) What kind of gear you want?
In Ascension 0 you want one set which will be your ‘combat’ set which has only ‘useful’ stats which always profit you(I will mention exclusions in my guide) and one set which is your reinc(and later reinc/whack) set
You equip reinc/whack set only before you reinc/whack(in whack case unless you are actively whacking you only need to equip it when trying to set new high score for auto.. you don’t need whack set for ‘auto’ whacking, it gives 25% from high score by default regardless)
Try to have those sets as different rarity, this way it allows you to spend different materials for upgrading. Whack/Reinc gear set usually wants to be of lowest rarity you can get.
Generally speaking until late game of A0 the usual enchantment goal will be approx 9 or 19 unless you are super active.
Due to latest materials being hard to get – highest rarity you can get is usually ‘bad idea’ and you want to get the lowest rarity you can get(assuming you have all item rarity+ upgrades that is)
3) What does rarity change?
Rarity does NOT change how high can attribute be but instead changes the amount of bonuses an item can have.
This means bigger rarity is not always better equip.
So let’s say area can drop T4-T6 gear randomly.
T4 gear can have 4 bonuses and hence will have ‘lower potential item rating’
T6 gear will have 6 bonuses and hence will have ‘higher potential item rating’
BUT it’s entirely possible that T6 gear will have stat that is useless to ‘constantly’ have like reincarnation exp, which means any item rating you get from actively wearing it is ‘fake’.
On the other hand let’s say the maximum reinc exp you can find on T4 is 7%
This means the T6 gear can also have a maximum of only 7%
Hence when combined with enchanting system being important for your item rating – higher item rating can be ‘punishing’ to you compared to getting only useful stats on lower rarity ones.
4) How exactly does item rating work?
First of all: only CHEST equipment can get maximum rating that the zone states.
The reason for that is it having 2 base stats instead of 1.
Why do I get much lower item rating than zone allows even on chest piece?
Only max rarity chest piece can get highest rating.
The way rating is calculated:
Each stat has minimum and maximum value.
For a simple(not real) example let’s say we have zone with T4-T6 and each stat can roll 75-100.
T4 will have a minimum rating of 75*4 = 300 and a maximum of 400
T6 will have a minimum rating of 450 and a maximum of 600
This is not counting base stats which also give rating. So a chest piece gets +150 more and other pieces get +75 more maxmium in our case.
So do not be discouraged when seeing much lower item ratings, that’s normal especially if you farm lower rarity items to only have ‘useful’ stats.
Do pay attention to what ‘approximate’ item rating is for chests and non chest equipment though. And lock those which seem potentially above average.
5) How exactly does enchanting work?
It raises item rating by ~5% from BASE item rating(means each following enchant is less and less impact relatively speaking) per enchant. So +19 set will have almost double the item rating.
The cost gets HUGE jumps every 10 enchanting.
So +10-19 is MASSIVE increase in cost compared to 1-9 and 20-29 is another massive cost increase compared to 10-19…
As you can see enchanting is important part of improving your gear and if you have choice between farming higher rarity which has useless extra stats and +9 gear or lower rarity one with only useful ones at +19 – the choice is always +19.
6) Stat unlocks you need to know for A0:
Each stat has a zone starting from which it can drop.
Those are the earliest zones when you get those stats.
-9 zones(boss ones) always have 1 fixed stat that appears NO MATTER WHAT earlier than it will normally appear.
My guide does tell when new important bonuses need to be farmed out, but here is a list if you only want the list:
Potato – 1-1
Class Exp – 1-4
Skulls – 1-7
Reinc exp – 1-9 guarantee, starts regularly dropping from 2-7
Confection 2-1
Poop 2-4
Those are what I would call ‘early game stats’. In A0 you will have enough mats to level 2 different sets so getting lower rarity for more + upgrades and ignoring reinc stat is a good idea.
Milk – 2-9 guarantee, starts regular dropping from 3-7
Another very important stat to farm out during boss zone, milk will be your best way to speed up progression at that point.
Whack score 3-1
A stat you don’t want permanently on your set, hence something you will try to avoid. I recommend combining this with Reinc set, during A0 priority on higher reinc % but try to have whack % also being decent.
Brewing Exp 3-4
Finally a new useful bonus and by far most important one. Getting this one will be your biggest progression boost during A0.
It’s the last stat you will farm out in Ascension 0 medium difficulty. Although last set you will farm will be 3-7+ for both milk AND brewing.
There are many more stats after that but they play no role until future ascensions, which is beyond the scope of this guide.
Your progress from now on is mostly stale until you reach ‘spikes’, which is usually either new content or new reinc talents, which massively spike your power.
There are 3 such improvements during this section:
Reinc Level 100, Challenges and reinc level 300.
I will describe those as I give tips overall.
First of all a few ‘generic’ questions out of the way:
1) How long should reincarnation last from now on?
~2-3 hours is optimal. This is the period of time where progression starts slowing down and after ~2 hours the reincarnation timer multiplier is slowing down considerably.
Be aware there are a few exclusions like being able to reach important breakpoint earlier.
Ideally you never go over ~8-10 hours since at that point the reinc timer multiplier progression is essentially non existant.
2) What is the ‘best’ class?
Freeloader is ‘best’ class since gear progression is the most important aspect to ‘carry’ your other heroes/overall progress.
For challenges I prefer ‘Smasher’ since it has biggest offensive stats, which is the best way to farm harder stuff faster hence best for rushing challenges.
Eventually ‘ Harvester’ becomes better when you can gather decent amount of crit damage talents and get perks for Crit from challenge.
Overall though – you will be swapping classes constantly with freeloader being one you will want to stay as overnight to get the most out of gear upgrading.
3) How to best progress reincarnations atm?
Overall best progress is IMO:
Finish your 2nd farmer run > Do one run with each other class for ~1-2 hour reincs to grab quite a few talent points.
Your goal with farmer is to get another solid boost to your levels and get some good gear.
Ideally the run is ~2-3 hours at most.
The most important thing for you to do is farm a ‘reinc’ gear set if you didn’t already.
The items with reincarnation stat drop at 1-9 stage, get a solid set and your goal is upgrading it to ~+19 eventually.
Spend a few minutes to see how much ‘%’ the reinc stat can reach the highest and try to get all pieces very close to this %.
Aside of that push as far as possible and get the best possible set you can do. It might stay as upgraded reinc set for now as well.
There is no particular goal – each reinc is ideally ~2 hours and your goal is simply getting a higher level with them before progress starts to slow down too much. Don’t forget to equip Reinc set before each reinc.
From now on – your ‘talent’ goals are always ‘reincarnation boost nodes which cost 25. Calculate(or check last section of guide) approximately how many of those you can realistically claim and make sure to claim those last, focusing on as many other boosts as possible first.
During this period you will reach Reinc level 100 talents:
All boosts in this one are a must have but order is Stat > Poop > Item Rarity > Recycle/Skulls > Potato
Challenge unlocks at 2-2-50 and has AMAZING rewards.
Ideally you have unlocked it after an overnight at approx the time you did each class ~twice or at least most of them twice.
Challenges are placed in approx order of difficulty for now.
For ‘Adventurer’ challenge you should have very easy time with Reinc 100 talents and ~25-30 extra talent points which you likely already have.
During challenges ignore the reincarnation talent nodes and instead go for full power. I prefer Smasher class focusing on Str/Damage multiplier/Class Exp and whatever is on the way towards those.
Reinc level 300 is your next major goal and shouldn’t take too long.
At this point your routine is cycling between classes and doing occasional big push overnight.
I would try to always finish your day with a ‘Freeloader’ class so you can progress into new gear via overnight gains. Enchanting gear is one of the biggest powerboosts you can get which is shared to all classes.
Reinc 300 talent priority:
Stats > Item Rarity….
Yep, that’s it.You might feel like you have loads of leftover points but those will help with 750 reinc talent tree A LOT.
The other bonuses are mostly meh, it’s best to save for next Reinc bracket since you want it fully.
Most importantly ~reinc 300 is when you can do 3 more challenges which will skyhigh your power:
All classes ~800-1k should be enough talent points to make it doable without too much challenge.
It’s best to do them in the order of Hammer > Greedy > Blind as that’s approx difficulty even though they are close to each other.
As usual I used smasher class entirely ignoring the reinc talents. The +1 to each stat per level 25 nodes become quite useful for challenge now that you have quite a lot of talent points.
Onto Reinc 750
Worm breeding becomes fast and hence important.
Early on it’s best to invest mostly into ATK/HP to reach as close to full bar as possible.
Reason is you can finally start increasing your reinc bonus via confection level.
You also should be unlocking the reincarnation bonus which is where you will put majority of your poop.
That’s a total of 2 new multipliers.
The confection level is likely going to give you ~8-10% in 2 hours via fast levels of attack/defend
The Reinc confection with majority of poop will likely get to ~10-15% in 2 hours as well.
Both will slow down after ~3 hours so try not to go over that time of reinc if you are active.
~3 hours is when level increase also starts to slow down considerably, so kinda optimal for level increase pushes of classes.
Another important mention is reinc exp for ‘potato’ – this will be an ~30% boost in 2 hours. It’s best to ignore it until ~30 mins before you plan to actually reinc after which you focus only that one.
Your first big goal is reaching 2-7 and sniping it’s gear.
Even if you can barely kill enemies there – it’s well worth spending ~20-30 minutes trying to snipe a new set.
Reinc exp can now appear on gear is the reason. You will be able to snipe ~10% base reinc exp gear provided you invest a bit into potato item rarity upgrade. Which is a solid improvement over previous set.
You should be able to get it to +19 without much problem and reach ~75-80% reinc exp on gear, which is a separate multiplier despite it being in ‘other bonuses’.
From now on you need to actually view item not only based on rating, but also based on bonuses.
Remember that rarity does not matter for individual stats like reincarnation, it only improves how many stats item will have. So it’s entirely possible you will be able to get a top tier yellow rarity gear with perfect reinc value.
Your actual combat set does NOT want stuff like ‘reincarnation’ ideally since it inflates the total item rating for 0 value. For now there are too few options for best rarity gear to get more optimal choices though, but keep this in mind for future.
ALL reinc 750 talents are amazing value and a must max.
The priority is approx: Class exp > Cow price > 1 residue > inventory/item rating/stats > finish residue
If you followed my advice you likely have enough points to max everything aside of last 2 residue, which is a HUGE boost overall.
A lot of talents help with ‘Cow Factory’ content which I didn’t yet mention since even if you could unlock it before – you wouldn’t be able to do anything there pre 750 reinc unless you are doing something wrong.
Cow factory is the single most important content in the game to speeding up your progress.
Everything in cow factory does NOT reset on reinc.
The way cow factory works is that you buy cow for worms and they produce milk/residue passively. Milk goes into first tab bonuses and residue is invested into another tab, the bonuses with ‘rocket’ will get carried over onto next ascensions.
IDEALLY you want to unlock cow factory when you are ALREADY reinc 750 overnight.
The reason being max cow price lowering the cost of first cow from 1k(unrealistic) to 206(totally doable overnight or very close to it, ideally you take a few perks that help towards worms, don’t focus it too much though)
Also IDEALLY you want to snipe 2-9 gear after this overnight since it gives a ‘milk’ bonus, which means you have chance to get master tier gear without the reincarnation.
As you might have guessed – it’s usually best to invest worms into cows around the time you reinc, but for first cow it’s certainly worth to go ASAP.
Once you got cow – invest milk with slight priority on ATK unless you are doing challenge and save 100 residue for Reinc exp upgrade ASAP.
Residue does NOT increase with more cows, which is why it was important to get at least 1 cow ASAP and it’s not as urgent to keep getting more cows.
Along with cow factory you also unlocked Medium Difficulty and it’s labor challenge.
From now on you want to only do medium labor since it counts as both easy and medium.
That being said I recommend waiting until you finish getting huge powerspike first so you can actually clear a decent amount of areas.
Medium waves early on are more annoying to farm due to them requiring higher spawning rates for optimal farm. I recommend tackling early ones later for reinc multiplier increase. Generally you will find it better to be progressing on easy difficult at the beginning since the medium would take too long.
But medium does count as BOTH easy and medium.
Check statistics menu in the settings to determine the optimal speed of farm. Be aware that whack buffs impact those results, so you need to keep a few factors in mind to be certain in your comparisons.
How much milk you got is not too important as you will improve enough over time.
You also should have upgraded your item gear to whatever best you could farm after getting the 750 reinc item rating boost.
The better your cow bonus/gear the easier it will be.. but those only serve to speed you up further.
For Double Dragon you want to use harvester(crit) class and for Neo you want to use Rancher(evade) class
I personally did it nearly full auto(only took an extra run of 1-9 to kill boss 50s) in ~20 minutes with the following:
Reinc level 850, Average class level 1.9k, ~50% HP/ATK from milk, heavy focus on ATK/HP in worm breeding, average gear rating ~20k with no reinc stat on those 20k pieces.
I simply rushed a total of x4 +1 stat per level 25 cost nodes.
Larva trick + worm breeding in general
First what you need to know about worm breeding:
1) Fully filled bar is the cap(50/s)
2) Going over the limit is not ‘wasted’ you can entirely remove worms and whatever value that was accumulated will work even without worms. So don’t worry about putting ‘too much’ into something that’s not capped full time each reinc(HP/ATK in A0)
2) Besides the stats you see in this menu confection total levels are also a separate multiplier to reincarnation, so it’s important to keep maxing out the HP/ATK starting with early-mid game.
3) Everything has increasing timers and hence diminishing returns. What this means is that you don’t want to fully neglect anything(aside of maybe item rating when not doing item runs)
What this means is that while you do want to focus on Reinc Exp – you should also put a decent amount into potato/class exp/skull as well.
Don’t go too crazy into reinc exp alone. Slight tip towards Class Exp out of potato/skulls/class exp and big tip towards Reinc Exp but not too much.
Now onto the ‘larva trick and all you need to know about larva:’
First of all the best investments for larva are obviously reinc exp/class exp. Once you have decent amount in those – throwing a bit into skulls/potato and maybe some other harder stuff is okay as well.
The larva increases in normal playthrough should be ignored as it’s terrible value for your talents, but there is ONE TRICK.
Larva have a ‘pity’ chance to drop when they reach 2.5k(by default) – the trick mid game is that if you see ~2.45k+ and you don’t mind reincarnating soon – do so and put EVERYTHING into +1 larva ignoring everything else.
This trick is only good early into the game when you only have like 5-10 larva in total and doing this will double or triple your total amount.
It’s small gain for small time investment, don’t force it however. If it happens – it happens.
Larva RESET on ascension, so it’s not even full time invest, hence why it’s not too important.
Reinc 1250
If you are an active whacker – the super important improvement is via 3-1-50, which gives another cow discount for whack points making it ultra cheap and skyhigh’ing your milk progression.
You will likely max out all reinc 750 talents by reinc ~900 if not earlier.
Save for next reinc bracket yet again after that.
Residue spending:
Reinc exp > Whack(and do a bit whack manually even if you have been mostly ignoring it, it’s just too useful, you will be getting whack on equipment starting with 3-1 as well) at least until ~15 since cost is rising > Spawn Potato > Double Larva/Double scrapping(order and getting them is up to you, those are not retained after ascension, BUT are good value in this one.. I personally ignored double scrapping since I was active and could reach +19 gear easily without it.. and going beyond +19 is very costy) > Material Conversion
That will take quite a while, just putting this up so you know what to focus on for now.
I personally went for spawn potato after 15 levels of whack.
Residue reinc perk is HUGE value and will remain one of your most important bonuses throughout the rest of the run.
At this point you can do more than 4 reinc nodes easily. ~5 at least with 5th leading you towards another +1 stat per level node which is kinda good value.
Now that you have 2 difficulties you might be wondering what location to farm.
My personal recommendation is to start using ‘average run’ menu in settings which shows you last 15 runs – once you reach a point where you are mostly ‘stuck’.stop buying anything new and give it a try in all locations you think could be good for you to see how your skulls/exp per second are like.
Usually best ‘passive’ farm is on last location you could fully clear.
Sometimes it’s worth sniping gear if you are on freeloader though. Due to medium having 200 waves the early waves are quite easy.
Don’t forget medium = double worm.
The overall progression is yet again boosting lowest classes if you are confident you can get ~200-300 more levels within ~2-3 hours.
And if you are planning on going away for a long time – go for freeloader class to push equip after you are back.
Your overall goal is to kill the max amount of waves you can during this period, which means backtracking some for medium. I recommend doing it as early as you can max out spawn there so it won’t harm your progress.
Assuming you did the progression the way I mentioned and got residue exp early – it shouldn’t take too long, but it’s a pretty stale period for sure.
The farthest I got out of any meaningful milestones is 3-1-50 in overnight run, which I already mentioned at start of this section.
Out of gear:
3-1 gear has whack… it’s a BAD stat to actively have BUT it’s a good set to ‘carry’ in inventory, just like the Reinc one or at least farming one out when you want to set high whack score or actively swapping into it for an active whack play.
2-8 medium orange gear is best I could get in terms of USEFUL rating.during period I reached ~3-1-50..
Takes some time to get it WITHOUT Reinc stat at decent rating. At +19 I got to ~55k rating per gear piece.
Remember to also upgrade your reinc set when you can get some noticeable gain. You should be able to reach enough reinc % for each upgrade to give +0.2 instead of 0.1, which is a solid boost!
+19 is usually your goal, but if it’s final set of that rank then you might as well go ham since converting mats does almost nothing until you upgrade it heavily.
Overnight runs are overall your biggest deal since they are where you will likely improve your gear the most so you want to ensure you place them into a solid ‘farm’ place before you go sleeping, hence you need to plan a bit ahead of time.
Towards Reinc 2000 part 1
The priority for them is:
Class exp exponent reduce > class/potato exp > worms > item rarity and ~brewery 8 and milk 6(do it balanced since cost increases)… order up to you, item rarity eventually is good but initially brewery/milk might be more useful for you.
I would save remaining points for 2k milestone after you complete the above, the 2k reinc talents will need A LOT of points for huge improvements.
This allows you to get quite a bit over 3k class levels in usual ~2-3 hour reincs. You unlock final part of talent tree for that class but it’s not too important until you get more talents.
Recommendation when farming gear around this point:
I highly recommend you farm out tier 6 gear on medium difficulty of 2-9. The reason for that is you have chance to get one without useless stat(reinc) due to forced milk stat. It kinda matches your current progress as well and should be latest you should be able to kill after an overnight at this point.
Even if it takes a while – gear doesn’t get too much better for a while after that due to you being forced to take either reinc or whack stat which play no role in having it full time.
Considerably better gear will only happen on 3-4 when you finally get another useful stat.
Don’t forget to learn the freeloader class special passives(marked as stars on talent map) – by now those are more than worth it since your point amount is quite big.
I am not certain when all of you will reach 25k total milk, but the earliest point is probably around here. Once you get 25k – you unlock new mechanic in Cow Factory called ‘brewery’.
It’s pretty simple – you put over 25k into ATK or HP and it starts generating exp which in turn multiplies boost you get from it..
It’s highly recommended to focus only on one stat at a time for now to maximize brewing exp gain until you gain considerably more milk.
I recommend working on atk first and only transfering to both once at around 60k milk.
It’s diminishing returns of exp per milk which start from 25001 milk invested, but not diminishing enough that you would want to spread into 2 earlier than that.
Obviously make sure you brew a bit HP before that as well for when you go hybrid to push stages.
Path challenges are basically… ‘infinite’ like labor challenges but allow you to ‘progress’ with nerfed stats and instead reward you for beating every area in world 2+.
For quite a while it will profit if you are ‘active’ around this period of time since there are a lot of things to do and you will keep having something to do with relatively short reincs.
Do I recommend going for path challenges instantly? Yes.
Labor applies after you ‘give up’ path challenge, so it’s good idea to bump up labor beforehand to get a bit more reinc value.
My personal stats when tackling those were:
~80k item rating average on +19 gear pieces of 2-9 blue gear(no reinc). +19 approx doubles the rating if you want to figure out how much default one is.
Class levels 2.8-3.5k, most were around ~2.8k, one class was slightly behind that and freeloader was 3.5k after most recent overnight run.
RL ~1.4k, milk ~27k when I started but it grew a lot over those challenges.
I highly recommend unlocking brewery(25k milk) first if you aren’t too far from it, but don’t dwell on it if you aren’t.
I recommend starting with harvester then rancher ones since those upgrade how far you can get the most in other ones.
After that is Smasher > Hoer > Farmer > Freeloader
On harvester class don’t forget to focus on crit damage nodes.
On other classes it’s mostly +1 stat per level nodes and STR/CON and fighting efficiency and class exp… a bit potato/skull too.
My recommended way to tackle those:
Offensive stats until lvl ~2k, ideally take an offensive stat in the node leading to reinc if it’s STR or CON..
Total challenge run time up to ~1 hour.
After you complete(give up) a challenge spend ~45-60 more minutes in the class progressing medium difficulties for more waves(I would skip 1-9) and some later easy areas, not only your milk will improve, but you also will certainly get quite a bit more class levels.
If you are brewing – near what you think is ‘end’ of path challenge make sure you add a bit milk into HP as well as having 0 likely won’t be enough even if you are one hit killing.
My results:
I started with Medium labor, 1-5 was pretty easy, if you are stronger you might handle 1-6, I could probably do it too but didn’t want to wait for buff from whack. Allowed me to reach more milk too.
All paths 2-3.. 2-4 would take too long and require full offensive stats. 2-3 is fast/easy.
All class levels ended up ~3.3-3.4k
Each class path took ~2 hours total with the post challenge grind included.
When do you tackle path challenges after that?
Honestly I would say for a while every run should start with path challenge, since by time you cycle through 6 it’s very likely you are ready to push 1 more area in new class. If you are confident you can’t do that – don’t obviously… since you are only spending ~30-60 minutes it’s not a big waste even if you fail.
The reward increase is ‘linear’, but you can’t reach far enough to start feeling the heavily diminishing returns.
If you are worrying it will make repeating game very activity requiring/grindy – don’t worry too much, after Ascension 3 you will auto complete those 9 areas behind your highest reached.
The only exclusion is if you have to freeloader afk suddenly.
Towards Reinc 2000 part 2
Make sure you are doing the medium difficulty overnight even if it;’s not most optimal choice. With 1.25k worm perk it will drop x4 worms for many more cows.
While you can ‘upgrade’ gear – it will probably have to be the same ‘milk’ set from 2-9 as there is nothing more optimal you can access yet.
If you have all inventory drops – minimum it can drop is tier 7, hence you will have to take 1 useless option, which is reinc.. but take this as opportunity to upgrade your reinc set without having to reequip it for now I guess.
Don’t worry if you don’t have enough mats – while farming out way above average rating pieces which sometimes appear you will get enough for +19.
I managed to reach brewery Atk lvl 250+ and HP very close to lvl 250 here.
This opens up new feature in cow factory – Calcium.
Calcium is an even more important feature since it’s a bigger multiplier you don’t even need to have milk invested into to gain progress. The progress in it is based on your brew level.
You should be able to complete 3-3-50 no problem if you reached calcium and overnight probably even without it.
I personally managed to complete 3-4-50 as well due to calcium(just barely), it’s pretty good since it allows you to get a milk increase in potato upgrades, nice to have while you are grinding for gear set.
First is potato/class exp in milk tab which require 100k milk to start brewing.
I recommend swapping if you meet 2 requirements:
1) Your brewing levels for ATK/HP are at least ~275
2) You have at least ~125-130k milk, which allows you to still have 2-5k in atk/HP to have good stats and decent
I recommend focusing class exp first when you start.
Obviously do invest ~1-2k into both potato/class even if you can’t brew them.
Once your milk is ~150k invest ~115k into class exp and ~35k into atk or HP, whichever has lower brew level, although try to keep attack a tiny bit higher.
Second and arugably even more important is a new challenge: First Extinction
This is arguably one of the best challenges in the game. Cow price drop 50%/and DOUBLE worms would be powerful enough already… BUT you also get to save skulls tab 3 after reinc which allows you to push medium difficulties from get go(after path challenges ofc) at optimal spawn rate.
Your next long run will be massive upgrade to your cows.
But onto requirements for this challenge…
My meaningful stats were:
Milk ~180k, brew atk 270, HP 250.. all paths 1-3, classes ~3.3-3.4k freeloader 3.8k, gear rating average ~140k(with reincarnation this time though), RL~1650
From now on – best class for challenges is 100% harvester with crit damage nodes.
Those stats felt quite overkill and I did challenge in ~20 minutes.
So even with somewhat lower stats you should be fine if you spend a bit time. Calcium itself is huge deal however.
The biggest issue felt HP, I feel like if I didn’t have HP calcium I would have considerably more issues. Crits could one shot anything but HP still dropped.
Don’t forget to swap HP/ATK into milk.
A good trick to powerboosting yourself is using ‘autoplay’ as a source of buffs. You should easily have 2 autoplays by now. Stack 2 manually and do a follow up with 2 autoplays for a total of 4 buffs, okay chances to get both atk/HP.
You have finally run out of new content for a while. How to progress from there?
You are likely at RL ~1.6k and should have easy time reaching classes ~3.7k by now.
I will first remind you what I already told before in prem currency section but basically your most important purchases for souls assuming you have all QoL you want(likely whack at least) are brewing/calcium since those are your main power progression means and have non diminishing returns.
First of all I recommend a medium labor, it should be easy to push yourself further with calcium and having skull page 3 means it’s pretty fast to update. 1-8 should be super easy.
Paths can be updated but this time I recommend you no longer go for ‘power’ and go for regular purchases instead. My recommendation from now on is doing up to 1 hour(if it seems realistic to push new area) of path challenge before continuing for another 1-2 hours of regular run.
2-4 path should be easy.
As usual cycle between classes and freeload overnight while trying to get calcium on class exp/potato.
Your first run should also focus on mostly farming easy mode so you can fast farm skulls and get page 3 skull upgrades so all future runs can farm medium 2-8 comfortably. Even short runs might end up in cow amount upgrade.
The last very imporant tip for this section is talent tree.
If you didn’t yet use loadouts – now is the time to start doing that otherwise it starts taking too long. My personal recommendation is saving a 7 reinc node + 1 residue setup for each class since that will be your approx default for now.
But there is one more very important detail however. From now on – once you reach ~620 talent points comfortably before you are slowing down it’s best to start investing into residue nodes.
Reason for that is you will get more profit from residue decreasing your reinc requirements.. and it itself being useful.
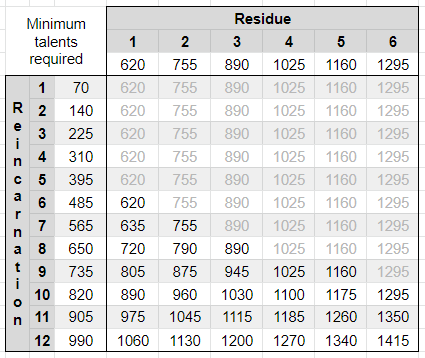
Useful breakpoints to know are:
7 reinc/1 residue – 635, 7 reinc/2 residue – 755, 8 reinc/3 residue – 890.. that should be enough for now.
Which residue to prioritize? I personally go for Hoer class as priority one since it boosts class exp nodes which I find the most useful.
Most other classes all have something interesting:
Freeloader has skull and class exp node along the way
Smasher for STR or potato/also has class exp node along the way
Farmer for overall when you don’t know what to focus, also class exp node along the way
Rancher has fighting efficiency which might have uses for pushing
Harvester is the most meh one IMO with his dex/confection
7 reinc/1 residue is something you should be able to be at already.
Those numbers are pure minimum and not totally min max but they are good approximates.
1 base residue sounds weak but reality is first one will double your residue gain since all bonuses to it are % based.
Remember that for residue node to be useful you need to get it ‘early’, so it’s not worth it if you are only getting it near the end of reinc, it has to be before your progress starts slowing down.
From now on – all nodes that can’t reach new residue/reinc go into class exp… if you are out of instant reach ones – fighting efficiency/skull/potato blocking it is kinda okay too.
My final freeloader run ended me a bit under reinc 2k – ~1.95k
But I managed to reach ~40k% atk/HP via calcium.
I beat 3-6-50 quite easily, which unlocks worms for brew exp. I set most of my words into it while I farmed gear.
Challenge is too hard for now, I recommend waiting 2k
Gear farm.
Farming new best set might take a while, don’t worry if it extends your reinc a bit.
Best set is farmed in 3-4 medium now since it adds brewing now. Since milk was unique to 2-3 your T7 gear will still have 1 useless stat though.
Obviously if you can handle 3-5 it’s better, but it was inefficient for me.
I personally recommend t7 gear with no whack or a blue gear with no reinc/whack.
Use this period to farm out new whack set.
One piece of nice t8 gear is probably fine enough but more is likely too demanding on enchant materials.
Pay attention to realistic gear ratings for each gear tier, remember that each useless stat still takes rating.
Do make separate reinc gear pieces if you plan to use T6 pieces with only useful stats. I was lucky to have it on whack set for pieces I needed.
My final gear examples:
T7/8 +19, T6 +29
T8(2 useless stat) – 360k chest, T7(1 useless stat) – ~280k pieces, T6 – ~300k pieces
Do a few more short reincs with lowest lvl classes(don’t do path) to get to 2k reinc.
Approaching Ascension!
This shouldn’t take too long from final gear upgrade you did.
You were wondering why I told you to be so stingy on reinc upgrade points? Well, that’s why.
The priority this time is:
Reinc exp > 3 potato ATK/HP levels > skull/confection > a few levels of calcium > potato 4/stat per level 1/more calcium…
By time you buy last step stuff your reinc level will be ~2.7k.. nothing else you buy will speed you up much. Make sure you buy all QoL from page 1 since those will stay if you buy them..
Whack buff duration if you are whacking actively around that point is biggest boost out of remaining stuff since you have great whack gear and buff stacking is a big improvement.
The last perks are honestly not too important since by then you will be close to finishing already.
With my upgraded gear just a little pre reinc 2000 I had ~600% brew exp and a set with ~1500% whack – this is enough whack % to max out cows discount quite fast even if you were somewhat lazy in whack before.
Such amazing brew % means your brew lvl gains skyrocketed and you certainly reached calcium and likely have very high brew levels with them rapidly rising like never before.
This means you will be spiking in ‘power’ very soon and your leveling speed is spiking as well, which means potentially 2nd residue node soon.
I will first direct your attention towards your residue – look at the 2nd tab
You are likely slowly approaching fully buying out(most important stuff should be done for sure) page 1 of residue.
Page 2 on the other hand is infinite purchases with ‘compunding’ values(each boost is 1% from PREVIOUS value, so you always get a ‘real’ 1% increase)
I recommend purchasing a few ATK/HP but saving majority of residue for 5k residue unlock, which is reincarnation %…
7.5k% one is quite good as well, but you won’t reach it during A0.
The restriction of this challenge is ‘no talents’. This means we can’t use harvester efficiently.
This leaves us with 2 choices:
1) Smasher – the most optimal choice in terms of power for faster farm.
2) Freeloader – if your smasher is veeeeery far behind freeloader for some reason then that makes sense since it will gain more levels.
I personally did smasher to also catch up on his levels. No talents means you will get talents back after challenge and be able to spread them normally, allowing you to finish it as a ‘normal’ reincarnation with reinc nodes.
When tackling this challenge my stats were:
Atk/hp%/class%/potato% from cow factory was ~60k%/55k%/8,5k%/8k%
This is on ‘equal spread’, tipping atk/hp can push it ~20% higher.
Residue shop atk/hp lvl 10 – cheap and efficient small boost.
Reinc level 2021(was exactly enough points to reach full max of reinc exp and 2 levels of potato nerf)
I reached 2-1-50 quite quick with those stats and after that it was a matter of worms scaling for ~50 minutes and tipping all milk into atk/hp to beat the challenge.
Don’t ignore crit/dodge worms – those play a big role as well.
Don’t ‘risk it’ earlier than you can reach ~wave 35 reliably since it’s mostly a waste of time before that, simply grind in 2-1 with potato/class exp milk
Tip higher into HP if using Smasher since it should ensure you don’t need too much atk to one shot most non buffed stuff.
It’s also a bit RNG due to poison/enemy buffs, with same stats I could often handle +/- 10 waves.
You can make do with SLIGHTLY lower stats to beat this in reasonable time BUT ONLY IF you use whack buff or potion to boost yourself.(I didn’t use either for the sake of guide, but you SHOULD, it’s one of best ways to speed this up by a lot) but overall those should be pretty ‘minimum’ since scaling is only going to get slower and slower.
The reward for this challenge is HUGE – more reinc exp and better base stats on nodes.
Right after I finished the reincarnation after this challenge I updated medium labor to 2-2(did it just barely, so maybe you would need to take 2-1)
Path challenges 2-5 are super easy, being able to do 2-6 or not is something you should look at yourself, I just barely did path 2-6 but it took ~40 minutes first time, you need to be reaching wave ~15 at around 20 minutes in to do wave 25 by ~40..or a whack buff
All the new boosts you got make a HUGE impact – reaching ~2.5k reinc levels will go in a breeze and speed up your brewing even further.
During short 2-3 hour reincarnations you are probably not going to be able to get enough worms for cows anymore so after you get a decent stack of worms in medium you should swap to a more optimal ‘exp gain’ spot which should be in easy mode.
Don’t forget that if you don’t have anything meaningful to upgrade in skulls and got a solid reinc % there – save the skulls for page 3 upgrades which last for whole ascension.
3-8-50 is certainly reachable after your next overnight of freeloader(maybe even earlier across your other short reinc path challenges) and unlocks final tab of the cow factory.
Last tab of cow factory for this Ascension has skull/confection exp which need 1m milk to start brewing
Hence if you are under ~1.3m – don’t bother hurrying up your progress.
I recommend starting with skulls, since it also improves how fast you can farm later stages via page 3 of skulls.
This is likely going to be doable on your next overnight freeloader run after having paths 2-6.
The reason why 3-7 is because it opens up a new stat, which is milk.
This means you can get T7 gear with 0 useless stats. And it’s a good point to update a T6 reinc set as well for the final time – upgrade it as high as you can, that’s your last use of T6 resource.
I overall recommend to ‘lock’ ANY item rating at this point for T7 since odds are low NOT to get both whack and reinc on it.
Also lock T8 pieces for the ones you miss as T7 which have all useful stats, you may have to use 1-2 as replacement for missing T7.
Try to combine your reinc T6 with whack as well.. you will likely be able to up this reinc/whack set to 29-39 if you were selling equip actively .
This is likely the last important equipment upgrade you will reach this ascension, so if you need to spend a bit extra time in reinc – don’t worry too much.
You might upgrade a set one more time or even reach the new calcium option in 3-9, but honestly at that point it will hardly make a difference, you are almost at an end!
Preparation to Ascension, Ascension information
So at this point you are likely to be RL around 2.5-2.7k and have the 3-7 set., the remaining progression can honestly be done with pretty usual reincarnations with residue > reinc node focus… you can’t really speed it up much beyond that since it’s already pretty fast, like 2 days left at most.
If you forgot – you likely can afford 3rd residue if you plan to do longer runs it’s 100% worth it. 3 residue + 8 reinc take 890 points with optimal route, easily doable by now.
It’s a good time to take a breather if you have been very active. Being active at this stage won’t improve your progress too much… minus maybe whack buff stacking since those can last long by now, esp if you upgrade whack time duration. They give a NEW multiplier so they are never a waste.
Even duration of reinc and classes you do doesn’t matter much.. as long as it’s not too much over ~8-10 hours. Almost everything will reset so there ain’t much point anymore trying to get more talent points and such. If you are ~ reinc 2.7k then ~8 hour reinc x2 might be all that you require, maybe even less.
You have insane milk gain so will gain all brewing to crazy high levels very fast and your equal spread will ensure you have great balance in everything.
I will list what to do before you reach Ascension:
1) In residue menu – buy all the QoL with ‘rocket’ on it. Inventory is up to you(you won’t be able to get more than 4/5, I personally calculated that I won’t get enough for inventory 4/5 so I just went all into reinc exp), all those stay after ascend.
2) In reincarnation talent menu buy all talents from ‘chill QoL’ corner from page 1 since those also stay after ascending.
NOT BUYING THOSE DURING A0 IS A WASTE OF REINC POINTS YOU COULD BE SPENDING INTO ‘INFINITE REINC SHOP’ WHERE YOU CAN PERMANENT INVEST THE POINTS STARTING WITH A1.
3) Ideally on last freeloader run before you reinc get your final Whack Set and try to make a good record. Whack high score stays over reinc and whack ‘best final score multiplier'(a combo of whack score and will be used by
I myself stopped at the 2-7 medium T6 reinc/whack set.. mine was enchanted to ~40 by the end.
4) Start saving souls since the best permanent purchasable will unlock: +25% item rating for 15k souls!
Not sure if this one will stay forever, but there was TheyKidnapedMe code for 5k souls which could be used after you hit ascension, covering 5 out of 15k.
When should ascending be done? Instantly when it becomes available, there is a bonus of 1 reinc point for next ascend if you overlevel by 50 reinc levels… which is obviously useless.
What ascend perk should I get?
The power level of perks is not too far from each other.
Worm breeding speed based on RL one is slightly more powerful for active playing.
It will reduce breeding time by half near RL ~1k and keep getting stronger. This allows you to get more larva passively and buy more cows earlier which in turn allows you to start milking/brewing//calcium’ing earlier which leads to your key progression.
Potato purchases not taking away potatoes are obviously good for getting all potato upgrades to same tier easier… but the main advantage is IMO for idle playstyles if you have auto potato improvement bought from soul shop for prem currency.
You will be able to reset ascend perk choices on next ascend so there is no harm in selecting one by the way.
What is kept on Ascension?
An easier question than what is lost, since it would be ‘everything else’.
1) Everything ‘whack’. Literally all of it, including high score and highest whack score% multiplier you reached(this is used so your manual is used with best combo of gear + score you had pre ascension until you surpass it)
This also means you can manual whack for a while without swapping into whack gear, which is a pleasant bonus for those who like whacking.
2) Residue bonuses marked with rocket
3) Page 1 ‘quality of life corner’ in reincarnation talent shop – except the ‘item rarity’.
4) 1 challenge instant completion. It will be 1 per ascension level(until all challenges are autocompleted), for A1 it will be the ‘adventurer’ one.
This means that challenge will be autocompleted at START of ascension, regardless of it’s unlock requirements.
5) Worm silk.. well.. yeah..(if you are reading this far after guide was posted then silk had previously 0 use)
6) Achievements – obvious, but this is very noticeable speed up to early progression compared to A0.
7) Pets are kept, pet ranks are kept, levels are reset – I wrote this before release of pets, so sorry if this is wrong but this is how dev told he plans those to work.
ONLY KEPT AFTER A1>A2 and higher ascensions:
Reincarnation Points are kept, hence you can keep RP to add in newly unlocked ‘infinity corner’ stats instantly.
What do you gain for ascension?
1) Reinc talent point AMOUNT gained +100% per Ascension(includes challenge completions)
2) Reinc ‘time’ multiplier +25% more effective per Ascension – essentially a direct boost to reinc exp gain.
3) Reinc talents which depend on ‘reinc points past X amount’ have improved scaling each Ascension, hence always remain must have.
4) ‘Unique permanent passive perk’ depending on ascension which remains with you forever.
The A1 perk for example is ATK/HP +50% and multiply improve this bonus by 10% each Ascension starting with A1.
You can read list of those in Ascend menu.
5) 1 Ascension Talent Point per Ascension – there is a list of purchasables talents you can buy from and what you spend can be reset each Ascension so there is no harm in selecting one and no need to ‘save up’ points.
6) Material conversion ratio improve by 0.5 – seems to be 1st ascend only.
7) Some things ‘unlock’ based on ascension number – mostly stuff that you have already seen locked in existing features/shops.. on top of that there is one more Soul Shop perma purchasable.
8) Final page of Reincarnation – ‘Infinity Corner’ unlocks which allows you to infinitely invest Reinc Points for some stat boosts. Those stat boosts are kept FOREVER.
9) Your ascension starts with all ‘Challenge’ auto completion rewards(RP from those are affected by +100% RP point amount bonus per ascension) and +1 for each excess 50 levels on your prev ascension(NOT affected by +100% reinc points).
So 3050 on A0 would result in start with 21 RP – 20 from ‘adventurer challenge(10+100%) and 1 from reaching 3050.
That’s it for Ascension 1.
1) Early progression becomes MUCH faster. Active playing during early ascension is highly profitable to reduce your total Ascension time.
2) Each ascension requires more and more Reinc levels which means you will eventually progress into higher zones than you didn’t visit before.
3) You have an ‘infinite purchase’ reinc point talent tab which makes you be more strict about your reincarnation point spending, so if main tab talent feels meh you likely better skip it in favor of permanently improving all future runs. Due to semi compounding nature those are effective per point for quite a while.
4) Ascension talent choice matters a lot the further you go and based on your playstyle can change your ascension time by DAYS. Pick smartly.
5) Shorter reincs and bigger early progress means your Gear upgrading is different from now on – you won’t have enough time to max 2 sets at same time efficiently for majority of the game AND your material convertion from now on should become much better making highest rarity equips upgradable earlier.
This results in reincarnation stat becoming useful on your gear on permanent basis.
Whack stat is IMO becoming a stat which you want to farm ONLY at the end of ascension for a huge jump in whack score and make do with whatever you have until then.
6) First few ascensions will be faster than 1st ascension. But with RL requirement rising each time you will eventually reach a point when it will become slower.
7) Biggest QoL is IMO ascension 3 reward which removes the need to do path challenges.
So after a1 you will still have to suffer 2 times doing path challenges but after that it becomes much more chill.
Thankfully a2/a3 are the fastest ascensions by far. A2 is fast since new boosts are so powerful compared to only a minor reinc requirement increase of under 1k RL. A3 since it can take best available talent with 2 points.
8) Currently ascensions are limited to certain amount, which means you are not intended to do them infinitely(at least for now)
Not too sure what dev will do to extend this type of playstyle. Currently once you reach ascension cap you have pretty much nothing left to do.
Not too sure if this also means that long term you want to actually spend longer time in A1+ to profit more from infinity corner.
9) Pay attention to Ascension rewards which give ‘keep X reinc shop layer’ – this means that the investment into those reinc talent perks becomes permanent and you should max them all out on the road to this ascension even if you usually skip those in favor of infinity corner.
Future ascension talent opinion:
Currently available ascension talents at the time of the guide and their costs + my ratings…
I will consider the ‘cost’ of perk in my rating on top of actual power of the perk.
Those might change since game is in active development.
Potato upgrades don’t take away potato – 1, 6/10 – great for idle playstyle QoL, but not as powerful as worms otherwise.
Worm Breeding faster based on RL – 1, 8/10 – powerful for active play allowing shorter reincs, cheap for how good it is. Faster worm breeding means more larva, more cows, more silk(might be important once it does something)…. Becomes stronger the higher ascension you aim at.
Semi – immortal poop(poop lasts across Reinc) – 2, 4/10 – a worse poop perk.. usually each further reinc will be giving more and more poop, low impact.
Super poop(poop is automatically used for every slot at full value) – 2, 7/10 – best poop QoL, forget it exists.
Milk timer faster based on RL – 2, 10/10 – top tier and a must each Ascension once you can get it… remember that this is also a RESIDUE gain increase. Becomes stronger the higher Ascension you aim at.
Skull upgrades don’t take away skulls- 3, 6/10 – another massive QoL for idle gameplay but 3 points is expensive.
Semi – Immortal Worms(stay across reinc) – 3, 3/10 – expensive and mostly eh, you will be spending worms on cows… keeping them between short reincs is nice, but 3 points is too much for that.
Cows don’t take away worms – 3, 1/10 – expensive… cow price increase is massive each time so you don’t save that much for what is a 3 cost talent. You also usually buy cows near end of reinc anyway.
A note on cows/semi immortal worms – those will be more powerful when paired together but that’s 6 points you could spend much better.. so likely you won’t use it.
Another interesting combo is semi immortal poop + super poop which synergize nicely.. but then again 4 points for one content is too much.
A1 – worm vs potato is IMO active vs idle gameplay with worms being stronger option if you don’t get much help out of idle potatos.
A2 – milk timer is the best perk, you should have already realized it by how important of a role it had in A0.
A3 – milk + worm breeding or potato.. active/idle yet again.
A4 – milk + worm breeding + potato upgrades.. poop is not much worse, but still worse than having both worm breeding and potato upgrades IMO
A5 – milk + worm breeding + super poop OR milk + skulls – honestly not too sure here, but I am more in favor of first option.
That’s as far as ascensions go at the time this guide is written.
Thanks for reading and enjoy your ascending!
Residue/Reinc node total talent cost cheat sheet.
Residue is always priority if you can get it before you reach a considerable slowdown in your run.
Reinc nodes are always 2nd priority.
I would say class exp/fighting effiency/skulls are next best options for leftover points.