General overview of recommended class builds, experience progression, and other tips for Gears Tactics
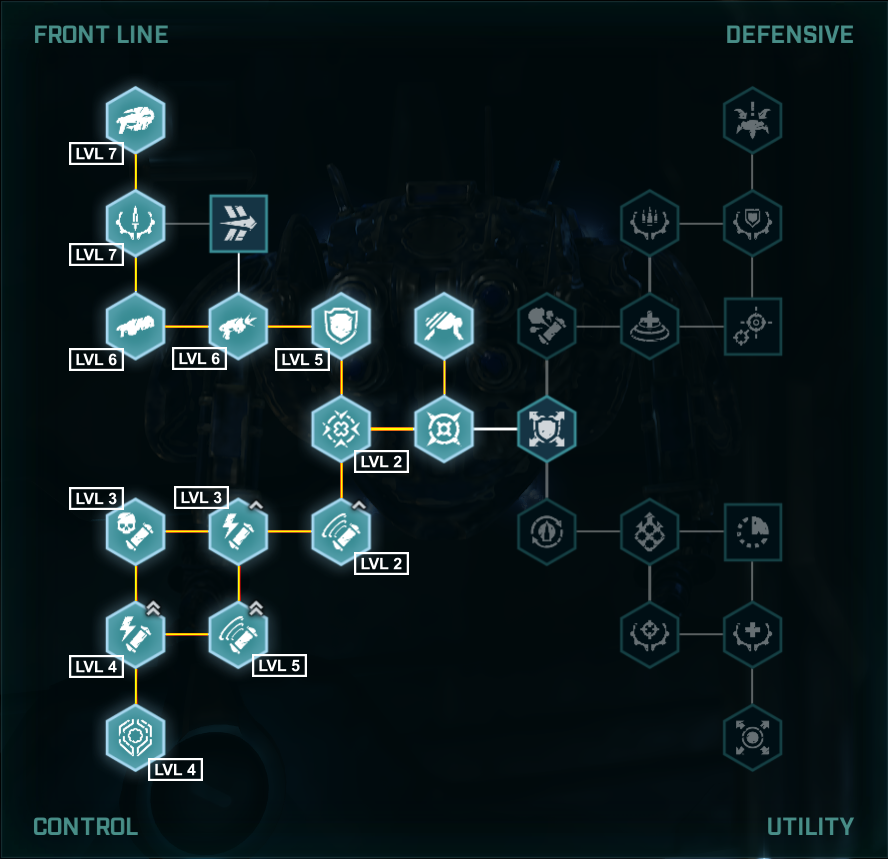
The Support
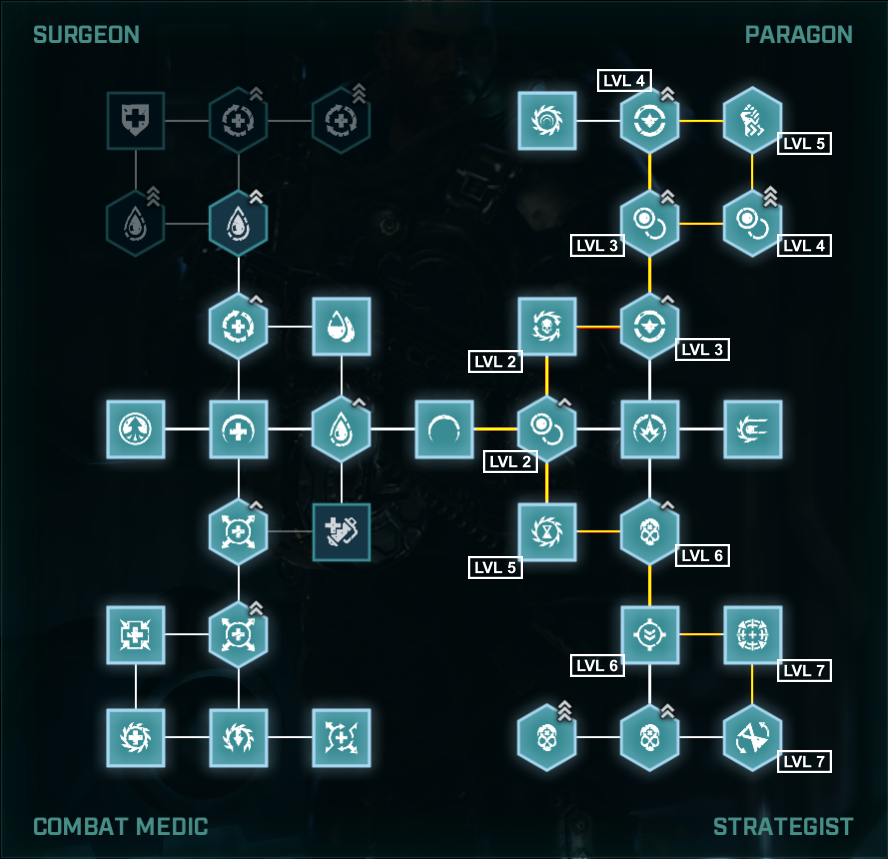 Max level skill tree with level 1-7 skill progression labelled.
The Support class is a force multiplier for any squad due to its Paragon skill tree, which gives it access to skills like Empower, Teamwork, and Lock & Load.
This is also the only skill tree, which has any worthwhile investment on higher difficulties. Healing skills & passives have severely reduced value when enemies can essentially one-shot you. It’s usually a better idea to clear out enemy waves quickly rather than extending the firefight by healing. Thus, the Surgeon and Combat Medic trees can be safely disregarded.
The recommended skill progression is to immediately work towards Empowered (LV3) and Teamwork (LV2). This will provide you free AP for you and your allied units nearly every turn, especially when paired with equipment mods that reduce or refresh cooldowns. Afterwards, you should progress towards the Surge skill in the Strategist tree to provide further opportunities for AP gain.
In short, a Support’s role is to spam Empowered and Teamwork to ensure that your damage dealers, like Scouts and Snipers, can clean up enemy waves by themselves.
For your gear & weapon mods, you should prioritize cooldown reduction, refresh, and AP gain.
+15% Crit Chance
+25% Crit Damage
+10% Crit Chance
+2 Ammo
Critical Disruption: When this unit hits an enemy with a Critical Hit, the target is interrupted.
Expertise – Skill cooldowns reduced by 2.
+100% Crit Damage
Cleave: This unit’s successful Chainsaw Attack counts as an execution and reduces this unit’s skill cooldowns by 1.
+10% Evasion
Optics: +10% Crit Chance. When targeting units out of cover, double Crit Chance.
+20% Evasion
Potential: At start of turn, get 100% chance to have a random skill cooldown reduced by 2.
+20% Evasion
Glory: When executing an enemy, get 100% chance to reduce skill cooldowns by 2.
The Sniper
 Max level skill tree with level 1-7 skill progression labelled.
The Sniper class can single-handedly decimate waves of enemies. They use their skills to chain together kills that in turn refresh the skills! It is recommended that you heavily spec into the Hunter tree as the more Action Points you can generate the better. The skills you want to prioritize are Second Chance, Fast Fingers (LV2), Chain Shot (LV2), Ultimate Shot. This provides your Sniper a plethora of AP and opportunities to mitigate any shot RNG as well.
Most encounters will begin with your Sniper using Chain Shot to initiate, Fast Fingers when you run low on ammunition (note that Fast Fingers can proc Active Reload if it’s the final bullet), and Ultimate Shot whenever you run low on AP. Additionally, Second Chance ensures that any untimely misses allow you to retry a skill at least once. Furthermore, combining the Support class’ Empower and Teamwork will allow your Sniper to continue popping heads as needed.
For your gear & weapon mods, you should prioritize cooldown reduction, refresh, and magazine size.
Bloodlust: Shots heal 50% of Damage. After kill, all cooldowns reduced by 1.
+80 Damage
Onslaught: When this unit hits an enemy with a Critical Hit, heal this unit for 20% of it’s Maximum Health.
+20% Crit Chance
+200% Crit Damage
Impact: When this unit hits an enemy with a Critical Hit, the target is knocked back.
+10% Evasion
Optics: +10% Crit Chance. When targeting units out of cover, double Crit Chance.
+20% Evasion
Potential: At start of turn, get 100% chance to have a random skill cooldown reduced by 2.
+40 Health
Magazine Extension: +3 Ammo Magazine Size
The Scout
 Max level skill tree with level 1-7 skill progression labelled.
The Scout class is arguably the strongest unit in the game. It has the capability to solo any mission with ease if you have the necessary equipment mods (mainly the entire UIR armor set). This is solely due to the class’ access to consistent frag grenades. Frags are by far the most powerful weapon in your arsenal as they have 100% accuracy, deal major AOE damage, interrupt enemy overwatch & pins, and knock targets out of cover.
Although, a frag-oriented build means that only the Commando tree is viable as any gnasher-related skill trees are lackluster in comparison. You should prioritize Frag Grenade Mastery and Proximity Mine LV2 to maximize your explosive capabilities. Additionally, look to pick up the Exertion LV2 skill node for the free 2 AP gain (the health cost is negligible).
A high level Scout will be able to run around the map gibbing enemies with buffed frags and cloaking out of any dangerous situations; all in a single turn!
For your gear & weapon mods, you should prioritize grenade cooldown reduction, refresh, and other grenade-related buffs.
Expertise: Skill cooldowns reduced by 2.
+1 Movement
+1 Ammo
Punisher: When this unit Executes an enemy, heal this unit for 20% of its Maximum Health.
Flatliner: After kill, get +100% Crit Chance for turn.
+1 Movement
Light Build: On move, +10% Accuracy for turn.
+20 Health
Blast Zone: +50% radius on Grenade effects.
+40 Health
Grenadier: +50% to Frag & Stim Grenade effects. When using Frag or Stim Grenade, 20% chance to refresh Grenade cooldowns.
+40 Health
Utility Belt: Frag & Stim Grenade cooldowns reduced by 4. The first time using Frag or Stim Grenade per turn, get 1 action.
The Heavy
 Max level skill tree with level 1-7 skill progression labelled.
The Heavy class excels for specific requirements but is relatively lackluster in every other situation. The most effective usage for the Heavy is as a “Overwatch Bot”, which means you will invest heavily into the Defender tree for skills like At the Ready, Suppressing Fire, Quick Overwatch, and Slayer. All of these abilities enhance your Overwatch ability. Eventually, you’ll look to grab Enhanced Anchor, Heat Up, and Ultrashot as they do provide an overall projected damage increase.
The Heavy’s high projected damage is balanced by its low accuracy, which is why Overwatch is such a critical component of its effective use. This also means that the Heavy is relegated to basically just Control missions as they can successfully hold down a point with their massive mag size and zone control. Missions that require high mobility and relocation prevent the Heavy from gaining Anchor stacks and making use of its Overwatch choke points.
All in all, the Heavy is definitely one of the stronger classes but ultimately with limited viability in most situations.
For your gear & weapon mods, you should prioritize Overwatch buffs, AP generation, and magazine size.
+80 Damage
Onslaught: When this unit hits an enemy with a Critical Hit, the active weapon is reloaded.
+3 Ammo
Barrage: This unit’s Overwatch shots get 20% Damage.
Overlord: This unit will reload during Overwatch. Entering Overwatch refunds 1 action to this unit.
+15% Crit Chance
Critical Overwatch: This unit’s Overwatch shots can be Critical Hits.
+10% Evasion
Optics: +10% Crit Chance. When targeting units out of cover, double Crit Chance.
+20% Evasion
Blitz: When not taking shot on turn, get 100% chance to get 1 action at the start of next turn. When Blitz is triggered, there’s a 20% chance a random ally will get 1 action.
+40 Health
Magazine Extension: +3 Ammo Magazine Size
The Vanguard
 Max level skill tree with level 1-7 skill progression labelled.
The Vanguard class is regrettably the weakest unit type in the game. It’s true that the projected damage output of the class is comparable to the Sniper but its non-existent effective range reduces the consistency significantly and a misfire usually means an immediate death. Indeed the Vanguard is supposed to act as a close-range tank unit; shrugging off hits and doling out punishment. But on higher difficulties, the hefty damage reduction really only turns that one-shot into a two or three-shot death.
Nonetheless, speccing into the Shock Trooper tree for Bayonet-related skills, Intimidate, and Breach makes for a sometimes useful unit. If your Vanguard survives the initial crossfire, they’ll definitely be able to return the welcome or at least allow your other squad members to mop up.
For your gear & weapon mods, you should prioritize cooldown reduction, refresh, and Crit-related buffs.
+100% Crit Damage
Overpower: This unit’s successful Bayonet Charge reloads its Primary Weapon and this unit gets 20% Damage Reduction for the rest of the turn.
Flatliner: After kill, get 100% Crit Chance for turn.
+150% Crit Damage
+100 Damage
Hot Swap: When this unit uses the Reload ability, its next shot gets +50% Damage.
+10% Evasion
Advanced Optics: +50% Crit Damage
+20% Evasion
Potential: At start of turn, get 100% chance to have a random skill cooldown reduced by 2.
+20% Evasion
Glory: When executing an enemy, get 100% chance to reduce skill cooldowns by 2.
Jack
 Max level skill tree with level 1-7 skill progression labelled.
Jack is a unique “class”, being the only robotic unit in the game. As such, they play entirely different than any other unit as well.
In my opinion, Jack’s most useful ability is to Cloak and zoom around the map collecting loot boxes, scouting, or triggering interactables. Basically, you get a free unit that does all the busy work so your squad can deal with the enemies.
However, they can provide offensive capabilities through the Control tree, which allows you to shoot capsules to shock, poison, or debuff enemies. Additionally, Hijack is a powerful, albeit high cooldown, skill that lets you control an enemy to fight for you. It’s always fun to have an opportunity to play as an enemy unit and it can turn the tide for any outnumbered situations.
Although it’s overkill, I do wish that Jack’s Explosive Hijack ability from Gears 5 was included but I fully admit that it would be an unnecessary power-creep addition.
Jack can also spawn reduced-ammo boomshots and torque bows for your units, which is just icing on the overpowered cake.
Experience (XP) Progression
 Squad up!
The level cap for all units is 15 (except for Jack who is capped at level 7). A rule of thumb is that your hero units will typically reach the end of the campaign around level 5-6. Additionally, try to prioritize their leveling during the campaign as they are often a required unit for story missions.
XP is gained by completing missions and killing enemies. A successfully completed mission awards a flat amount of 250 XP to any surviving units. Further XP is awarded to specific units depending on the amount of kills they personally achieved.
Kill XP is detailed as follows:
- An enemy kill is worth 50 XP regardless of unit type or kill method. For instance, a Boomer kill is worth the same amount of XP as a Ticker.
- Enemies that are killed due to the downed turn timer do not award XP.
- Executed enemies do not award XP. However, using the bayonet or chainsaw skills on a downed enemy will count as both an execution and a kill. Thereby giving both the execution AP bonus and the 50 XP gain for kills.
- Units receive a 900 XP bonus around every 20 kills.
Rescue Mission XP
It should be noted that, during a Rescue mission, rescued recruits do not gain any XP from the mission they are rescued from. As such, try to reduce the amount of kills performed by a rescued recruit unless necessary. However, Marcella and Tyrone, rescued during Act 1 – Chapter 2, are an exception to this rule.
Farming & Maximizing XP
- Control and Rescue type missions will continuously spawn enemy waves every two turns for farmable XP.
- E-holes will spawn 3 waves of additional enemies for further XP before automatically closing. Additionally, e-hole spawn locations are scripted and will always be the same for each playthrough.
- During the tutorial mission (Act 1 – Chapter 1), all enemies can be killed by gunshots, except for the single enemy where you are prompted to perform an execution. Also, the 3 wretches that are killed by the Overwatch tutorial do not award XP. Note that skipping the tutorial will promote both hero units, Gabe & Sid, to level 2 but you actually get more XP by playing the tutorial.
Enemy Priority
On lower difficulties, enemies can usually be picked off at your leisure. But higher difficulties, like Insane, require immediate suppression or elimination of spawned enemies. The following table outlines a recommendation of enemy target priority.
Additionally, their tankiness requires you to quickly focus them down before they push up close. If you can’t deal with them immediately opt to slow their movement with skills like the Heavy’s Suppressing Fire.
Additionally, the torque bow has a surprising amount of range; rivaling the Locust Sniper’s longshot when RNG decides to forsake you.
Disciples are slightly tougher and more aggressive with their only major difference being the poison debuff on death, which is not much of a deterrent.
Miscellaneous Tips
 Best laid plans…
Missions
- Campaign side missions will always have the same mission type and modifiers each playthrough but the physical map will change. For instance, the final story mission will always be preceded by a Scavenger side mission with the 2 AP debuff modifier.
- Enemies will not push forwards during Sabotage, Incursion, or Rescue missions until they have been revealed by your units in the fog of war.
Barracks
- For easier Barracks organization, try renaming your recruits’ first names to their class. For example, renaming “Marcella “Specter” Trinh” to “Scout “Specter” Trinh”. This is useful as the Barracks is currently default sorted by level then alphabetically by first name.
- Recruiting and then dismissing a new unit will remove all of their equipment and transfer it into your inventory.
- The snub pistol has an upgraded Common variant and a Rare variant but neither appears as a loot drop. Instead, they only come equipped on new recruits.
Overwatch
- Stagger you units’ Overwatch rather than overlapping them as it prevents a single enemy from triggering every unit’s combined fire, which reduces wasted shots and maintains the Overwatch perimeter.
Frag Grenades
- Planting a grenade and throwing a grenade have separate cooldowns.
- It usually takes 3 total AP to plant a grenade. 1 AP to move to a location, 1 AP to plant, and 1 AP to relocate out of the blast zone.
E-holes
- Enemies that exit an e-hole can move and shoot on the same turn as opposed to a Reaver drop, where they can only perform non-damaging actions.
Snub Pistol Usage
- Swap to your pistol if an enemy has low enough health for it to be a kill shot as the pistol usually has higher accuracy compared to other weapons. This saves ammo on your primary weapon and increases the chances of downing the enemy if you are aiming for an execution chain.
Weapon Effective Range
- You can determine a weapon’s effective range by using the line of sight indicator (the white UI line that extends from your selected unit towards potential targets). A solid white line means that you have a clear shot but a dotted white line means the target is out of range.
- The solid line will occasionally have a line marker on it. If you see the marker, it means that your projected shot will have a range penalty applied. The further the target, the higher the penalty.
- However, if you do not see the marker on your sight line, then you are within the weapon’s effective range and will receive no range penalty.
Modding Recommedations
 What’s Next?
Replayability is a big factor in my enjoyment of a game. So I always appreciate it when there’s opportunities for accessible modding.
You currently aren’t able to modify UI or visual features but you can easily adjust values (e.g. lootbox rarity, enemy spawns, and equipment stats) by accessing the game’s Excel sheets.
I personally recommend the following mods to enhance your experience after you’ve played out the base game.
Ukkon’s Wrath[www.nexusmods.com]
If you ever felt that the enemy density was sparse, then this is the mod for you! It heavily increases the total amount of enemy spawns and unit variety for every mission. Face the full force of Ukkon’s monstrous army.
Lootbox Enhanced Plus Supreme[www.nexusmods.com]
This mod adjusts the Supreme mod drop appearance and increases the rarity of overall lootboxes. Super helpful since Jacked mode has severely neutered the drop appearance of Legendary equipment in Veteran missions.
Modding Excel Guide[www.nexusmods.com]
If the previous mods don’t meet your needs. Try customizing your own values to curate the most enjoyable experience for you.
Otherwise, feel free to browse mods created by other members of the community here.[www.nexusmods.com]