Basics, resources, mechanics, endings, note locations, daily routine to stay alive.
Starting the game
When just starting out, you might have no idea how to survive. This guide offers some explanations for the game.
The entire guide is kinda one big spoiler as it explains a lot of stats/mechanics. If you’ve tried the game and/or are in need of some clarifications, feel free to continue reading~
The major spoilers are the last sections about the endings for Route_A and Route_B and the notes location section.
Changing language
Title screen — bottom left, two icons allow you to change between Japanese or English language.
Note: Some dialogues in English might seem a bit off, but the translation is OK in my opinion.
Note 2: as the time of the game release some notes you found during explorations are not fit on the screen. You can read the note in a separate guide.
Scenarios (Routes A and B)
If you’re just starting out I recommend to start with the Route A.
Route B:
- Significally harder, has heavier encounters, thus requiring more game experience;
- Twice as long as the Route A;
- A lot more depressing
Just get familiar with the game in the Route A, and when you’re done you can aim for the highscore in the Route B.
Action Points explained
You start every day with 2 Action Points. Performing actions will use up 0, 1 or 2 Action Points.
- Binoculars and mouse trap use 0 AP.
- Hammer and bat use 1 AP.
- Map and rest use all the AP (either 1 or 2 remaining AP).
After you’ve used your Action Points, the night comes. At night mobs try to break into the house, dealing damage to your rooms. You cannot take actions during the night. Then the next day starts.
Saving progress
To save the progress go to the leftmost room with a broken mirror and click the note icon in the bottom right corner of the screen.
You can check this guide for visual reference.
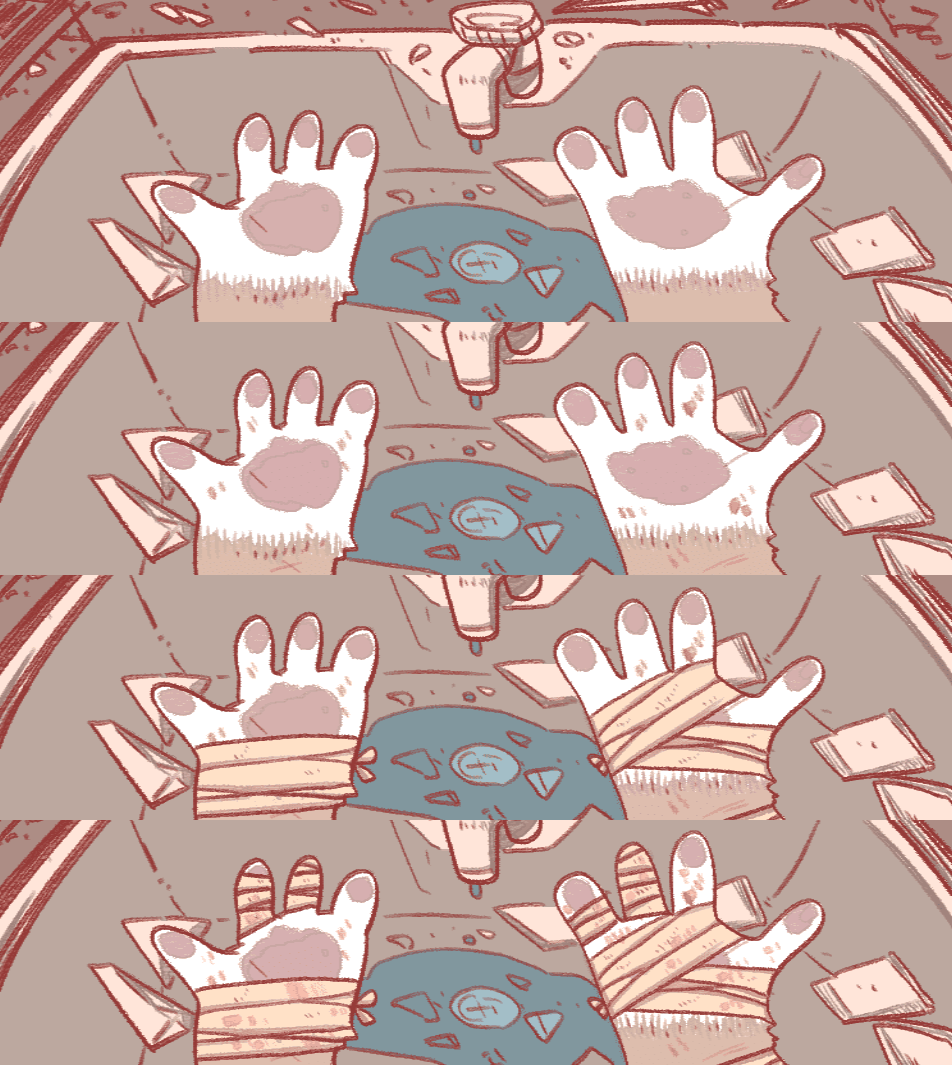
Stats: Sunny’s health
- Visually indicated by the hands’ state.
- Food is required to recover health.
- You do lose some health overnight from mob attacks.
- The overnight breach event deals damage to Sunny.
- The claw marks all represent damage to Sunny and nothing else.
- Location: the leftmost room with a broken window.
Has 4 states:
- Clean
- Spotty
- Bandaged
- Extremely bandaged. Going beyond that will lead to a bad ending
Resources: Food
- Food is required to recover Sunny’s health.
- Increases when exploring the map. Also increases a bit when cleaning the mouse trap.
- It’s better to keep it at max at all times.
- The yellow mob attack at night and mice event will decrease the food stocks.
- Location: the left room.
Has 4 states:
- 4 bottles
- 3 bottles
- 2 bottles
- half a bottle. Sunny won’t recover any health. Stay hydrated. This is a threat.

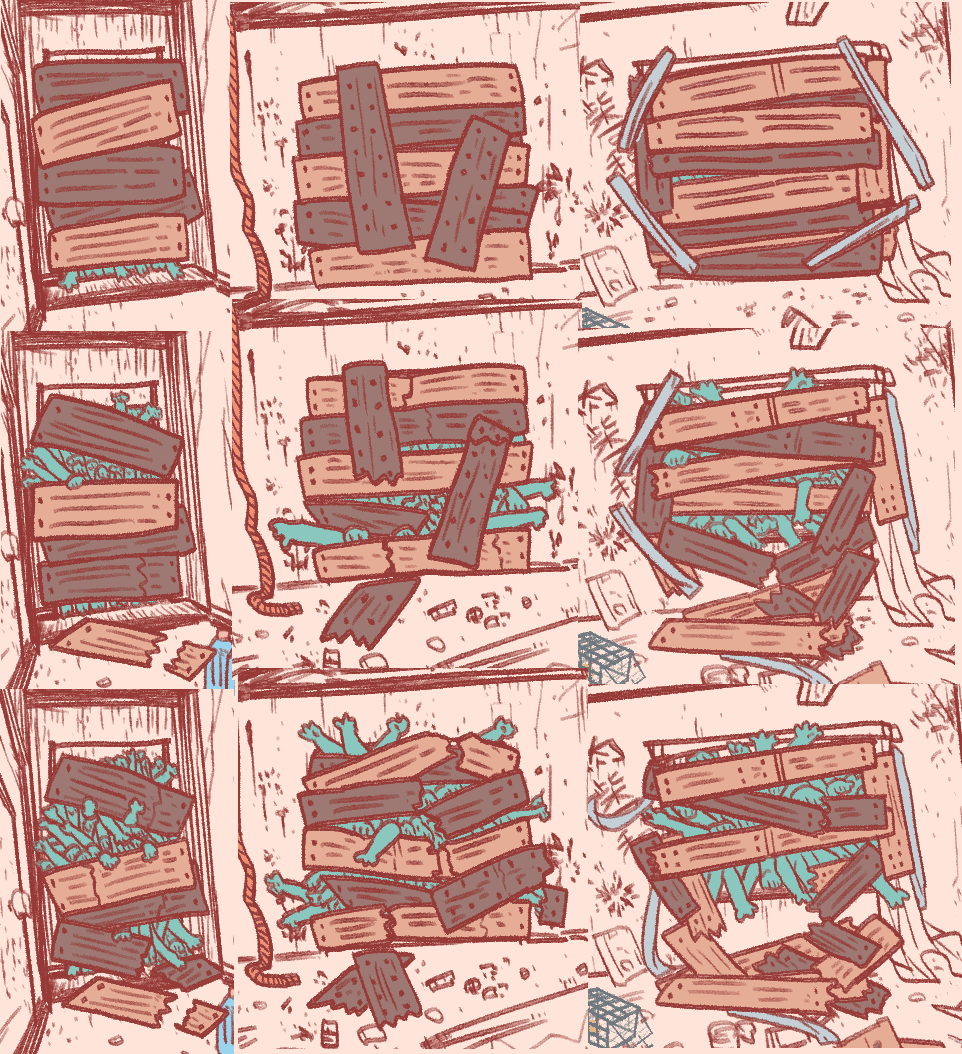
Stats: Room health (repair state)
- Total three rooms, each has one window.
- Rooms will take damage at night from the mob attacks.
- Rooms do not take any damage during the day.
- Sometimes rooms will take some additionial damage from the overnight events.
- Each colored mob does a different amount of damage at night.
- Seems like you can fortify beyond what is visually presented as max.
- You can fend off some mobs to prevent/reduce damage, see the bat section.
Each window has 3 states:
- Repaired
- Broken a bit, green hands are breaking in
- Half broken, a lot of mob hands are breaking in. Going beyond that will lead to a bad ending
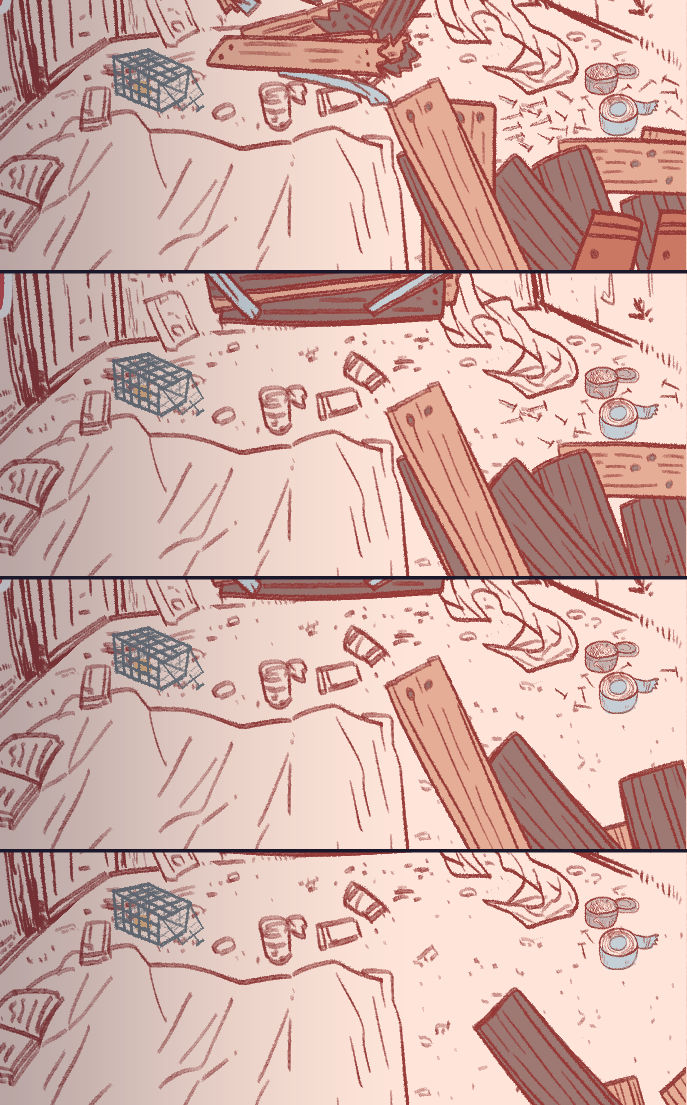
Resources: Building materials
- Affects the ability to repair the windows.
- If materials are low, it will take 2 times to just fix a single window state, meaning the mobs will break in faster than you will fix the windows and that will lead to a broken window and a bad ending.
- If you have enough materials you can fix one window to max with just one action.
- It’s better to keep it at max at all times.
- Location: the right room.
Has 4 states:
- Planks
- Less planks
- Even less planks
- Almost no planks (no repair power, hammer 2 times just to fix a single stage of the window)
Basic operations and Action Point cost
The basic controls of the game are presented below. For more details see the individual sections.
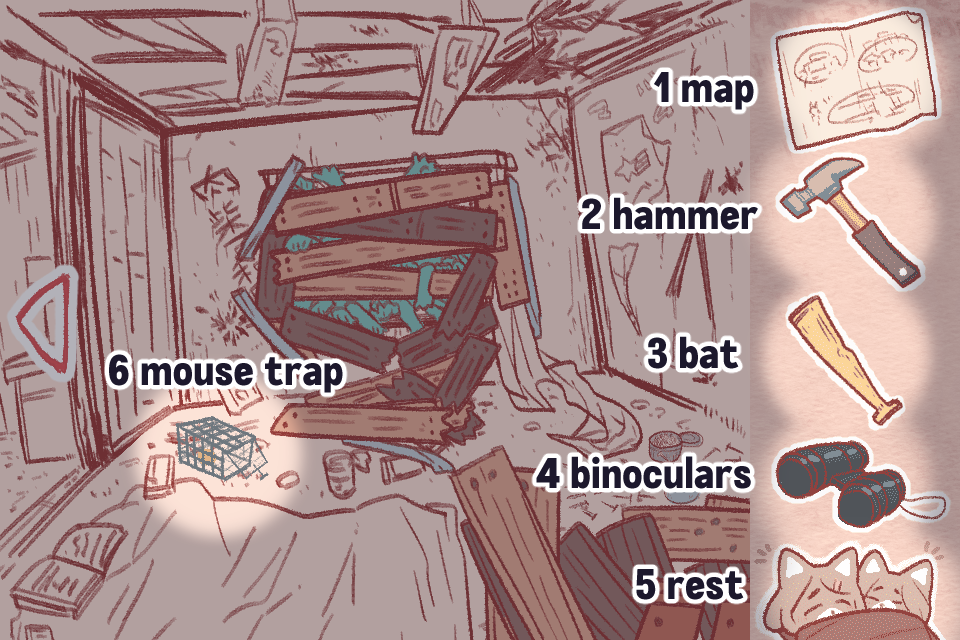
Map / Exploring
- Costs all the remaining Action Points. You can use hammer once before exploring to avoid spending 2 Action Points on exploration.
- Using 1 Action Point before exploring does not seem to affect the exploration results.
- Always use binoculars before exploring. This will allow you to estimate the amount of damage Sunny will take when exploring since each mob does a different amount of damage.
- You get food and materials when exploring.
- Sometimes you will find notes (see the events section)
- There are 3 possible locations to explore.
Location info based on observations:
- Top-right: more material oriented
- Top-left: more food-oriented
- Bottom: the only location that seems to possibly get you two stacks of both, but there is probably a downside (higher chance of encountering rioters perhaps)
Hammer (repair)
- Costs 1 Action Point.
- Repair a broken window or fortify a fixed window.
- 3 repair stages per window.
- When no sufficient amount of building materials is present, it takes 2 actions just to fix a single stage.
- You can fortify more than what is visually presented as the max stage. This is crucial for fending off sequential blues and blacks.
- When going out, it is best if you cyclically fortify one window before doing so, since exploring will take up all the remaining Action Points.
- All windows should be at max if you are not going to fend off blue or black (see the bat section)
Bat (fending off the mobs)
- Costs 1 Action Point.
- Scare zombies away and reduce the room damage.
- Drains small amount of Sunny’s health, around as much as green damage per use.
- When used once, generally fails to do anything.
- When used twice, 100% fends off anything up to blue overnight.
- When used twice, fends off black and red about 50% of the time (it’s advised you save the game before taking the risk)
When successfully fended off the mob:
- No room damage/minimal room damage at night.
- Sunny does not take damage overnight (she already got some damage swinging the bat)
Each bat hit will add 1-2 “fend off” points. Purple and blue will do reduced room damage at 2+ points. Red and black require 3+ points for that, meaning you have to do 2 successful bat hits.
Binoculars
- Costs no Action Points.
- Can be used whenever you want during the day.
- You can see the mob you will have to face when exploring/sleeping today.
- The mob does not change for the current day. You can use hammer and then explore, it will still be the same mob you observed.
Rest
- Costs all the remaining Action Points (instantly ends the day).
- Allows Sunny to recover health.
- Using rest with 2 Action Points is not much more effective than using just 1 Action Point: 2 AP will heal 4-6 HP, 1 AP will heal 3-6 HP. It might be better to use hammer before resting.
Mouse trap
- Costs no Action Points.
- On some days you will find a mouse in the trap.
- When full, the trap can be cleaned up.
- Emptying it somehow adds a bit of food and Sunny’s health.
- Check it once every day, don’t forget to empty it when it’s full to prevent the mice overnight event.
- Emptying it does not completely prevent the mouse event.
Mobs / Colored zombies
You can check what mob you will encounter today with the binoculars.
- If you explore, Sunny will take some damage from the mobs.
- At night the mobs will attack you. Windows will take some damage.
- Additionally sometimes Sunny will also take some damage at night.
- Exploring does not prevent the overnight window damage.
- You can fend off some mobs, that might prevent/reduce the room damage at night (see the bat section)
Overnight events might still happen.
Either weak or medium damage to each window (when fended off)
OR heavy damage to one window, weak damage to the other windows.
Events
These can happen while exploring.
- Notes give you lore/hints and some bonus food/material.
- You can find them on a certain day on a certain map spot. See the Notes location section for a full list.
NOTE: If you’ve found a note and it does not fit the screen (you see the note partially) you can ctrl+f it in this guide.
- Additional black mobs that are sometimes encountered during exploration.
- They deal additional black (heavy) damage to Sunny.
- There are 3 possible encounters, each has their own image.
These happen at night after the mob attack.
Event
- Check all rooms and get rid of mice.
- If blue or black, use bat twice and end day as much as possible. save before fending off black.
- If yellow green red or purple, hammer one window and go out.
- If at worst health, hammer one window and sleep.
- Safest time to overwrite a save is the beginning of a yellow day.
- The visual representation of any stock or status isn’t a reliable unit of measurement. Just keep everything max.
Endings | HEAVY SPOILERS PAST THIS POINT
Route A and Route B both have 2 possible good endings – the default and the alternative ending. Each ending is different.
If clear condition for the alternative ending is not met, you’ll get the default ending.
Hint for the default ending: survive until the end
Hint for the alt ending: stay alive and explore a lot
Notes: Route A alt ending is pretty easy to miss.
Good endings list:
good_end…[meshe]
end…[baseball]
good_end…[sea]
good_end…[boat]
Good ending conditions:
See the section below for details.
just stay alive for 87 days
just stay alive for 197 days
Bad endings (any route):
Route A alternative ending conditions
These have ‘From Meshe’ or ‘From Meche’ or ‘メシェより’ in Japanese version at the end of the note.
Explore a certain spot of the map on a certain day to collect the Meshe notes.
I’m going to go somewhere else.
But I can’t carry all my stuff.
I found this note.
I don’t know who it is. Use it as you see fit.
From Meche.
ぼくは他へ避難するよ
でも全ての荷物は持ちきれない
このメモを見つけたのが
誰だか知らないが 好きに使ってくれ
メシェより
I really don’t have time for this.
I’m going somewhere else.
I’m going elsewhere.
You found this place, use the supplies.
From Meche.
そんなことしてる場合じゃないよ本当に
ぼくは他へ行くよ
ここを見つけた君、物資を使ってくれ
メシェより
Anybody.
Use it.
From Meshe.
誰でもいい
使ってくれ
メシェより
From Meche.
メシェより
Route B alternative ending conditions
Note number correspond to the note number from the guide.