A guide on how to complete the side-quest for each Incarnation. Each character will list the locations you have to visit next to their names so you can appropriately plan what order you want to do the side-quests in. There is also a reward for completing every side-quest, which will be listed at the conclusion of this guide as to not spoil those reading the overview. Most of these side-quests will probably at some point delve into spoiler territory, and I’m not going to go through and spoiler every other word, so read at your own risk.
Baozhai (Iron Kingdom, Tai Krung)
When going back to the Iron Kingdom and asking Princess Mary, she says her father did soul transposition experiments even before she did, and Barbarossa’s soul was probably in a robot somewhere in the factory.
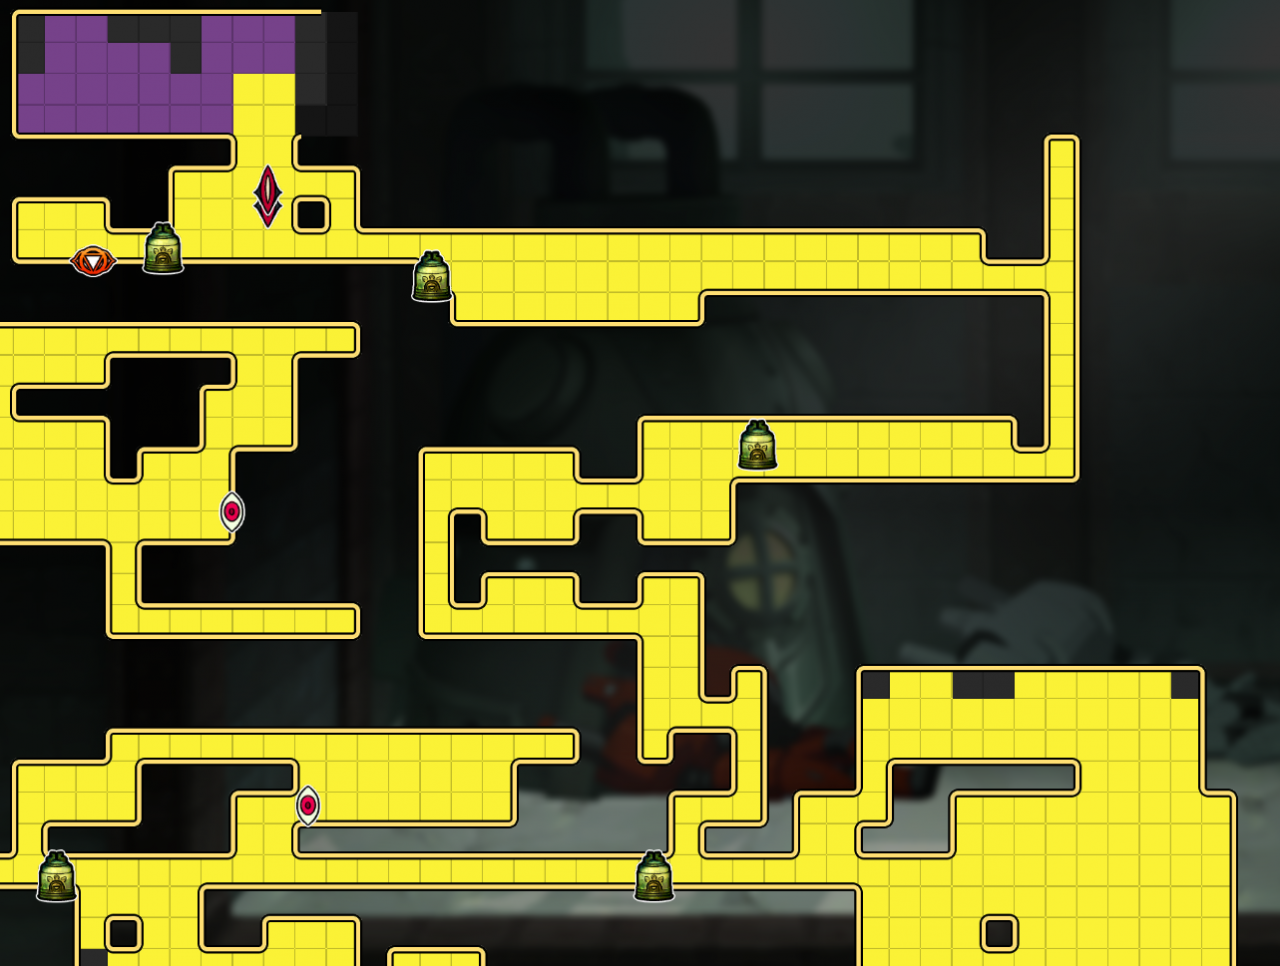
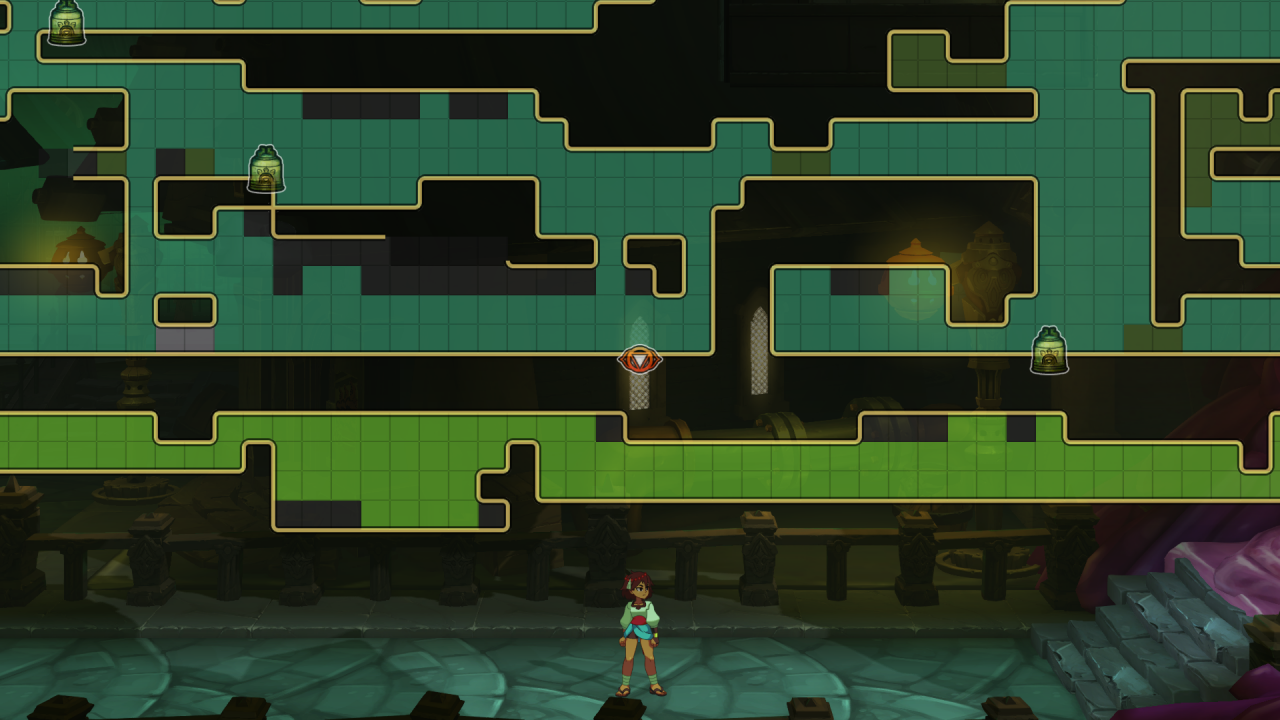
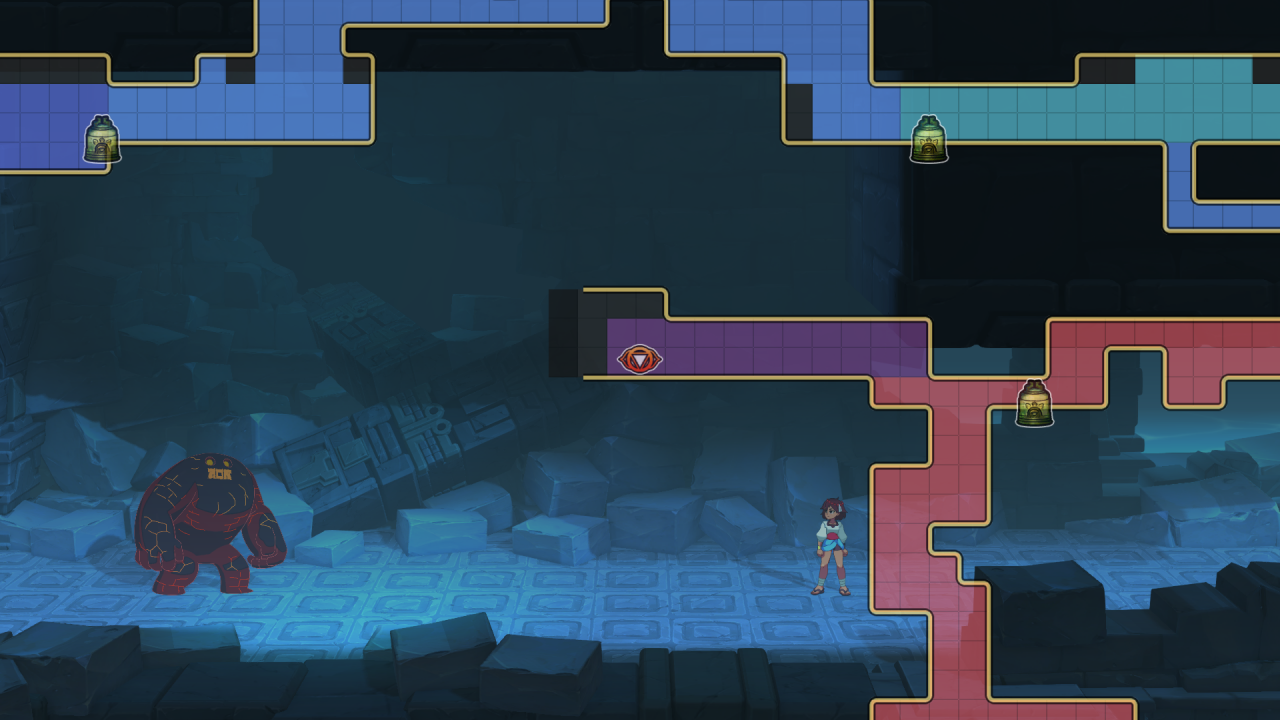
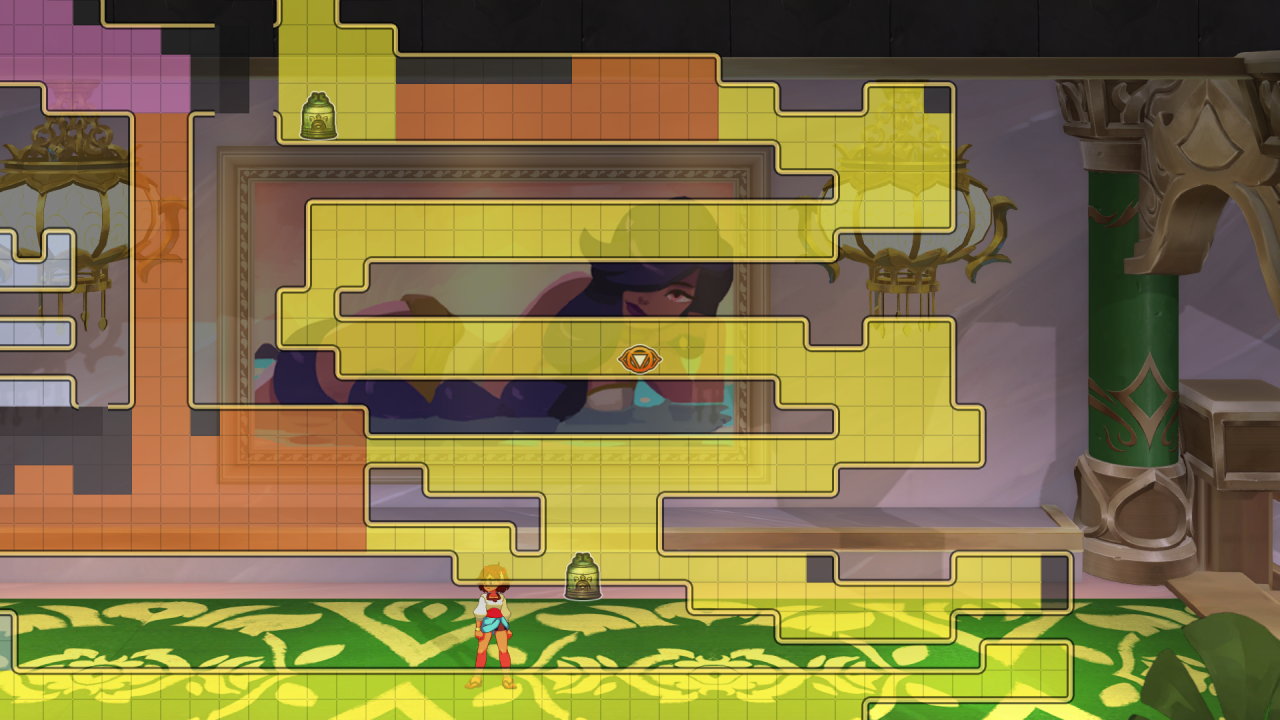
From the factory’s main room, traverse through like you’re going to the Slime Queen boss arena again, but right before the smokestack, take a left (shown on the map here):
 Here you’ll find and fight a red robot with Barbarossa’s soul in it, and he’s angry.
Once defeated, Thorani suggests you bring his soul to the Ocean of Milk so he may rest. You do so by travelling to the Tai Krung ohma basement and going to where you find Thorani after re-visiting Tai Krung for the first time. Baozhai and Barbarossa get closure, Thorani suggests they talk over drinks, and Baozhai’s side-quest is complete.
Ginseng & Honey (Tai Krung, Port Maerifa, Kaanul)
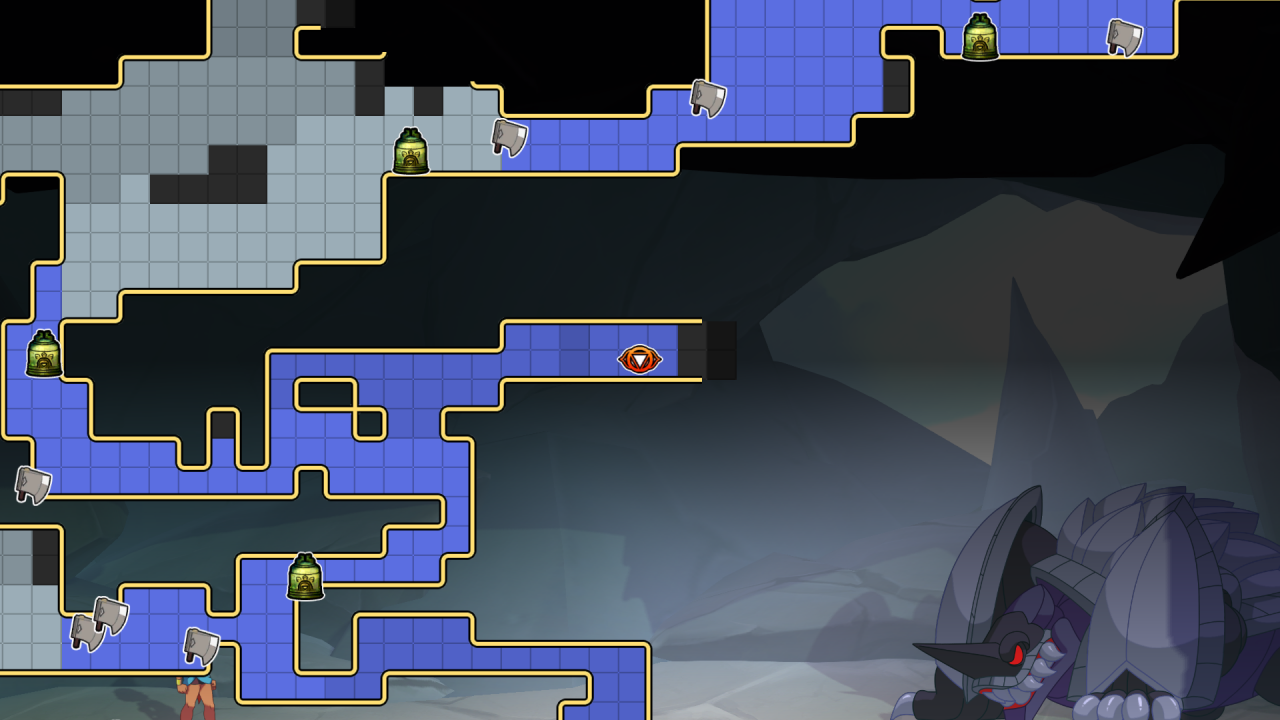
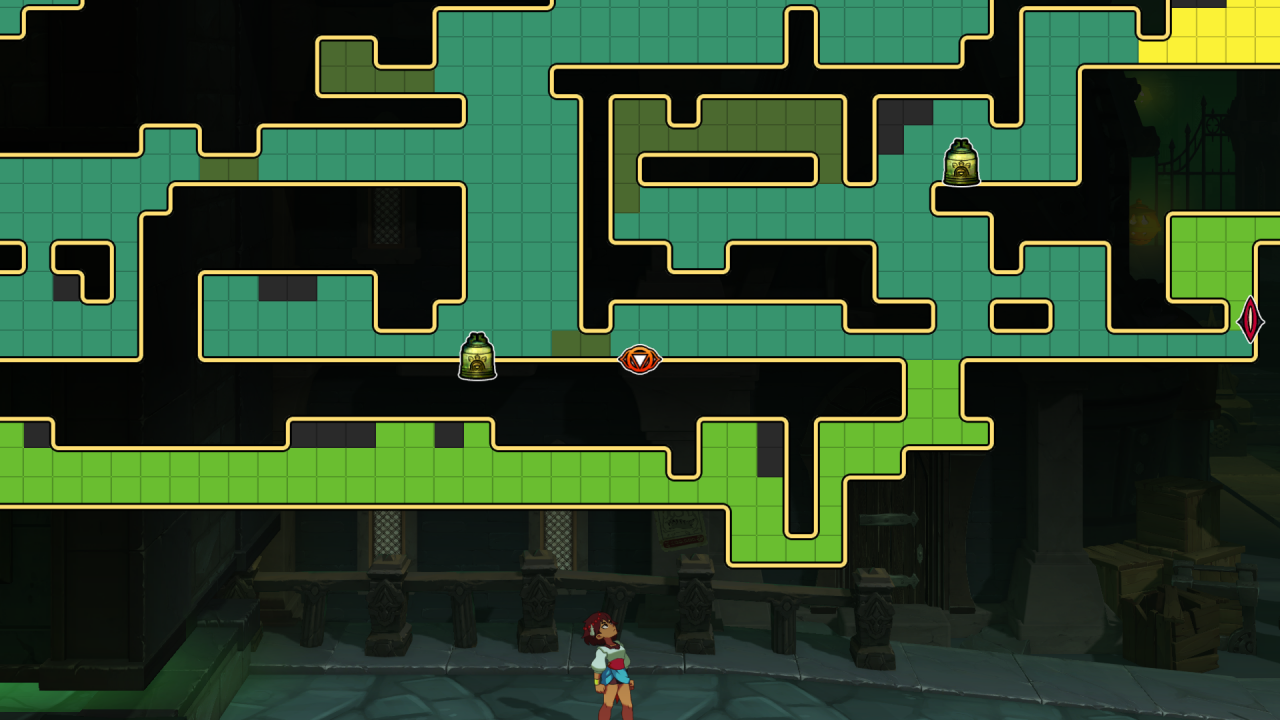
She says when she was a kid 16 years ago, she saw them sometimes near monsters in an eastern cave, and when travelling to this eastern cave, you’ll fight a blue and orange monster (located on the map below):
 Once defeated, Ginseng will look around for a bit and find a frozen mushroom, and then suggests they wait for it to thaw at their parents house in Tai Krung.
Once you reach Ginseng’s parents, you find out that Ginseng has already started thawing the mushrooms and there are now mushrooms growing in your brain. Ginseng pulls two mushrooms out and feeds them to their dad, who immediately starts feeling better cause of the mushroom’s potent healing powers and from Ajna’s iddhi that helped thaw them. Ginseng gives another to their mom, and asks to return to the Tower of Wisdom to give some to Angwu. She archives it in her database, and Ginseng names it after Ajna: Cordyceps Ajna. And with that, Ginseng’s side-quest is complete.
Hunoch & Xiboch (Kaanul)
Kampan (Port Maerifa, Almutah Sands, Iron Kingdom)
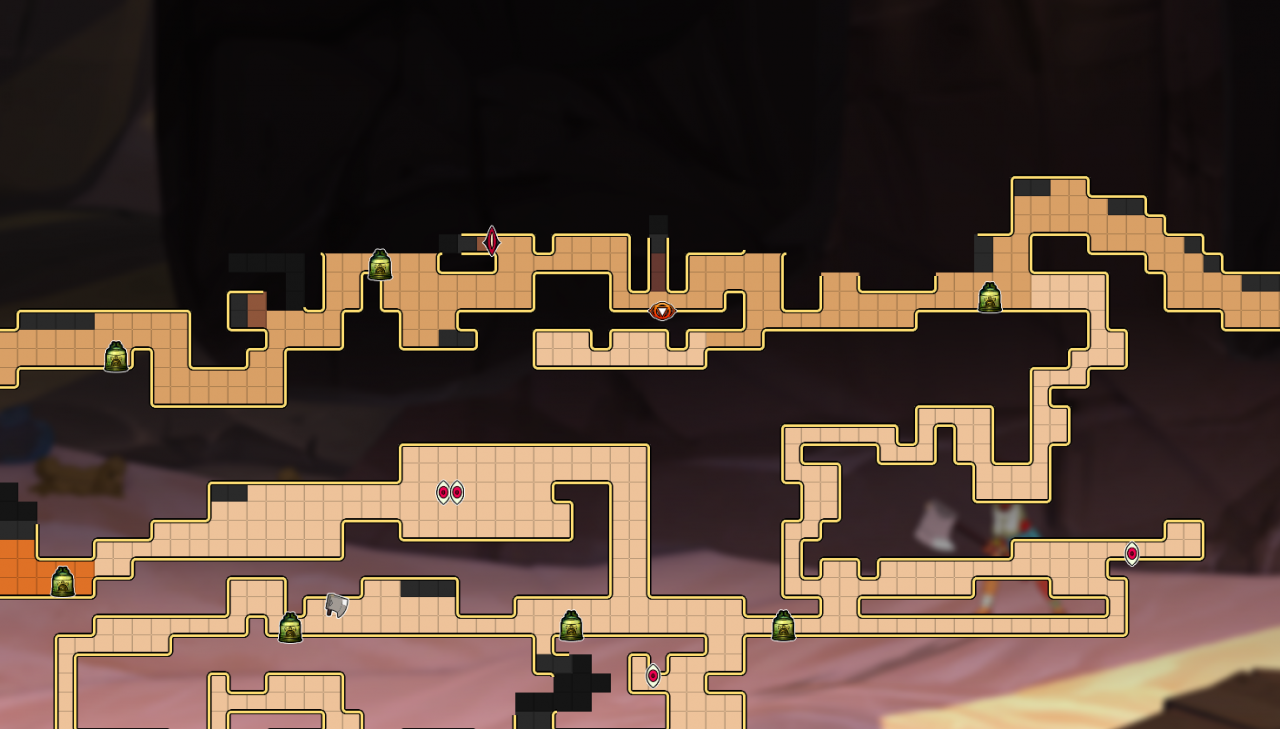
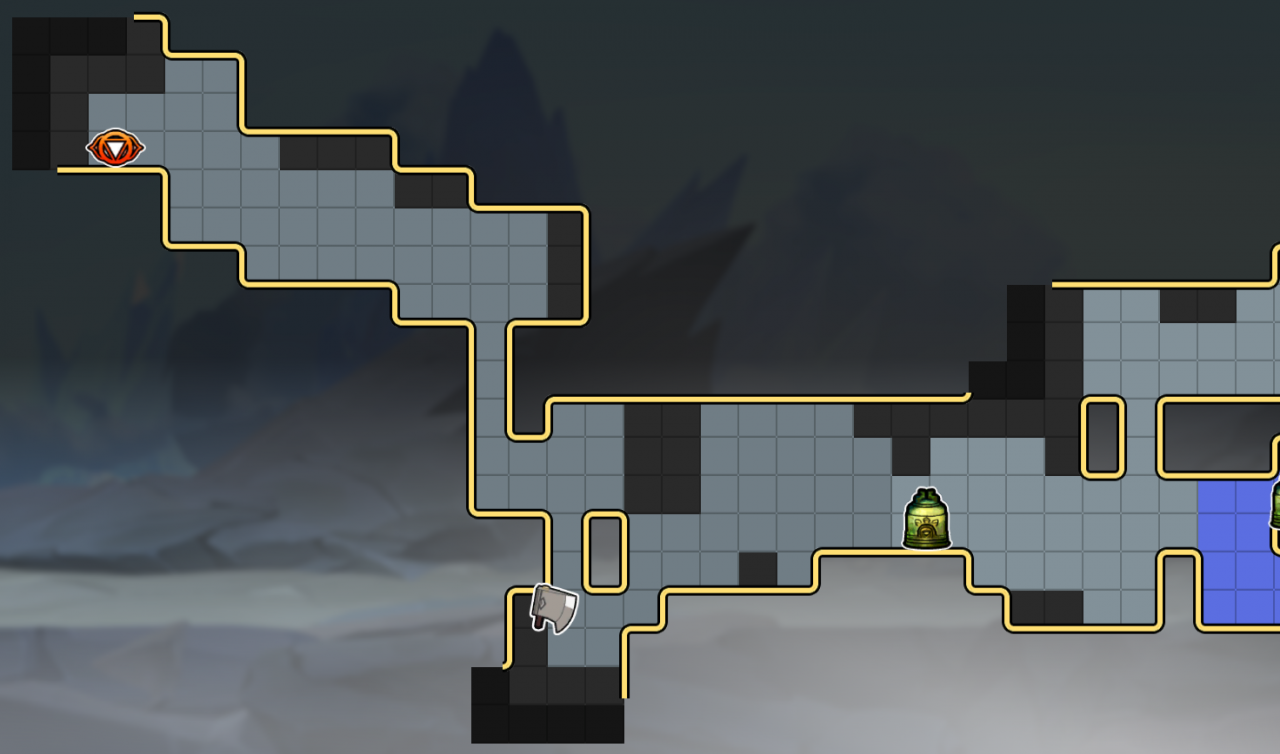
Kampan knows the bartender Felicity in Port Maerifa (found in the same room that you find Zahra before she becomes an Incarnation), and knows she’ll have a lead to follow and track the King of Thieves. She tells you the King of Thieves hid his treasure somewhere in the Almutah Sands, and while travelling to the right of Port Maerifa, look for a sandy downdraft moving through a tunnel above (located on the map below):
 To travel against the wind, you have to be in Heruka form, which you can do by getting a running start, then jumping and wall-jumping upwards. The treasure lies to the left behind a giant spike pit, guarded by the King of Thieves himself (not Altun). Once you beat him, Kampan suggests you take the treasure and spread it amongst the poor folks in the Iron Kingdom.
You find 3 townspeople around the Iron Kingdom that are in need of funds: a man who can’t afford a treatment for his sick parents, a man who’s hungry and can’t buy food (and forgot that you can buy food), and a man who lost his home. You give them money to solve all their problems (locations in the maps below):
 ============================================================================
 ============================================================================
 After that, Kampan is feeling so generous that she goes and buys herself a golden arm to cure her “not-having-enough-gold” disease, and furthermore completes her side-quest.
Kushi & Zebei (Lhan, Tai Krung, Sumeru)
He’s relatively easy to find, hanging out just outside of Mara’s Den (he’s found on the map below):
 He tells you that he can repair the bell, but he needs a rare metal only found from a turtle that lives in Mount Sumeru. The turtle can be found here:
Lanshi (Ashwat, Sumeru)
 you’ll find a lone flower that Lanshi thinks you should bring to the crying Asura Child. When handed the flower, she’ll stop crying and tell you about how she feels homesick, and after a bit of talking, realize that her father’s soul reincarnated into Lanshi (didn’t see that coming). After your conversation, Lanshi’s side-quest will be complete.
Latigo (Kaanul, Almutah Sands)
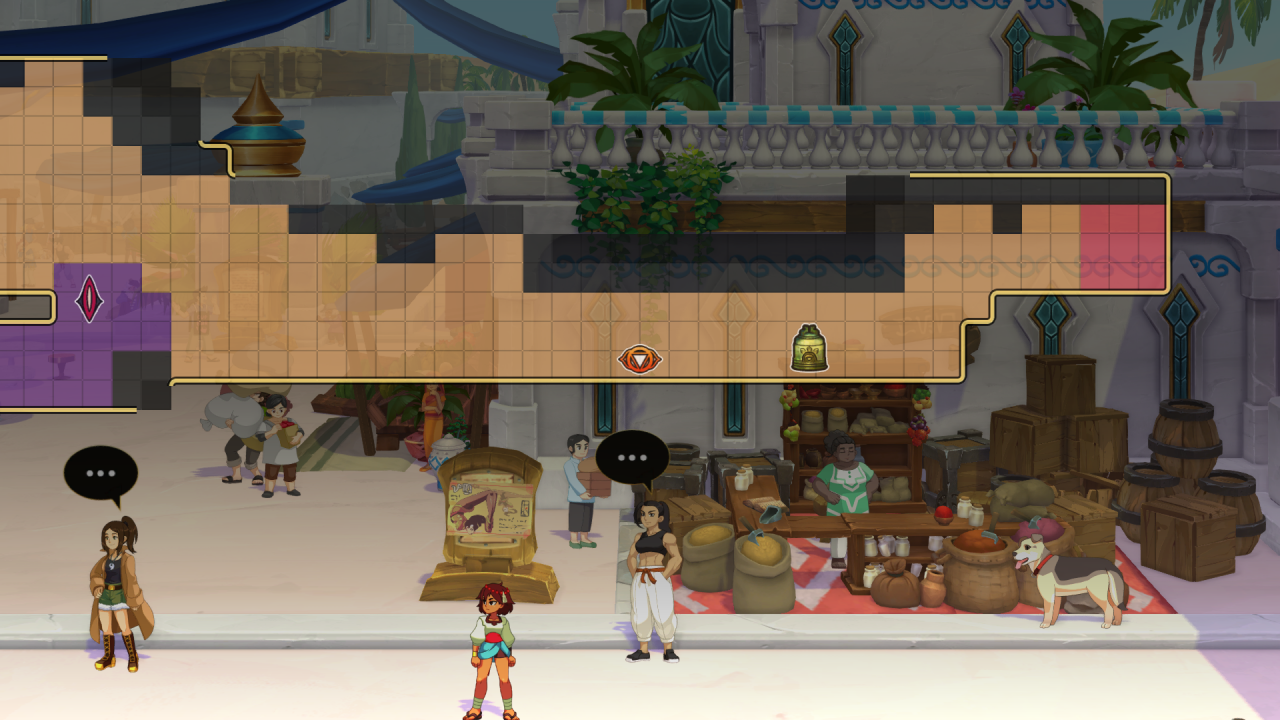
Go to the common areas of Kaanul (with all the villagers like Nijone hanging out around the save bell) and look for a cowboy dude named Sage (should be easy to spot to the left of the bell) who will tell you that Vasco took one of their boys hostage until Latigo showed up at the Almutah Sands.
Better get used to running because Vasco is all the way to the right of the desert: just keep running right until you hit the end of the map and he’ll be there. Simply destroy the tank he’s cowering in, kill his lackeys, then wait for Latigo to duel him and win (in a cutscene of course). Vasco’ll feel bad for what he did, and, after being forgiven by Latigo, die, bringing Latigo’s side-quest to a close.
Leilani (Port Maerifa)
 A bit of an odd ingredient since the merchant will give it to you for free because no one wants to buy a laxative.
Next she needs some ‘Awa, a spirit (strong distilled liquor). Baozhai says she knows a bartender that specializes in odd drinks, and who else is it but Felicity, the lady who helped Kampan find the King of Thieves. You can find her directly above where you got the first ingrediant (where Zahra was hanging out before she became an Incarnation). She gives Baozhai the drink for free because no one will buy it (perhaps it’s because when you drink the ‘Awa it turns your tongue numb?).
The last ingrediant Leilani needs is a Sea Cucumber, which can be found simply by talking to Leilani who is standing in-front of the Teotul at Port Maerifa. You’ll be put on the ship with only Leilani, and when you move towards her (to the left) you’ll start a conversation which leads into a battle with the “Sea Cucumber” (weird way to spell Giant Pink & Purple Sea Crocodile).
After all is said and done, Leilani cooks it in your inner realm and invites everyone to the ship’s deck to try it, and it’s surprisingly good based on the ingredients used to make it. Everyone thanks Leilani for her excellent stew, and her side-quest is completed.
Naga Rider (Tai Krung)
Nuna (Kaanul)
 Once broken, sunlight will shine into the cavern, the plants will grow within seconds, Nuna and Nijone will tell Ajna how they can turn into vegetables, and Nuna’s side-quest will be complete.
Phoebe (Port Maerifa)
Travel to the right of Port Maerifa, up to the oasis-looking area close to town, where you’ll find everyone waiting (somehow they got there faster than you). Not only will you fight Phoebe this time but also Tungar. After the fight, Phoebe’s kids learn a good bit of information, including “Nobody is a match for Ajna,” and “You and Tungar sure do move well together.” With that out of the way, Phoebe’s children show interest in learning Tungar’s fighting style, and Phoebe’s side-quest is completed.
Qadira (Port Maerifa, Kaanul, Iron Kingdom)
 After defeating it, you need to bring its heart back to Felicity, who will then tell you someone with a distinct green scarf was captured about a year ago in the Iron Kingdom by the docks, which is where you’ll go next.
Once you arrive at the Iron Kingdom, walk to the right until you meet someone with long white hair wearing a newsboy hat and circle-rimmed glasses named Emily. She’ll tell you she did remember someone who had a scarf and eyes similar to Qadira’s who worked at the factory before “…the whole thing went belly-up.”
Make a long trek up to the pathway that leads inside the factory. Along the path you’ll find a woman named Malina casually standing in-front of a tank. She’ll tell you Qadira’s brother led the uprising, saved as lot of lives, and that he’ll probably be found in the slums (specifically here on the map below):
 Qadira has finally been reunited with her brother, Husam, who has also answered everyone’s burning question. Does Qadira have lips? “Ol’ no-lips we used to call her.” Now that everyone can actually focus on the game’s story, Qadira’s side-quest is complete.
Razmi (Port Maerifa, Sumeru)
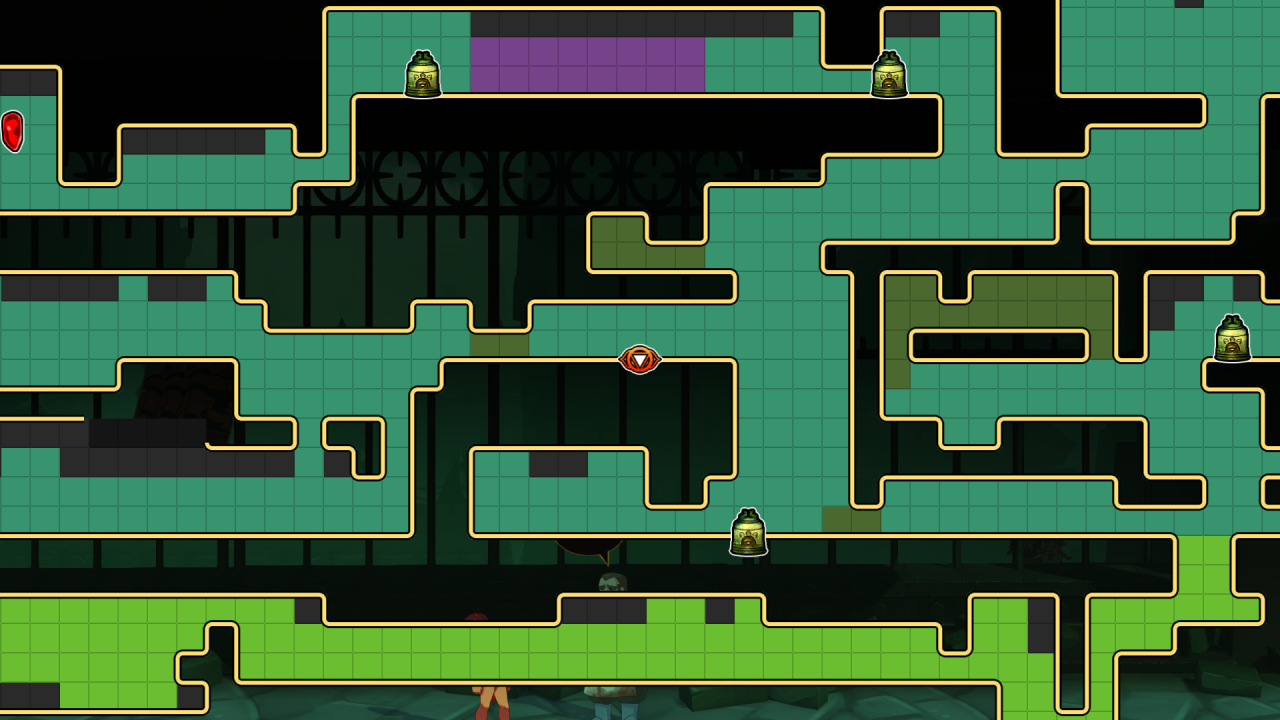
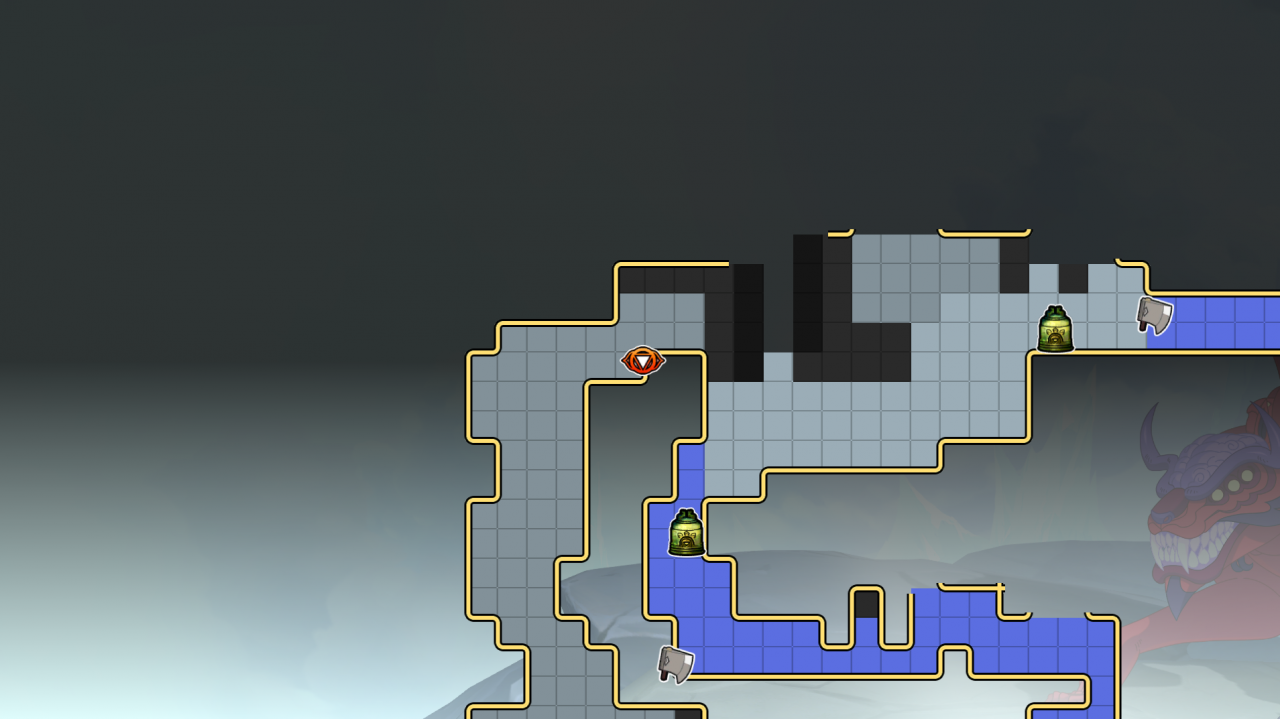
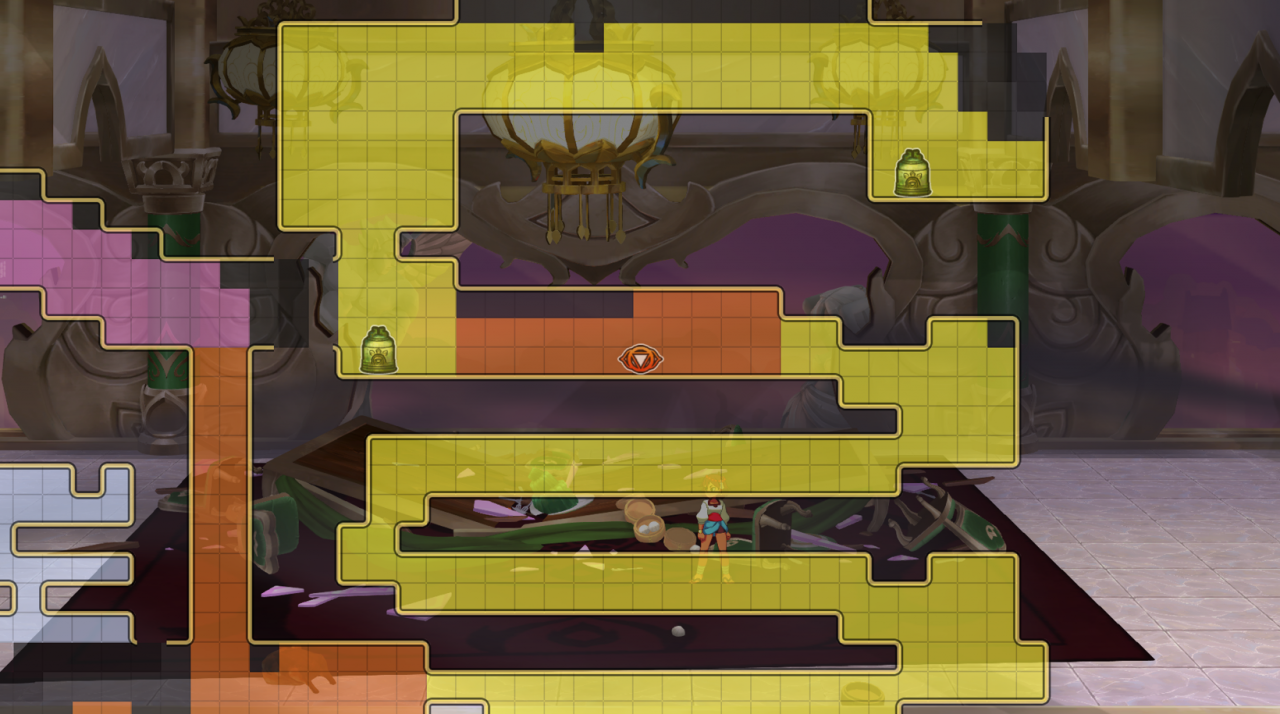
After travelling to the Tower of Wisdom and asking Angwu for help on the matter, she gives Razmi the spell to release Dueoksini’s soul, and Ajna suggests they release it at Sumeru so it doesn’t kill everyone when the soul is released. Scale through the inside of Sumeru until you reach this save point:
 Once you’re there, scale up and to the left until you find a big opening. A cutscene will start and Razmi will release your next opponent: Dueoksini. After defeating him, Razmi’s side-quest will be complete.
Ren (Port Maerifa, Tai Krung)
Ajna wants to go confront her at Tai Krung instead of fleeing like Ren wants, so off to Tai Krung the group goes. She can be found at Mara’s smashed dinner table (on the map below):
 After defeating her, she’ll reveal herself to be Ren’s mother, talk to Ren about his failures, then disappear/die (I’m not really sure to be honest), completing Ren’s side-quest.
Thorani (Tai Krung, Sumeru)
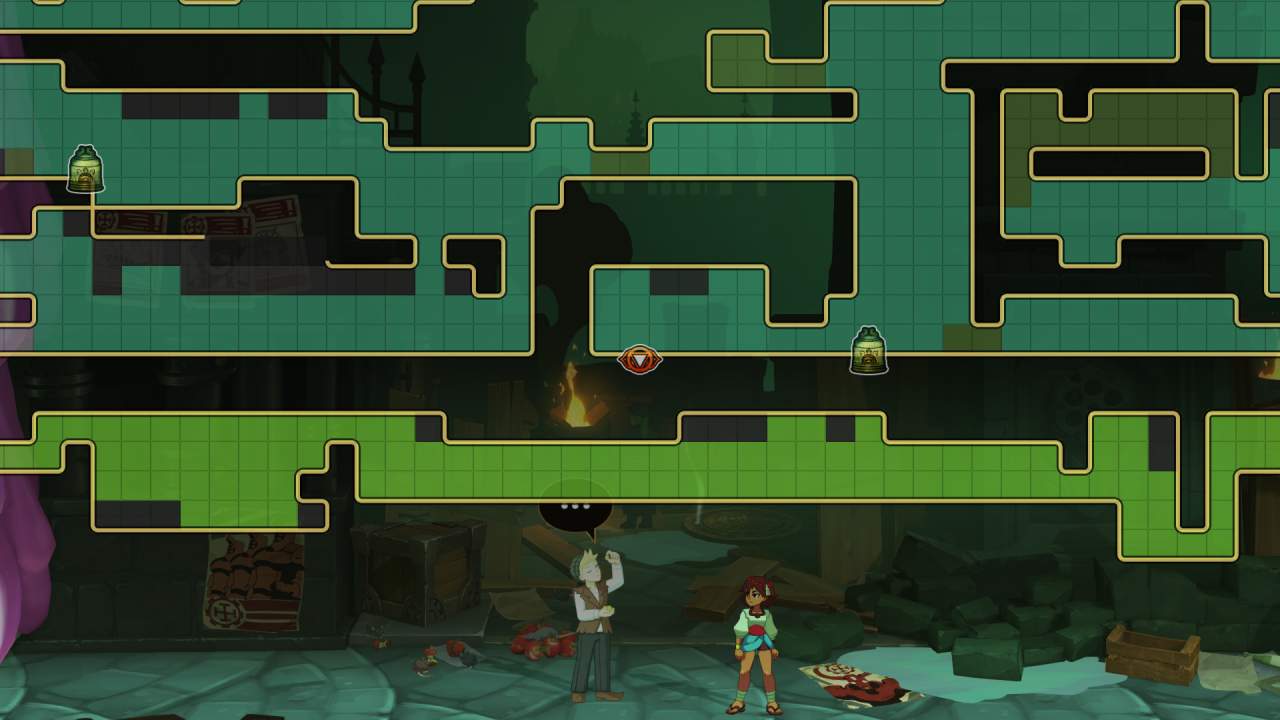
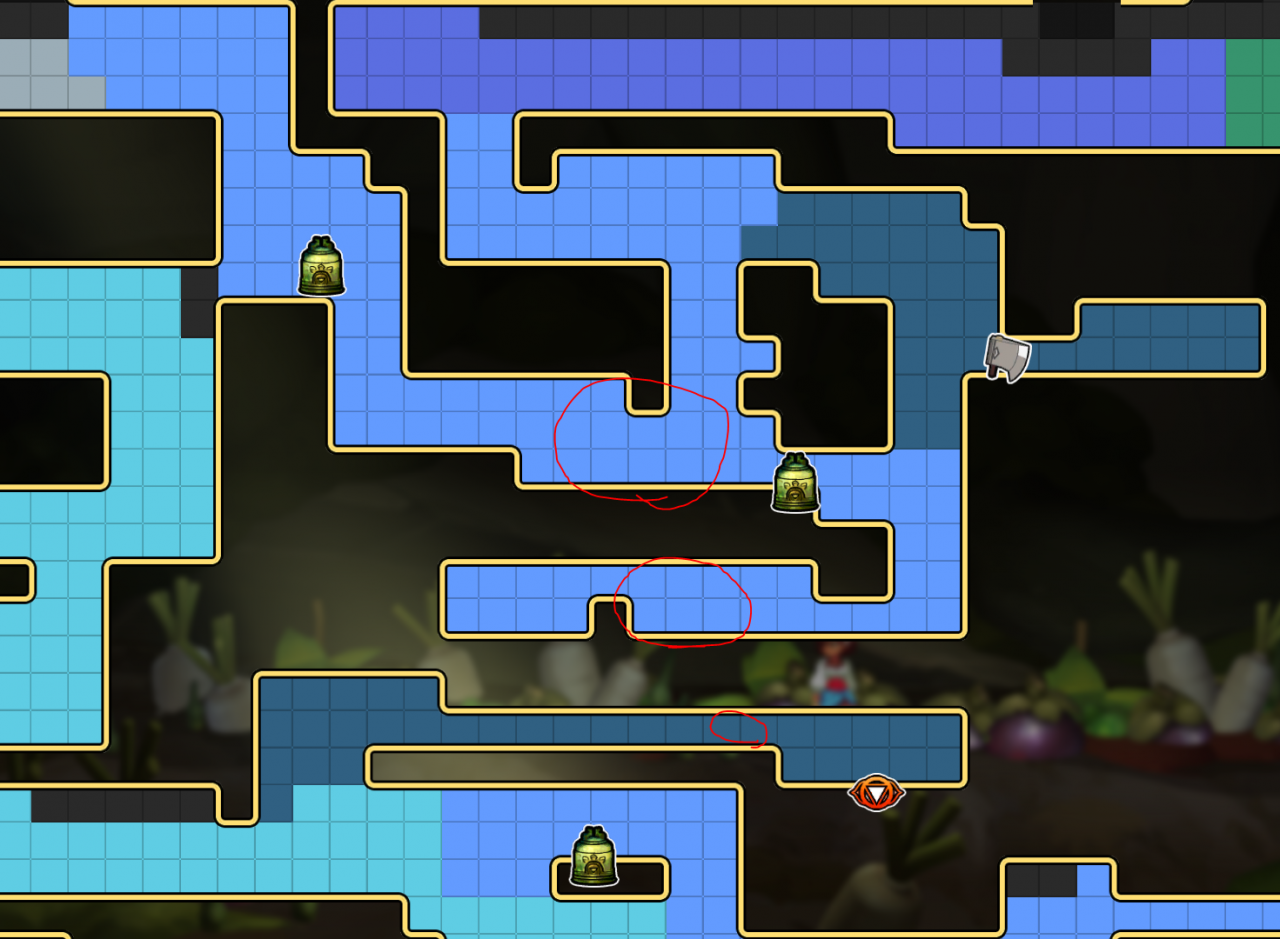
 Thorani recognizes it as Mara reincarnated, and wants to see if she can save him in this state, requesting you take her to the base of Sumeru (and by the base, she of course means halfway through Sumeru) to try and jog his memory. The group travels to this location specifically:
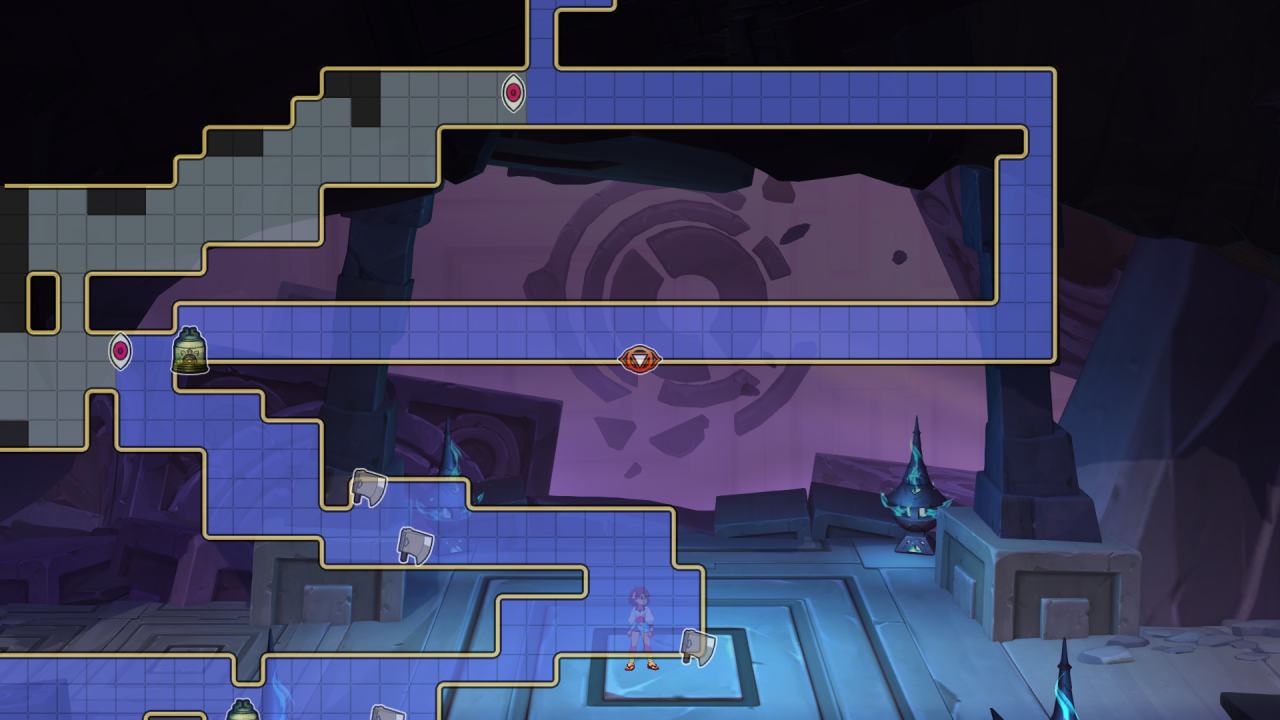 After fighting off a long-legged horse-thing, she finds a glass Mara gave her. She fills it with her purifying water, and requests to travel back to find Mara in Tai Krung. Once he is found (in the same location as last time), he’ll drink the water, feel calm and shame, then leave. After checking back in with Ginseng’s parents, they say Mara/the Hungry Ghost has recruited others into a gang, but not to steal everyone’s food/drink, and instead to eat everyone’s garbage. With that, Thorani’s side-quest is finished.
Tungar (Tai Krung, Ashwat)
Once at Ashwat, keep travelling left like your going to Ajna and Indr’s training grounds, and you’ll encounter an enemy on your way there. After defeating it, Tungar will be at ease after releasing his allies’ souls, completing his side-quest.
Yan (Port Maerifa, Iron Kingdom, Tai Krung)
– Port Maerifa –
 ============================================================================
– Iron Kingdom –
 ============================================================================
– Tai Krung –
 Once every poster has been put up, You can make your way back to the dance floor of Mara’s Den where a cutscene will start (note: if you want the cutscene to play out properly, walk on the ground from either the left or right onto center-stage, do not jump from the top platform on the right to center-stage. For some reason when I did so, Yan got stuck underneath the bottom platform throughout the whole cutscene and the camera was following nothing). After her dancing, Yan is congratulated by Ajna and Thorani, and a mysterious man talks to and recognizes Yan, who reveals himself to be her father that lost her 16 years ago. With her dance being shown to the world and after being reunited with her father, Yan’s side-quest is complete.
Zahra (Ashwat)
Zebei & Kushi (Lhan, Tai Krung, Sumeru)
He’s relatively easy to find, hanging out just outside of Mara’s Den (he’s found on the map below):
He tells you that he can repair the bell, but he needs a rare metal only found from a turtle that lives in Mount Sumeru. The turtle can be found here:
Once you beat the turtle and gather up it’s remains, you can return to the monk in Tai Krung and ask him to re-build the bell. He’ll travel back to Lhan and re-build it (and in record time I might add), telling the group how seeing their passion to fix the bell gave him purpose again. He also unveils that he’s one of the highest-ranking monks of Lhan, and promotes Zebei to Captain, who in-turn promotes Kushi & Altun to full-fledged official Protectors, completing their side-quests.