An overview and then in-depth discussion on how to use the Kyle is Complete editor. you can find all commands from this list.
Introduction
WHOA. You’ve gotten every single ending in Kyle is Complete? I respect you. AND I implore you to maybe take a stab at making one of your own!
The Kyle engine is pretty easy to use but has enough customization options to functionally recreate Kyle is Complete from scratch yourself. This guide written by me (John, Kyle developer) will take you through the general use of the Kyle editor and all of the various functions you can use! There is a quick reference guide in the editor if you ever just need to look up some syntax of something similar.
Basic Use
First, click on “Custom Stories” and the “New” button. That will bring up a fresh story that has some prewritten text. You can delete all of it or keep it around to act as a little skeleton for yourself – either way works!
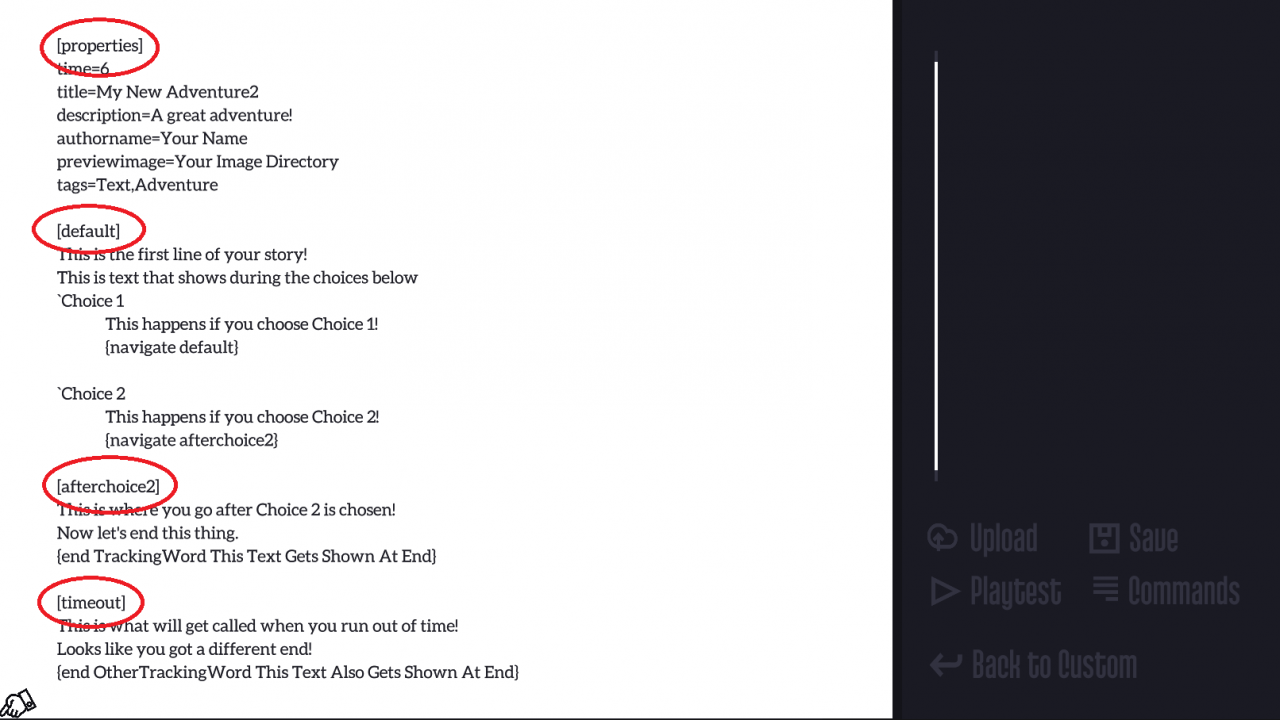
Kyle stories are divided into sections (think like “The Kitchen” or “Outside”). The writer (you) can use as many of these sections as you want, and you can name them whatever you want. You might notice that in the example that pops up when you create a new story, there are four different sections: [properties[, [default], [afterchoice2], and [timeout]. Three of these sections are built-in sections for the editor and one is something that a user could make.
———————–
[properties]
This is ONLY a way for the editor to get some extra data about your story, like your author name and how much time the player should have. None of this will be displayed in game. For a full list of that data can be stored here, look later in this guide.
[default]
This is where your story will start, 100% of the time. Every Kyle story will need this. Make sure you have one!
[timeout]
This is the section that will be navigated to when the day ends in your story. Keep in mind that you can change this section name in the properties section (more detail about that below!)
[afterchoice2]
This is a section that I made as part of my test story. There is nothing special about it.
———————–
If a player is currently “in” one of these sections (except [properties], of course), the story will progress line by line until the section is over. A section should always end by either A. navigating to a new section, or B. ending the game. If a section does not do one of these two actions, the story won’t progress and the player will be sad!
Navigating to Sections
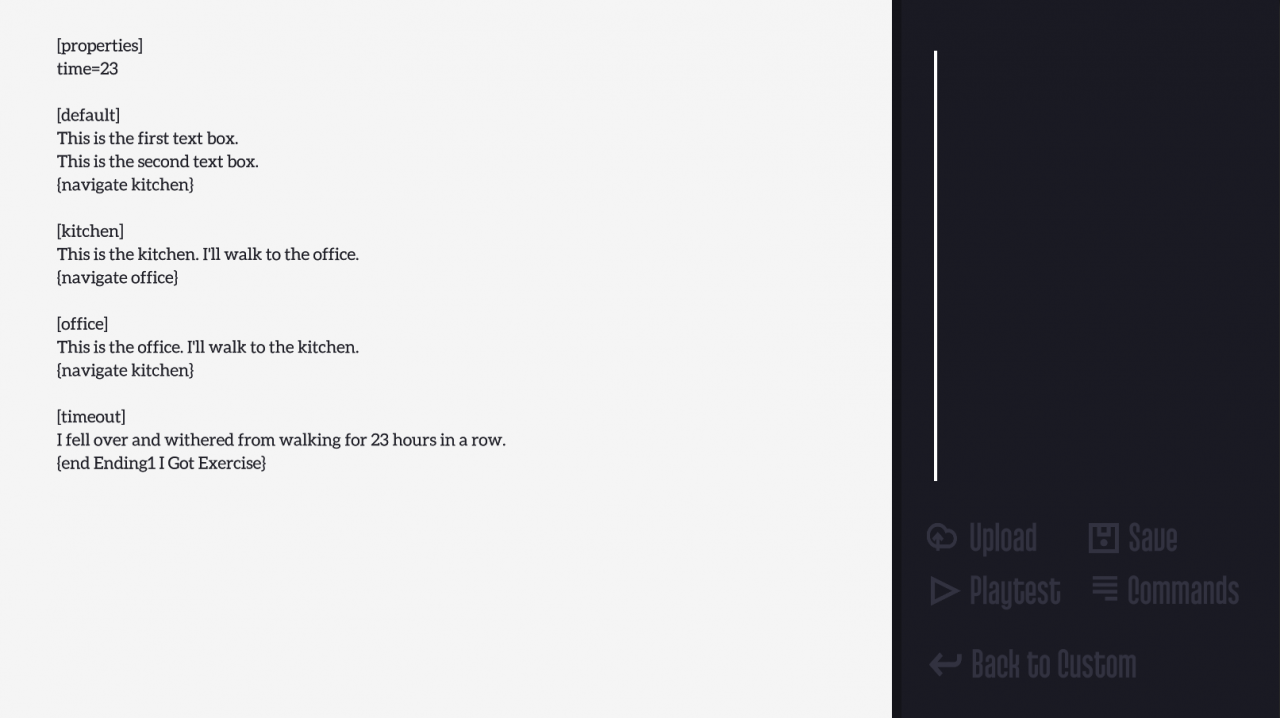
So how do you “work” with this “sections” concept? Like, in practice, how should it work? Well, let’s look at this little story that I made.
You’ll see first that I have a default section and 23 hours in my adventure. The default section has a command at the end of it to take the player to the kitchen. And at the end of the kitchen section, I’m taken to the office. And at the end of the office, I’m taken to the kitchen. And back and forth and back and forth until I’ve taken 23 moves, in which case the “timeout” section is automatically navigated to, the player falls over, and an ending shows.
I can make as many of these sections as I want as the writer. But flipping through them one by one in a “linear” story is pretty boring, huh? Let’s talk about how to add in choices.
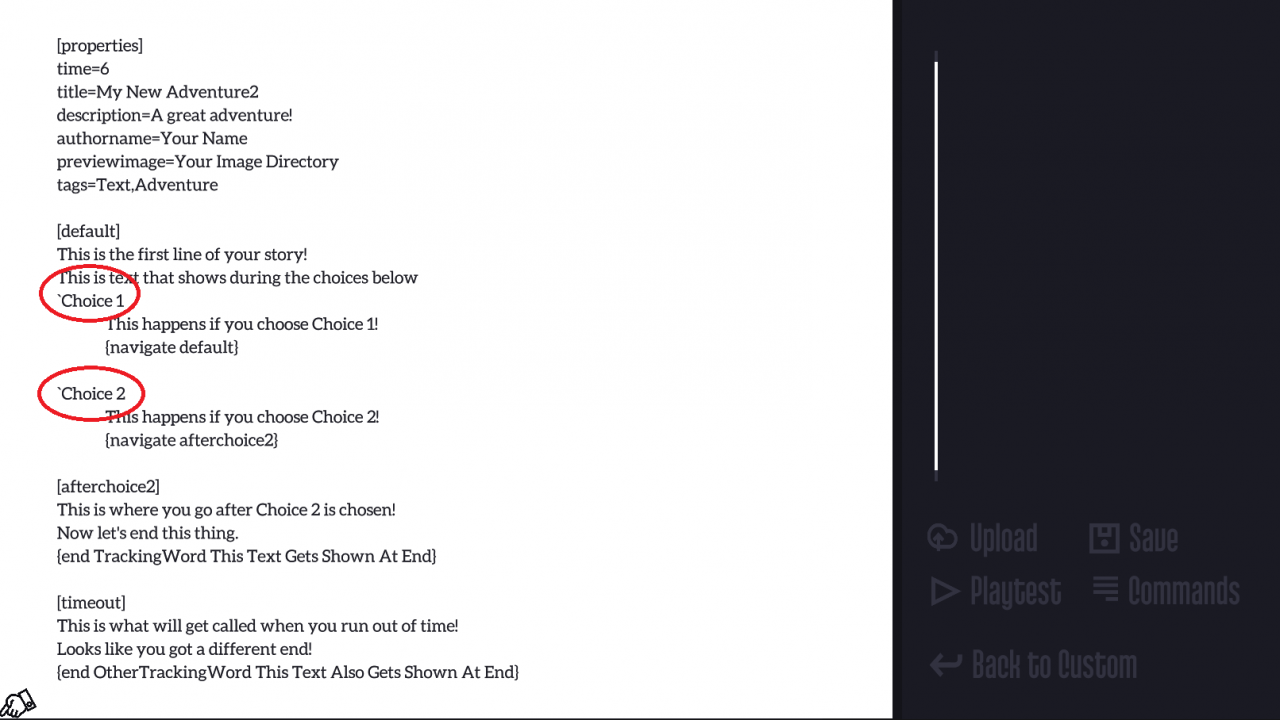
Adding in choices to your Kyle story is fairly easy. Let’s take a look back at that “initial story” that gets created when you click the “new” button. See that symbol that is followed by the word “Choice 1?” It’s the ` symbol, which is found right above the tab key on your keyboard. This is the way to tell the Kyle engine that you’re about to give the player a set of choices to choose from.
In this story, when the player enters the default section and goes through a couple lines of text, they will encounter a textbox that says “This is text that shows during the choices” and be presented with “Choice 1” and “Choice 2.” What happens if the player chooses one of the other is shown by the text directly below each choice symbol. NOTE: the editor knows what to assign each choice by whether it is tab-indented or not. All text that gets read inside of a choice must be indented by one tab.
In this case, if the player were to choose Choice 1, they will go back to the “default” section and get the choice again. But if they choose Choice 2, they will instead navigate to the “afterchoice2” section and get a different ending!
Choices can be nested inside of each other, although I personally recommend dividing each choice out into sections like is demonstrated in this story just to keep things more organized for yourself. Just remember to use more tabs to tell the editor what each piece of text goes to!
Can I have choices that only appear if a player has done something else in the world, like getting an item? Yes. Look in the “Variables, If/Then Statements, and Variable Choices” section.
Commands
Your Kyle story would be pretty dull if it was just bits of text following bits of text without anything to break things up. There are a set of commands I’ve put together that will help you interact with the engine to do more things like play sounds, give the player items, store data, and other things.
What is a command? Well, we’ve seen one already! {navigate . . . } is a command that navigates from one section to another. As it turns out, other commands look pretty similar. One command you might have noticed in our test story is the {end . . .} command. This command will end the story for your player, showing a bit of text and setting some data in the editor to remember that the player got that ending. An example of using the end command would be like this:
{end TestEnding This Text Will Show}
This will display the ending screen with the text “This Text Will Show” and the game will use “TestEnding” as an ID in storage to remember what ending the player got.
Some other commands that the editor has are
{sound SoundID}
{item ItemID}
{guion}
And several others. An exhaustive list of commands and their use will be at the end of this guide.
After you’ve written a story or two in the editor, it becomes pretty clear that it’s hard to do compelling writing without some way of telling whether the player has gone to a place, gotten a thing, and then change what dialog they get depending on it. That’s where variables come in.
For the non-programmers, a variable is essentially a fancy word for “a bit of data.” In this case, that “data” is always a number. The Kyle engine can remember numbers temporarily (for the duration of that run through your story) or permanently. You can do this through some commands:
{set NameOfData value} (this is the temporary version}
{store NameOfData value} {this is the permanent version}
NameOfData is any word you want to use to refer to your number. It could be “HasSeenChickens”, “IsBug”, or anything else. “value” is any number, although most often you’d want to simply just use 0 or 1.
So what can you do with this data? There’s a few different things.
Firstly, you can change dialog based on what value one of your variables is. This is done with the ~ symbol, which is on the key right above the tab key. The way you would write this is as follows:
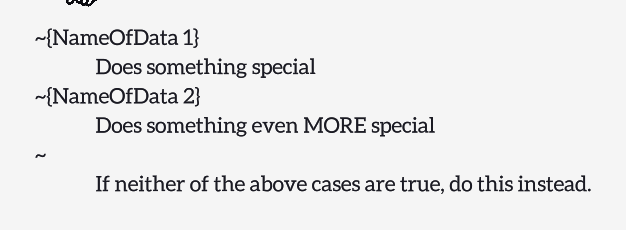
This would make the editor check if NameOfData is currently set to 1 (and if so, that’s the text it will read), then check for if its set to 2, and then if neither of those are the case, it would read the text that’s below the final ~ symbol. Keep in mind that, like with choices, these commands are tab-sensitive. Two things: firstly, please don’t add extra spaces next to the ~ symbols. And also, the final ~ sign will NOT read anything after its text if it’s at a lower tab indent.
In addition to these “If/Then” statements, there is one other way you can use your variables to change the text the player gets. Choices can have a check for a variable to tell them if they should display or not. If the variable check passes, the option will appear in blue instead. The way you would write this is as follows:
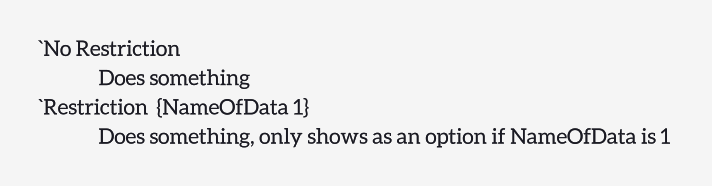
This will give the player the “Restriction” option ONLY if NameOfData is set to 1.
Using these variables is a matter of decision up to the writer. You could have a variable to decide whether a certain character has been talked to that day, or whether the player is going through the story for the second time, or anything else. Use this functionality creatively! It’s arguably the most important thing you can do to make your story engaging.