This game is overall fun. But it is no means an easy game. It’s brutal and some people call its design bad because they cant handle it weren’t expecting its level of difficulty. Here I will ease some burden by explaining tips for new or stuck players
Before you start, Learn the important mechanics.
- The most important thing to remember is everything is a consumable
EVERYTHING - Weapons and tools all have durability, they auto repair when to return to the surface but you cannot repair in the abyss.
- When you set up ropes or pitons to help yourself navigate the abyss easier, these items will stay in the environment for the entire time you are in your current dive. But when you return to the surface, they all disappear meaning you’ll have to set them again. No you cannot pick them up once they’re set.
- Some parts of the environment are destructible or changeable. Such as a wall you can break or rocks you can push over to make a bridge. However unlike ropes, these changes will disappear and revert back as soon as you leave the area, so don’t count on them if you’re trying to navigate a path back to the surface.
There are many stats in the game,
HP, Hunger, stamina, Bag weight, status effects, resistances, durability, curse, XP, level, skill points, whistle rank, money (Orth), attack and defense
But the main 3 are Hunger, Bag weight and HP, in that order. So we’ll start with those three
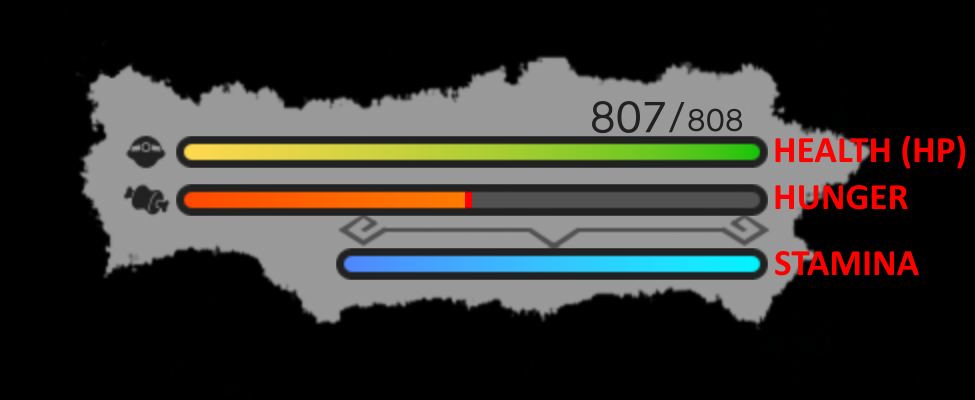
When in the abyss, all actions including just standing still, will consume small amounts of hunger. When hunger hits 0 you can’t climb, atk, dodge, run, change areas and your stamina will be zero. Running climbing and attacking uses stamina. If you’re climbing when your stamina reaches zero you will fall and probably die. Changing areas also consumes some hunger, the greater the depth difference, the more hunger consumed
So you always need to bring a food supply and keep your hunger levels up. I’ll leave some quick tips for food optimization further down

Bag weight, you can only carry a certain amount of weight on you at all times, this will start at a measly 10kg but you can increase this as you rank up your whistle rank and obtain skill points by leveling up (more details on these below)
However once you exceed the max weight, you move at a crawling pace, cannot climb, dodge or attack and are basically sitting ducks for the wildlife.
You need to plan you pack carefully as very little thing is weight counted, arrows for your bow? 20 grams each arrow, ammo for guns? 60 grams per bullet. Even the armor you’re wearing counts towards the weight. Armor will be explained in more detail further down
Items can be as little as 5 grams of weight, and exceed in excess of 4000 grams of weight

HP may seem obvious but it and hunger tie together in one very important part
When moving areas around the abyss, going to a new area that’s further down, will take amounts of hunger, but changing area to somewhere higher than you currently are, will also take a chunk of HP
These values also decrease as you whistle rank up
Some enemies are just nuisances with little damage dealing, but some will one hit you or fling you off a cliff to your death, others just do huge amounts of damage so best not to agro them until later game.
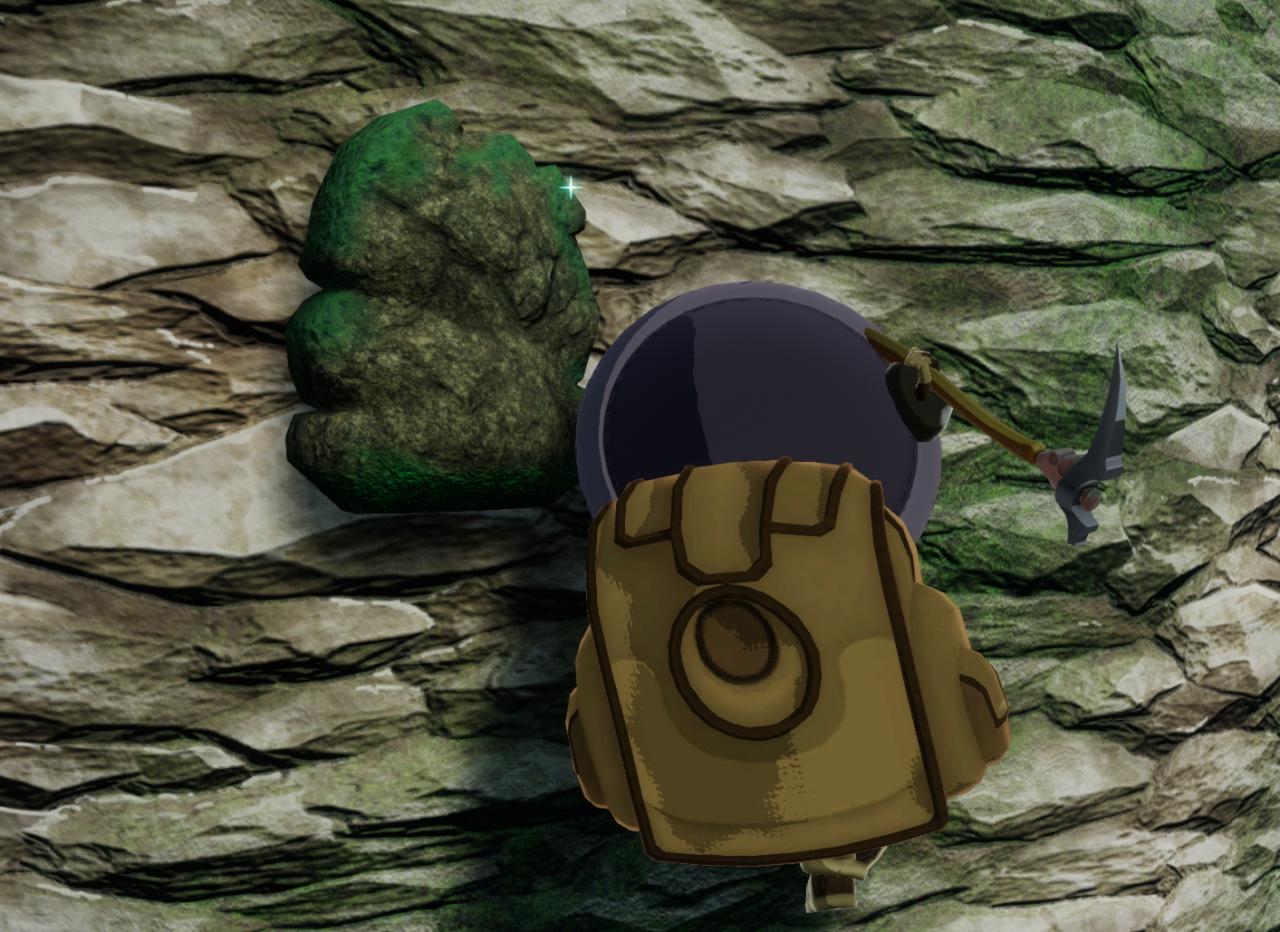
Plants, ore veins and monsters, each can only be harvested once and give you one item before it vanishes. You can upgrade your skills for each of these to drop TWO items later on.
Ores and monsters will give one of a selection of items, it’s an RNG drop. This makes farming for certain crafting items a tedious process sometimes until you get the double drop skill(s)
When you change area, monsters and fish will re-spawn but plants and ores do not, until you leave the abyss
Surprised this isn’t more important? Well to be honest despite being a main staple of the series, it very quickly becomes an annoyance.
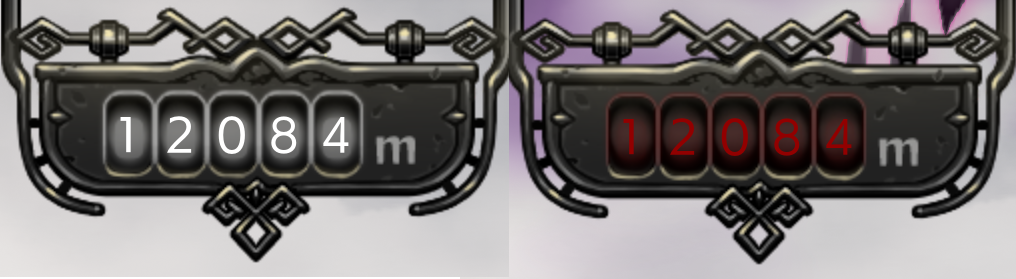
Every cumulative 10-15 metres you ascend in a short amount of time in the abyss will threaten you with the curse. If you continue to ascend it will trigger which does a variety of effects depending on which later you are own. I wont spoil what they are, because you’ll have fun finding them out yourself
Even continually jumping in place over and over without pause can trigger the curse so it’ll be a constant hazard when climbing or running around bumpy terrain. After a while the curse will stop and you can safely ascend again. Curse recovery time gets shorter as your whistle rank goes up
Spawning Mobs
 This mechanic makes or breaks the game for a lot of players because it can become quite annoying. So this mechanic gets its own dedicated section
The game punishes you for staying in the same area for too long.
There’s a hidden 5 mins timer that resets every time it either hits 0 or you move areas.
When it hits zero, it will spawn a 1hp enemy just off screen near your player, usually behind you. It has the same agro range of others of its type and while it does only nuisance damage, if you get hit while you are doing an action like mining, harvesting, attacking, eating, etc, the action is interrupted and cancelled usually before it can finish.
Even if you kill it, it will just re-spawn again a few seconds later off screen. The 1hp mobs that will spawn will change depending on what layer you’re on or area you’re in but there’s two kinds,
- Ground based, ones that will spawn while you’re walking around normally.
- Flying based, ones that will spawn while you are using ropes or climbing walls
An additional 1hp ad will spawn every 5 mins until you leave the area. I am unsure if there is a limit to how many will spawn. The max I’ve personally reached is 5 (over 25 mins in the same area)
The reason most players hate this mechanic and you can easily see people making ways or asking how to disable it, because of two reasons. First is it can make farming for certain items/relics really annoying if you cant fish without getting attacked every few seconds. The second is some can inflict a status ailments, mostly the flying types which makes the 3rd layer much more aggravating that it already is. Also some areas are quite big and painful to navigate, so it will take you longer than 5 mins just to get from point A to B. As soon as you change areas though, they vanish and the timer resets again from zero.
Bugs
When performing combo attacks on an enemy, sometimes they’ll tank the hit with no damage but you’ll still lose durability. extremely frustrating but to minimize this happening, don’t spam the attack button and only tap the attack button once every half to three quarter second. When done right, it will keep your combo and minimize the chance of the enemy just tanking your attack
Some rope locations are finicky when you climb to the top. their ledge design is odd enough that when climbing up, your character may slip and fall back down. There’s only a few places this can happen and its rare to happen in the first place, but the 2nd and 4th layer have some of the ledges of caution
Its retarded. Having a companion can be great. They will attack things for you, they never run out of durability and they will annoy you with their constant voice lines.
However they will continually get caught on the terrain and just bounce in place, stuck. as soon as you get too far away, or go up/down a ledge, they will respawn right behind you, like the 5 min mob spawns, but they get stuck fairly often. I’ve also experienced cases where they will just freeze in place, and not do anything. They become invulnerable to all attacks, and enemies will still agro on them, but nothing else happens.
This one has only happened twice. Once being hit by a Madokajack while climbing on the 3rd layer, another was being slammed into a wall by an Ottobas in the second layer.
Some monsters when you deal fatal damage, will trigger a quick time event you need to pass to kill it. However sometimes this button press needed wont actually load on screen in time for your to react, causing you to fail. Don’t worry to much because unless you’re really low on HP, it wont kill you. but the monster will have a small amonut of HP again, meaning you have to hit it once more and re-enter the QTE. The button should instantly load the 2nd time around.
When battling bosses, there’s often a rapid tap QTE at the end, if your settings are up too high, too many particle effects can cause lag and the QTE wont register all your button presses. Sometimes leading to failure
As your whistle rank goes up, the time needed to pass these quick time events gets longer.
This game seems to have very un-optimized particle effects. I run a 1080. I can run the game on ultra except when there’s alot of effects on screen. A silkfang throwing its web caused lag, finding foreign cave raiders caused severe lag when the arena fog spawns, Vine-blasters absolutely destroyed any hope of being playable when they spew a haze all over the area.
Lowering it down to just high fixed most of these, except vine blasters still caused lag, and the Goblet of Giants in the 4th layer has a fog haze over everything that also causes FPS drops
Menu
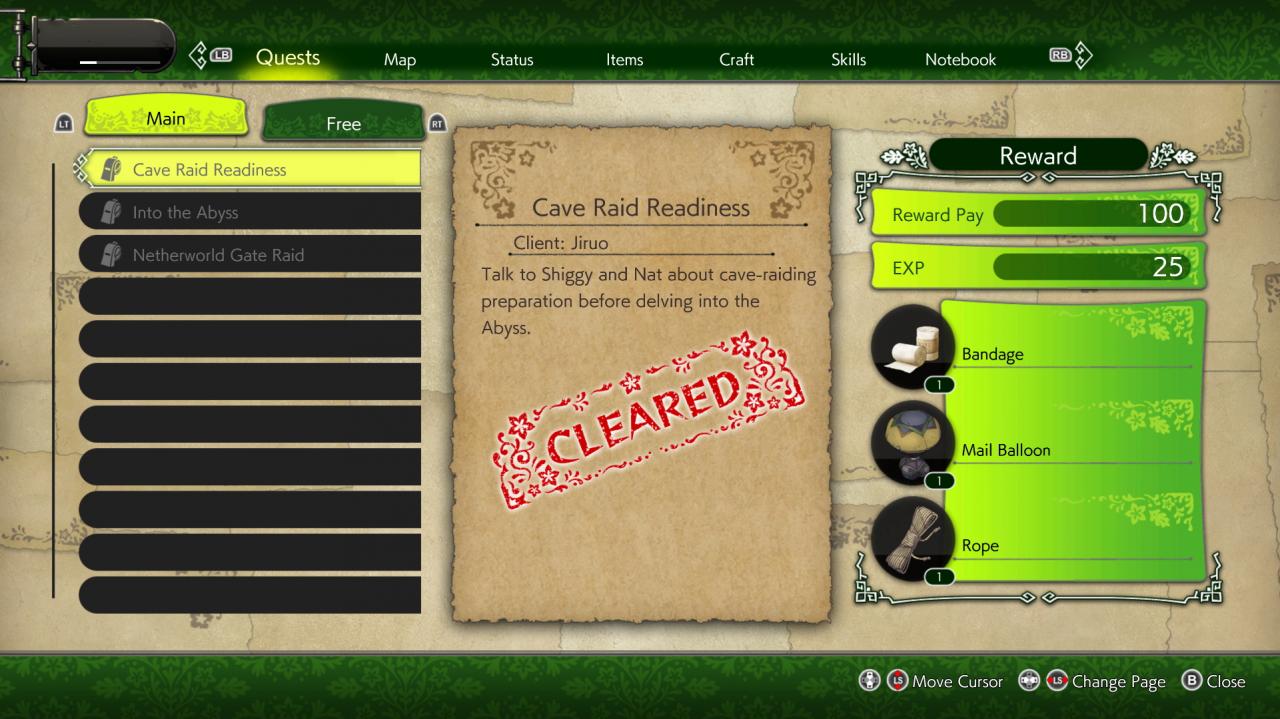
This tab is split into two sub tabs, Main and Free
Main is your list of current and completed quests that involve the main story line. These quests are directly tied to your whistle rank and are the only way to level up through the 5 ranks. You start at Red whistle and as you progress the main story become, blue, moon, black and finally white.
The Free tab are where guild quests and side quests are kept
You can obtain free quests from the Guild in Orth that will provide decent chunks of experience and some money when completed. Side quests are fount either by talking to people in Orth or finding them in the abyss
You can differentiate the two by the color of the exclamation marks or icons on the map tab. Main is always yellow and side quests are always purple.
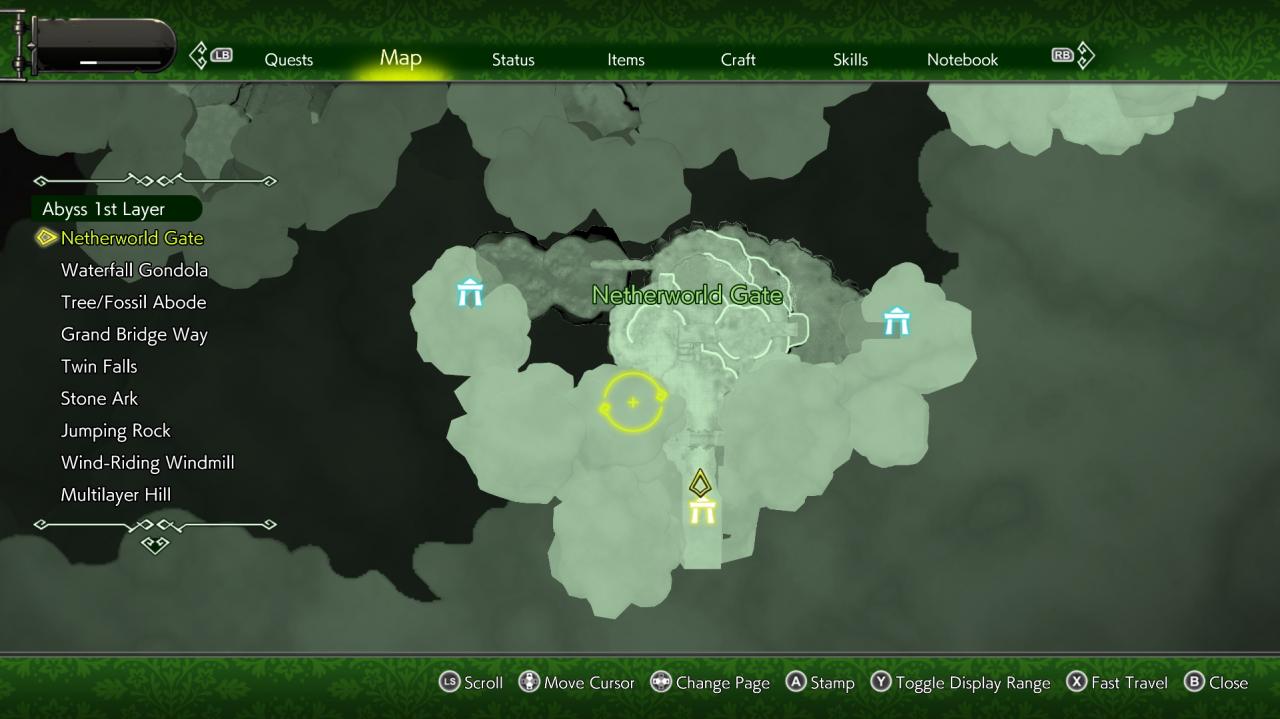
this ones pretty self explanatory. When opened will show a map of the area you are currently in as well as its entrances and exits to other areas. You can scroll though a list of places you’ve already been to and check quest location markers. While in the abyss you can even place your own markers down on the map from one of 3 types to help you for what ever reason you want. I personally have never used them.
Note these personal markers will vanish when you leave the abyss.
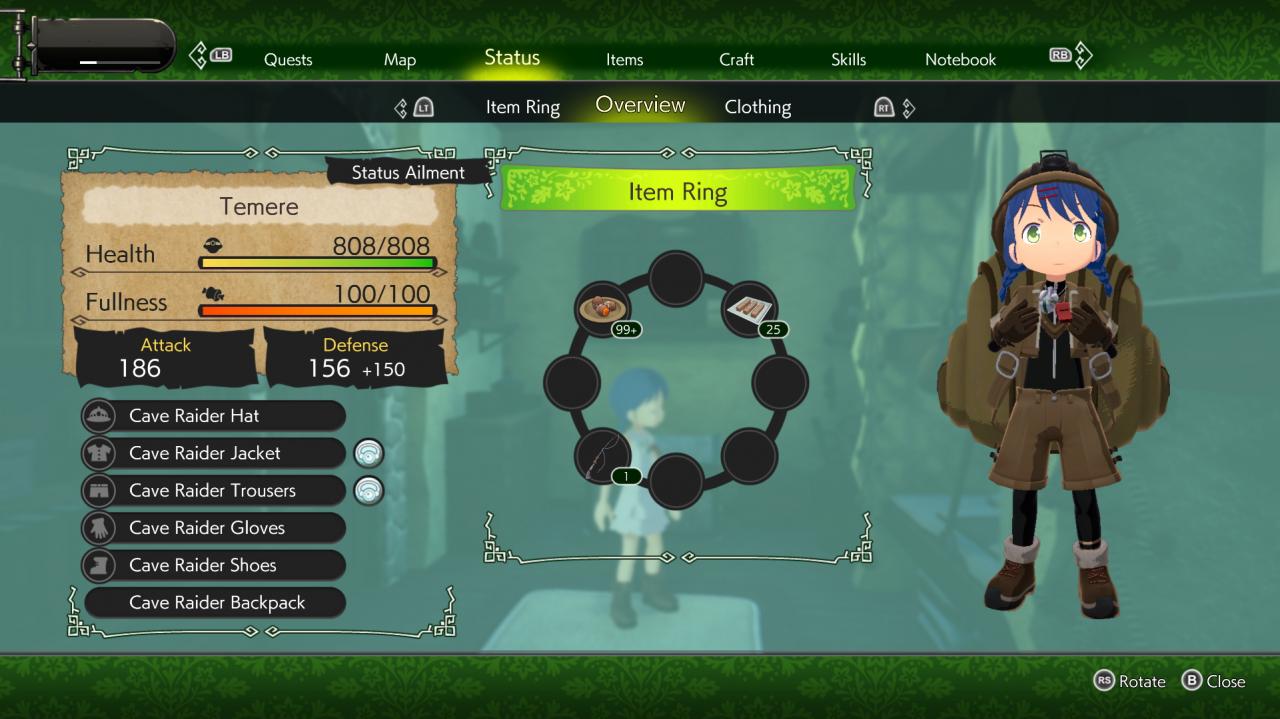
Here you will rarely need to ever go and is the most unused tab of the menu.
You get the basics, you can see what armor you’re wearing in more detail on the clothing sub tab and inspect your item ring in the other sub tab…. as if you didn’t put all the items there yourself
Your Attack, Defense and HP values will increase as your levels go up (or have certain items equipped) But I will explain that in more detail in another section below
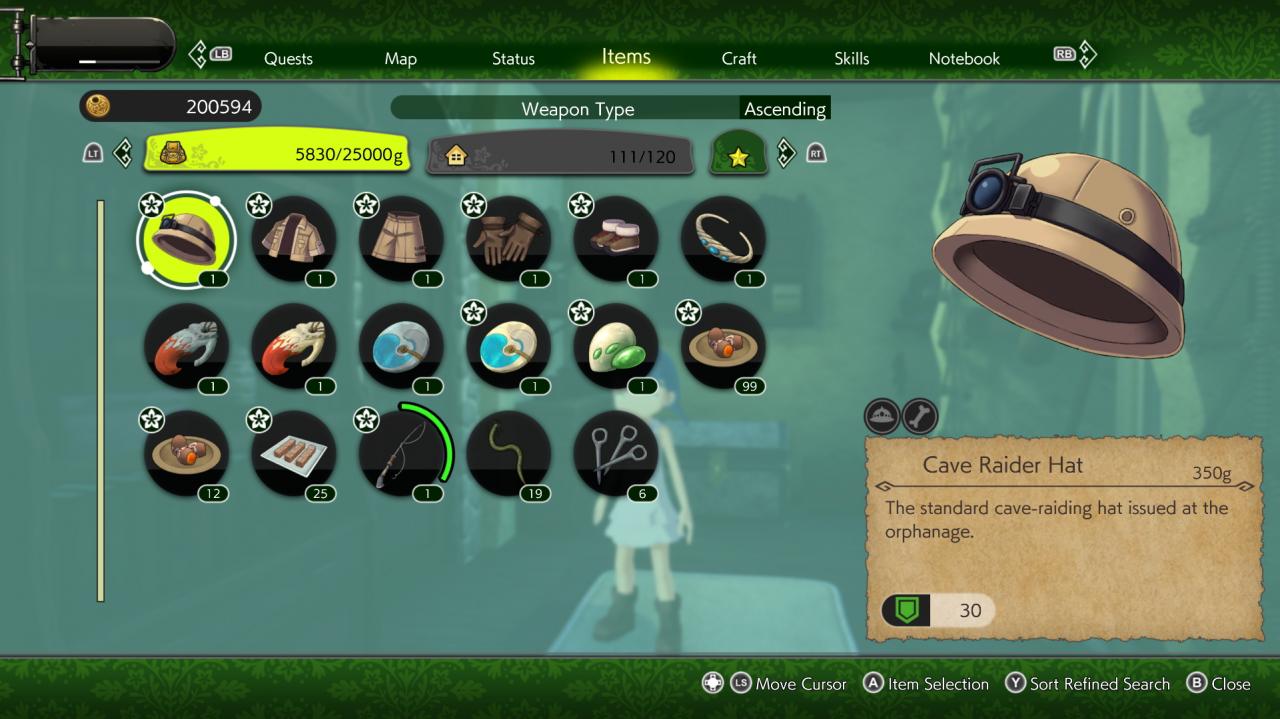
The tab where you will spend most of your time
Here you equip weapons, armor, charms and set items to your equipment wheel. View your currency and max weight at the top, key items in the Star sub tab, and view your item box back home in the grey’d out tab. When not back in your room you cant access these items, only view them. (no ♥♥♥♥ Sherlock) It does make it easier to remember how many of certain items you have for when you are saving items to craft and are in the abyss farming more
Key items do not consume bag weight (thankfully)
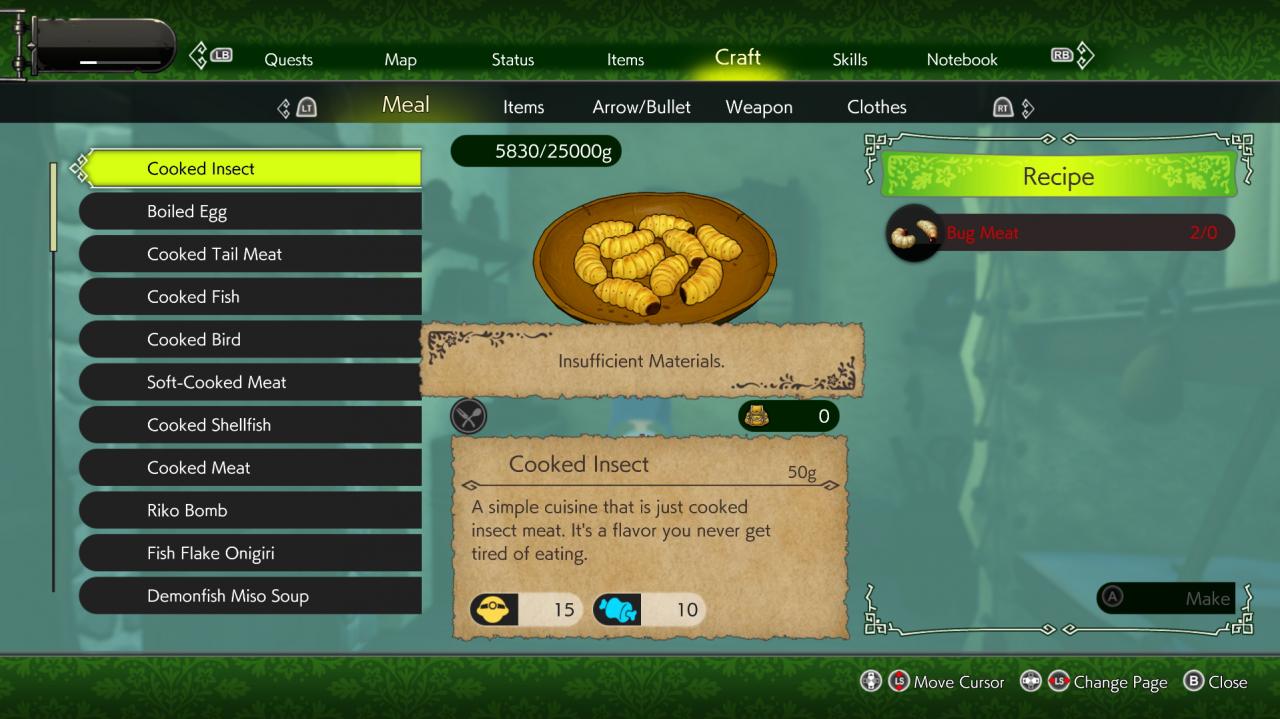
Seems self explanatory, Collect materials, craft items
You can get more crafting recipes through the skills tab. Except some cooking recipes are obtained through quests
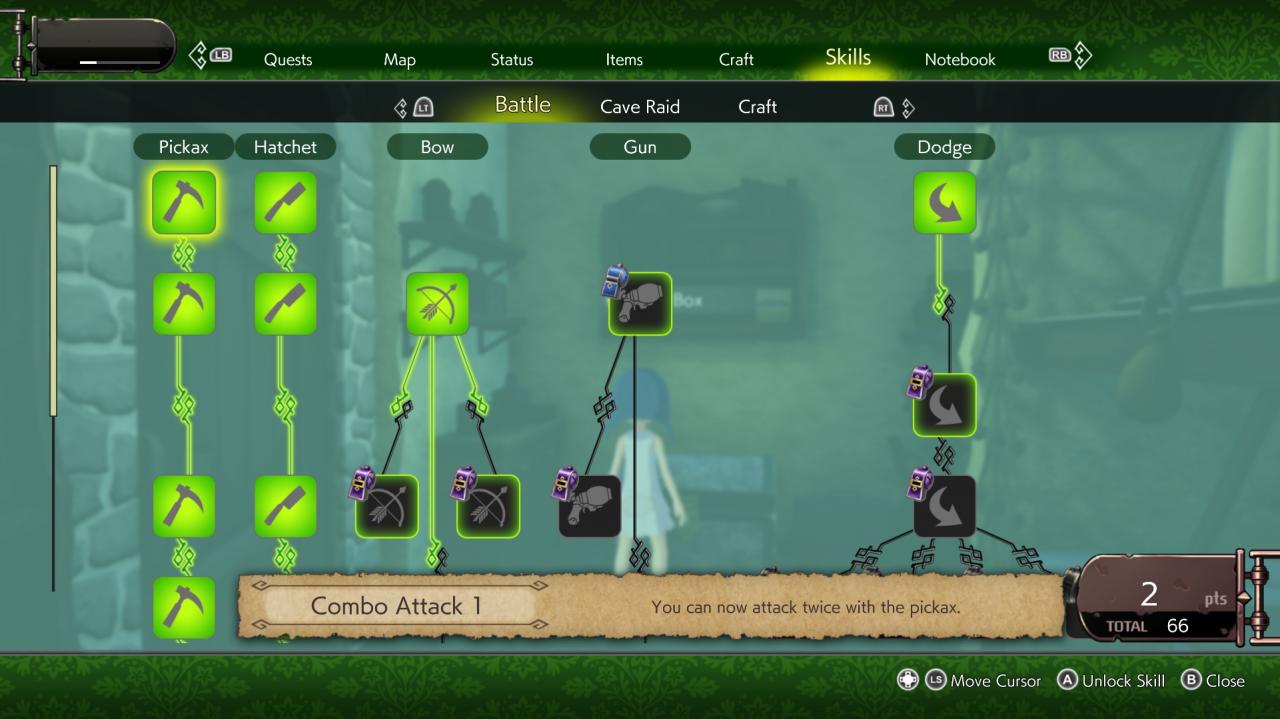
As you complete quests or sell relics, you will gain experience points in the top left of your screen. I have just edited my level out in pictures because minor spoilers. However I will say I am as of writing this, level 69. You start the game at level 1 and 0 skill points, you gain 1 skill point each level you go up from then on.
However skills are also locked behind whistle ranks as well. As you can see in the screenshot, the whistle icon in the top left of some grey’d out skill icons, that is the corresponding whistle rank you must be in order to unlock that skill
The skill tab is split into three sub tabs, each with its own skill tree
- Battle
These are your combat skills and is focused around your weapons. skills such as, dodge rolls, combo attacks, increase crit rate, decrease durability wear, decrease stamina usage, etc
- Cave raid
Here is where you will probably always upgrade first when you reach a new whistle rank. Things like Max bag weight increase, movement speed, stamina use decrease, status resistances and gathering upgrades, can all be found. Almost everything in this tree is a must have
- Craft
Here is where you get new crafting recipes and upgrade your item box storage. Super simple stuff.
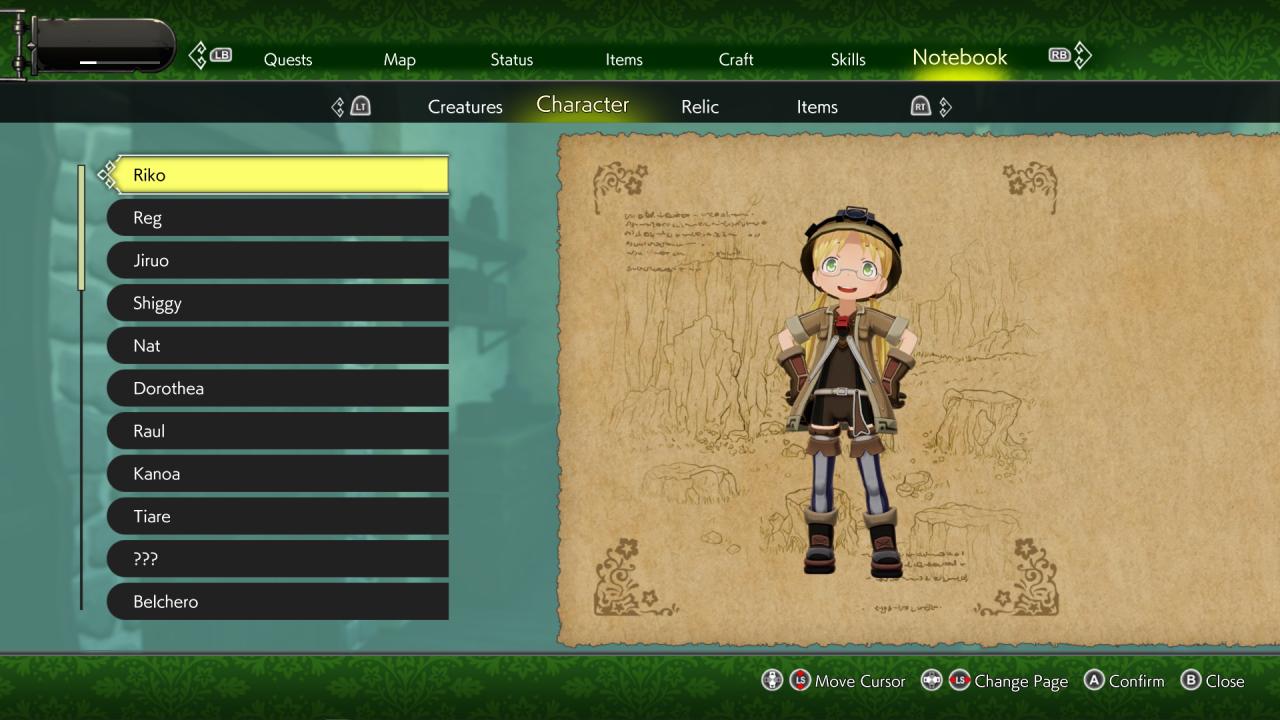
Here is not really important unless you like learning the basics of everything this game has so i’ll skim though here.
Creatures tab will only start to really get filled out once the buy a monocular or telescope from the foreign trade ship, you can use this to observe and record creature records here.
Characters tab with auto fill as you meet more people on your journey
Relics tab will fill out as you collect more relics
Items the same as the relics tab
Orth
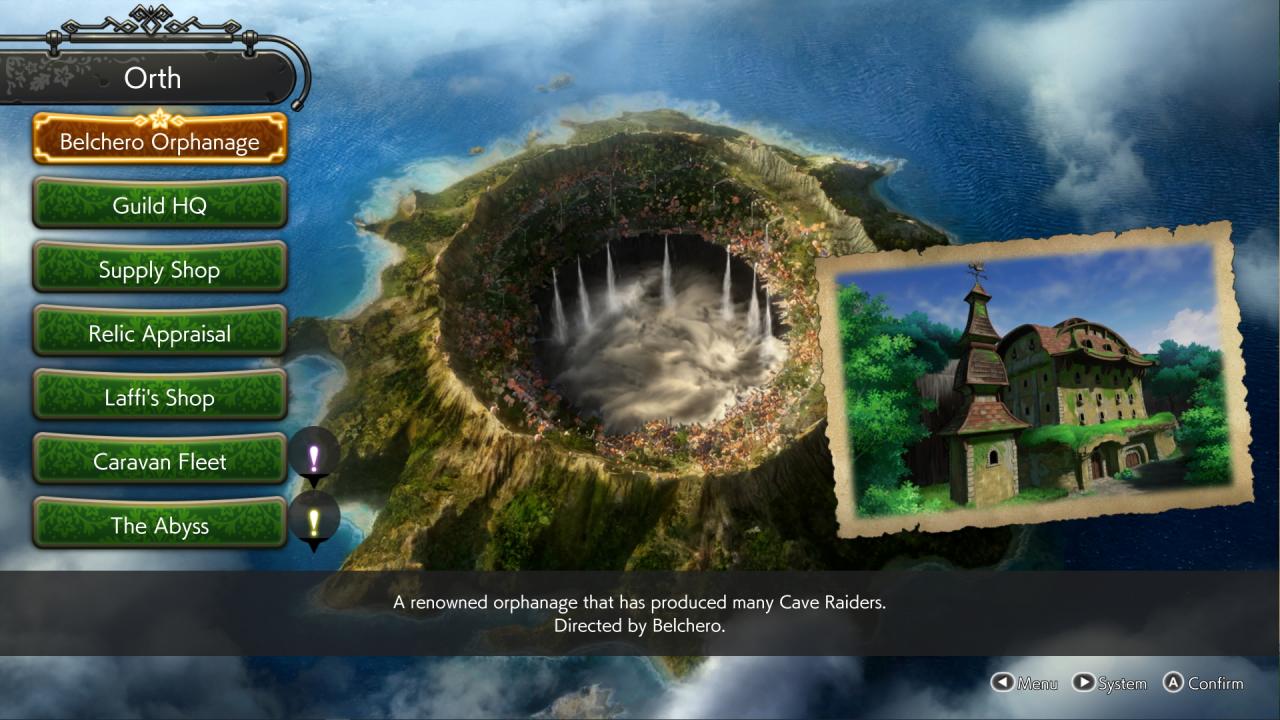
TADA! thats the town. Boring I know.
Its all basic stuff here so I’ll skim though it all
You’ll go here to your room to access your item box and save your game. There’s the classroom where you will sometimes go for quests. The other rooms are never used or only used once.
Collect and Submit Free quests here
Buy weapons, armor, basic items and equipment here. You can sell any excess crap too, tho most items have garbage resell value until late game.
As your whistle rank goes up, more items become available to you
When you collect relics in the abyss, you sell them to this guy. Sold relics will be your main source of income for a majority of the game. Selling relics grants you Money and experience points, the higher the relic’s grade (4 the lowest and 1 the highest), the more its worth in both orth and xp
Food and Ingredients are sold here. It’s best to buy a small stockpile in your items box of basic ingredients from this shop, they’re cheap and you’ll be cooking a variety of different foods though the game. As your whistle rank goes up, more items become available to you
A mix of goods like armors, recovery items, charms and foodstuffs. This is also where you buy the Monocular and Telescope from that was mentioned in the previous section.
Most of these goods can be quite expensive but apart from the antidotes (and armors), nothing in this store is craftable or naturally obtainable in the abyss
As your whistle rank goes up, more items become available to you
Hello Abyss
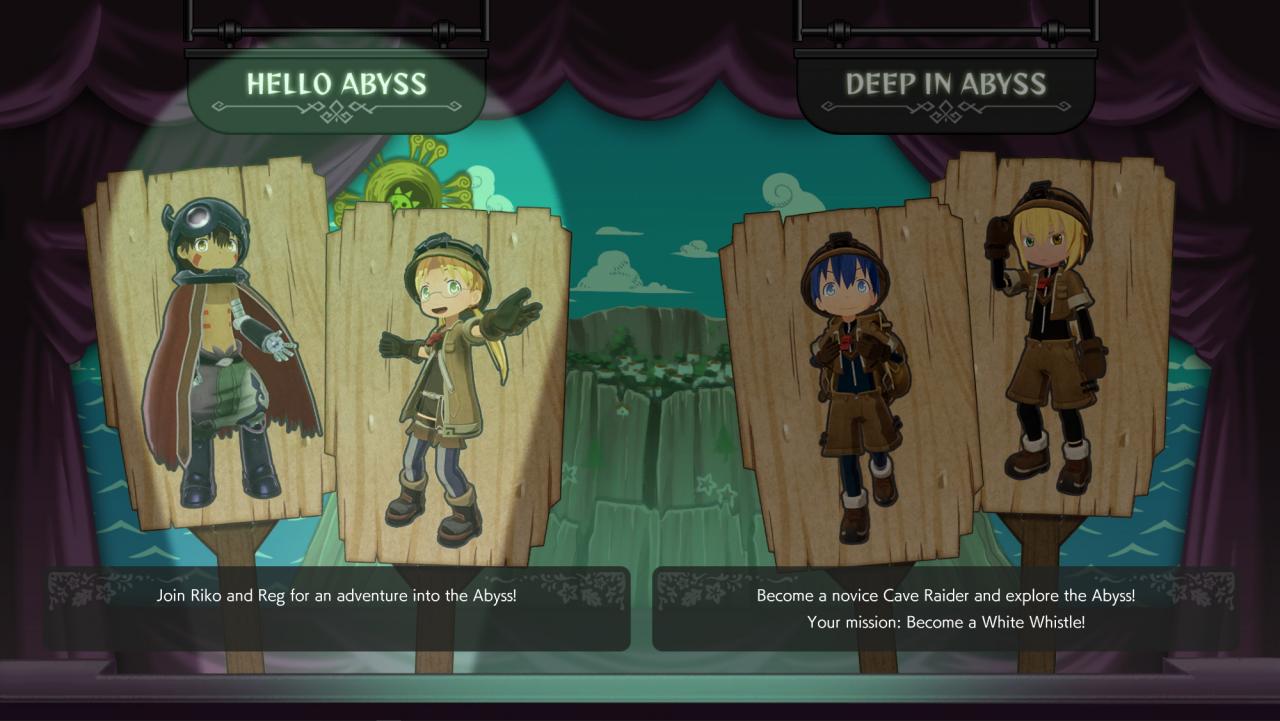
When you open a new game for the first time, you’ll be greeted with Two windows, one Labeled Hello Abyss, the other Deep in Abyss. But you cannot select the Deep in Abyss mode YET. You’re forced to play through Hello Abyss first
This mode you play as Riko, the main character from the source material manga/anime, whichever you prefer.
It sort of acts as a tutorial to the game where you get pulled along the same story line as the source material up until they leave the second layer. It is adapted slightly to work for the game so don’t expect it to be a 1:1
It teaches you the basics of exploration, hunger, combat, quick times and dangerous creatures.
Despite being called a tutorial, its still an open map with freedom to explore. Which can take 2-ish hours if you speed though it or 3-4 hours on average
You can hunt, explore, mine, analyze creatures with the monocular, and even craft.
When you open your menu, view all the tabs at the top. Quests, Map, Satus, Items, Craft, Skills, Notebook.
This was all explained earlier but none of its really needed for Hello Abyss mode.
But everything you do in this mode is exclusive to this mode. So don’t get hung up on anything because once you eventually finish it, no progress you do in this mode will carry over and thus, don’t get mad when you lose it all if you stick around for 5+ hours.
Deep in Abyss
This section will be an explanation of the basics for new starters and afterwards I’ll make an miniture walkthough of the start of the game so you dont get caught in a constant loop of farming for relics, only to have to immediately spend the money you just made to replenish your supplies and have to go farm more
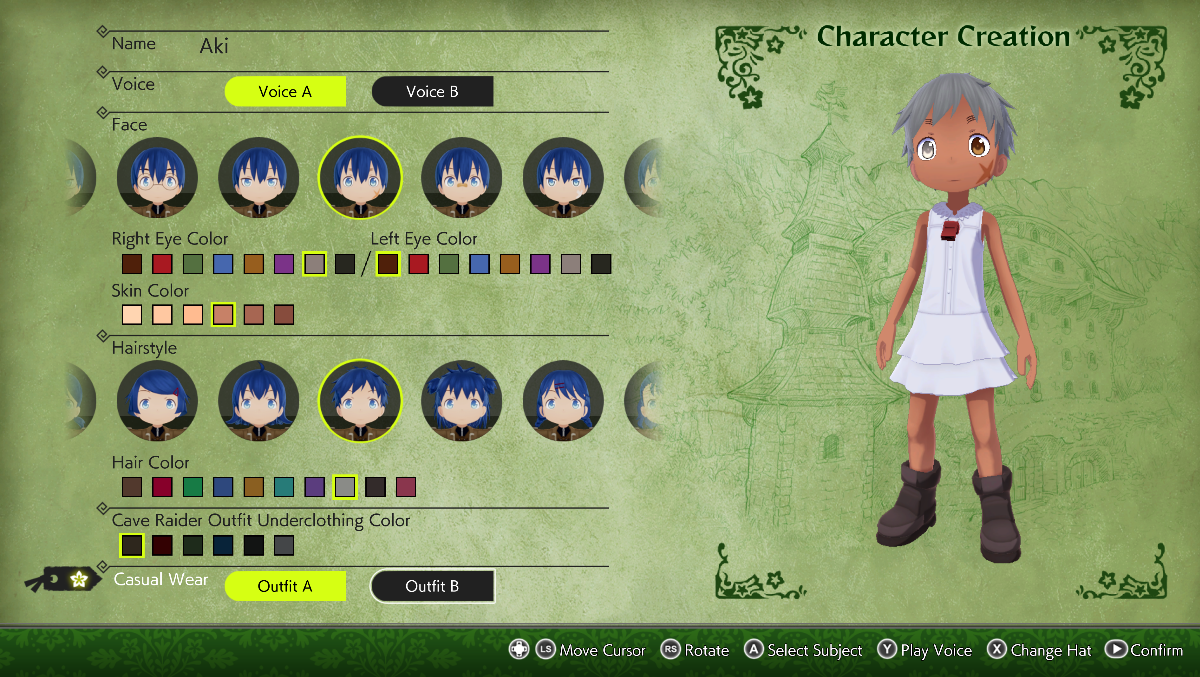 Once you start the game. You’ll be met with a rather basic character creation screen. Some with find it a little lacking, I personally find it charming for a game where it really does not matter at all. You can spend an hour making your character or just quickly randomize it.
It has a couple of neat features like being able to add hetero-chromatic eyes as well as being able to make your ‘male’ character wear a dress when not in the abyss. I played my game with JP voices and both the selectable character voices sounded feminine anyway so it felt as if you don’t get a choice but to make a tomboy character… lol
Start your adventure, and go though a bunch of dialogue. I wont spoil that, in your first cave raid you’ll quickly learn that you start out even weaker than Riko was in the Hello Abyss mode, so be careful as you’re still just as squishy if not more.
Useful things and tips 1
You can freely save when on the surface by returning to your room, but in the abyss, while it does auto save every time you change area, you will need mail balloons to manually save your game and guess what? You guessed it these are also weighted and consumable each save. So if you accidentally use one, or you accidentally cancel and close the save screen, Too bad. The Balloon is gone.
Luckily you can find broken balloons all over the abyss in every area that you can craft 2 into a working one for a pinch save
broken balloon 50grams
fixed balloon 80grams
Not much but I know when I first started playing it confused the hell out of me as to what it was.
when you complete a quest, a paper icon with number will appear on the right side of the screen. this indicates you have a quest completed and the number indicated how many are completed.
Jumping consumes quite a bit of hunger, but some times you need to leap. You can grab onto a climbable wall or rope by leaping directly at it.
The dodge mechanic does indeed have invincibility frames so when timed right you can avoid damage from attacks. Dark souls pro this entire game
Sunspheres are light sources. They can be set to the equipment wheel where you equip and throw like a grenade. When thrown they give off a bright light which gets brighter and lasts longer the low level the sunsphere came from.
Most hats in the game also come with a torch light on their heads that cant be turned on and off at will. A nifty tool for exploring through dark caves. Although not all hats have a light.
You cannot repair weapons in the Abyss, once an items durability hits zero, it breaks and is gone forever. Every time you return to Orth, all weapons and tools regain durability to max, so its best to not break them.
Always keep three types of weapons/tools on you at all times, unless you have a specific goal in mind that you need the extra free weight for. Because they stack and you cannot use an undamaged weapon/tool if you already have a partially used weapon of the same kind. This way you can swap weapons and continue to kill things without breaking your tools which can get costly if you do it often. At the start of the game this will be 1 pickax, 1 large hatchet, 1 small hatchet. But later on this will evolve into 1 pickax, 1 light pickax, 1 hatchet. Then you can make your own loadout as you see fit.
A pickax is always more powerful than its hatchet counterpart of the same rank. However they’re heavy and slow attacking weapons. When performing combos, in the time it takes to hit with the pickax twice, the hatchet can hit 4 times. Take this into account when making your loadout
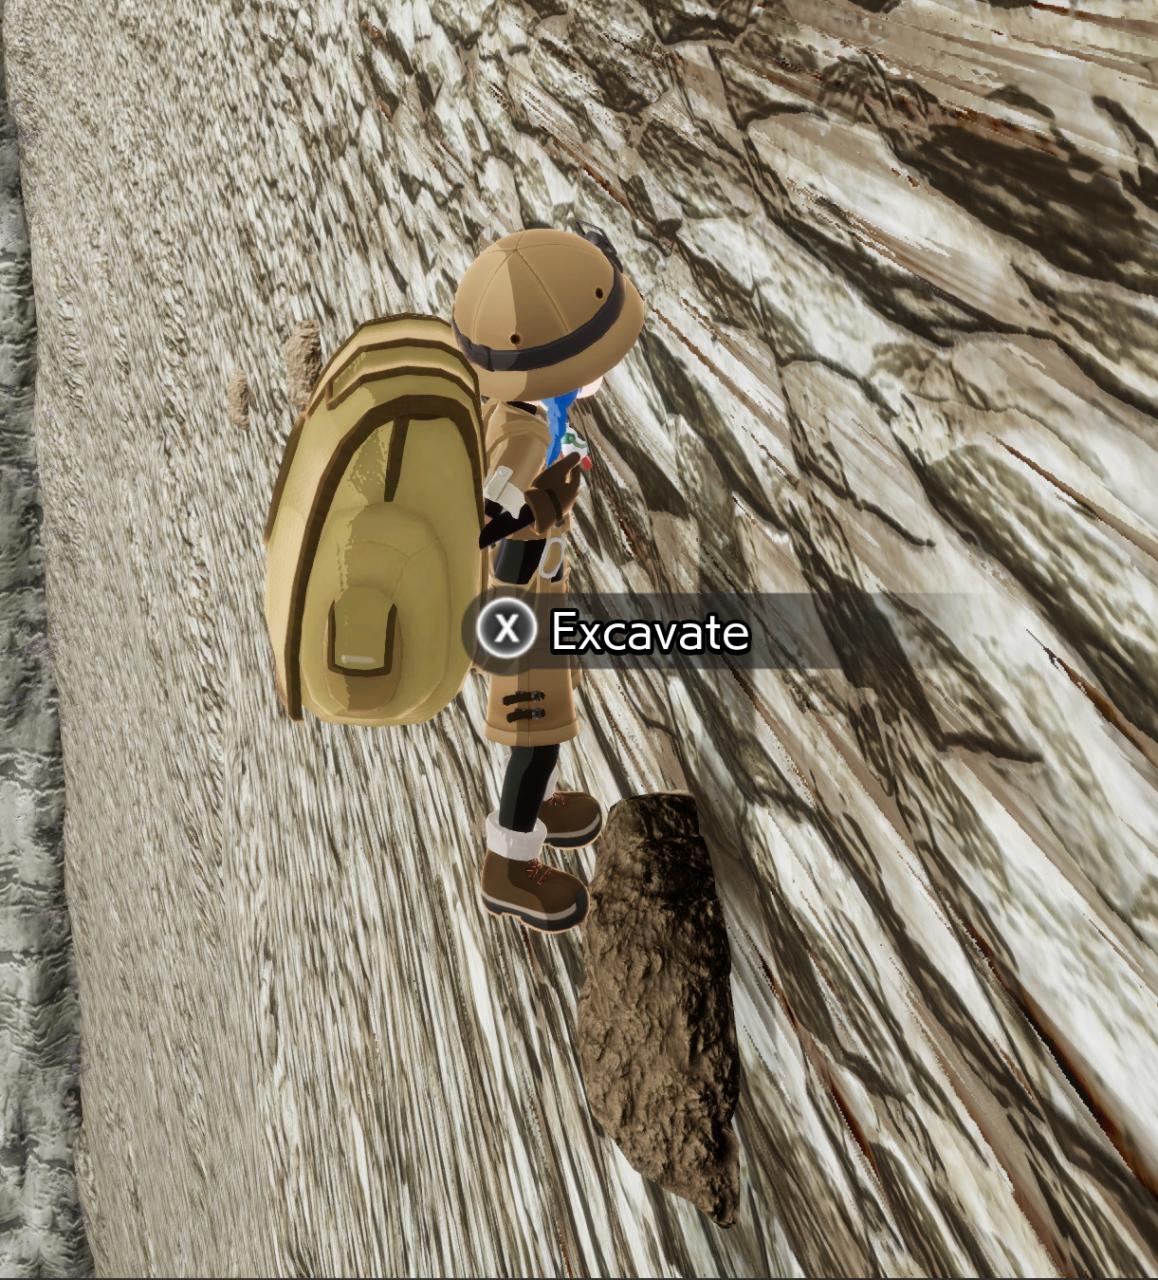
When spawning on climbable walls, mine locations can spawn out from the wall a bit. This can allow you to actually stand on the tops of them and give your stamina a chance to recover, before continuing your ascent/decent. While most do, Not all rocks spawn out far enough for this to happen though. You’ll eventually be able to tell which rocks have enough top leeway to stand on as you play more. These rocks are a good way to be able to reach locations you normally wouldn’t be able to earlier in the game. So don’t go blindingly mining every rock you see, or you may ruin your only route back. Your stamina bar refills faster the closer to the surface you are. This is boosted by higher whistle ranks
But it has its own set of rules around it.
You can fast travel down to any layer you’ve visited before at the cost of hunger. This hunger cost gets less as your whistle rank goes up. However you cannot fast travel back up unless you’re in a layer you’ve cleared the rank for.
- Red Whistle – No fast travel
- Blue Whistle – can fast travel only from the first layer up
- Moon Whistle – can fast travel from the second layer up
- Black Whistle – can fast travel from the Third and Fourth layer up
- You cannot fast travel from the 5th Layer
Note fast traveling upwards will also demand a HP sacrifice as well as Hunger, the further up you go, the bigger the cost. This decreases as your whistle rank goes up
At the start of the game, you will only have small stats, so always confirm you have a return route before you start climbing down cliffs. You might not have the stamina to return and can easily soft lock yourself, being unable to return, forcing you to give up on your dive.
Once you reach the 3rd layer and below, its not good to just willy nilly dive and just meander around. The third layer has the hardest difficulty curve of any stage in the game. I will bet half the players that get this far will quit playing the game here because of its difficulty.
When diving in the third layer and below, always have a specific goal in mind. Pack only for that goal and only take on one goal or quest at time.
Once you reach Black whistle and can fast travel to the entrance of the 5th layer, questing on layers 4 and 5 gets a million times easier
I honestly just recommend when reaching Moon whistle, just to power through the main quest line until black whistle ASAP
There’s 7 different status effects in the game,
- Red poison, slow HP loss overtime
- Blue poison, faster hunger loss
- Orb piercer poison, massive hp loss over time
- Paralysis, Immobilization
- Broken Leg, slow movement, cannot dodge, can still attack
- Broken Arm, cannot attack or run, moderate movement speed
You can buy charms from the Foreign trader that increases your resistance to each effect except Orb piercer poison. In the entire time I’ve played this game since writing this, I never once was infected with Red poison. So personally, you can forgo those charms. I’m pretty sure there’s only 2 monsters in the game that can even inflict this effect anyway.
Paralysis and broken bones are temporary effects that will pass after a bit of time but blue, red and orb piercer poisons will persist until you either cure them with an antidote, or you leave the abyss
Blue you will get infected with almost once every dive, as the flying mobs that spawn from the 5 min counter can almost all inflict blue poison.
Red and Blue poison antidotes are easy to craft on every layer, the items are easy to find plants. Orb piercer poison you will only ever encounter on the 4th layer in a couple of areas. But it is a problem if you get infected as you cannot craft antidotes, nor buy resistance charms. you can upgrade resistance in the skill tree, but this does sweet FA. The only way to obtain antidotes or charms is by feeding good food to Nanachi on the 4th layer, you can only do this once per dive however
You can also craft red and blue poison arrows to shoot from your bow. These arrows both do HP draining effects on enemies, however all enemies will have a resistance to one of them, so you have to find out which one yourself. I’ve never used poison arrows during my play through. But I’ve heard they can be quite useful is taking out large or dangerous enemies from a distance
Useful things and tips 2
You’ll find some areas that have a lip over a cliff that prompts you to ‘hammer in’ when you walk over it. These areas use an item called Pitons, which you wont get until much later in the game.
You will need 1 piston AND 1 rope to use on a piton location
On early layers, Pitons spots don’t really access anywhere worthwhile. But in later layers, they’re used like ropes and can greatly assist abyss traversing. However you can go the entire game without actually needing any
Sometimes in unusual or dangerous areas you’ll find backpacks on the ground, sparkling. You can get weapons and sometimes food from these, which can be helpful. The further down the abyss you are, the more valuable the items these packs contain.
Once you reach black whistle rank and can fast travel through the 4th layer as well as the 5th layer entrance, you can farm these backpacks in the crystal valley on layer 4 and the sea of corpses 1 tower on layer 5, for easy money.
These backpacks also drop when you defeat foreign cave raiders.
Food weighs a lot. Luckily your backpack doesn’t seem to have an item limit like the item box in your room does. Your backpack is solely limited to your maximum weight capacity.
Once you can buy Boiled eggs directly from Laffi (I cant remember if this is Blue whistle or Moon Whistle), theses are the most efficient cave raiding foods until very late game.
At only 20 grams each, they do 15 HP and 10 hunger. Which means while most other foods weight 100-150grams each and only cap out at 30 hunger per meal, you can eat 5-8 eggs and gain 50-80 hunger in the same weight. They cost 150 Orth each so it’ll cost you 14,850 Orth for a stack of 99 eggs. BUT one stack of 99 eggs is less than 2Kg of bag weight
Later on you can buy Type 4 Energy Rations from the Caravan Fleet, which are the most efficient food in the game at only 25 grams but 250 HP, 50 hunger and 30 stamina each
They are expensive however at 2000 Orth for 1
Upon reaching the 4th layer, you will eventually have a side quest from a black whistle
He gives you a grade 1 relic to give to the guild back in Orth.
This relic is actually one of the games most powerful items and can be equipped like a charm to your armor.
Before you hand in the quest, equip it to your armor and save your game in your room. When you hand in the quest, it shouldn’t remove the relic from your inventory and it will remain attached to your armor. (I am unsure if its a bug that may be patched later)
This relic increases your Attack power buy an insane margin and will make light work of even end game content.
Some side quests will catch you completely off guard by giving you steps that require certain equipment or durability to complete. Don’t let it happen to you. Quests of note are
- Ecology report, Take range weapons
- Relic Recover Quest, Take weapons
- Kanoa’s Lost Item 2, climb to the top of the room and you can collapse the ceiling
- High temp ecology study. Pack weapons
- Frigid Survival (side quest icon in cold heat layer) take multiple weapons and food
- Herb Search, pack weapons and food
After you complete Herb Search, you can talk to Ozen in her room. DO NOT DO THIS YET. I will have a category for this further down (SPOILERS!)
SPOILERS BELOW
Lets speed run the start. First Layer
From here on out, all images will be linked via imgur, partially to avoid people accidentally being spoiled while scrolling, but mostly because I hit the 29 image upload limit steam has. lol
When you start, you’ll be mining for basic relics, until you can explore more and go further into the first layer.
You’ll have fun with friends before the game will rather quickly remind you its not a happy go lucky environment. Once you get the quest to go explore the unexplored area in ‘jumping rock’ i recommend putting a hold on the main story for a bit and go farm some tail meat and soft meat from Man-toyers in the Gate and Gondola map areas for a bit.
Best spot is stay in the Gate area near the exit back to Orth and wait 5+ mins and man-toyers will just spawn near you, this means you’re always close by to get free heals and weapons repairs by returning to town. Don’t let your weapons break, they can get expensive to replace.
Once you have around 40 tail meats and/or Soft meats (they’re heavy so throw them in your item box each time you return to Orth, buy some salt from the Foreign trader. the salt will craft the soft meat into lighter, eatable food and 2x tail meats will do the same. Now you have a small stockpile of accessible food
Next we aim to complete a bunch of the free quests the guild gives you. There is thankfully no limit to how many free quests you can take on at once so just select them all
I recommend avoiding the Twin falls one for now because navigating that place early game is nightmare with cliffs you wont have the stamina to climb back up if you go down. Also you’ll jsut waste ropes if you have any. You’ll rarely ever have to go into that map anyway so its not worth exploring at all at this stage
Note that each “[X] Layer Part [Y]” quest will ask you to excavate or gather 50 times in each area of the layer. Killing mobs and harvesting their corpse does not count to this number at all so its honestly best to avoid as much killing as possible as you’ll only waste time and durability. Pick up every plant and mine every node until you complete each area, some areas you’ll have to leave the abyss and come back as there’s no enough there to complete it in one run.
Take a few every now and again back to your item box so you have them for later game, but most you can just drop if your bag gets overweight as there’s no plants that are exclusive to the first layer
You should have a few Orth saved up now by selling relics that you can easily just buy some Magotato from Laffi if you are starting to run out of tail and soft meats, its always easier to just buy your food, more so later game.
This early in the game, always mine orange glowing rock sites, even if you’ve already completed the gather quest for that area. Orange glowing mine sites will always hold relics worth more money and xp which is great for early game. These rarer relics on the first layer also weigh alot less than the standard sun stones, so you can carry more.
Once you have around 30,000 Orth, (120-150 relics worth) you can pretty much never have to worry about cash again until you get to Moon whistle
Here’s a few maps[imgur.com] I’ve made that note mining locations and rope spots for easy naivigating on some of the starting maps. Mining locations will spawn at these locations, but the depth they spawn at on climbable walls will often change, sometimes two will spawn at the same location on different depths.
These maps are not 100% complete but it should help speed the process up
Black icons are indications of the spot being underneath a platform
Note, save a few 1st layer relics and items in your item box for later
- 60x Hemostatis Leaf
- 13x Horizontal Layer Board
- 12x Vertical layer Board
From here on always make sure you carry 3-5 rope on you at all time and continue the main story until you reach the quest, Blue whistle trial. This quest has a boss fight at the end, so take a balloon and save once you each the bottom of the multi layer hill
I would recommend taking range weapons thought the treetop areas as the part you need to kill the monkeys, is somewhat annoying, however you can reach them with a melee weapon as they do jump close enough for you to hit them. Although be careful as you can still fall off the treetop and to your death. once you reach seeker camp, there’s not much else you can really do here. Quest a bit continue the main story. the second layer is short but sweet
Once you’re given your Moon Whistle Trial quest, same as the first one, another Boss awaits you and personally i found this one to be the hardest of all the whistle bosses. So remember to save when you’re walking down the Heavens Waterfall.
Also note, once you complete the side quest ‘Relic Recovery’ from Jiruo, you can encounter foreign cave raiders in the Heavens waterfall, so be careful as you cannot run from battle once encountered.
To avoid encounters, run along the side walls of the map.
MOOOOOOOON Whistle
Do you remember the relics and Hemostasis leaf i told you to save from the first layer? Now they come into play
I hope you like fishing, because you’re gonna hate it very soon.
in the Edge of the abyss area in the second layer, as well as Terminal pond, you will need to do alot of fishing for Limber Scales.
Collecting 23 to be exact. It’s a painfully long task but trust me
This task can be sped up with the Black whistle skill increase skin speed, which gives you two item drops per fish.
along with that, we need some rare relics from the second layer
- x4 Mushroom Ball
- x4 Fox Bone
- x2 Pulled Teeth
We lastly need to buy the entire cooks armor set from the supply store, this will cost a total 18,000 Orth
once you have all these, unlock the low class relic recipes skill in the craft tree.
This will allow us to create a set of armor and weapons that will last us until late game.
The relic set.
Relic pickax,400 atk
Relic Hatchet, 300 atk
Relic Hat, 100 def
Relic Garb, 160 def
Relic Pants, 135 def
Relic Glove, 75 def
Relic Shoes, 90 def
Relic weapons and Relic armor are top level sets in each crafting tier. Relic weapons also have the added bonus of having a high chance to land critical hits on everything
The only downside to the relic armor is that it does not have a headlamp, so it makes the 3rd layer caves really difficult to navigate.
Dark Souls Pro
This one quest is incredibly hard even for end game players.
Once you’ve completed Marulk’s quest line and saved the man from dying of poison, You will be able to talk to Ozen in her room. She demands you join her and when you refuse she challenges you to a duel
Ozen is an End game Boss that can be accessed from as soon as you’re a Moon Whistle
You can beat her without end game gear and there are a few ways to do this
Make good use of the Dodge I frames to get a few hits in between her slow animations. unless you have end game gear, you will likely only do chip damage where as she will likely crush you in a couple of hits, so bring A LOT of weapons
Once she hits 30% HP her movements speed up, so be aware
Relic weapons do huge damage, but against Ozen its still slightly better than chip damage. 3 low grade relic weapons is enough to take her down. if you have the combo skills unlocked as well, you can get 1-2 pickax hits in and 3-4 hatchet hits in before you need to back off or else she will grab you and launch you 25m in the air. You take Curse damage, and massive fall damage
Staying too close to her all the time will cause her to ground slam and AoE around her which will launch you back, the then throws rocks at you like the primate she is
Ranged weapons are not recommended as if you stay too far away from her she launches fast rocks at you which have high chance of breaking your bones. She also dashes at you and tries to pick you up to launch you into the air again.
If you’re not MLG Pro gamer enough to fortnite dance over her attacks then you will have to wait until you receive the entrusted relic quest on the 4th layer. This first grade relic you tasked with delivering during this quest, when equipped will give you a huge enough attack boost to make much quicker work of Ozen and defeat her rather quickly. You will still have to survive long enough to attack her however.
After you get her HP to zero, you’re met with a button mash quick time event. It’s easily passed and then you’ve won.
She rewards you with her hat, which has the best highest def stat of any armor in the game, you get (maybe another) 1st grade relic charm that increases your attack by an insane amount, and you get a replica of her white whistle, another equip-able charm that greatly increases your Health. Very useful for traveling in the 5th Layer
The two downsides to her hat are, it doesn’t have any charm slots, nor does it have a flashlight