
Night Mode is the risk-reward switch that veteran players swear by, and it’s hidden behind a surprisingly simple two-step process. You grab a special item near the first beacon in Fallgrim, haul it to the top of Marrow Keep, and flip the switch. That’s it. No boss gauntlet, no cryptic puzzle, no hidden questline. The payoff, however, is substantial: harder enemies, fatter loot drops, and access to four exclusive locations that simply don’t exist during the day.
The best part? You can toggle it on and off whenever you want. If the increased difficulty starts to wear you down, just walk back to the beacon and return to the daylight cycle.
Getting the Gloom-Bound Flame
Your journey starts in Fallgrim, right at the first beacon you encounter in the opening hours. Look for a glowing item resting next to the beacon structure itself — that’s the Gloom-Bound Flame, the key item that makes Night Mode possible.
Walk over and pick it up. There’s no fight guarding it, no platforming challenge, no hidden trigger. It’s sitting right there in the open. If you’ve already progressed past Fallgrim, you can fast-travel back to the first beacon and grab it at any time — it doesn’t disappear or become locked behind story progression.
Activating Night Mode at Marrow Keep
Once the Gloom-Bound Flame is in your inventory, make your way to Marrow Keep. This is the large fortress area you’ll reach during the main story — you can’t miss it. Climb to the top of the structure and find the beacon located there.
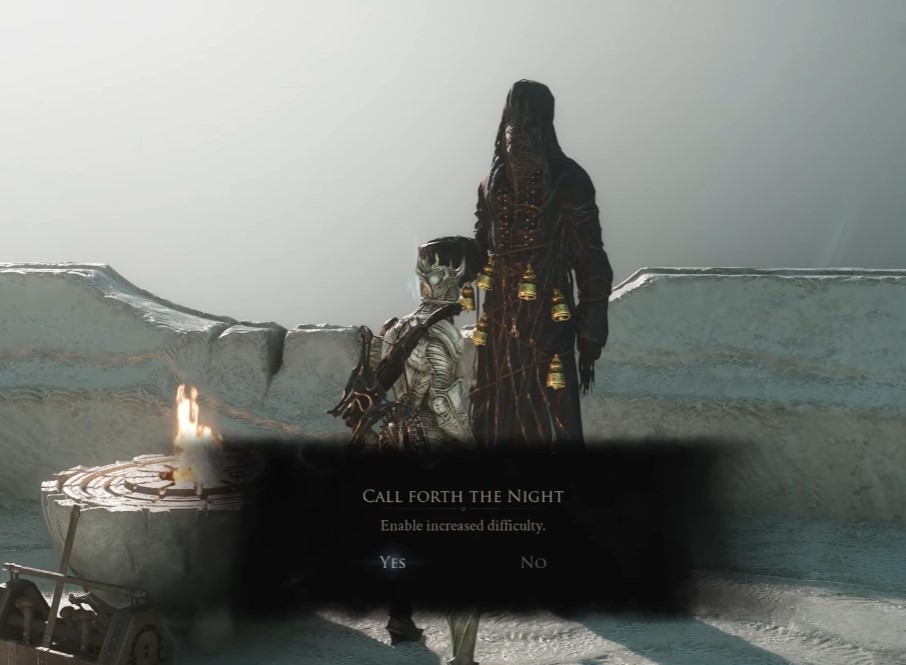
Interact with the beacon while holding the Gloom-Bound Flame, and Night Mode activates instantly. The screen will darken, enemy placements will shift, and the world will take on a distinctly more hostile atmosphere.
Tip: You don’t need to complete Marrow Keep’s boss or clear the area first. As long as you can physically reach the top beacon, you can activate Night Mode. Sprint past enemies if needed — the flame won’t drop on death.
What Actually Changes in Night Mode
Night Mode applies three global modifiers to your entire playthrough, not just the area around Marrow Keep:
| Modifier | Effect |
|---|---|
| Enemy Difficulty | Enemies hit harder and take more punishment |
| Gloom Rewards | Defeated enemies drop significantly more Gloom |
| Gold Coin Rewards | Gold Coin drops increase alongside Gloom |
The difficulty spike is noticeable but fair. Basic enemies that took two hits now take three or four, and their attack patterns feel more aggressive. Bosses don’t change mechanically, but their increased health pools mean longer fights — bring more healing items than you think you need.
The reward increase is the real draw. Gloom is Mortal Shell 2’s primary currency for upgrading your shell and weapons, and Night Mode effectively accelerates your progression curve by a significant margin. If you’re farming for a specific upgrade, Night Mode cuts the grind time roughly in half.
Note: Night Mode is fully reversible. Return to the Marrow Keep beacon and interact with it again to switch back to daytime. Your progress, items, and unlocked locations all persist regardless of which mode you’re in.
Four Exclusive Night-Only Locations
Night Mode isn’t just a difficulty toggle — it opens up content you literally cannot access during the day. Four locations change or become available:
1. Garrick’s Den
This one’s easy to miss. Head back to the tutorial area where you first learned to parry. The dungeon entrance sits just to the left of the beacon there. Inside, you’ll find a massive stash of Gloom Coins — easily one of the best early-game currency farms in the entire game.
2. Mushroom Village Dungeon
Near the mushroom village, cross the bridge adjacent to the settlement. This triggers a unique first-person dungeon that plays differently from the rest of the game. It’s a short, self-contained experience with its own rewards at the end, and it’s only accessible during Night Mode.
3. Forgotten Tower
A mysterious NPC spawns at the Forgotten Tower exclusively during Night Mode. This NPC wants a specific item — we’re not spoiling what it is or where to find it — and will trade it for a unique reward. If you’ve been hoarding rare items, check this tower before you use anything valuable.
4. Night Merchant
A special merchant appears at night and sells unique Tar Stones along with crafting materials you can’t buy from any daytime vendor. Tar Stones are used for weapon upgrades, and the Night Merchant’s stock rotates, so check back periodically to see what’s available.
Should You Turn It On Early?
Here’s the honest take: if you’re still getting comfortable with the combat system, wait until you’ve upgraded your shell at least once or twice before flipping on Night Mode. The early game is punishing enough without the difficulty multiplier. But if you’re confident in your parry timing and want to accelerate your character progression, Night Mode is the best tool in the game for that purpose.
The four exclusive locations alone justify turning it on at least once to explore. Even if you switch back to daytime afterward, the Gloom Coins from Garrick’s Den and the Tar Stones from the Night Merchant are permanent gains that carry over regardless of your current mode.


