This guide avoids plot spoilers, but contains solutions for all of the game’s puzzles. Only use this guide if you truly get stuck!
Introduction
To get maximum enjoyment out of Nine Noir Lives, I suggest taking your time with the game, and not rushing. A lot of the game’s charm lies in its humor, and it’s possible to miss a lot of the worldbuilding and jokes if you just beeline towards the finish.
Every object or person in the game world has three interactions: USE/GRAB, LOOK, and LICK. (For people, TALK TO replaces USE/GRAB).
Explore thoroughly, because practically every item, scene, or character in the game has at least one unique message per action – and frequently two. In addition to the classic LOOK action, which provides loads of flavor text as you examine scenes, Nine Noir Lives’ LICK action brings a whole new meaning to the term “flavor text”. While you are only required to lick a handful of things to finish the game, you can lick or attempt to lick everything in the game, usually to great comedic effect.
Most characters also have unique reactions to each of your inventory items. Go around town showing people your oddball collection of adventure game miscellany to see what they have to say, it’s fun. There are usually custom responses for each attempted object combination, as well.
Section coming soon
A Tiki Tutorial
This is a tutorial area that doesn’t have a whole lot of bearing over the story, so it is a great opportunity to familiarize yourself with the controls, and get used to the idea of looking at and licking everything in sight.
Have a look around the Tiki Bar, and talk to the proprietor about everything; we are unsuccessful in serving our papers, but you will get a bit of context about why we are here, and earn the AHMBIHANCE achievement.
Present your papers to the owner. They aren’t interested.
Maybe the guy in back can help? Present your papers to him, as well. He’s not interested, either.
Well, there’s another “employee” in this room! It even has an employee name tag. Slap the papers on the cactus, and Cuddles will successfully complete his mission, unlocking IP JUSTICE.
The Case Begins
Before grabbing the gift, have a look around. You can find your DETECTIVE BADGE hidden underneath a couch cushion, and there’s a RECIPE BOOK tucked away on one of the research shelves that Cuddles thinks may come in handy later. Finally, the present on the table contains a TAPE RECORDER, heretofore nicknamed “Ramon”. RRRAMON.
Grabbing the present triggers some scenes, and the phone will ring. Answer, and the Chief of Police tells you that there’s been a “disturbance” down at the Knitty Kitty club, a den of sin owned by the notorious Montameeuw Crime Family.
Before leaving the office, we can now further investigate Cuddles’ desk. You can call the professor at Mouse Shell Bell Bunny Bathtub for a small Easter egg, but of particular interest is the desk drawer, which contains a SJABLOON COIN. There’s also some booze in here, which will be of interest much later, so don’t forget about it.
Head out to the map, and over to the Knitty Kitty club. Outside, you will meet Officer Krakowski, so have a chat with him (SNOB COP). He’s not too forthcoming about the details, but according to him, there’s been a murder! He will not let you in without your badge, which we’ve already found, and a permit, which we are lacking.
Going left leads you to the back alley. There’s an old computer with a partly faded TASTE-O-TRON label laying in the street that you can investigate, and even turn on, but it’s asking for a passcode that we do not have. Also, you can go dumpster diving, which turns up a BAG OF GEARS and an OLD SHOE. Since everything not nailed down is useful in adventure games, why not snag them? (DUMPSTER DIVING).
To get the permit, go back to the office. Speak to Tabby, and she will give you a POST IT with the number for the police station. Use the phone in your office, and input the number BIRD SNOWFLAKE MOUSE BELL SHELL to connect to the lovely and endlessly cheerful Edna. Then, chat with Tabby again and grab the PERMIT from her desk.
Back at the club, show the Permit and Badge to Krakowski, and he will let you in. (And In… We… Go)
The Knitty Kitty Club
You will be led to the corpse, lying on the carpet by the stage.
Try to examine the corpse to discover we are not allowed to do so until the body has been photographed by an official police photographer. Speak to Fuzzball again and ask him about everything for a full rundown of the situation. It’s important to press him on the photographer to gain access to a new map location: The police station. We’ll go there in a bit.
By the bar, a suspicious stain is on the carpet. Examine it, and you will find a comically large footprint beside a discarded DRINKING GLASS, which you should take.
Now, let’s explore a bit. Main points of interest:
- If you go backstage, you will find Kitty’s dressing room, which is locked up tight.
- The incredibly inviting golden elevator to mob boss Bartholomew’s office requires keycard access, so that’s off-limits for the time being.
- The large bartender, Champion Crusher Tinkle, will give his testimony from the previous night, so you will definitely want to hear what he has to say.
- There’s an inviting bowl of PEANUTS on the bar here, but Tinkle won’t let us have one.
To the far left, there’s a door to the basement near the coat-check. The basement is dark, but look/feel/lick around, and you will meet the janitor, a conspiracy theorist crackpot named Pepe, who will provide his testimony from the previous night as well.
When you’ve finished talking to him, examine his printing press in the corner. It’s broken, but you can open up the maintenance panel using your coin as a makeshift screwdriver. Use your gears on the machine, and arrange them as in the screenshot below.
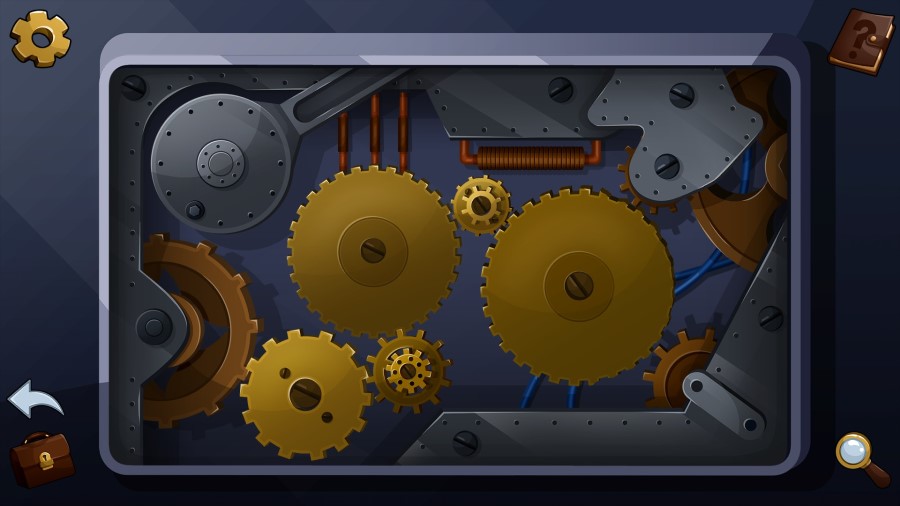
Once arranged, back out of this screen and press the button. The press will begin operating, and will spit out a MANUAL that was jammed in the machine.
Pepe will move towards the machine which is now in operation. Turn off the lights, and then QUICKLY take the PYRAMID KEY that is laying enticingly on the velvet cushion. (ZOINK)
Immediately before heading upstairs, interact with the second switch at the bottom of the stairs. As soon as you get upstairs, QUICKLY snag a PEANUT from the bowl while Tinkle’s back is turned. GIANT PEANUT
Now that we have a key, we can enter the dressing room backstage. There’s not much of interest in here for now, of course, except the large colorful chest. Open it to finally meet the sultry Miss Kitty (UNBOXED). Speak to her fully to get her testimony from the previous night, and then take the PUNCH CARD from the chest she was hiding in.
We still can’t investigate the body because the photographer hasn’t shown up, so leave the Kitty Club and go to Police HQ. As a reminder, if you don’t see this location on your map, chat with Fuzzball some more.
Upon your arrival, there’s some free STICKY TAPE on the chair and some CAKE CRUMBS on the floor. Also, there’s a bunch of interesting stuff on the bulletin board, including a KRAKOWSKI INCIDENT POSTER and a BAKERY FLYER, both of which you should take. There’s a milk vending machine, but it’s out-of-order for the time being – note this for later.
Ring the bell or knock on the door, but Edna is busy (Customer Service). Use your glass on the door to eavesdrop on the conversation. There’s been a cake mishap, and we need a replacement cake in order to calm Edna down.
Return to the Knitty Kitty club, and go to the back alley. We now have a passcode for the computer here, 641, which is the solution to the math problem on the manual cover. The computer comes to life, and we meet Storn, low-key one of my favorite characters in the game. Exhaust all dialogue with Storn, and enjoy this character while you can, because they won’t be around long.
When you are ready, give Storn the punchcard from the dressing room, and Storn will become Super-Storn, who has a whole different set of dialogue and new responses to all inventory items. If you give Super-Storn the cake crumbs, the flavor of the destroyed cake will be identified. (SUPER STORN)
Next, return to the office. Specifically the telephone, where you can call the bakery at Butterfly, Shell, Bunny, Bunny, Bathtub. Kibbler, the proprieter, is another really fun character, who has quite a bit to say about running a pirate-themed bakery. Ask him about Edna, and follow this dialogue chain to its conclusion. During the quiz, you will fail the first 2 questions no matter what you answer, but will succeed on the third one.
Go back to Police HQ, and on your way out of the office, Tabby will give you a HOOK HAND, and you should can grab the CAKE BOX from the chair. In HQ, use cake on door, and Edna will come out for a chat (SEABIRTHDAY SURPRISE). Speak to her fully to learn that all photographers are out sick. There’s 0 chance of getting one to come out. Darn!
Go back to Fuzzball, and report on the photographer situation. He doesn’t believe you at all, so we will have to find another way of obtaining the evidence we need.
Show him the Krakowski Peanut Flyer, and the response is really fishy, but he doesn’t cough up the info. Krakowski himself doesn’t either. But if you show the flyer to Edna over in HQ, she will tell you that Krakowski has a certain reaction to peanuts. She also gives you a slice of CAKE for Fuzzball. But we aren’t going to give the cake to Fuzzball at all, we will use it for our own nefarious purposes.
It’s too obvious if we put the large peanut on the cake, so back at the Kitty club, hand the large peanut to Tinkle, who will demonstrate his crushing skills and turn it into a fine powder. Dust the powder over the cake, and hand it to Krakowski, who has himself a little nap. (FAT LITTLE ANGEL)
Report this to Fuzzball, who runs off. Finally, we can investigate the body.
In the closeup of the body, investigate fully to understand the situation. You will find BROWN SEEDS scattered around the floor. In Edgar’s hand, there is a BAG OF NIP. Finally, there is a BUSINESS CARD in the vest pocket. When you back out, there is a short scene, and then you can also investigate the wall vent nearby, where you find MYSTERIOUS PHRASE. (KITTY TINY HANDS)
That’s everything complete for our initial investigations. Once you’re ready, leave the club for a scene, and then you will automatically go back to your office for a conversation with Tabby. Discuss all of the evidence with her, and then you are prompted to visit your office to call the professor (Mouse Shell Bell Bunny Bathtub) to learn about the seeds and receive a new lead.
After a few more scenes, it’s off to school!
Tabby Goes to School
Speak fully to the character at the desk, and then show her your scrap of paper. You will be given a multi-page PRINTOUT with lots of films. Locate “gentlecat” in the G section, and select it. It is found in “Monkey 02”.
Exit right to the library, and examine the microfilm cabinet. Open the Monkey drawer, and take the FILM CANISTER. (THERE’S A MONKEY IN MY POCKET)
Next, examine the microfilm reader. Place the canister into the slot, but the text is too dark to read. Open the side-panel containing the light bulb, which is too hot to take out. Examine the rest of the room before leaving, particularly the high window.
Exit left twice to find the school museum. There’s lots of fun lore in here, so take your time, but the items of importance are the LIGHT BULB and the SPEAR. Take them. (SHARP AND POINTY)
Next, we need the towel behind the reception desk. Try to take it, and then ask the receptionist about it, fully exhausting the dialogue. We can have the towel if students are being noisy, but as of right now, it’s quiet.
Exit right to the library. Using the spear, open the window latch. Then, walk close to the sliding doors, so that they slide open, and affix the brass knuckles from your inventory onto the track, jamming the door open. Once this is done, you can now collect the TOWEL from reception. (ITS MUFFLING TIME!)
Using the towel, replace the light bulbs within the socket. Tabby will read the newspaper article. Once you have finished, there will be a few more automatic scenes, and we regain control of Cuddles.
Start by returning to the Kitty Club. Super storn is gone, and the entrance now has a memorial for Edgar (THE SPRAWL). The basement is locked, and the corpse has been cleaned up.
In Kitty’s dressing room, she has moved her furniture around a bit, and you can now spot a heart-shaped button that heats things up a bit. Press it, and take the WHIP. (IS THAT…?)
Then, talk to Tinkle, who will let you upstairs to talk to Bartholomew. After exhausting all dialogue, you will receive a new map location, an exclusive club called The Establishment, and will have another encounter with Desiree on your way back down.
Outside Meowy’s, there’s a poster slapped on the wall, that just barely conceals something behind it. Examine the poster – Cuddles sure loves that Lappy and Geronimo amusement park, but unfortunately it closed down. Try to remove the poster, but it’s very stuck – not even our sharp hook can scrape it off. Go inside.
We meet the incredibly optimistic and delightful Meowy, who is the most feline cat I’ve seen since Rover from Cat President. He gives us a promotional MOOD RING. Have a look around the store, and chat with Meowy. We learn we can get the food basket if we help with the promotion, and we receive PROMOTIONAL MATERIALS.
There’s also an exchange system in the store, and Meowy has a hypnotic hat and bubble bath he is willing to trade for historic clothing. We have some “historic clothing” with us already – Give Meowy the old shoe, and he gladly takes it! Collect your HYPNOSIS KIT.
Finally, have a chat with Cosmo, Meowy’s assistant. Cosmo agrees to take a look at your seeds. However, once he sees them, Cosmo freaks out. He lets slip the name of a new location, but after that, clams up tight. We won’t be able to get anything more out of him for quite a while.
This location is a theater. Upon arrival, notice Bartholomew’s pawprints in the cement. You can lift some FINGERPRINTS from them using the Sticky Tape. That will definitely come in handy later. An Alphonso cutout is here, which Cuddles hates quite a bit. The ticket agent prevents you from entering the theater, but flashing your badge will scare him into letting you enter.
Inside, meet Tybalt Magtheridon, a pompous performer. He’s scared of pickles.
After he stands aside, try to remove the cloth from the large green object on the pedestal. Tybalt tries to stop you, but if you are persistent, he runs away into Concessions. Be sure to take the RED BLANKET from the floor, and then continue backstage, to meet Scarlett. You can talk to her fully, but she doesn’t have too much to say for now.
Visit Tybalt in concessions. There’s a free OSCAR PLUSHIE here for grabs. Then, speak to Tybalt fully. He’s quite an actor, with a booming voice, so maybe he will help promote Meowy’s store. Show him the promotional materials. Unfortunately, they aren’t good enough.
Make a quick trip back to your office. Show Tabby the materials, and she will spice them up for you, and give you a SCRIPT. Return to the theater and give Tybalt the script – he likes it! Unfortunately, he is still scared of the giant pickle.
Using your hat, hypnotize him. Then, leave the room and put on the large green suit (WIBBLY WOBBLY). Return, and while in the suit, scare him with your mini green plushie. He is cured! (WOOGA WOOGA WOOGA)
Show him the script one more time, and enjoy the show. After the performance, you will get a CREEPY MUG for your troubles. Also, make a quick stop back at Meowy’s, where the merchandise has flown off the shelves, and receive your well-earned GIFT BASKET as well. (PROMOTION SQUARED)
The Establishment
Knock on the door. Celestine speaks to us from the other side, and flat refuses to open the door as long as Duncan is there. We will need to get rid of him.
Exhaust all dialogue with Duncan, and then knock on the door a second time. Speak fully to Celestine again, and get permission to open the postbox. Then, open the postbox, remove the PACKAGE inside, and open it via the inventory to receive a CRAZY TRANSLATION BOOK. Read the book via the inventory for a full list of terms.
Next, use the book on Duncan. This will pull up a large number of terms in the dialogue. We need to ask Duncan what he wants. Use the terms: KEPOKTI QUALA CHUMGA. It turns out that Duncan wants to sell milk to the thirsty cats inside – he thinks they are there because of the sign.
Unfortunately, we are at an impasse. If you explain to Duncan that there’s no thirsty cats, he doesn’t believe you, and when you try to get Celestine to turn off the sign, he doesn’t. We need to take matters into our own hands.
Combine the whip and hook to make a WHIPHOOK ™ (I’M GOING TO BE RICH). Use this on the ladder to pull it down, and ascend to the roof. Open the window and chat with Humboldt, a big cat who is enjoying a bath in the room below. He agrees the only way into the club is to get rid of Duncan.
Using your blanket, cover the sign. The problem of the sign is now CERTAINLY solved. (ER…)
Go back downstairs, shoo off Duncan, and enter the club. Inside the club, you won’t get far – Celestine restricts your movement to just a small space in the entryway. Speak to him fully, and then pop back up to the roof.
Ask Humboldt through the window about entry to the club, and then appease his hunger by tossing down your hard-earned gift basket of food. Humboldt will toss up his MEMBERSHIP CARD. While you’re here, snake the whiphook down the open vent, and leave it in place. Then, card in hand, walk back down and enter the club.
When you show the card to Celestine, he begrudgingly allows you access, and gives you a complimentary BAG, which you should open via the inventory to find some SCENTED OIL. Then, exit right, to the locker room.
Edgar’s locker is here, but it’s locked, and we lack the key. Stash your stuff in your own locker, change your clothes, and walk down the hall to visit Humboldt in person (HIGH FASHION).
Humboldt has Edgar’s key, but is hesitant to break the rules and give it to you – however, he can be bribed if you help him relax. That bubble bath from Meowy’s would be awful handy here, but unfortunately we don’t have it yet. We can’t do anything else here for the time being, so return to the locker room, change back, and grab your stuff.
Creative Mixology
This recipe requires a “vessel of hideous visage”, which is the creepy mug you got for helping Tybalt. Into this mug, we need: Something oily, something sweet, something angry, something neat, and a touch of moonlight. In that order.
* Something oily: Add some bath oil.
* Something sweet: Return to the police station, where the milk machine is no longer out-of-order. Place your coin into the slot and buy a sweet honey milk. Add this to the mug.
* Something angry: If you try to wear your mood ring, it does not work. Complain to Meowy, and learn your fur is too thick. LICK your mood ring, and it turns blue. Blue represents calm. Visit the theater, exterior, where the display Cuddles hates sits. Kick the display, and immediately lick the mood ring: it turns red, representing anger. Add to the drink. (ALFONSO’S TOUCH)
* Something neat: According to the glossary, “neat” is just booze, straight-up. There is booze in the desk drawer in your office. Did you forget it was there? In my first playthrough, I sure did. Add it to your drink.
* Moonlight: The moon is visible from the alley to the left of the Kitty Club. The moon is too high up BUT the nasty alley water just sitting there. Add it to your drink.
Combining these five ingredients creates the almighty cocktail, Paintstripper (DO PEOPLE DRINK THIS?). Bring painstripper to Meowy’s, and remove the stubborn poster, revealing the same symbol that is on the bag of Nip.
Enter, and confront Cosmo again. We get some shocking story revelations, and are left holding Cosmo’s WIG. Don’t let this opportunity go to waste, and immediately give the wig to Meowy, who will be delighted to part with the BUBBLE BATH after you spin another tall tale.
Then, with your whiphook still snugly in the vent of the Establishment rooftop, toss the bubble bath down to Humboldt through the window. He’ll have a nap.
You can now re-enter the establishment, change clothes & stash items, and visit the bathing room, where the KEY is in plain sight. You can’t smuggle the key out through the metal detector, but you can remove the vent and attach it to the whiphook. Then, you can change again, return to the roof, and grab the WHIPHOOK and KEY, and then finally, return to the locker room a third time, to open Edgar’s safe. A PHOTO is inside. Examine the photo closely in your inventory. (EVIDENCEZILLA)
Scarlett’s Mission
When you return to the Knitty Kitty, you will find it securely locked, but fortunately you still have the skeleton key, which will disappear when you use it. (BREAKING AND ENTERING)
The elevator card will get you upstairs, and you can finally poke around in Bartholomew’s office.
You will find a safe under the carpet. Examine closely, and turn it on. Entry requires 2FA – both a pin and biometrics.
We already have the biometrics – the fingerprints lifted from the Walk of Fame. The photo here hints at this puzzle solution in case you had not figured it out.
For the PIN, we will have to look around the room. If you LICK the globe, Cuddles notes how one particular spot is smooth. Cross-referencing this with the large map on the wall, we can pinpoint the coordinates of the location. You have to eyeball this a bit, but 1 5 3 5 is the correct code.
There’s nothing in here to take for your inventory, but plenty of shocking evidence to look at. (MERELY LAID ASIDE)
Once you’ve seen everything, return to Scarlett for another heart-to-heart.
She tells us about a new location, the Memorial Gardens.
The Memorial Gardens
The small courtyard to the right has a new take on a familiar face. Nothing much to do here for now. Meanwhile, the mausoleum to the left is sealed, and has a shield-shaped keyhole.
Let’s ask someone who may know about this area. Go to the theater, where Tybalt is still chilling in the Concessions room. He’s very generous, and outright gives us his FAMILY CREST.
Returning to the Gardens, use the crest to enter the tomb. Any time you try to move the lid of the casket, a voice from the darkness stops you. We need light.
Exit, and return to the courtyard with the giant vegunbleiter. In close-up, notice the circular indentation on the pressure plate, and place the gnome upon it. The gnome is incinerated, and a nice roaring fire is going. (WITH FIERY EYES)
Next, jam your mini-oscar onto the short stick, and coat it with bath oil. Boom! Instant torch. Light it on fire, and return to fight the darkness. This triggers an exciting scene, and Mousezilla gets away!
Examine the casket once again to find a hole and a COSTUME TAG for the taking. Exit through the hole to find yourself back in the gardens. (UNVEILED)
There’s nothing else to do in this location, so it’s time to return to Tabby. Back in your office, you will present her with the evidence you’ve found, and then you are paid a visit by an unexpected guest.
Tabby Goes Shopping
We now need to indulge Bea in her twisted little murder investigation fantasy.
- First station: Examine the broken cat. Return to the office and steal some BANDAGES from the mummy. Bandage the dummy (MOON HEALING).
Remove the BANDAGE again.(DOCTOR EVIL) Take the CHEESE GRATER. - Second station: Speak to the dummy, and then show the cheese grater to the dummy. Hit the dummy with your brass knuckles.
- Third station: Hit the dummy, and then tie the dummy up with the bandages. (NO SURVIVORS)
After this sequence, Tabby will automatically steal a peek at Bea’s ledger, and dash back to the office.
In Hot Pursuit
The junkyard has a massive drug operation hidden away amidst the piles of garbage.
Find Duncan in the cabin, where he refuses to speak to you in any meaningful way. A discarded Mousezilla costume lays on the floor.
Explore the location. If you go down the ladder, you will find a small, locked tank. The lock is pretty rusty, and it can be completely removed with the remnants of your paintstripper cocktail. Reach inside the tube for a GREEN WORM.
Inside the fridge nearby, there’s a NOTE, and a MANNEQUIN HEAD frozen within a block of ice. While you can take the note right away, you will have to repeatedly lick the ice to thaw it out before the head can be taken. (THE OL LICKEROO)
Next, use the nearby phone to call Tabby at the office. The first time you call is a conversation where Cuddles checks in, and the second time you call, there are several dialogue options to go through. Most notably, you learn about the interesting properties of the worm you’ve found. (WORKMLICKER, GOOPSUCKER)
Returning upstairs, place the head on the sharp post that is closest to the window, and then go inside and open the window. Speak to Duncan, and he will leave. Follow him outside and push him off the ledge, into the vat of worms. When you meet him downstairs, he is lucid. (THE PLOT THICKENS)
Upon returning up the ladder, however, Cuddles is in for some surprises, and he finds himself cat-napped. (THE PLOT SOLIDIFIES)
Tabby Kicks some A**
Speak to the guards, who obviously won’t let you in. We need a disguise; use the mousezilla suit on the nearby port-a-litter to change. (SQUEAK)
Walk past the guards to the next screen, and then into the hall of curiosities where Cuddles is being kept.
Once you are alone with Cuddles, talk with him. You gain the ability to switch between the two characters, and can pass items back and forth.
Leave the hall again, where you will meet a familiar face working a booth. Speak to the Tiki-masked person, who gives you the responsibility of getting rid of CUDDLES’ STUFF.
Go back inside. Pass Cuddles the STICK and the WHIPHOOK.
Switching to Cuddles, tie the whiphook around the bars of the cage, and then use the stick as a lever to bend the bars – Cuddles is now free. (READY FOR REVENGE)
There’s a guard outside, so we can’t just waltz out the door, but there is a weak wall in this room.
We need to lure the guard. As Tabby, go back outside, and place Ramon the Tape Recorder into the nearby box, as a decoy, and then alert the guard. When he goes to investigate, walk back inside and push on the weak wall. Both Tabby and Cuddles will automatically work together to knock the guard out.
Once outside, continue right, to the large tent, where Tabby is caught by a group of guards, and given some drugs. Once you take care of the punching-clowns, you will automatically gain control of Cuddles. Examine the monitors and leave.
The Final Confrontation
Shimmy to the right a few times, and swing into the lower window.
Pull the large lever, and you will be caught! Fortunately, after some quick thinking, your best Duncan impression saves your hide.
Push the crate of Fluff to the center of the room. Then, pull the lever a second time, which really causes a stir.
Pay attention to the shadow moving overhead, and when it is around the center of the trap door, pull the lever one last time.
Enjoy the final sequences, and congrats on finishing Nine Noir Lives! If you liked the game, please tell your friends – I’d love to see a sequel someday!
I wish at the end of the game that window thing was really hard on my fingers,,,I tried over & over & over…oh darn!
Great game thou 🙂