A beginner’s guide and overview of the many systems and mechanics you will encounter throughout your journey, with some additional reference material.
Traversing The Galaxy
Much of your journey will be spent travelling between the various solar systems and planets in the galaxy. These will be important for maintaining your ship and collecting resources and crew to complete your mission.
Travelling between systems and orbiting planets takes Fuel and Oxygen, limiting your ability to travel without maintaining these essential needs. Some locations may also cause damage to the Hull, such as orbiting a Gaseous Planet or landing on a planet with an atmosphere.
The type of system will indicate the type of planets you will be able to find orbiting the system, including Rocky, Garden, and Gaseous planets. Other points of interest like Abandoned Ships, Civilised Planets, and Storage Bays appear rarely in any system and are not tied to specific star types.


You can look at the star types of any system within range of your Telescope, and by upgrading the Telescope you can plan ahead for systems you need.
Within every system you visit there will be points of interest to visit. Moving to and between these will cost some Fuel and Oxygen but provide a large amount of benefit, particularly in the upkeep of your Fuel, Oxygen, and Hull.


Rocky, Garden, and Gaseous planets are the most common in systems, and provide the basic necessities you will need on your journey. Civilised planets offer potentially any resource you need, even Omega, but for a price, however it can also be important for maintaining your crew’s Morale. Stars offer similar benefits to a Gas Giant, but require a Hyperprobe to take advantage of.
Abandoned Ships can be potentially easy resources by taking all on-board resources and dismantling its equipment, or a way to upgrade your ship. By boarding on a new ship, you receive its different stats, current Fuel, Oxygen, and Hull; and all equipment currently on-board. Be aware that you cannot transfer equipment from one ship to another, and must rebuild any that you need. Additionally, different ships require different resources to maintain, and may be more difficult with your current resources (See the Ships section for more information).
The Storage Bay is not like other locations, you are able to spend one Omega and your progress will be saved. This means even if you get a Game Over, you will immediately return to your last save point. Your game still auto-saves progress between sessions, even without the use of a Storage Bay
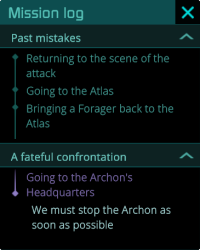 The Mission Log contains a list of objectives given to you throughout your journey, helping you keep track of your goals and what will need to be done.
Each mission is marked by an indicator in the Galaxy View, with an arrow indicating the direction and distance in Light Years from your current position. Hovering over these markers at any time will tell you which location it points towards.
Managing The Ship
 Any time except during an Expedition, you can view your ship, which can be accessed through the Cargo View. This will be your main hub for managing resources you gather, the equipment on your ship, and the crew you have available.
Cargo View is where you will manage a lot of your resources to gather resources and improve your ship. Each of these is handled on a square segment called a slot. There are three types of slot on the ship:


The type of equipment slot determines what can be placed into the slot. If the slot is currently empty, it can also be converted into a different type of module, using a small amount of resources.
The total number of slots available will be determined by the type of ship you have.
If you do not wish to use a module anymore, you can disassemble it. Doing so returns some of the resources originally used to create the module. This can also be done on abandoned ships you find in the galaxy.
If you wish to dispose of a resource that you do not want, you can click and drag the resource out of the edge of the ship. You will gain nothing for doing this but can free up a slot for other use.
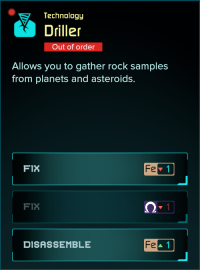 Technologies and Modules can become damaged particularly through use. When damaged, the Technology or Module becomes unusable, however it can still be dismantled or repaired.
To repair a module, you will require a small amount of the materials originally required to construct it, or by using Omega. For most basic technologies this will require Iron, but other modules may need rarer resources.
You can also choose to disassemble the equipment. This will give less resources than disassembling when it is in full working condition, but will free up a slot. This is particularly useful if you cannot repair it and wish to use the slot for something else.
The ship comes with a set of basic utilities to uphold, these are always visible when viewing the ship, local solar system, or galaxy.
Fuel, Oxygen, and Hull:
These three are all essential systems of the ship. If at any time you run out of these, your journey will be over and you must return to your last save. Even if you do not have enough of any of these three utilities to make the next jump, you have a 50% chance to survive the journey, in hopes of finding a means of survival, but it is a gamble every time you attempt this. You must stay on top of these three if your journey is to survive.
Morale:
Unlike the other three, this is non-essential, and you can have zero Morale without immediate consequences. However, when your Morale is low, some crew will not go on expeditions.
- At 40% Morale, 1 crew member will be demotivated.
- At 20% Morale, 2 crew members will be demotivated.
Demotivated crew will refuse to go on expeditions. Additionally, when you next visit a Civil planet, they will immediately resign. Less crew on expeditions means more dangers and lower rewards, while resigning crew means you will get less benefits from their learned skills over time. If you wish to have the greatest success, you will benefit from keeping a good Morale.
Every ship comes with a set of stats determined by the ship and its equipment on-board. These stats determine its efficiency at handling each of its conditions, and its capacity for equipment, resources, and crew.
Every variety of ship comes with a base value for Performance, Ecosystem, Resistance, Comfort, and Slots. Some may be more fuel efficient, some may be very comfortable for the crew.
Each stat can also be improved through the use of additional Technologies and Modules or the assignment of Crew to a task.
Resource Management
Various actions in your journey will cost some amount of the four utilities: Fuel, Oxygen, Hull, and Morale. Different tasks require different utilities.

Fuel
Oxygen

Hull

Morale
Unlike other utilities, actions that require Hull will consume a random amount. This makes it unpredictable how well your Hull will be maintained across several damaging actions.
Events are completely unpredictable, as the outcomes depend entirely on the event in question. Sometimes you may be given a choice, and can select what is spent or gained.
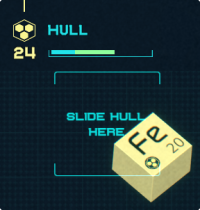 To survive you will need to continuously refill and repair your ship by using resources. By dragging a usable resource on one of the meters, you can spend those resources on refilling and repairing the ship.
Every ship has different needs for all three primary statuses: where one ship may use Iron to repair the Hull, another ship may require Cobalt. Some ships may not even be able to use Oxygen to refill the Oxygen meter, so be mindful of what resources your ship can use. You can also use Omega, providing a huge refill on any meter.
Resources that can be used on the ship will be labelled with a Fuel, Hull, or Oxygen icon. Additionally, hovering over any of these utilities will highlight all stored resources that can be used.
For Oxygen specifically, if you travel to a Garden planet and land, you will automatically refill to 100 Oxygen, gaining the benefits of the breathable atmosphere. Each type of planet provides for each resource you will need (see the Planets section for more information).
Crew
Every crew member has a unique set of stats


Each member of the crew can be assigned to one basic technology currently installed on the ship. Doing so will improve the operation of the Technology when used. Each technology can only have one crew member assigned at one time.
Every time the technology is used, the crew gains experience, developing a Specialisation at it. Once they reach 15 points in a single task, they become more proficient and will perform the task even better.
There are 3 levels of specialisation, each further enhancing the benefits.
Crew can change assignments at any time, and gain specialisation in more than one skill.
 When Morale drops too low, one or more crew members become demotivated, with the exception of Nyx and Sergei who cannot become demotivated.
Demotivated crew members will not go on any expeditions. Additionally, one demotivated crew member will resign immediately upon visiting a civil planet.
Every time you lose crew or go on an expedition, the crew that are demotivated will change. This means you will be able to rely on any specific crew member to always be available, but no crew member will remain permanently demotivated.
![]() Unique to Nyx and Sergei, as you progress through the story they receive unique Suits, which allow them to change their abilities
Unique to Nyx and Sergei, as you progress through the story they receive unique Suits, which allow them to change their abilities
Expeditions
 When you orbit a Rocky or Garden planet, you may be given a chance to Scan for anomalies, revealing points of interest. You can choose to land at these anomalies and go on an expedition to find valuable resources, items, and improve Morale.
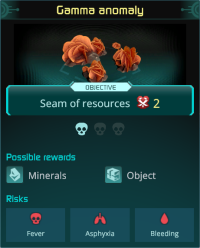
When you scan an anomaly, you will be given some basic information about the expedition sight:
Objective shows the goal of the expedition. It may not have a specific target, and be a place for mining, or contain a village to visit. Objectives show the action points a good outcome may require.
Danger, shown in a scale 1 to 3, this will indicate the dangers present, including number of hazards and the risks on Events you will encounter.
Possible Rewards, the type of rewards you can find, including Minerals, Plants, Objects, Blueprints, Aliens (Crew) and Omega.
Risks, showing the type of hazards you will encounter. Consider bringing crew and equipping objects that can better tolerate the risks.
Before any expedition, you must prepare the team that will go. You can select up to 4 members to go on an expedition.
Demotivated crew cannot be taken on expeditions, this is caused by low Morale. This is indicated by a red marker, and their portrait will have a darkened background.
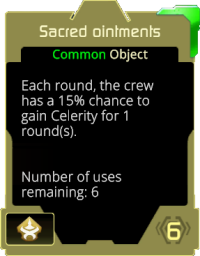
Items are special objects found on expeditions, from events, and for sale on Civilised planets, which can be used on expeditions.
Every member of the team can be assigned 1 item from the ship. These items provide a passive benefit to the member or team. However, items can only be used a finite number of times before they’re used up completely.
Every item has an associated Class with it of either Xenolinquist, Survivalist, or Engineer. Items can only be used by crew of the corresponding class.
A crew member’s health persists both before and after expeditions. Expeditions run a large risk of causing damage, therefore crew that are not full-health prior to an expedition may be at risk of death. Health can be naturally regenerated over time using a Sickbay while travelling across systems.
Unlike most crew, Nyx and Sergei have access to unique ‘Suits’. These are options that change both their Skills and Action Points during expeditions. Select the Suit most appropriate for the task.
Suits are unlocked as you progress through the story and complete missions.
Expeditions operate on an expansive hexagonal board, with turn-based navigation. You begin the expedition with all of the crew you selected, with full action points.
The crew are given a set of stats that will determine their options during an expedition:
Rounds are done by selecting a location then clicking it again to move. Using a Skill or calling the ship does not take a round to perform, and the round only finishes when you move. You can only move as far as the Crew’s Speed in a single round.
Scattered around the map will be areas to gather valuable items to take back to the ship, including Treasure chests and resource veins. Treasure Chests can contain items including Objects and Blueprints, while resources can be for either Minerals or Plants.
Some named areas you may find will trigger an Event. Events during expeditions provide a choice where you may spend Action Points. Good outcomes can provide new crew, objects, blueprints, and materials, while some bad outcomes can cause crew to receive afflictions, lose health, or lose action points. If the Expedition has an Objective, the Objective will always have an Event.
Events offer three choices, with at least one that costs zero action points, usually with a low reward and riskier outcomes, and one that uses Action Points to more safely resolve the situation with better rewards. If more than one crew member can fulfil the Action Points, you will be asked to choose which one will perform the task. You will need to consider the current condition of your crew, and the potential implications of what your choice could do.
You can see what Action Points are required to receive the best outcome when hovering over a Point of Interest, and on the expedition’s Objective, however this will not show if a second option using Action Points is available. You can use this information to plan ahead what you will wish to spend on Skills and other Events.
The crew can receive beneficial and harmful status conditions, particularly from skills, objects, and some events. Some held objects may give these randomly or upon completing certain conditions, while skills can be activated any time to receive their benefits.

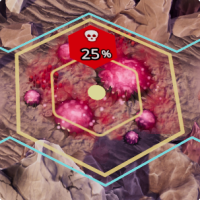
By contrast, hazards are dangerous zones that are sometimes found during an expedition. Standing on or moving across has a chance to inflict each member with a condition. The shown percentage on the hazard tile is the chance each member has of receiving the affliction.
Most afflictions will apply immediately, and then apply again within a number of turns. This makes it imperative to reach locations quickly, if the affliction will cause severe harm.
Expeditions (Continued)
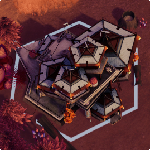 On some Expeditions you may find a Village. Similar to Civilised Planets, you can visit these locations to dismiss crew, recruit new crew, and trade materials and objects.
 If you cannot make it back safely or need it immediately (i.e. a crew member has been dangerously afflicted), you can spend 7 Fuel to immediately call the Ship to an adjacent tile.
This action does not take a round. However, boarding the ship still requires 1 round, so plan accordingly if you are in dire need.
 If a crew member’s Health hits zero, they are immediately lost permanently. If all crew on the expedition are lost (and Nyx and Sergei are not on the expedition), the Expedition will end prematurely, and you will not receive any item or material gathered on the expedition.
If either Nyx or Sergei reach 0 Health, you risk a Game Over. The only way to avoid this is to spend 1 Omega from the ship to revive them. If you do not, your journey immediately comes to an end.
Upon returning to the ship, you will receive every item and material earned on the expedition, alongside experience and morale for the crew, with a quick overview.
Depending on activities done during the expedition, your entire crew gains a certain amount of XP towards levelling up, and Morale benefitting the entire crew.
Experience gained depends on points of interest within an expedition, and the use of crew skills.
Morale is influenced by the completion of objectives and visiting villages, but is also affected by the loss and gain of crew.
Frequent expeditions are good for Morale if managed properly, but can be devastating if any crew falls. Complete as much of the expedition as possible to get more XP, but make sure to protect your crew, and prioritise safer expeditions if necessary.
When a member of the crew has their XP reach maximum, they will Level Up. During Level Up, you can select 2 of 3 level up perks:
You cannot upgrade both skills.
After levelling up, their XP returns to 0. No excess XP is earned. After each Level Up, the XP requirement increases
Using a crew member on expeditions will improve their abilities for future expeditions. Maintain valuable crew and give them more expedition opportunities to ensure you can build levels.
After an expedition, all crew that went on the expedition become fatigued, and cannot go on another expedition for at least 2 inter-stellar trips, limiting how many expeditions you can perform. Currently fatigued crew are indicated by a red battery icon.
With more crew, or by using less crew on expeditions, you can perform more expeditions in a solar system, to better maintain Morale and gain resources.
Archives: Technologies
Allows you to scan planets while in orbit, to find landing zones for expeditions.


Allows you to Drill when landed on a planet to either collect metals from Rocky planets or gases from Garden planets.

Allows you to probe while in orbit of a gaseous planet to collect gases usable as fuel.

Allows you to jump between planetary systems. Provides a base 5 light-years of Cosmic Folder range.


Allows you to move between planets in a solar system.


+3 light-years of Cosmic Folder range

+3 light-years of Cosmic Folder range

+3 light-years of Cosmic Folder range


Archives: Modules
+10 comfort
+2 Crew capacity
+5 comfort
+2 Crew capacity
+3 Crew capacity
+1 Crew capacity
+20% chance of regaining +5 Morale per interstellar trip.
Allows storing divine beings on the ship
Archives: Misc.
Refining minerals
Refining minerals
Refining minerals
Refining minerals
Refining minerals
Refining minerals
Refining minerals
Refining minerals
Refining minerals
Refining minerals

Thanks to Charis and Sir Emo Tarquin Death Chapington for his great guide, all credit to his effort. you can also read the original guide from Steam Community. enjoy the game.