Successful completion of Mazcab Raids every 2 days can yield approximately 16m in 2 hours every week or 8m/hour excluding unique rare drops such as the Mazcab Ability codex which will significantly increase profits.
Getting there
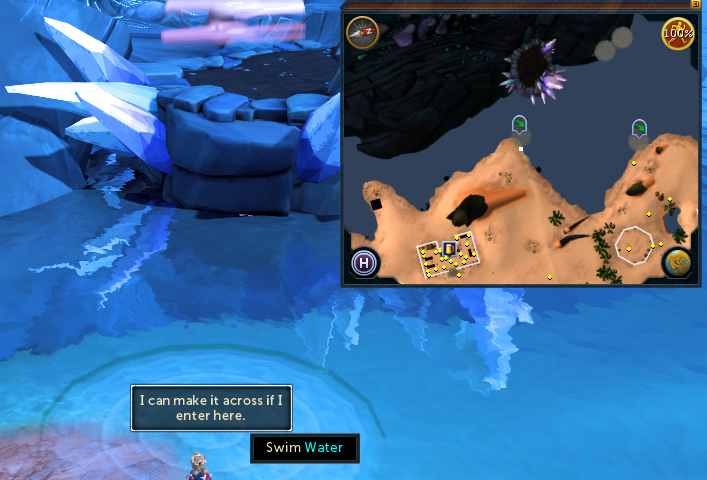
- The World window on Tuska’s corpse – teleport to Tuska either
- through Wizard Chambers on the bridge to the East of Lumbridge Swamp or
- run roughly northwest from the Bandit Camp lodestone and look for shortcut icon on the coastline that lets you swim westwards.
- Otot tablet
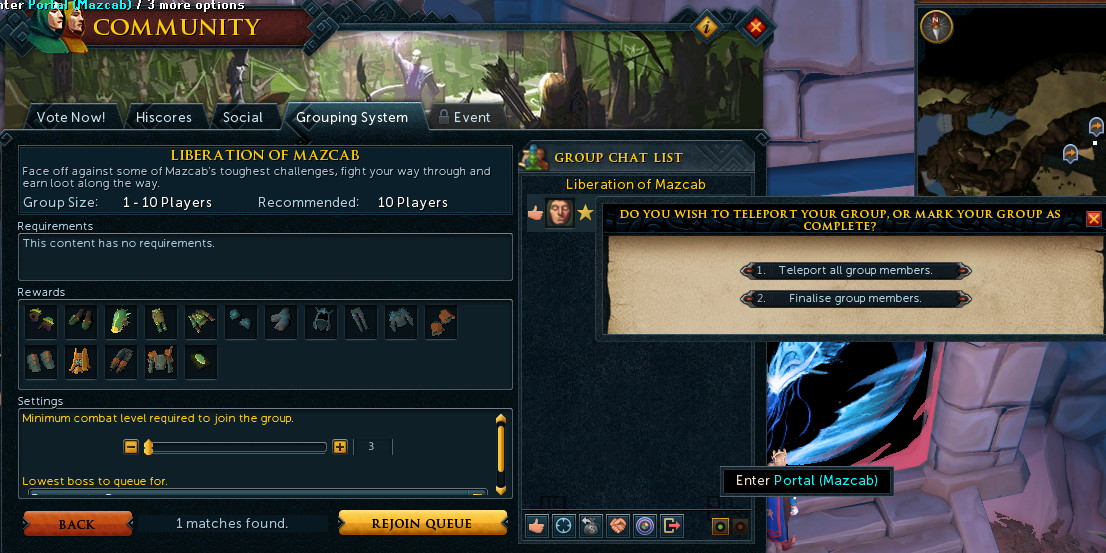
- Grouping System
- Casting the Mazcab Teleport spell.
- A Boss portal (War’s Retreat) that has been attuned to Liberation of Mazcab.
Reputation
Daily
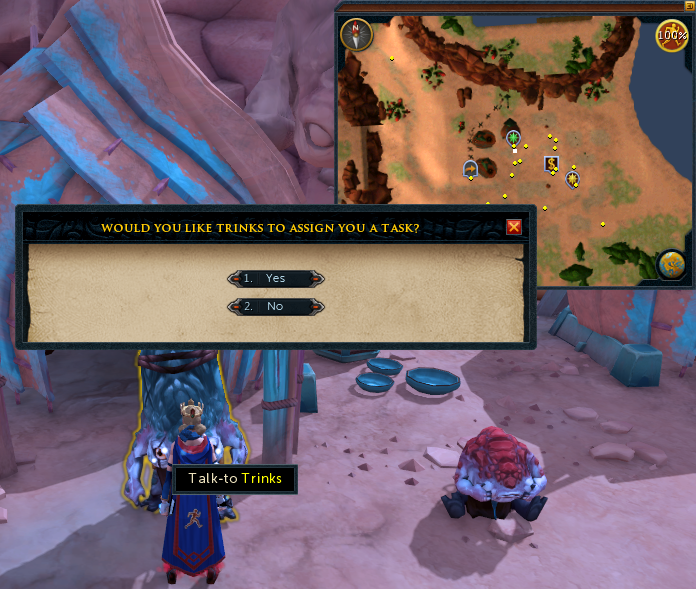
- Completing Trinks’ tasks granting 15 reputation each, with a maximum of 3 tasks per day
- Various actions (9 in total) in Nemi Forest grant 5 reputation each.
One-time
- Finding 5 stone fragments and using them on the ancient statue to the south of the Airut will earn reputation and unlock lore. 50 reputation is earned for each stone fragment added to the monument.
- Killing raids bosses Beastmaster Durzag for 250 and Yakamaru for 500.
- Catching 4 different creatures and handing them in at Arod the environmentalist for 250 reputation.
Combat Stats, Herblore, Summoning, and Prayer
Herblore: 96+ (Boostable from 89)
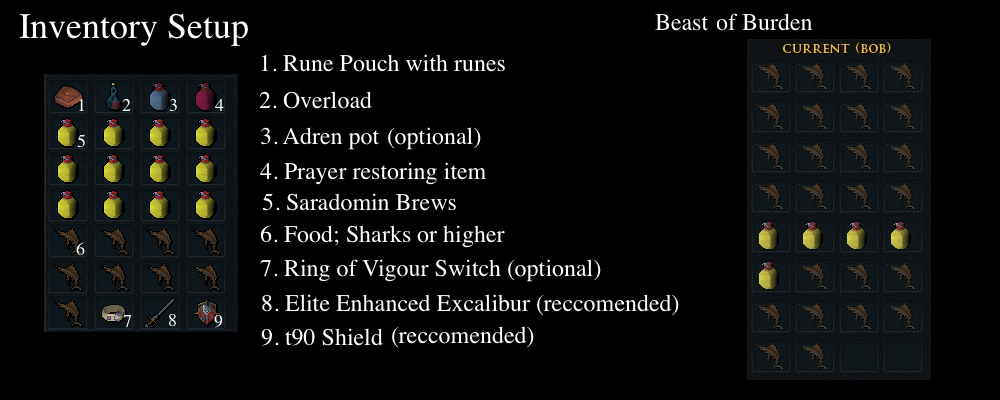
- To provide good damage and survive a Yakamaru kill, you need overloads. Overloads boost
- and refresh your stats and allow you to drink Saradomin brews.
Summoning: 68+
- You need a Beast of Burden to carry extra food so you won’t run out of supplies during
- a kill. At 68 you can summon a decent BoB, the War Tortoise.
Prayer: 70+
- While t95 and t99 prayers and soulsplit are great to have, their not absolutely needed. You should be using the piety variants at minimum.
The World Wakes
- It’s recommended that you complete The World Wakes quest so you have access to Sunshine and Death Swiftness.
Recommended Style Equipment
- Aura: Maniacal > Supreme Runic Accuracy > Inferiour Runic Accuracy
Aura’s - Head: Elite Tectonic > Tectonic > Superior Zuriel’s > Refined Anima Core of
Seren > Virtus > Anima Core of Seren - Pocket: Grimoire > Scripture of Ful > Scripture of Wen > Superior scrimshaw of the elements
> Scrimshaw of the elements > Other God Books > Sign/Portent of Life - Cape: Ful Capes > Kiln > Comp/Max Cape > Combatant’s > Defence cape
> Other Skillcape - Necklace: Essence of Finality (Guthix staff) > Reaper Necklace > Amulet of
Souls - Ammo: Grasping Rune Pouch > Large Rune Pouch
- Weapons: Fractured Staff of Armadyl > Praesuls > Staff of Sliske >
Seismics > Noxious > Superior Zuriel’s Staff > Obliteration > Cywir >
Seasingers> Camel Staff = Staff of Darkness - Shield: Kalphite Rebounder (Advanced) > Merciless > Spirit Shield >
Anything else - Torso: Elite tectonic > Tectonic > Superior Zuriel’s > Refined Anima Core of
Seren > Virtus > Anima Core of Seren - Legs: Elite tectonic > Tectonic > Superior Zuriel’s > Refined Anima Core of
Seren > Virtus > Anima Core of Seren - Gloves: Enhanced Kerapac’s Wraps > Kerapac’s Wraps > Deathtouch >
Celestial Handwraps > Virtus - Boots: Enhanced Blast Diffusion Boots > Blast Diffusion Boots > Hailfire
boots > Virtus - Ring: Ring of Death > Channelers Ring > Asylum surgeon’s ring
Ranged
- Aura: Reckless > Supreme Sharpshooter > Inferior Sharpshooter
- Head: Elite Sirenic > Sirenic > Superior Morrigan’s > Refined Anima Core of
Zamorak > Pernix > Anima Core of Zamorak - Pocket: Grimoire > Scripture of Ful >Scripture of Wen > Superior Scrimshaw of cruelty > Scrimshaw of cruelty > Other God Books
- Cape: Ful Cape > Kiln Cape > Comp/Max > Combatant’s > Defence cape:
Ranged cape - Necklace: Essence of Finality > Reaper Necklace > Amulet of Souls
- Bolt: Pernix Quiver > Hydrix Bakri (e) > Dragonstone Bakri(e) > Diamond
Bakri (e) > Onyx Bakri (e) - Arrows: Deathspore Arrows > Black Stone Arrows > Splintering Arrows
- Weapons: Blightbounds > Eldritch > Ascensions > Seren Godbow >
Noxious > > Decimation > Shadow Glaives > Wyvern Crossbow - Shield: Kalphite Repriser > Vengeful > Spirit Shield > Anything else
- Torso: Elite Sirenic > Sirenic > Superior Morrigan’s > Refined Anima Core of
- Zamorak > Pernix > Anima Core of Zamorak
- Legs: Elite Sirenic > Sirenic > Superior Morrigan’s > Refined Anima Core of
Zamorak > Pernix > Anima Core of Zamorak - Gloves: Deathtouch bracelet > Nightmare Gauntlets > Ascension Grips >
Pernix Gloves - Boots: (Enhanced) Fleeting Boots > Flarefrost Boots > Elite Ranger Boots >
Pernix Boots - Ring: Archer’s Ring(Only bows) > Ring of Death > Asylum surgeon’s ring
Melee (Advanced/ Experienced only)
- Aura: Berserker > Superior Brawler > Inferior Brawler
- Head: Jaws of the Abyss(If primary bleeder) > Trimmed Masterwork > Masterwork
- Pocket: Grimoire > Scripture of Ful > Scripture of Jas/Wen > (Superior)
Scrimshaw of Vampirism - Cape: Ful Cape > Kiln Cape > Comp/Max > Strength Cape > Defence Cape
> Other Skillcape - Necklace: Essence of Finality > Reaper Necklace > Amulet of Souls
- Ammo: Aloy Armour Spikes (Almost useless) > (Grasping) Runepouch >
Tirannwn Quiver - Weapons: Ez-Zekkil > Zaros Godsword > Leng Swords (T95’s) > Khopeshes
> Drygores > Scythe - Shield: Malevolent > Spirit Shield > Anything else
- Torso: Trimmed Masterwork > Masterwork
- Legs: Trimmed Masterwork > Masterwork
- Gloves: (Enhanced) Gloves of Passage > Trimmed Masterwork >
Razorbacks > Masterwork > Torva - Boots: Trimmed Masterwork > (Enhanced) Laceration Boots > Emberkeen
> Masterwork - Ring: Champion’s Ring > Ring of Death > Asylum surgeon’s ring
Beginner’s setup
Invention Perks and Archaeology Relics
An Archaeology level of 56+ is recommended for use of Berserker’s Fury relic.
Invention Perks
While top tier perks not mandatory, basic perks are recommended.
These perks are relatively cheap and easy to get. Due to the affordable
nature of Ancient Invention, these are selected with that in mind.
If invention level is not mentioned, you can boost for it.
If you are not 120 invention, you’ll not get the rates listed here in most
cases. Use the calculator to check chances.
https://runescape.wiki/w/Calculator:Perks
If only 5 components are listed, it’s a standard gizmo, not an ancient one.
Basic perks
- Main Hand: Precise 6 (9 Classic, 1/3)
- Off-hand: Equilibrium 4 (8 Timeworn, 99% chance)
- Two Hand: Main Hand + Off-hand
- Off-hand switch: Flanking 4 (9 clockwork, about 1/5 when lowered to 53
invention. God wars entrance can lower invention. Will take lots of spam clicking) - Planted Feet switch: Aftershock 1 Planted Feet (3 Cywir, 2 Ilujankan Most
expensive perk here, but worth it for future-proofing. 100% at 105+ invention) - Body 1: Biting 2 (5 Direct, 40% chance at lvl 34/35 invention)
- Body 2: Crackling 4 (7 Explosive + 1 Magical OR 8 Vintage)
- Legs 1: Impatient 4 (4 Zamorak + 3 Zaros)
- Legs 2: Enhanced Devoted 4 (8 Faceted)
- Shield: Turtling 4 (3 Evasive + 6 Historic
Archaeology Relics
Combo 1:
- Fury of the Small – 150 energy cost – All adrenaline generating basic abilities generate +1% adrenaline.
- Berserker’s Fury – 250 energy cost – Deal up to +5.5% damage (all styles) the lower your current life points are below max. (Doesn’t stack with Dharok’s set effect.)
- Blessing of Het – 100 energy cost – Food and potions heal 10% more lifepoints.
Combined effect – 500 total – General best in slot set of relic powers for most PvM at a maximum of 500 monolith energy.
Combo 2:
- Fury of the Small – 150 energy cost – All adrenaline generating basic abilities generate +1% adrenaline.
- Conservation of Energy – 350 energy cost – After using an ultimate ability, you will regain 10% adrenaline.
Combined effect – 500 total – Conservation of Energy is useful if one’s rotation involves multiple ultimate abilities
Combo 3:
- Conservation of Energy – 350 energy cost – After using an ultimate ability, you will regain 10% adrenaline.
- Berserker’s Fury – 250 energy cost – Deal up to +5.5% damage (all styles) the lower your current life points are below max. (Doesn’t stack with Dharok’s set effect.)
- Font of Life – 50 energy cost – Increases maximum health by 500.
Combined effect – 650 total – Conservation of Energy is useful if one’s rotation involves multiple ultimate abilities
Alternate Relics:
- {alternate Font of Life – 50 energy cost – Increases maximum health by 500.}
- {alternate Death Ward – 150 energy cost – 5% damage reduction when your life points are below 50%; 10% damage reduction when they are below 25%.}
- {alternate Persistent Rage – 150 energy cost – Your adrenaline will not drain outside of combat.}
- {alternate Shadow’s Grace – 50 energy cost – Reduces the cooldown of Surge, Escape, Bladed Dive and Barge by 50%, but these abilities no longer generate adrenaline.}
If completed Mysterious City mystery then one is allocated 650 monolith energy and can utilize higher costing relics, not to exceed 3 total relics, for a better combination.
Beastmaster Guide Roles 1
NC: As the North Charger role, once the airut counter at the top of your
screen reaches O and the BM timer begins you will want to stand by gate to
the north of the eastern gong and pray melee. Once the chargers appear in
the gates, you will click to open the cages releasing the chargers going in a
counter clockwise fashion until you reach the western gong. As pet 3
spawns all cages will open up releasing any remaining chargers. At this
point you will meet up with the BU in the south western corner and
proceed to aoe and kill the them all together. After all chargers are dead
you resume as a normal dps role.
Note: Be sure to step a square out before moving across the gongs or the
chargers will get stuck on the edge of the platform and no longer follow you.
PT: There are 2 Pet Tank roles for BM. Pet Tank 1/3 and Pet Tank 2. As Pet
tank 1/3 you will be in charge of tanking the first and third pet.
Pet 1 Cormes, will come out of the western most gong at 21 on the airut
counter, which is at the top of your screen. He will attack with whatever
style you are weak against unless you are ranging and at a range distance.
Stand slightly north of the gong, pray range (against your weakness if MD),
voke, and help dps the pet down until it dies.
Pet Tank 1/3 will be tanking which ever pet did not spawn for PT 2, Tuz-
mage or Krar-range. Pet 3 will spawn in one of the 4 corners of the arena
when BM yells “HEEEEERRRREEEEE BOOOOYYYY” and any remaining
chargers in the cages will be released. You must locate your pet, pray
accordingly, voke, and bring it to the north western corner where you will
also tank it until 150k hp. Once BM is at 750k hp, dps will come help you
finish killing your pets and your job is done.
Pet Tank 2 the second pet will come out when the airut counter reaches O
and the BM timer begins. This pet will be Tuz- mage or Krar-range, and
come from the northern most gong. Stand slightly west of the gong, voke
your pet and pray accordingly to which one spawns. Once the NC gets to
the northern gong simply surge forward and take your pet to the north
eastern corner and continue to tank your pet using defensives. Dps will
help drop the pet to 150k hp then move on the the 3rd pet.
Note: If your pet jumps you need to voke it asap to regain aggro and run it
back to your corner. If someone is in the way they will body block it and
once you are out of range the pet will jump again. In this case you may
need to tank in an alternate location such as the south west corner or ask
them to move so you can get the pet through. Also if you find yourself
taking too much damage you might consider using the ability freedom to
lower your pet stacks (you can see them on your debuff bar).
BU: As the Backup you are responsible for doing the south chargers as well. Simply follow the north charger guide but start at gate south of the eastern gong and work your way around clockwise until you get to the western gong, at which point you can backtrack to the south west corner and begin dpsing your chargers with the NC. Once the chargers are dead your job is to help dps BM down to 750k hp with the BT, at which point you will pray melee, voke BM, and cycle defensives. You will then tank BM until the base, vokes back once his stacks clear. At this point if the base gets hit for over 4k, says v/voke, or gets bombed you should voke it off of him and tank again until base takes back. If you need base to take it off of you, you may say v/voke.
Note: If pets die early you may need to voke BM before 750k hp. Also keep in mind that BM resets your defensives every 5 stacks (can be seen on your debuff bar) use freedom to halve these stacks and never allow them to reach 15. You should use anticipation and preparation at 4 and 9 stacks as these abilities are not reset and anticipation still allows for 10% damage reduction. Bombs will also reset any defensives and you should click any coming your way to defuse them.
BT: As Base once the airut counter reaches you will pray melee and stand slightly north west of the eastern gong and voke BM. Wait until the BU has cleared the south eastern corner of chargers, and walk BM to the corner. At this point you will begin cycling defensives while tanking BM (it is strongly recommended that you sunshine or death’s swiftness upon reaching the corner and dps while tanking). As BM attacks, you will gain an enrage stacks (which can be seen on your debuff bar) that increases BM’s power. The enrage caps at 15 stacks, and at 5, 10, and 15 BM will reset your defensives. You will know BM resets your defensives as it gives a message saying “Beastmaster is enraged and smashes through your defensives” canceling all active abilities, and resetting cool downs on all defensives. Never let your stacks reach 15 as each hit there after will continue to reset any defensives used and can easily 1-2 shot you. The use of freedom halves the number of stacks you are on rounded down to the nearest whole number and should be used at 3 and 13 stacks which will round down to 1 and 6 stacks respectively. Anticipation and preparation should be used at 4 and 9 stacks as these abilities are not reset and anticipation still reduces damage taken by 10%.
Once Bm reaches 750k hp the BU will voke BM off of you and allow you time for your stacks to clear. You will know when this happens as you will receive a message saying “The beastmaster has forgotten his rage on you.” and the stacks will no longer be seen on your debuff bar. Once your stacks are cleared you should voke BM back from the BU and begin tanking again. Make sure to defuse any bombs coming towards you as they will also reset your defensives. If your BU is bombed, hit for over 4k, or says V/voke you should also voke BM back. The BU will in turn be doing the same. Continue this cycle and rotating your defensives until BM is dead.
Beastmaster Guide Mechanics 2
After the host starts the fight, airuts and chargers will spawn from the gongs around the arena.
The chargers deal low melee damage, and are killed easily. Pray melee against the chargers.
The airuts are the same as normal airuts; they have two attacking styles: melee and ranged. It is important to pray properly against them because they deal high damage. If the airut on standing on two legs is it melee. If the airut is on all fours is it ranged.
When the “Airuts Remaining” counter reaches 21, the first pet, Cormes, will spawn out of the west gong.
When Cormes spawns, kill the airuts that spawn in the same wave, but do not kill the chargers. Killing the chargers spawns the next wave early, which we do not want! We kill the airuts because they deal a lot of damage.
After the airuts are dead, simply DPS Cormes, making sure not to stand in front of him. Usually he will be facing north, so standing to the south or east of him is fine. Cormes should die quickly. After Cormes dies, kill the remaining chargers.
The host will make sure to remind the team of everything before Cormes spawns.
After Cormes dies, the airut and charger waves will continue until the “Airuts Remaining” counter hits 0, and then the next phase of the fight will begin.
——————————————————————————————————————-
Pre-750k
This phase is called pre-750k because this phase lasts until Beastmaster enrages at 750,000 HP.
When this phase begins, pray Ranged. Beastmaster will spawn from the Northeast corner. Tag him to guarantee loot if you die. Start to DPS the pet spawned at the north gong. The Base Tank will lure BM to the south east corner.
The pet tank will quickly pull the pet into the north east corner. The pet will either be: Krar or Tuz, it is random which one spawns, but the identity of the pet does not matter to you.
Please do not use snares or binds on the pets. It doesn’t do anything bad (not like stunning the north pool at Yakamaru), but it makes the pet tank’s job a lot easier if you don’t use them.
Continue to DPS the pet until the pet reaches around 150k-175k HP, and then begin to attack Pet 3, which the other pet tank should have lured into the north west corner. You will switch your dps when the host says “Switch Pets” or “Switch to Krar or Tuz,” it is up to the host’s discretion how low the pets should be.
After Pet 3 reaches 150k-175k HP, the host will say “on BM.” Switch to melee prayer. At this point DPS Beastmaster until he reaches 750k, then the next phase of the fight will begin.
Miscellaneous
This fight is very RNG intensive so there are a few things to look out for.
Bombs and Cages
There is a chance that BM could throw out bombs or cages during this phase, but there will be only one of each. It is nothing to worry about, and these will be covered more in depth in the next section.
Pet Charging
Occasionally the pets will jump onto one of the DPSers (be flattered, it means you have high DPS). You will be stunned and the pet will attack you with melee; the amount of attacks you will receive depends on how fast the pet tank vokes the pet, but expect around 2-3 melee attacks. If a pet jumps on you, quickly switch to melee prayer and use freedom and eat up. The pet tank should quickly bring the pet back to its appropriate spot.
Magic attacks
One of the pets, Tuz, attacks with magic. If the pet jumps and the pet tank makes a mistake and pulls the pet through the DPS pile, there is a chance you will be hit with magic attacks. These attacks deal high damage because you should be praying ranged, but if you are being hit by magic, switch to protect from magic. Once the pet is out of the DPS pile, switch back to ranged prayer.
BM Pulls
BM pulls are another Post-750k attack that happen very, very rarely during the pre-750k phase. When you are attacking BM, there is a chance he will pull you into melee range. This is why you are praying protect from melee. If you are pulled, quickly eat up and run out of melee range and continue DPSing.
——————————————————————————————————————-
Post-750k
For this phase you should be praying against melee.
I am not going to make a map for this phase; just stand outside of BM melee range.
Once Beastmaster hits 750k, the host will say to “kill the pets,” quickly finish off the two pets, which should be very low depending on how much the pet tanks attacked them.
After the pets are dead, Beastmaster’s attacks will become much stronger. BM will periodically switch targets, so he will move slightly, just be careful not to stand in the changing melee range. There are a few new mechanics for which you have to watch out, but otherwise, keep DPSing the boss like normal.
Post-750k Mechanics
In this “enrage” phase, BM gains new mechanics.
Bombs
Occasionally, BM will throw out pigs with dynamite strapped to their backs, and these are the “bombs.” When they come out switch your prayer to protect from magic. Their left click option is “defuse,” and you want to make sure you defuse as many as you can. However, it is unrealistic that all of the bombs will be defused, and each bomb does 2000 magic damage without prayer. Make sure you are high hp and praying magic and you should be fine for whatever few bombs are left. After the bombs explode switch back to protect from melee.
Note: the bombs also reset defensives, but this shouldn’t affect the DPS.
Chargers
Beastmaster will release a ton of chargers periodically through this phase. Because you are praying melee, they will deal insignificant damage. Because focusing damage on the boss is most important, just ignore them.
Cages
The cages lock you in one place and prevent you from moving. They last a short-medium amount of time. You can’t use freedom, but you can still attack. You can left click a cage to free someone, but as long as they’re not out of range, there is no reason to do so. This is another mechanic you can ignore.
Pulling
While it is much more common in this phase than in the pre-750k phase, getting pulled by BM is fairly uncommon. Since you are praying melee, you should be able to survive being pulled into melee distance, but quickly move out of the way as soon as you can.
Once Beastmaster dies, you can loot the corpse and then right click “leave” to exit the arena. The intended method to get to the puzzle is searching all of the openings, but we can skip that by just leaving the arena. Congratulations, you completed your first Beastmaster kill!
Yakamaru Mazcab Puzzle (Post Beastmaster)
-Meleefish (Jellyfish that melees) — Red
-Piercing Jellyfish (Jellyfish that ranges) — Green
-Magical Jellyfish (Jellyfish that mages) — Purple
-Durable Jellyfish (Heals other Jellyfish around it) — Big and purplish pink
-Reflecting Jellyfish (Reflects all damage dealt to it and takes 10k damage when other jellies die around it) — Big and white
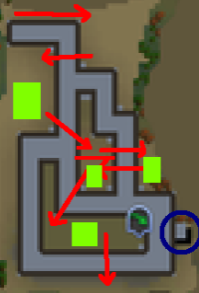 (Following red arrows from top left to bottom right)
How to clear the Jellies
1. Turn on Soul Split & Soul Link
2. Target the Durable Jelly first so it can’t heal the others
3. Target the other Jellies & use AoE abilities to clear most of them
4. Jump to the next area
Things not to do unless you are pro
1. Onslaught the Reflecting Jellyfish
Pads & Button
After you clear all of the Jellies you must unlock the gate to Yakamaru by stepping on the pads. There are 4 of them indicated by the lime boxes on the map. One person is designated to flip the button (indicated in dark blue on the map) and it will reveal one of four faces. The person on the easternmost pad will call out a cardinal direction which matches the appropriate pad with the face on the button
When everyone had stepped on the correct pad the gate will open at the agility shortcut icon on the map and you can jump down.
Before you jump down make sure you are geared for Yaka if you are doing a full raid.
Yakamaru Roles Guide 1
Note: Freedom will halve your stacks (seen on your debuff bar) and reduce the amount of damage being taken.
CPR: The CPR’s job is to go resuscitate the poison tank at the end of each of the 4 pools during the kill. Once Yaka’s hp reaches 0 he will eat the PT and they will be washed up on the shore of the beach near where the planks spawn just south east of the tendril pool. The CPR should be there waiting for the PT to wash up with auto retaliate off and simply click on the PT to resuscitate them. Wait until the blue bar above the PT is completely full and the PT is back up before going back to dps.
JW: Once mirage starts the Jelly Wrangler is in charge of gaining agro of all the jellies that spawn in the arena and luring them around the central pool. Turn on incite and pray melee and attack the jellies or voke to draw agro. Do not use abilities such as ricochet or chain while getting jellies off the tanks as this may cause your ability to hit the sand pool or tendril pool, and cause the pool to sand you and the tank or possibly choke you at the tendril pool. Be careful not to be md of the central pool once all 4 pools are closed and yaka spawns in it or you will be hit with a magic attack.
NT: You will need a basic understanding of defensive abilities and how to use them for this role. Once mirage starts as North Tank you want to tag the sand pool then use voke on the stun pool. Use Devotion and help dps stun until it is killed. From here you only have to worry about tanking sand pool so simply cycle your defensives while doing as much damage to the pool as possible until the rest of the team arrives. Remember to use freedom to halve the number of stacks you have. If a jelly spawns and aggros to you make sure to run towards the middle pool to help the JW grab it easier. If you need to do so don’t be afraid to stun the jelly in place especially if there are more than one following you. Below is a picture showing where you should be standing as NT at the start of mirage. This keeps both pools facing away from dps, keeps you in range distance of both pools, and keeps you closer to the middle pool so the JW can grab the jellies as they spawn.
BT: You will need a basic understanding of defensive abilities and how to use them for this role. It is also highly encouraged that you are wearing at least 3 pieces achto for this role as the passive will reset the cool down on your defensives. As Base Tank you want to constantly keep aggro of Yaka and keep him facing away from the dps pile. To help ensure this happens turn incite on and voke at the start of every pool (and again if he re-aggros during the fight). Each time Yaka hits you there will be an enrage stack added to your debuff bar which will cap at 15. Each stack will increase the amount of damage yaka will do to you with his auto attacks by 20%. You can use the ability Freedom to halve the number of stacks you currently have rounding down. Keep this in mind while using abilities such as resonance because higher the stacks the higher your res will be. Another ability to keep this in mind for would be Devotion/barricade as you wouldn’t want to block the lowest hits but rather the highest since they are harder to tank. During Mirage Phase (all 4 pools come up at once) You will want to take Tendril Pool. When the tendrils spawn you will be choked above them and will need to do 10k damage to release yourself. It is strongly advised you sunshine at the start of mirage to help with this. Below is the list of pools, Yaka’s attack rotation, and pictures of where you should be standing as BT (the 3 players grouped together representing dps).
MS/BUS: As Main Stun/Back Up Stun your job is to stun Yaka to reset the defense mechanic making yaka able to take damage again. Stunning Yaka at any point will deal typeless damage ranging from 1-5k to everyone on the team along with giving a message that that person has stunned the pool. The amount of damage done is determined by how much Yaka’s defense has gone up since the last stun or from the start of the pool (the closer to the last stun/start of the pool the more damage it will do). As MS you should prioritize using a basic ability stun first such as impact (if this misses use a threshold stun such as deep impact, and if both miss call “miss” in chat and the Back Up Stun will proceed to do the same until a successful stun has been landed.). You will notice as pool goes on, Yaka will start gaining higher defense and the amount of dps will slow significantly this will be your signal to stun (try to target roughly 1.5-2.5k stuns to help dps stay high, and avoid stuns at exactly 100k unless telling people to off the pool as people will often times over dps and kill Yaka before poison can be taken). A rough estimate depending on the team’s dps will be around 780-850k dps for the first stun and again around 250-350k for the second stun. If the dps is slow you may need to include a 3rd stun or adjust when the second stun takes place.
PT/DBL: The Poison Tank’s job is to stand in the middle of the green arrows (this looks like the ability detonate) to collect the poison when it is released on each of the 4 main pools when Yaka reaches 100k hp. After the PT collects the poison they must go md/melee distance before the pool reaches 0 hp, at which point yaka will eat them and the player will wash up on shore for the CPR to resuscitate.
The Double’s job is to also grab the poison while at the sand pool and continue to tank the poison through the stun pool while being md/melee distance so that Yaka will them eat him during this pool (do not clear your poison at sand unless the PT misses it). If you don’t get the poison for any reason call out “no dbl” to signal that the poison tank needs to grab the poison during stun pool, and the dps will need to off the pool to allow him time to grab it.
ST0/ST5: There are 2 Stun 5’s and 1 Stun 0 during mirage at Yaka. The ST5’s will each take 5 planks from the beach just before mirage while others are killing jellies and make their way to the stun pool. The ST0 will also meet the ST5’s at the pool and as all 4 mirage pools spawn the 3 of them will devotion, take a sip of an adrenaline potion, onslaught the pool, and activate Enhanced Excalibur if owned (this allows onslaught to be used longer from the hp regeneration). As the pool closes the 2 ST5’s should be md/melee distance and click the pool with the planks in their inventory to close the pool. Once the pool is close all 3 will join back up with dps at shark pool and proceed as normal.
Note: alternatively you can use vuln – corruption blast/shot – wild magic/snap shot – apot – onslaught.
Yakamaru Pools Guide 2
Yaka’s rotation on this pool will be:
3 auto attacks > jelly > 3 auto attacks > blue
Upon starting the fight, once Yaka’s HP reaches 800k he will jump to one of the outside pools. Before jumping he will briefly turn to the pool he will start at (the starting pool is always random but they move clockwise from there). Yaka will return to the middle pool after each one of the outside pools has been completed. During this time Yaka will be “Sick Yakamaru” due to the poison and all damage done to him will be doubled.
Tendril Pool:
Yaka’s rotation on this pool will will be:
4 auto attacks > jelly > 4 auto attacks > blue > 4 auto attacks > tendril
When tendril happens Yaka will choke the 5 players who have done the most dps during this rotation and spawn tendrils under whoever has aggro (this should be the bt). The tendrils will deal rapid 2k typeless damage so just before they spawn you will want to run/escape so they do not spawn on you. Alternatively you can use barricade to block the damage.
Shark Pool:
Yaka’s rotation on this pool will be:
4 auto attacks > jelly > 4 auto attacks > blue > 4 auto attacks > sharknado
To avoid the sharks you will simply walk north/northwest. Remember clicking Yaka at this point will run you back towards to pool.
Sand Pool:
Yaka’s rotation on this pool will be:
4 auto attacks > blue > 4 auto attacks > jelly > 4 auto attacks > sand
Since sand will cancel your defensives it is important not to use things such as barricade or devotion before this mechanic.
Stun Pool:
Yaka’s rotation on this pool will be:
4 auto attacks > jelly > 4 auto attacks > blue
Yakamaru General Guide 3
Base Pool
This pool is indicated by the white circle on the map. You will be standing in the red circle and you will dps Yaka, after you kill each special pool Yaka will jump back to the base pool and you must do 200k damage to phase (with exception of mirage).
Once Yaka hits 800k life points he(she?) will jump to a random pool. Yaka will quickly look in the direction of the pool before jumping. After the first pool the pools following will be in a clockwise order. For example; Base> Tendril> Sharknado> Sand> Stun> Mirage

For this pool you will stand in the dark green circle and will dps
Sharknado Pool (Blue dot)
For this pool you will stand in the blue circle and will dps.
Sand Pool (Green Dot)
For this pool you will stand in the pink circle and dps.
Stun Pool (Dark red Dot)
For this pool you will stand in the yellow circle and dps.
For all of the pools
You will dps Yaka until he/she hits 100k lifepoints at which point you will get off and wait for the PT to take the poison and run MD at which point you can finish killinig the pool. Yaka will now jump back to the Base pool.
—————————————————————————————————————–
Special Abilities
For all of the pools Yaka will have two abilities that she always uses; Blue and Jelly.
Blue
The blue affect will make your character turn blue (same animation as the water metamorphosis) and if you do not stand next to someone you will take 1500 damage then 2500, then 3500, then 4500 every second. This ability’s damage can be stopped by barricade. If the blue is passed ~5 times it will disappears.
Jellyfish
Yaka will throw out a yellow jellyfish and 5 geyser spots. After a certain amount of time the geysers will erupt dealing 2k magic damage to whomever is standing on them, each unique geyser stood on will deal 10k typeless damage to the Jellyfish. You can resonance the geyser to heal yourself for ~2k health, keep in mind you must tag the Jellyfish because tagging it will make it so Yaka does not attack you, which means Yaka can’t snipe your res. Also, if the Jellyfish attacks you it can also steal your res and then you will take 2k magic damage without heal, so stunning/binding the Jellyfish is your best option.
————————————————————————————————————————
Pool Abilities
Along with the blue and the Jellyfish each pool has it’s own ability. The rotation is fixed; 4 attacks> Blue> 4 attacks> Jelly> 4 attacks> Pool Spec. Keep in mind when the pool starts it can start anywhere in this rotation.
Tendril Pool
This pool has 2 specs, a flailing tendril and a choking tendril. The only one that you should have to worry about is the choking tendril.
The choke will happen to the top dps of the group so it is a compliment, you will begin to take bleed damage and you are resticted from moving, the choke will let up after the rest of the team does 50k damage to the pool.
Sharknado Pool
On this pool Yaka will begin to have a water vortex circle the pool and will shoot out a bunch of sharks. These sharks do 2-3k damage when they explode. The best thing to do is to wait until the shark hits the ground and then escape/surge to the beach. Otherwise you can just wait till the shark hits the ground and run to the beach. This damage can be blocked by barricade, but you should not be using cade.
Sand Pool
On this pool everyone but two players will get dropped into quicksand and those two players must click on everyone else to free them, if you do not free them in time it is an instakill, which can be prevented by a sign of life. Freeing the base tank should be your number one priority
Stun Pool
The only thing you need to worry about is not stunning, for learners it is imperative to take all stuns off your bar in case you accidently use a stun. Only the main stunner should be stunning. When you get a message “Cube World22 has stunned Yakamaru” and you get hit 1-6k you want to use your high damage abilites i.e., snapshot and wild magic as Yakamaru’s defense will be 0 at this point.
———————————————————————————————————-
Phasing
Between each special pool Yaka will jump back to the center pool poisoned, taking double damage and dealing double damage to the base tank. Once a jellyfish touches Yaka the effect will be cleared.
Going to Tendril, Sharknado, and Stun pool
You want to take advantage of the double damage and deal as much damage as possible to make Yaka phase to the next pool, after Yaka is in the next pool you will kill alll of the Jellies.
Going to Sand and going into Mirage
You want to kill all of the Jellies before phasing. In sand this is because if everyone is all over the place killing jellies and there is a sand, most people will die because the people are scattered. In the case of Mirage you need to kill the jellies and pick up planks (you will not pick up planks as dps) because when mirage starts there wont be time to kill the jellies.
Mirage Phase
After getting the Base Pool down to 50k Yaka will split into 4 images, one in each of the special pools.
It is crucial that you do not tag the sand pool
At this point in the fight you will want to stand somewhere inbetween the pink and red circles and focus your dps onto the Sharknado mirage, once the pool hits 0 you want to spam click on the big lightning bulge thing and this will help close the pool.
After Shark you will move onto Tendril and then onto Sand doing the same thing for each pool. If you get Sanded, do the same thing as you normally would.
If a Jellyfish gets on you
Hopefully your jw will notice and quickly voke the jelly off of you, if not you can run around because the Jelly is slower than you it will not be able to keep up with you.
After mirage
Yaka will reappear in the base pool and will only have 50k hp, this part of the fight will be over before you know it.