Rusty Lake Roots 100% Walkthrough
Pick up the seed and bone
Give the dog the bone and plant the seed

Plant a Tree
Story achievement
Pick up the watering can and fill it up in well
Water our plant
Click on the man
Get worm and diamond from plant pots
Move the stool under James, give him the twig
Poke down the nest
Crack the egg open and feed it the worm
Pick up the diamond
Crack open the window for another diamond
Place all the diamonds in the door
Get matches and hatchet from draws
Use hatchet to break the wood
Light it up in the fireplace for a key
Use it to open the window, we got a pattern to memorise
Use that pattern to open the cupboard 1-3 3-2 5-1 6-3
Open the watch and change the grandfather clock 8:25
Break it open with the hatchet
Keep clicking his nipple and enter

The Nipple
Story achievement
Take the rose
Get a feather from the crow
Get hanky from James
Give the lady the rose and click on her
Collect the blood with the hanky
Give James the blood and feather for a note
Give her the letter for a worm
Feed the crow for a key
Take the ring and give to the lady
Get tap from cot
Get scissors, mortar and spoon from draws
There are notes there for a future puzzle. The colours match what we need to feed them
Cut the plant
Mash it in the pestle and collect on spoon – feed to Mary
Lift up her skirt and cut the cord of 3 babies and placenta

Triplets
Story achievement
Feed the dog and get the key
Open the cupboard for 3 bottles
Use 1 on Mary
Use 1 on window
Use 1 with keg
Using the picture hints feed the babies Left Milk Middle Water Right Wine
There are a few clues hidden around for our next puzzle- Table, James , Picture
1st row – triangle, circle, triangle. 2nd row – circle, moon, moon. 3rd row – triangle, moon, triangle Get the telescope
Use the telescope to look out the window for our next clue
Rearrange the top book case so the lines match up
Rearrange the middle book case in the order you saw the guests Rabbit, Pigeon, Boar, Crow, Deer, Pheasant
Rearrange the bottom bookcase so the symbols match, start with square
Enter the new room
Weight the vials to find the right ones ~xxo get the elixir

The Elixir
Story achievement
Give the drink to the dog and James
Examine the glass
Open the casket
Examine his hands and move the rings about for eye
Change the cabinet to a bird and deer for 2 coins
Place the coins in James eyes for another eye
Go fix up the statue
Place the eyes in the statue and get the knife
Cut out the tongue and place in jar
Get twig and honey from tree
Take the girls ribbon
Give twig, ribbon and marbles to the boy on the left
Use him to knock the butterfly
Place honey in girls jar
Click butterfly to trap it with cover
Click the boy until he falls down
Use the other boy to knock the beehive down
Click the beehive boy and talk to mr crow
We need to recreate the flowers from above, using the bee to pollinate the white flower 1st flower – Red, yellow, red, leaves. 2nd flower – red, blue, red, spikes. 3rd flower – blue, red, blue, curl, leaves. 4th flower – blue, yellow, blue, flat leaves If you make a mistake there’s a garden weasel by the tree to dig it up
Place all the flowers in the empty plant pot. Click it then the girl
Pick up the blue mask and place on the man
Pick up the watering can
Open the window and fill can with water
Use it in the funnel for a key
Open the top cupboard for a white mask – place on man
Take an icicle and use it on pipe for another key
Open the bottom cupboard for a telescope
Use telescope to look out window towards the church
Swap to the blue mask
Use telescope to look out window and towards the right rock
Use these codes on the cupboard next to us Triangle right, round end up, U right side up, triangle left
Pick up the moon mask and place on man

The Moon Mask
Story achievement
Use telescope to look out window and towards the black gap for a code
Use the code in the box on the left 5231
Pick up the butterfly and place in front of man
Stab the butterfly
Pick up saw, oil and gear
Pick up the gear behind the poster
Give the man the saw and cut up all the pieces of wood, gluing them together
Don’t forget to pick up the gear
There’s another gear on the window
With all the pieces cut fix the clock
Change the time to the poster clue 3:30
Get the pipe from the lady – give to man
Get matches from his pocket to light it up
There are 3 voodoo dolls on the table and another one in the tree. These are clues for our next puzzle
Enter the tent and put the cards in the right order Top row: Star, death, devil Bottom row: hermit, hanged man, empress
Get the key
Open up the cupboard for a crystal ball
Give the ball to the lady, you will get your next clues Top row: empress, devil, death. Bottom row: hanged man, hermit
Look in the ball again, click the lady to finish
Take the knife and key
Cut out the pumpkin mask and place on Albert
Open the cupboard for teddy head and arm
Fix up the bear and gift to kid
Pull the swing all the way back and let go
Pick up the bear and give back to kid
Keep clicking Albert
Get ink and paper from shrine
Get paper from puzzle above
Get paper from picture
On the table piece it together
Use the telescope to get coordinates
Count them up for the puzzle box 126
Get the stamp and head to the other table
Use the ink and stamp to get letter
Use the telescope to look at hotel
Give letter to Harvey
Pick up the veil, cap and hat
We got two puzzles to solve. Top row count the sides. Bottom row count the points
Collect the top hat and mask
Open the cupboard by swapping to a cube, get the final hat
Place all the hats on the correct people veil – ida. top hat – samuel. mask – albert. cap – kid. hat with ribbon – mary. black hat – emma
Take the wedding photo
Grab the key by the plant pots
Get shell and turmeric from other plant pot
Open the cupboard, pick up brush and bottle
Use bottle to get oil from tree and cherry
Grind up all the items in the pestle to get 3 colours
Use these paints on the painting. Using the flowers below paint the picture Tree – Orange People – black House – white Ground – yellow Circle – red
Go to the tree and click Emma
Look on the table for the games rules
Each character holds 3 cards, some are lies some are truths. You need to work out what everyone is
Check the wedding photo for a card
Check the gold portrait for a key
The other table gives a clue
Open the window for a card
Open the safe with the 2 correct people 3794 and get the final card
Now give each card to who you believe they are Albert – Devil Mary – Chariot Ida – Empress Samuel – Priestess
If done correctly look out the window
Get the mask and use on Albert
Get paper from Albert and kid
Get paper from table
Piece them together above
Make everyone play AEAE CBCB TLTL EGEG
Take Mary’s teeth and put in jar
Take Samuel’s pipe
Light up the candle and pick it up
Use the candle on the left voodoo doll – lift up left arm
Get the key from the broken lantern
Open up the right box for a needle
The other box will show us some combinations to make
Use the needle in the right voodoo doll. Take not of all 3 expressions
Using this info open up the box Open eyes, closed mouth. Closed eyes, open mouth. Closed eyes and mouth
Pick up the scissors
Use the scissors to collect both buttons from dolls
Now apparently the next achievement might be buggy so collect Samuel’s eye first

The Eye
Story achievement
Place both eyes in the jars
Get the potato and egg from small table
Zoom into the grate and give the man the potato – get flints
Get the pot on the chemistry table
Give Albert the pot
We need to put the semen and egg into the big jar
Use the flint to light the candle
Turn the tap to put water into the jar
The papers will explain both puzzles
Start with the birds, you need to swap them 3 times 1st set – Red: Top left Blue: Bottom right White: Top right Green: Bottom left. 2nd set – Red: Top right Blue: Top left White: Bottom middle Green: Bottom right. 3rd set – Red: Top middle Blue: Top left White: Bottom left Green: Bottom middle
Pick up all the bike parts
We now need to fix up the bike
Click on the bike and man to finish
Get the cup and table leg
Get key from Leonards pocket
Get scissors and pinchers from draw
Cut off his head bandages
Cut off his sleeve and get the bullet
Cut his trousers and cover all the blood
Make him a peg leg out of the table leg and cup
Enter his mind. We will be repeating this alot, keep pulling the pin and putting the pieces together. When you get the key open the chest inside his mind
Get the gas mask and put on Leonard. The next explosion will give us a code
Enter this code on the far right box upside down triangle, crossed out circle, crossed out Y
Pick up the foot and put in jar
We will be using the ouiji board, pretending to be William Vanderboom.
Talk to the kid and replying to her answers for a key
Open the gold closet with this key
Get the key and click the mirror
Open the chest for our next 2 words
Talk to rose again until you can leave
Get rock and wire from bear
Click the paper aeroplane until it leaves
Zoom in on the grate and stab the hand for berries
Feed the man
We need to make each symbol on the wall
Use forked branch and normal branch
Feed the man
Use wire and forked branch
Feed the man
Use bone and both branches
Give the stick to the man
Now we need to do her actions. So drink. Food and stick
Click on the well for a note
Get hatchet from fireplace
Get stick from Rose
Get cup, worm and matches from plant pot
Cut wood from tree
Place worm on bear trap, wait to pick up fish
Have the dog pee in the cup

The Cup
Story achievement
Burn the wood in fireplace
Place stick and fish above
Get back the fish and stick
Now place each item in the bucket. Drink. Fish. Stick.
Bring Frank up the well
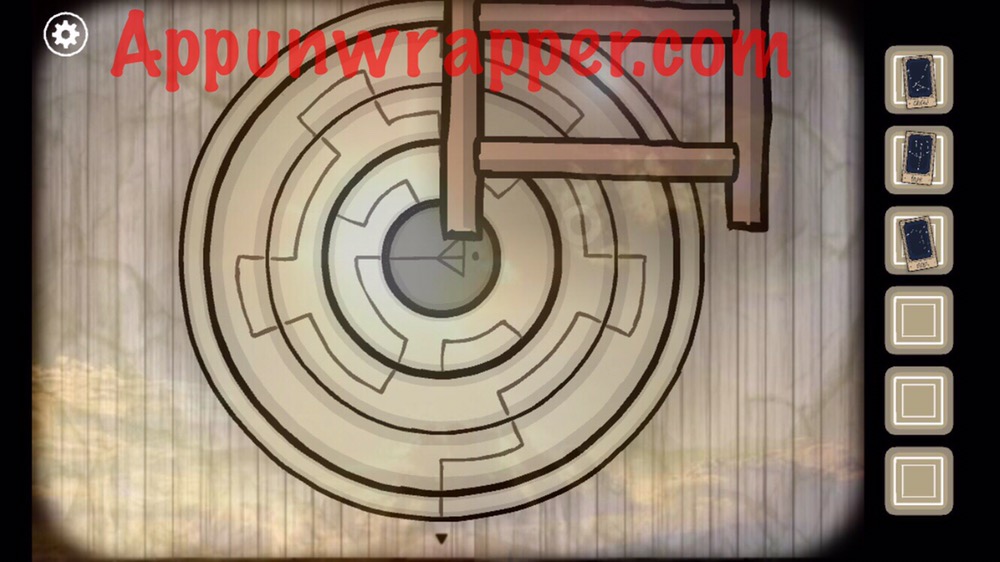
There’s a puzzle above, starting from down just follow the path down up downx2 upx2 downx2 up down up
Pick up the chess piece
Pick up knife from picture – this is a clue
Cut the potato in franks hand – get chess piece
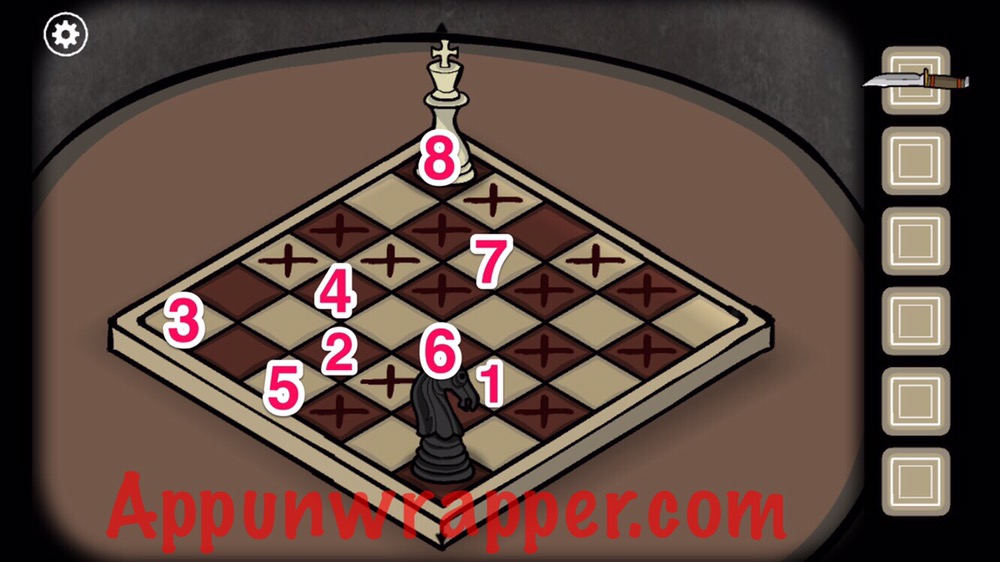
Use both pieces on the chessboard
The 1st puzzle has us just reach the king
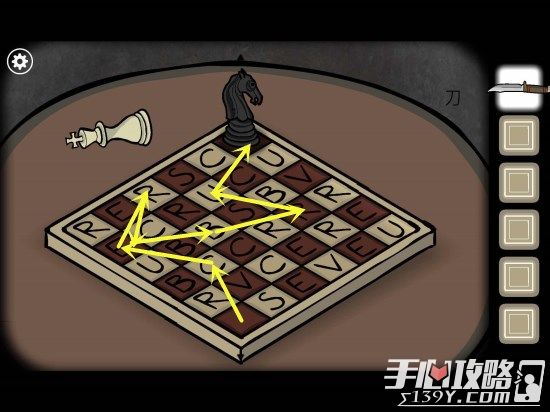
The 2nd puzzle has us spell out Cerebrum with the king being m
 Keep clicking albert until you get his brain – put it in the jar
Crack the mirror for a key
Close the window and board up the gaps
Get coal and matches from draws
Get the bucket from furnace and fill with water
Burn the coal in the furnace and boil the water
Use water on bathtub for key
Get the scissors from draw
Cut Frank’s hair and place in jug
Read the letter for our clue
Pick up the shovel
On the table is a puzzle. Move the grasshopper to opposite side so you can pick one up
Get the insect from the tree
Now go to the frog and place down the grasshopper and insect
Now using the letter find where the treasure is Move frog to rock. Frog, insect, grasshopper – 3 Insect, frog – 2 Insect – 1 Grasshopper – 3
If you got the right spot pick up timepiece and give to Leonard
Get card and bird food from table
Open both windows and place bird food
Get letter from Harvey and give to Frank
Go back and click Harvey until he leaves
Look out the window

The Date
Learn Dale’s birthday
Look at both pictures for a card
Line up the lines to reach attic
Look into the telescope
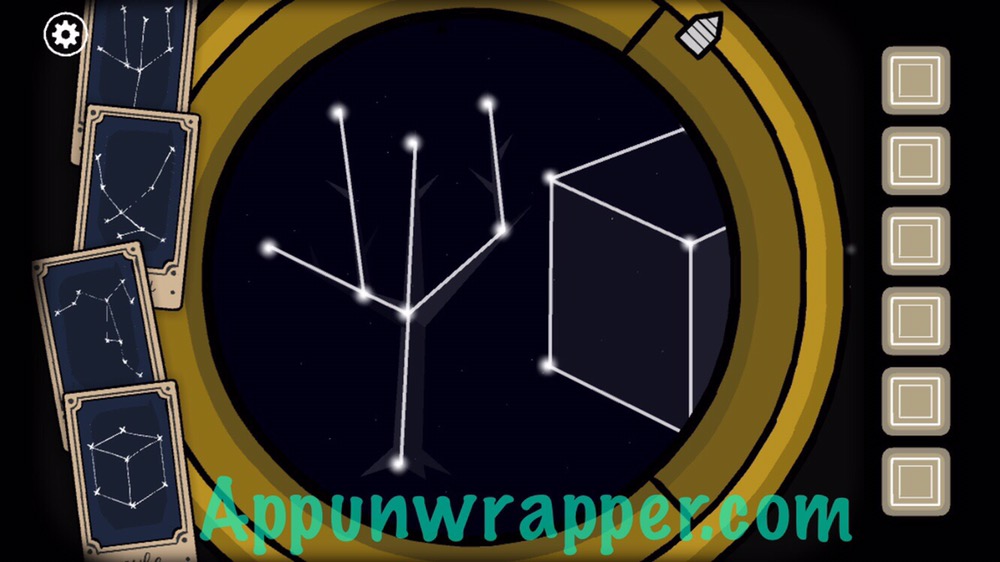
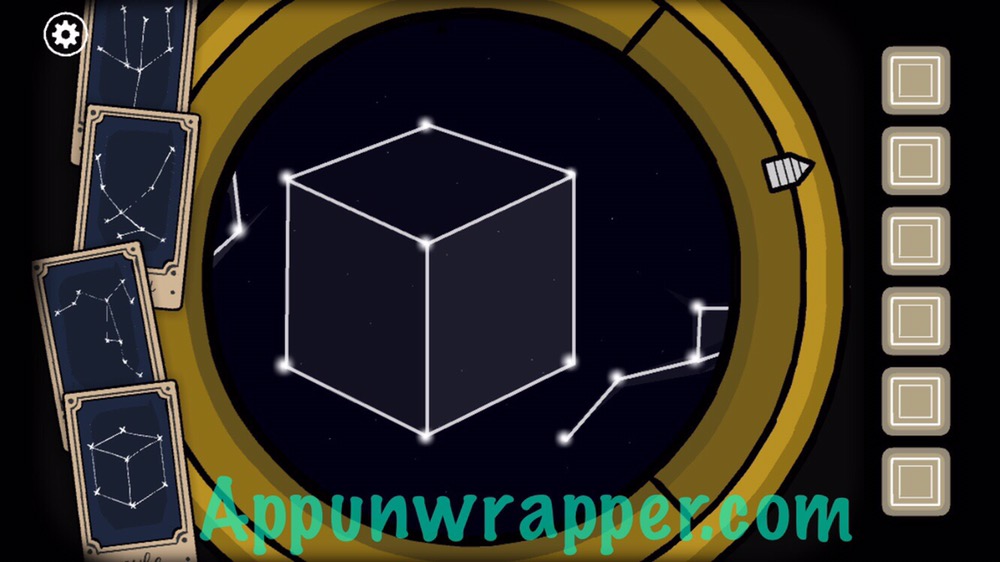
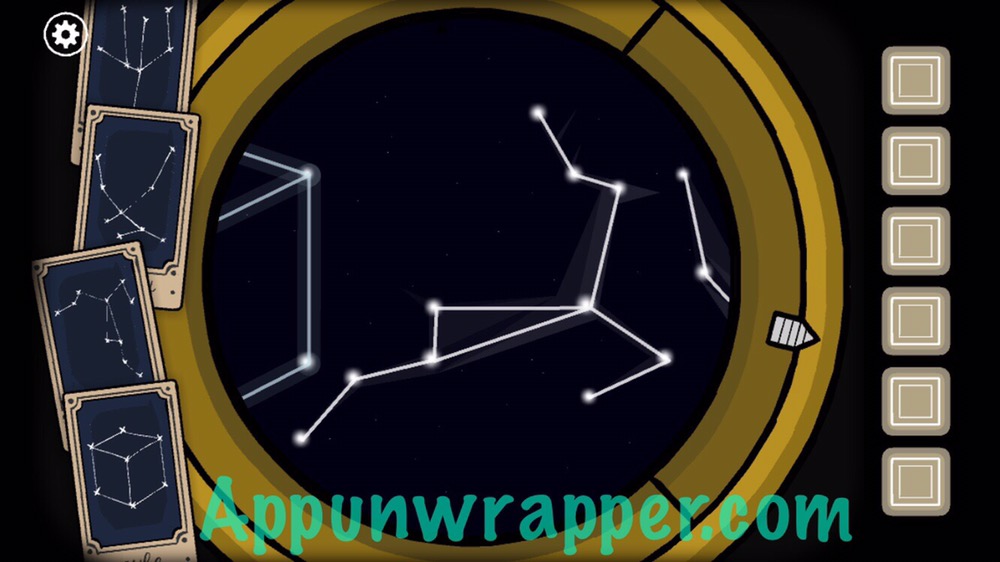
We now need to make the 6 constellations.
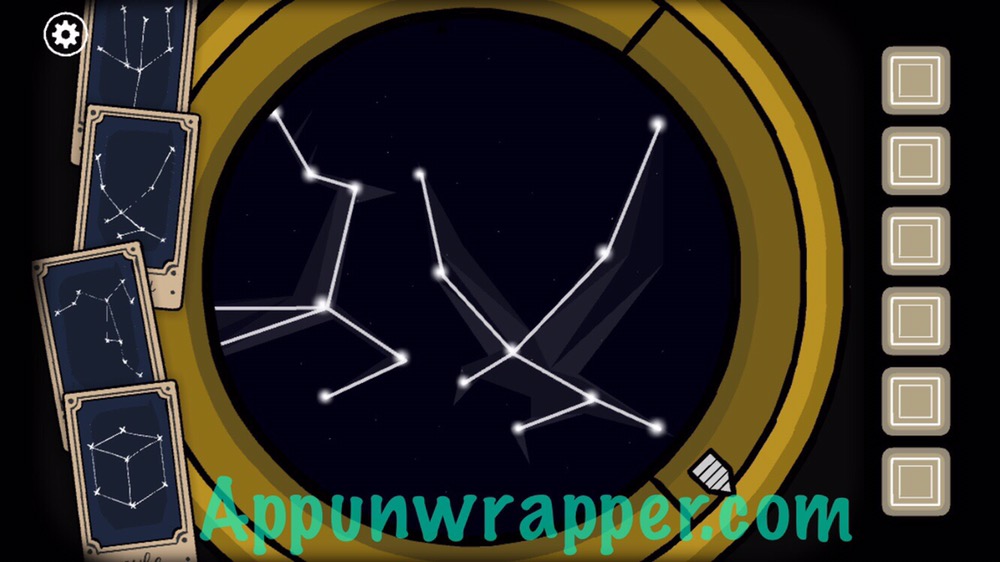
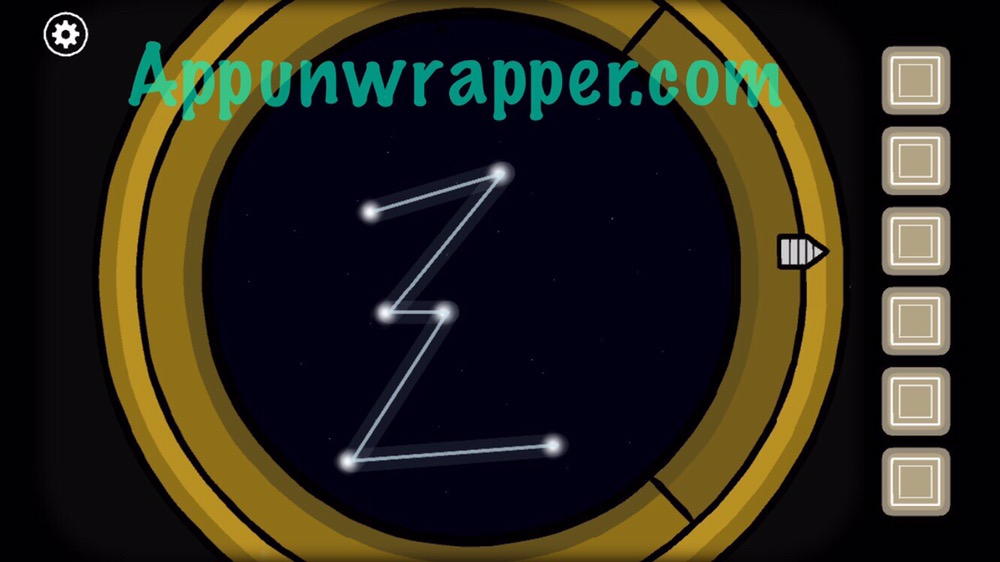
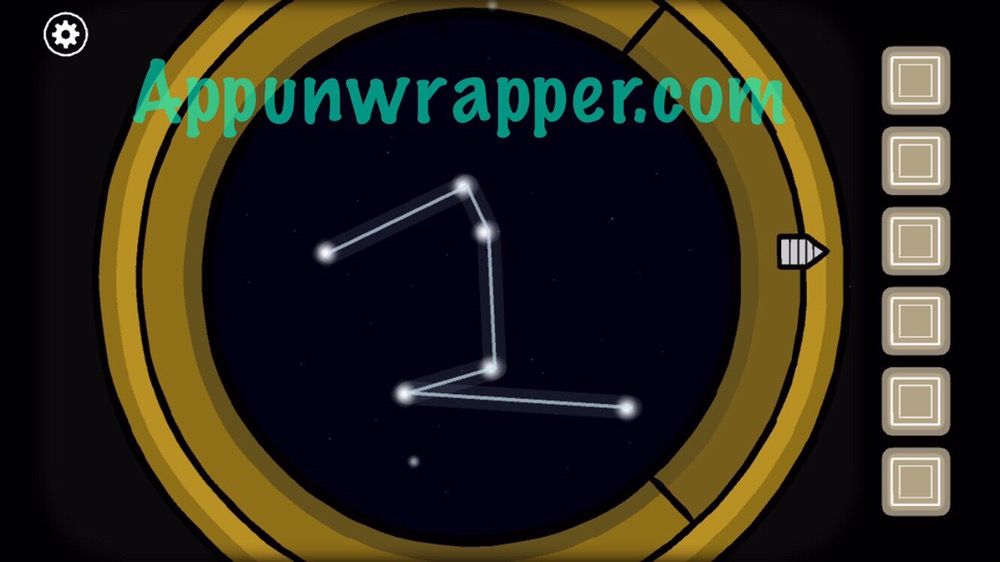
You will end up with a lens – use on letter for next clue
Put the code into the box Love
Pick up timepiece and give to Frank
Pick up the record and play it
You will have noticed some arrows where the record was follow that to make them dance rightx2 leftx2 rightx3 leftx3 rightx2
Get the key and open the cupboard
Get the record and dress
Give Rose the dress

The Dress
Story achievement
Play the record and do the dance rightx3 left right left right leftx2 rightx3
Pick up the needle from the gramophone
Prick Rose’s finger
Use the shovel to open everyone’s grave. Open the box for 2233 piercer
Use the piercer on alberts grave. You should now have 5 bones
Get the final bone from the dog
Piece together the skeleton for a timepiece
Give the timepiece to Rose
Go through the door
Place all the timepieces in their correct spot
Put the time shown in the grandfather clock 2:45
Close the clock on Rose
Go back to the other room
We now need to weigh all the objects teeth, eye, foot, tears, hair, tongue, blood, eye, brain
With the weight info and the pictures info input the code Top – 535 Bottom – 234
Pick up the heart and place it in the final spot
Click on all the sacrifices
Keep clicking to the man
Give him all the sacrifices
Click through to the end

Rebirth
Story achievement

The Last Emblem
Story achievement

The Crow
Story achievement
During the Rose part, talk about CubeEscape

Laura
Talk about Laura
The final achievements take place in the last area. We need to create 3 items before making the elixir. The achievements guide actually does a good job at mentioning how to do it

White Cube
Create the white cube

Black Cube
Create the black cube

Rusty Lake Cocktail
Create a cocktail