A guide to completing Priority Assignment: Shattered Quadrant.
Introduction
There are a few optional items and locations in the Shattered Quadrant, but they will not be present in this guide, so feel free to explore for yourself if you are feeling curious.
Getting the First Transporter Tickets
The first area you wake up in as you begin your journey is the Explorer’s Home Unit⠀⠂. You should pick up the following transporter tickets before you leave: Ancient Section Side Aisle⠘⠲, Human-Machine Data Sharing Interface⠐⠕, Pre-Shift Transit Station⠨⠪, Stone Waterfall⠰⠔, Murtaugh’s Observatory Unit⠠⠍, and Explorer’s Home Unit⠀⠂. You will also want to pick up the Makeshift Arc Breaker, better known as soap. With these items, make your way to the ticket transporter and use the ticket for Ancient Section Side Aisle⠘⠲.
Here, you will find a ticket for Right Side of the Rift⠸⠀. After you find it, return to the ticket transporter and use the Human-Machine Data Sharing Interface⠐⠕ ticket.
In this area, you will find the Engine Proxy⠐⠬ ticket. After you have it, return to the ticket transporter and go to Murtaugh’s Observatory Unit⠠⠍.
Here, you will find the Number Station⠰⠈ ticket. When you get it, return to the transporter and go to Number Station⠰⠈.
Here, you find a ticket for The Cellar⠠⠊. There is also a Weight Stone in this area, hidden behind a barrel. After you have both of these items, return to the transporter and go to Pre-Shift Transit Station⠨⠪.
Here, you will find another Weight Stone, as well as a place to use it. After you have used the Weight Stone, get the Plasma Vial and go to Right Side of the Rift⠸⠀.
In this area, you will find the Architect’s Study Room⠠⠇ ticket, as well as a portal that you can travel through. Go through the portal, and you will find a ticket for Laser Junction :: Horizontal Node⠀⠴. There is also a place to use the Plasma Vial here, activating another portal. Go through this portal and use your other Weight Stone. Return to the ticket transporter and go to The Cellar⠠⠊.
Here, you will find the tickets Hallway Caught in Spatial Anomaly⠸⠽ and Dead End⠀⠩. You will also find a Stone Plate. After you have all of these items, go to Laser Junction :: Horizontal Node⠀⠴.
Here, you will find the Pre-Shift Basement Variant⠀⠮ ticket. While you are here, turn on the 2 projectors to activate their lasers. After you have done this, go to Architect’s Study Room⠠⠇.
Here, you will find the Ship’s Brig⠨⠨ ticket. There is also a Valve that you should pick up while you are here. After you have these, go to Pre-Shift Basement Variant⠀⠮.
This area is larger than most of the previous ones, so it can be easy to get lost. As you explore the area, you should find a ticket for Reception Hall Spatial Loop⠀⠹, as well as 3 levers that you should turn on. Somewhere in the area is a teleporter; go through it and you will find a ticket for Brass Hatch with Triumph Inscription on the Wall⠘⠤ and a computer with a switch that you should pull. This will open a ladder back in the main part of the area, allowing you to access a 4th lever. After you have turned on all 4 levers in the area, a machine will open, allowing you to get the Sigil. After you have done all of this, return to the ticket transporter and go to Brass Hatch with Triumph Inscription on the Wall⠘⠤.
Here, you will find the titular brass hatch and its accompanying triumph inscription on the wall. More importantly, you will find a ticket for Karmic Manipulation Museum Unit⠈⠢. With this, you should have a total of 19 transporter tickets.
Exploring the Transit Station
Here, you will find the Mixing Console Settings. Take it and go to Reception Hall Spatial Loop⠀⠹.
Here, you will find the Stabiliser Fluid Vial. Take it and go to Pre-Shift Transit Station⠨⠪.
Going up the ladder, you will find a ticket for Roman Church Crypt⠨⠥. Going all the way left to portal 1, you will find a ticket for Prison Unit⠰⠭. There is also a rod on a pedestal that you should push. Skipping over portal 2 for now, go to portal 3 and you will find a ticket for _Root Surveillance Station⠰⠌. In portal 4, there is a spot for you to use your Stabiliser Fluid Vial under the telescope, activating another portal. We don’t need anything from here at the moment, so we will continue on to portal 5. Here, you will find a ticket for Karma-Luminescent Cave Paintings⠰⠤. On to portal 6, you will find a ticket for Defense System Interface⠐⠺. There is also a device with 11 levers. Adjusting the levers to match the drawing on Mixing Console Settings will open a device, allowing you to get a ticket for Tilted Gravity Anomaly⠠⠆. Return to the ticket transporter and go to Karma-Luminescent Cave Paintings⠰⠤.
Here, you will find a ticket for Airplane Wreck Caught in Spatial Anomaly⠰⠬. You will also find a portal above and a portal below. Starting with the portal above, you will find a place to use the Sigil. In the portal below, you will find another rod on a pedestal to push, and another portal. Going through the new portal, you will find a candle. Take it and return to the ticket transporter. Go to Roman Church Crypt⠨⠥.
Here, place the candle in the empty spot. Return to the room in Karma-Luminescent Cave Paintings⠰⠤ where you first got the candle and turn the emblem right side up. Go to Human-Machine Data Sharing Interface⠐⠕.
Here, go to the back room on the right and go through the portal. You will find a ticket for Asylum Loop⠐⠌. Next, go to _Root Surveillance Station⠰⠌.
Here, you will find a ticket for Energy Transition⠨⠀. You will also find the Karma Vial. Next, go to Dead End⠀⠩.
Here, pick up the Copper Plate and go to Stone Waterfall⠰⠔.
Here, use the Karma Vial to get access to a ticket for Ouroboros Ruins⠐⠆. Go to Ouroboros Ruins⠐⠆.
Use the Copper Plate to get access to a portal. Go through and get the Piece of Chalk. Return to Pre-Shift Transit Station⠨⠪.
Go through portal 4 and get Tile C. Go through portal 5 and place the Piece of Chalk in the device and pull the switch. If you have already drained the fluid from the machine, you can refill it by turning the knob on the tank behind it. Receive the Karma Infused Piece of Chalk from the machine and return to Ouroboros Ruins⠐⠆.
Use the Karma Infused Piece of Chalk on the wall to draw a ladder, allowing you to access a portal. Go through and place Tile C in its designated slot.
The Beginning of the End
Here, you will find a portal. Go through to find a ticket for Cube Loop⠐⠈. There is also another rod on a pedestal for you to push. Next, go to Defense System Interface⠐⠺.
Here, you will find the Turbine Blade and a portal. Go through, and you will be able to find a ticket for Glowing Pyramid⠨⠁. Return to the ticket transporter and go to Tilted Gravity Anomaly⠠⠆.
Here, you will find a ticket for The Duality of Unknown Outcome⠰⠂. You will also find a portal. Go through, and you will find an arc that needs to be broken with your Makeshift Arc Breaker. Next, go to Asylum Loop⠐⠌.
Here, you will find a portal. Go through and you will find a Valve. Take it and go to Energy Transition⠨⠀.
Here, you will find another Stabiliser Fluid Vial. Take it and go to Pre-Shift Basement Variant⠀⠮.
Straight left, you will find another device to use the Stabiliser Fluid Vial. Do so, and a portal will appear. Go through and you will find a place to use the Stone Plate. Use it, and you will be able to get another Sigil, although this one is triangular rather than oval. After you take it, return to the ticket transporter and go to The Duality of Unknown Outcome⠰⠂.
Here, you will find a portal. Go through, and you will be able to find another rod on a pedestal. Push it and return go the ticket transporter. Go to Murtaugh’s Observatory Unit⠠⠍.
After pushing all 4 rods, a device has activated in this area, opening a portal. Go through and you will be able to find a ticket for Cathedral Ruins⠈⠒. You will also be able to find a Lever Handle and a place to use it, allowing you to access another portal. Go through, and you will find a place to use the Turbine Blade. Return to the ticket transporter and go to Stone Waterfall⠰⠔.
Go through the portal and you will find a ticket for Laser Junction Infiltration Station⠈⠥. You will also be able to find a teleporter. Go through, and you will find tickets for Mathematical Museum Unit⠠⠚ and Left Side of the Rift⠀⠸. You will also be able to find the Karmic Vessel. Return to the ticket transporter and go to Glowing Pyramid⠨⠁.
Here, you will be able to find the Pyramid Key. In the cubbies at the base of the pyramid, you will also find tickets for Pre-Shift Lighthouse Ruins Variant⠰⠘ and The Arcade⠨⠊.
Mass Surveillance
Here, you will find a device at the bottom of the ladder. Turn it on, and it will emit a laser. Next, go to Cathedral Ruins⠈⠒.
Here, you will find a ticket for Surveillance Station⠀⠛. Take it and go to Pre-Shift Lighthouse Ruins Variant⠰⠘.
Here, you will find an old arcade machine. Remove the coin slot from it and take the Energy Crystalline Shard from inside. Next, go to Pre-Shift Transit Station⠨⠪.
Go through portal 4 and then through the portal under the telescope. Use the Pyramid Key on the box to get the Shutter Switch. Return to the ticket transporter and go to The Arcade⠨⠊.
The floor of this area is littered with Blank Surveillance Data Discs. Pick them all up for a total of 10. Additionally, you will find another Makeshift Arc Breaker on the floor. There is a spot to use the Valve. Use it to reveal a Brass Tongue. There is also a spot to use the Shutter Switch here. Use it to reveal a portal. Go through, and you will find a ticket for Ancient Section Right Aisle⠀⠁. With our items claimed from The Arcade⠨⠊, we must return the Blank Surveillance Data Discs to their rightful positions. Go to each of the following locations and put a Blank Surveillance Data Disc in its place:
The Arcade⠨⠊
Pre-Shift Basement Variant⠀⠮
Number Station⠰⠈
Engine Proxy⠐⠬
Right Side of the Rift⠸⠀
Roman Church Crypt⠨⠥
Airplane Wreck Caught in Spatial Anomaly⠰⠬
Laser Junction Infiltration Station⠈⠥
Surveillance Station⠀⠛
The Duality of Unknown Outcome⠰⠂
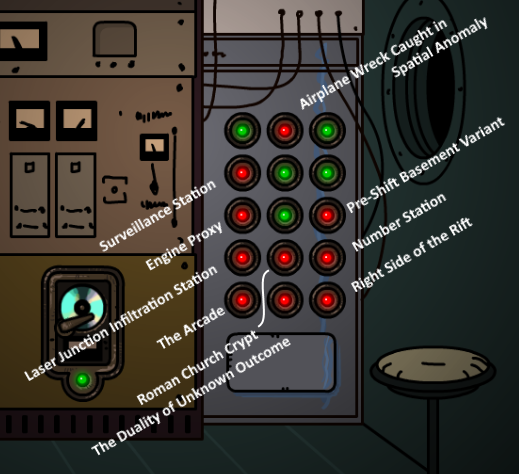
After you have returned all of the Blank Surveillance Data Discs, go to _Root Surveillance Station⠰⠌.
You will now see that all of the lights are green and a panel has opened, revealing the Brig Key. Are you curious as to which lights correspond to which areas? No? Well I was, so here is an image showing that:
The End
Use the Brig Key on the door to get access to a portal. Go through and you will find a spot to use your Sigil. Enter the portal it reveals, and activate the last laser. Go back and enter the other portal in the area. You will find another Stabiliser Fluid Vial and another portal. Grab the item and go through the portal to find a ticket for Micro Loop Experiment⠐⠗. Return to the ticket transporter and go to Laser Junction Infiltration Station⠈⠥.
Climb to the top of the ladder to find that the device has opened, revealing the Cube Password Packet. Take it and go to Left Side of the Rift⠀⠸.
Use the Stabiliser Fluid Vial on the device to open a portal. Go through, and you will find a socket to place the Energy Crystalline Shard and a knob that requires power. Turning the knob will open a hatch leading to a room with another Brass Tongue. Take it and go to Ancient Section Side Aisle⠘⠲.
Insert a Brass Tongue into the mouth of the stone dragon and continue on to Ancient Section Right Aisle⠀⠁.
Insert the other Brass Tongue into the mouth of the other stone dragon and continue on to Pre-Shift Transit Station⠨⠪.
Enter portal 2 to find a ticket for Hindi Temple Isle⠠⠀. Return to the ticket transporter and go to Hindi Temple Isle⠠⠀.
Here, you will find a ticket for Iron Triumph Loop⠐⠀. You will also find a Lever Handle stuck in a pedestal. Take it and go to Iron Triumph Loop⠐⠀.
Find the room with the triumph inscription and place the Valve in the hole above it. After the inscription lights up, go to Brass Hatch with Triumph Inscription on the Wall⠘⠤.
Enter the newly opened brass hatch to find a portal. Go through to find another arc that needs to be broken by the Makeshift Arc Breaker. After breaking the arc, go to Pre-Shift Transit Station⠨⠪.
Go to portal 3 and enter the newly revealed portal. All the way to the right, you will find Tile D. Take it and return to the ticket transporter. Go to Ouroboros Ruins⠐⠆.
Return to the chamber with the tile device and use the Lever Handle. Go through the portal and you will find a familiar puzzle from Chapter 1. Set the valves to the correct position to burst the water pipe, revealing Tile A. While you are here, use the Karmic Vessel to take some of the extra water. Take the Karmic Water and return to the ticket transporter. Go to Architect’s Study Room⠠⠇.
Go through the teleporter and use the Karmic Water on the dish. Go through the portal and insert the Cube Password Packet into the device. Take Tile B and return to Ouroboros Ruins⠐⠆.
Return to the tile room and insert any tiles you have had the restraint to save for this moment. Climb the ladder, press the button, and claim your victory.
By porotoman99