Here is an overview of the Gameplay and Strategy for the Terraform Inc game.
Keys and Controls
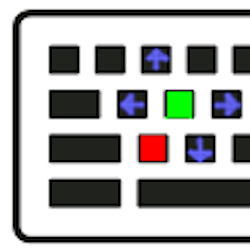
Terraform Inc flight gives free-3d movement. You can move the same speed in any of the six directions: Right/Left, Up/Down, Forward/Back.
That’s a lot of buttons, so it can be hard to become familiar. If you think of “S” as forward, the surrounding four keys work to move in the perpendicular directions – plus “Z” for reverse.
You may be tempted to only use the mouse to look and only “S” to move, but you will find free movement to be very important, especially when placing new rails or parts.
As a useful trick, you can use multiple thrusters to increase your speed. For example, by using both Up and Forward at the same time, you’ll move both Up and Forward at full speed. This can be useful for quicker travel, but it’s also less efficient since it’s not the direct path.
Placement – Mouse with Drag and Drop, R to rotate
Learning to place rails and parts is a critical skill. Click a rail or part (or portal) as the starting point. But remember it is important WHERE you click on that target.
The building node nearest the point you click will become the building point. If you click at one end of a rail, then the new part will drag from there (not the other end). Note that parts are built as a part-rail combination. So, you can technically start a new rail from the MIDDLE of that if you ever have a reason to do so.
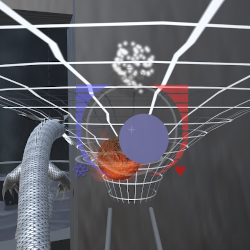
Once you’ve got the starting point set, you drag your new construct into place (movement is allowed as above) and drop it. Invalid placements will appear red, while valid placements appear blue. In most cases, invalid placements are due to excessive slopes or turns.
If you watch the numbers at the top of the screen, it will tell you how far (horizontal and vertical distance) the new construct is from the starting point. This is important to know whether you have enough slope.
Also, it is critical to learn the “R” key to rotate parts during placement. This key will flip the part around until you find the end you want.
Adjustment – Shift-Key and Move
Learning to adjust rails and parts is a critical skill. First, you must select a rail or part. That is a simple left-click, but it is imporant WHERE you click on that target. The building node nearest the point you click will become the adjustment point. If you click at one end of a rail, then that end will move while the other end will remain stationary.
Once you’ve selected your target, hold down the SHIFT key and use same movement keys above. Invalid placements will be disallowed, such that you won’t be able to adjust the part in that direction.
Part Choice Controls – Number Keys
When choosing a part to place, you can use the number keys to toggle your desired part. If there is more than one part available in that category, press the same key multiple times to toggle through.
The “E” key toggles through all available parts. The “Q” key clears the chosen part.
Radar Choice Controls – Function Keys
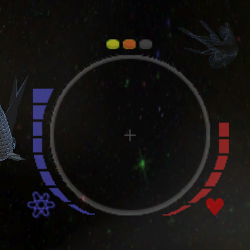
Once the tutorial missions are done, The F1-F10 keys select different customers AND their portals. Customers appear as rotating stars. Sources appear as rotating triangles. Sinks appear as rotating squares. In addition, the range appears as a number and the elemental type appears as an icon.
Useful Mouse Functions – Tips and Tricks
The mouse is primarily used to look around, and select or place parts, however there are a few special functions.
First, if you right click on certain pieces of certain parts, you can configure them. The most important example of this is the “Filter” part where you can change what element is used as the filter. However, you can also use this to push the various freely rotating bits like windmills, splits, and switches.
Second, you can right click on a planet to turn on “Follow Mode”. Your dragon will then follow the ball where ever it goes WITHOUT USING ANY ENERGY. This is very useful when analyzing your constructions, but can also be used to travel around inexpensively. Note that you can even use the movement keys while in follow mode to change your angle (or distance).
Rails and Parts
Slope – planets roll downhill. If your slope is insufficient, or if there are bumps, a planet can easily get stuck. This can be remedied by making sure the planets are moving fast enough when moving uphill.
Altitude – you have a limited amount of vertical space to work with. Since gravity points down, it is much easier to go down than up. You can regain altitude through the use of certain parts such as the escalator or accelevator.
Lifetime – planets only last in hyperspace for a limited time before dissolving. You need to make sure that they arrive at their destination before they expire. You can also use certain parts such as the screw or the windmill to refresh a planet and give you more time.
Velocity – the above three concerns suggest that it is better to go faster. You are less likely to get stuck, you can go up slopes to regain altitude, and you’ll arrive at your destination sooner. However, there is a problem with that. Quickly moving planets are more likely to bounce off the track at the slightest bump. Likewise, the rails themselves do not “HOLD” down the planet on turns. The rails are slippery and planets will easily fly off if they go around a sharp turn too fast.
Elements and Geomancy
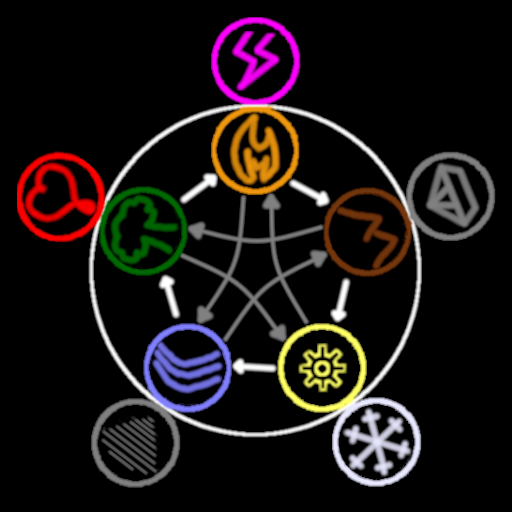
There are two types of geomancy: rolling geomancy (conversion) and flying geomancy (production). Both are similar in that you need to bang two planets together with enough force to react. The difference is in the list of ingredients and whether the planets are airborne or not.
Rolling geomancy (conversion) gives three planets from two following the white arrows in the picture. This is true whether you are using inner ring elements or outer ring elements. Fire and earth results in three earth planets. Lighting and crystal results in three crystal planets.
Flying geomancy (production) gives three planets from two following the gray arrows in the picture. Again, this is true whether you are using inner ring elements or outer ring elements. However, the two ingredients are not changed and the extra planet is produced from the opposite ring. Two inner ring planets produce an outer ring planet. Two outer ring planets produce an inner ring planet. For example, fire and water produce fire, water, and wind. Lighting and wind produce lightning, wind, and water.
One last point – although it is not geomancy. When a planet’s lifetime in hyperspace expires, it dissolves. For inner ring elements, it disappears. For outer ring elements, it degrades to the inner ring equivalent. Lighting becomes fire. Crystal becomes earth.
Customers and Quests
Customers are important for several reasons:
Money – you sell planets by delivering them to the customer’s sinks. This turns into profit. If your total profit in the current run is higher than your prior budget, then your budget goes up. This serves as capital to buy more parts in Bubba’s shop. Also, the total number of non-part rails you can build is equal to your maximum budget plus one.
If you want more money per planet, enhance the planet while it is in transit. You can add rings by spinning it around by various mechanisms such as loop or flip parts. You can add planets by throwing the planet and catching it. The further it flies (horizontally), the more planets you can get, with a maximum of two per planet. Each enhancement is worth one more profit upon delivery.
Affinity – as you make larger and larger deliveries (regardless of enhancements), the number of affinity hearts will rise. This is important since it unlocks parts, gives you free parts as rewards, and also makes quests available.
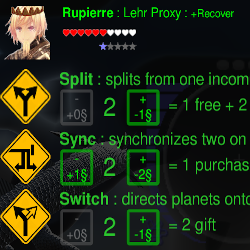
Quests – the stars that show next to the customer UI represent quests. To activate a quest, you must reach a number of hearts equal (horizontally) to that star. At that point, you can talk to that person to learn what they want. Finish the quest, and you can get various special rewards – generally specific to that customer’s territory.
Introductions – you can’t reach the outer ring set of customers without being introduced by those in the inner ring. This can be accomplished by finishing the first quest that opens up at six hearts.
There is one major downside to raising your affinity. Each customer in hyperspace has enemies. As you become better and better friends with someone, their enemies will start to dislike you. This causes your maximum affinity with these other people to go down. Not a permanent problem, because you can get it up again by extra work (extra deliveries) – but then that will then make their enemies angry. You can’t make everybody happy!
Strategy and Tricks
Planets – Although rolling geomancy can produce three planets from two, all three in the result set are all the same element. For example, fire and earth becomes three earth planets. This is useful if you simply need a few more planets.
The key to longer term production is infinite loops and flying geomancy. If you combine fire and water, you get three planets: fire, water, and wind. You can then reuse the fire and water to do it again and again and again! Just make sure you refresh the lifetime each cycle and you can make infinite wind planets.
In fact, if the outer ring planets dissolve, they return to their base state. So, you effectively have infinite water planets too! Better yet, you can even add or edit your construction while the cycles go on, allowing you to place new rails and tracks to do even more without restarting.
Done right, this method COULD provide every planet you’ll ever need all in one run. The problem is that it’s hard – and unless your design has high reliability and failsafes, it’s likely to break at some point.
Ideally, you’d want multiple infinite production loops, but even one can be pretty complicated.
Elements – Sometimes you need an element that you don’t have available. This is especially true for the infinite loops mentioned above. Fortunately, there’s an easy solution. As you’ll learn in the first customer quest, if you pass a preferred planet directly through a customer’s contact node, they will convert that planet to the next element in order.
Money – If you need more money, set up a “enhancement area”. Build loops get rings and build jumps to get moons. Generally this is best if you arrange this after a production loop. If every planet goes out with a ring and two moons, each delivery will be worth four profit. Assuming you are reaching the six hearts needed for the customer quests, that’s already twenty four budget just fulfilling the needs of one customer!
Dangers and Death
First, you can run out of energy (the blue bar). Energy is used during movement and replenishes slowly over time. You can also get a full refill by approaching any portal – either source or sink.
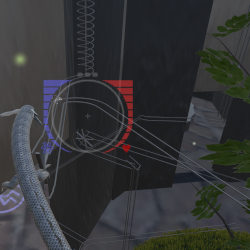
Second, you can run of of stability (the red bar). Stability is lost whenever an anomaly is nearby and you are looking in that direction. The screenshot above shows one such anomaly near the upper right corner. Think of stability as your sanity points. If you don’t look, you don’t see, so you don’t lose sanity. Also, the closer you are, the more it hurts. Stability is recovered slowly over time and there is no quick refill.
Note that there is an anomaly proximity indicator at the top of your HUD circle that appears as three indicator lights in a row. Normally, these are all dark, but as you get closer and closer to an anomaly, the yellow, then orange, then red lights will start flickering.
If you die, you don’t lose anything except time. You will be rescued and restored back at the hub, near Bubba’s shop. For a short time, your movement speed will be reduced. Also, once you’ve passed the tutorial missions, you will have to go visit whoever rescued you before you can request more planets. Generally, whoever is nearest will rescue you, but this is weighted by affinity. If you are on the border between two regions, whichever person likes you best will likely rescue you.