A guide explaining the basic combat mechanics of Taiwu for new and returning players.
Intro
Given the game is still seeing balance changes and edits, I won’t go into exact formulas, calculations, etc, as those are more or less all subject to change, but aim to give a general idea of how combat works and what each stat does.
This is not a in-depth build guide as there are simply too many ways to play and build this game, what I hope to do is explaining the mechanic so you can understand and make your own decisions in game. I will also avoid covering non-combat related stuff such as how to learn skills for now since the guide is geting long as is.
Combat Stats
Before going into the combat interface, it is helpful to understand how each of the basic combat stats in Taiwu functions, please note given that the EN translation is an ongoing progress, I will use the current translation of all the stats, and if any thing changes, please let me know.
As seen in the character window, stats relevant to combat are on the right side of the screen.
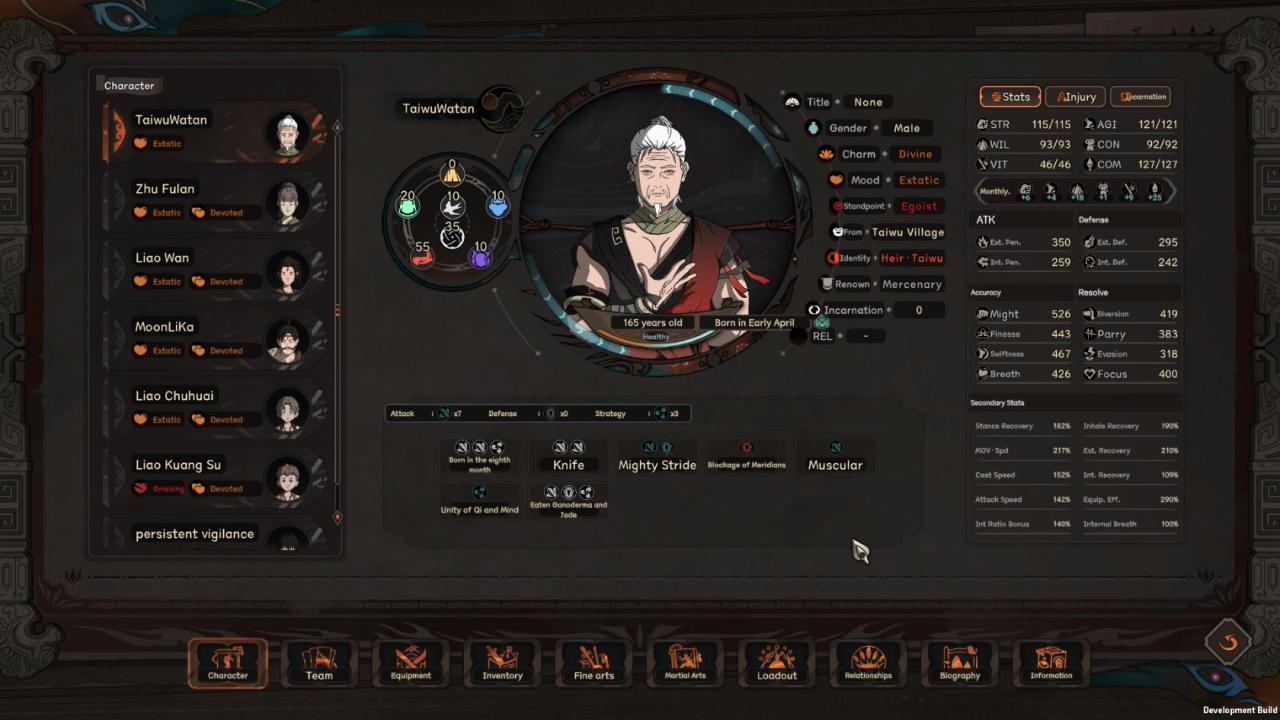
Primary Stats are basic attribute of character that are can only rarely be modified. In most cases, they do not directly affect combat, but most gear/skill require one or more primary stat in calculating their effectiveness, if you lack the required stat, you may not get 100% out of the equipment/skill. But each stats also affect several combat stats as I will set out below.
STR
Increase Might/Diversion
Increase Character’s equipment weight (which reduce penalty to speed as a result of wearing heavy equipments.)
AGI
Increase Swiftness/Evasion
WIL
Increase Breath and Focus
CON
Increase Ext Atk/Def
Every 10 con translate to one consumable you can use per month.
VIT
Increase Int Atk/Def
COM
Increase Reading Speed
Increase Finess/Parry
Each of the basic stat, if reduced for any reason, will recover each month, some stat recover faster when the character is younger, such as STR, others recover faster when character is older, such as WIL.
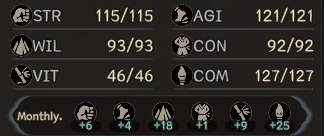
The next set of stat are the attack stats, as mentioned above, these are affected by your primary stats, your allocation of True Qi, equipment, and passive effect of any of your equipped skills. In taiwu, two thing determines whether an attack does anything, whether the attack hits, and whether the attack does pierces the defence of the defender.
Each of your character’s auto attack will be based on one of the four accuracy stat, which is compared to the opponent’s corresponding resolve stat to see if the attack hits.
Accuracy is not a flat hit/miss chance, the more your accuracy stat exceed the enemy’s corresponding resolve stat, the more likely it is for your hit to deal additional damage, though if your accuracy stat is sufficiently low, there will be a increasingly higher chance that your attack is resolved by the defender and negated entirely.
Once an attack does hit, the game then use compare the Ext Atk/Int Atk stat (exactly which stat is used defends on the weapon/skill used to attack) to the corresponding defense stat to determine actual damage done, if any.
As a general rule, high accuracy increase the chance of your attack at least does something, and magnify the damage done if you have sufficient ext/int attack to overcome the defender’s corresponding defence.
More on damage calculation in the Combat Interface Section
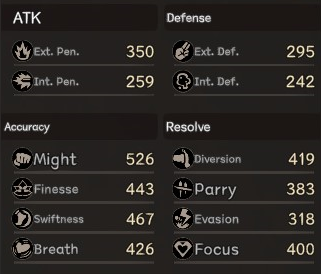
There are also a set of secondary stats that further affects various actions in combat, I will briefly go over them here and further explain when I explain the combat mechanics.
Stance Recovery
– The rate in which your character recovers their stance with each hit landed/taken.
Inhale Recovery
– The rate in which your character recovers inhale overtime in combat.
Move Speed
– Self explanatory, the higher this is, the quicker and further your character move with the same amount of movement.
Ext Recovery
– How quickly your character recover from weaknesses created by your opponent’s attack.
Cast Speed
– How quickly your character finish channeling any skills in combat.
Int Recovery
– How quickly your character recover from Acupoint
Attack Speed
– How quickly a character gains attack actions in combat.
Equit Eff.
– Affects the Max effectiveness your weapon/equipment can have (having high stat here allow you take a weapon over 100% effectiveness provided the required stat for that weapon is high enough). As well as decrease cooldown for switching weapons.
Int Ratio Bonus
– Allows you greater freedom to adjust the int/ext damage ratio of weapon and skills, will be explained in more detail later.
Internal Breath
– Increase the speed you recover any lost True Qi, and allow additional True Qi you gained to remain longer. Also speed up recovery of chaotic inner breath and reduce any chaotic inner breath taken.
Basic Movement and Attacks
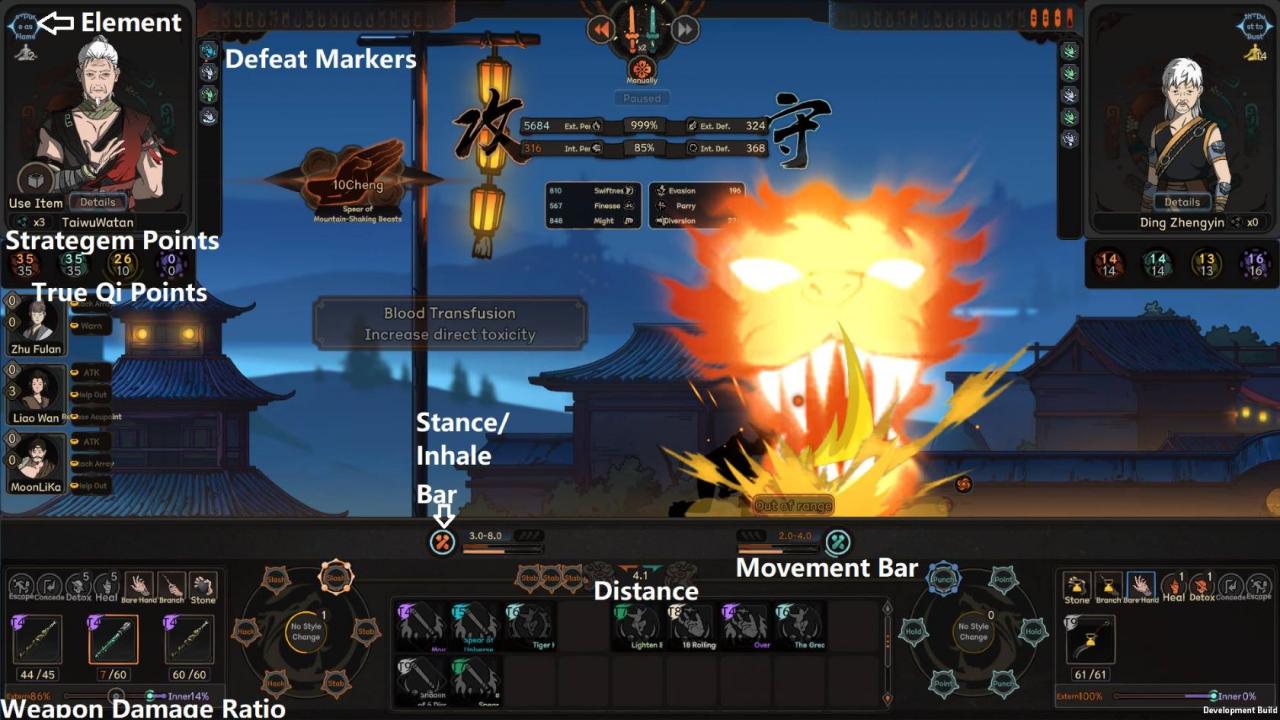
The Combat Screen is show above, I have made some notes regarding main section of the screen I will refer to as I go along.
The basic control of the combat is simple, A/D to move left or right, and left click to attack, any skill you may want to use will be accessible in the bottom.
Moving
The Distance of between you and your enemy is set out in the middle of the screen, each weapon has a strike range, indicated above your movement bar. skills may further modify a weapon’s attack range. Attacks out of range will always miss, this includes enemy skills, which you can dodge entirely if you are fast enough.
The movement bars has two part, the top bar shows your movement points. Without movement skills, you can only move until your top movement bar turns red (at 50%), and will move slower the closer you get to that point.
Using a movement skill instead consumes a portion of your movement points, and allows you to move (and enjoy whatever other effect your movement skill give you) while the duration indicated by the bottom movement bar lasts. Note that moving while a movement skill is active will usually cause the bottom movement bar to deplete faster, so for certain movement skill that focuses on buffing, it may be beneficial to not move after casting it.
Movement point will gradually regen as a greyed out part of the top bar, until the grey part fills the top bar, no movement point is actually regained, and any movement resets the progress. Once the grey bar has filled the top bar, it will rapidly begin to restore your actual movement point until full, though this prorcess is also interrupted by any use of movement points. Having an active movement skill also stop the movement point from recovering.
As a result, you generally don’t want to deplete your movement bar too much to allow for quicker recoveries, if you fully exhaust your movement points, you will be a sitting duck for a long time.
Attacks
Right above the movement bar and above the attack range is 3 sword icon, these are the number of attacks you have currently stored, the speed these regenerate is based on your attack speed. Left clicking will consume 1-3 of these attack counters and cause your character to make a basic weapon attack. Generally, strong and heavy weapon will take use more counters to attack but also cause more damage.
Each time you left click to attack, you may attack multiple times, the chance of this happening is based on the Combo% shown on your weapon. (Its not a direct calculation, but high combo% make you see these combo more often)
You can also bank up to 3 of these counters (more with certain skills), to allow you to attack in rapid succession to overwhelm the enemy’s weapon parry or quickly fill up their defeat markers in rapid succession.
Weapon and Syles
 Each attack will be made in one of the styles your weapon is capable of making, listed on a rotating wheel at the bottom left of the screen. Here, the weapon is cable of slash, hack, and stab, and slash is highlighted as the next style to be used. Each attack use a corresponding accuracy stat (Slash with fines, Hack with Might, and Stab with Swiftness in this case), which is important to consider given your opponent’s resolve stats.
Different weapon may have different number of styles assigned to it, a light sword could for example have 4 stabs on the style wheel, with only 1 slash and 1 hack.
You can switch weapon at any time by clicking the weapon’s icon, which will put the original weapon on a cool down.
Everytime your attack, the inner wheel of the style wheel will gradually charge up, once full, you get a “Style change” charge, which allows you to double click any style around the style wheel to rotate to it, and give that attack a bonus accuracy. (It will also ignore weapon parry, which will be explained later.)You can store multiple style changes and they remain when you switch weapon.
Weapon Parry
This is a relatively new concept and may see some change. But if an attack hits the enemy, the enemy may immediately attempt to parry that attack with their weapon. Each weapon will list the maximum amount and type of damage they can parry (a metal sword can parry lots of ext damage, but cant parry internal attack, for example).
If an attack did not deal enough damage (these damage calculation arent affected by armor, but si affected by def stat and some defensive skills) to overwhelm parry, those attacks are negated, and parry will be on cooldown based on how much damage it absorbed. If the attack eventually breaks parry, the excessive damage will be dealt, and any absorbed damages will be converted to weak points.
 When parrying is on cooldown, the crossed arm icon in the stance/inhale circle will be greyed out.
There are a few tips to break through parry which seems to be a headache for new players.
– Save up multiple attack and attack in rapid succession, even if you don’t break parry, doing enough damage to put it on cool down may let your attack go through (you will need to at least do some damage tho, if the enemy is too tough to damage at all then it wont matter how many times you hit)
– Attack made after using style change cannot be parried.
-Skills cannot and is not affected by parry.
-Timing your attack to hit the enemy in the middle of their attack animation, while they are healing/detoxing, or charging up to move multiple space with a movement skill will all ignore parry.
-Switching to a damage type the enemy weapon cannot parry.
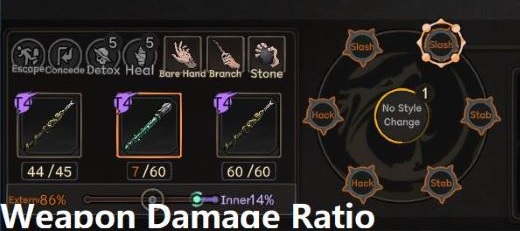
Weapon Damage Ratio
You can adjust your weapon’s damage ratio in combat through the slider shown above, the amount you can adjust depends on both weapon type and your int-ratio bonus stat. some weapon type are versitile and allow you to adjust according to the enemy, adjusting the ration also affects the amount of int/ext attack that will be applied to each attack.
As a result, if you struggle to pierce enemy’s ext and int def, adjusting your damage ratio to 50/50 will only make things worse.
On the other hand, your opponent has weak def stat, a 50/50 ratio allows you to inflict both int and ext damage on hit, which could rapidly stack a lot of injury on your enemies.
Note damage ratio for an attack skill is adjusted separately for that skill in the martial arts panel.
Winning Combat and Defeat Markers
So now you hit your enemy, made it through their weapon parry mechanic, now what?
The purpose of the combat is to inflict enough defeat marker on a enemy to win. The current version of taiwu, unlike EA, no longer has a HP system.The amount of defeat marker needed to beat an opponent is solely dependent on the nature of a fight, a spar can be resolved with 10 defeat markers, where as a fight to the death needs 30.
![]()
The above is an example of a defeat marker bar of an enemy who has taken some damage. There are several type of defeat markers that may be inflicted on the enemy, it doesn’t matter how many of each you inflict, as long as it adds up to fill the defeat marker bar, the enemy will be defeated. I will explain each in turn.
Generally, each defeat marker is attributed to an enemy body part based on which body part is hit by the attack that caused it, which you can tell by hovering over that marker. This is relevant since some skill specifically target a certain body part.
Weak Point – Orange – The easiet defeat marker to inflict, any attack that successfully hit may inflict weak points on the enemy, these disappear quickly over time.This also shows up on the enemy as a glowing dot in the corresponding part.
the number of dots on the marker indicates its severity of the weakpoint, attack with high accuracy or causing damage can likely inflict more serious markers, which take longer to go away.
While a weakpoint defeat marker remains, subsequent hit on the same body part will have a easier time causing damage. So essentially if an enemy have high defense stat, but your accuracy is high enough weak point markers, it might be a good idea to bank your attacks and then attack in rapid succession, with many weak point marker, its more likely your attack may finally hurt an enemy.
Acupoint – Deep Blue – similar to weak point, but usually only caused by skills, while it also goes away on their own, it tend to last a lot longer than weak points.
External Injury – Red- Inflicted by Ext damage attacks that overcame an target’s Ext Def/armor will cause External Injury, unlike Weak Point these will not go away overtime, though there are quite a few skill that heals them in specific circumstances.
Up to 6 external injury can appear on any body part, having 5 on the same part will cause a debuff to the injured character, having 6 will also prevent them from casting skill that recovers that body part.
Any damage beyond 6 limit on a body part will be transformed to Heavy Injury markers, which isn’t isolated to one body part, but those are harder to cause than normal injury markers, so it is usually more efficient to hit multiple body parts.
Internal Injury – Light blue – The same as External Injury, except inflicted through internal damage. It otherwise identical to external injury markers, but does not share the 6 per body part limited, making it generally more effective to use attack that cause both int/ext damage if you can ensure you have sufficient attack to pierce the opponent’s corresponding defence.
Dazed/Breath Injury – Gray with a heart symbol – translation for this seems to be somewhat uncertain atm. This is basically mental damage caused commonly by sound attacks, but also some exotic skills. These will last a very long time, and also apply a debuff to the enemy’s focus, essentially making them more vulernable to follow up sound attacks.
Old Injury – Special version of Ext/Int injury that is darker in color, these are any pre-existing injury you entered the battle with, and can also be caused by some skills. They are much much harder to heal in combat than normal version of themselves, but is otherwise identical.
Poison – This will deserve its own section, so I will probably get to it later. For now, just know that one type of poison can cause at most 3 poison marker of its own type, but it can contribute to victory through other effects such as causing more ext/int injury under certain conditions.
Skills
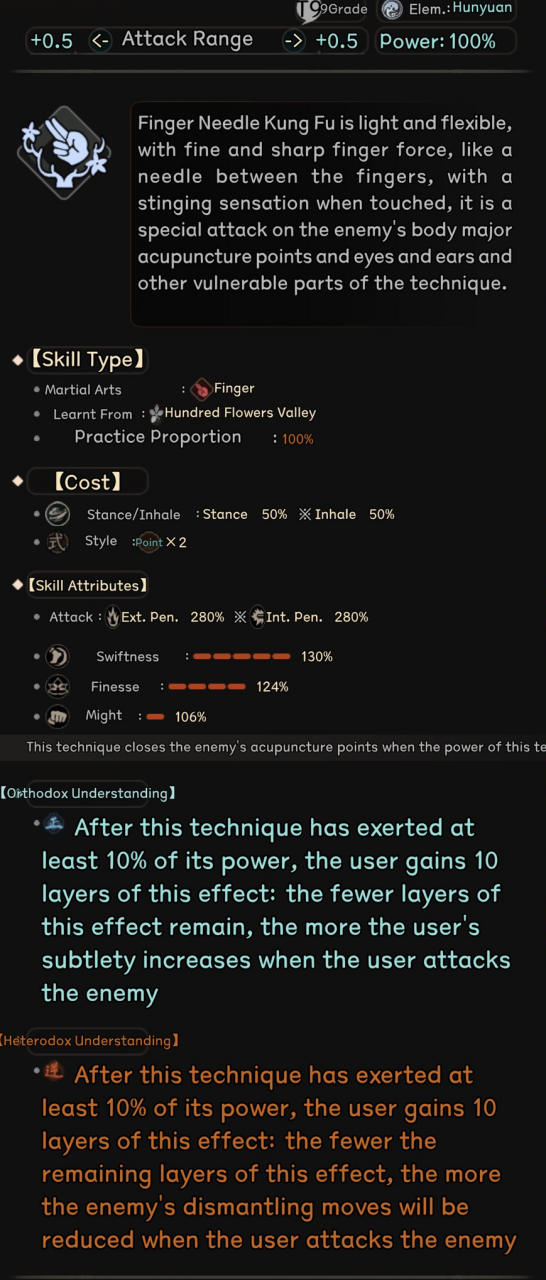
Attack Range
Going from top down, we can see that a skill will modify your weapon’s attack range, usually increasing it and thus making it harder to dodge, in this case it gives you +0.5 max and min range.
Power
Power % shows that given your current stat, how effective you are with this skill, most property of the skill can be modified positively or negatively if you can do more or less than 100% power. (Over 100% can usually only happen as a result of internal arts/element affinity modifiers, but it is not too difficult to have 150%+).
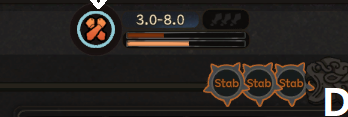
Inhale and Stance Costs
A skill will cost a certain amount of Stance and Inhale, which is shown in combat in the circle besides your movement bar, as seen below.
The outer ring is your stance, which recovers whenever you are attacked or attacks the enemy. The inner rain is your inhale, which recovers naturally over time.
Movement and defense skill cost a set amount of stance/inhale, while attack skill almost always cost a sum of 100% stance and inhale, the ratio of stance to inhale is also the ratio of the skills ext/int damage. (This can be adjusted in the skill breakthrough window at the bottom)

Style Cost
Attack skills also costs a number of styles, styles are gained whenever you make an attack with that style that hits. If the attack combos, you can gain additional style if the combo goes on long enough.
 The amount of style you have accomulated is show under your movement bar, please note you can only hold a limited number of style, and the excess is wasted.
It is also worth noting that as long as the weapon can generate the same style, they might be able to use the same skill. A sword skill costing stab style, for example, can be used even if you are holding a saber that also has stab style in its style wheel.
Skill Atrributes
This sets out the amount the skill’s attack will modify your attack and accuracy stats. in this case, you can see the attack will strike with 280% your normal ext pen and int pen.
Furthermore, the red bars besides each accuracy stat also shows the proportionate of the damage the skill will deal depending on the relative hit stat. Essentially, when attacking with a skill, the enemy has to make a check to block each of the 3 accuracy stats, if the enemy’s dodge beats out your swiftness for example, your skill will only hit with 50% power, and thus deals proportionately less damage.
Defence Skills
These costs no styles, and a set amount of stance/inhale.
These fall into 3 categories generally, ones that just increase your defence or resolve stats to make you more tanky, ones that allow you to counter attack if your enemy missed certain type of attack, and ones that allows you to reflect certain type of damage back to enemies.
These will all last a set amount of time, during which you can move (but not with movement skills), attack, and use items, but not using attack skills.
Movement Skills
These costs no styles, and a set amount of movement (and maybe style/inhale in some case I believe)
As mentioned in the movement section, they last for a period of time shown on the bottom movement bar, and they fall into two categories generally: ones that speeds up your movements, and ones that buffs you while it last, while also allowing you to move at regular speed.
By Mycophobia