Guide with everything you need to know to use my Layer parenting script for Wallpaper Engine.
Introduction
The script supports every layer that has these properties, including particle systems, 3d models and lights.
It’s possible to add some layer type specific properties, such as particle lifetime for particle systems, but with the way script properties are currently handled they would still be visible even if the script is not used on that specific type of layer, thus making it even more confusing and space wasting than it currently is. This is why i’m not planning on adding them anytime soon.
To use this you have to apply the script to any property of the layer you want to be the parent, once this is done you’ll get eight script properties, seven text inputs for the actual parenting of properties and one checkbox to deactivate the script without having to delete it and losing all eventual configuration you’ve set.
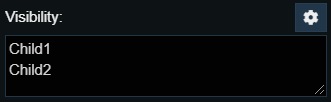
Now, to actually create a child layer you have to write it’s name (it’s case sensitive) in the textbox of the script property corresponding the property you want to bind, some properties only require this, others also requires other parameters to specify how the child layer have to react to changes in the parent layer. These parameters must be separated by a comma “,”.
To add other children you just have to repeat the same procedure, making sure to do it in a new line if it’s the same property.
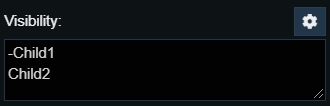
It’s possible to temporarily deactivate the parenting of a property for a single layer without having to delete the line entirely thus losing it’s configuration, it can be useful for testing purpose. To do this place a “-” at the start of the line before the name of the layer, this way that specific line will be ignored.
Visibility and opacity
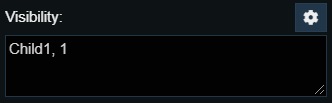
The values for visibility are as follows:
- 1: direct visibilty. If parent is visible, child is also visible.
- -1: inverse visibilty. If parent is visible, child is not visible.
- 0: status change. If parent visibility changes, child visibility also changes, regardless of what the actual values are. ex. Parent false => true, child false => true but also child true => false.
The values for opacity are as follows:
- 1: direct opacity. If parent goes from 1 to 0, child also goes from 1 to 0.
- -1: inverse opacity. If parent goes from 1 to 0, child goes from 0 to 1.
As of the time i’ve written this guide there’s no such a thing as visibility for 3d models and no way to access their opacity through script, so whenever a 3d model is involded visibility and opacity won’t work.
Lights also don’t have opacity, so it won’t work either.
Origin and color
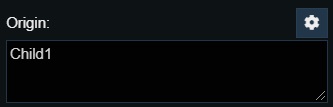
- Origin binds the relative position of the child layer to the parent layer, meaning every movement made by the parent will also be done by the child. This does not make the origin of the child the same of the parent.
If origin is not used while rotation is used, the child will still rotate around the parent but what doesn’t change is the starting position, so if you were to move the parent under these condition the radius of the rotation will change to match the distance between parent and the staring position. - Color binds the offset in color between parent and child based on the hue scale.
The hue scale goes from 0 to 360 and represent the whole rainbow with red at both ends, now if, for example, you apply this when the parent has a color of 30 while the child is 150, what this script keeps the same is the 120 of difference so if you were to apply a rainbow script to the parent, the child will also cicle through every color but shifted forward with that 120 of difference.
If you want them to be the same color you have to manually set them in the editor.
As of the time i’ve written this guide there’s still no way to access colors for 3d models through script, so whenever a 3d model is involded colors won’t work.
Angles, rotation and scale
Basically what changes is the center of rotation, for angles is the child’s center while for rotation is the parent.
Angles, rotation and scale need a peculiar parameter that i call “axis configuration”, it’s usage is to choose which axis of the child layer is to be bound to which axis of the parent layer. The sintax is composed by three possible letters X, Y and Z (not case sensitive), exactly three of these letters must appear but they don’t necessarily need to be different, by this i mean that you can put three X if you want, the first represent the X axis of the child layer, the second and third represent respectively the Y axis and the Z axis. Lastly, these letters must be separated by a space.
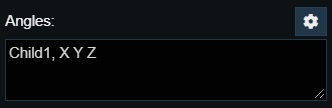
Now, take angles for example, if you have a rotation on the Z axis of the parent layer you can choose to apply that rotation to the X axis of the child layer instead, or even all three axis at the same time.
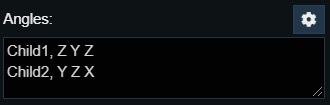
In this example, the rotation happening on the Z axis of the parent layer will happen on the Z axis and X axis of Child1, while for Child2 it will only happen on the Y axis instead.
It’s also possible to change the speed (or amount) and direction the child has to vary in relation to the parent for every axis by using a multiplier value.
This value can be any number and must be placed before the corresponding axis.
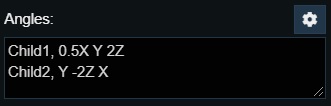
In this example, for Child1 the rotation on the Z axis will be twice as fast as the parent layer while the X axis will be half as fast. For Child2 the rotation in the Y axis will be twice as fast as the Z axis of the parent layer but reversed.
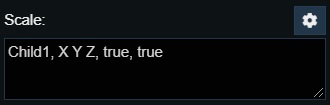
The scale property, in addition to the previous parameter, also requires two additional boolean parameters (true or false), named “scale size” and “scale distance” (not case sensitive). As the name suggests they are meant to choose if you want to apply the variation in scale of the parent to the size of the child and/or the distance between them.
First is “scale size” and then “scale distance”.
Error messages and logs
Logs are simple messages to display what the script is doing. Errors, on the other end, halt the execution of the script because something is not right.
When error messages appear means that a mistake as been made while setting up the configuration in the textboxes.
Do not worry because these errors also indicate where the mistake is and give a brief explanation of what is wrong, this way it’s a lot easier to fix them.
If you still can’t figure out how to fix them, consult this guide, it’s here for this after all.
If you find logs to be annoying you can disable them by changing e value directly in the script.
At line 20, there’s a constant named “logs”, change it’s value from “true” to “false”.