Guidance for obtaining 100% achievements! Warning massive spoilers! All achievements in this walkthrough are thick and underlined.
Map Overview
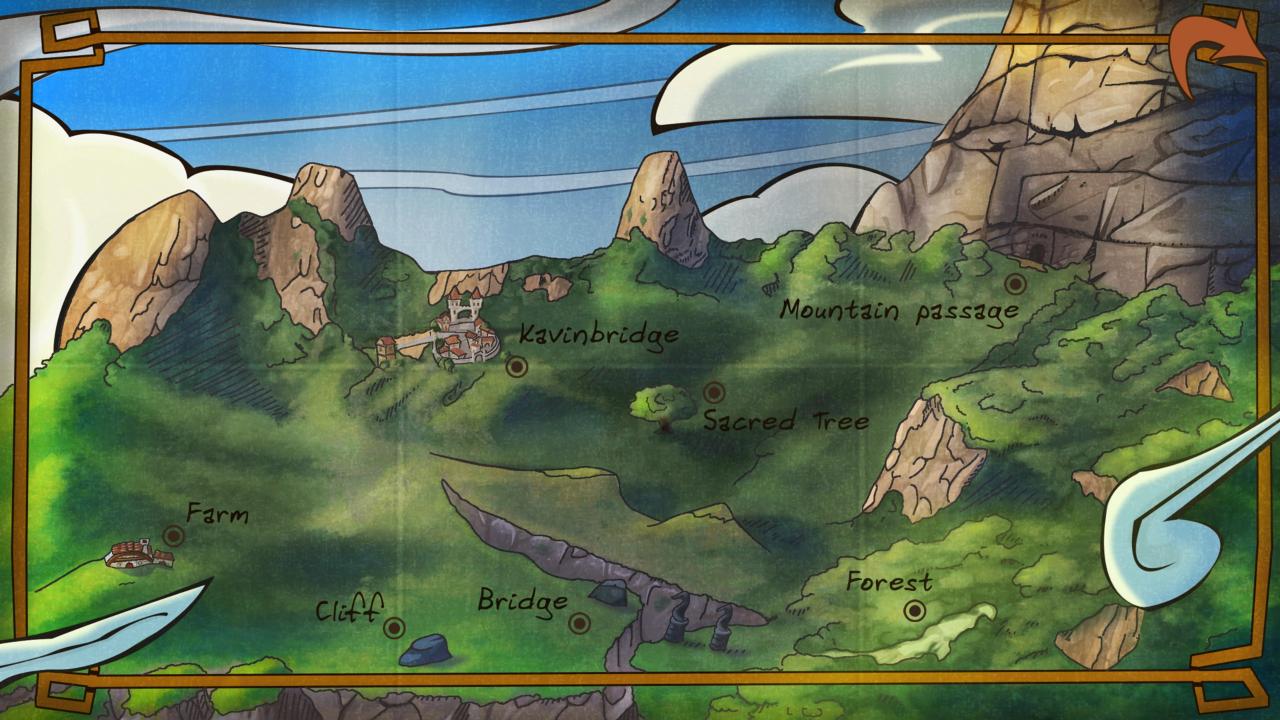
1th map
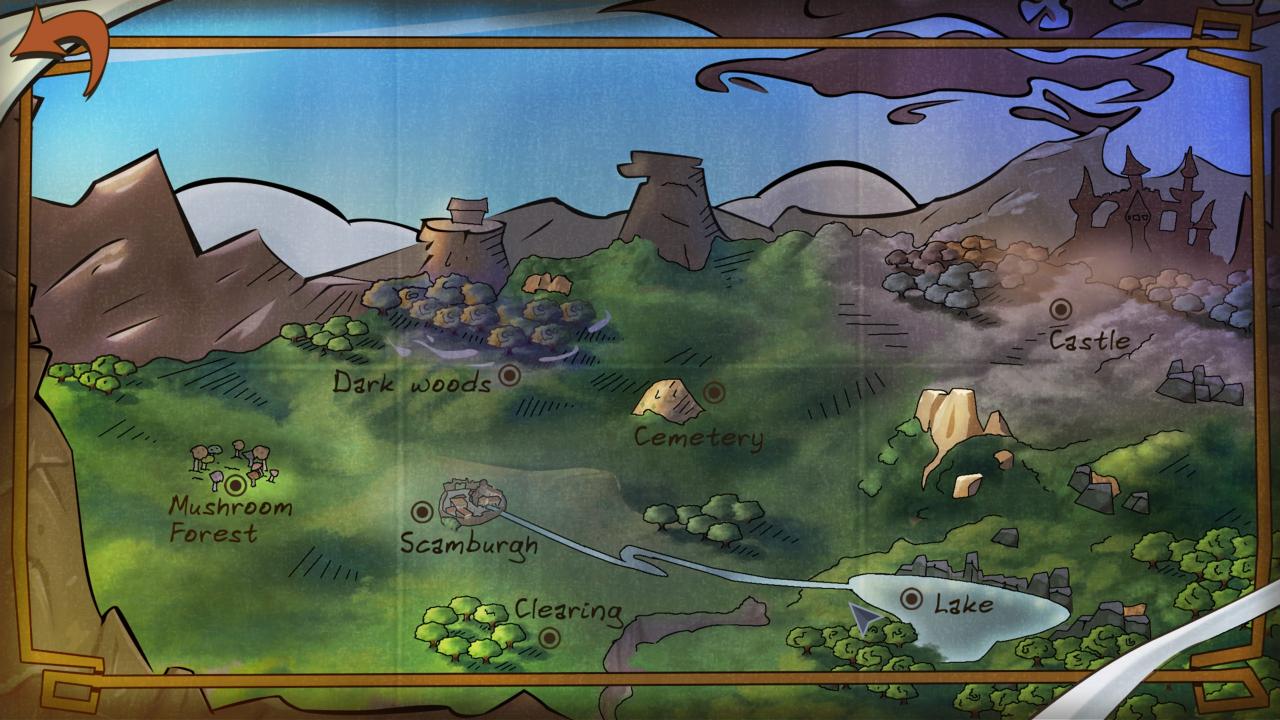
2th map
Toll station
After the intro, your quest to become a hero begins at the Toll Station. Rupert, your donkey, is with you. Explore the area. Look at the sign. Talk to the troll – he won’t let you cross the bridge, unless you pay him the toll. Okay, give him your two silver coins.
Ready to fly!
Unfortunately, you drop one of the coins, and it falls down the mountain. Since you only have one coin left, the troll will only let you or your donkey cross the bridge. But you have a cunning plan! Use your piece of fabric with Rupert the donkey – you’ll hide him inside the fabric, and carry him over your shoulder. The troll allows you to cross the bridge. Unfortunately, the bridge collapses, with you on it! You manage to throw Rupert to safety, but you fall down to the valley below.
Valley
The troll calls down to you from above, to make sure you are okay. Then the troll drops his club, which lands on your head! Still, at least you find your second coin, which you automatically pick up. Pick up the club. Explore the area. Look at the ground where you landed. Pick up rock from the ground. Examine the tree, and you formulate a plan to get out of this valley, and reunite with Rupert at the top of the mountain. Pick up piece of wood from the ground. Look at the pile of boulders on the right, and use club with the boulders to dislodge them. You’ve uncovered a cave. Walk right, into the cave.
Cave
It’s dark in here. Too dark! You need to find something to let you see in the dark. Search the darkness, until you find ‘surface’ – it feels soft. Use club with the ‘surface’ to break through the earth, and let light into the cave. That did the trick!
Explore the newly-lit cave. Take animal skull from the ground. Search the bag to find not so healthy sandwich.Take bone from the ground. Pick up sharpeing stone from the ground. Examine the corpse, and take rope from the corpse’s feet. Look at the weasel on the right – it looks vicious. Maybe you could trap it? Place animal skull on the rib cage in the ground. Use bone with the rib cage with head on top. The trap is complete, all it needs now is some bait. Place not so healthy sandwich in the trap. It worked! The weasel is now in the trap. Now walk right to the inner chamber.
Cave – Inner Chamber
Take metallic object from the cave wall. It’s a blunt knife. In your Inventory, use sharpeing stone with the blunt knife to get a sharp knife. Now use sharp knife with your piece of wood to get sharp piece of wood. Pick up shell from the ground. Now walk left, back to the cave. There’s nothing more you can do here, so walk up to leave the cave.
Valley
Look for the softer piece of ground near the left, where you fell. Insert sharp piece of wood into the ground, then bash it further in with the rock. Now tie your rope to the sharp piece of wood. You automatically tie the tree down. Now climb up into the tree.
While aiming the catapult, start by aiming too low so you will hit the side of the cliff
Good Thinking #1. Next aim too high, so you will come back down before reaching the cliff
Good Thinking #2 your perch in the tree top, move the screen up & down, until you see your donkey, Rupert. Now click to launch yourself towards Rupert, and the mountain-top. Watch the cut scene as you finally arrive at Kavinbridge.
Kavinbridge – Town Overlook
Enter Kavinbridge Town through the stone gates at the lower-right. Watch the cut scene, as a mysterious couple bet on your fate.
Kavinbridge – Town Centre
Talk to Bobby on the right and work through all the dialogue. He’s selling homing pigeons. After a not-so-successful demonstration of his pigeons, he needs to find another one. Enter the Diner through the open door.
Kavinbridge – Diner
Pick up bone that’s on the floor near the door. Take cocktail umbrella from the bin next to the door. You can’t do anything else here at the moment – as soon as you make a sound, Cook will throw you out.
Kavinbridge – Town Centre
Look at the statue of Lord McHaggis, and look at the bird feeder near the base of the statue. Walk left a few steps, talk to the Painter, and work through all the dialogue. Apparently, he comes from a long line of artists, although he really wants to be a lawyer. When you’re ready, walk up through the arch on the left, to the Adventurer‘s Guild.
Kavinbridge – Adventurer’s Guild
Explore the area. Look at poster on the wall. Take plank that’s leaning up against the wooden support beams, next to the poster. Walk left a few steps – a bucket will fall on your head! Enter through the door into the Adventurer’s Guild Hall.
Inside the Adventurer’s Guild, work through all the dialogue with the Guild Master. He tells you that in order to become a Certified Adventurer, you must find 3 items – a Sword, the Golden Fleece, and an Artefact Of Great Craftsmanship. He also tells you about Lady Alicia Goodheart being abducted. When conversation is over, you automatically leave the Guild.
Back outside the Guild, climb the stairs on the right, up to the Market Square.
Kavinbridge – Market
Talk to the Knight, but you can’t understand what he’s saying. Talk to the woman in the Sweetie Stall. Give her your silver coin, and she gives you some candy in return. Talk to Igor the Strongman. Try to take Igor’s bottle of lotion, which is at his feet, but he won’t let you touch it. Talk to the Chinese Merchant. Look at all the small bag and the small plant pot on his stall, and take the plant pot. Climb down the stairs to the left of the Chinese Merchant, so you are in the Shopping Area.
Kavinbridge
Enter Airy Knight Boutique.
Kavinbridge – Airy Knight Boutique
Talk to the Boutique owner. Explore the boutique. Take catalog from the bench. When you’re ready, leave the Boutique.
Kavinbridge – Libary
Enter the Library. Talk to the Librarian. You need to know the title of a book, before she will help you. Explore the Library. There’s nothing you can do yet, so just leave the Library.
Kavinbridge – Alley
Explore the Alley. Search the small opened case on the ground to find a red PIECE OF CLOTH. Search the case on the right to find some BENT SCISSORS. When you’re ready, leave the Alley.
Kavinbridge – Market
Climb up stairs on the right, back to the Market Square. Give bent scissors to the Strongman. He fixes them, and gives you back the fixed scissors. Head right, then climb down stairs on the right, down to the Adventurer‘s Guild.
Kavinbridge – Adventuer Guild
Use your red PIECE OF CLOTH in the fountain, to get a WET PIECE OF CLOTH. Walk down to the Town Centre.
Kavinbridge – Town Centre
Talk to the Painter again, using the following dialogue option.
– Hey, a bucket just fell on my head, while I was walking by a scaffold.
The lawyer instinct in him immediately takes your case – he just has to do a bit of studying first. Take paintbrush and palette that he placed on the ground. Take a sheet of paper from the pile of paints on the ground. Walk right a few steps to where Bobby the kid is standing. Now head down to Kavinbridge Overlook.
Walk to the Great Area, to access the Map Screen.
Farm
Look at the SHIRT that’s draped over the fence. Look at the sheep that’s next to the fence, and use your FIXED SCISSORS on the sheep to get some FLEECE. Now walk right to leave the area.
Cliff
Look at the flower. on the left. Pity it’s out of reach. Or is it? Use the plank on the gap, then pick up the flower. In your Inventory,Combine your flower and the plant pot and add the cocktail umbrella to get FLOWER IN POT.
Made Something Special Now walk right to leave the area.
Bridge
Look at the huge sign – it mentions Rodin-The-Not-So-Great. It seems that you’ll need to learn more about him. That’s all you can do here for now, so walk left to leave the area.
Sacred Tree
Talk to Pastor Theodore and work through all the dialogue with him. When you’re ready, walk left to leave the area.
Map
Go to the Mountain Passage.
Mountain Passage
Talk to the Guard. He won’t let you past, unless you are a Certified Adventurer… which you’re not. Take VINE that’s hanging from the tree branch on the left. Walk down to leave the area.
Map
Go to Kavinbridge. Enter Kavinbridge Town through the stone gates at the lower-right.
Kavinbridge – Town Centre
Walk left a few steps, so you can see the Painter. Dip your FLEECE into the can of Yellow Paint next to the Painter, so you get a GOLDEN FLEECE.
Making Gold That’s one of the things you need to become a Certified Adventurer. Now go through arch on the left, so you’re outside the Adventurer’s Guild. Climb up stairs on the right, to the Market Square.
Kavinbridge – Market
Walk left a few steps, to the Chinese Merchant. In your inventory, add COCKTAIL UMBRELLA to the FLOWER IN POT, to create a spectacular FLOWER IN POT WITH A TWIST. Now give FLOWER IN POT WITH A TWIST to the Chinese Merchant, who gives you a BONSAI TREE in return for the flower. Climb down stairs on the left, to the Shopping Area.
Kavinbridge – Libary
Enter the Library. Talk to the Librarian and ask for a book about Rodin-The-Not-So-Great. She tells you that you must pay a deposit to use the library, and the deposit is either 5 Silver coins, or a donation of another book for the Library to keep. Well, you don’t have 5 Silver coins, that’s for sure! In your inventory, add the sheet of paper to your catalog to get catalog with dust cover. Use your paintbrush and palette with catalog with dust cover to create catalog with painted cover, and give this to the Librarian. She gives you the Rodin biography book that you were wanting. Now leave the Library.
Kavinbridge – Alley
Look at the hook on the wooden beam above you. You can’t reach it. Use your vine on the hook to catch it, then pull the vine down. In your Inventory, combine the vine and the hook to create a grappling hook. Leave the Alley. Walk back to the Town Centre. Walk down to go to the Town Overlook. Walk left to the greater area to leave the town.
Farm
Use the rodin biography book on yourself, to read about Rodin’s great history. Now take the t-shirt that’s draped over the fence, then leave the Farm.
Bridge
Look at the large sign in the ground. Use t-shirt with the statue – the statue falls over, covering the gap. Now simply walk over the statue, and leave the area via the path on the right.
Map
You now have access to the Forest. Go there now.
Forest
Look at the stone Engraving. Take BRANCH from the tree on the left. Look at the foliage on the right, and use your FIXED SCISSORS with the foliage to reveal a hidden path. Head up the path to a Sword In The Stone area.
Try to pull the SWORD out of the stone, but you can’t manage it. Use your wet PIECE OF CLOTH on the SWORD to get a better grip. Repeat this, until you manage to pull the SWORD out, but it slips from your hands, and falls down the cliff. Walk up the path, to where the SWORD fell.
From your vantage point on the cliff edge, you can see the SWORD down below. Use your GRAPPLING HOOK on the SWORD to snatch it back. Sword Bearer The SWORD is something you need to become a Certified Adventurer.
Make your way out of the Forest, and back to the Map.
Sacred Tree
Talk to Pastor Theodore, and use the following dialogue option.
– Nice statue, you have there.
Give him your bonsai tree, and he gives you the small statue in return. The statue is something you need to become a certified adventurer. Now walk left to leave the area.
Map
Go back to Kavinbridge Town.
Kavinbridge – Town Overlook
Enter Kavinbridge Town through the stone gates at the lower-right.
Kavinbridge – Town Centre
Head left, and go through arch on the left, to the Adventurer’s Guild.
Kavinbridge – Adventurer‘s Guild
Enter the adventurer‘s guild hall.
Talk to the guildmaster, using the following dialogue options.
– Check this out…
– I got myself a sword.
– Take a look at this fleece.
– Is this an artefact of great value and craftsmanship?
The guildmaster lets you keep thesword, but he takes the golden fleece and the statue. He gives you a CERTIFICATE Adventurer proving that you are now a certified adventurer, then you automatically leave the hall. Walk down to the Town Centre.
Kavinbridge – Town Centre
Walk right a few steps, so you can see Bobby the kid, then go down to go to the Town Overlook.
Kavinbridge – Town Overlook
Map
Go to the Mountain Passage.
Mountain Passage
Show your CERTIFICATE to the Guard, then head up through the passage.
After the cut scene, continue right to the end of the path. There are 2 doorways here, with a sign indicating that one of them is a dead end. Whichever doorway you try to enter, the sign will jump to that side, and claim it’s a dead end. Notice the tongue in the sign, panting like a dog. Well, dogs like bones, don’t they? Give your BONE to the sign, and it will chase off after the bone. Now enter either doorway, to the next section of the Map.
Map
This is a new section of the Map. Go to the Dark Woods.
Dark woods
Look at the shrub on the right, and take berries from the shrub. Now walk up into the sinister looking cave.
Yikes! There’s a giant spider in this cave! Use your sword to defeat the spider. Some rocks fall on top of the spider, trapping your sword in the process. Oh well, I guess you won’t be needing it anymore. Now open the chest, and search the chest to find lots of gold, pearl necklace and a ruby. When you’re ready, leave the cave.
Walk left, deeper into the woods.
Take either the path heading up, or the path to the left. Whichever path you choose, you’ll be greeted by some rather ferocious rabbits! There’s no way past those rabbits, so just leave the area, and make your way back to the map.
Scamburg Town
Enter the Curiosities Shop.
Scamburg Town – Curiosities Shop
Talk to the storekeeper and work through all the dialogue. Look at all the items on the shelves. Look at the troll mask, and you trade your pearl necklace for it. Look at the amulet, and you trade your ruby for it. Now leave the shop.
Scamburg Town – Tavern
Talk to the man in the foreground. He tells you that you need a magic potion from the fairies, in order to get through the magic force field that surrounds the castle. This Hero stuff is getting trickier by the minute! Talk to the man at the bar – you end up buying him a drink, and he gives you the KEY to his shack, so you can check up on his dog. Talk to the Bartender twice, and try to buy a drink for yourself. He refuses to serve you, since you are a human, not a troll, and he’s afraid that the drinks here would be too strong for you. Use TROLL MASK on yourself, to wear it as a disguise. You automatically talk to the Bartender and get a MUG of beer, before leaving the Tavern.
Legal Drinking
Scamburg Town
Cross the bridge on the right.
Look at the boar statue. Look at the drunk man, and try to take the bottle from him. Keep trying to take his bottle, until he sits up. Take the small packet of bird food that’s on the ground behind him. Now look at the lock on the green door on the left. Use key in the lock, then enter the shack.
Scamburg Town – Shack
Explore the shack. Take empty flask that’s on the barrel next to the stove. Take really dirty mirror from the shelves. Use your wet piece of cloth with the mug to get a beer-soaked piece of cloth. Now use piece of cloth on the really dirty mirror to get a clean mirror. Look at the boxes on the left, and take the paper that’s sticking out from between the boxes – in your Inventory, you realise it’s a jousting tournament programme.Take shovel from the corner on the right. Look at the rat in the lower-right corner – this is the ‘dog’ that the man in the tavern wanted you to check on! Now leave the shack.
Scamburg Town
Head right, to cross back over the bridge again. Walk left, and leave the Town.
The Lake
Take a REED from the edge of the lake. In your Inventory, combine your REED with the BERRIES to create REED WITH AMMUNITION. Use EMPTY FLASK with the water to get FLASK FULL OF WATER. Now leave the Lake.
Map
Go to the Mushroom Forest.
Mushroom Forest
Walk left a few steps. The fairies will reveal themselves to you, because they want to help in your quest. But they will only help if you can prove yourself worthy, by completing the task they set for you – activate their magic pillars. Work through all the dialogue with them. When conversation is over, leave the forest.
The Clearing
Look at the bird in the tree, then use your reed with ammuniation to shoot the bird. Now use your branch to get the EGG from the nest.
Egg Stealer When you’re ready, leave the area.
Map
Click on the arrow at top left of the screen, to get back to the previous section of the Map. Now go to Kavinbridge.
Kavinbridge – Town Overlook
Enter Kavinbridge Town through the stone gates at the lower-right.
Kavinbridge – Town Centre
Walk left a few steps, to the statue of Lord McHaggis. Place your bird food in the bird feeder at base of the statue, and watch as the pigeon swoops down to feed. Now talk to Bobby the kid on the right, and tell him about the pigeon. He’s a bit low on sugar at the moment, so give him your candy. Talk to him again, and tell him again about the pigeon – he captures the pigeon and puts it in his cage. Walk left to the statue, and take feather, which is balanced on the left edge of the bird feeder. It’s hard to spot, but it’s there.
Got Feather Now walk right, and go through arch on the right, to the Shopping Area.
Kavinbridge – Libary
Enter the Library. Talk to the Librarian, and ask for a book about fairies. She gives you FAIRIES FOR DUMMIES BOOK. Use the book on yourself to read it. Now leave the library. Climb up stairs on the right to the market.
Kavinbridge – Market
Take the small bag of magic beans from the Chinese Merchant’s stall. You can easily afford it now, since you have ‘Lots of gold’. Walk right a few steps, and give jousting tournament programme to the Knight, who signs it for you. Walk up the path next to the Knight, so you’re outside the adventurer’s guild.
Kavinbridge
Go down to the Town Centre.
Kavinbridge – Town Centre
Walk right a few steps, so you can see Bobby the kid. Now go down to the Town Overlook.
Kavinbridge – Town Overlook
Map
Click on the arrow at top right of the screen, to go to the next area of the Map.
Go to Mushroom Forest.
Mushroom Forest
Walk left a few steps, until the Fairies reveal themselves. Now use the following dialogue option with them.
– Let me try activating the pillars again.
You see a close-up of the 4 pillars. Activate them as follows.
– On the 1st pillar, click on the chocolate cake cupcake.
– On the 2nd pillar, click on the pint of ale.
– On the 3rd pillar, click on the slice of lemon pie.
– On the 4th pillar, click on magic stars.
The Fairies will now tell you a Password – 123456. Now leave the Forest.
Scamburg Town
Enter the Curiosities Shop.
Scamburg Town – Curiosities Shop
Talk to the Shopkeeper, and use the following dialogue option.
– How much do you want for the chart behind you?
The Shopkeeper will only part with his chart, for something valuable. Give him your SIGNED JOUSTING TOURNAMENT PROGRAMME, and he’ll give you the COLOUR CHART from the wall behind him. Use the COLOUR CHART on yourself, to see the hint about bunnies. When you’re ready, leave the shop.
Scamburg Town
Walk left to leave the Town.
Dark woods
Head left, deeper into the woods.
Use the amulet on yourself, so you can sense the colours surrounding you in the woods. Now the amulet you’re wearing, in combination with the colour chart, allows you to navigate through the woods, based on the colour you see, as well as the number of bunnies. To make it easier, just follow these directions.
– Go North
– Go East
– Pick up SPHERE from the ground
– Go West
– Go North
– Go East
– It’s dark here. Use SPHERE in the pillar on left to get some light.
– Go West Navigator
You’ve reached a Clearing.
Walk left a few steps, and look at the patch of soft soil. Plant magic beans in the soil, then water the planted beans with your flask full of water. Something Of A Fairy Tale The beans quickly grow into a full-size beanstalk. Climb up the beanstalk
Top of the beanstalk
Look at the door to realise that it only opens from the inside. Use the Megaphone to talk to Ziggy. You automatically tell him the secret password – 123456 – and he opens the door for you. Go through the door to enter Ziggy’s shop.
Ziggy’s Shop
Work through all the dialogue with Ziggy. He needs some ingredients, so he can make a magic potion for you. Make sure you ask about each ingredient. When conversation is over, you automatically leave Ziggy’s shop.
Top of the beanstalk
Walk left to climb back down the beanstalk.
Dark woods
Head down to return to the edge of the Dark Woods.
Walk down to the Map Screen.
Map
After asking Ziggy about the ingredients for the potion, the Cemetery should appear on the Map. Go there now.
Cemetery.
Look at the gargoyle near the giant pumpkin. A ghost will appear, scaring you away.
Let’s get going! Return to the cemetery.
Ignore the gargoyle this time.Try to take the root on the right, but it’s too firmly planted. Don’t worry, just dig it up with your shovel. Now try to pick up the root, but it just dissolves into your hands. Okay, let’s try another way. Look at the Gargoyle on the right, and place mirror into the Gargoyle Statue Arm. Light is reflected down onto theroot, acting as light from the moon. Now simply pick up the root.
Got Root Leave the Cemetery.
Dark woods
Walk left, further into the Woods.
Climb up the beanstalk.
Top of the beanstalk
Walk through the door, into Ziggy’s shop.
Ziggy’ Shop
You automatically give Ziggy the ingredients he needs for the Magic Potion. He gives you a MAGIC POTION, and also an INVISILITY POTION.
Watch the cut scenes. Eventually, you’ll end up at the Magic Field surrounding the Castle.
Magic Field
Use magic potion on the magic field to create a doorway. Walk right through the doorway.
Watch the cut scene, as you try to save Alicia. Now it may seem as though the screen has frozen, but it hasn’t really. Pick up rock from the pile on the right, and watch the cut scene as you try to get Alicia’s attention… and end up in the Dungeon! You’ve been set up by the very man who you though would help!
Castle – Dungeons
You have to find a way to escape the dungeons, and rescue Alicia. Unfortunately, all your inventory Items have been taken.
Kick the pillar you’re chained to – this causes a small rock to fall down on the guard’s head. Talk to the prisoner on the right, and tell him your plan. However, the Guard will interrupt you. Keep talking to the prisoner, until you both manage to kick the pillar at the same time. A rock falls down onto the guard, knocking him unconscious. Watch your head Look at the dungeon keys on the ground on the right – you can’t reach them. Look at the ex-prisoner skeleton hanging in front of you, and take bone from the ex-prisoner. Toss the bone to the other prisoner, who uses it to latch the dungeon keys, and toss the dungeon keys to you, which you use to unlock your shackles. Try to use dungeon keys on the other prisoner to free him, but there’s no lock on his shackles. Talk to the prisoner again. Now use dungeon keys on the door on the left to unlock it, then walk through the door to leave your cell.
Look at door on the right, and use dungeon keys to unlock door on the right. Now go through door on the right, into Duke Walland’s cell.
After a short conversation with Duke Walland, he leaves his cell. Explore the cell. Look at the loose brick in the wall on the left, and you remove the brick. Now search the hole in the wall to find a metal rod. When you’re ready, leave the cell.
Climb up stairs on the left, to the recreational Level.
Castle – Recreational Level
You can see 3 doors, and one of them is opened. Ignore the 3 doors for now, as you can’t do anything. Climb up stairs on the left, to the upper recreational level.
Castle – Upper Recreational Level
There’s a sleeping guard here, along with some more rooms. Enter room on the left.
It seems that this room is being used as a Storage Room. Explore the room. Search sack on the left to get some fertilizer. Use your metal rod on the rat hole to get some cheese. Dip cheese in the barrel of wine at the lower left corner to get cheese dipped in wine. Now leave the room.
Go through the arch next to the sleeping guard, so you are back downstairs.
Castle – Recreational Level
Look through the open door on the left, to see the witch.
Look at creature in the high-up cage, and give cheese dipped in wine to the creature. The wine is too much for the creature, and it falls into a drunken sleep. Sweet Dreams Now take invisibility potion from the table. Also take bowl of green potion from the table, that the mouse in the cage was drinking. Now step back, away from the room.
Mix your fertilizer into the bowl of green potion to get enhanced fertilizer. Now climb up stairs on the left, to the Upper recreational level
Castle – Upper Recreational Level
Use invisibility potion on yourself, so the sleeping guard won’t see you if he wakes up. Walk right, past the guard, and open the door to the right of the Guard. Go through this door, into Permar’s room.
Move the stuffed elephant from the base of the bed, then pick up toy soldier that was hidden behind the stuffed elephant. Pick up toy stuffed penguin animal from table on the left. Now leave Permar’s room.
Enter door on the far right, into the Dining Room.
Explore the Dining Room. Take handkerchief and take knife from the table. Use knife with the toy soldier, and you find a small cog hidden inside. When you’re ready, leave the Dining Room.
Walk left a few steps, and climb down the stairs via the door to the left of the guard.
Castle – Recreational Level
Look at the clock to realise that it’s broken. Use knife on the clock face (not the clock itself) to open it up. Now take cog from the clock face window. Walk right a few steps, and enter through door on the right, into the Art Room.
In the Art Room, look at the suit of armour next to the door, and try to pull the spear on the suit of armour. Nothing happens. Look at the gauntlet on the suit of armour. Insert cog, then small cog in the gauntlet. Now pull spear on the suit of armour again, and you hear a ‘Click’ coming from the left. Examine painting on the left to get a close-up of it, then look through the eyes of the painting to see the fair Alicia in the next room. There she is! Now you just have to figure out how to rescue her. When you’re ready, leave the room. Walk left and climb up the stairs on the left.
Castle – Upper Recreational Level
Enter door on the left, into the storage room.
In the storage room, dip your handkerchief into the barrel of oil to get handkerchief dipped in oil. Now leave the room.
Enter Permar’s room, which is just to the right of the guard.
Try to open the window in Permar’s room, but it squeaks loudly, disturbing Permar. Use handkerchief dipped in oil with the window to stop it from squeaking, then open the window again. Now look out through the window.
Look at the plant on the windowsill, and use enhanced fertilizer with the plant. It sprouts a long shoot downwards. Climb down the plant, into Alicia’s room.
Castle – Alicia’s Room
After the cut scene with Alicia, you realise that you need to find the key to her room. After all, you can’t expect her to climb out through the window. When you’re ready, climb out through the window, back up to Permar’s room.
Castle – Upper Recreational Level
In Permar’s room, note the key under his hand. Use the stuffed penguin animal with Permar – he cuddles the stuffed toy, releasing the key that he was hiding. Take key from the bed. You automatically climb back down to Alicia’s room.
Castle – Alicia’s Room
You rescue Alicia from her room… only to be caught by Permar again. Watch the cut scene, as a love spell is cast on Alicia, so she agrees to marry Permar. Then a sleeping spell is cast on you.
Castle – Cage
When you wake up, you are locked in a cage, hanging high about the ground. How are you going to escape? Look at the pigeon on the right, and give letter revealing Permar’s evil plan to the pigeon. Watch the cut scenes as Duke Walland rescues you. You eventually end up at the wedding reception, where Alicia is going to marry Permar.
Wedding Reception
Talk to the Guest in white, on the left. Take a glass of wine from the table. Take champagne from the ice bucket on the table. Look at Guest next to the Notice Board – his glasses are huge! On the Notice Board, there are ‘Wanted’ posters of you and Duke Walland. Yikes! Look at the Bouncer – you better avoid him, until you can disguise yourself. Talk to the Kid with the ball. Talk to the woman in green to get her wedding invitation (she asks for it back after a while). Talk to Ziggy. Talk to the Guest in the purple dress to learn that she has a spare dress with her. Give your glass of wine to this Guest – you ‘accidentally’ spill some wine on her, and she goes to change. Follow her right, to the Fitting Room.
Take the dress from the Fitting Room door. Pick up the NOTE that fell to the ground. Walk left, back to the Reception area.
Talk to Duke Walland, and use the following dialogue option.
– Listen, can you play the goalie for a second?
Duke agrees to your request, which results in the Kid kicking his ball, and knocking the huge glasses off the elderly Guest. Pick up glasses from the ground. Use your bottle of champagne on the Guest in white, on the left, and you knock his toupee off. Let’s Celebrate! Walk left to the stream.
The toupee has landed on the fence next to the stream. Try to take the toupee, but you can’t reach it. Walk right, back to the reception area.
Talk to Duke, using the following dialogue option.
– I need you to help me reach something.
Watch the cut scene as you and Duke retrieve the toupee.
Walk right a few steps, to the woman in green. Talk to her, and ask for her wedding invitation again. In your Inventory, use NOTE with the wedding invitation to switch them. Watch the cut scene, as you and Duke Walland don your disguises, and crash the wedding. Wedding Crashers
Chapel
You interrupt Pastor Theodore, in the middle of the ceremony. Use the following dialogue options.
– The couple is not true Ang believers!
– How many Ang churches do exist?
– Because there’s a wizard in the room to defend me.
– Look at Permar for a moment. Game Completed
Now sit back, and enjoy the final cut scenes. I hope you enjoyed it as much as I did.