A spoiler-free, 100% walkthrough of the game, including pebble collecting, secret achievements and fun/game lore stuff!
This is a spoiler-free walkthrough, that came from our official press kit – it will not list any story details, or important names (unless it’s necessary), so you can safely use it for any hints on how to progress, or when you missed something. All items (including characters, scenery items or secret pebbles) are bolded, and location names in italics. The walkthrough covers the most optimal route for 100% completion, including some optional stuff for both encyclopedia pages, achievements, secret pebbles and additional game lore!
Note that some puzzles can be done in any order, or with alternative solutions.
Check the posters on the right side of the wall and talk with the salesdino. Talk with the Lambeosaurus and search behind the boxes with merchandise to find a wallet. Give the wallet to Lambeosaurus.
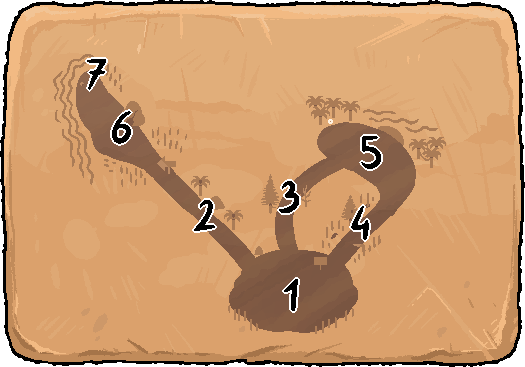
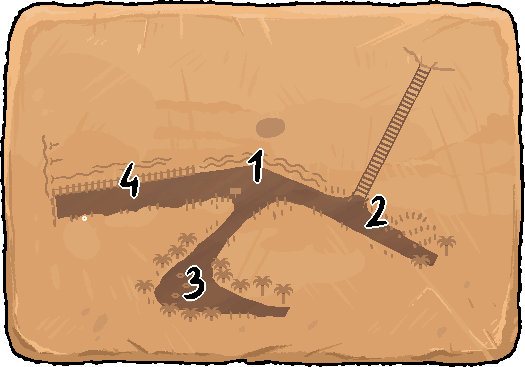
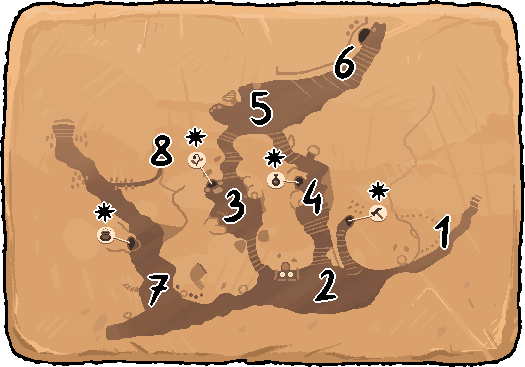
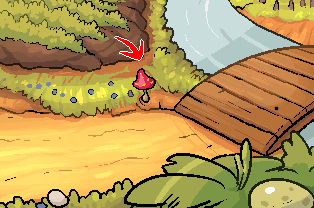
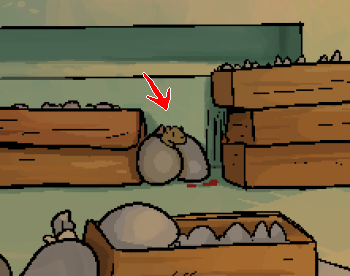
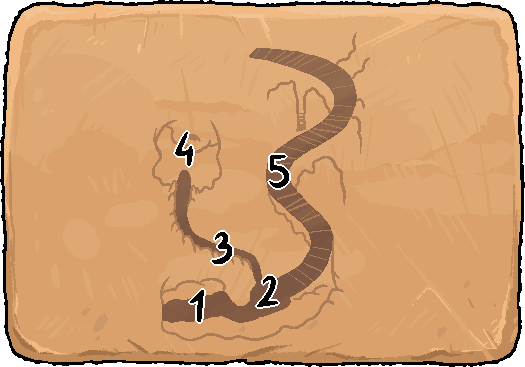
1 – Scattered Woods clearing; 2- Left path; 3 – Middle path; 4 – Right path;
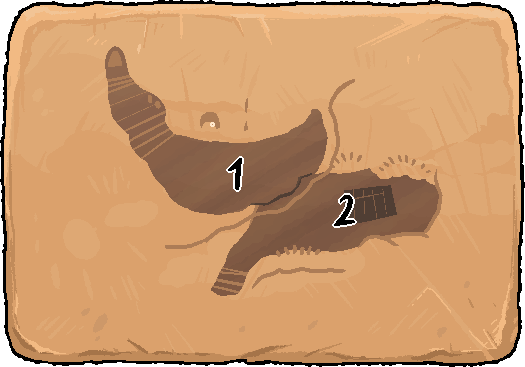
5 – Scattered Woods turn; 6 – River beach; 7 – River bankAfter the cutscene grab the Interesting Pebble (1) from the lower right and follow the right path. Talk with the Hesperonychus (try talking first, then yell). Try picking up the pine cone from the tall tree and check the mysterious hollow.
Go northeast to Scattered Woods turn and pick up the long vine. Return to the clearing via the right path and follow the left path.
Check the boulder and the sign. Pick up the cycas cone, and drop it, since it won’t be of any more use for you. Continue west to the river beach. Drop the long vine and try to take the durable leaves. After you finish talking with the old turtle take the durable leaves and combine them with the dropped long vine to create a small backpack. Pick up the Shiny pebble (2) from the bunch of other rocks, right next the to the river. Go west to the river bank.
Examine the burrow and try taking the crab. Go east until you return to Scattered Woods clearing and take the middle path this time. Grab the white flowers and withered twig. Continue north to the Scattered Woods turn and take the red fruits. You can eat the fruits any time you want, plus it will actually regrow if you wander around some more.
Go back to the Scattered Woods clearing and then go east, all the way to the river bank again, and use the twig with sap on the burrow with crab. Return to the clearing and go to the right path. Use the crab on a stick on the pine cone, and then pick up the snipped pine cone.
Return to the river beach and give both the flowers and pine cone to the old turtle. After the dialogue return to the left path and examine the boulder.
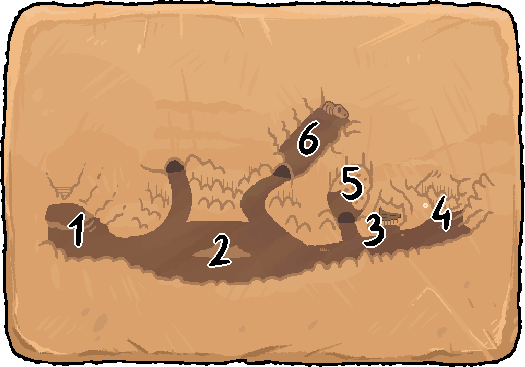
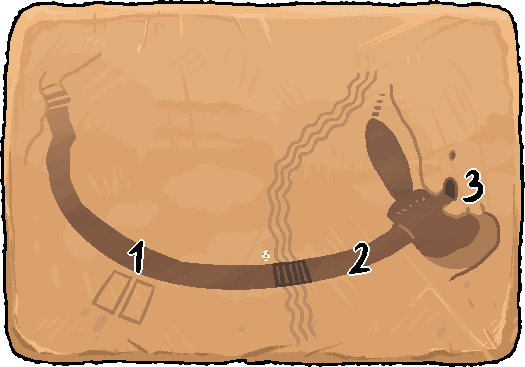
1 – Forest frontier; 2- Rivenn-na bridge; 3 – Rivenn-na crossing; 4 – Green grove;
5 – Woodlands area; 6 – Woodlands depths; 7 – River island(You can head back west to Scattered Woods at any time – if you do it right away, after talking with Euoplocephalus, and after seeing the crocodile in the river, the dialogue with the old turtle will change slightly. You will progress the story only by seeing the crocodile and talking with the turtle, though)
After the cutscene check the sign and go east to the Rivenn-na bridge. After the dialogue with Euoplocephalus continue east to Rivenn-na crossing. Notice the crocodile in the river.
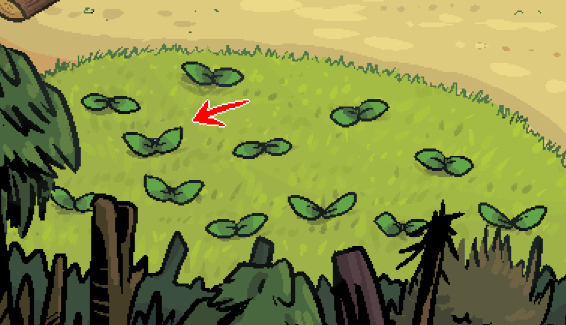
Head south to the green grove. Take the stick, white flowers and the log. There’s a Camouflage pebble (3) hidden beneath one of the red fruits (if they’re still not ripe, just wander around a bit and return to green grove, when they’re red and ready to be picked up):
Return to Rivenn-na crossing and go east this time to woodlands area. Take the log and talk with the Hesperonychus. For your amusement, try waking him up with a stick, or even use a log on him.
Continue east to woodland depths. Look at the big crocodile and try taking the hunk of meat from his tooth. Use the stick and the log on the big crocodile, and take both of them after the cutscene. Return to the big crocodile and use the stick on the hunk of meat.
Go west all the way to the Rivenn-na bridge and give the flowers to Euoplocephalus to receive the Hungry pebble (4). Return to the starting point (forest frontier) and head back to Scattered Woods.
After returning to the forest, try going east to the clearing. After the cutscene go west and check the notice on the door. Continue west to the river beach and talk with the old turtle to receive the crocodile repellent (if your backpack is full, it will appear right next to the turtle).
Head east and return to Rivenn-na via the path behind the boulder.
Go east all the way to the woodland depths and use the crocodile repellent on the big crocodile. After the cutscene pick up the crocodile repellent, return to Rivenn-na crossing and use the crocodile repellent on the crocodile in the river.
Now that the river is safe to cross, use the log on the first gap between islands. After you cross it, pick up the log and do the same on the second and third gap. Go to the river island.
Talk with the snake (either by the ‘talk’ command, or by using the hunk of meat on him for an unusual greeting). After the conversation use the hunk of meat on the snake. Take the log you used to get here and give both logs to the snake.
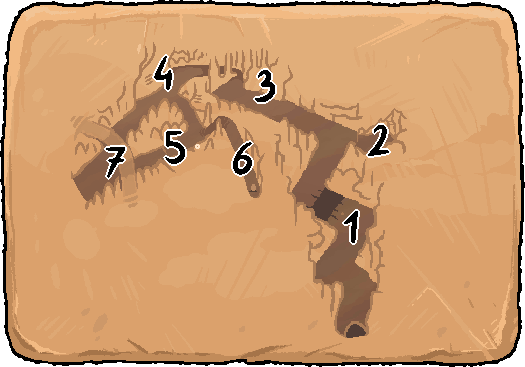
1 – Rivenn-na bank; 2- Rivenn-na bridge, north side;
3 – Scattered Woods, north part; 4 – The waterfallHead south to Scattered Woods, north part and talk with the leading Troodon three times. Check the other Troodon as well. Return to the Rivenn-na bank and pick up the Angry pebble (5). Go east to Rivenn-na bridge, north side and talk with the Troodon gang.
After the conversation head west to the waterfall. Go all the way to the left and admire the scenery on the viewing point. Talk with the Euoplocephalus and agree to help him.
After the cutscene either talk with the Euoplocephalus again, or try going east to the woods.
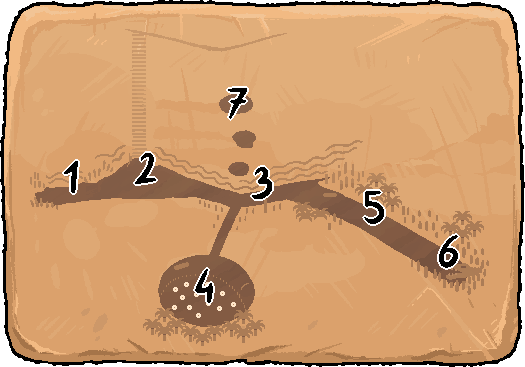
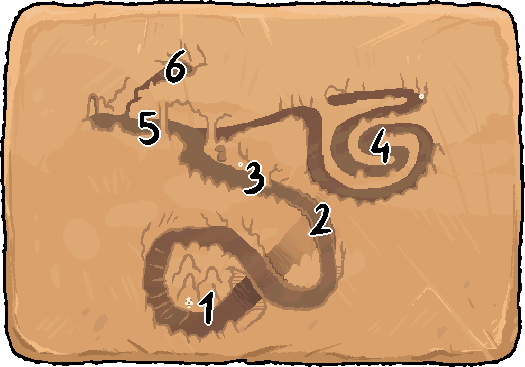
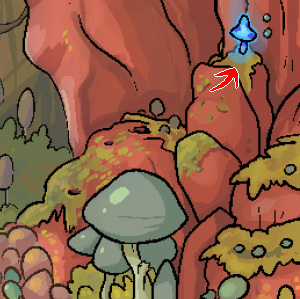
1 – Dead fish cavern; 2- Main cavern; 3 – Smelly tunnel;
4 – Fresh air cavern; 5 – Secret room; 6- Lower gatewayCheck the glowing mushrooms, waterfall and dead fish. Go right to the main cavern and check the steep stairs on both sides of the cavern. Continue east to the smelly tunnel.
Try to pick up the ribs and grab the old bone. Look at the petroleum seep at the illuminated part of the tunnel, and stick the old bone in it. Grab the flat stone as well. Go east once again to the fresh air cavern.
There’s a mushroom growing on the wall, in case you need something to eat. Look at the ceiling hole and the pointy stone. Use the bone on the pointy stone to knock it down. Combine the flat stone with pointy stone to acquire flint and pyrite. Use the bone on the [d]dry leaves[/b] (or pick up the dry leaves and combine them with the bone), and then finally use the flint and pyrite on the bone.
The torch can be lit up and extinguished by either the verb coin action inside the backpack, or via the tiny torch button that appears right next to your backpack icon. Light the torch, return to the fresh air cavern and go to the secret room, that was previously shrouded in darkness. Once inside extinguish the torch and grab One-of-many pebbles (6). Once you’re done light the torch and return to main cavern.
Follow the steps to the rightmost lower gateway first. Grab the pieces of wood and long rope. Look at the dinosaur remains and read the mural. Combine the pieces of wood with long rope to create a ladder. Return to the main cavern and go back all the way to the fresh air cavern.
Use the ladder on the ceiling hole. After the cutscene light the torch, go back to the main cavern and enter the upper gateway.
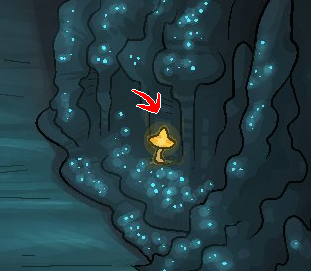
1 – Upper gateway; 2- Dark chamber; 3 – Column room; 4 – Undercave T-crossing;
5 – Bending path; 6- Hidden cavern; 7 – Undercave underpassFollow the twisty path until you encounter a chasm. Use the ladder to cross it, and once it’s broken take the single twig. Continue to the top of the screen, light the torch (unless it’s already lit), and go right to the dark chamber. Inside, extinguish the torch and grab the Dark tunnel pebble (7). Return to the upper gateway and continue left to the column room.
Grab the tiny pebbles laying right next to the wall, and extinguish the torch to see some bright light coming out of the wall opening – that’s the passage to the Undercave T-crossing. Follow it and then take the right bending path.
Take the mushroom, in case you don’t have anything to eat, and extinguish the torch to reveal a barely lit hidden cavern on the right. Go inside and take the heavy rock and Chill pebble (8). Return to the bending path and go south to Undercave underpass. Continue south to the path slope.
1 – Path slope; 2- Undercave overpass; 3 – Upper level passage;
4 – Stalagmite labyrinth; 5 – Vast room; 6- Climbable spot
Examine the stone wall. Extinguish the torch and use small rocks on the wall. Locate a small, glowing crack on the wall (it’s on the left side of the throwing view window) and throw two rocks at it:
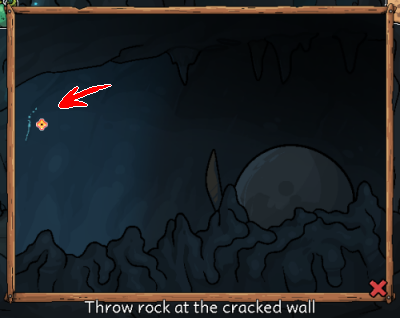
Close the throwing view window, light the torch and use small rocks on the stone wall again. Throw the third pebble at the crack on the wall, and then throw another one at the right stalactite.
You can take another heavy stone from the debris, in case you haven’t grabbed it in the hidden cavern. Go up and look at the yellow mushroom, the sulfurous cap, and read the scribblings. Continue up to the Undercave overpass, and follow it to the upper level passage.
Read the scribble sign and look at the sculpture. Light the torch and go to the far right at the crossing to enter the stalagmite labyrinth. Navigate the labyrinth to nab the Labyrinth pebble (9) and an optional mushroom. For an easier navigation just click at the very end of the path, and Zniw will automatically follow. Return back to the upper level passage and go left to the vast room.
Once inside, examine the moss block, and use the single twig on it.

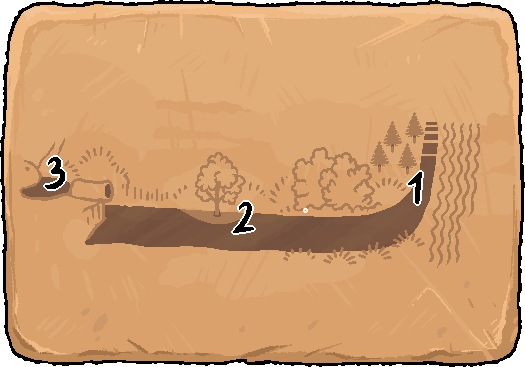
1 – Undercave entrance; 2- Mushroom crossing;
3 – Pillar spot; 4 – Mushroom pathOnce you get out of the cave, drop the torch, as it won’t be needed for a while. Go west to mushroom crossing and look at the strange scribblings and signpost. Also take notice of the mammal hiding behind the plant. Follow the bottom left to the mushroom path, and continue west to the winding path.
1 – Fungilla outskirts; 2- Fungilla market; 3 – Warm sunlight street; 4 – Cool shade street;
5 – Fungilla square; 6 – Residential Wall alley; 7- Western district; 8 – BackalleyInteriors:
2* – Used wares shop; 3* – The pantry
4* – The pharmacy; 7* – Healer’s house
Watch all of the cutscenes, then try to talk with the Chasmosurus on the left, and go to the cool shade street (the second exit on the right). Watch another cutscene, and after that you’re free to explore the village. The game opens up at this point, and you’re able to visit much more locations than before. The village layout is as follows:
In order to progress the story forward you need to talk with Tra and Triceratops guard, but there’s much more you can do at this point:
- talk with Tra in Fungilla’s market (required)
- talk with the Triceratops guard in Residential Wall alley (required)
- talk with the Stegoceras near the fountain in Fungilla plaza, and take the comic book afterwards (required, but for later events)
- peek through the open windows in the western district
- talk with the injured Navajodactylus in the healer’s house, located in the western district (required, but for later events)
- visit the used wares shop in the cool shade street, accessible via the stairs on the left in Fungilla’s market (required, but for later events)
- talk with the Albertonykus in the western district (optional)
- talk with the villagers on the warm sunlight street (optional)
- talk with the Orodromeus on the cool shade street (optional)
- talk with the rest of the villagers and shopowners in Fungilla’s market (optional)
- visit the lake area and talk with the Pachycephalosaurus (optional)
After you’re done with the exploration, head to the western district and travel north to reach the food farm.
1 – Fields; 2- Stream bridge; 3 – House near the riverTalk with the farm workers and head right to the stream bridge. Tra should be there, right next to the house (if she’s not there yet, check the points above in the ‘Fungilla’ chapter and ensure you did the first two). Talk with her and agree to help. She’ll show you the way to Fungilla forest.
1 – Stream edge; 2- The glade; 3 – Hollow stumpGo left, take the wooden box and look at the stream. Go back right and grab some juniper berries and a single breadfruit as well. Look at the sack right next to the Unescoceratops and take the thick thread. Finally try to take the water skin from the Unescoceratops’ back, and agree to help him. Fill the water skin with the water from the stream, and give the full water skin to the Unescoceratops. After that go back to the stream and fill the water skin again. Finally go left to the glade.
Look around the glade and locate three suspicious spots and a hollow stump on the upper left. Take the stick and combine it with the thick thread. While you’re here take some ginkgo seeds too, they’re right next to the big tree in the middle of the screen.
The key to capturing the mammals is as follows:
- use either some juniper berries or the breadfruit on either of the suspicious spots (mammals don’t like ginkgo seeds, but you may try using one for a unique response)
- place the wooden box on the suspicious spot with a lure
- use the stick with a thread on the box
- after the trap’s constructed, hide behind the big tree
- when the mammal is captured, return to the stream edge and talk with the Unescoceratops
You only need to capture one mammal to progress the story, although repeating the sequence on all three suspicious spots, and catching all mammals will net you more shells after this section is done.
Additionally you can also perform the side objective for even more money and a secret pebble – finding and destroying the mammal’s nest. To do it, use the wooden box on the hollow stump and then climb up to the stump. For some additional interactions, try talking with the mammals, or use any of the berries or seeds you found around here on the nest (you will have to go back and grab some more if you do, however you can repeat it as much as you like). Finally use the full water skin on the nest, and pick up the unconscious mammal and Mammal’s pebble (10).
After you’re done with everything, return to the Unescoceratops and give him the unconscious mammal (if you decided to go after the nest). Finally talk with the Unescoceratops and tell him you’re ready to leave the forest.
Go to the house near the river. Talk with Tra’s sister and Tra’s father. If you have the heavy stone in your backpack, you will automatically receive Collector’s pebble (11). Finally take the pillow that’s underneath Tra’s father and return to the stream bridge.
Talk with Tra once again and agree to help her with watering. You will automatically receive the fluffy glove and go to the berry fields. To receive a high amount of shells via the watering mini game, use the bucket on the berry plants, and the glove on the weeds. Be careful not to overwater the berries, or extract the berry plants. Depending on how many mammals you caught in the Fungilla forest, you may have to repeat the mini game several times to have enough shells for future purchases.
At this point the game opens up once again, and many puzzles can be done in any order. The walkthrough presented below is the most optimal one.
There are two additional objectives you can do at any point of the Fungilla story:
- if you’re short on shells to buy something, return to the food farm and repeat the watering minigame by talking with Tra (and having the fluffy glove in your backpack). You can repeat it as many times as you like.
- buy the Commercial pebble (12) from the Troodon merchant for 30 shells.
- save your game beforehand and buy the pink backpack from the Troodon merchant for 400 shells. Be warned it’s actually a joke item, and you will lose your 400 shells, but receive a secret achievement. Load your game afterwards.
After you’re done, return to the western district and stop by the healer’s house. Give the pillow to the injured Navajodactylus (if you haven’t visited the house before, you need to talk with him first) to receive the pantry pass. Before you leave, look at mortar with pestle. Step outside, go to the warm sunlight street and show your pantry pass to the Unescoceratops guard to gain entry to the pantry, but you don’t need to visit it just yet.
Return to Fungilla market and buy an ammonite and herbs from the Tescelosaurus merchant. Head back to the mushroom crossing in the Fungi path.
Go back to the mammal hiding behind the plant and use the ammonite on it. After it’s lured out, use the backpack remains on the mammal to capture it. Traverse back to the Undercave entrance, use the mammal on the lower burrow, and take the Burrow pebble (13) afterwards. Head back to the village.
If you still haven’t, head to Fungilla market and go up the stairs to visit the used wares shop. Talk with the sick Unescoceratops and annoyed Orodromeus inside. Go to the healer’s house in the western district afterwards. The healer should be inside (if she’s still not here, make sure you visited the used wares shop and already talked with the Navajodactylus. Talk with her, and then give her the herbs to obtain the medicine. Take the medicine to the used wares shop and give it to the sick Unescoceratops. Buy the pickaxe afterwards, but leave the rest of the wares for now. Exit the shop and watch the cutscene.
You should automatically acquire the feather cape. If you didn’t, drop something from your backpack, and grab the cape, as it will be required later. Return to healer’s house and give her the bowl back to acquire the pharmacy pass. Go to the cool shade street and use the pharmacy pass on the nothern-most wooden door. Once inside have a chat with the pharmacy owner and go to the western district.
Look at your mini map, and compare it with the map from the feathered cape. Notice there’s an additional path on the map from the cape, that’s not on your mini map, labelled ‘tunnel’. This indicates there’s an additional location you haven’t visited yet.
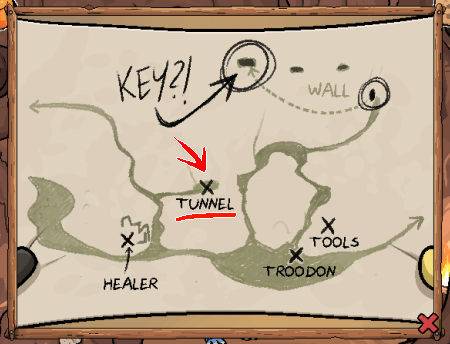
Head north, just before the entrance to the food farm, and inspect the bushes to discover a hidden path behind them. Notice how the cursor stays green to indicate a walkable area:
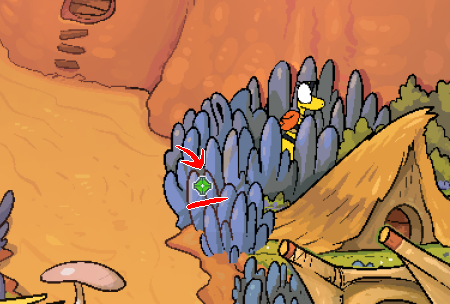
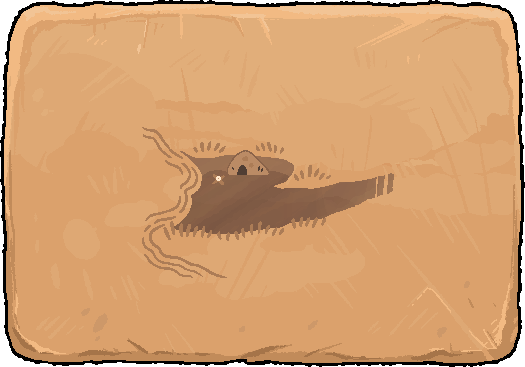
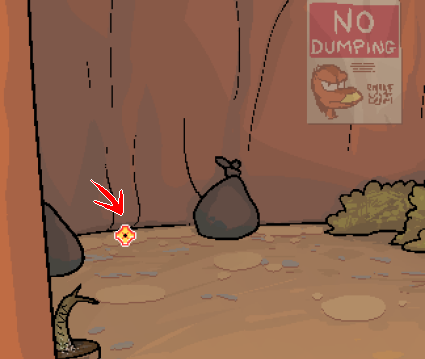
Traverse the path and look at the trash bags. Go south and head over to the lake area.
A Pentaceratops should be resting right next to the barrels on the far left (if he’s not here, return to Fungilla market, get the feathered cape, and go back). Talk with the Pentaceratops, and tell him about the trashbags. You’ll automatically go the hidden path. After the cutscene go right and enter the backalley.
Look at the pile of leaves and interact with it. Afterwards use the fluffy glove on any of the trashbags laying around. Finally use the pickaxe on any of the suspicious spots to trigger a unique side-quest.
You need to load all three trashbags onto the wheelbarrow, by picking them up with the fluffy glove. They appear outside your backpack inventory list, but you can still interact with them like normal. Once you get rid of all three trashbags, you will be rewarded with an Alleyway Pebble (14).
Once you’re done with the little side-quest, continue with your investigation. Use any heavy item (a trashbag, heavy rock or heavy plant you can pick up on this very screen) on the spot between the two trashbags on the left:
After you discover the tunnel, go to the left and search through the loot to obtain the skull. Look at the notebook and take it with you. Leave the tunnel and head to western district.
Go to healer’s house and give the skull to the healer to obtain the discount voucher. Head over to used wares shop and buy the rope and frying pan. If you still haven’t, go to Fungilla plaza, talk with the Stegoceras and take his comic book afterwards. Talk with the Orodromeus in the fountain as well. Finally travel to the warm sunlight street and enter the pantry.
Give the frying pan to the Albertonykus to obtain a pretty feather. Go to the back of the pantry, talk with the bored Unescoceratops, and give him the comic book. You will now be able to take the metal hook. Do so, and use the metal hook on the rope to create a climbing hook.
Leave the pantry and go down. You should see the annoyed Orodromeus lady on the roofs (if she’s not there, go back to Fungilla plaza and talk with her when she’s in the fountain). Give her the feather to get amushroom trophy in return. Take the mushroom trophy to the old Notronychus in the Fungilla outskirts to obtain the white mushroom. Finally give the white mushroom to the gardening Orodromeus in the warm sunlight street to obtain the Mushroom pebble (15).
Once you’re done with another little side-quest, head back to Residential Wall alley, talk with the Triceratops guard once again, and take a look at his food bowl. Return to the pharmacy in cool shade street and talk with the pharmacist again, but this time ask for the hot mushroom sauce. The pharmacist will gladly make you one, but you need to gather all ingredients yourself:
- the vermilion cap, which grows on the Fungilla farm (the Stream bridge screen). You need the fluffy glove to pick it up
- the azure cap, located in the pillar room of Fungi path. It’s growing on the rock formation, so use the pickaxe on the rocks first, and after the conversation pick up the mushroom with the fluffy glove
- the sulfurous cap, that grows deep inside the Undercave, more specifically in the path slope (the large caven where you dealt with the stone wall and the big boulder). Use the fluffy glove to pick it up
- a glass bottle, which can be bought in the used wares shop for 200 (100, if you have the discount voucher) shells
Additionally, while you’re going back to Fungi path and Undercave, you can obtain two additional pebbles:
- on the mushroom crossing screen (Fungi path), use either the pickaxe, metal hook or climbing hook on the map pebble, that’s just above the strange scribblings, to obtain Map pebble (16).
- return to the Undercave entrance (Fungi path), pick up your torch and head inside the Undercave. Light the torch and use the climbing hook on the small stalagmite to climb to the climbable spot and take your reward – Climbing pebble (17). Drop down afterwards, take the climbing hook, go outside, and drop the torch again, as it won’t be needed anymore.
After acquiring all four items, go back to the pharmacy and talk with the pharmacist once again to obtain the hot sauce. Return for the last time to the healer’s house and show her the hot sauce to obtain Gourment’s pebble (18). Go outside and use the climbing hook on the folded ladder, and pick up the Writer’s pebble (19). After you’re done with everything, head to Fungilla plaza.
Look for the lone rock sticking out of the rooftops on the right of the plaza. Use the climbing hook on the rock to climb up. Go right to the Residential Wall alley rooftops and peek through the single uncovered window. Finally use the hot sauce on the food bowl.
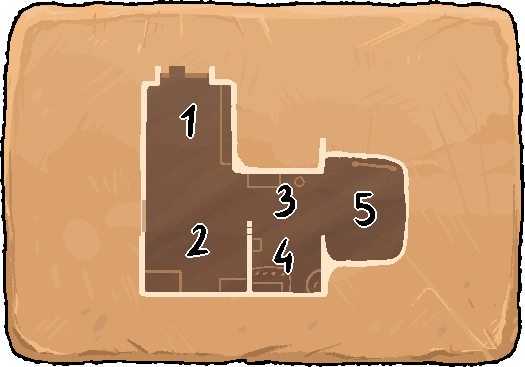
1 – Antechamber; 2- Long corridor; 3 – Long corridor (cont.);
4 – Ceratopsian rooms; 5 – Storage rooms; 6 – Utility roomGo up the stairs and look at all the posters on the bulletin board (including one scribble on the bottom left), then turn left to the long corridor. Talk with the Orodromeus kid and go to the corridor on the bottom left (storage rooms). Remove the wooden plug from the closed wooden door, open it and pick up the Storage pebble (20) afterwards. Look at the shabby doors on the bottom left as well. When you’re done return to the long corridor and go upstairs.

1 – Staircase; 2- Foyer; 3 – Even longer corridor;
4 – Mushroom storage; 5 – Chief apartment’s door
Look beneath the doormat to find the iron key. Use the key to unlock the solid wooden doors and go inside. After you finish talking with the guard, notice a small mammal is peeking through the boxes.
Try to interact with the mammal five times (it will never appear in the same location, so you must look for it in the entire warehouse), to receive the Warehouse pebble (21):
Go left to the mushroom storage and take a look at the solid door. Continue left to chief apartment’s door and talk with Steffan. Head back to the even longer corridor and talk once again with the busy Orodromeus.
1 – Detention cell; 2- Crumbling passage; 3 – Storeroom;
4 – Basement corridor; 5 – Basement exitTake a good look of your surroundings, including the water bowl, glowing mushrooms, basket, bowl with berries, boulders on the wall and the upper shelf (on the upper left, just above the door).
Start by grabbing a berry and eat it. Then pick up all three glowshrooms and place them in the basket on the wall. After you talk with Agu, look at the upper shelf (in case you haven’t yet), and ask Agu for help with the shelf. He will give you a rusty spoon. Use the rusty spoon on the wall boulders – you will notice one of them is pretty loose. Ask Agu for help with the boulder and leave the cell through the hole in the wall.
After you get your backpack back, pick up the axe head (the shiny stone sitting on the shelf where your backpack was), the rubble right next to it (which will turn out to be the throwing pebbles), and look at the rightside wall – notice one of the rocks on the wall is suspiciously round. Interact with it to obtain the Basement pebble (22):

If you want to have a unique piece of dialogue with Agu, crawl back to the cell and talk with him. Otherwise head north to the storeroom.
Take the broom and walk up to the pile of bowls. Use the throwing pebbles on Steffan. For your amusement, try throwing one at him, or the cupboards. Go back to the crumbling passage and crawl back to your cell.
Talk with Agu one more time. Crawl out of the cell and go back to the storeroom. Use the throwing pebbles on Steffan once again, but this time throw one to the small tunnel. Quickly use the broom on the tunnel door (if you’re not quick enough, you’ll have to repeat the process and throw a pebble to the small tunnel again), and then open the stone door.
Start with opening left cupboard and take both the copper key and cup. You can also check the right cupboard and drawer, but there’s nothing particularly useful inside. Head back to the detention cell via the door, and fill the cup with the water from the bowl. Return to the storeroom and go down – just before you leave, look at the empty basket on the top shelf. You can’t quite reach it, so ask Agu for help. There’s a piece of string inside he’ll give to you. Go back to the crumbling passage. Check the wooden door, ask Agu to deal with them and proceed to basement corridor.
Look at the broken bottles, big sack and stone lockers. Take the cloth from the foreground wood piece, and bowl of worms from the stool. There’s a old cork board in the background – try to read the worn-out posters and look for small text on the right – then proceed to read all of 10 puns scribbled on the board:
After you’re done, open the wooden locker and take the handle. Combine the axe head with the handle, and then tie the unsecured axe with a piece of string. Go right and pour water from the cup to the plant pot and pick up Gardening pebble (23) afterwards.
Look at the large doors, which you can’t open for now, so focus your attention on the smaller door instead. Use the copper key to unlock the small door and use it to get to the basement exit. Once inside look at the oil lamp and clay slabs, and then finally use the axe on the bolt.
Look at the large doors and check what’s behind the curtain. Continue to the long corridor and read the new poster that was put on the bulletin board. Go to the left side of the long corridor and turn to the storage rooms. Use the axe on the tied line and open the shabby doors.
Once inside, take the comic book from the stack of books, as well as a piece of lodestone from the broken toy. Interact with the pile of sacks to be able to climb out of the building through the window.
Go left and use the climbing hook to descend to the ground. You can’t enter the Residential Wall alley, or the warm sunlight street, so navigate to cool shade street instead. You can’t leave the village, or go to the farm area either, so head to the lake.
After the dialogue, take the fishing rod, and use it on the lake – try to fish out a waterweed and nothing at all. Use the bowl of worms on the fishing rod afterwards. Use the fishing rod with worm on the lake (any spot will be fine) to catch a fish. Either give the fish to the old turtle, or return the fish back to the lake to receive Fishy pebble (24). Now use the lodestone on the fishing rod and use the lodestone rod on the lake (again, the spot doesn’t really matter) to fish out the blue gateway key. Return the fishing rod near the tent and head back to Fungilla plaza. Use the climbing hook on the lone rock, go to the right and climb back to the building via the window.
Exit the storage and head back to the basement entrance. Use the bowl with worms on the mammal, and when it’s busy eating capture it with the cloth. Go back to the long corridor and head up the stairs. After the dialogue give the comic book to the Orodromeus kid, open the solid wooden doors and go inside.
Go left and position yourself behind the stack of boxes, so that you can see the guard, and use the mammal on him. Take the small log and use it on the solid door afterwards. Finally head to the chief apartment’s door and go inside.
1 – Entrance; 2- Living room; 3 – Office space;
4 – Bedroom; 5 – BalconyLook at the fishing rod and examine the bookshelf, mainly the 10 books you can interact with. Look at each one of them, and head right to the office space afterwards. Look at the fern plant and the map on the wall. Memorise the amount of mushrooms in the place that has the red X on the note. Use any item, or try to interact with the map to reveal a small safe. Open the book on the desk and read it. Check the drawers, mainly the middle one – it contains a vital clue.
Go back to the entrance and this time thoroughly search the books. You need to check two specific ones. The solution to this puzzle is the paper from the middle drawer – depending on what the clue said, you need to search the following spot:
- yellow – Fungilla Chronicle
- black – Captain Disaster in The Dark Side of the Moon
- blue – Eternal Ocean
- green – Flora Of Polisemia
- red – Tales For Children
- white – Far North Scenery
- osteoderms – Tales For Children
- ceratopsian – Far North Scenery
- frightful lizard – In The Jaws Of Daspletosaurus
- long crest – Music Theory For Beginners
- crocodilian – Basics Of Self-Defense: Wetlands
- skilled flyer – Aviation Physics
Checking both books will unlock the safe in the office space. Head there and take the pentagon key from the safe. Head to the bedroom and check the ashpit to receive Warm pebble (25). Look at the drawings on the wall as well. When you’re ready, proceed to the living room.
Check the cupboards, the wardrobe and some more drawings. There’s a dinosaur plushie on the top shelf, however it’s too high for you to reach, so ask Agu for help. Once you obtain it, read the label of the plushie. Look at the tapestry and interact with it – memorise the secret code you find beneath it. Look at the withered fern and ask Agu to put it away. Once it’s done, ask Agu to move the wardrobe and look at the safe. Use the pentagon key on the safe and input everything you’ve learned so far:
- the amount of dial turns is the code from the tapestry – for example 5L10R is 5 turns counterclockwise (left) and 10 turns clockwise (right)
- the amount of button presses is the amount of mushrooms from the place that had the red X on the map in the office space
1 – Upper balcony; 2- Lower balconyTake the dried mushrooms wreath and eat it. For you amusement you can also try taking several wreaths, or try interacting with the wooden door or the window. Use the climbing hook on the stalagmite to lower yourself down. Look at the grating and use the climbing hook on the stalagmite once again.
There isn’t much to do in this section, other than talking with all the characters you encounter for additional story bits and information. Head to the Fungilla outskirts and leave the village.
Once you arrive in Fungi path, take a detour to the Undercave entrance before going to the pillar room. Talk with all villagers and head inside the cave.
Talk with everyone inside, especially with the Unescoceratops you met in Fungilla forest earlier, who’s located in the upper level passage. There’s nothing more to do here, as the rest of the cave is blocked, so head back outside.
Once you’re done with the Undercave, rush to the pillar room. Talk with all of the villagers, and then use the appropriate gateway keys on the coloured keyholes.
1 – Village gate entrance; 2- Inside the tunnel;
3 – Secret passage; 4 – Tunnel depths; 5 – UpstairsLook at the crowd and talk with the Spinops, then enter the tunnel. After the cutscene head back to the tunnel and light the oil lamp. Investigate the suspicious boulder, and ask Agu for help removing it. Crawl to the secret passage and go all the left to the tunnel depths.
Wait for the cutscene to finish and use the climbing hook on the stalagmite. After the cutscenes talk with everyone, and give the plushie back to Aira to receive Cuddly pebble (26). Go upstairs and take the mushroom if you wish. Finally go up the stairs and leave the tunnel.

1 – Path to the gate; 2- Forest clearing; 3 – Forest path;
4 – Forest slope; 5 – Mud pit; 6 – Dead end pathYou can’t wander in open spaces, or return to the gate, so look around for a hidden path in the bushes to the right:
Continue south, take some of yellow ochre that’s hidden in the shrubs and notice the mud splash right next to the forest path waypoint. Go down to the forest path afterwards:
Take the yellow fern and long vine, then travel east to the forest slope. You can’t do much on the upper part, as it features an open area, so take the lower path and take all four durable leaves. Continue east to mud pit and grab the submerged stick and oval stone. Look at the sign, then use the yellow fern on the mud to make it sticky. Go back all the way to the forest path, and take a detour to the forest clearing.
Remember the mud splash you’ve seen earlier? Use a durable leaf to wipe off the mud, and then hit the stuck pebble with the oval stone to free it. Go down to the forest path and pick up the Summit pebble (27). Continue left to the dead end path afterwards.
Take another long vine and the stick. Look at the withered stick on the tree and ask Agu to get it for you. Look at the pile of sand and the oddly shaped rock, then interact with the landslide to receive round pebbles. Put the ochre chunks onto the oddly shaped rock, and use either the round pebbles or oval stone on them to create a pigment. Now you need to start assembling the prop figure:
- use the oval stone on the pigment to colour it
- combine yellow oval stone with round pebbles to create a yellow head piece
- use either of the vine pieces on the three sticks to create a stable tripod
- put the yellow head piece on the stable tripod
- use the dirty fern leaves on the stable tripod to finally acquire the finished figure
When you’re done, use the durable leaves on the pile of sand to create sand bags – you can repeat the process for all four durable leaves. Once you’re ready, head to the forest slope, but this time take the upper path.
Use the finished figure on the open clearing, then quickly use the sand bag on the azhdarchid, and finish the sequence with the long vine. If you’re not quick enough, you’ll have to repeat the process – if you run out of sand bags, simply travel down the lower path, pluck some more durable leaves and fill them with sand on the dead end path.
If you did everything correctly, you will automatically travel to the mud pit. You can try using the remaining sand bags or the finished figure on the azhdarchid. Take the sign and use it on the trapped azhdarchid to finish the game and enjoy the ending cutscenes.
Congratulations! You finished Zniw Adventure – if you followed this walkthrough, you should have all 32 achievements after the end credits, every encyclopedia page, as well as all 27 secret pebbles!