Below is a full step-by-step walkthrough to help you navigate every room, solve every riddle, and reach the true ending. Be warned: there are spoilers ahead.
Starting Out – The BBQ Restaurant
Begin with the Adventure Club perspective. Enter the BBQ restaurant and watch the opening cutscene. After that, save your game.
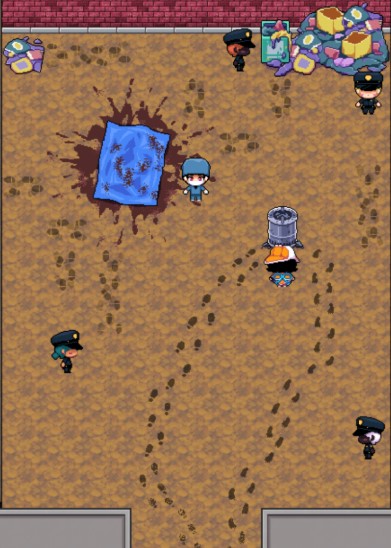
Switch to the Detective Agency perspective. Walk left, talk to the officer, and enter the crime scene. Speak with the tired policeman, then investigate the stove and the trash can (check the footprints). Talk to the coroner, and examine the footprints again.
Once you’ve gathered enough clues, enter the Thought Corridor and select the following images in order:
[Footprints] → [Near the stove] → [He’s not the killer] → [Spilled from above] → [Speed of a moment] → [It was an accident] → [Skin]
This will reveal the cause of the incident. Watch the cutscene.
Mall & Jewelry Store
Save again. The scene shifts to the activity room. After the dialogue, switch to the Adventure Club perspective and enter the jewelry store.
Examine the poster and choose “Keep looking”.
Leave the jewelry store and explore the first floor of the mall. Talk to the balloon giver to get a balloon, and speak with the gift shop owner to receive a coupon. Exchange the coupon at the bubble tea shop for a drink, then give the drink to the girl on the couch. Hand the balloon to the cat mom.
After gathering intel, return to the jewelry store entrance. A cutscene will play. Enter the store and collect the round, triangular, square, and pentagonal gems from the counter. Place them on the four corner pads in this order:
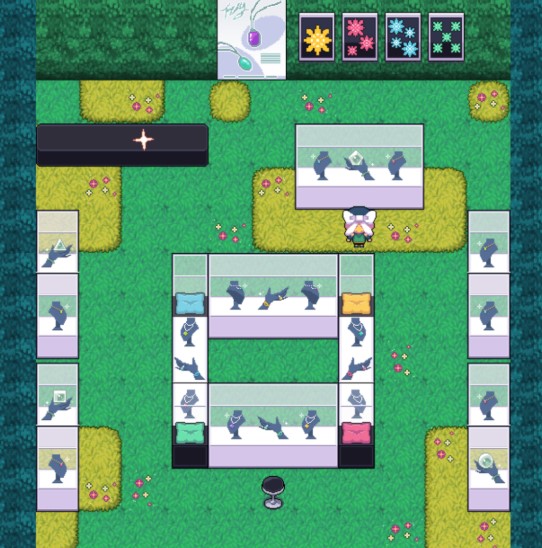
- Yellow = Circle
- Red = Triangle
- Blue = Square
- Green = Pentagon
Then sit on the stool. A secret door will open.
B Building – Floor -3, Room 1
After the cutscene, solve the block-pushing puzzle. Take the yellow stone from the cabinet and use it on the vines to the left.
Go down, turn left, and talk to the trapped cultist. Fetch the holy water from the door and give it to the cultist. You’ll receive an Energy Amber.
Place the amber on the vines here to open the path. Use the green or yellow levers to clear the way, navigate the maze downward, and eventually you’ll be caught.
B Building – Entrance 2
Read the text on the stone tablet. Pick up the three items in the upper left corner. Follow the vine order:
- Place the cloth on the first vine
- Stand Lucas on the second
- Place the book on the third
- Stand Jack on the fourth
- Place the fruit plate on the fifth
Then touch the yellow stone above.
Mall – Detective Agency Investigation
Switch back to the Detective Agency activity room. Head to the mall to investigate. Use Zanxi’s ability. Examine the pink bulletin board (employee rules), then follow the water-stained potted plants to the men’s restroom. After a conversation, enter the mirror.
Use the elevator, then exit.
A Building – Floor -1 Corridor
Follow the blood trail. Enter the room on the right. Examine the body in the center, the bone fragments at the glowing spot, and the moss on the wall. Choose to leave the room — you’ll be submerged.
In the Thought Corridor, select in order:

[Decompose] → [Small bones] → [Top to bottom] → [Bird] → [Died]
B Building – Floor -3, Room 2
Untangle the vines in this order: legs, right arm, left arm. Talk to Mirror and choose “Let’s go out together”. Enter the room where the vines have broken.
Leave the room and search for the Energy Amber. First, turn off the green switch and open the yellow door. Then turn off the yellow switch, navigate the maze, and enter the dark area on the left.
Grab the Energy Amber and activate the vine bridge.
Lucas’s Story
Move the flower pots and plants so both sides match. Pick up the clay figure. Read the diary on the table, then place the clay figure in the blue drawer. Continue reading the diary. When done, leave through the French window.
At the church, pick up the bouquet and place it on the coffin. Watch the cutscene, then leave the church by going down. Light the Christmas tree, watch the cutscene, go upstairs to Lucas’s room, and after the cutscene, leave the room.
Jack in the Dark
After the dialogue, walk down to the end. Then follow this path (always go to the end before turning):


Right → Down → Left → Up → Left → Down → Left → Up → Left → Up
Interact with the ghost you meet again, and follow it. When two ghosts appear, go left and always follow the cyan ghost. When only the red ghost appears, go in the opposite direction.
When surrounded by red ghosts, don’t worry — that’s the correct path. Then follow the blue ghost again to escape.
Switch to Citi’s perspective, continue forward, and exit the elevator.
B Building – Floor -1 Corridor
First, go to the opposite side of the corridor and check the elevator. Then search for the Energy Amber.
There are five rooms with vines at the entrance. The order to press the buttons depends on the number of vines at each door. For example, the 3rd and 1st rooms correspond to certain vine counts.
- Room 3 (Swamp): After being pulled in, choose “Check the vines” → “Lean backward” to escape.
- Room 4 (Purple): Interact with the lower right corner to find the button.
Press the buttons in the correct order. In Room 5, collect the Energy Amber, then activate the elevator on the right to go downstairs.
B Building – Floor -2 Corridor
Find Jack. Go down and enter the room. Talk to the blue ghost. Walk to the end and check the confessional, then leave immediately. Take the clothes from the body below and re-enter the confessional.
Save manually here. Avoid the enemy and grab the Energy Amber. Once you have it, your identity will be exposed. Don’t get caught — leave through the door on the right.
Enter the elevator on the left. The game will auto-save, and the perspective will switch to the Detective Agency.
Go to the right side of the hole to find End. Then go around the hole and enter the door above.
A Building – Floor -3, Preparation Room
Examine the shelf above, the cabinet in the upper left corner, and the circular vines in the center. After a short dialogue, examine the shelf again. You’ll trip over the vines on the floor. Check the cabinet again — nothing useful.
Interact with the circular vines. You’ll see a hint: “New leaves grow”. Examine the shelf again — it will break. Check the documents on the floor to find a password 463. Then examine the hair and enter the password.
The vines will open a gap. Take the jammer and use it on the cabinet in the upper left corner.
Open the cabinet, read the diary and the computer emails. Enter the Thought Corridor and select:
[Human female] → [Information doesn’t match] → [Footprints]
A cutscene will play, and the game will auto-save.
Floor -4, Altar
After the cutscene, enter the dog beastman’s illusion. Interact with it to get a toy plane, then enter the next room.
Read the documents on the table, then sit on the sofa and talk to Collins. Enter the room, read a few more documents, then talk to Collins again near the vines. Leave the room and enter the meat shop to listen to the conversation.
B Building – Floor -3 Corridor
Keep moving right. You’ll see hallucinations. After a cutscene, talk to the Detective Agency members through the door. At the crossroads (facing forward), go:
Right → Straight → Left (this one is easy to get wrong — the correct direction is to the right side of the screen) → Left
If you make a mistake, you’ll return to the start and can rewatch the dialogue.
In the power supply room, turn off the power. Exit and save (a chase scene is coming). Avoid the enemy and follow the glowing vines.
After the chase, reunite with Mirror. The game will auto-save, and the scene will switch.
Control the Detective Agency members. At the crossroads, go down and take the stairs.
B Building – Floor -4, Path to the Altar
Avoid the orange vines and stick to the center path. (Save manually if you’re worried about touching the vines.)
When you meet the dog beastman, choose the ellipsis option. Save first, then choose “Heal”. Select the dog beastman and talk to Zanxi. Save again — another chase is coming.
During the chase, keep moving right and avoid the orange vines by staying in the center. After passing, reunite with the Adventure Club. Continue forward to reach the altar. Watch the cutscene.
Floor -4, Altar – Final Battle
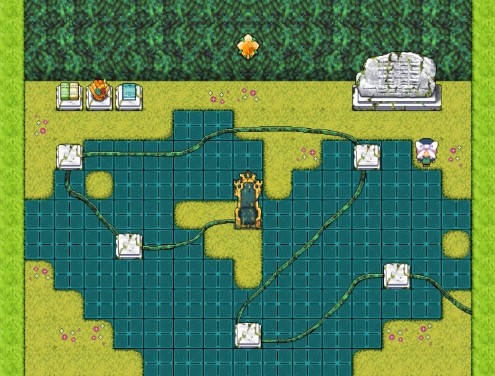
Enter the illusion and go right into the maze. The maze isn’t too hard — try a few times and you’ll find the exit, which is in the upper right corner.
Read the stone tablet. Take the bowl from the last stone platform. Interact with the second-to-last platform to collect black water. Pour the black water onto the last platform to get a seed. Plant the seed in the cracked platform. Finally, interact with the first platform.
After that, interact with the throne to enter the picture book story.
Final Thoughts
That covers every puzzle, hidden item, and branching path in Ticy Adventure Club: Queen of the Spring. The game is packed with clever logic challenges and perspective shifts, so don’t rush — take your time and enjoy the story. If you found this guide helpful, feel free to share your own tips or ask questions in the comments. Happy adventuring!