
Quick Summary: This guide breaks down every ship tier in Corsair Cove, from the starting Land Lover to the mighty Providence, listing the materials and production chains you need. Use the logistics and production tips to avoid bottlenecks and keep your fleet shipshape.
Ship Tiers Overview
Ships in Corsair Cove are built at the Pier (or Shallow Pier) and come in four tiers. Higher tiers require more advanced materials and production chains. Here’s the full lineup:
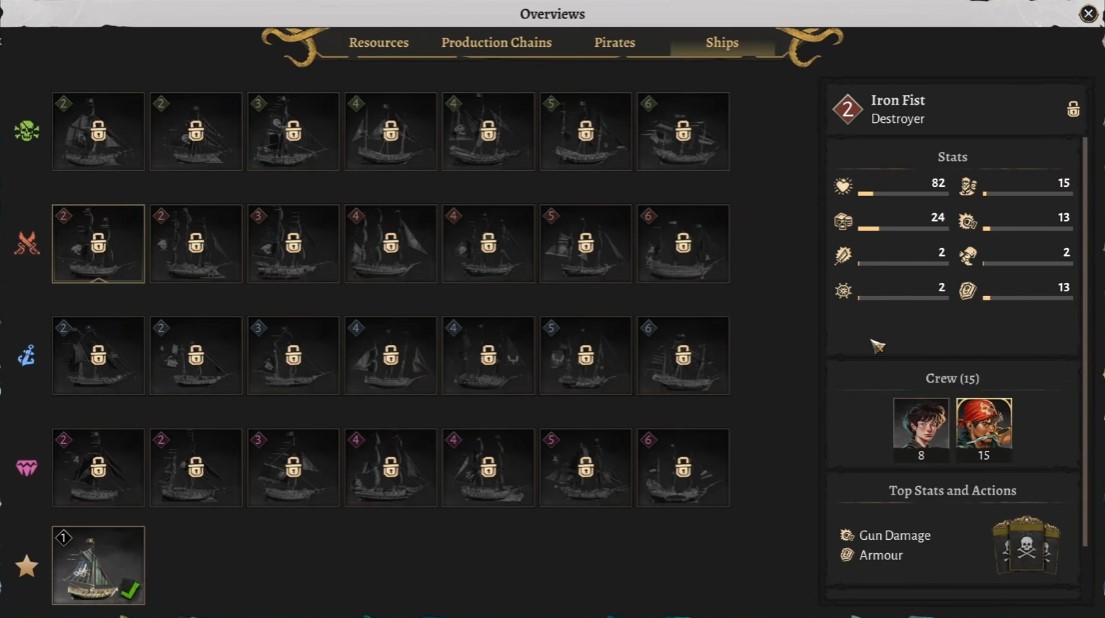
| Tier | Ships | Notes |
|---|---|---|
| T1 | Land Lover | Starting ship; poor performance. |
| T2 | Moonlight, Azimuth, Tide Runner, Huracan, Iron Fist, Steel Edge, Sharktooth, Goldseeker | Moonlight and Azimuth have high mobility; Iron Fist is high attack/defense; Steel Edge is fast. |
| T3 | Nightshade, Yoke Breaker, Tempest, Wolfhound | Mid-tier ships with balanced stats. |
| T4 | Rogue, Vulture, Sea Dragon, Ravager, Fortune, Catshark, Providence, Bedlam | Top-tier ships; Providence is the endgame goal. |
Note: Ship stats affect combat outcomes. A ship’s Captain provides fixed bonuses, and a full crew reduces randomness in battles.
Ship Construction Materials
Each ship requires a combination of construction resources (planks, stone blocks, etc.) and ship-specific resources (rope, sails, pitch, etc.). Below is the general material list you’ll need across all tiers:
| Resource | Source | Used For |
|---|---|---|
| Planks | Sawmill (from Wood) | Basic construction |
| Stone Blocks | Stone Cutter (from Stone) | Construction |
| Rope | Rope Maker (from Fiber) | Ship construction/repair |
| Sails | Production Building | Ship construction/repair |
| Pitch | Production Building | Ship construction/repair |
| Figurehead | Production Building | Ship construction/repair |
| Jolly Roger | Flag Maker | Ship construction/repair |
| Fittings | Production Building | Ship construction/repair |
| Steel Chains | Production Building | Ship construction/repair |
| Silver Lining (Steel) | Production Building | Ship construction/repair |
| Copper Lamp (Copper) | Production Building | Ship construction/repair |
Tip: Build a Salvage Dock to reduce ship construction costs. It pays off quickly if you plan to build multiple ships.
Production Chains for Ship Materials
To keep your shipyard running, you need efficient production chains. Here are the key chains:
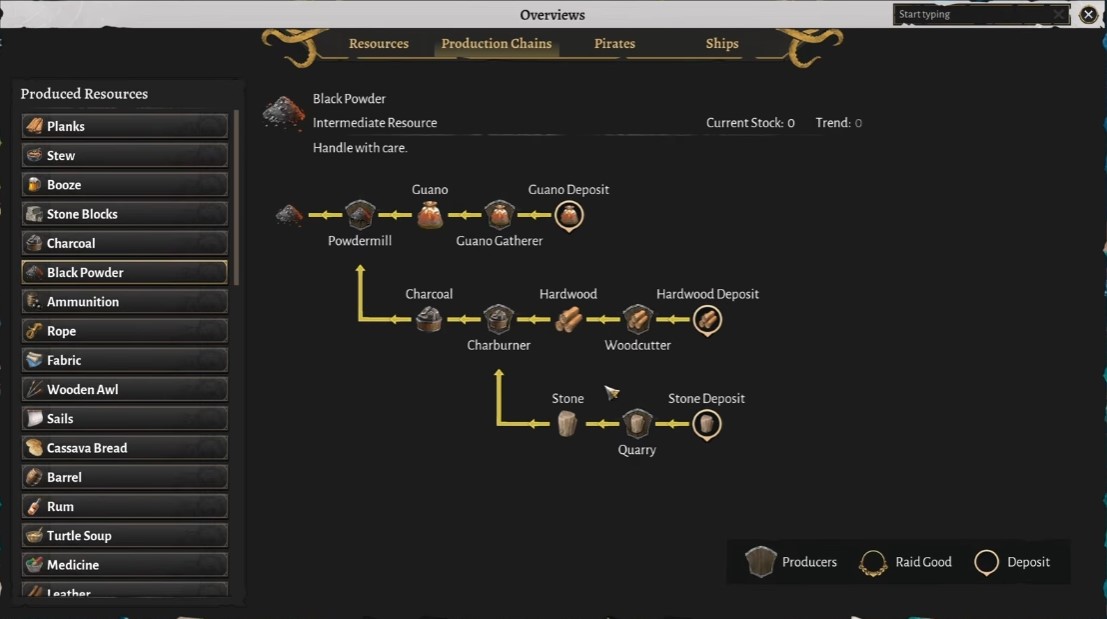
Basic Construction Resources
| Chain | Buildings | Output |
|---|---|---|
| Wood → Planks | Wood Cutter → Sawmill | Planks |
| Stone → Stone Blocks | Quarry → Stone Cutter | Stone Blocks |
| Fiber → Rope | Leafcutter → Rope Maker | Rope |
Advanced Ship Resources
| Chain | Buildings | Output |
|---|---|---|
| Hardwood → Barrels | Hardwood Lumberjack → Cooper | Barrels (for Rum) |
| Sugarcane → Rum | Sugarcane Farm → Distillery (needs Barrels) | Rum |
| Wood + Stone → Charcoal | Charburner / Vegetarian Charcoal | Charcoal (for metalworks) |
| Charcoal + Ore → Cannons | Cannon Foundry | Cannons |
Warning: Leather is often a bottleneck because it’s hard to scale up. Plan your leather production early if you need it for ship upgrades.
Logistics and Transport
Efficient logistics are crucial for moving materials from production to the Pier. Here are the key structures:
| Structure | Function | Tip |
|---|---|---|
| Warehouse | Storage and transport hub | Use as a central hub to optimize resource flow. |
| Zipline | Cheap vertical transport | Combine with Masts for two-way transport. |
| Mast | High point for ziplines | Place near production areas to create fast routes. |
| Elevator | Vertical transport | Costs 50 gold; saves time vs. rope ladders. |
| Bridge | Connects areas | Improves logistics across gaps. |
| Winch | Vertical transport | Useful for resource movement. |
Tip: Use the Color Diagnostic System to spot bottlenecks. Red routes indicate inefficiency—rework your connections or add warehouses.
Crew and Upkeep
Ships need crew, and crew need food and drink. Here’s what to keep in mind:
| Resource | Source | Purpose |
|---|---|---|
| Stew | Campfire (from fish/pig) | Basic food |
| Cassava Bread | Cassava Oven (from Cassava + Salt) | Food upkeep |
| Rum | Distillery (from Sugarcane + Barrels) | Drink upkeep |
| Booze | Moonshine Still / Tavern | Drink upkeep |
| Wine | Smuggling Runs | Rare drink for high-level pirates |
Note: All Hands on Deck is a buff that increases production/transport efficiency but doubles upkeep for production buildings. Use it wisely.
Common Mistakes
| Mistake | Consequence | Fix |
|---|---|---|
| Ignoring logistics | Production stalls due to missing materials | Build warehouses and ziplines early |
| Not building a Salvage Dock | Higher ship costs | Build it before mass-producing ships |
| Overproducing food | Wasted resources | Balance food production with crew count |
| Neglecting fertile zones | Can’t place farms/quarries | Plan your layout to reserve fertile zones |
| Skipping the Crow’s Nest | Limited vision | Build it early; it pays back quickly |
Final Tips
- Plan your shipyard layout around the Pier and Warehouse to minimize transport time.
- Use the Compass to track your victory path (Notoriety, Empire, Seafaring, Wealth) and align your shipbuilding goals.
- Upgrade your ships to Tier 2+ (like Goldseeker) for better pillaging efficiency.
- Keep an eye on Cohesion—if it drops to zero, you lose the game. Spend it wisely on events.
Warning: Don’t forget to repair and resupply at Friendly Ports. A damaged ship is a liability in combat.
With this guide, you’ll have a clear roadmap from your first Moonlight to the mighty Providence. Fair winds, Captain!
More Guides:
- Corsair Cove: Production Chain Optimization Guide (Maximize Resource Output)
- Corsair Cove: All Hands on Deck + Entertainers’ Guildhall Guide
- Corsair Cove: How to Unlock T2 Ships (Deeds, Compass, and Victory Path Choices)


