
... content here ...
... more content ...
This guide covers every collectible in SILENT HILL: Townfall — all Documents, Strange Postcards, CRTV channels, and Telephone numbers, listed in the order you find them across all six chapters. Missable items are flagged with warnings, so read those carefully before moving on.
Before You Start: Two Rules That Save Runs
Two mechanics govern how collectibles behave in Townfall, and both are easy to get wrong on a first playthrough.
- Call numbers immediately. Several phone numbers only work during a specific section of the game. Once you leave that area, the number can become permanently unavailable.
- Watch for static. A CRTV makes a soft static sound when a channel is available to tune. If you hear it, stop and look for the nearest screen or device.
Editor Warning: Phone numbers discovered on documents or posters are not added to your directory automatically. You must physically dial them at a phone booth before they register. A missed call window means a missed entry.
Part 1: Arrival (First Third)
Chapter 1 opens with the Cold Open section. Most collectibles here sit along the mandatory path, but a few hide behind optional doors.
| Collectible | Location | Notes |
|---|---|---|
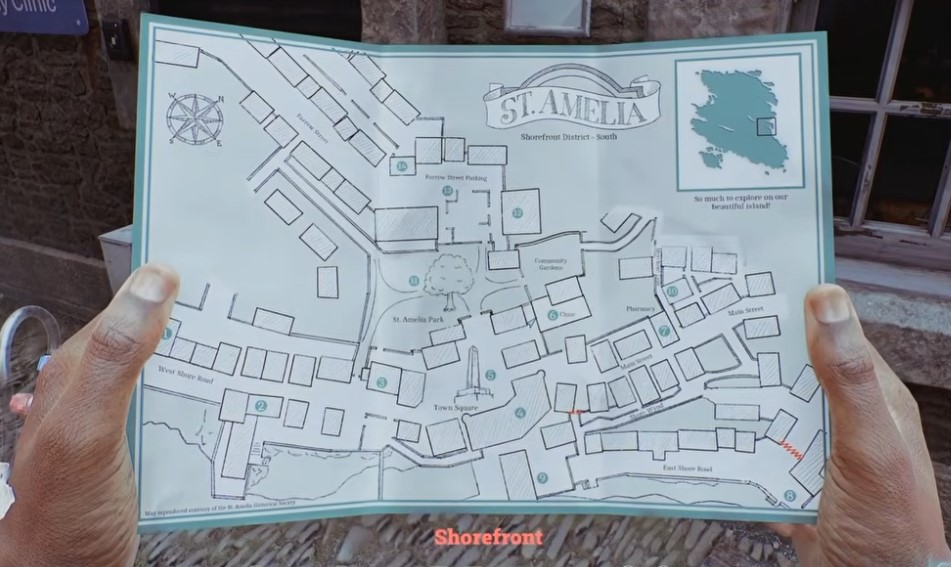
| Document: Boat Tour Cancelled Notice | Small building right of the St. Amelia sign | Attached to the door |
| Document: Shorefront Family Clinic Notice | Town Centre clinic | On the wall beside the door |
| Phone: 900, 010, 100 | First phone booth | Interact with the “Your local services” poster beside it |
| Phone: 496 0496 (Tourist Center) | Bottom of the map | Must be called to enter the directory |
After the phone booth, move into the Escape section.
- Clue: Room Service Card — on the table where you pick up the CRTV.
- CRTV Channels — two channels can be tuned in the same room.
- Document: Hotel Room Note — after solving the door puzzle in that room, check the bathroom counter.
- Document: Hotel Reception Notice — behind the reception desk after riding the elevator.
- Phone: 496 0244 (The Haldane Hotel) — printed at the bottom of the Hotel Reception Notice.
Next comes A Connection.
- CRTV Channel — triggers automatically after leaving the hotel.
- Document: Vigil and Protest Flyer — on a bench in the Town Square, next to a large red sign.
Part 1: Arrival (Second Third)
A Connection continues here.
- Strange Postcard 1 — walk down West Shore Road (slightly under Simon’s left thumb on the map). A Video Store sits there; the postcard is on the counter.
- Document: Hand Delivered Letter — inside Zoe’s house (mandatory). On the living room table, left of the entry point.
- Clue: Organ Transplant Card — upstairs in Zoe’s house. Go through her bedroom into the bathroom; it lies in front of the shower.
- Clue: Power Card Credit Guide — combine the batteries and flashlight, then crouch under the crawlspace by the bottom of the stairs. The clue sits next to the power box.
- Document: Newsagents Note — the next mandatory stop, the Newsagents. On the counter.
- Documents: Your Letter, Please Report In, For Attending — return to Zoe’s house after restoring power and read every email on the computer.
Into Searching For Zoe:
- CRTV Channel — pops up at the start of the chapter.
- Document: Note on Patient Records — at the mandatory clinic. First door on the right, inside a drawer.
- Clue: Resignation Letter — farthest openable door down the hallways, in Z Ellis’ room. Directly in front of you.
- Clues: Where Are You, Answer Phone Message — computer in the same room.
- Document: Nurse’s Rounds Form — on the reception desk once unlocked.
- Document: Restock Issues — in the mandatory pharmacy, on the front desk.
- CRTV Channel — the back room of the pharmacy holds a CRTV device. These minigames appear throughout the run and are not difficult.
- Strange Postcard 2 — in the park, take the left path, then left again at the next split. This leads to a back alley behind some houses, notably behind number 3 on the map. The postcard sits behind a dumpster next to a red container.
- Strange Postcard 3 — on the left side of Farrow Street, attached to the large wall.
- Document: Feeling Sick Note — opposite building 14 are apartments. Go to the top floor, apartment 1/2. Inside, a door on the left leads to a dresser where the note lies.
- Strange Postcard 4 — opposite the bedroom above is another bedroom. On the floor at the end of the bed.
- Clue: Jess’s Door Note — at the back of building 14, stuck to the back door.
Part 1: Arrival (Third Third)
- Document: Task Assignment — entering building 14 (Jess’s house), turn right immediately to the kitchen counter.
- Document: Jess Legal Advice — in the living room of Jess’s house.
Part 2: Zoe
Begin Zoe Rounds:
- Document: Water Warning — living room table at Zoe’s house.
- Phone: 01632 960595 (St. Amelia District Council) — printed at the bottom of the Water Warning document. Not added to the phonebook until you call it.
- Document: Email “Coming back” — Zoe’s computer in the living room.
- Document: Jane Chalmer’s Obituary — progressing back to the park, go right into the gardens. There is a mandatory locked shed; code 1993. The document is on the middle shelf.
- Document: St. Amelia Standard — at Mr Stewart’s house, enter through the back and check the living room table.
- Phone: 496 0103 (Zoe Ellis) — interact with the phone in the same room. A folder sits next to the answering machine. Inspect the note inside to register the number.
- Clue: Medical Security Note — the security booth outside the Medical Centre. Attached to the window.
- Phone: 496 0556 (D. Glenn) — automatically obtained by picking up the note above.
- Document: Community Help Needed — inside the Medical Centre, go up and left. The note is on the first table on the right.
- Document: Exhausted Supplies — same area, back left, a tent with beds. On the farthest bed.
Next, Journey to Medical:
- CRTV Channel — triggers when leaving the clinic.
- Strange Postcard 5 — in the alleyway, keep going forward until you reach a set of stairs. The postcard is next to some Wellington boots.
- Document: Scaffold Notice — entering the first apartment in this area, attached to the front door ahead of you.
- Document: Handwritten Note — go up one floor to apartment 1/1, on the living room table.
- CRTV Channel — another CRTV device in the same apartment and room.
- Documents: “Note.txt” and “Printed Photos 1/2” — up one more floor to apartment 2/2. The first room on the left has a computer where you view “Note.txt”. To get both photos, enter the kitchen of the same apartment and turn it on, then return to the computer and print them. Collect the prints from the printer.
- Strange Postcard 6 — on the ground floor of the second apartment building, skip the front door and go out back. Enter the farthest shed.
Part 3: The Patient
Begin Zoe The Patient:
- Documents: “Supply Situation Update”, “RE: Supply Situation Update” — once you have access to the Medical Centre, leave the surgery room, take the left set of doors to the end of the corridor. The last door on the right has a computer with both emails.
- Document: “Unrealistic Expectations” (1098512…) and Clue: “Dailies – Infusion Status” — go up the stairs to the next floor. The computer is behind the reception desk.
- Clue: Dailies – Records Room Code — in the Office on the same floor, on a blue board.
- Phone: 5353 (Hospital Storage) — given automatically as you progress the story.
- Document: Equipment Cleanup Notice — down the long hallway in the basement, on a blue bed on the right side.
Into Many Into One:
- Strange Postcard 7 — before descending the ladder, the room on the right mirrors the Zoe section. Enter 7103 again; the postcard is on the far side of the room.
- CRTV Channel — after squeezing through a gap, a CRTV device sits on a table.
- Clue: Zoe’s Patient List — in the room where you get the Otherworld Medical Centre map, take the right corridor to the farthest right door. A vent in this room leads to a locked room.
- Strange Postcard 8 — lower section of the left side, room 6. On a table.
- Strange Postcard 9 — lower section of the right side, room 8. Inside a medical cabinet.
Part 4: Clara Woods (First Half)
Opening section Begin Again:
... content here ...
... more content ...
- Document: Harbour Notice — walking down the pier again, go in front of the big white-and-blue docked ship. Attached to the metal fence.
- Strange Postcard 10 — past the street of bodies, at the road split go right to the very end. An alleyway on the right side (near the body hanging from the streetlight) leads to a garden. The postcard is in a shed there.
- Document: Store Staff Notice + CRTV Channel — from the road split, go all the way left. A store sits on the left side. The note is on the checkout counter. A CRTV machine is also in the store.
Continue with Missing Parts:
- Phone: 946 (WHO Dial Back Service) — after the call with Richard, return to the phone booth and interact with the WHO poster.
- Phone: 496 0112 (Unknown) — received automatically after dialling WHO.
- Document: Atlas Square Apartment Note — near the phone booth is an apartment building labelled “1”. In the ground floor unit, the note is on a set of drawers in the living room.
- Strange Postcard 11 — go up one floor in the same building. In the openable apartment on this floor, check an openable set of drawers toward the back end, in a bedroom.
- Strange Postcard 12 — in the shopping halls, across from the store “Cash It” is an unnamed building. Smash the window on the right side to reach the postcard.
- CRTV Channel — at the end of Atlas Way, a strange gate with a metal structure.
- CRTV Channel — as you progress, you will enter a building leading to a small playground and the CEG Lockers. The channel becomes available when you enter that leading building.
- Clues: “Lost and Found” and “CEG Employee Locker List” — at the CEG Lockers, use the front desk computer.
- Document: CEG Lockers Managers Note — in the CEG Lockers office, inside a desk drawer.
- Phone: 496 0993 (CEG Lockers) — visible on locker barcodes.
- CRTV Channel — in the 5th South Brae house, living room.
- Clue: Gaming Magazine — upstairs in the same house, on a bed.
- Clue: Reciprocating Compressor — after solving the computer and floppy disk puzzle in the house above, you can print it out.
- CRTV Channel — pops up immediately after picking up the bolt cutters.
- Clue: Lamenting Poem — entering 6th North Brae through the back door. Upstairs on a chair in a bedroom.
- Strange Postcard 13 — across the Overpass and on the Upper Braes, in a dead end.
Part 4: Clara Woods (Second Half)
Missing Parts continues:
- Clue: The Code Today — inside 5th Upper Brae, first room on the left upstairs, on a table.
- Clue: The Code Before — during the tape time travel, use “Tape: Yesterday”. The clue is in the kitchen, on the corner of a table.
- Clue: The Code After — switch to “Tape: Tomorrow” and go downstairs. It is in the living room.
- Strange Postcard 14 — after collecting the backdoor key from the tape puzzle, switch to “Tape: Tomorrow” and exit the back door. Many sheds line the alleyway; the postcard is inside the open one.
- Clue: Email “Current Count” — switch to “Tape: Today” and use the backdoor key again. The next openable shed (right of the one above) contains an Ammonite Disk. Return, switch to “Tape: Yesterday”, and use the disk on the computer.
- CRTV Channel — triggers when you leave the house after these puzzles.
- CRTV Channel — appears after obtaining all three mechanical parts.
Then Inside CEG HQ:
- Document: Inquiry Preparation Notice — corner of the reception desk.
- Clue: Box IDs and Names — back end of the larger assembly room on the ground floor, resting on the podium.
- Clue: Grid of Codes — in the Maintenance room, inside a bin.
- Clue: Grid of Codes / Complete Grid of Codes + CRTV Channel — in the Security room, in a bin again. Combine this with the previous Grid of Codes to obtain the Complete Grid of Codes. A CRTV machine also sits on the desk.
- Documents: “CEG Security: Out of Hours Access” and “Urgent Message” — the computer is also in the Security room.
- Clue: Employee File Cover Note — back in the big assembly room, unlock container 36 on the third row from the front. Code is 486.
Part 5: Richard
Getting Inside:
- Document: Construction Halted Notice — inside the building immediately left after opening the parking lot. From the entrance, it is the far left side room.
- Document: CEG Kiosk Note — through the garage door, on the right, on a workbench.
- Document: CEG Memo — upstairs on the far left side, the Manager’s office. On the desk.
- Document: “Facilities: Works Halted” and “DONTREAD.DOC” — after starting the generator, return to the first collectible building in this chapter. From the entrance, it is the right side room. The computer now works.
Another Attempt:
- Document: CEG Tower Meeting Minutes — climb to the third floor, unlabelled meeting room.
- Documents: “Evening News” and “CEG Tower: Engineer Public Statement” — in the Public Relations area of the third floor, the computer sits in the room with the phone.
- Document: PR Meeting Note — still in Public Relations. Exiting the previous room, it is the first room on the right as you head down the hallway. Inside a drawer.
- Clue: Richard’s Note — in the bigger Public Relations room, on the floor.
- Clue: CEG Checkout Sheet — 4th floor Media Department, an unmarked Storage room. In the “General Storage” cabinet.
- Document: “CEG Tower: He’s Done” — on the 10th floor, computer on the desk outside the office.
Part 6: Simon
Section Fix This:
- Document: Ordell File — at the start of the chapter, on the desk next to the phone.
- Document: “CEG Tower: What did you do?” — leaving the office, the computer outside has a new email.
- Clue: Reference Sheet + CRTV Channel — in the big room with flashing yellow lights and the pipe puzzle, on the right on a long metal drawer. Both the sheet and the CRTV machine sit next to each other.
- CRTV Channel — after crouch-exiting the pipes, do not take the ladder down immediately. The CRTV machine is in the left room.
- Strange Postcard 15 — you will reach a point where you open a vent. When the paths split inside, go right, then left.
Editor Warning: Collecting every Strange Postcard unlocks the hidden achievement Blur Your Eyes. There are 15 total, and postcards 10-15 in Part 4 onward are the easiest to permanently miss if you rush through splits in the road or tape puzzles.
Trying Again:
- Document: “SWDP: Ordell Site Visit” — after riding an elevator, you reach an area connecting to an “AUX” room and a “JOE” room. The computer is in the top right room of the map.
- Document: RCU Refit Note + CRTV Channel — opening and going through the “JOE” room, squeeze through a gap to another room. The note and CRTV machine are on the bed.
Editor Warning: Tuning into every CRTV signal unlocks the achievement Sweeping Signals. Some CRTV channels only trigger at specific moments after events, so check your television regularly rather than waiting until the end.
- Document: Photo of Joe McKenzie — wedged in the door frame in the same room as above.
- Clue: Remote Systems Control — in the Control Room, between the panel and lock-box.
- Clue: “Auxiliary Lines” — in the “AUX” room, insert the AUX Disk into the disk reader. It appears on the computer afterward.
- Clue: Clamp Release Procedure — after turning Valve F, return to the Control Room. It will be in the printer.
The Eraser chapter contains no collectibles.
Returning:
- Document: Crew Patch — at the start of this segment, go down onto the beach and walk all the way to the other side. Attached to some clothes on the ground.
Editor Warning: Picking up every Document unlocks the achievement Thorough Inspection. Cross-check your Documents list in the menu before finishing the story — several chapter-specific documents vanish once you pass the chapter’s end point.
New Game Plus
New Game Plus adds one extra phone number during the opening chapter.
- Phone: 496 0842 (Unknown) — on returning to the Town Centre, call 946. You will be given the new 496 0842 number. It should work as soon as you reach the phone booth, though some players report it only registers during the A Connection section. If it fails the first time, try again after that point.
Conclusion
Most of these collectibles are missable, and the phone directory has no second chances. Save often, call every number the moment you find it, and check each CRTV you pass. That is the whole method — skip any of those three habits and the achievements slip away.
More Guides:
... content here ...
... more content ...


