
... content here ...
... more content ...
This guide walks through every achievement in SILENT HILL: Townfall, including all 138 collectibles, 5 endings, missable trophies, and the fastest route to a full completion. It covers a first playthrough, New Game+, and a clean-up run.
Achievement Overview
Total achievements: 36
Missable achievements: Yes
Difficulty-related achievements: None
Minimum playthroughs: 2–3
Estimated time to full completion: 20+ hours
Playthrough Plan at a Glance
Plan your runs around the following three phases.
| Playthrough | Primary Focus | Key Notes |
|---|---|---|
| New Game (Run 1) | Collect every collectible, kill every enemy | Finish with 60+ kills for the “Cast Aside” ending. Do not use manual saves if you want “Refusal of Help”. |
| New Game+ (Run 2) | Endings and speed | Finish under 4 hours for “Fleeting Visit”. Get the remaining 4 endings via manual save reloads. |
| New Game++ (Run 3, optional) | Clean-up | Start with a strong handgun from the “Fantastic” ending. All puzzle solutions are already known. A run takes about 2 hours. |
Phase 1: First Playthrough
During your first run, pick up every collectible item you pass. Kill every enemy you encounter — by the end of the game you need more than 60 kills for the “Cast Aside” ending.
Avoid using manual saves on this run if you are also going for “Refusal of Help”. Knock out any combat and cumulative achievements whenever the opportunity appears.
Phase 2: New Game+
Try to finish the game in under 4 hours for “Fleeting Visit”. Get the remaining four endings by reloading manual saves. Detailed guidance for each ending is in the Endings section below.
Clear any combat and cumulative achievements you still have left.
Phase 3: New Game++ (Optional)
If you used manual saves on your first run and didn’t get the timed achievement on your second, start a New Game++. You will begin with a powerful handgun from the “Fantastic” ending, and you already know every puzzle solution. A full run takes roughly 2 hours.
In-Progress Achievements
The achievements below can be earned on any difficulty and in any playthrough. The walkthrough section marks the best places to get them.
Crafting: Early in the game you learn to combine items using the flashlight and batteries as an example. You will craft a few items for story progression, but most crafting will be healing items. You will hit the required count quickly without trying.
Throwing bottles: Both bottles thrown at the ground and bottles thrown at enemies count. This is cumulative, and you will finish it naturally during your first playthrough.
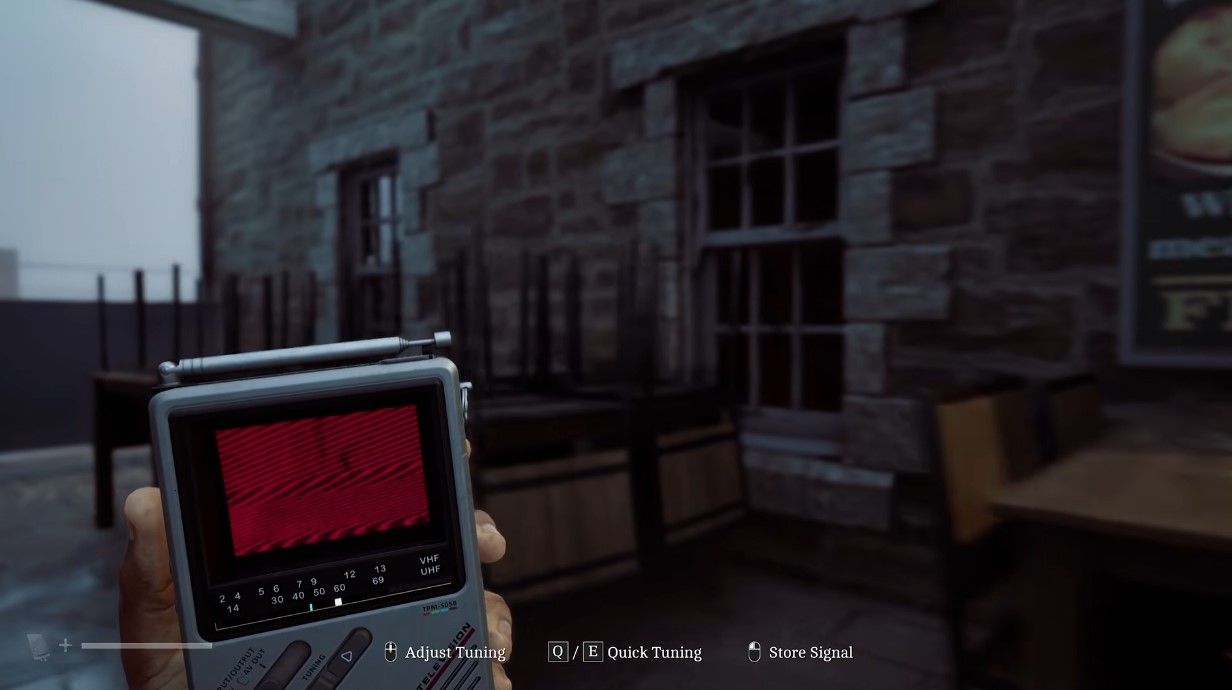
CRTV signals: Starting in Chapter 5: Detour, radios appear in every location. Approach and interact with E to trigger static.
Hiding: Hide behind the special doors in the streets or in lockers inside buildings. You can duck into any of these at any time to log progress.
Car alarms: The streets of St. Amelia are filled with cars. Throw a brick or bottle at a car to set off its alarm.
Editor Warning: The “Air” achievement (bottle + gunshot) is easiest at the start of Chapter 6, right after you get the handgun. Move toward the pharmacy, neutralize the enemy, then step into the alley behind the pharmacy and pick up the bottle near the dumpsters. Toss the bottle up and shoot it. If you miss, reload the autosave, or make a manual save inside the pharmacy after picking up the bottle so you can retry quickly.
Combat and Cumulative Achievements
Headshot with handgun: A headshot is required. If you struggle, use the prone enemies in Chapter 10: Missing Parts. The streets are covered with lying-down enemies and the alleys are littered with bricks, so you can practice safely.
Headshot with rocket launcher: The rocket launcher sits in one of the employee lockers in Chapter 10: Missing Parts. Its shot is unpredictable — the flight path changes at random, which makes a headshot much harder than normal. Make a manual save in the locker room, step outside, and fire at the enemy on the streetlight. If you miss the first shot, reload and repeat.
Widows (Chapter 13): A new enemy type, the Widow, appears only in this segment. You will meet a little over 30 of them across the chapter, so you must kill each one. This achievement is cumulative, so you can finish it in New Game+ if you fall short.
Kill with 7 Different Weapons
You need one finishing blow with each of the seven weapon types in a single playthrough.
| Weapon | Availability | How to Land the Killing Blow |
|---|---|---|
| Bottle | Every location | Weaken an enemy with the pipe first, then finish with a thrown bottle instead of the final melee hit. Prone enemies in Chapter 10 also die to a single throw. |
| Brick | Every location | Same method as the bottle. Prone enemies in Chapter 10 die to one brick. |
| Pipe | Every location | Your standard melee weapon. |
| Lead Pipe | Chapters 8 and 15–16 only | Pick it up in those chapters and use it to finish an enemy. |
| Handgun | From Chapter 6 | Obtained through the story. |
| Rocket Launcher | Chapter 10 | Found inside an employee locker. |
| Shotgun | Chapters 13–16 only | Obtained through the story. |
Missable Achievements
You can unlock the achievements below on any difficulty in any playthrough. The walkthrough section marks each spot so you don’t miss them.
Refusal of Help: You can make manual saves at any time by using the phone and dialing 100. For this achievement, avoid manual saves from the moment you first visit St. Amelia Main Square in Chapter 1 all the way to the end of the game. The game’s autosaves will be enough — they trigger when you pick up story items. The safest plan is to do this on your first playthrough, since New Game+ will need manual saves for the endings. Or leave it for New Game++ and combine it with the time achievement.
This Is for Patients: You need to avoid all healing items while playing as Zoe in every segment. This means passing Chapter 5: Detour and Chapter 7: Patient with maximum care. Alternatively, leave it for New Game+, where Zoe has an axe that makes these sections much easier.
Axe: Only found in New Game+. Its location is covered in the New Game+ section.
Pistol-3000: Only found in New Game++, after earning the “Fantastic” ending.
Collectibles Overview
Six achievements are tied to collectibles.
| Achievement | Requirement |
|---|---|
| Observance / Thorough Inspection | Collect 85 documents |
| Defocused Gaze | Collect 15 strange postcards |
| Gathering Signals | Tune into 18 CRTV signals |
| Abundance | Open 7 resource crates |
| Cold Calls | Call 13 phone numbers |
There are 138 collectibles in total. Every one of them can be missed — once a chapter ends, you cannot return to that area. Clues and Documents count as the same collectible type, and how many you find affects the ending.
Strange postcards and phone numbers carry across playthroughs. Postcards you already found do not reappear in New Game+. Every collectible can be picked up in a single playthrough except phone numbers. Each location is listed in the walkthrough.
Endings
SILENT HILL: Townfall has five endings. Each one unlocks its own achievement.
| Ending | Achievement |
|---|---|
| Justice | For the Sake of St. Amelia |
| Forever | Here for a Long Time |
| Cast Aside | Only Makes It Worse |
| Dog | Let’s Talk |
| Fantastic | Fantastic Story |
The three main endings depend on the ratio of Enemies Killed to Discoveries Found (documents and clues).
If Kills are far higher than Discoveries, the Cast Aside ending activates (60+ kills, even with 85 discoveries).
If Kills are slightly lower than Discoveries, the Forever ending activates (roughly by 5).
If Kills are far lower than Discoveries, the Justice ending activates (roughly from 10).
CRTV signals and Strange Postcards do not count as discoveries. The other two joke endings are only available in New Game+ under special conditions and with specific items collected. Their locations are listed in their own section.
Recommended Ending Route
- On the first playthrough, collect every collectible and kill every enemy. Reach 60+ kills, then finish with the Cast Aside ending.
- Start New Game+ and pick up the axe.
- Collect documents and clues in the first half of the game (Chapters 1–8). Avoid killing enemies where possible.
- In parallel, grab every item needed for the Dog and Fantastic endings.
- In Chapter 10, avoid kills. Collect all mechanism parts and make a manual save.
- In Chapters 12–13, keep collecting documents and avoiding kills.
- In Chapter 15, get the remaining items for the Dog and Fantastic endings and make a manual save before interacting with the valve.
- Get the Fantastic ending, then reload.
- Get the Dog ending, then reload.
- Get the Justice ending. Check the Discoveries statistic, then load the manual save in Chapter 10 (Clara Woods).
- Kill enemies in this area until the gap between Kills and Discoveries is no more than 5. Remember you still have Chapters 12–15 plus optional enemies during the final fight.
- Finish the remaining chapters the same way as before the Justice ending. Collect the same documents you did previously. End the game on the Forever ending.
Chapter 1: Prologue
Document [1/85] – About the Cancelled Boat Tours. On the pier, to the right of the St. Amelia sign, on the door of the back room.
Editor Warning: Phone number 100 is the manual save line. For Refusal of Help, avoid saving from this point onward. You may dial 100, but leave the save menu immediately afterward.
Phone Number [4/13] – 900, 010, 100, 496 0496. After picking up the map at the main square, check the phone booth. Local service numbers are added automatically. You can also find the Tourist Agency number by examining the map.
Chapter 2: Escape
CRTV Signal [1–2/18]. Once you reach the Otherworld, the game introduces the CRTV. In the same room, find and save 2 signals.
Clue [2/85] – Room Service Card. On the table in the hotel room.
Document [3/85] – Note from the Hotel Room. In the bathroom after solving the puzzle.
Document [4/85] – Notice at the Hotel Front Desk
Phone Number [5/13] – 496 0244. After you take the elevator up to the hotel lobby, go behind the front desk and examine the document. It lists the hotel’s phone number, which you can dial at the main square phone booth later.
Chapter 3: Contact
CRTV Signal [3/18]. After leaving the hotel, use the CRTV at the main square.
Document [5/85] – Protest Awareness Leaflet. On the bench at the base of the main square monument.
Strange Postcard [1/15]. Visit the video rental store at the dead end of West Short Road (far left edge of the map). Examine the postcard on the counter.
Document [6/85] – Hand-Delivered Letter. On the table in Zoe’s living room.
Clue [7/85] – Transplant Organ Card. On the second floor of Zoe’s house, go into the bedroom and through to the bathroom. It’s on the floor near the shower stall.
Clue [8/85] – Electrical Work Order. After you find the batteries, crawl under the door to the breaker box and examine the document.
Document [9/85] – Note from the Print Shop. On the counter next to the register in the print shop.
Document / Clue [10–12/85] – Emails for Zoe: Report Yourself / Your Letter / For the Recipient. After turning the power back on in Zoe’s house, read the 3 emails on the computer in the living room.
Chapter 4: In Search of Zoe
CRTV Signal [4/18]. After leaving Zoe’s house, use the CRTV at the main square.
Document [13/85] – Clinic Notice. To the right of the door of the Coastline clinic (No. 6 on the map).
Document [14/85] – Medical Records Note. Inside the clinic, go into Dr. Stevenson’s office to the right of the main entrance. Open the desk drawer and read the document.
Clues [15–17/85] – Termination Letter + 2 Emails. In Zoe’s office, read the document on the boxes in front of the scales, then check email on the computer in the corner of the room.
Document [18/85] – Nurse Round Form. Pick the lock on the reception desk (2896). Listen to the answering machine and read the document.
Document [19/85] – Supply Problem
CRTV Signal [5/18]. Pick the pharmacy door with the scalpel. Examine the document on the counter. Interact with the radio in the room.
Strange Postcard [2/15]. After the pharmacy puzzle, open the passage to the Park. Go through the gate and turn left immediately. Enter the alley behind the houses and find the postcard near the dumpsters.
Strange Postcard [3/15]. Go to the dead end of Farrow Street and grab the postcard from the wall (far northwest corner of the map).
Clue [20/85] – Note on the Door. On the front door of Jess’s house.
... content here ...
... more content ...
Strange Postcard [4/15]
Document [21/85] – Patient Notes. In the building across from Jess’s house, go up to the second floor. Enter apartment 1/2. In one of the bedrooms, pick up the postcard from the floor; in the room across the hall, examine the document on the dresser.
Document [22/85] – Appointment + Safe Key. In the kitchen of Jess’s house, examine the document and take the key from the kitchen drawer.
Document [23/85] – Legal Consultation. On the table in Jess’s living room.
Resource Crate [1/7]. After taking the stethoscope from Jess’s bedroom, go back to the building across the street. On the first floor, enter apartment 0/1. Open the crate on the living room table.
Chapter 5: Detour
Editor Warning: For This Is for Patients, you cannot use any healing items in the Detour and Patient chapters. You can save this achievement for New Game+ or sneak through these segments with maximum care.
Document [24–25/85] – Water Warning + 1 Email
Phone Number [6/13] – 0163 296 0595. In Zoe’s living room, check email and examine the document on the table. The St. Amelia District Council number is at the bottom of the email. Use the phone in the hallway.
Document [26/85] – Jane Chelmers Obituary. On the shelf in the story barn.
Document [27/85] – St. Amelia Standard Newspaper
Phone Number [7/13] – 496 0103.
Editor Warning: Do not enter the bathroom until you have collected all collectibles.
In the dining room of Mr. Stewart’s house, examine the newspaper on the table. Then interact with the phone and open the notebook to its right to find the number.
Clue [28/85] – Medical Safety Notice
Phone Number [8/13] – 496 0556. Examine the notice on the window of the medical center guard post. Dr. Glenn’s phone number is added automatically. Return to the phone booth and call it.
Document [29–30/85] – Running Out of Supplies / Community Help Needed. In the medical center parking lot (left of the main gate), examine the document on the table and on one of the beds.
Chapter 6: Into the Medical Center
Editor Warning: At the start of the chapter, right after you get the revolver, you can unlock Air by tossing a bottle upward and shooting it. After the first enemy near the pharmacy, step into the alley and you will quickly spot a bottle on the ground next to the dumpsters. If your first attempt fails, reload the autosave.
CRTV Signal [6/18]. After leaving the clinic, use the CRTV at the main square.
Strange Postcard [5/15]. In the alley behind the pharmacy, where the “axe-head” enemy patrols, there is a staircase leading to the building’s basement. The postcard is down there.
Document [31/85]. When you reach the residential complex, there is a notice on the door directly in front of you.
Document [32/85] – Note
CRTV Signal [7/18]. On the second floor, in apartment 1/1, examine the document in the living room and interact with the radio.
Document [33–35/85]. On the third floor, break open the door of apartment 2/2. In one of the rooms, check email on the computer. Then go to the kitchen of the same apartment and activate the printer. Go back to the computer and print 2 photos (a “Print” button appears in the bottom-right of the monitor when a photo is open). Return to the kitchen and pick them up.
Resource Crate [2/7]. After using the scaffolding to cross to the other wing of the building, go down and enter apartment 1/1. In the bedroom with the enemy, pick up the key from the bed. Now go to the top floor and open the crate.
Strange Postcard [6/15]. After you jump through the hole in the floor to the first floor, exit into the residential courtyard (door to the left of the phone stand). The postcard is in the farthest shed.
Chapter 7: Patient
Editor Warning: For This Is for Patients, you cannot use healing items in the Detour and Patient chapters. Save this achievement for New Game+ or sneak through both segments carefully.
Document [36–37/85] – About the Supply Situation. From the patient’s room, go into the block with the Pharmacy Warehouse. In Consultation Room B, check email on the computer.
Clues [38–40/85] – Archive Department Code / IV Status. From the patient’s room, go to the Chapman Ward block. Go up to the second floor and check email at the reception desk in the hall. Then sneak into the Office in the far-left corner of the hall. Examine the note on the board.
Phone Number [9/13] – 5353. During the story, Dr. Glenn gives you the hospital warehouse number. Use the phone at reception near the surgery room.
Document [41/85] – Equipment Cleaning Notice. After calling the warehouse, take the elevator down to the basement. Pick up the document from the couch in the corridor opposite the staff room.
Chapter 8: Many in One
Strange Postcard [7/15]. At the very start of the chapter, before going down the stairs, go into the room where you did Zoe’s X-rays. (Password: 7103)
CRTV Signal [8/18]. Once you are in the Otherworld, keep moving until you have to squeeze through a crack in the wall. Right after that, there is a table with a radio in front of you.
Clue [42/85] – Zoe’s Patient List. On the table in the room with Alan’s blood.
Strange Postcard [8/15] + Safe Key. After you go down to Sector W, where the new enemy appears, first sneak into Ward 04 to take the master key. Then go to Ward 06 for the postcard, and then to Ward 11. Escape using the stairs in Ward 13.
Resource Crate [3/7]. After going back up to Sector S, sneak into Room 01 and open the crate.
Strange Postcard [9/15]. After you reach Sector D, go down the stairs to Sector P and enter Ward 08. Take the postcard from the wall cabinet.
Chapter 9: Starting Over
Document [43/85] – Port Notice. On the pier opposite the sign, go down to the boat and examine the document on the railing.
Strange Postcard [10/15]. After the cutscene in town, you walk down a street full of corpses. When you reach the fork, turn right. At the dead end, turn right again through the gate. The postcard is in the shed.
Document [44/85] – Notice for Store Staff
CRTV Signal [9/18]. Return to the fork. Now go left. Take the map from the town board. Opposite it, go to the store with a car next to it. Go inside, examine the document on the counter, and interact with the radio on the table with items.
Chapter 10: Missing Parts
Editor Warning: This chapter is the best place for Long-Range Brickwork (hit an enemy’s head with a brick from 15+ meters) and Sniper Inaccuracy (hit an enemy’s head with a rocket launcher from 10+ meters).
Phone Number [10–11/13] – 946, 496 0112. After you talk with Richard, go back to the phone booth and examine the notice. Dial 946. A second number is given to you and is added automatically. Use the phone again.
CRTV Signal [10/18]. From the phone booth, go to the dead end on Atlant Way. Examine the iron pipe, then use the CRTV a short distance away.
Strange Postcard [11/15] + Safe Key. Go into the post office on Atlant Way and take the key from the register. On the same street, break the shop window of the unmarked furniture store and examine the postcard.
Document [45/85] – Apartment Note
Resource Crate [4/7]. Return to the phone booth and enter the house to its left. On the first floor, examine the document on the dresser in the living room and open the crate in the kitchen.
Strange Postcard [12/15]. In the same house, go up to the second floor and enter the farthest left room. You’ll find the postcard in the dresser.
CRTV Signal [11/18]. Go to the staff parking lot. In the bottom-left corner of the area there are opening doors. As soon as you step into the passage, you will hear a click. Use the CRTV.
Clues [46–47/85] – Lost and Found Locker / Employee Lockers
Phone Number [12/13] – 496 0993. In the employee locker room, check email. Examine the barcode next to the scanner. You’ll see a phone number in the top-left corner. Use the phone in the adjacent room.
Document [48/85] – Manager’s Note. Open the desk drawer opposite the lost-and-found locker.
Clues [49–50/85] – Game Log / Piston Compressor
CRTV Signal [12/18]. After taking the keys from the lost-and-found locker, return to the phone booth. From there, go up the stairs to South Bray and open house No. 5. On the first floor, interact with the radio. In the bedroom upstairs, examine the magazine.
Next you will solve the floppy disk puzzle. This will print the document with the code for the box.
CRTV Signal [13/18]. Return to the employee locker room. Break open the locker and take the bolt cutters. Then use the CRTV.
Clues [51–52/85] – Game Log / Piston Compressor. Leave the locker room and go to the left corner of the area opposite. Go up the stairs, break open the gate, and enter North Bray No. 6 through the back door. On the second floor, examine the document on the chair.
Strange Postcard [13/15]. In the staff parking lot, go up the stairs and open the gate. Cross to Upper Bray. At the dead end in the eastern part, near the dumpster, you’ll find the postcard.
Chapter 10: Continuation
Strange Postcard [14/15]
Clues [53–56/85] – Today’s Code, Before and After / Current Date. In house No. 5 on Upper Bray, go up to the second floor and examine the note on the table next to the record player. Find the “yesterday” cassette in the next room.
Insert the “yesterday” cassette and play it. Go down to the first floor and examine the note on the dining table. Find the “tomorrow” cassette.
Insert the “tomorrow” cassette and play it. Find the note in the living room and the “do not listen” cassette.
Insert the “do not listen” cassette and play it. Take the back door keys from the kitchen. Go back and put in the “tomorrow” cassette. Go down and open the door to the backyard. In one of the storerooms, crawl under the boards and take the postcard.
Go back and insert the “today” cassette, go out to the yard and take the floppy disk from the storeroom. Now play the “yesterday” cassette and use the computer to get the clue.
CRTV Signal [14/18]. After solving the cassette puzzle, use the CRTV.
Resource Crate [5/7]. Before returning to the employee locker room, visit the post office again. Exit through the back and cut the gate with the bolt cutters. Now you can enter the laundromat and take the safe key.
In the lost-and-found room, open the box.
CRTV Signal [15/18]. After you open every locker and assemble the mechanism, use the CRTV.
Chapter 11: Inside the CEG Office
Document [57/85] – Survey Preparation Notice. Inside the CEG building, behind the reception desk, examine the document and pick up the map.
Clues [58–59/85] – Box Names and IDs / Code Table. Behind the podium in the conference room, examine the document, then go into the room opposite and pull a sheet of paper from the waste bin.
Clues [60–63/85] – Employee File / Completed Code Table + 2 Emails
CRTV Signal [16/18]. In the room where you found the code piece, examine the wall board to find the hint for the security door password. In the security room, pick up another code piece from the bucket and combine them in your inventory. Check email and interact with the radio.
After that, return to the conference room and open box No. 36 to get the employee file.
Chapter 12: Getting Inside
Document [64/85] – Construction Halt Notice. In the area with the construction elevator, enter the single-story building and examine the document on the table in one of the rooms.
Document [65–66/85] – Booth Note / Memorandum. Lift the garage door of the two-story building. To the right of the entrance, examine the document on the table, then another one on the second floor.
Document [67–68/85] – Tech Department Letters. After starting the generator outside, go back into the single-story building and check email on the computer.
Chapter 13: Another Try
Editor Warning: For Completely Missed the Point, you must neutralize 30 “Widows”. These special enemies appear only in this chapter. You’ll encounter slightly more than 30 across this segment, so you’ll need to kill most of them. This achievement is cumulative, so you can finish it in New Game+ if needed.
Document [69/85] – Meeting Minutes. After infiltrating the building, go up to the 3rd floor. In the room opposite the stairs in the eastern part of the floor, pick up the document.
Document [70–71/85] – Engineer Statement / Evening News. Once you have the Level 3/4 key card, go down to the 3rd floor. Unlock the western part of the floor. Enter the PR department. In the room with the phone, check email on the computer.
Document [72/85] – PR Meeting Note. In the room opposite the previous one, check the shelf.
Clue [73/85] – Richard’s Note. In the bottom-right room of the PR department, examine the note near Richard’s body.
Clue [74/85] – Payroll Sheet. From the PR department on the 3rd floor, go up to the 4th floor to the Media department. In the western room, take the warehouse key. In the warehouse, pick up the document from the cabinet with the projector lamp
More Guides:
... content here ...
... more content ...


