This guide will walk you through each page of the MARINCA to help you find the fishes that you’re missing. It also goes over special conditions for catching certain fish, and explains how to get ⭐⭐⭐ quality fish.
To use this guide, start by jumping to the section of the MARINCA that you’re looking to complete. It may also be helpful to read the “Completionist Basics” section if you’re a new player.
This guide contains minor unmarked spoilers such as boss names/looks and pictures of fish from late-game areas.
Completionist Basics
It is impossible to be a true completionist without first beating the game (as some fish are endgame). If you’re having trouble finding a fish, wait until you beat the game as some fish do not start spawning until after certain events.
Not all fish spawn in every dive. Be patient. It may take many dives before you catch certain fish.
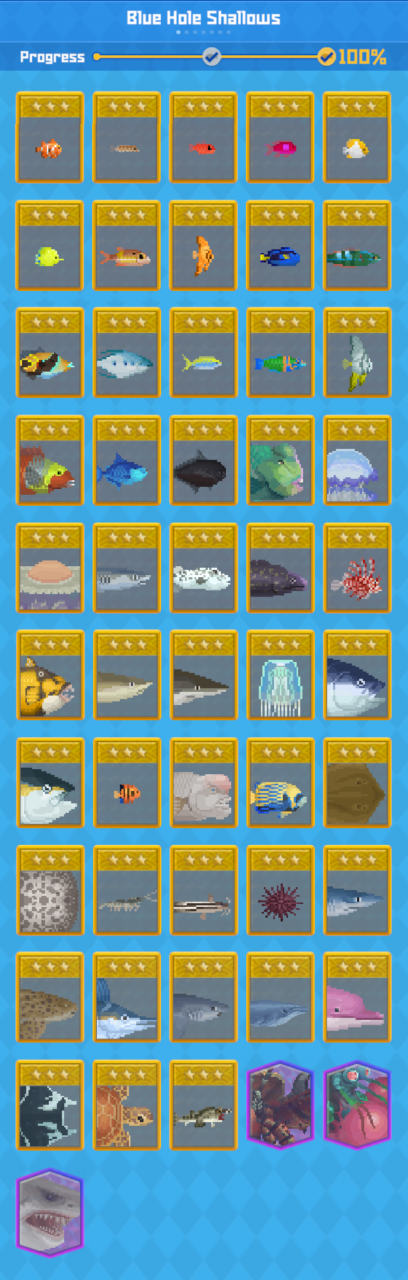
[Area] Blue Hole Shallows
Overall, most Shallows fish are straightforward to catch. Often the hardest part of catching these fish is their small size (can be hard to see) and the number of fish in the shallows. Many fish will not spawn in all dives, and may require you to check multiple times for the fish (some fish took
me nearly 10 dives to find). Some fish also require raining weather to spawn.
Because this area is so expansive, this can be the hardest section to complete.
To get ⭐⭐⭐ quality fish, you must first tranquilize the fish or catch it in a net.
Find the location of your missing fish in the image, and then scroll down to the table below for names/notes.
⬆️ – Large: Large fish must be killed before you can cut their meat off of them. To three star these fish, you need to tranquilize them or catch them in a steal net, and then recover them with the Recovery Drone (see appendix for more information).
🔍 – Hidden: These fish are hiding in the ground! You’ll need to approach these fish for them to appear (you will a red “enemy” mark where these fish are hiding when close enough).
📅 – Event: These fish will not start appearing until after an event takes place. Just continue playing through the game and the events will happen eventually.
📷 – Photo: Instead of catching these fish, you must take a photo of them. Photo fish are always three star.
👑 – Boss: To get these cards, you must defeat a boss.
☀️🌑🌓 – Day/Night/Both: Indicates when the fish can be caught (see “Completionist Basics” section for more information)
⭐ – Special: See below for notes on these cards!
Purple Sea Urchin: You must obtain gloves (in the normal story) before you can catch this fish.
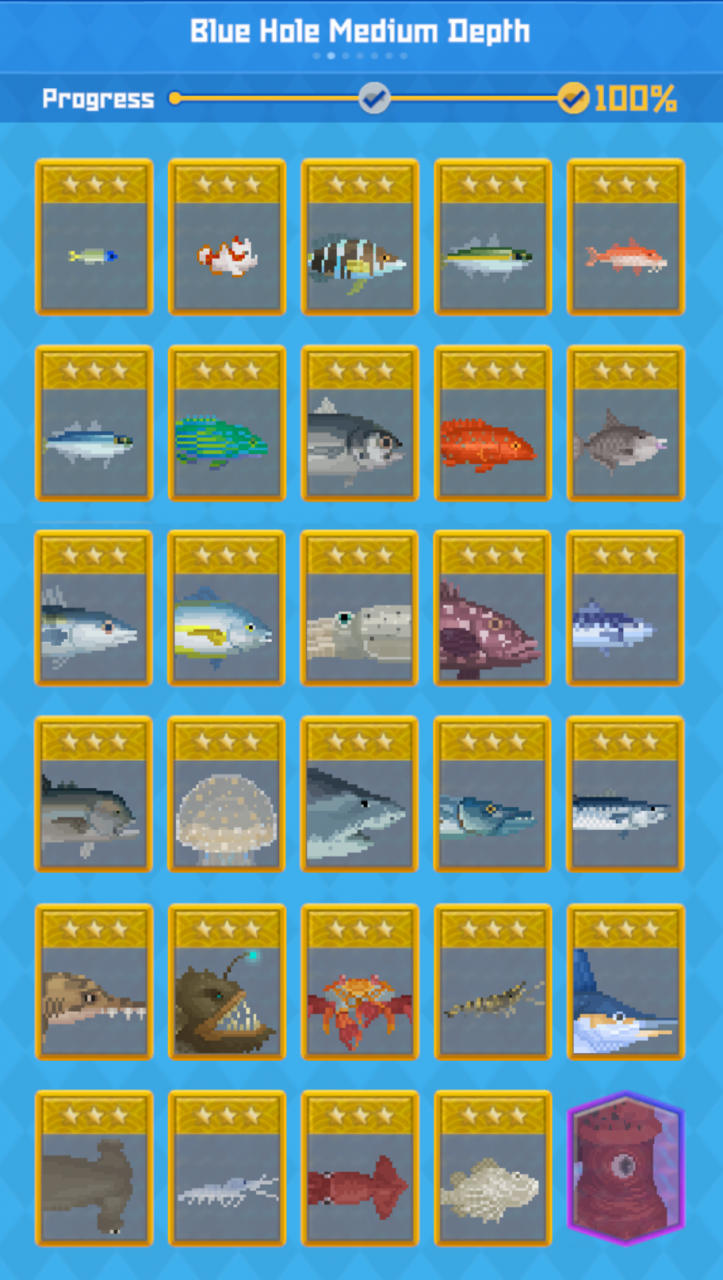
[Area] Blue Hole Medium Depth
Overall, the Blue Hole Medium Depth is a area full of new challenges with significant biodiversity. It’s one of the harder areas to complete and adds some new challenges (e.g., Sally Lightfoot Crab) to your completionist quest.
To get ⭐⭐⭐ quality fish, you must first tranquilize the fish or catch it in a net.
Find the location of your missing fish in the image, and then scroll down to the table below for names/notes.
⬆️ – Large: Large fish must be killed before you can cut their meat off of them. To three star these fish, you need to tranquilize them or catch them in a steal net, and then recover them with the Recovery Drone (see appendix for more information).
❓ – Large-like: While these fish aren’t the same as large fish and have some nuances, catching them with maximum quality must be done in the same way as catching large fish (with steel nets only — no tranquilizing). Otherwise, drop a rock on these fish for one star quality.
🔍 – Hidden: These fish are hiding in the ground! You’ll need to approach these fish for them to appear (you will a red “enemy” mark where these fish are hiding when close enough).
📅 – Event: These fish will not start appearing until after an event takes place. Just continue playing through the game and the events will happen eventually.
⚓ – Shipwreck: These fish are located inside the Shipwreck (which is unlocked during normal gameplay).
🍇 – Stalactite Cave: These fish are located inside the Stalactite Cave (where the strong currents are).
👑 – Boss: To get these cards, you must defeat a boss.
☀️🌑🌓 – Day/Night/Both: Indicates when the fish can be caught (see “Completionist Basics” section for more information)
[Area] Blue Hole Depths
Overall, the Blue Hole Depths tends to be one of the easiest areas to complete due to the lacking biodiversity in this area. By the time you get this deep, you should also have a basic understanding of the game’s mechanics and some useful guns for catching fish!
This section does not include a “☀️🌑🌓” annotation because this area cannot be accessed at night. All fish are daytime fish.
To get ⭐⭐⭐ quality fish, you must first tranquilize the fish or catch it in a net.
Find the location of your missing fish in the image, and then scroll down to the table below for names/notes.

⬆️ – Large: Large fish must be killed before you can cut their meat off of them. To three star these fish, you need to tranquilize them or catch them in a steal net, and then recover them with the Recovery Drone (see appendix for more information).
❓ – Large-like: While these fish aren’t the same as large fish and have some nuances, catching them with maximum quality must be done in the same way as catching large fish. Otherwise, drop a rock on these fish for one star quality.
📷 – Photo: Instead of catching these fish, you must take a photo of them. Photo fish are always three star.
👑 – Boss: To get these cards, you must defeat a boss.
⭐ – Special: See below for notes on these cards!
Blood-belly Comb Jellyfish: These fish can be particularly hard to catch because they often blow up before you get them! My favorite way to catch these is hitting them with a Tranquilizer Rifle (which has a chance to instantly tranquilize them). Once they’re knocked out, you can easily pick them up — maximum quality!
[Area] Glacier Passage
Overall, this is the easiest area to complete because there are very few fish in the Glacier Passage. If you don’t complete this page when you’re in the area for the story missions, come back to the Glacier Passage and swim down through each level of the passage. You should pass every fish (though there is only one Pelican Eel per dive).
This section does not include a “☀️🌑🌓” annotation because this area cannot be accessed at night. All fish are daytime fish.
To get ⭐⭐⭐ quality fish, you must first tranquilize the fish or catch it in a net.
Find the location of your missing fish in the image, and then scroll down to the table below for names/notes.
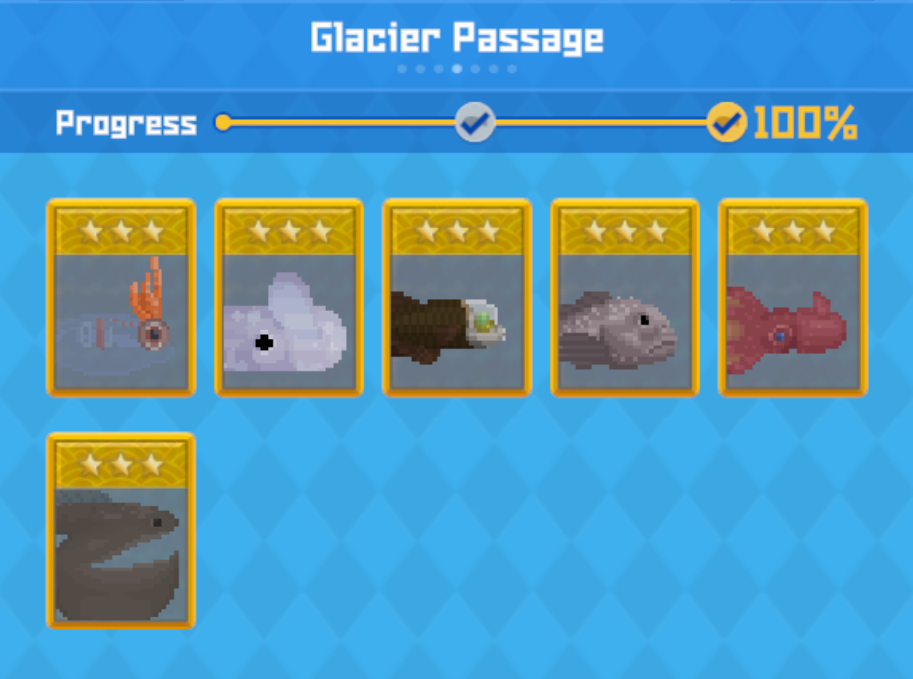
Nothing to see here! This area is pretty straightforward.
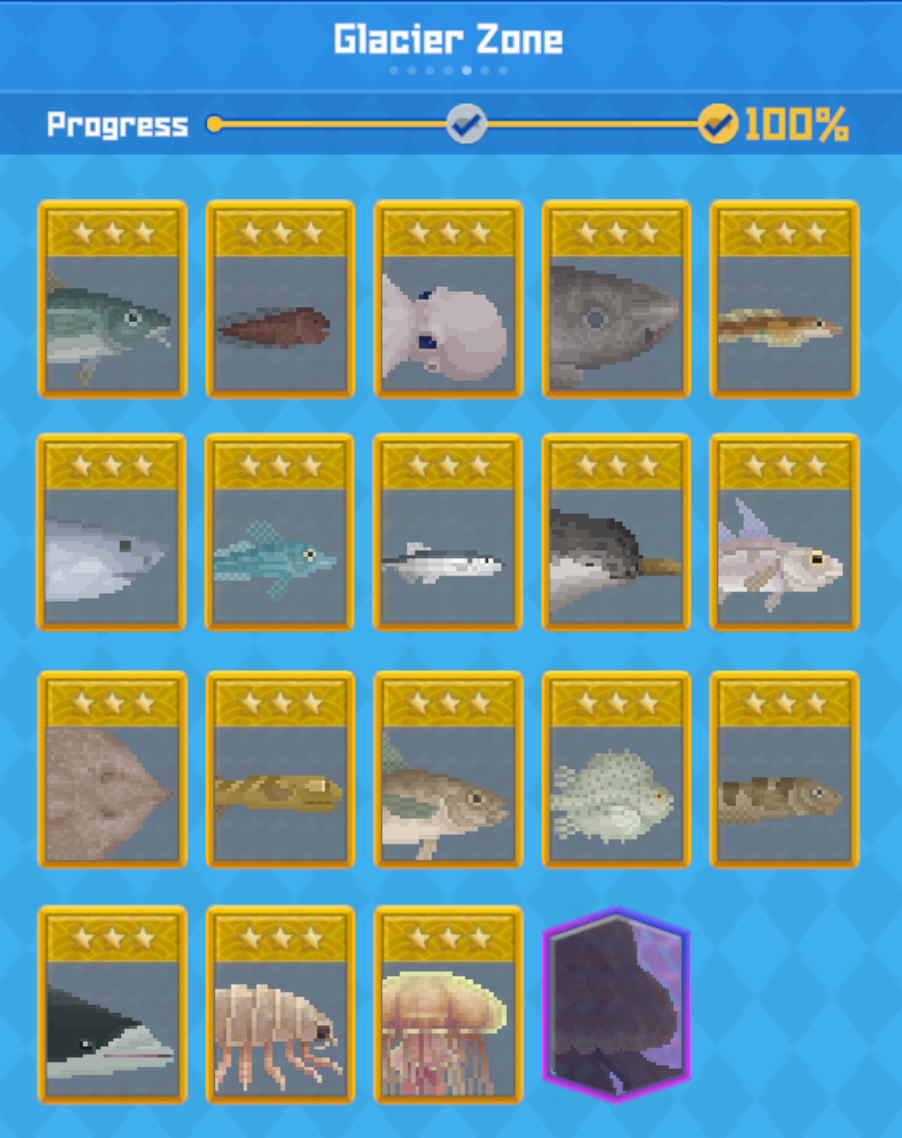
[Area] Glacier Zone
Overall, the Glacier Zone is pretty easy to navigate and complete. The main challenge in this zone is that many of the fish are extremely tanky, so I prefer tranquilizing them with a Tranquilizer Rifle instead of catching them with the harpoon.
Some of these fish only spawn in the Glacial Caves (which you will access during the story). The second Glacial Cave does not have any unique fish in it because it can only be accessed once.
This section does not include a “☀️🌑🌓” annotation because this area cannot be accessed at night. All fish are daytime fish.
To get ⭐⭐⭐ quality fish, you must first tranquilize the fish or catch it in a net.
Find the location of your missing fish in the image, and then scroll down to the table below for names/notes.
⬆️ – Large: Large fish must be killed before you can cut their meat off of them. To three star these fish, you need to tranquilize them or catch them in a steal net, and then recover them with the Recovery Drone (see appendix for more information).
1️⃣ – First Glacial Cave: This fish only spawns in the First Glacial Cave (accessed regularly during the story).
2️⃣ – Second Glacial Cave: This fish will be accessed when you enter the Second Glacial Cave in the story mission. Play through the story to obtain it.
3️⃣ – Third Glacial Cave: This fish only spawns in the Third Glacial Cave(accessed regularly during the story).
🔍 – Hidden: These fish are hiding in the ground! You’ll need to approach these fish for them to appear (you will a red “enemy” mark where these fish are hiding when close enough).
📷 – Photo: Instead of catching these fish, you must take a photo of them. Photo fish are always three star.
👑 – Boss: To get these cards, you must defeat a boss.
[Area] Hydrothermal Vents
Overall, the Hydrothermal Vents area is an easy area to complete because it is so small. You must beat the game to unlock all fish in this section (as the final boss is one of the boss cards).
To get ⭐⭐⭐ quality fish, you must first tranquilize the fish or catch it in a net.
Find the location of your missing fish in the image, and then scroll down to the table below for names/notes.
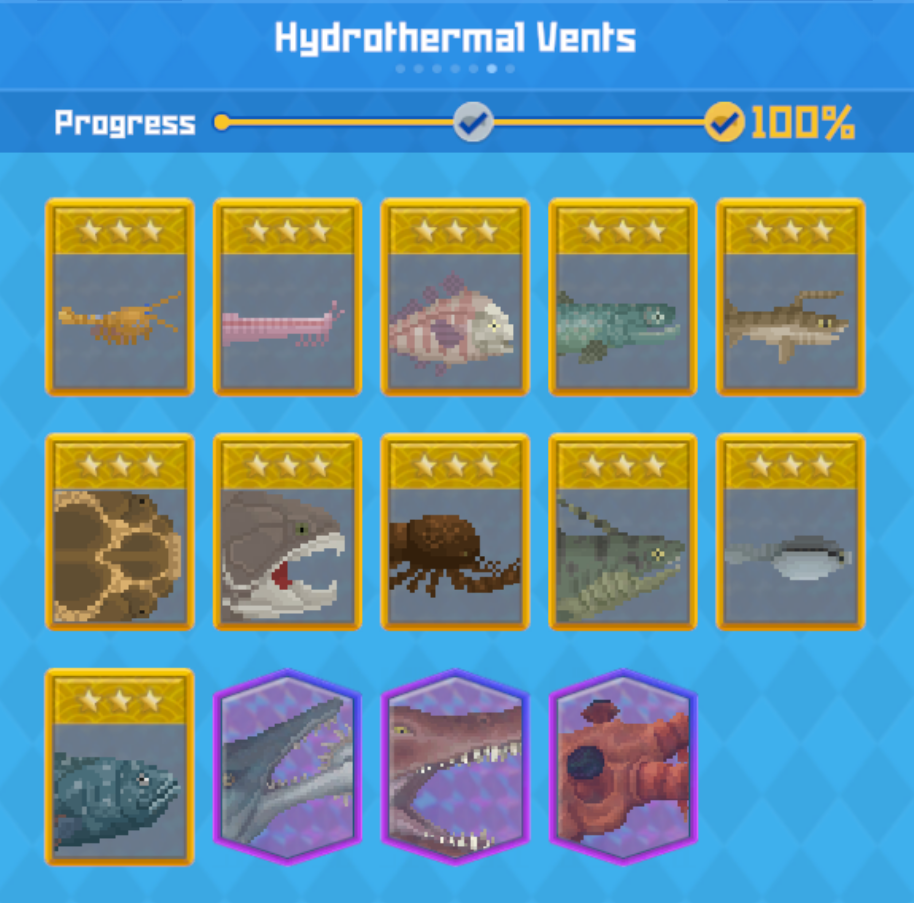
⬆️ – Large: Large fish must be killed before you can cut their meat off of them. To three star these fish, you need to tranquilize them or catch them in a steal net, and then recover them with the Recovery Drone (see appendix for more information).
🚩 – Divine Tree Control Room: These fish are located in the Divine Tree Control Room (which can be accessed at the very end of the game).
🔍 – Hidden: These fish are hiding in the ground! You’ll need to approach these fish for them to appear (you will a red “enemy” mark where these fish are hiding when close enough).
📷 – Photo: Instead of catching these fish, you must take a photo of them. Photo fish are always three star.
👑 – Boss: To get these cards, you must defeat a boss.
[Appendix] Seahorse
This isn’t really a seahorse guide because it’s pretty hard to use words (or even images) to explain where seahorses are. However, I will include a standard list of seahorses so you can see what they look like and can keep an eye out for them. Consult your MARINCA for information on what depth to search for the seahorses at.
All seahorses only spawn during the day.
If you would like a seahorse guide, let me know in the comments and I’ll consider making one. I can also try to help you in the comments if you’re looking for a specific seahorse.
Seahorses are always ⭐⭐⭐ quality.
Find the location of your missing seahorse in the image, and then scroll down to the table below for names/notes.
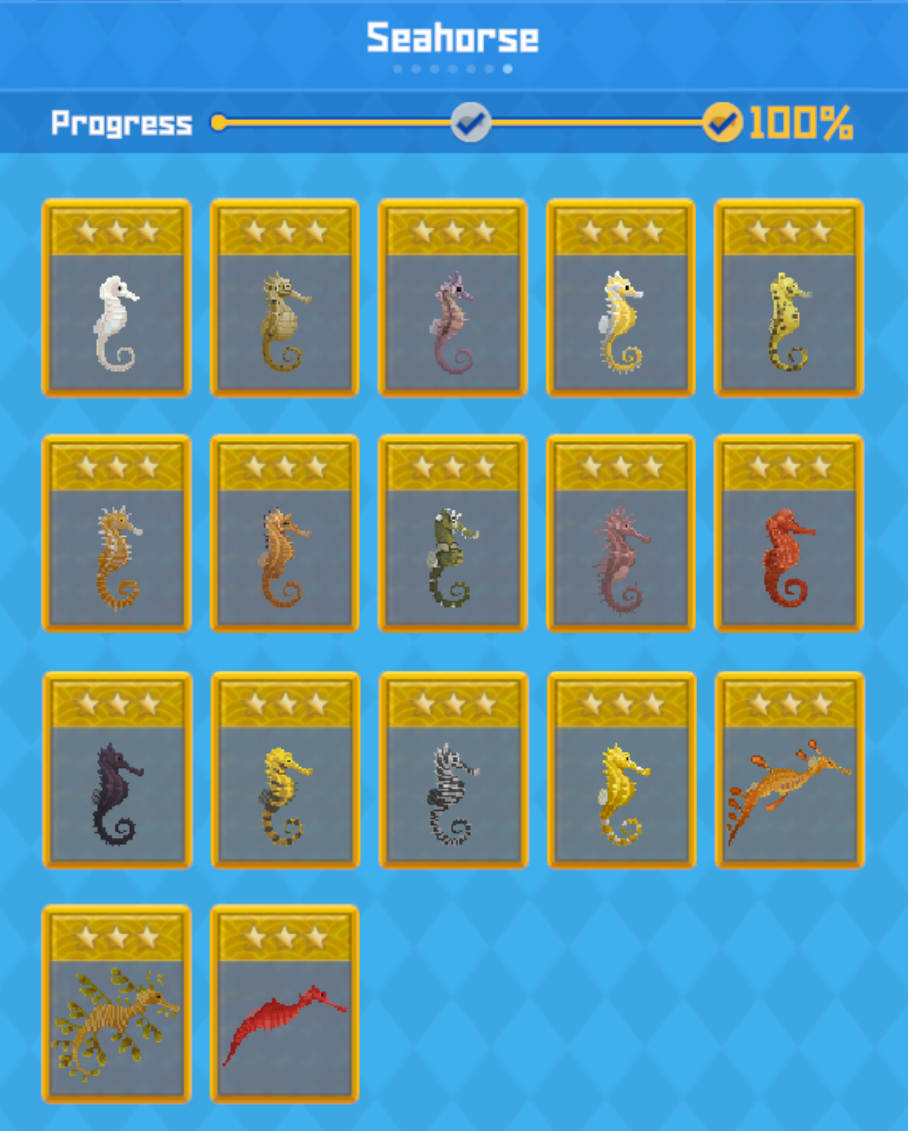
No notes for this section!
[Appendix] GYAO!
- During regular gameplay, you will unlock the GYAO! app on the phone. This also will add a new MARINCA page.
- Each GYAO! animal will live for 10 years (10 in-game days). If you take care of them, you will unlock the entry in MARINCA
[Appendix] Large Fish – ⭐⭐⭐Quality
To catch maximum (⭐⭐⭐) quality fish, you must first have unlocked the Salvage Drone (in the normal story). If you haven’t gotten to this point yet, you’ll get need to wait and can catch ⭐⭐ fish in the meantime.
I also highly suggest upgrading the Salvage Drone to the maximum tier. It’s worth every penny.
The hard part about catching maximum quality large fish is that you can’t tranquilize them with the Hush Dart, nor can you catch them in a regular net.
- (My favorite early-game option) Upgrade an Underwater Rifle into a Tranquilizer Rifle. When you shoot fish with this, there will be a 40% chance of it tranquilizing the fish. Once tranquilized with this method, you can use the Salvage Drone on the fish.
- Cobra randomly sells a Steel Net Sensor Trap (after the Tuna event occurs in normal gameplay). This can be used to catch large fish in a net. Once caught, they can be recovered with the Salvage Drone.
- A few end-game guns (i.e., Modified Hush Dart and Steel Net Gun) can tranquilize/net large fish. Once you tranquilize/net the fish, simply use a Salvage Drone on it! This is the easiest way, if you’ve unlocked those guns.
More Guides:
- DAVE THE DIVER: How To Find/Get The Runaway Seahorses
- DAVE THE DIVER: Blue Hole Depths Map (Items and Seahorse)