Guide to all solutions in Stratford Tower, including how to unlock the “When a Plan Comes Together” achievement.
Lobby
- Her name (shirt tag)
- Daughter’s name (photo on desk)
- Receiving calls (smart watch on wrist)
- Location of car (parking pass on deck)
- Address (water service notice on desk)
After Markus analyzes those, he will call her and have the following 3 options:
- Pose as fireman
- Pose as daughter’s teacher
- Pose as parking attendant
What you choose does not matter, as all of them will work the same, getting the supervisor to leave work, and leaving the android receptionist unattended. Speak with her to move past the security checkpoint and enter the elevator.
47th Floor
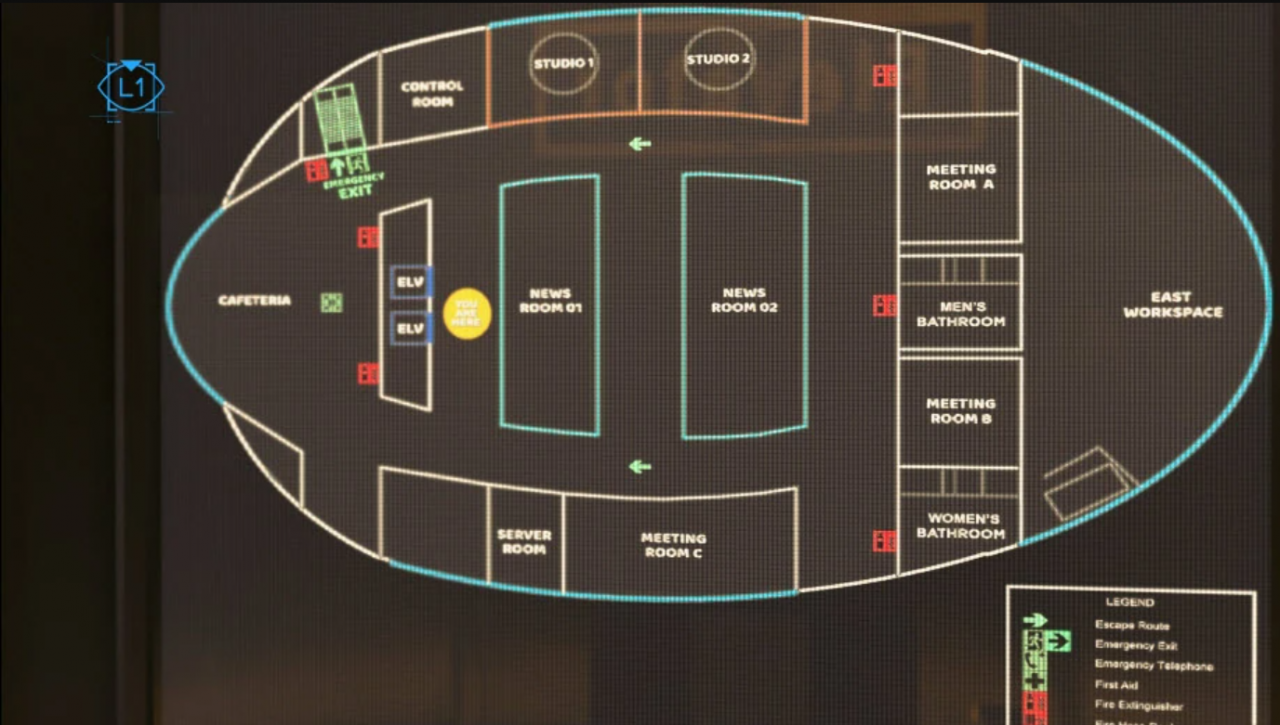 Available on this floor:
- Magazine 06/38 in cafeteria area
When Markus exits the elevator, head towards the Men’s Restroom on the far side of the floor. Inside the restroom in the farthest stall will be a change of clothes in the ceiling. Change clothes and then exit the restroom.
Once outside, the objective of acquiring a maintenance badge will appear. Head into News Room 02 and convert the android inside to obtain his badge, and the camera will show you the maintenance cart you will need to steal. Take the cart and head the to “Emergency Exit” stairwell that’s back near the cafeteria (this is a great time to pick up the magazine in the cafeteria if you need it).
Once you open the stairwell door, North will take control of the maintenance cart and maneuver it toward the Server Room. The team will discover the Server Room is blocked by security guards, and Markus will need to cause a distraction to get in. Markus has the following options:
- Hack robot cleaning the floor
- Hack drink dispenser in cafeteria
Once that is complete, North and Markus will enter the Server Room. North commands Markus to lock the door, but Markus has two options:
- Lock the door (go towards the door and follow prompts)
- Forget to lock the door (grab the bag and head towards the window, follow prompts until cutscene)
NOTE: Failing to lock the door will prevent the “When A Plan Comes Together” achievement from unlocking.
Forget to lock the door
If Markus forgets to lock the door an employee will enter and discover North and Markus. Markus has three options:
- Alibi (decrease North relationship)
- Gain Time (decrease North relationship)
- Draw Gun
The rest of this scene will play out similarly to if Markus had locked the door.
Either way, Markus will need to bring the bag to the window, follow prompts to cut open the window, and scale the side of the building.
Top Floor – Access Corridor
- Assault the guards (increase North, decrease Josh)
- Ruse the guards (decrease North, increase Josh)
NOTE: Choosing to assault the guards will prevent the “When A Plan Comes Together” achievement from unlocking.
Assault the Guards
If Markus chose to assault the guards, you will immediately have the following option:
- Don’t draw gun (Simon is shot – decrease Jericho, decrease Simon)
- Draw gun
If Markus drew his gun, you will have 3 options available:
- Shoot guard on the phone (Simon is shot – decrease Jericho, decrease Simon)
- Shoot guard with gun (increase Jericho)
- Don’t shoot (Simon is shot – decrease Jericho, decrease Simon)
No matter what happens in the “Assault the Guards” scenario, the team will go through the door, and prepare to enter the broadcast room.
Ruse the Guards
If Markus chose to ruse the guards, approach the guards to be met with the following choice:
- Don’t Draw Gun (Simon is shot – decrease Jericho, decrease Simon)
- Draw Gun (increase Jericho)
NOTE: If Markus does not draw his gun while attempting to ruse the guards it will prevent the “When A Plan Comes Together” achievement from unlocking.
No matter what happens in the “Ruse the Guards” scenario, the team will go through the door, and prepare to enter the broadcast room.
Broadcast Room
- Shoot Operator (increase North, decrease Josh)
- Don’t Shoot Operator (decrease North, increase Josh)
NOTE: If Markus doesn’t shoot the broadcast operator, it will prevent the “When A Plan Comes Together” achievement from unlocking.
Once you regain control of Markus, you can now walk into the center of the room to begin the speech. (increase Jericho, increase North)
The first two options will be:
- Calm
- Determined
The following list will appear for two choices:
- Recognition
- End of Slavery
- Equal Rights
- Freedom of Speech
The following list will appear for two choices:
- Justice
- Segregation
- Work
- Civil Rights
The last options will be:
- Peaceful
- Determined
Based on your previous choices in this chapter, the following will happen:
- SWAT Team storms broadcast room (happens if Markus fails to lock the door of the server room, assaults or fails to ruse the guards, OR spares the human broadcast operator.)
- Leave broadcast room (happens if Markus locked the door in the server room, successfully ruses the guards, AND kills the escaping human broadcast operator.)
SWAT Team Storms Broadcast Room
This happens if security was alerted at any point listed above. Simon will be shot no matter what (decrease Jericho). Markus will have the following options:
- Leave Simon (decrease Jericho)
- Try to save Simon
If Markus attempts to save Simon, you will need to pass a QTE to successfully save him. If you fail the QTE, Simon will be left behind. If you pass the QTE, Markus will assist Simon up the stairs to the roof.
Leave Broadcast Room
This will happen if all threats to alert security were neutralized (as listed above). The team will leave the broadcast room and head to the roof together.
Roof
- Simon was injured, but Markus helped him to the roof
- Simon was left behind
- Team unharmed
If Simon is injured but alive
Simon will collapse on the rooftop, unable to parachute with the rest of the team. Markus will have two options:
- Kill Simon (increase North, decrease Josh)
- Leave Simon (decrease North, increase Josh, increase Simon)
If Markus spares Simon, he will give Simon his gun and Simon will crawl to a hiding spot while the rest of the group prepares to jump.
The team will jump no matter what at this point, regardless of whether Simon is injured, dead, or with the group. There are only two options left at this point:
- Markus makes it to the edge of the roof
- Markus gets shot before jumping
Impact of Choices on Public Opinion
- Human casualties (decrease public opinion)
- No human casualties (significant increase public opinion)
- Markus’ speech was “Determined” with human casualties (significant decrease public opinion)
- Markus’ speech was “Determined” without human casualties (decrease public opinion)
- Markus’ speech was “Peaceful” without human casualties (significant increase public opinion)
All Possible Endings
- The Group Escaped but Simon was Left Behind: Simon will be injured if a guard outside the broadcast room shoots him, or security is alerted and SWAT arrives. When Simon is injured, make sure to help Simon so that he makes it to the rooftop, and then choose to leave him.
- The Group Escaped: If security isn’t alerted at any point, the team will escape with all team members alive and unharmed. This ending is the only one that will unlock the “When a Plan Comes Together” achievement.
- The Group Escaped but Simon was Destroyed: Simon will be injured if a guard outside the broadcast room shoots him, or security is alerted at any time and SWAT arrives. When Simon is injured, make sure to either leave him behind in the broadcast room, fail to save him in the broadcast room, or help Simon so that he makes it to the rooftop and then choose to execute him.
Cross Chapter Impacts
The following is a list of all of the major impacts this chapter has on the storyline:
- Simon dies: If Simon dies in this chapter, the “Survivors” achievement will not unlock, as Simon is one of the required characters that must live until the end.
- Simon is injured and left behind: If Simon is left behind on the roof, it will open up the possibility of Simon dying in the next chapter, Public Enemy. This unlocks potentially two pieces of evidence for Connor to use to locate Jericho (Jericho tablet and Simon’s body). While Simon’s death is not required to get through “Last Chance, Connor”, his death is the only one that could potentially yield two critical pieces of evidence.
- Simon dies: If Simon dies in this chapter, John must have joined in Spare Parts, otherwise, Markus will die if he chooses to sacrifice himself in “Freedom March”.
- Simon dies: If Simon dies in this chapter, North must live to the end, or Markus chooses the demonstration or be shot less than 3 times during the revolution. If Markus is shot 3 times during the revolution without Simon or North, Markus will die.