
I’ve run both of these Blade Spirit setups through multiple playthroughs on Normal and Very Hard, and after a lot of trial and error I’ve landed on refinements that keep the energy engine running without dead turns. Below is exactly how I build them, including the mistakes I made so you don’t have to.
How Blade Spirit Actually Generates Energy
Blade Spirit is the passive this entire concept revolves around: every critical hit landed by a skill grants 1 Energy, and it has no cooldown whatsoever. The catch I ran into early on is that Basic Attack is labeled as a skill in the UI but does not trigger the passive — so don’t count on auto-attacks to fuel anything.
Sword skills are generally multi-hit and clearly balanced around this passive, which means most of them are either cost-mitigating or outright Energy neutral — Chain Slash is the textbook neutral example. The sleeper pick is Sweeping Cleave, the innate skill that ships with any Sword: it only costs 2 Energy yet can connect up to 6 times, which makes it genuinely Energy positive in practice. That said, I want to walk you through the two builds I’ve personally verified as consistently Energy positive, not just situationally.
Build 1: Sword Counter + Shield Tank
Sword Counter Tank
- Official Description / Core Objective: Sustain an infinite Energy loop by punishing every blocked hit with a counterattack that crits and refills Energy.
- Type / Difficulty Tags: Off-Meta Tank | Difficulty: ★4/5 | Stat-Intensive
- Prerequisites: Sword + Shield skill trees, Sword Counter, Guard Chance gear, Deserter background recommended
The heart of this build is how Sword Counter interacts with Blade Spirit. While the buff is active, every hit your character Guards (blocks) triggers a Counterattack that deals damage back to the attacker — and its properties are what make the whole thing work: it has no cooldown, it ignores your character’s attack speed, it counts as a Skill, and it can crit. The Sword Counter buff lasts 12 seconds (15 with the Elf Expedition Leader bonus) and costs a flat 4 Energy regardless of how many Counterattacks fired off. Both your damage and Energy generation scale with how hard your tank is getting beaten on — the more enemies hit you, the more Energy you print.
The core stats I prioritized are: Guard Chance > Crit Chance > Guard Damage Reduction. These are non-negotiable for the build to function and directly dictate your Background, Attribute, Inscription, and Accessory choices.
1. Background — Deserter
I always take Deserter. It gives a free 10% Crit Chance and unlocks all three skill trees I need: Sword, Shield, and Bow. The -20% Crit Damage penalty is irrelevant here — for this build, triggering crits matters far more than raw damage output.
2. Attributes
My main stats are CON and PER. I aim for an Exceptional (silver) talent in CON and at least an Outstanding (bronze) talent in PER — that combination is more than good enough. Avoid Poor (red) talents in your other stats, especially STR and WILL. On every level-up, roll until you get at least 6 in both CON and PER.
3. Inscriptions
Here’s the theoretical perfect setup — this is just to show you the ceiling, not a requirement:
- Elasticity > Guard Chance > Crit Chance > Guard Damage Reduction
A more realistic average roll looks like this:
- Guard Chance > Crit Chance / Magic Resistance > Guard Damage Reduction
The build only strictly needs raw stat Inscriptions to work, but try to roll at least Uncommon rarity. I highly recommend grabbing Elasticity if you can — it synergizes beautifully. You get a small heal each time you Guard, and more importantly it grants a buff providing 30% Damage Reduction, which is invaluable against magic damage since magic bypasses Guard entirely.
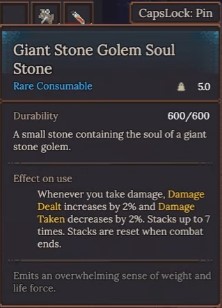
For the soul, Stone Golem is the best pick. It grants damage and damage reduction for each time you’ve been hit — a perfect match for a tank that’s getting pummeled.
4. Accessories
Accessories are tricky because all stats are split into three categories: Offense, Defense, and Utility. A single Ring or Amulet can only roll stats from one category at a time.
I recommend a Hit Chance + Crit Chance Ring, paired with either an Amulet featuring Crit Chance + Crit Damage/Physical Attack Power, or an Amulet with Guard Chance + Guard Damage Reduction/Magic Resistance/Maximum Health — the choice depends on which stats you’re currently lacking.
Editor Warning: Remember the caps. Guard Chance and Guard Damage Reduction both cap at 80%, Sword Counter already gives you 35% Guard Chance by default, and Crit Chance caps at 100%. Since PER also feeds your crit, use your Accessory slots purely to fill in whatever stat gap you have left.
5. Skills and Passives
You can open with either Sword Counter immediately or Shield Up for an additional 35% Guard Damage Reduction (bringing you to the cap) — but the latter means figuring out how to acquire a shield fast. On level 2, pick up whichever one you skipped. Skip level 3 to bank the point, then grab Guardian’s Taunt at level 4. Sword Counter is your main skill, but if you want to function as a useful tank you still need a reliable taunt. Treat Shield Up as a panic button for when Sword Counter is on cooldown.
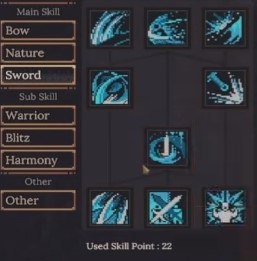
For passives, start with Sharpshooter so it begins stacking immediately. At level 2 take Shield Handling for an extra 10% Guard plus a reduced attack-speed penalty from shields. Levels 3 and 4 give you Swordsman’s Resolve and Blade Spirit — at this point the build is officially online. At level 5 you can swap to Bastion and Elastic Guard for even more survivability.
Editor Warning: This character struggles to accumulate Sharpshooter stacks on its own. I learned this the hard way — once you hit around level 3–4 and can comfortably clear the first Dungeon, pair your Tank with a Healer, drop the shield, and run just the first two floors with only those two characters for a while to rack up stacks. During this grind, don’t use Sword Counter — just beat enemies down with Basic Attacks.
Build 2: Greatsword Spin-To-Win DPS
Whirlwind Slash DPS
- Official Description / Core Objective: Turn a multi-hit AoE spin into a self-sustaining Energy engine by stacking crit, then convert the surplus into sustained damage output.
- Type / Difficulty Tags: AoE DPS | Difficulty: ★3/5 | Energy-Sustaining
- Prerequisites: Greatsword + Bow skill trees, Whirlwind Slash, Blade Spirit, high Crit Chance
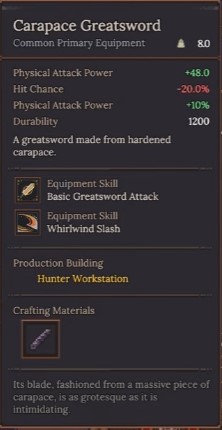
Whirlwind Slash is your main skill. It charges up to 5 tiles, and each tile moved — including the starting and ending tiles — performs a spin that damages everything in a 3×3 radius. It costs only 4 Energy and has a short 12-second base cooldown. Plowing through a large enemy group easily racks up a few dozen hits, which means a huge amount of free Energy.
Editor Warning:
Whirlwind Slash hits your own Allies too. I’ve wiped out my own squad more than once by spinning blindly in a tight corridor — always check your positioning before you charge in.
The core stats are: Crit Chance/Hit Chance > Cooldown Reduction > Crit Damage.
1. Background — Carter
Carter is the perfect pick because it has access to all three skill trees this build needs: Sword, Greatsword, and Bow. The only catch is that Carter is exclusive to Lycans. The alternative is Butcher, but you’ll need to burn an Inscription slot just to unlock the Bow passive tree and grab Sharpshooter — because a 42% crit chance is simply too efficient to pass up.
2. Attributes
Your core stats are STR and PER. CON and WILL are less critical but still nice to have. Avoid Poor (red) talents in any of them, and try to get an Exceptional (silver) in STR with Outstanding (bronze) in PER and CON. On level-ups, aim for 6 in STR and PER, and ideally CON as well.
3. Inscriptions
The theoretical perfect setup:
- Giant’s Inscription > Hit Chance > Crit Chance > Cooldown Reduction
A more average alternative:
- Hit Chance > Crit Chance > Crit Damage/Physical Attack Power
I highly recommend Giant’s Inscription — it’s a large damage buff that converts your Max HP into damage, and since armor gives you a ton of Max HP, the payoff is big. Again, it isn’t strictly required.
For your soul, take the Red Monster Rat Soul. It grants the Bloody Scratch skill. On its own that’s already a solid damage boost that costs 0 Energy, but with Blade Spirit it starts generating Energy on every use. Just leave it on Auto Cast.
Also worth flagging: the Blood-Soaked Fruit. It grants 10% Lifesteal at the cost of -20% Max Energy. Once your Crit Chance is very high and you’re generating a large amount of Energy, you can equip it to pick up some bonus sustain.
4. Accessories
Aim for Crit Chance + Crit Damage/Physical Attack Power. Cooldown Reduction is a Utility stat, so I don’t recommend patching it with accessories. Unlike other weapons, the Greatsword needs 20% Hit Chance (or 30% on Very Hard and above), which requires rolling Hit Chance on both your Amulet and Ring — and those accessories are already in high demand from your other characters.
An Uncommon Hit Chance inscription gives 20% Hit Chance, which is perfect. It’s far more efficient to cap the Greatsword’s Hit Chance via an Inscription and free up Accessory slots for better stats.
5. Skills and Passives
Honestly, you don’t need anything beyond the two core skills. You can take Slay, but I personally dislike how it applies Exposed Flaw to my own character, guaranteeing a critical hit against me. The starting Whirlwind Slash is already very strong and the Rat Soul gives you another excellent skill, so you won’t have spare slots anyway.
Passive order: start with Sharpshooter for stacking, then Fast Hand at level 2, Swordsman’s Resolve at level 3, Blade Spirit at level 4, and either First Assault or Sharp Edge at level 5 — whichever you prefer. One gives you a bigger alpha strike, the other provides a smaller buff that persists through combat.
Editor Warning: The Execution tree is genuinely awful here, and I advise skipping it entirely. Its bonuses only trigger when you kill enemies with this specific character, and they don’t last long enough to matter in real fights.


