Describing tips and tricks, general tactics you can use to survive longer and logic behind some better choises.
Short introduction
Since game is new and i am still learning, guide will be small and chaotic in the beggining. I will add some thoughts and observations over time. Refer to the last section (list of changes) to see what have been added.
Basic route
Routes — are big types of strategies used to play. They are incredibly different from each other, have unique rules, goals and gameplay feeling. In the beggining player has access only to basic route with simple rules.
Basic route goal
Make enemy path as long as possible and force them to revisit same place many times. We have three switches and one exit, enemies will always move to switch 1 > then 2 > then 3 > then exit. Since we do know how exactly they will move around, it is easy to counter it.
1) Make sure ‘switch 3’ is short distance away from ‘switch 1’. If they are too far – consider restarting run;
2) Make a line from bottom part of “exit” towards ‘switch 1’;
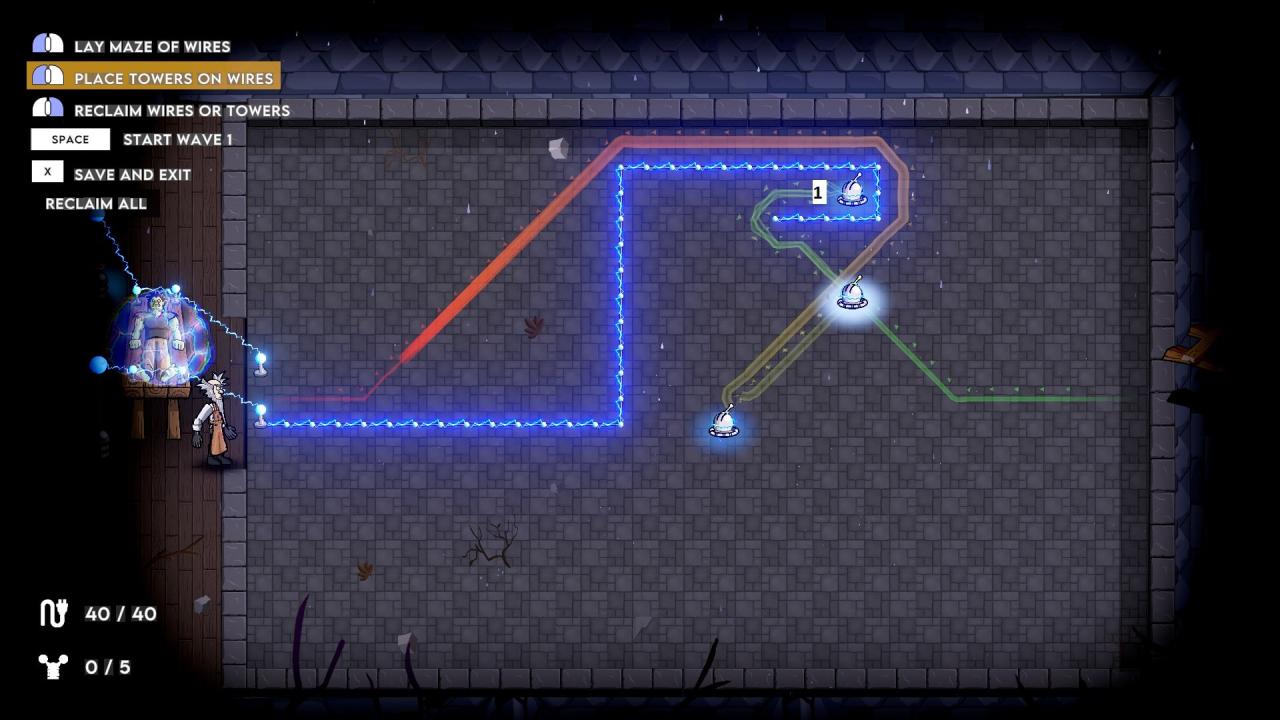
3) Make a back door from ‘switch 1’ to switch ‘3’ like in a picture;
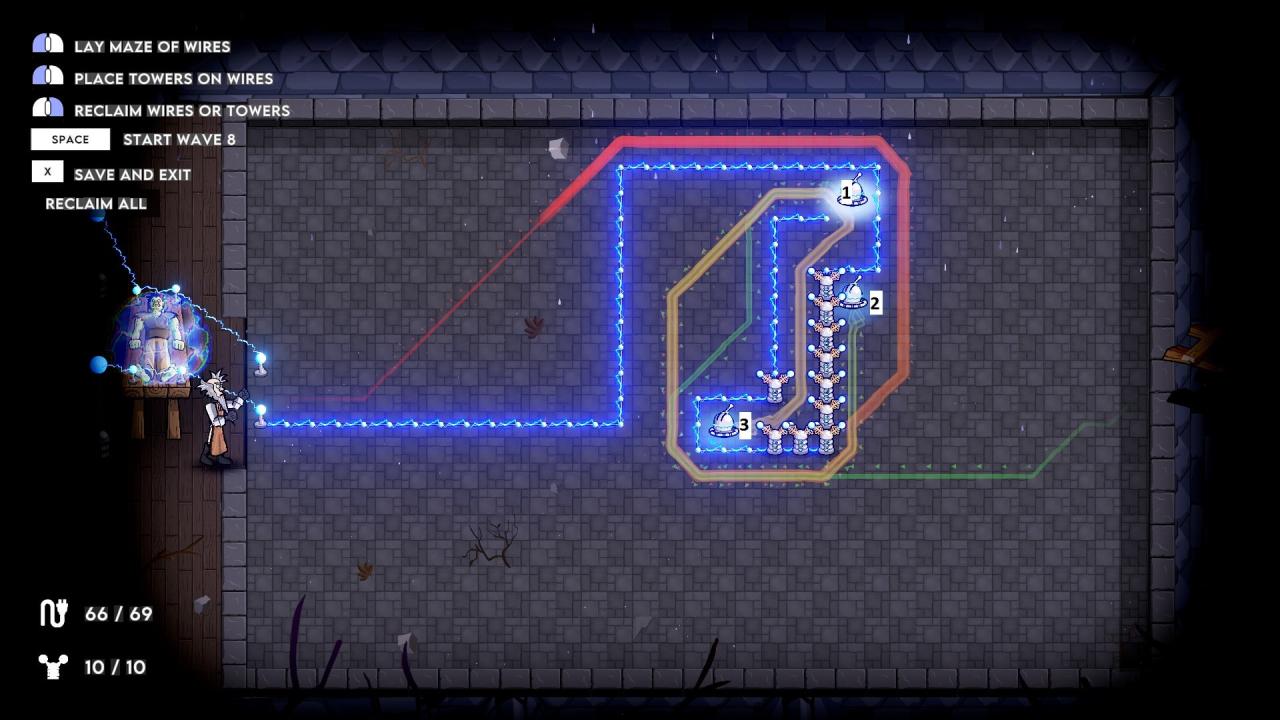
4) Now what we did there is very clever and sneaky. Enemies will move towards ‘switch 1’ using ‘path 1’. Then they will reach dead end and have to turn around and move using “path 1” for the SECOND time to get out from maze we created. They will head to ‘switch 2’ using outer space we don’t care about. Then they are forced to go ‘path 1’ for the THIRD time, cus guess what – that is the only way to reach ‘switch 3’ via small backdoor. Finally, after flipping last switch they have to move using ‘path 1’ for the FOURTH time towards the exit. You see what we did? Very evil.
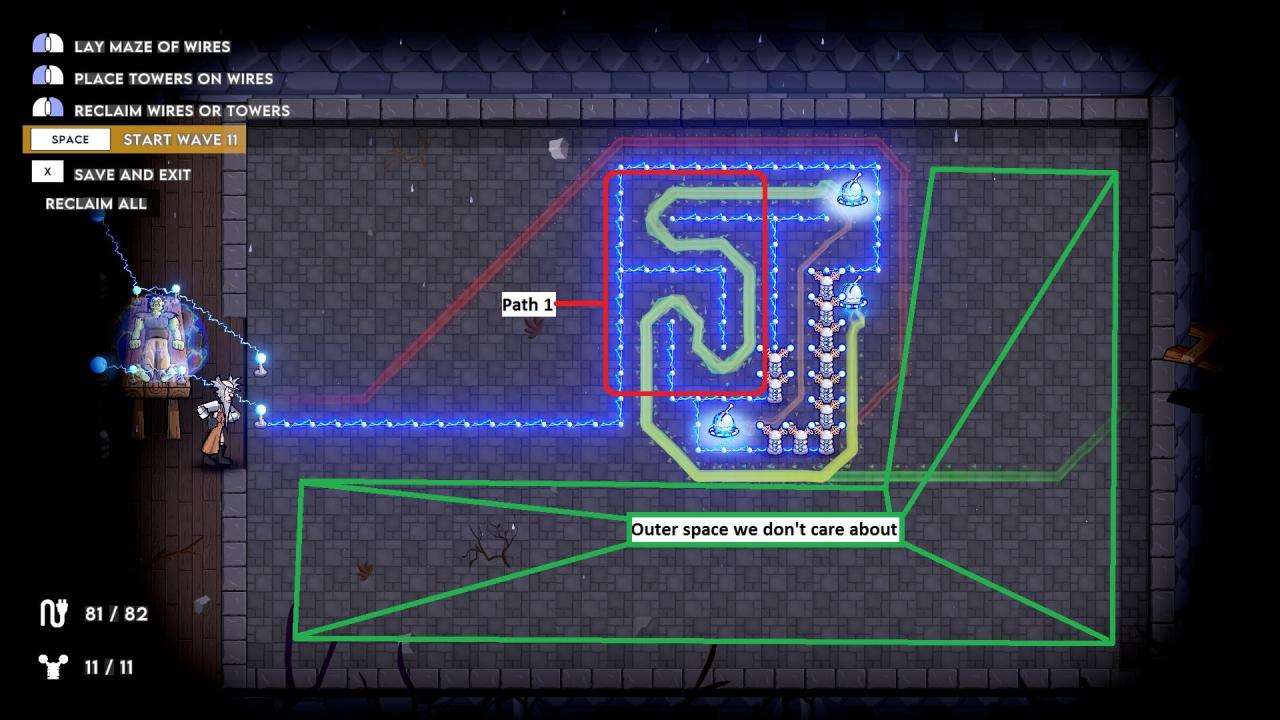
5) Every time game gives you choises, pick ‘2 Towers’ > then ‘1 Tower + xWires’ > then ‘xWires’. If you have just started playing or have less than 50 Salvage, it is good idea to pick Salvage before anything else, make it your priority. Salvage will be used later to unlock new Routes.
6) Now just increase size of ‘path 1’ as much as you can, since evey single tile inside of that area will be visited four times. I think there is no better place to increase overall path lenght. We can also call it “Kill Zone”, cus that is where all enemies gonna perish.
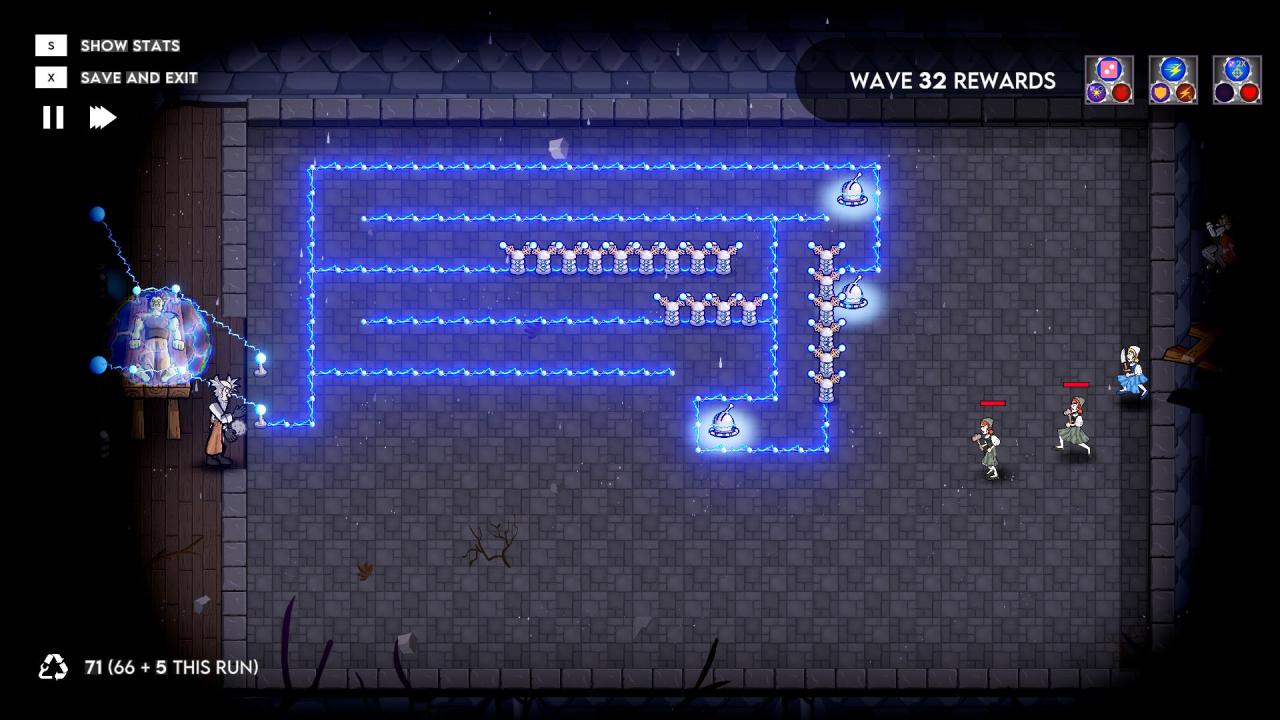
Now since you know how to build basic mazes and make them very annoying for mob, we need to take care of another important part — doodads. From the first glance you might think every doodad will make you stronger, but it’s actually the other way around. The more of them you pick, the weaker you become over time, since very slowly they will reduce your overall power and strenghten the mob. Take a look at this screenshot:
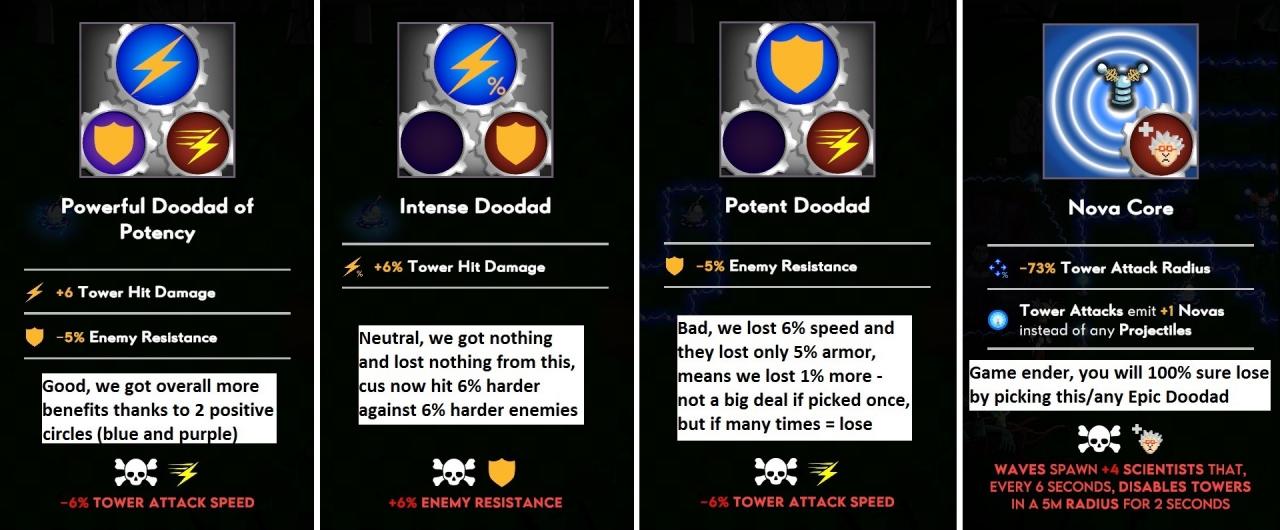
The first thing you should look at – if there are 2 good bonuses or just 1. Overall, having two good means much better chances to actually get a positive power change for yourself. Unfortunately, those are super rare. The next, you should always consider picking neutral ones to not harm yourself in long run. This is why i prefer picking Salvage, Towers or Wires — it won’t cause any problems.
As for Epic Doodads, they switch gameplay into completly different route. Doing this in the middle of run, where you already established a base, kill zone, backdoor and towers, will absolutely sure destroy you in 1-10 upcoming waves. You simply won’t have enough time to change strategy. Take that “Nova Core” doodad from picture as example, it reduces towers range (basic range is 6 tiles), so now their reach is only 1,62 tiles – they literally cannot hit anything that isn’t right in front of tower. On top of it, enemy will 100% sure get +4 scientists EACH WAVE which will shut down towers in range of 5 meters over and over again.
The only reasons to pick epic ones — if you ready to end the round and want to permanently unlock that doodad for later use from wave 1 (which will cost 50 Salvage). You can have maximum 3 of epics active at the same time when starting the game and their combination is what i actually call a “route”. We will talk about them later, since i haven’t yet farmed any.
T-section
The first thing you can do to optimise any straight-line labyrinth is use every possible tile to make path longer. On screen shot below you can see basic tactic i used for a long time. There are many T-sections which look ok and from the first glance nothing can be done about enemies moving diagonally.
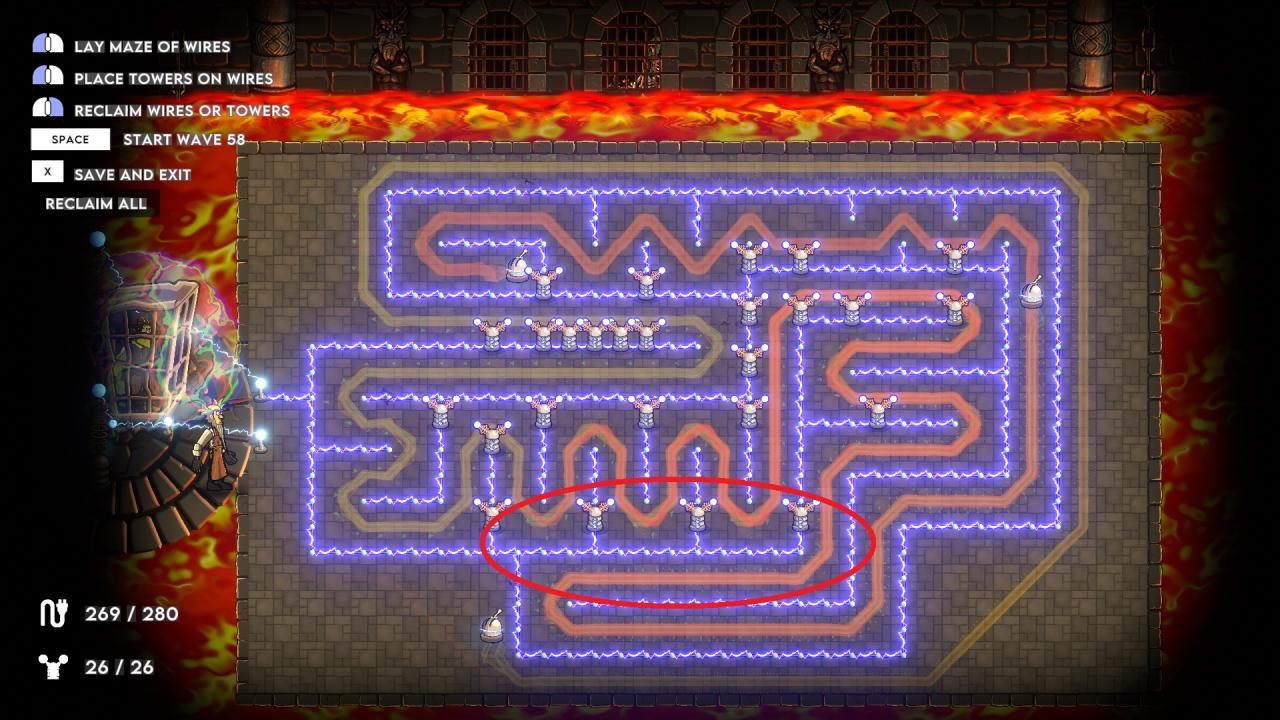
So the problem is – i have some extra wires and need to find a way to make path even longer. Just adding extra wires outside of tower attack range – useless. An idea poped up to use 2 extra wires to make a little gap inside T-section and force enemies go upwards 1 tile, then downwards 1 tile.
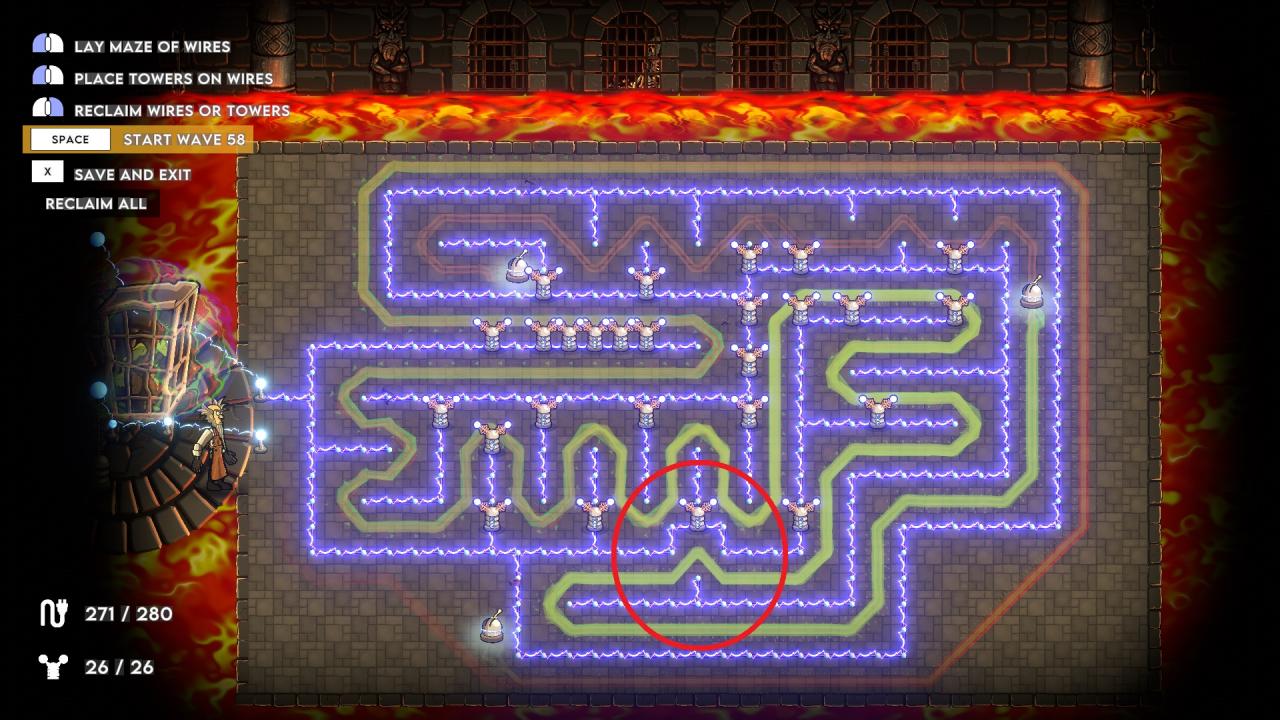
After observing whole maze i found quite a lot of such T-sections and changed them accordingly.
Zig-zag
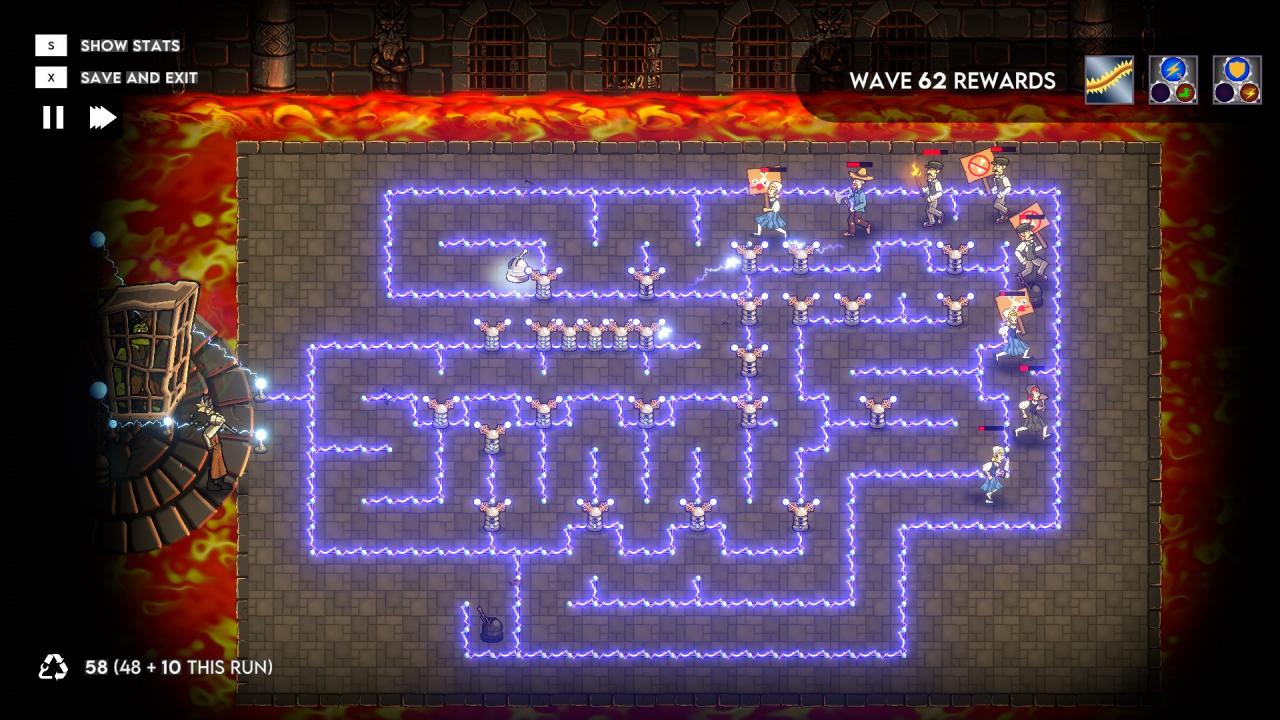
Unlike T-section, Zig-Zag tactic uses every possible square and cannot be optimised, but from other hand it will look the same every time you play, which is bad and leads to burnout (thats when you getting fed with game and uninstall it due to repetitiveness).
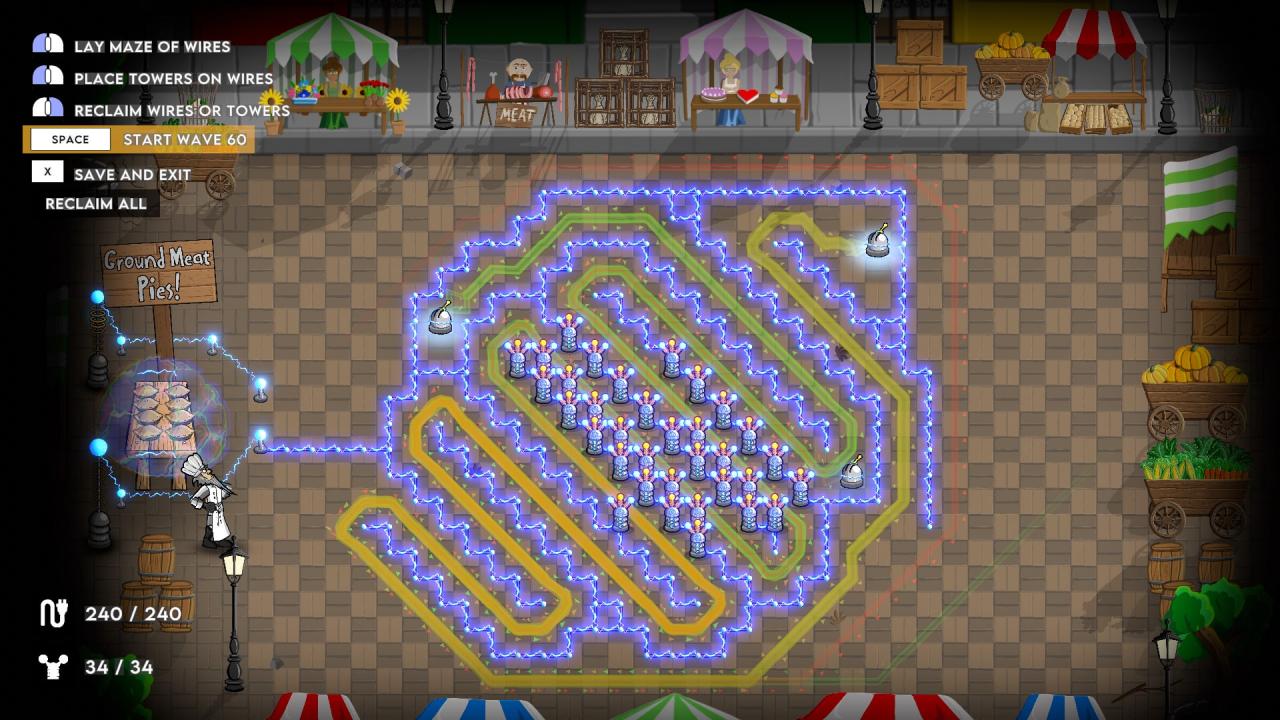
Since in Zig-Zag maze all towers are in the middle, make path to first Switch as long as possible and covering whole tower area (upper-left switch on screenshot). The best upgrades for this tactic are “+ Tower Range” bonuses, until their attack zone reaches borders of arena.
Effective tower is the one that shoots all the time without breaks.
Towers Grid
This is grid i made from playing several long runs, ending at wave 70-90. I was carefully writing ammount of towers reached, so you can figure out how many is posibble to have at any given moment. Also each time you choose Towers doodad, your overall power increases, cus more towers will shoot. And i decided to show % strenght increase every time another +2 Towers picked (sure sometimes you get only +1, but that’s not improtant, just split the % in two).
Well, first of all, even picking +1 Tower at wave 80+ will give you dmg boos for 2,56%. So you can compare that number to other doodads and figure which one is better to pick. Maybe there is some rare one that can improve overall stats by 4-6%, then you should pick it instead of +1 tower. If there is +2 towers one, it’s a +5,12% boost, i doubt you get better deal at that stage of playing, plus it always goes with extra wires.
Some players saying wires are useless, cus, apparently, they give 0% power increase. That is wrong! Imagine a big pile of crazy mob (15 of them) all having same stats and speed. They move ony one after another turning into some sort of snake. When snake reaches tower zone, it’s whole body will be there getting hit. When it goes into outer space, towers have no targets to shoot. That is where you start losing!!! If towers are not shooting, you lose precious attack power, which could be spent on shooting something.
Now imagine a different situation, where enemy mob consists from 15 creatures: 5 fast dogs, 5 medium peasants and 5 slow brutes. They all move at different speed forming three ‘snakes’ – fast, normal and slow one. When ‘fast snake’ enters kill zone, it gets damaged, then leaves kill zone and goes into outer space area without towers… At the same time, medium snake just reached kill zone for the first time and starts getting dmged. They flip ‘switch 1’ and also quit kill zone… Now slow brutes entered kill zone for the first time and started getting dmged. They are so slow that you will be able to kill both dogs and peasants way before dealing with brutes. This ways towers attacking NON-STOP and enemies getting damaged all the time.
Conclusion — by mixing enemies you was able to create 3 different enemy factions. Now the question is, what does it have to do with wires, right? Everything!!! If you simply put 200 wires in straight line inside outer space, dogs will have enough time to separate themself from everyone else and gonna lead the charge. Brutes are slow enough to pile up in the tale this way. Without wiring long roads you will not be able to force them into splitting and istead, dogs will hide among brutes and peasants, while finally reaching exit and ruining your experiment.
By LotusBlade

The best and easiest maze is to do this. Start with a map with all waypoints on the left 1/3 of screen. Assign the exit a number at the end of your series. Now construct a line where all the odd numbers are on one side of the line, and all the even on the other side. Build it as far to the right side of the screen as possible. If you look at the mob’s route now, you will see it will pass the end of this line between each waypoint. If you build an extensive maze using this point, the mobs will have to go through the heart of your power between every point.