This walkthrough was created by myself with Ver. 2.0.0, Hedonistic difficult. It’s just a simple walkthrough with no combat or boss tactics, at least most of the time. I hope this guide will help you find your way if you get stuck.
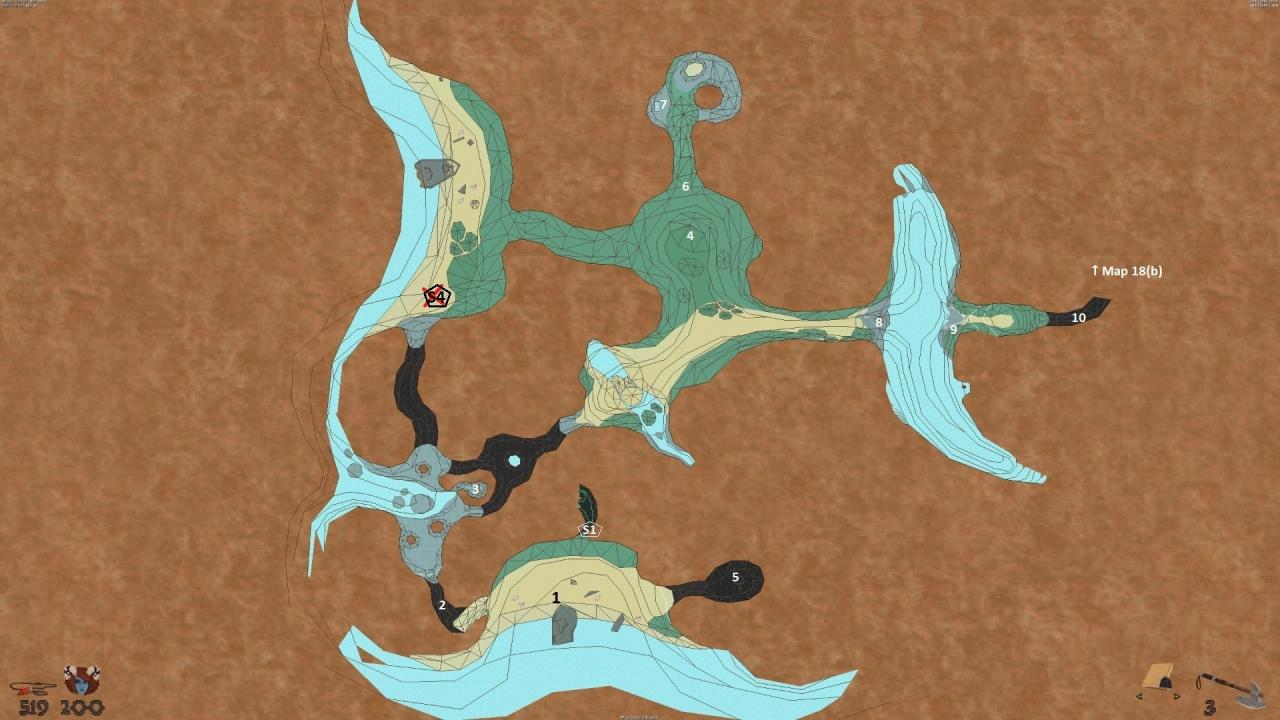
1. Start.
 2. Jump over the crates an move outside(2.1)
follow the cistern/Bridge to the end(2.2), head
right and follow the Wall(2.3) till you reach
the “Vine Key”(2).
3. Vine Door.
4. Duck through the window(4.1), Jump to the other side(4.2), go right and follow the wall(4.3), jump over the broken bridge(4.4) and take the “Empty Potion Bottle”(4).
5. Jump in the small pool and use the “Empty Potion Bottle”(4), take “Mana Potion”(5) from the edge of the pool.
6. Give “Mana Potion”(5) to the Crystal Curator.
7. Upstairs, pick up the “Ancient Dictonary”(7).
8. Now with the “Ancient Dictonary”(7) you can read the Hint: “The Key is behind the farm plot shed”.
9. Take the Shovel(9).
10. Use the Shovel(9) on the unevenness on the Ground to get the “Copper Key”(10).
11. Copper Door.
12. The right switch open the Gate near you(12.1), the left switch opens 12.2, the middle switch opens 12.3.
13. pull the lever on the left of the cabinet and take the “Dark Key”(13).
14. you can jump here from the balcony(14.1) to the roof of the Vendor(14.2) or you go upstairs
in the stable and through the small hole in the wall(14.3), jump on top until you reach the hole
in the wall(14.4),go through the broken window(14.5), further through the broken wall(14.6),
further to the Dark Door(14).
15. Jump through the hole in the ground(15.1) and take the “Bottle of Fire Oil”(15).
16. Go Upstairs and follow the path through the cellar 16.1.
17. you reach a waterfall, you can grab Secret 1 at the bottom(S1) or go right and jump back
inside through the window(4.1).
18. Use the “Bottle of Fire Oil”(15) here.
19. Speak the 3 words of power…forget the 3 words, just use the book ;).Now the magic barriers
at 19.1, 19.2 and 19.3 are removed.
20. Continue to the exit.
Secrets:
S1. Crawl through the bushes.
S2. The hind for Secret 2 can be find at S2.1, use the Shovel(9) on the ground.
S3. Go through the small hole in the wall(14.3), turn left and Jump right on the roof of the
Vendor(S3.1),jump on the flower box(S3.2) and further on the clothesline, go through the
broken window and take the Sledgehammer(S3).
S4. Jump on the Wall(S4.1), follow the wall to S4.2 and take the open door on the left.
S5. Use the Sledghammer(S3) to break the wall.
S6. Use the Sladghammer(S3) on the left bricked up window.
1. Start.2. Pull the lever right of the Door.
3. Pull the lever in the Middle.
4. Crawl through the hole in the wall.
5. This way…
6. “Fragfire”.
7. Burn the vines with the Fragfire(6).
8. Go behind the statue and dive down, follow the corridor.
9. Dive up here.
10. This way…
11. The Exit, sealed with 5 magic Symbols bounded to 5 Books(41,46,59,67,70).
12. Mansion entrance.
13. Use the food elevator to get upstairs.
—-Map 12(b)———————————–>
14. Here ends the food elevator.
15. “Copper key”.
16. Open the Copper Door.
17. Go Downstairs.
—-Map 12(a)—-
18. We are back on Map(a) here.
19. Take the “Body Gem” out of the hole in the wall.
20. The way to Secret 6 and 7 and a lever that opens the gates below.
21. Lever opens the gates below.
22. Go back Upstairs Map(b) again.
—-Map 12(b)—-
23. Insert the “Body Gem(19)” to the right of the door.
24. Jump through the window.
25. “Vine Key”.
—-Map 12(a)—-
26. Move out of the Mansion and use the Vine Door (alchemists).
27. On the chessboard you can see the way(28) you have to go in a moment.
28. The way described(27).
29. “Golden Key”.
30. Back via the trap path, open the Door.
31. After open the Door(30) the two previously closed doors are now open.
32. “Password Scroll”.
33. Back to the Mansion through the back entrance.
34. Through this corridor.
35. down to the basement Map(c).
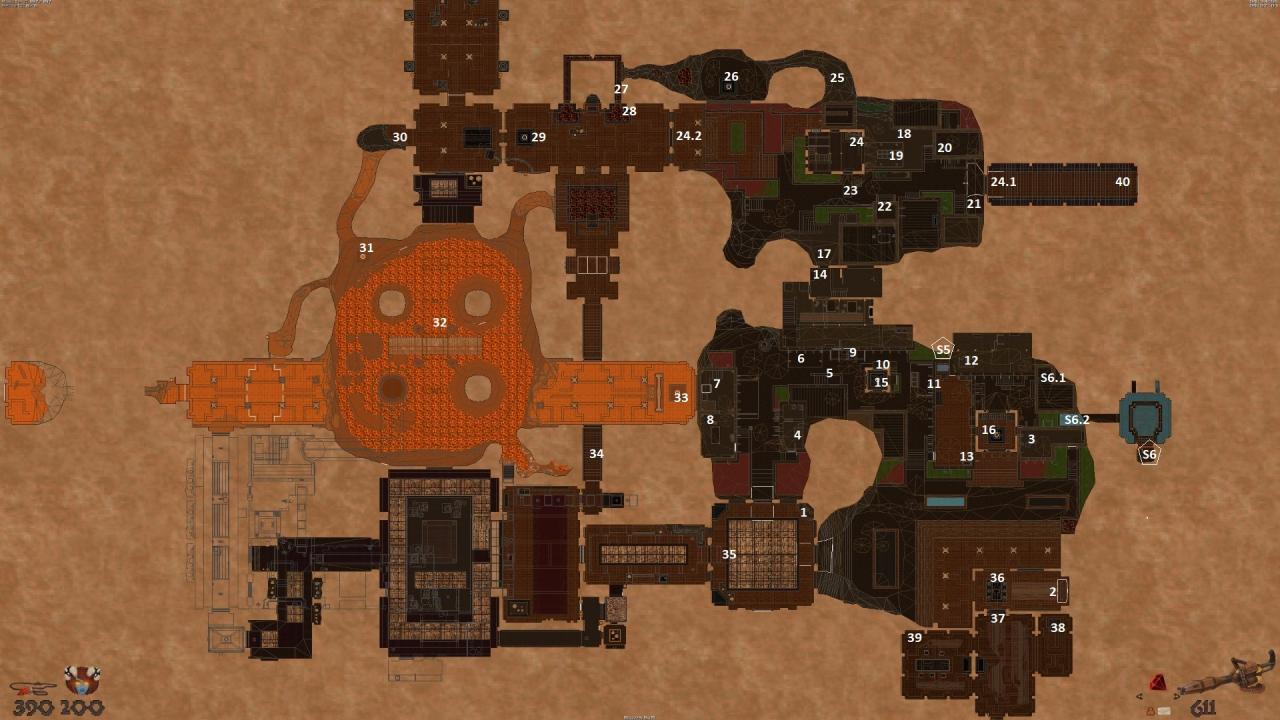
—-Map 12(c)———————————–>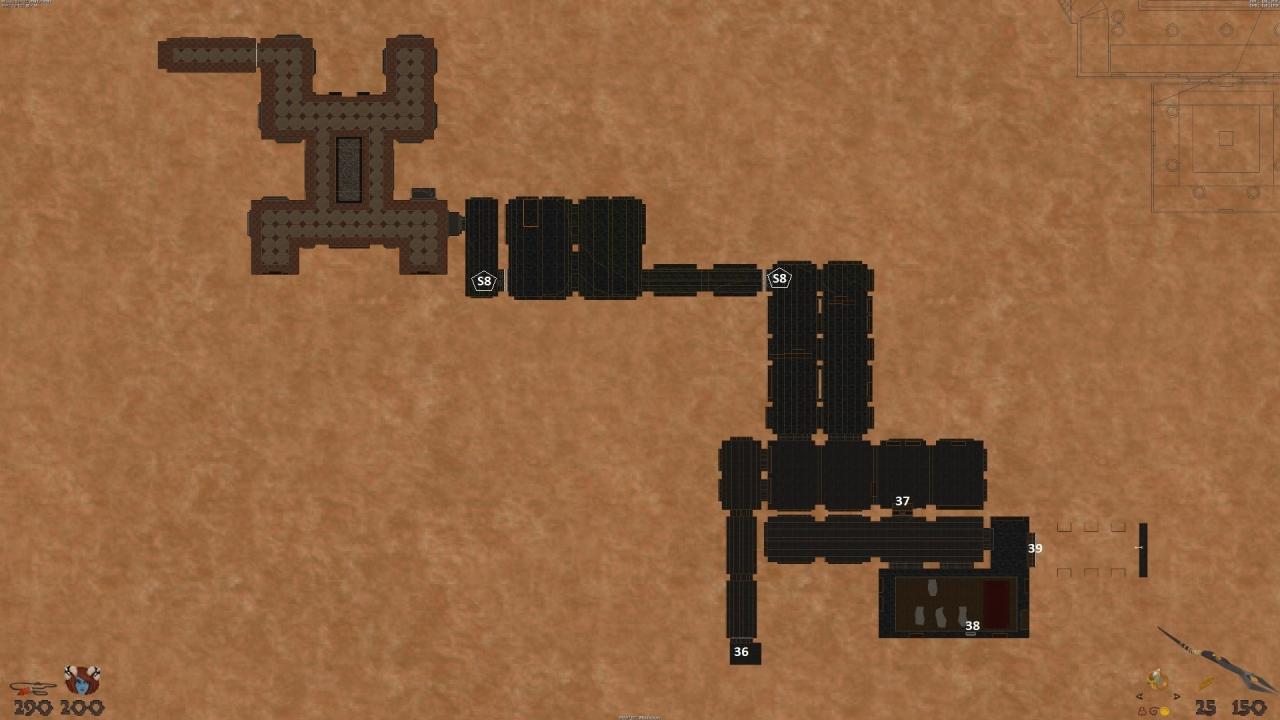
36. We are here now.
37. Use the “Password Scroll(32)” on the Door.
38. “Harp Tune”.
39. Follow this way and we end up on Map(a).
—-Map 12(a)—-
40. We are here Now.
41. The first book that destroys a magic seal(11).
42. The lever opens the doors.
43. Back to the main entrance of the mansion(12) .
44. Clear the Room.
45. Play the “Harp Tune(38)” will destroy the barrier around the book(46) and destroys the windows(48) which exposes a way out.
46. Use the second book that destroys a magic seal(11).
47. Clear the Room again 🙂
48. Destroyed windows.
49. Back to the main hall.
50. And on to the casino.
51. “Mind Gem”.
52. Jump through the window.
53. Throw the axe or shoot the red crystal until it explodes.
54. Go to the room above Map(b).
—-Map 12(b)—-
55. Go through the blasted wall.
56. Look in the mirror and walk backwards to pick up the “Soul Stone”.
57. We stay on this floor and go on to the Mind Gem Door, insert the “Mind Gem(51)” to the right of the door.
58. Up the stairs and under the roof.
59. Use the third book that destroys a magic seal(11).
60. Jump from the centre into the pool below Map(a).
—-Map 12(a)—-
61. Continues at the windows(48) that were destroyed by the “Harp Tune(45)”.
62. Cross the bridge.
63. Pick up the “Psishroom”.
64. Go back to the alchemist Vine Door(26) .
65. Fill the cauldrons with the Soul Stone(56) and the Psishroom(63), brain are already in there, pull the lever and take the “Psi Crown”.
66. Go to the cultist meeting on the other side of the map. With the “Psi Crown(65)” the barrier
dissolves.
67. Use the fourth book that destroys a magic seal(11).
68. Pick up the “Cyan Crystal”.
69. go back to the alchemist lab(26) and go via the path(28) into the hall behind and put the “Cyan
Crystal(68)” into the socket.
70. Use the fifth book that destroys a magic seal(11).
71. Go to the Exit(11).
****Secrets****
—-Map 12(a)—-
S1. Use the wall with the symbols.
S2. Swim here and go out of the water.
S3. At the beginning of the table missing the tablecloth duck and crawl through to the end.
S4. Use the food elevator lever, go back and wait for the food elevator to go up.
—-Map 12(b)—-
S5. One of the books sticks out a bit use it.
—-Map 12(a)—-
S6. Use the bookshelf in the corner. This secret can be reached from the other side as well.
S7. At S7.1 jump out of the window onto the roof further to the chimney(S7) and jump into the chimney.
—-Map 12(c)—-
S8. Use the Sledgehammer on the wall with the crack. This secret can be reached from the other side as well.
S9. ??
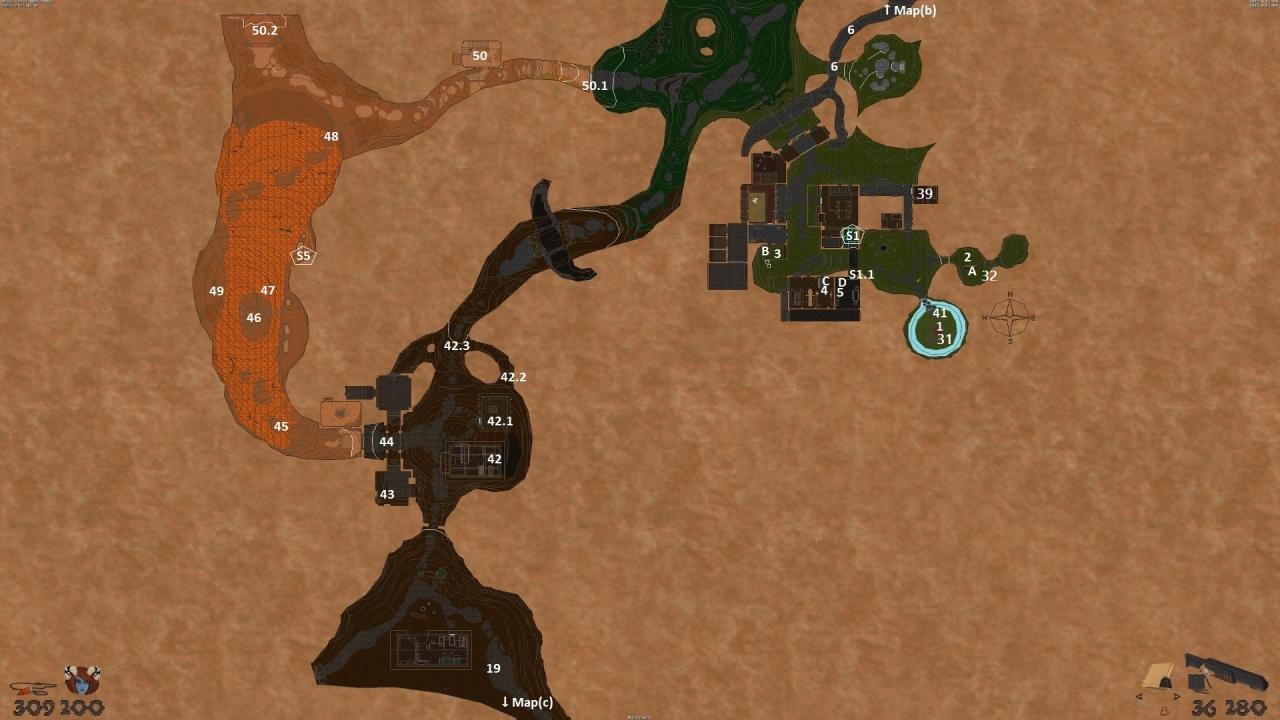
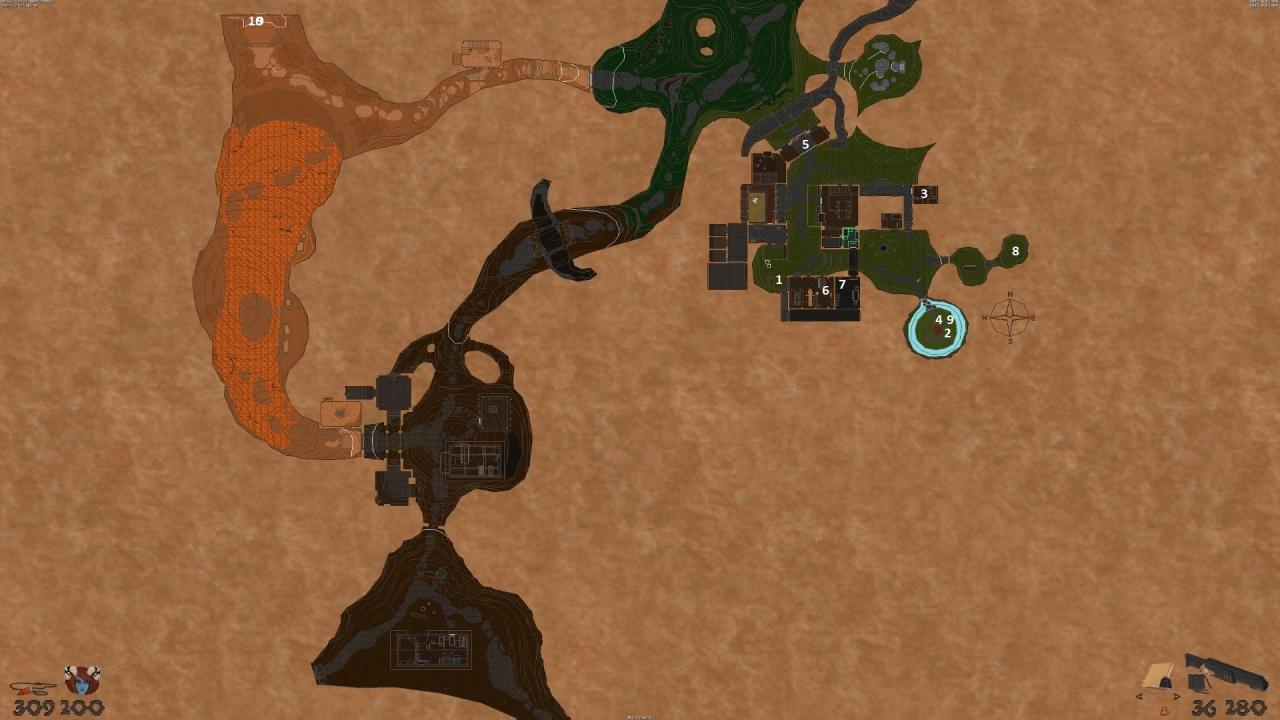
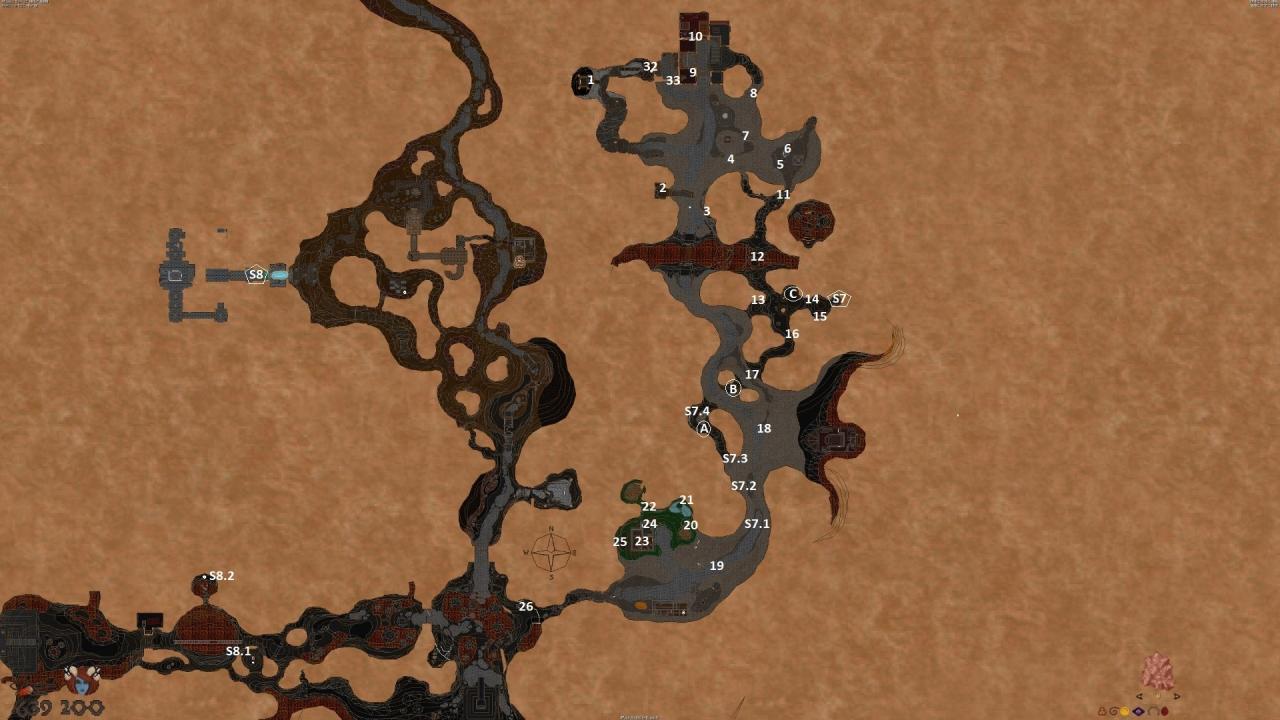
Quest Npc’s:
A= Earth Mother Bendi
B= Smith Hectus
C= Workshop Boss
D= Shady Fixer1. Start, take the “Journal” that is on the table (Use the “j” Key to open it).
2. Earth Mother Bendi(A) “Journal” entry: “E.M.Bendi needs a “Spirit Gem(28)” to charge my Psi
Crown.”
3. Smith Hectus(B) “Journal” entry: “Smith Hectus is trading ammo for Iron Ore.”
4. Workshop Boss(C), read the note on the cabinet next to the workshop boss. “Journal” entry:
“Workshop Boss needs 6 lumps of Dark Iron Ore for gun parts.”
5. Shady Fixer(D) “Journal” entry: Shady Fixer sells, Fixer Goggles(10G.), 2 Sentry Guns(100G.),
Bag of Holding(300G.)
6. Get out of the settlement, dive down by the river, continue on map(b).
—-Map 13(b)———————————–>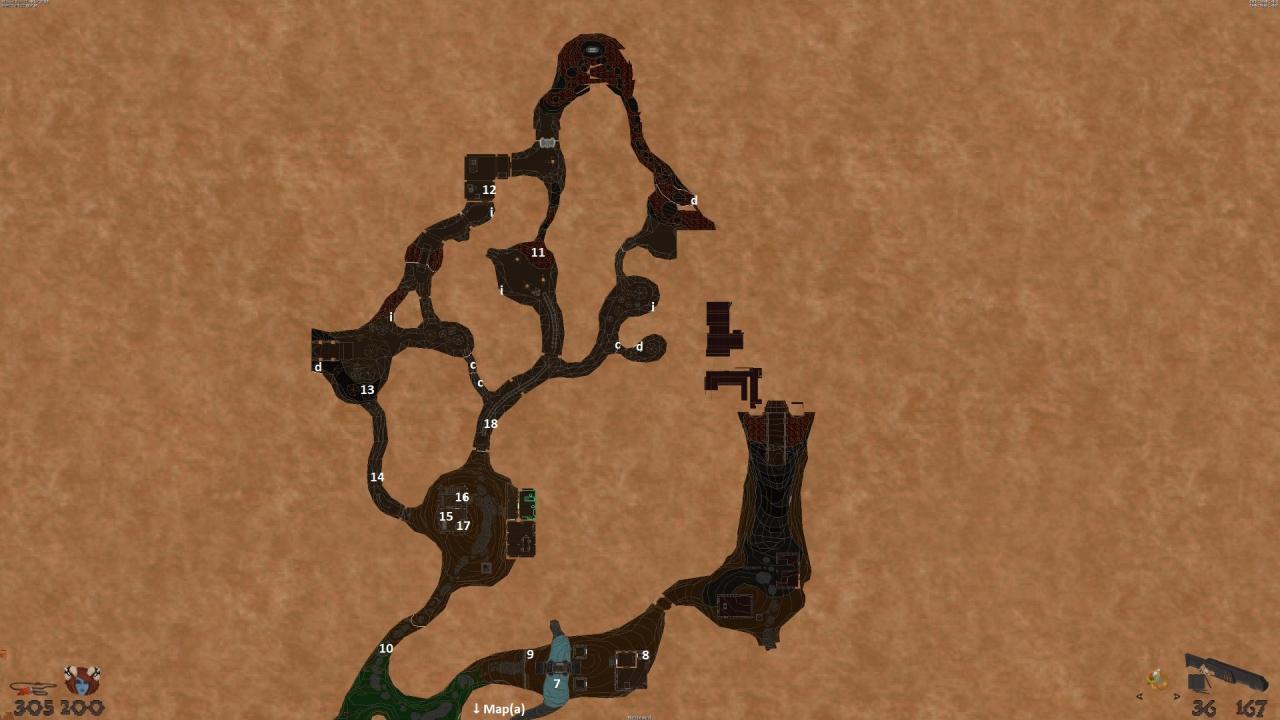
i= “Iron Ore”
d= “Dark Iron Ore”
c= Crack in the wall, use”Iron Pickaxe(16)”
7. Dive up here.
8. “Intel Scroll” bring it to the Advisor(1), gives you a “Code 2367”.
9. Jump back over the wall.
10. This way.
11. Use the fragfire to remove the vines, jump to the other side.
12. Through this room.
13. Jump up over the columns into the tunnel.
14. Use the detonator for the T.N.T. that will destroy the wall.
15. Jump on the roof of the building.
16. “Iron Pickaxe” (upstairs).
17. “Lump of Iron Ore” (Downstairs).
18. With the Iron Pickaxe you can now search the tunnels for “Iron Ore” and “Dark Iron Ore”.
When you are done, continue on map(a) in the very south(19).
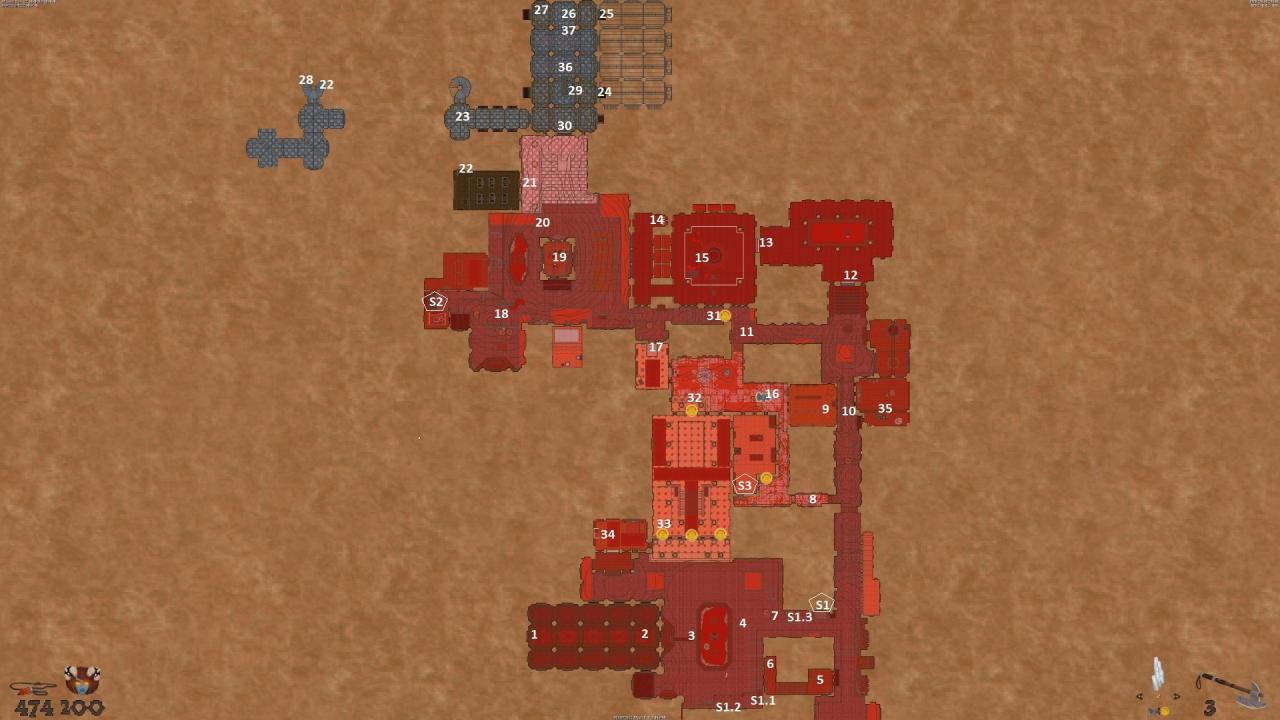
—-Map 13(a)—-
19. Fixer “Journal” entry: “A fixer told me her squad vansihed-should investigate.” Continue to Map(c)
—-Map 13(c)———————————–>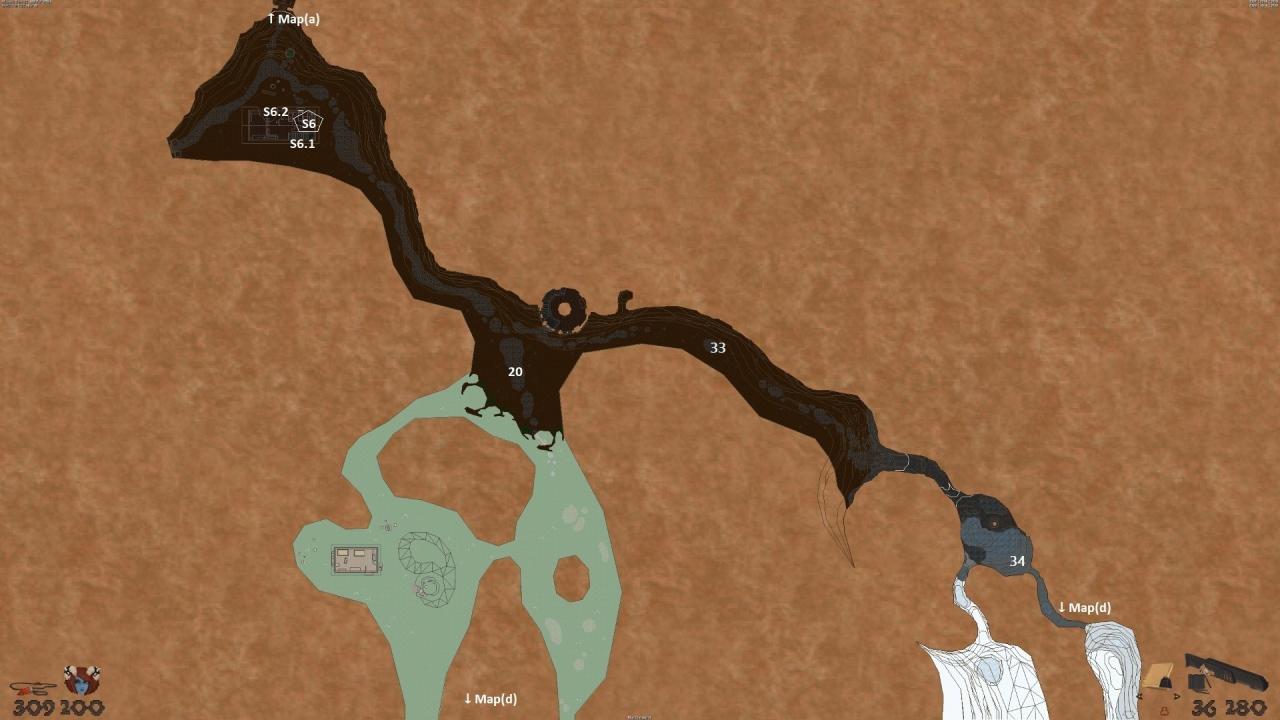
20. go this way south to Map(d)
—-Map 13(d)———————————–>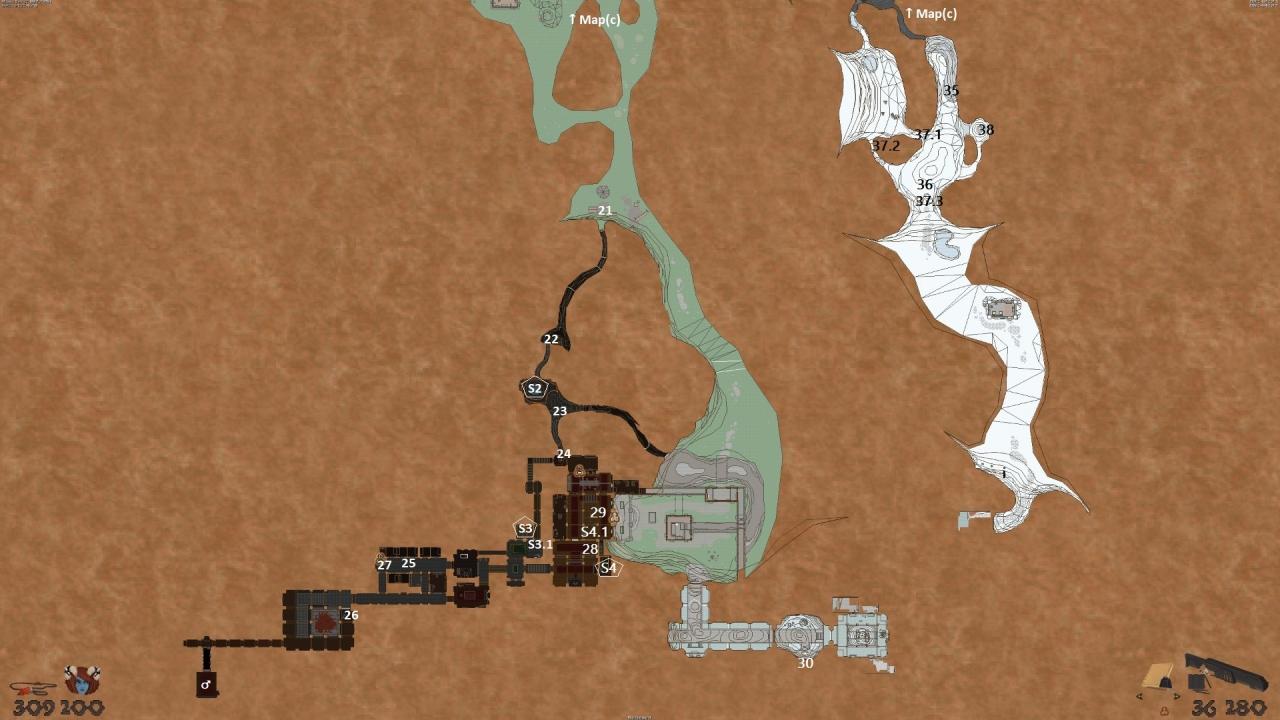
21. go into the tunnel.
22. Crack in the wall, use”Iron Pickaxe(16).
23. Up to the next tunnel.
24. You will drop down here.
25. The squad(19) is here in prison.
26. “Copper Key”.
27. Use the switch outside, “Copper Key(26)” is required. Inside the cell pull the levers. To get out, press the switch outside again.Say hello to your squad of 5. With the use button you can take the squad with you or leave it as you please.
28. “Spirit Gem” in the knight armor. Bring it to Earth Mother Bendi(A) to solve her quest(2).
29. Let the squad wait here in front of the door and pull the opponents to the squad.
30. After the ambush, use the portal back to Map(a).
—-Map 13(a)—-
31. Go to Grand Earth Mother Breaza to finshed the Fixer “Journal” entry(19).
32. Bring the “Spirit Gem(28)” to Earth Mother Bendi(A) to finshed her “Journal” entry(2). She
—–wants more Spirit Gems to charge the Psi Crown. Now all the way back to Map(c).
—-Map 13(c)—-
33. This time we take this way.
34. Dive down here to Map(d)
—-Map 13(d)—-
i= “Iron Ore”
35. Dive up here.
36. When you reach the place with the pentagram on the ceiling an ambush trigger.
37. After the ambush go the path(37.1), continue up to the path(37.2), then over the stones(37.3) that fell down and move on to the other side.
38. “Bracer of the Revenant”, back to Map(a) Zan’s Room.
—-Map 13(a)—-
39. Zan goes to sleep.
—-Nightmare—-
40. Zan is waking up, isn’t she? Hunt the black spirit at (a)-(i) and wake up on Map(a).
—-Map 13(a)—-
41. After waking up and the conversation ends, take the “Giant Ruby” from the table. “Journey”
entry:”Get into the Minotaur Town, find and secure the hell powder.”
42. In the house jump onto the chair and then onto the cupboard, continue along the beam
to the opening in the roof. Jump over the neighbors roof(42.1) to the opening (42.2), follow the path and jump over the gap(42.3).
43. Insert the “Giant Ruby(41)” into the pedestal.
44. The door at the bottom is open now.
45. jump over the columns.
46. Go down here to the boat(22).
47. A boat to the other side.
48. After the boatride go along the columns until you reach “Giant Ruby(49)”.
49. “Giant Ruby”, the same way back over the columns.
50. Insert the”Giant Ruby(49)” here opens the gate(50.1) back to the settlement and the gate(50.2) where we continues to Map 14,Pt .1 – Brazen Bull.
****Secrets****
—-Map 13(a)—-
S1. At S1.1 use the shelf (Shady Fixer is not amused).
—-Map 13(d)—-
S2. Simply break through the wall(22).
S3. Go behind the curtain(3.1).
S4. Play the Piano(S4.1) opens the wall.
—-Map 13(a)—-
S5. In the alcove.
—-Map 13(c)—-
S6. Jump through the window(S6.1), go upstairs to the broken wall(S6.2), jump under the roof.
—-Map 13(b), Pt. 2—-
S7. We get this later…after Map 14-Brazen Bull, Pt.2. Look there for the solution.
S8. We get this later…after Map 14-Brazen Bull, Pt.2. Look there for the solution.

i= “Iron Ore”
d= “Dark Iron Ore”1. We are starting here.
2. Through this door.
3. Duck under this door and jump into the shaft behind it.
—-Map 14(b)———————————–>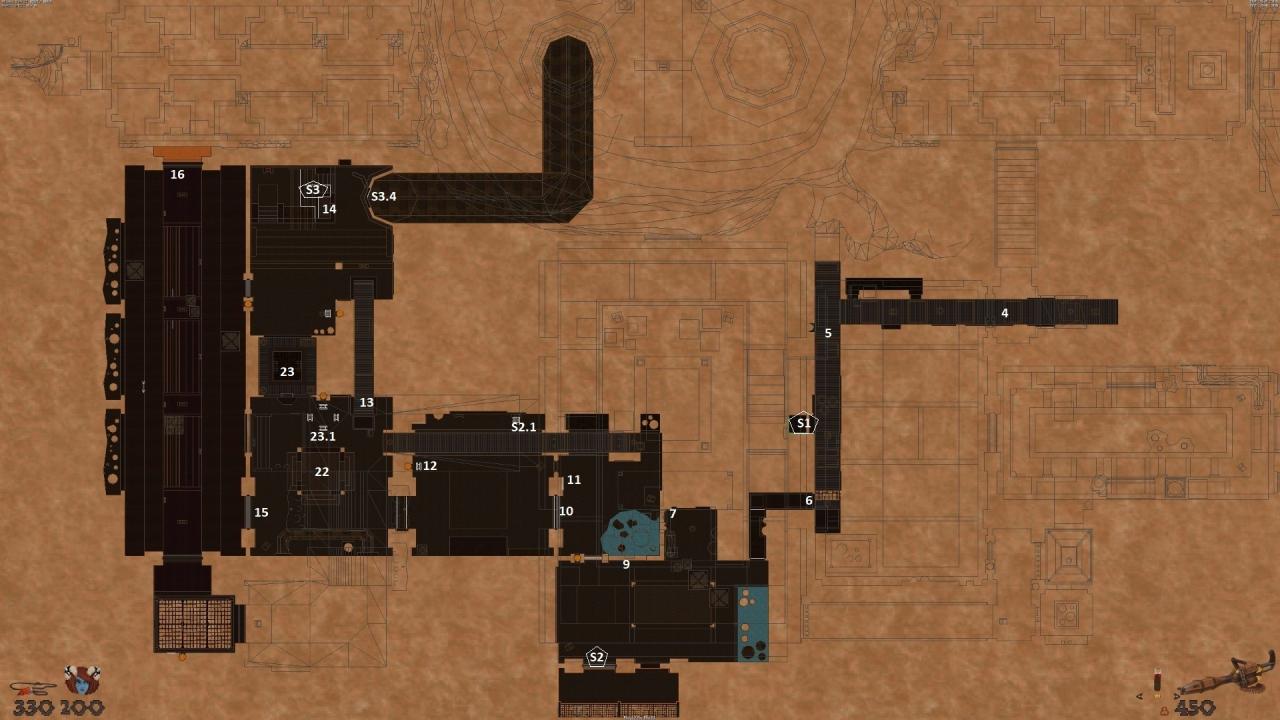
4. This way deeper into the shredder.
5. Around the corner.
6. Jump into the ventilation shaft here.
7. Press the switch to destroy the wall(9).
(8.) **nothing to see here, no I do not make mistakes:)**
9. Go through the broken wall.
10. Only Pitlords and Hellblaze can open this door.
11. Knock (Axe) or Shoot on the window to the right of the door(10) and take a step back…one
more step!
12. Pull the lever.
13. Along the conveyor to the other side.
14. Ring the bell 3 times(repeatable for Secret(S2)) to spawn a Hellblaze in the previous room.
15. Pull the Hellblaze to this door.
16. After the smoke has cleared through this door. Continue on Map(a).
—-Map 14(a)—-
17. Jump over the columns onto the ring(17.1) that moves up and down.
18. Here we get off the ring.
19. Press the switch to destroy the Attack Turrent behind.
20. This way up.
21. To prevent the spawning of enemies you need to use 4 levers(21.1-21.4) in this room.
22. Now we have enough energy, head back on Map(b) in the room where you spawned the
Hellblaze(15).
23. 4 levers(23.1) for the 4 conveyor belts behind the fence. Press the levers until the “Giant Ruby(23)” comes forward and pick it up quickly.
24. All the way back up to map(a) the catwalk(25).
25. Jump from the catwalk…
26. …on the ring that moves up and down.
27. With a little timing you can jump into the alcove.
28. Put the “Giant Ruby(23)” on the pedestal.
29. this door is now open…
30. …and this door too.
31. Jump over the trap.
32. Press the switch to destroy the Attack Turrent.
33. Back and further to this alcove.
34. Continue the catwalk to the top.
35. This switch activates the ring.
36. Jump on the Catwalk(25) below, on the ring(26), in the alcove(27),through the door(30).
37. This door can now be opened.
38. Further into the room that is like any other room.
39. In the alcove on the right wall there is a lever that opens the door(40) again.
40. Opened with the lever(39).
41. The lift also becomes accessible after pulling the lever(39). Take the Lift down.
42. Read the note to update the “Journal” entry:”Found more then just Hell Powder, should report to Breaza”. Ok, back to Breaza…go to the lefer(39) again.
43. Jump into the lift shaft.
44. Press the switch and watch the drill from a safe distance.
45. Go through the portal you will be now on Map 13 Besiege again.
****Secrets****
—-Map 14(b)—-
S1. Press the switch on the right in the alcove.
S2. Pull a Hellblaze(14) to this door. Take the “Iron Lever” and put it in here(S2.1), when you
restart the machine with the lever(12) you get infinite ammo for the Paingun. When you are
done turn the lever (12) again.
S3. From The ring(17.1) jump on the catwalk(S3.1), then jump into the broken pipe(S3.2). Dive in the pipe to the end and then up the ladder(S3.3). You are now back in the room with the
bell(14) on Map(b). Jump on the roof of the building with the bell.
—-Map 14(a)—-
S4. Send the lift down and immediately up again, jump onto the roof of the lift. Crawl into the ventilation shaft at the top. You will Find a “Dwarven Lockbox”
—-Map 14,Pt.2—-
S5. See Map 14-Brazen Bull,Pt.2
S6. See Map 14-Brazen Bull,Pt.2
1. Dwarf Militia, give him the “Dwarven Lockbox”(Map 14(a)-Brazen Bull,Pt.1,(S4)). He will give you 50G., 1x “Iron Ore” and a “Giant Ruby”.2. Report to Breaza what you have found out.
3. It was a long day….go to sleep.
4. After the Briefing we have a new “Journal” entry:” Enter the old dwarf town & check if Lith’s vision
were true”.
5. An Earth Mother will join us.
—-Map 13(d)———————————–>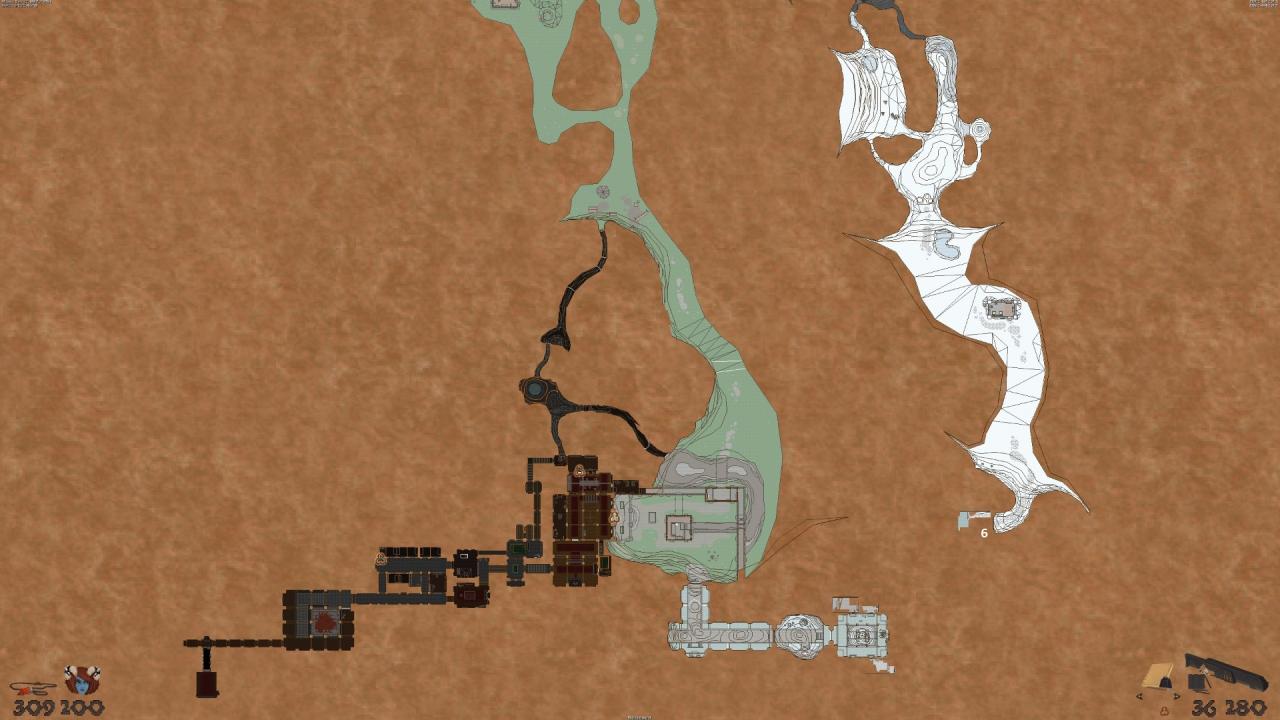
6. Map 15 – Deep Calls entrance.
****Map 15 – Deep Calls****
—-Map 15———————————–>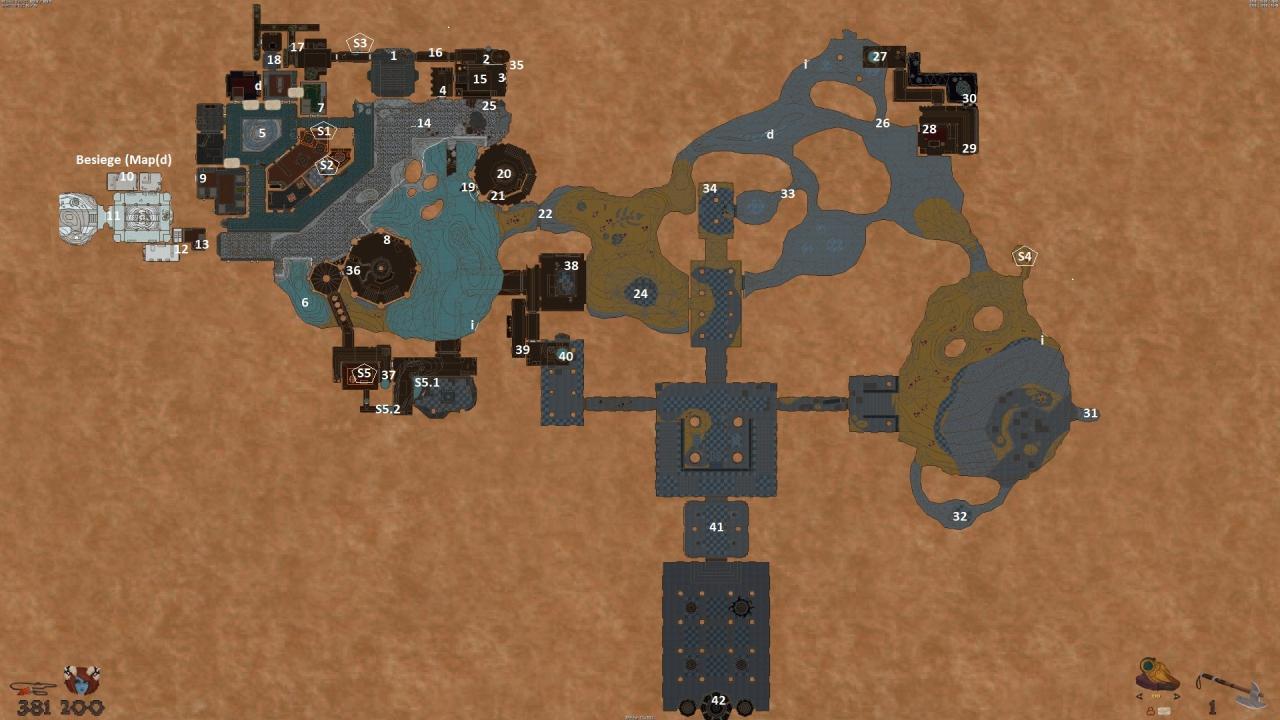
i= “Iron Ore”
d= “Dark Iron Ore”
1. Start.
2. Pull the lever to call the lift that will take you up.
3. Use the lever to open the door(4).
4. Door opened by lever(3).
5. Clear the Room.
6. “Stone Key”.
7. “Empty Dwarven Tank”.
8. “Dwarven Suit(part)”.
9. A short excursion to Map(d)-Besiege.
10. “Dwarven Suit(part)”.
11. This door leads to the portal.
12. “Giant Ruby”
13. Pull the lever to open the wall. “Spirit Gem”. Remember E.M.Bendi? She charge your Psi
Crown with the Gem if you need it.
14. Time to return to Deep Calls.
15. Pull the lever(3) again.
16. Take the lift down and follow the corridor to the end.
17. Upwards in the pipe.
18. Head back to (14) and jump to the other side of the broken catwalk.
19. Open the Door.
20. Here you can fill up with oxygen when we have finished the diving suit.
21. This lever opens the gate(22) under water.
22. Dive here.
23. “Dwarven Mask”.
24. Dive up again and give.
25. Talk to the Dwarf Smith, give him 1x”Empty Dwarven Tank”, 2x”Dwarven Suit(part)”,
1x”Dwarven Mask” and you get a “Diving Suit”.
26. Select the “Diving Suit(25)” and activate it, then Jump back in the water and dive to this small
passage(26).
27. Dive up here in the pipe, keep the suit on until you have left the poison cloud behind you, then you can take off the suit.
28. ” Mysterious Recipe”.
29. Use the Gear on the Wall and you will get a “Mithril Gear”.
30. This way is now free and we come back until we reach the passage(26).
31. “Cyan Crystal 1/3”.
32. “Brace of the Revenant”.
33. This way.
34. “Cyan Crystal 2/3”.
35. Now go all the way back to (18) down the Pipe (17) to the other side (16), up the lift (2) and
insert the Mithril Gear at (3). Now Yellow and Blue doors are accessible at the same time.
36. Head to the left Atrium and through this Door.
37. Pull the lever and wait until the water has been redistributed.
38. “Cyan Crystal 3/3″.
39. Push the button to open the Shortcut(40).
40. Take the shortcut.
41. Insert 3x”Cyan Crystal” in the pedestal.
42. After the Fight take the “Seed of Corruption”. “Journey” entry: “Found a weird corruption
sample, should report back to Zura”. It is best to take the portal(11) to return to the village.
—-Map 13(a),pt.2—-
6. You have 6 “Dark Iron Ore”now, give it to Workshop Boss, you will get some Paingun Ammo.
7. At this point you also have enough gold for all the items that The Fixer sells, go get it!
8. Give the Witch Brewer the ” Mysterious Recipe(28)”, you get a “Mystery Potion”.
9. Speech with Zura to complete the “Journal” entry:”Found a weird corruption sample, should
report back to Zura”. A new “Journal” entry:” Sabotage the flame towers protecting the demon town gate.” was given to you.
10. We continue with Map 14-Brazen Bull ,pt.2.
****Secrets****
S1. Jump into the window from the stairs.
S2. The Advisor gave you a code before, remember? The code is “2367”. Enter it and open the
door to your right.
S3. Dive down.
S4. Dive behind the plants into the hidden place.
S5. Jump into the water(S5.1) and follow the Pipe(S5.2) to the Secret
1. You must have 2x “Giant Ruby”, (Besiege-Map 13 pt.2(a)(1), Deep Calls-Map 15(12)) in your inventory. Use one on the pedestal.2. “Fire Figurine 1/6”. This one first.
3. “Fire Figurine 2/6”.
4. “Fire Figurine 3/6”.
5. Go up the handrail.
6. Turn around and jump onto the textile roof on the right side of the balcony.
7. Run and Jump to this Roof and drop down at the hatch.
8. “Fire Figurine 4/6”.
9. Go back to(5)(6) and jump on the balcony(9).
10. Jump over to the tower.
11. Onto the textile roof.
12. The roof beams stick out a bit, perfect for jumping up onto the neighbour’s roof and down the hole.
13. “Fire Figurine 5/6”.
14. Go back to(5)(6) and jump on the balcony(9). Go into the building and grab the last “Fire Figurine 6/6”.
15. Go back to the balcony(9) and jump over to the tower(10). Follow the stairs up to the
“Pedestal 1/6”, place the first statue on it.
16. Jump onto the textile roof(11) and through the window in the second tower. “Pedestal 2/6”.
17. back to the balcony(9) and walk through the building to the other side.
18. Continue to the market place. Jump onto the sacks…
19. …and then onto the textile roof.
20. Jump to the next building.
21. Via the catwalk to the other side.
22. Jump here on the roof…
23. …and down to the drawbridge.
24. But the “Giant Ruby(1)” on the pedestal. This will open the doors 24.1(Exit) and 24.2(back to Map 14 Pt. 1).
25. further on this way.
26. “Pedestal 3/6”.
27. This way…
28. Drop down here.
29. “Pedestal 4/6”.
30. Continue to the next pedestal.
31. “Pedestal 5/6”.
32. Ring that goes up down, catwalk, ring that goes up down…you know the way.
33. “Pedestal 6/6”.
34. This way….
35. We are at the start again. Go back to where you picked up the first statue(2).
36. Walk through the firepit to open the door(37).
37. Door opens when you walk over the firepit(36).
38. “Giant Ruby”.
39. “Scroll Case” give it to the Minotaur Pyromancer next to Earth Mother Bendi.
40. Now go further to the exit(24.1) of the map. continue on Map 13(b)-Besiege, Pt.2.
****Secrets****
S5. When you are standing on the roof(12) drop down on the ledge.
S6. Jump from the roof(12) to the other roof(S6.1), drop down and dive here(6.2), follow the path.
—-Map 13(b)- Besiege, Pt. 2——————->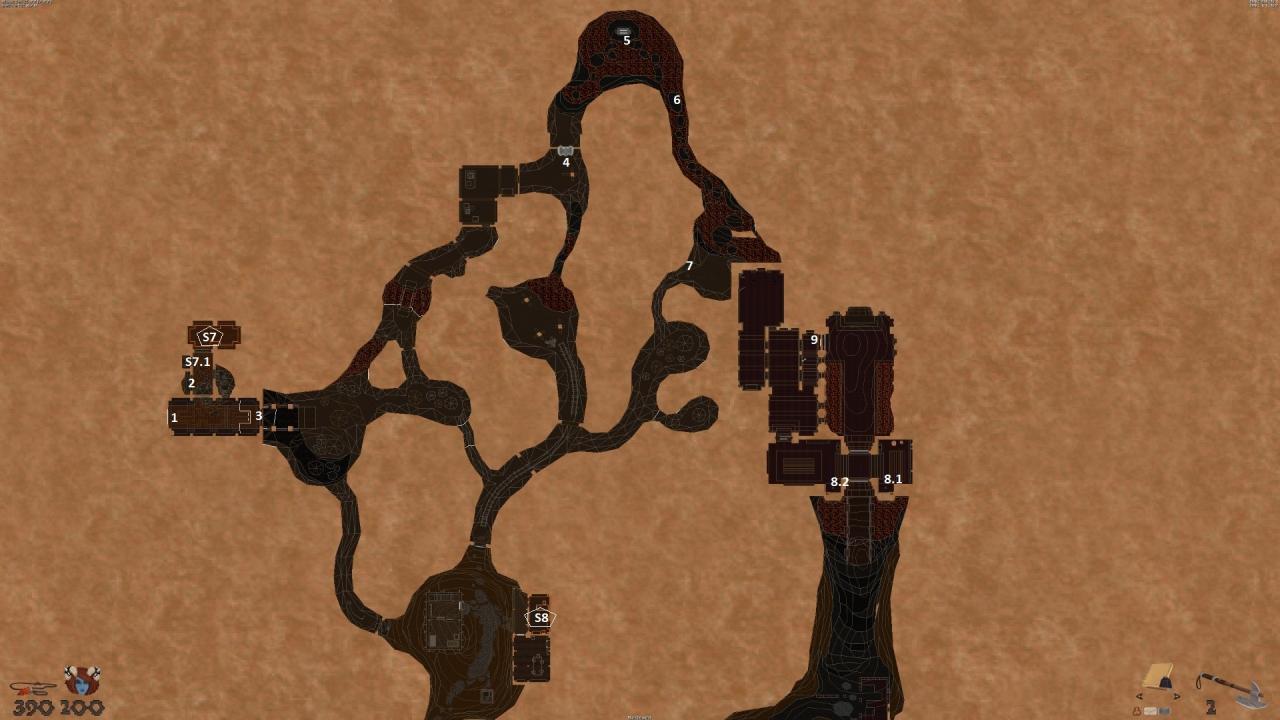
1. Here we start.
2. Pick up the “Axe Key”.
3. Through this door.
4. On and on to the Axe Door.
5. Portal. Watch out now! This is the last chance to get into the village to do everything that still needs to be done in the village. Actually, we should have done everything except 1 Secret and the “Scroll Case”. Give “Scroll Case” to the Minotaur Pyromancer, he is next to Earth Mother Bendi in the village. Move on to the last secret(S8).
6. Back to the portal(5) and continue on the path.
7. Use the detonator.
8. Use the lever 8.1 and 8.2.
9. Wait until a hole is blown in the door, go through and continue on Map 16-Port to Hell.
****Secrets****
S7. Put the “Giant Ruby(38)” on the pedestal(s7.1) it opens the Door.
S8. use the “Axe Key(2)”
1. Start.2. Group your companions here inside and make
them wait.
3. Run out of the building to trigger the enemies, run immediately back into the building. Help your companions to eliminate the enemies, preferably the ones on the roof opposite. When the lines are cleared, order your companions to follow you and finish off the remaining enemies here at the plaza.
4. Regroup! Let the companions wait here and pull the opponents to them.
5. Clean the building.
6. Go upstairs.
7. Jump on the other balcony or solve secret 1 to spawn more enemies.
8. Now we go this way.
9. through the alchemy store.
10. Regroup! Let the companions wait here and pull th enemies if necessary.
11. More companions…
12. This way now.
13. Through this door.
14. Kill only the cultist but do not take the “Axe Key” yet.
15. Clear this room and take the “Axe Key(14)”. Clear this room again :). Back to your
companions(10). Take the companions with you.
16. Axe Door open it with the “Axe Key(14)”.
17. Break the window and jump through.
18. Regroup! Let the companions wait here, always in mind that a serious attack can take place.
19. In the tower, jump from the broken stairs onto the sandbag in the middle, then onto the other
sandbag, which will ring the bell. This will spawn some enemies outside. Jump onto the catwalk
and over to the other side where a ladder leads upwards.
20. Go outside and over this plank.
21. Into this window.
22. Go upstairs.
23. This way.
24. Into the library.
25. Through this door.
26. Jump on the chandelier.
27. Take the “Golden Key”.
28. back to the spiral staircase(23) and all the way down.
29. Take the “Large Shell Casing”.
30. Through this door and back to your companions(18).
31. Open the Golden Door with the “Golden Key(27).
32. Through the Axe Door(16) to here.
33. Through this door.
34. take the “Large Shell Warhead” from the table.
35. Go back through the alchemy store(9) and to the ammo machine. Use “Large Shell Casing”
and “Large Shell Warhead” to get “Large Shell”.
36. Take all companions(18) with you and head back to the cannon.
37. Destroy the gate and go through.
—-Map 16(b)———————————–>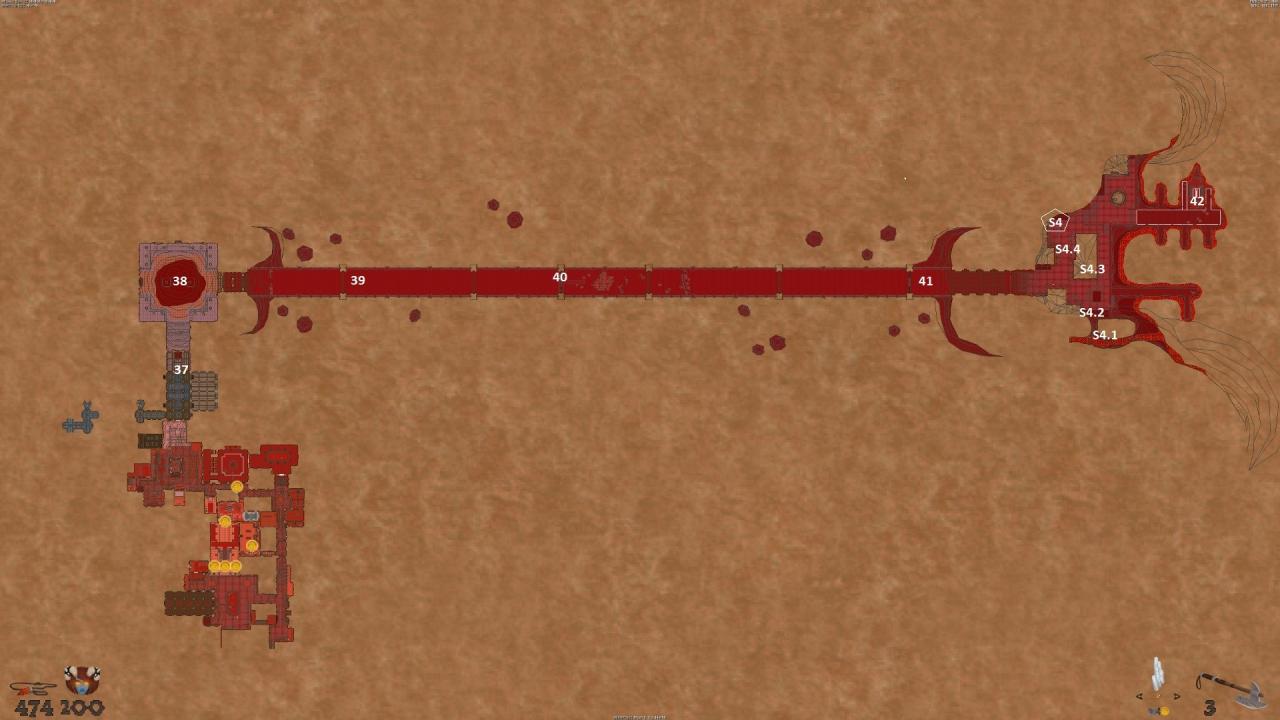
38. Paingun ‘n run…
39. Regroup! Let the companions wait here.
Pull the enemies, be careful.
40. Paingun your way to this door.
Take the ladder up to the left of the door.
41. Paingun ‘n run .
42. Take the ship to the next Map 17-HellScape.
****Secrets****
—-Map 16(a)—-
S1. Jump to the balcony(S1.1), use the barrel, box and chair(S1.2) to get on the roof, jump on the
other roof(1.3).
S2. Jump up on the burning beam.
S3. Behind the curtain is a window that leads to a backyard.
—-Map 16(b)
S4. Go in the lava cave to the end and jump up(S4.1), further up on the wall and the other wall to
the alcove. In the corner up to the roof(S4.2). Jump to the other roof(S4.3). Over the plank to
the other side and down to the textile roof, up onto the balcony(S4.4). In the corner is the secret.
1. Start.2. Over the drawbridge.
3. Drop down at the hatch.
—-Map 17(b)———————————–>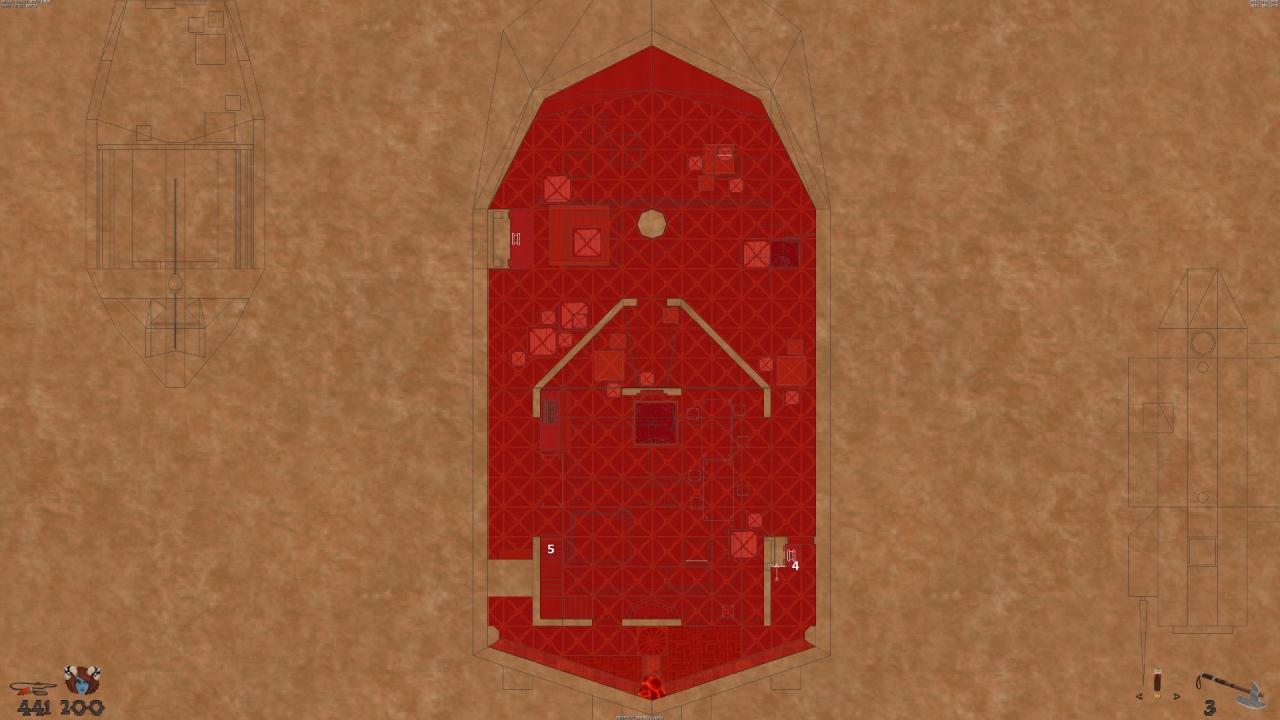
4. Pull the lever, lowers the drawbridge(8) and calls
a bridge ship(8.1).
5. Go up the stairs.
—-Map 17(a)—-
6. Climb up the ladder.
7. Through this door.
8. Via the drawbridge…
9. …to the next ship.
10. Duck and cover to the ladder at the next ship.
11. …and to the next ship.
12. Watch out now! Jump, duck & cover your ass and use the chains to get from ship to ship until
you reach the big ship(13).
13. Go upstairs.
14. Here is a window with a crack, destroy it with your axe.
15. Climb up the ladder
—-Map 17(c)———————————–>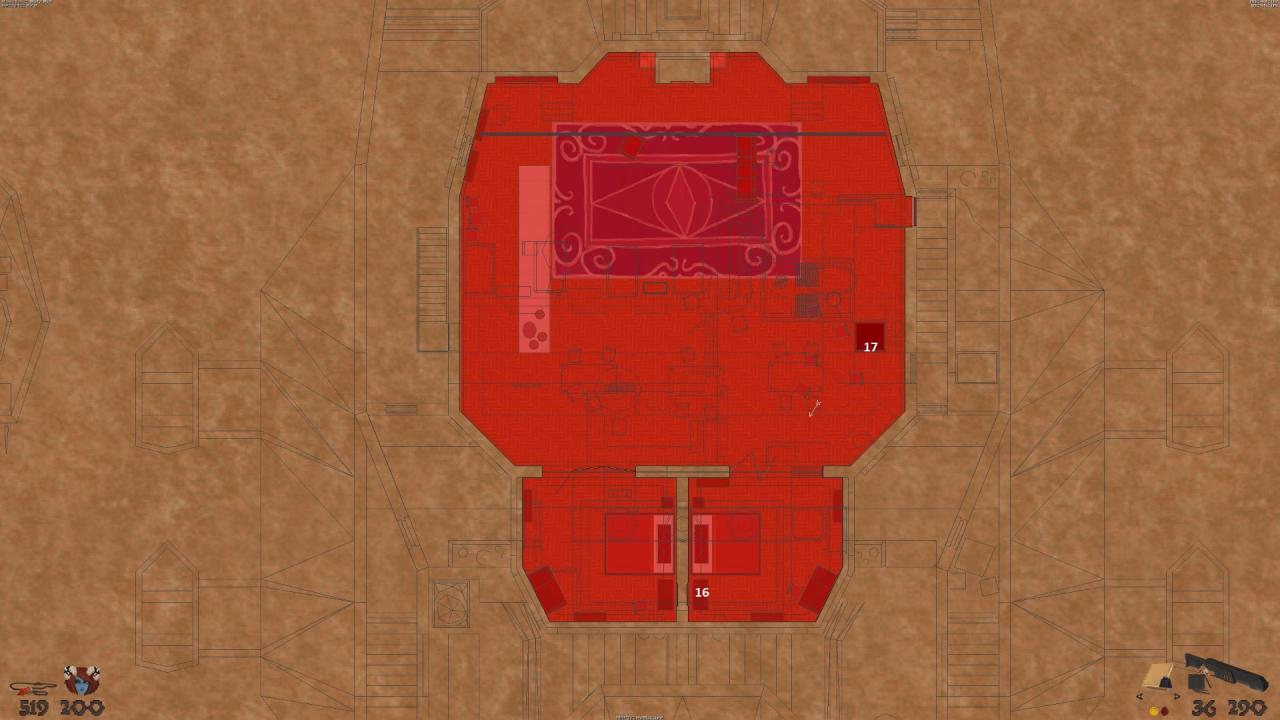
16. “Golden Key”.
17. Climb down the ladder.
—-Map 17(a)—-
18. Call the lift and go down.
—-Map 17(d)———————————–>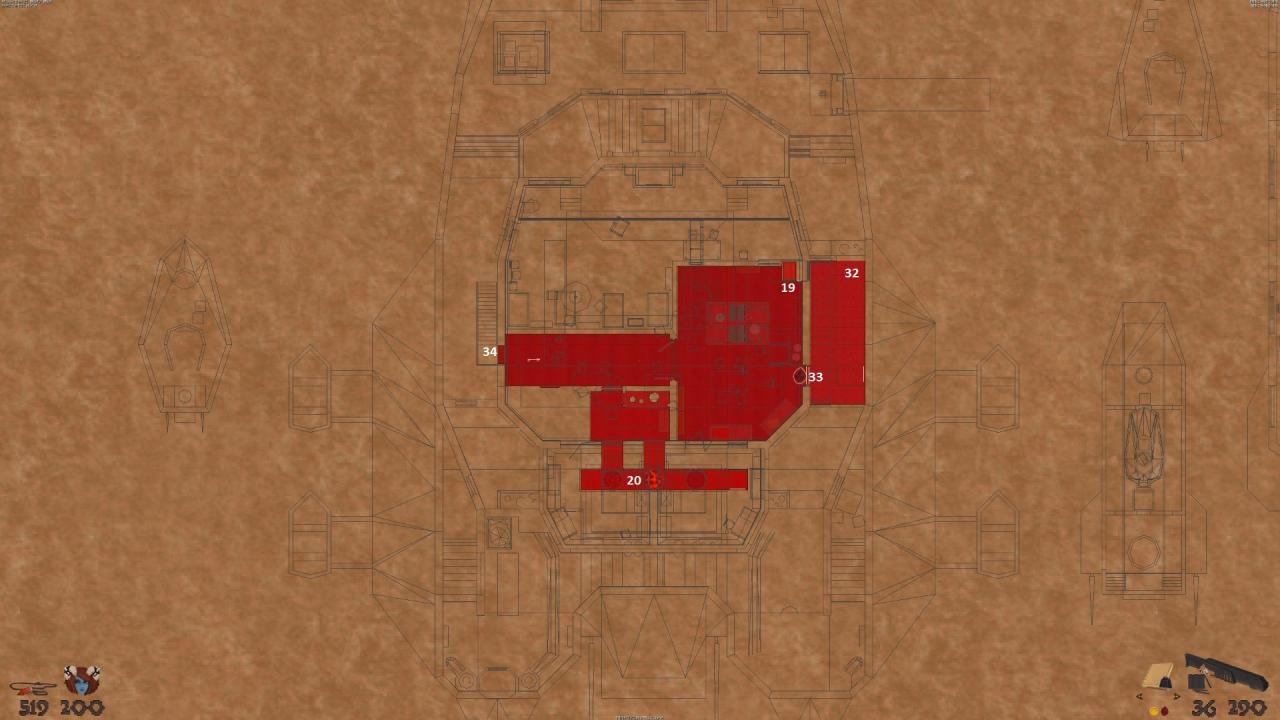
19. Jump out of the lift.
20. Duck & run through the machine and climb up the ladder.
—-Map 17(e)———————————–>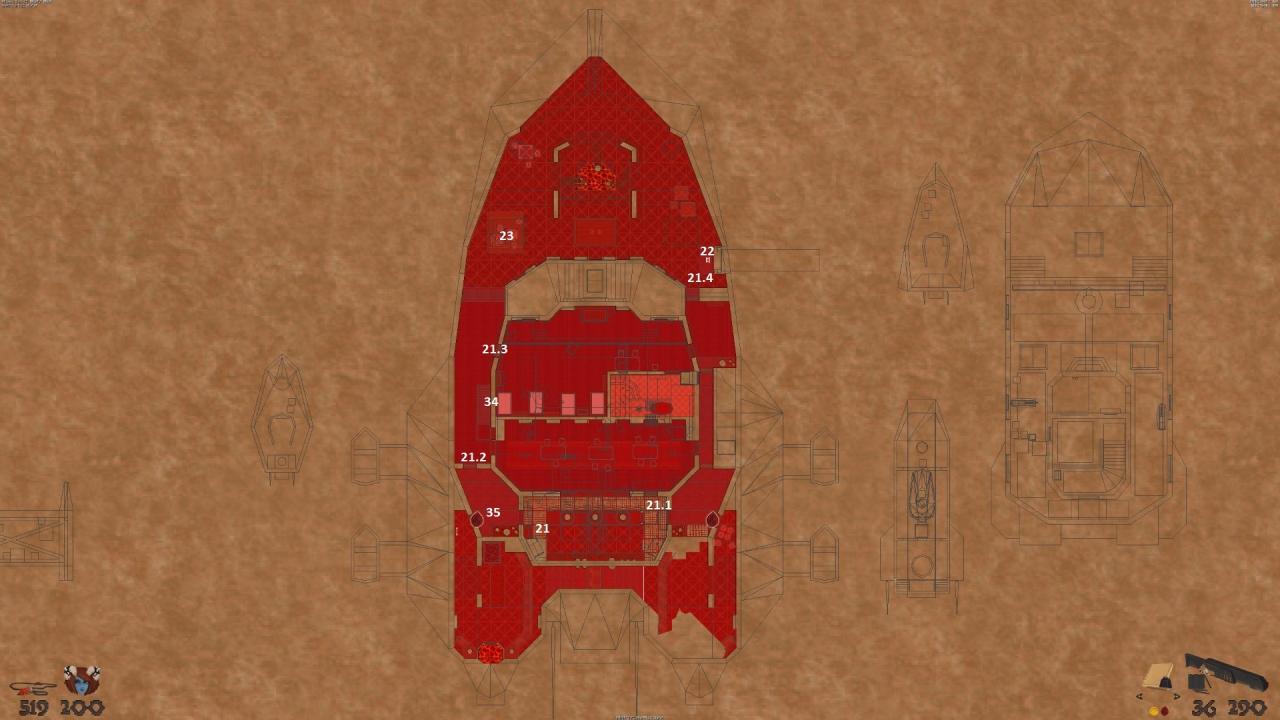
21. Pull the lever will open the Doors (21.1)-(21.4).
22. Pull this lever lowers the Drawbridge(24) outside.
23. Jump on the deck.
—-Map 17(a)—-
24. Via Drawbridge…
25. …to the ship.
26. Jump to the ladder and go on deck.
27. through this door to the inside.
28. All the way down, use the “Hull Piercer”.
29. Back on deck and jump to the next ship.
30. Through the hole that we have just created by the “Hull Piercer(28)”.
31. Climp down the ladder.
—-Map 17(d)———————————–>
32. “Blood Key”.
33. Through this door.
34. Up the stairs.
—-Map 17(e)—-
35. Through this door to the exit.
****Secrets****
—-Map 17(a)—-
S1. We need the “Golden Key(16)” first…
S2. Jump & run from the edge(S2.1) of the ship to the sail(S2.2). Turn around, now you have to
jump precisely onto the left very thin ledge(S2.3), otherwise you will be blown away.
1. We start at the beach. Take the “Journal” and
your Axe. “Journal” entry: “Stranded. Need to find
some food and get my bearings.”2. Take this away.
3. Carefully down to pick up a few gold and up again.
4. Grab the “Squirming Sand Nut”.
5. Put the “Squirming Sand Nut(4)” in the cave on
the beach on the stone altar.
6. The Vines here are Now Open.
7. Pick up the “Vine”.
8. Use the “Vine(7)” here.
9. We have lost the Paradise, go over the chain to the other side.
10. Go to Map 18(b).
—-Map 18(b)———————————–>
PR= Portal Room
11. Take this Way…
12. Clean the room, during this action a hole is blown in the gate.
13. Through the blown gate(12).
14. Continue to the camp.
15. Minotaur Lord Murguth. “Journal” entry: “To enter the icon’s lair i need taints from 5 primarchs: Gaun, Adur, Elariel, Scorlag, Erudin.”
16. Obelisk 1/5 **Secret**
17. A “Sledgehammer” in the tunnel.
18. A “Iron Lever” near Hectus.
19. Get out of the camp.
20. Collecting the gold to the barrel will spawn some mobs.
21. Pick up the “Copper Key”.
22. Go back to the house with the copper door.
23. Under the table is a secret passage.
24. Use the wall.
25. Entrance to Map 20-Salt and Blood.
26. Use the lever on the right.
27. Open the gate. Head all the way back to he Camp(14), continue to(13),(12),(11).
28. Take this way now.
29. Obelisk 2/5 **Secret**
30. Jump over the broken gate. If you wanna go back here you need to jump on the wall(30.1),
move to the guardhouse(30.2) and jump down. Unlock the door downstairs to save you the steps in the future.
31. This Way.
32. Jump up here.
33. Through the half lowered gate. On the right is some Gold that spawns some mobs and a
magic bridge.
34. Back through the half lowered gate(33) and you will see a statue, move it to the pressure
plate further forward…
35. …this will open the gate.
36. Duck here further.
37. Use the “Iron Lever(18)”.
38. Move the statue the long way…
39. …to this pressure plate.
40. This door is open by the pressure plate(39).
41. Gaun, “Journal” entry: “Gaun-green- wants a crimson salt statue of myself”.
42. Slide the statue off the pressure plate. Get the statue(39) and push it now onto the pressure
plate(42).
43. Take the other satue and push it through the main room into the hole here. Go down and push it completely onto the pressure plate.
44. This will open the doors(44) and (44.1)
45. Slide the statue(42) off the pressure plate (what you always have to do if you want to get through here) and go into the altar room.
46. Move on the pressure plate behind the altar…
47. …and quickly run to the secret passage with a satue in it.
48. Push the statue(47) down the stairs.
49. Duck under the trap and push the statue into the hole at the very end.
50. Now use the statue (watch out for the trap) to get to the other side and take the “Withered Vine Key” with you.
51. Move out of the Tempel through the half lowered gate(33) and move this way.
52. Take the “Shovel”.
53. Withered Vine Door, Entrance “Place Afoul- Map 19”.
54. Now this way.
55. A portal that leads to the portal room(PR).
56. A crack in the wall for the “Sledgehammer” no problem.
57. Upstairs you find a “Back of Yeast”. Lady Ingrim is interested.
58. Use the door.
59. Another crack in the wall.
60. Pick up the “Pendant of true sight(rebel)”, “Journal” entry: “Port ghost ask me to find his brother with his pendant.”
61. Give the “Back of Yeast” to Lady Ingrim in the Camp(14) with the Npc’s.
62. Go back through the portal(PR,55) and all the way nord-east to the next Map 19 – Place Afoul.
****Secrets****
S1. After we lost the Paradise 🙂 go back to the beach where we started. Use the Fragfire to destroy the Vine.
—-Map 18(b)—-
S2. On the back of the tombstone(S2.1) is a lever that opens the secret right of the lever(26).
S3. Use the wall. “Body Gem”.
S4. A long jump from the edge(S4.1) to the other side, behind the bush is a secret passageway. In the box there is a pillow and behind it a piece of writing(S4.2) that marks an X at the beach on
Map 18(a).
S5. Use the Demon face on the wall.
—-After getting the “Charged Chaotic Device(49)”,Place Afoul- Map 19—-
S6. Use the “Charged Chaotic Device” here. And solve the worst secret you ever see by yourself :).
—-Map18(c)—-
S7. We get this secret after Map 20, Look there…
S8. We get this secret after Map 20, Look there…
1. Start2. Adur, “Journal” entry: “Adur-purple-wants me to seduce a demonblood.”
3. Yzbeth drops the “Golden Key” after the conversation.
4. Obelisk 3/5 **Secret**
5. Yzbeth again.
6. Through this door.
7. Through the golden door.
8. Use the portal.
9. Use the portal.
10. Use the portal.
11. Use the portal.
12. We are here now.
13. Through this door.
14. Jump here from the chair to the table.
15. Jump to the bookshelf.
16. Via the chandelier to the other side.
17. Ok, repeat the steps before 🙂 and jump to the Bookshelf.
18. Jump over to the table.
19. Across the tables hanging from the ceiling to the other side.
20. “Dark Key”.
21. Back to the bookshelf(15), use the 3rd bookshelf from the left and go through it.
22. “Arcane Salt”.
23. Recipe.
24. Through this door.
25. All the way back and through the golden door(6), open the door opposite.
26. Use the dark door.
27. Go through the middle mirror…
28. …and through the dark door here.
29. Yzbeth again.
30. “Iron Key”
31. Take “Primarch Avatar” Elariel in your Pocket.
32. Back to the mirror room(27) and through this door.
33. Go through the golden door.
34. dive down in the pool.
35. Dive up here.
36. Use the Button.
37. Press the switches in the following order (A-F)
38. This opens this door and the door(38.1)
39. Put the “Primarch Avatar(31)” Elariel in the wall. “Journal” entry: “Elariel-gold- wants me to offer him 300G.coins.” You only need the gold after this quest if you want to buy some items from the Shady Fixer.
—-No Map—-
40. You are now looking at the Shady Fixer talk to her.
41. Take the “Chaotic Device”.
42. through the half open gate.
43. On a shelf we find “Pendant of true sight”.
44. Go back in the main room and read the sign under the primarch.
45. Cobbler Dovan = 8G., Butcher Iod = 9G., Widow Fray = 9G., Farmer Drav = 14G. put the exact amount of gold in each bowl by using it.
46. a gate opens.
47. After the Door go right and “barbeque” your way further to the “Ritual Dagger”.
48. The way back and this time not through the door but to the right to the altar.
49. Cut yourself with the “Ritual Dagger” by using the altar, “Charged Chaotic Device”.
50. Now back to the main room where we started and talk to the Shady Fixer. You will be ported to the entrance of the Map Place Afoul Map 19.
51. Continue to Paradise Lost-Map 18(b).
—-Map 18(b)—-
52. On Paradise Lost you can solve S6(see there for solution) and buy some items from the Shady Fixer in the Camp.
53. Now continue at the house with the copper door(22) and go the secret way under the altar(23). Use the Entrance(25) to Salt and Blood-Map 20.
****Secrets****
S1. Press the switch to the left of the door(S1.1), press the button on the coffin(S1.2), Press the button in the alcove(S1.3), duck in the coffin(S1.4) and press the button, Shoot the symbol(S1.5) above the door, press the switch to the left of the door(S1.6), shoot the switch in the alcove(S1.7). Now the Secret is open.
S2. Jump up to this passage(S2.1), right along the edge(S2.2) and at the end duck under
the column.
S3. Move the red chair(S3.1) away from the table. Rightside after the golden door is the secret in a alcove. “Withered Vine Key”
S4. Use the switch behind the altar(S4.1), If you go further in this secret you will come to Lancer Painting(S4.2). “Journal” entry: “A lancer trapped inside a painting ask me to rescue her.”
S5. Defeat your mirror image(S5.1), go inside the room turn arround and use the Door, run as fast as you can to the door behind which the secret lies. (Sometimes the door closes way too
fast making it impossible to release the secret which is probably a bug)
S6. Press the hidden button on the back of the sofa (S6.1), The hidden switch behind the table(S6.2) and the hidden switch in the fireplace(6.3).
—-Map 19, Pt. 2—-
S7. look at Map 19,Pt. 2.
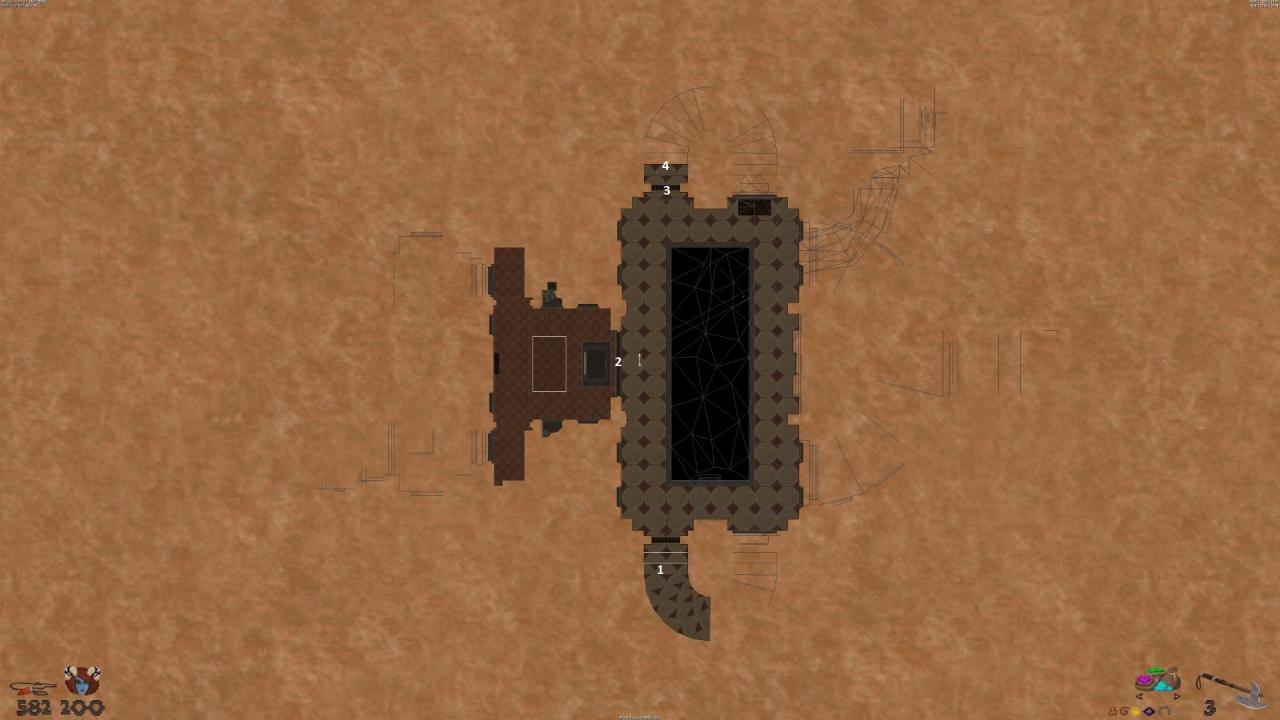
1. Start.2. Hit the bones in the coffin behind the barrier with the axe (there is a switch that you can not see), this opens the barrier(3) and a lot of other barriers.
3. Barrier is opened at(2).
4. Go downstairs.
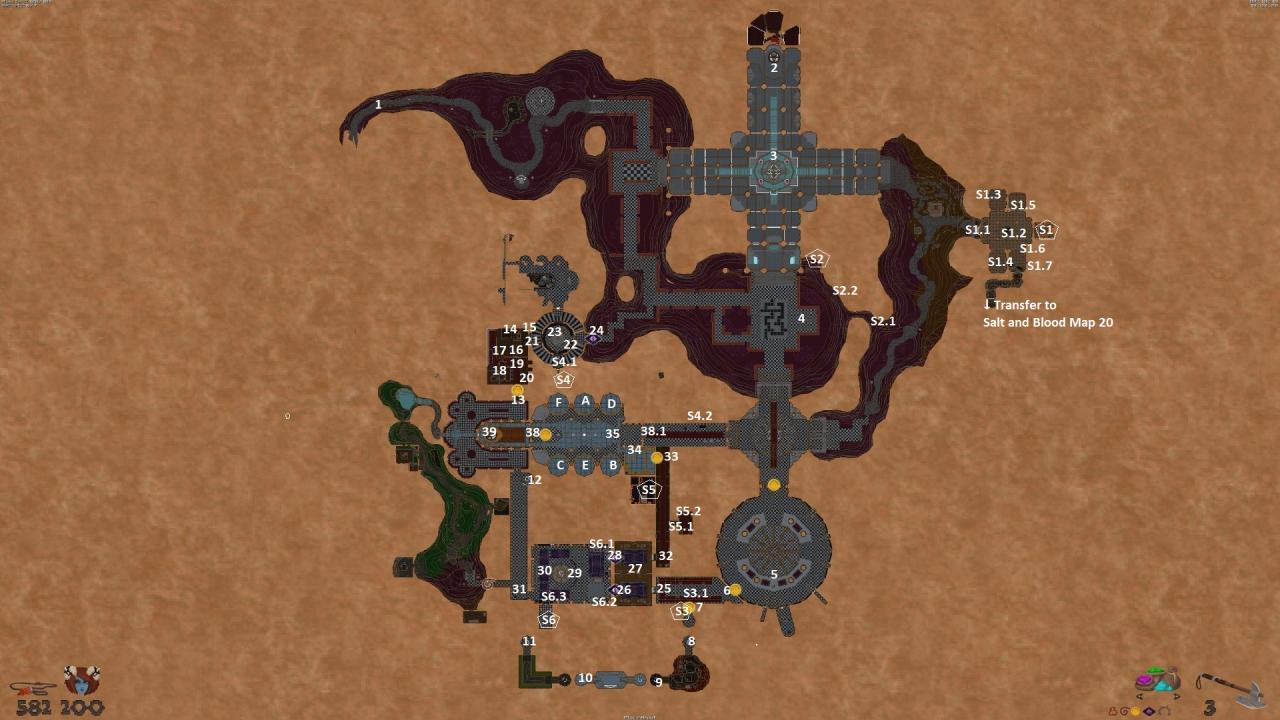
—-Map 20(b)———————————–>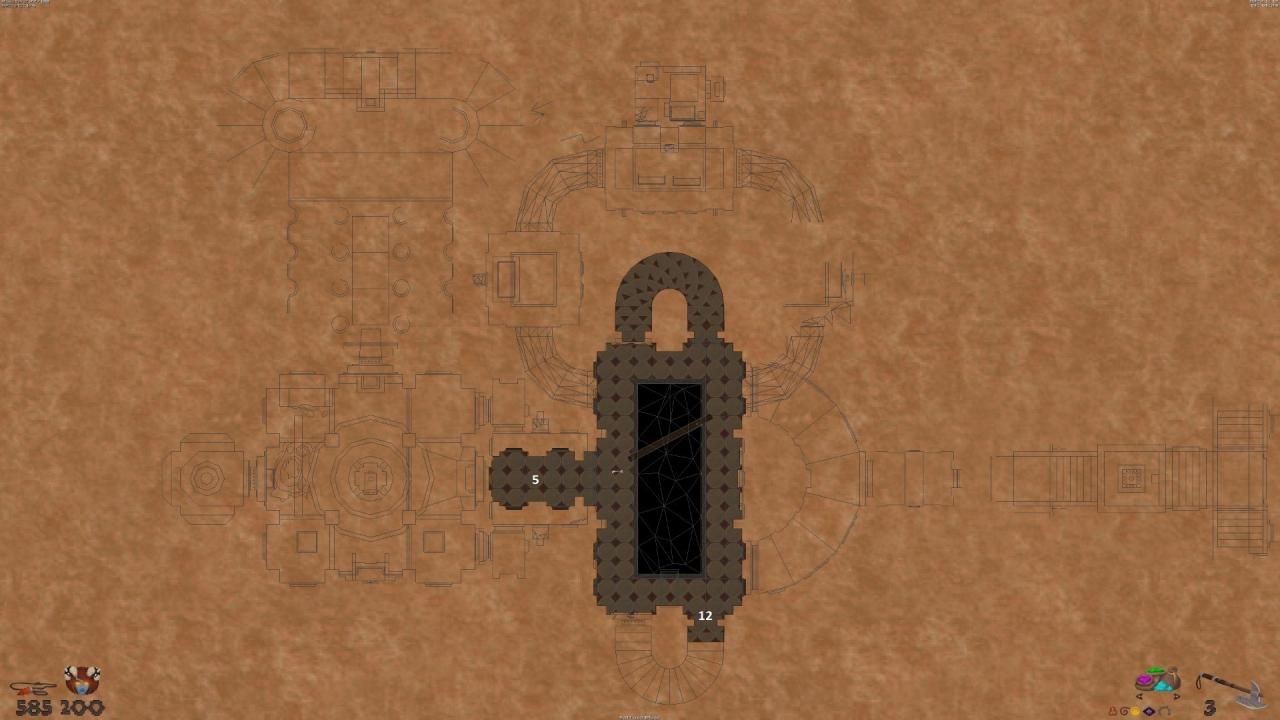
5. This way.
—-Map(20(c)———————————–>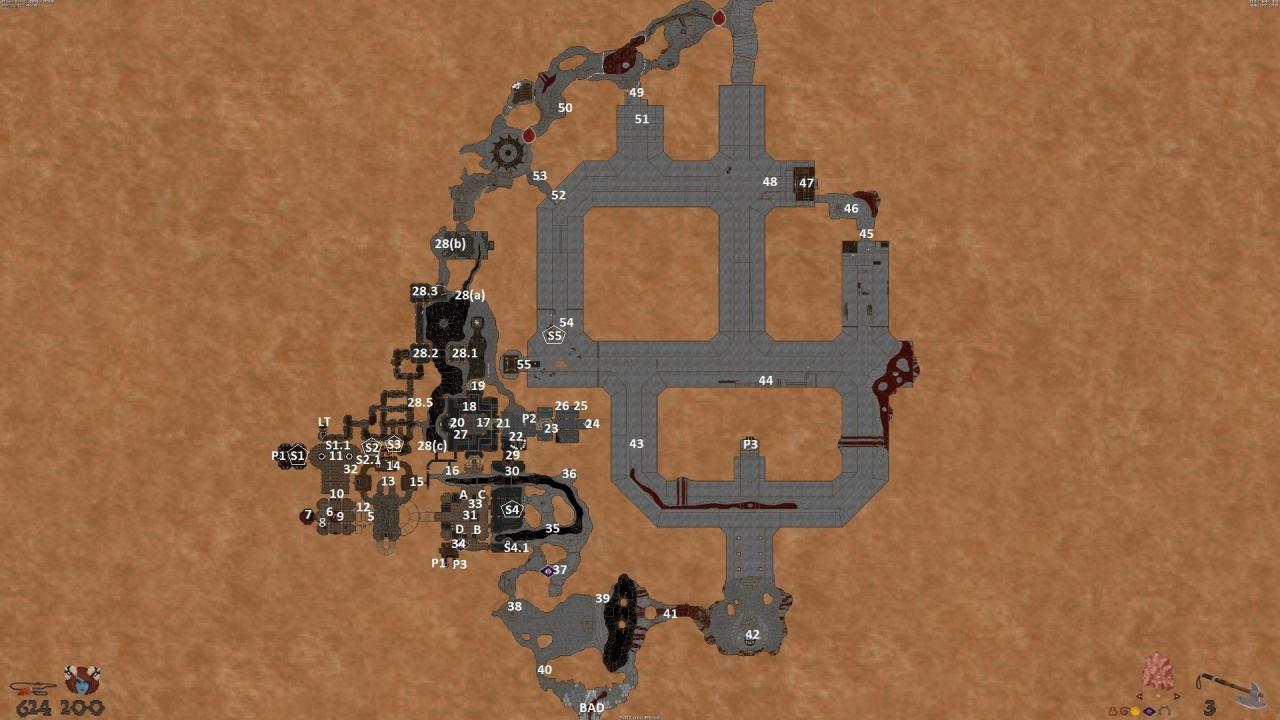
P1= Portal 1
P2= Level transfer to Paradise Lost Portal Room(PR)
P3= Portal 2
LT= Level Transfer to Place Afoul-Map 19.
BAD= Blood Axe Door
6. Jump from the ring to the next level.
7. This Barrier is opened at(2).Take the “Cursed Chalice”.
8. Go up the board.
9. Jump into the column and press the switch, now the ring(6) goes up and down.
10. Ride on the ring all the way to the top and get out.
11. Read the scroll 1/4 “Call of Chaos-First Chant”, “Knowledge”.
—-Map 20(b)—-
12. back to the staircase(5) and downstairs
—-Map 20(d)———————————–>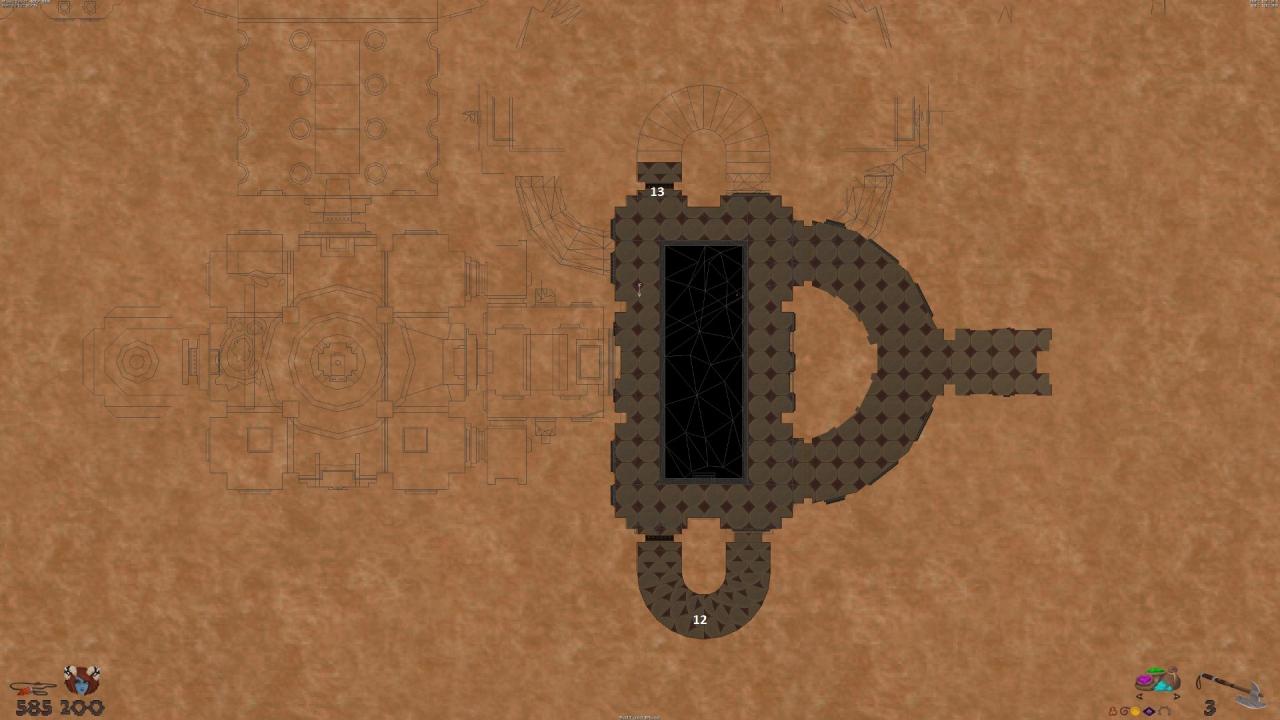
13. Continue all the way down to the basement.
—-Map 20(c)—-
14. Read the scroll 2/4 “Embrace of the Afterlife-Final Word”, “Death”.
15. Behind the coffin is a small tunnel, crawl through it to the outside…
16. …and here again in the small tunnel. Follow the tunnel.
17. Read the scroll 3/4 “For the Worthless-2nd Verse”, “Worship”.
18. Follow the tunnel.
19. Go out the tunnel, take the small way on the right, until you reach the iron door, use it.
(“Iron Key(30)”, Place Afoul-Map 19).
20. Grimmy Primarch wants mana.
21. Pull the lever to open the Iron Door.
22. Here is the laboratory for mixing objects with a recipe on the table.
23. Use the lock with “Pendant of true sight(rebel)(35)”, Paradise Lost Map 18(b). “Journal” entry:” Abedun said i need 3 soul key fragments to sap the baron.”
24. Fill the “Cursed Chalice(7)”at the well with mana. You get “Cursed Chalice(Mana)”.
25. “Iron Pickaxe”.
26. Scrawn gives you a map (press “j” 2 times to see the map).
27. Give Grimmy Primarch(20) the “Cursed Chalice(Mana)(24)”. After the ambush you are in a
kind of dream, just follow the way there is nothing special here. “Journal” entry: “Scorlag-blue- wants elixir of life and elixir of death”.
28. You wake up near the Old Orc and Scrawn(26).
*Edit*
28(a) Go out the door(19). Move up in the tower(28.1) and to the next tower(28.2), follow the way to the next tower(28.3) and go down. Take the “Crimson Salt Rock 1/7”.
28(b). Obelisk 4/5 **Secret**. Read the note that lies in front of the obelisk.
28(c). Go back to 28.2 and move on in the tunnel(28.5) and take the path on the left outside to the “Crimson Salt Rock 2/7”.
28(d). Go back the way(28.5) and at the end left once right to the door, press the switch(28.6) right of the door. Inside you will find “Crimson Salt Rock 3/7”. Now back to the laboratory(22).
29. Jump into the hole in the lab…Wait! Death for the enemy comes from above…
30. Read the scroll 4/4 “Path of Chaos Chapter III” “Hedonism”.
31. Here we will soon solve the riddle. But we need a “Cursed Chalice(Oil)” first. Go all the way back to the room with the first scroll 1/4(11).
32. Fill the “Cursed Chalice” with oil and get a “Cursed Chalice(Oil)”. Head back to (31). Fill
the bowls as follows: (A)Knowledge, (B)Worship, (C)Hedonism, (D)Death.
33. Up and grab the “Anointed Phylactery” on the top.
34. Open the dark door and take the “Scroll of Enchant Trinket”.
35. Jump over the gap…
36. …and anoher gap to the “Crimson Salt Rock 4/7”.
37. Through this dark door. I advise you to fill the “Cursed Chalice” now with mana at the
mana fountain(24) before you go further. On the next map you get 3x Scrolls of Nourish from
Bendi for it.
38. Use the lift down.
39. “Crimson Salt Rock 5/7”.
40. This way…
41. …further this way.
42. Erudin, “Journal” entry: “Erudin-red- wants me to perform a bloddy betrayal.”
43. This way.
44. Go all the way up here to the catwalk.
45. Jump here from the catwalk to the opening.
46. “Crimson Salt Rock 6/7”.
47. Boss fights! Just shoot from above, be careful that the shaking doesn’t cause you to fall down.
48. Up the ladder to the catwalk again.
49. The switch for this door can be reached from the outside.
50. “Crimson Salt Rock 7/7”.
51. Back up to the catwalk.
52. Up this ladder.
53. Sleep Potion recipe.
54. Down the ladder(52) and jump from here to the boxes(S5) below.
55. Take the lift up to Paradise Lost Map 18(c)
****Secrets****
S1. Press the 2nd gem from the left(S1.1) to reveal the secret.
S2. Press the switch in the Pool(S2.1) that has no flame. There is also a crack in the north wall that can be used as a transfer.
S3. Behind The scroll(14), go through the curtain and up the ladder. There is also a
transfer through the chimney, just press the button in the chimney.
S4. Fill the “Cursed Chalice(7)” at the pool with the blood(11). Fill the “Cursed Chalice(Blood)”
into the bowl(S4.1), now the secret below is accessible.
S5. At the top of the catwalk(54) jump onto the crates below. In one of the boxes is the secret
1. Start.2. Bear Warrior, “Journal” entry: “A wounded bear ask me to warn our camp of an attack.”
3. Forget the useless mortar and go up here at the edge of the rock.
4. Past the hanging bridge.
5. A little further and press the detonator below.
6. Obelisk 5/5 **Secret**.
7. Go back and over the hanging bridge(4), go up a rock ramp.
8. Continue to a kind of mine entrance.
9. Opens the gates below.
10. Lord Eberon give you the “Boold Key”, “Journal” entry: “Eberon wants me to open the gate
by the side of his fort.”
11. Go back to the detonator(4) and take the mine entrance.
12. Jump over the lava to the other side.
13. Pull the lever…
14. …this will open a room.
15. Pull the lever…
16. …this will open a passage.
17. Jump down here.
18. Follow the way…
19. To the orc camp.
20. Talk to Warlord Grund about the “Life Elixir(22)”.
21. Talk to Breaza about the “Life Elixir(22)”.
22. “Life Elixir”.
23. If you give the “Back of Yeast(57), Map 18(b)” to Lady Ingrim (61), Map 18(b), she will give you some items.
24. “Hog Liver”.
25. Bendi needs mana, fill the “Cursed Chalice(Mana)” into the bucket next to Bendi,
3x Scrolls of Nourish.
26. Talk to Shady Fixer. She will tell you how to poison the dog and will give you “Bottle of Deadly Poison”. Mix “Bottle of Deadly Poison” with “Hog Liver” and fill it into the dog bowl(22). There is another solution a few steps away(30).
27. Do you remember Scrawn(26), Map 20(c)? He gave you a drawing. The place is in Place Afoul Map 19, go on there.
—-Map 19———————————–>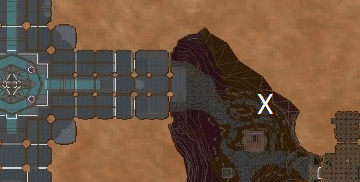
28. Dig in front of the two graves Map 19,(X), look at the drawing again if necessary and get “Mithril Chisel” give it to Scrawn(26),Salt And Blood Map 20(c). Use the portal room(PR) in Paradise Lost-Map 18(b) to get there quickly.
—-Map 20(c)—-
29. Scrawn(26) takes the “Mithril Chisel” and wants from you 7x “Crimson Salt Rock: (28(a),28(c),28(d),(36),(39),(46),(50)). Give it to him and you get “Crimson Salt Statue”.
30. Continue to the alchemist table. Make “Elixir of Death”, Primarch Scorlag(27) gives you the recipe for the elixir: Pull the lever on the oil tank (orange), fill the mana tank(blue) with “Cursed Chalice(Mana)” then pull the lever, pull the lever on the poison tank(green), add a breeze of pink and green salts to it. Use the lever on alchemist table, you need “Anointed Phylactery(33),Map 20” to get “Elixir of Death”.
**If you have not yet poisoned the dog guarding the “Elixir of Life” you can now make a sleeping potion and tranquilize the dog with it.
Remenber der Sleeping Potion recipe(53), Map 20? First Close the oil tank if you mixed “Elixir of Death” before. Leave the mana tank and the poison tank open and add a breeze of cyan salt then use the alchemist table to get “Sleeping Potion”. Go back to the dog and use “Sleeping Potion”and “Hog Liver” and fill it into the dog bowl(22). Take the “Life Elixir”. Give Scorlag(27) the two elixirs.
—-Map 18(b)—-
31. Give Gaun(41) the “Crimson Salt Statue”.
Now go to the place where you found the shovel(52). There is a npc or is it just a brain calling Yzbeth’s Gardner? No matter, use “Pendant of True Sight” with the brain-npc. You
get “Pendant of True Sight(Servant)”. Go all the way back to the lift Map 18c(1) and take the
lift down to Map 20(c).
—-Map 20(c)———————————–>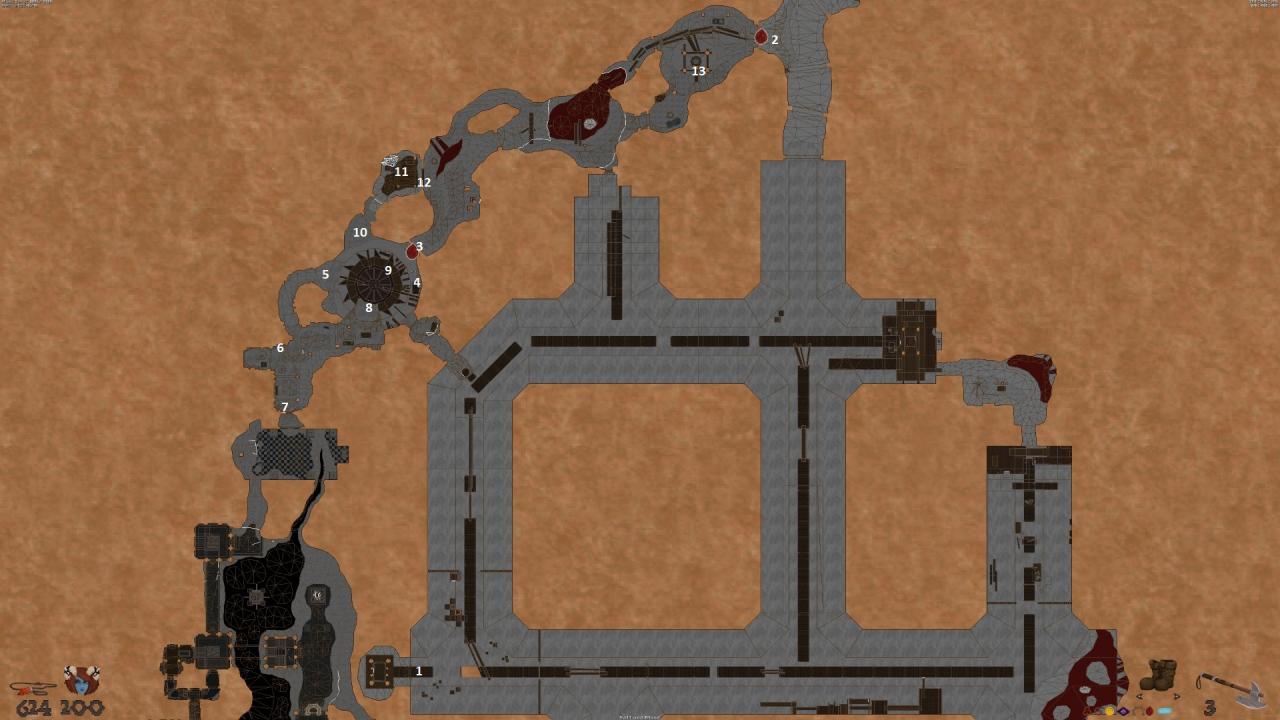
1. Go out of the lift.
2. Open the Blood Door.
3. Go to the next blood door.
4. Go up the ladder to the end and then jump onto the other board. a little further you can open the Door, it’s always good to have all the doors open.
5. Jump over the boards to the top.
6. Take the “Iron Lever”.
7. Remember: It is always good to have all doors open…:) pull the lever on the rightside of the door.
8. Jump here in the blood pool.
9. Use the “Crimson Salt Rock” at the bottom to drain the blood. After that you can collect the “Crimson Salt Rock (8/7)”. The Sahdy fixer will give you some gold for the “Crimson Salt Rock”.
10. Go up here.
11. Take the “Winch Wheel”.
12. Break the right window.
13. Use the “Iron Lever(6)” here and go down to get “Crimson Salt Rock (9/7)”.
14. Now return to the lift and go up. Continue with Map 18(c).
—-Map 18(c)—-
32. Use the “Winch Wheel” here…
33. …this opens the door here, with some enemies ;). After the fight we go back to Lord Eberon(10). We want his head and we will get it! kill him…. and take the “Pit Lord Head” Take the lift down again to map 20(c). Go to Erudin(42) and give him the “Pit Lord Head”. Now we have to go to the main entrance of Place Afoul at Map18(b),(62) and continue with
Map Place Afoul Map 19,Pt. 2.
****Secrets****
—-Map 18(c)—-
S7. Jump up here(S7.1), carefully along the rock(S7.2), into the cave entrance(S7.3), read
the script(S7.4)” from south to north, the first(A), third(B) and fifth(C) Stone needs to be
activate. The secret is now accessible.
S8. After you have used the Obelsiks at Map 18(b)(16),(29); on Map 19(4); on Map 20(28.b) and on Map18(c)(6),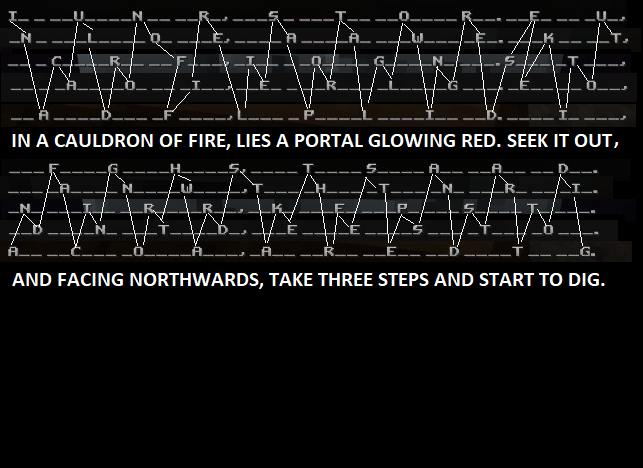 go to the lava pit(S8.1). You can comfortably climb down here at the edge. Go all the way down carefully along the wall and into the cave, dig behind the broken portal(S8.2) you get “Crystal Key”. The sameway back again always jump up and open the secret. You get “Boots of Journey”.
1. Go to the church and kill everything .2. Go through the wall that is now open.
3. Yzbeth again.
4. Jump out of the window and follow the path, jump over here to the path with the columns below. A little further along the winding path it turns into a library (look around here for S7.).
Jump the bookshelves until you reach the top. Jump into the book tunnel right in front of you and then to the top, now the library we know from the last visit will open.Jump even higher to the colonnade with chessboard pattern. Now jump onto the chair with the powershard and immediately over to the table. Jump onto the bookshelf and over to the colonnade where there is a hole at the end, jump in. Get out of the water and jump to the smaller tube on the edge. Continue to jump into the pan and up the cooking spoon, take “Soul Key Fragment(1/3)”.
Yzbeth(3) again. Go outside on the pink clouds behind you. Jump on the tube and on the edge of the next tube, jump on the magnifying glass, jump on the bed and continue to the other bed. Jump on the first stone plate to the second one which immediately lowers so quickly jump to the third plate. Now jump over on the staggered walls until you reach the top. Jump into the hole. Out of the water.
5. You are now here on Map 19,Pt. 2
6. Go to this door an event starts.
7. After the fight this door is open take the “Soul Key Fragment(2/3)”
Yzbeth(3) again. Turn arround and jump up the pink clouds to the outside. Jump on the bed and further up on the top of the bunk bed. On the round bed and further to the sofa. Another bunk bed on which we jump from the sofa and then continue through the passageway. Further into the low gravity room, after the fight go through the other door. There are now some beds where you will find your way easily. Take the “Soul Key Fragment(3/3)”,Yzbeth again, you don’t have to seduce Yzbeth, read below(**) how you can seduce another demon. When she has finished talking, talk to Yzbeth to seduce her, you get”Piece of Perfumed Cloth”. On the way out you can free the Lancer in the Painting(8).
9. With the “Pendant of True Sight(Servant)” you can now go through this wall(9).Take the “Orc Doll” and bring it to the Lancer in the Painting via (S4). Now give Adur(1) the”Piece of Perfumed Cloth”.
—————————————————————————————————–
When you have refused Yzbeth’s offer and go through the door you can talk to Eraanthe, she stands near Gaun (Map 18(b),41). She will help you further. you will get the “Bloody Axe Key”and a “Journal” entry: “Eraanthe will help me if i find her a sacrificial sword” head to Map 20(c)to the Bloody Axe Door(BAD) and futher to Map 20(e).
—————————————————————————————————-
****Secrets****
S7. Before you go into the library jump right onto the table, continue to the bookshelf on the right and then onto the column to another column, turn around and jump onto the high column, turn around and you will see the secret lying on another column.
—-Map 20(e)———————————>
1. Entrance.
2. To the right.
3. Up the stairs.
4. Through this room.
5. Along the passage.
6. pull the lever.
7. Grab the “Sacrificial Sword”. Go back to Eraanthe near Gaun Map 18(b),(41) and give her the “Sacrificial Sword”. After you seduce her you will get “Lock of Hair”
-Go back to Adur(1). Map 19, Pt2. Give Adur(1) the “Lock of Hair”
>>>>This will be one of the last steps in this hub after you meet Reaver, if you go futher to Bloodrite Map 21 you can no longer return to the hub. So do everything you still want to do before<<<<
-Show Abedun, Map 20(c)(24), the 3 “Soul Key Fragment” and he gives you “Angel Feather”. Take the Portal(P2) back to the Portal Room(PR) and you will meet Reaver there at the entrance, a cutscene comes…Fight your way north to the door that leads to bloodrite map 21, or clear the whole map. I advise you to keep your companions (i had 8 companions at the end) waiting and pull the mobs to them if possible. I am sure you know how to fight at this point. Continue to Bloodrite Map 21.
—-Map 21(a)———————————->
1. We start here and all our keys have disappeared. We are alone again…
2. This way.
3. Carefully around the corner.
4. Into the tower here.
5. Arrived at the top along the walkway.
6. This way.
7. Follow the corridor to the “Bloody Axe Key”.
8. Go back to(6) and then right to the blood axe door.
9. Take the spiral staircase up.
10. Use the portal.
11. You are now in the church, use the book.
12. Go out into the courtyard.
13. Clean the rest of the map and then go through this door. Say hallo to the Pit Lord Commander…
14. The Blue Baron…
—-Map21(c)———————————->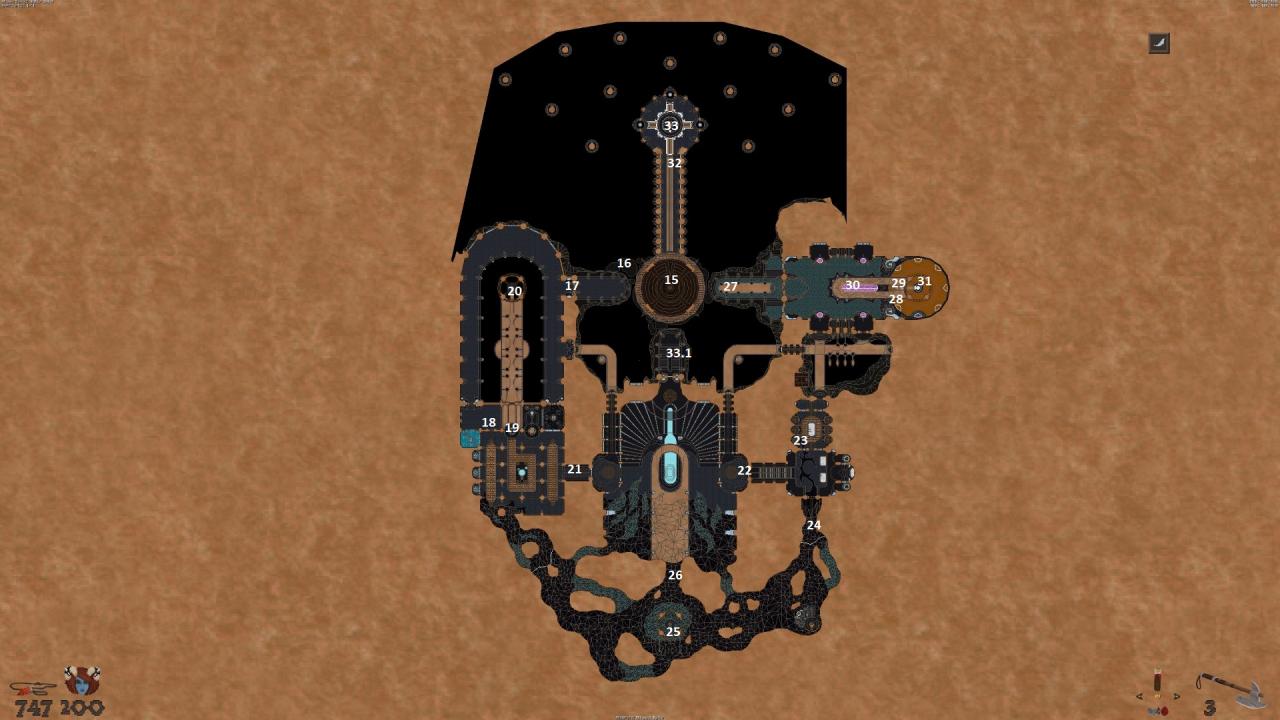
15. Ahhhh…say thanks to Abedun who gave you the “Angel Feather”, gives you low Gravity!
16. Jump up the columns.
17. Through the archway.
18. Follow the path on the right to the laboratory.
19. Jump up to the catwalk here and immediately drop down to the next catwalk.
20. Use “Soul Key Fragment 1/3” here.
21. back to the lab and take this away…
22. …to the other side.
23. Press the button on ever tank if you want but the tank(21)…
24. …removes the tendrils here.
25. Use the “Soul Key Fragment 2/3” here. This will remove the the remaining tendrils.
26. Further this way.
27. Back to the beginning of this map(15) and continue this way.
28. What a huge hole drop all the way to the bottom.
29. Press the button at the very bottom and immediately turn around, stand on the column turn
around again and face the button, ride it upwards. After a short time there is an opening
through which we jump, from there jump up the jumppads on the edge until we are back up(28).
30. Jump via jumppad to the catwalk above.
31. Use the last “Soul Key Fragment 3/3” here.
32. Go via(15) to the vault that is open now, go inside.
33. Pull the lever for the lift(15) or use the portal(33.1) to see a easter egg and credits. This portal also leads back to Map 21(a), prepare for the final battle and collect everything. Now pull the lever(15).
Bossfight: Fight the boss until he has only 74% left to live, Cutscene…Dive to the last Pillar an go the ladder up, you need to push 3 buttons on every pillar. Cutscene…a new Map, you have only 1 hp left. Go downstars, Lancer wants us all to gather downstairs. So talk to the Npc’s again. Set up your npc’s and get ready for mass Attack. After everything has been killed, continue on the right until you reach the fortress. Again a mass attack of mobs.
Cutscene…Fight the boss down to 39% life. We are falling a long way down. Keep fighting the boss until he drops to 24% life then Hide behind Abhaoth. at 19% life you need to hide behind Abhaoth again. Fight the boss to 14% and hide again behind Abhaoth and again at 9% life. If the boss has only 4% life left he will die.
****Secrets****
—-Map 21(b)———————————->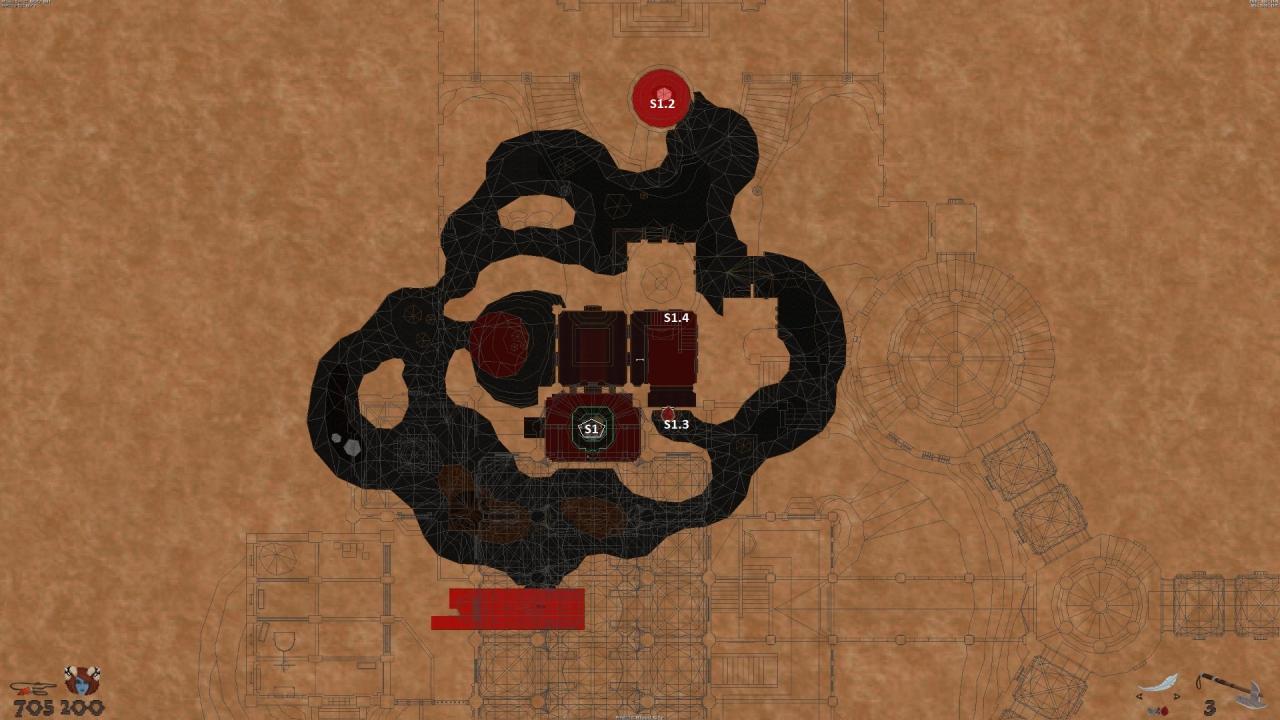
S1. Use the left armour rack(Map 19(a),S1.1) to get the “Blood Key”. Jump in the Blood Well (Map 19(a),S1.2). You are now on Map 21(b), dive through the Blood Door(S1.3). Out of the water(S1.4) and on to the secret. Use the Portal to get up fast.