Contains walkthrough, endings, and collection.
Walkthrough Part 1: Blue to Gray
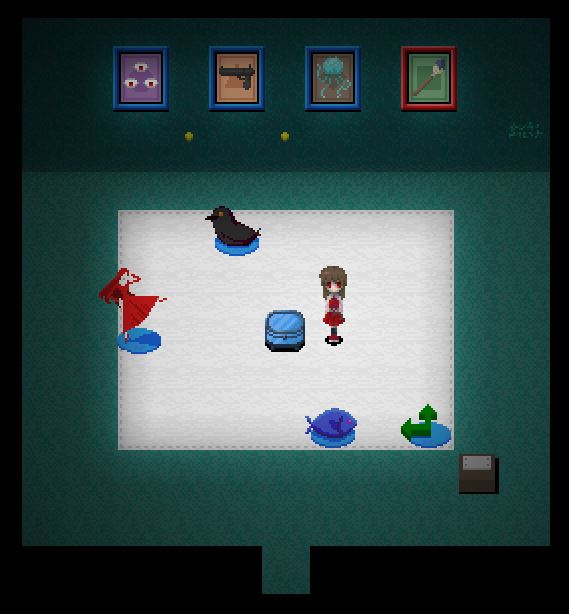
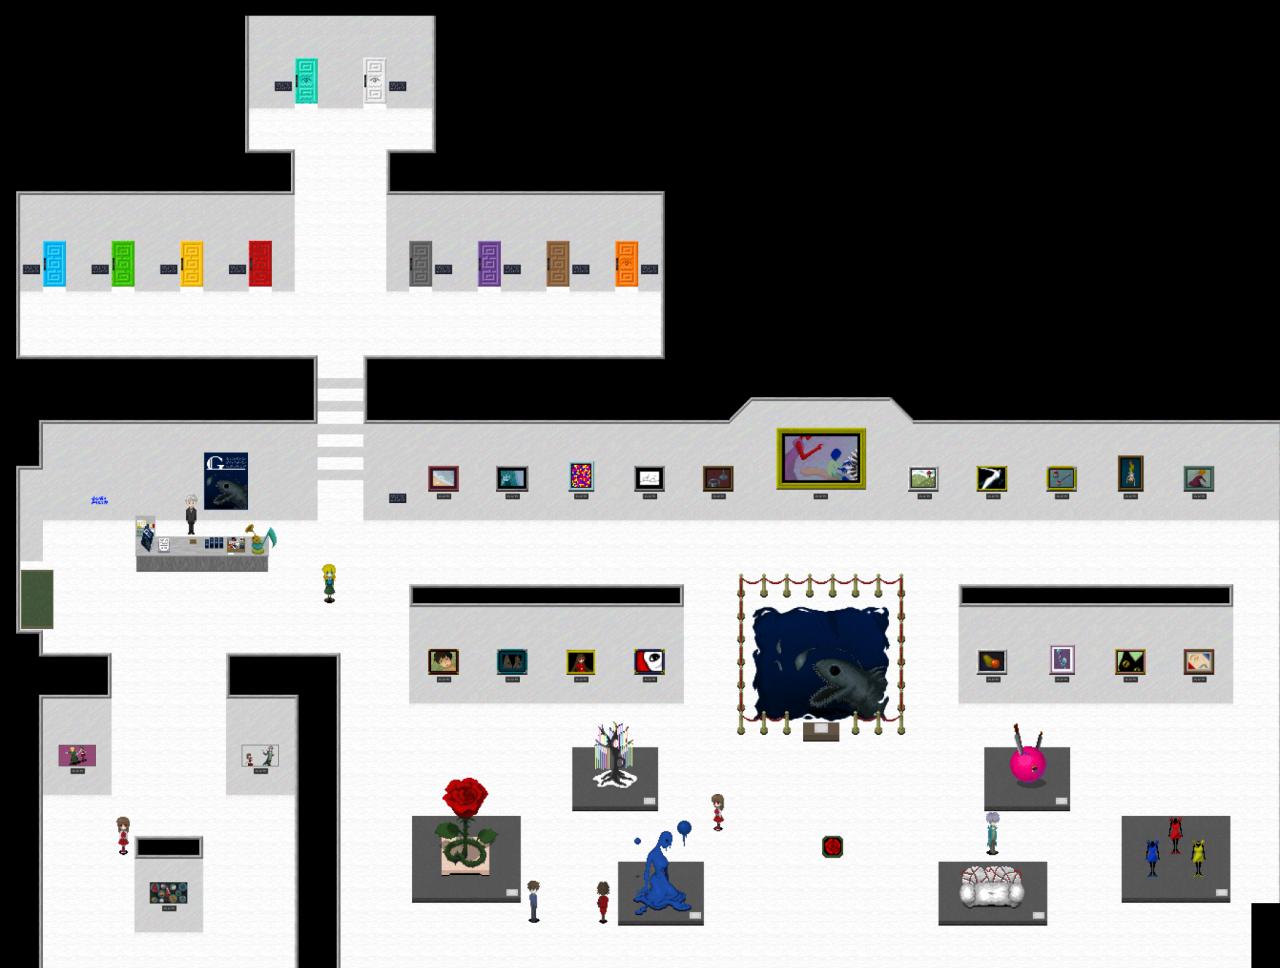
[The gallery]
Head all the way up to 3rd floor and look at the painting’s name.
When the light flickers, go back downstairs to the 1st floor, then get back to the painting.
Look at the blue ink smeared on the wall, then follow the footsteps to floor 1.
Walk into the deep sea painting.
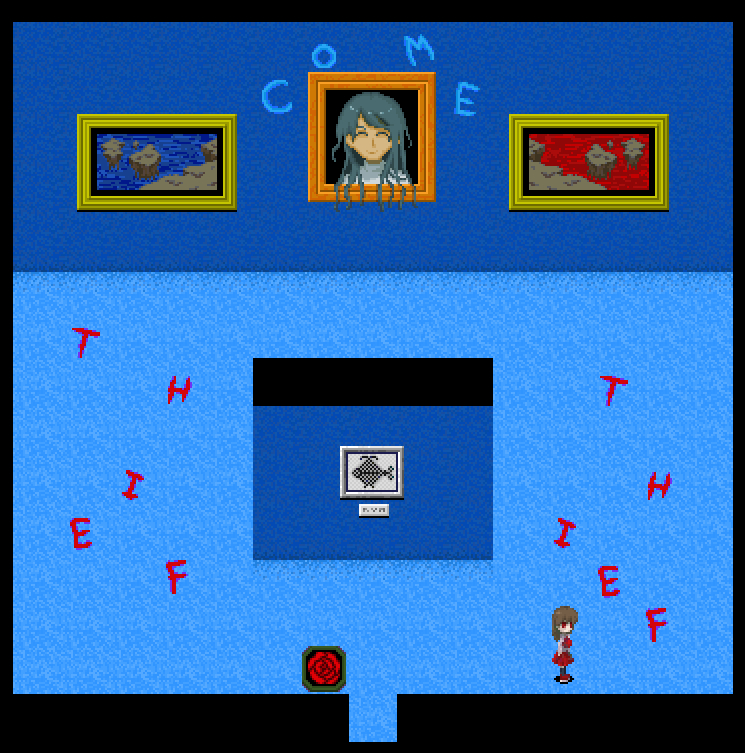
[Blue Area]
Head right to pick up your rose, then push the table aside to get into the room.
Pick up the key, then get out. Head left and use the key on the door.
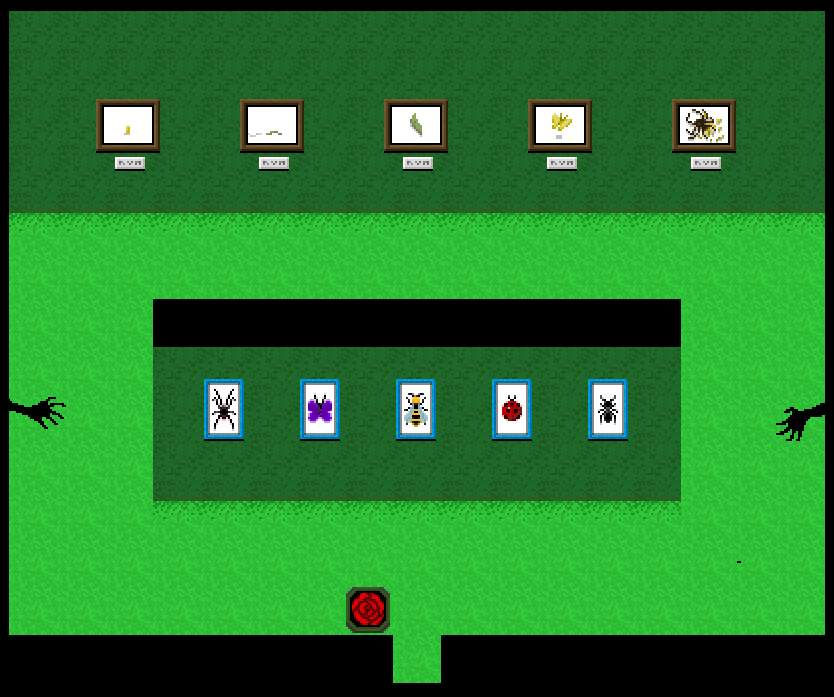
[Green Area]
Talk to the ant on the left, then walk up; avoid touching the walls.
Take the ant painting then go through the door on the bottom right.
Use the painting as a bridge, and go through the door on the bottom right again.
Get the key and get back to the place where you got the ant painting. Use the key.
[Yellow Area]
[Left room: Hide and seek]
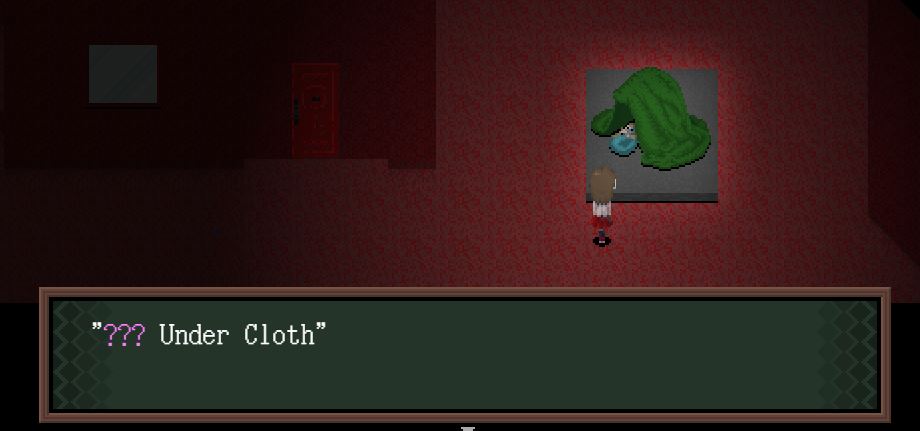
Look at the man in the painting, move once, then read the yellow text on the wall.
(Save your game outside then come back, if you’re going for a specific ending.)
Find the man, look at him, then read the new yellow text.
Pick up the fish head at the top of the room.
[Right room: Storage]
Go to the right and look at the blue stool. Push it to the left until it starts walking.
Look at the stool and look at their feet. Go to the upper right corner and look at the box.
Go back to the stool and give it the other high-heel.
Let the stool follow you until it’s in front of the shelf with the blue fish tail on the top.
Talk to it to make it stop, then talk again to get on the top of its head.
Pick up the tail, then get out of the room.
You should now have a full fish. Use it on the hole in the middle of the cat’s face.
[Sprout Area]
[Liars’ room]
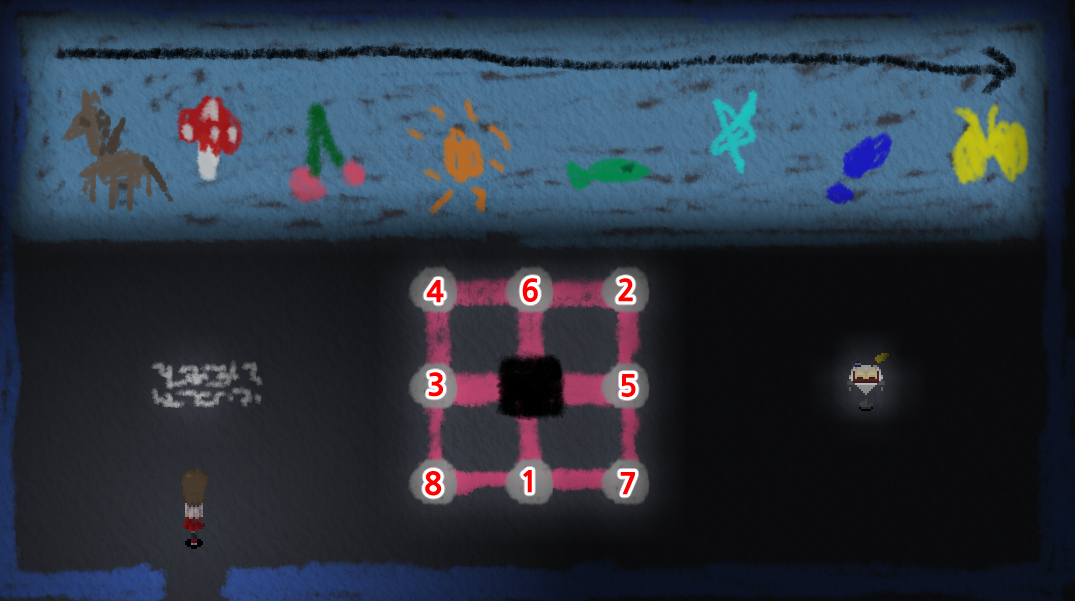
Brown one is telling the truth. Go to the center room and interact with B-2 tile. Wind it up.
Get out and go to the top area, where dolls are hanging.
Interact with the pink doll, fifth one from the right. The red doll then falls off.
There was a clockwork hidden where the red doll was hanging; wind it up.
(You don’t need to make the doll fall, though.)
There’s a clockwork on the far right hallway, where the mouth is. Wind it up.
Go back to the middle of the room where the sprout was. Pick the blue fruit.
Watch out for the walls when you go to the mouth on the wall.
Give the fruit to the mouth. Watch out for the guillotine.
[Red Area]
Go past the hallway.
Interact with “The Lady in Red” in the upper right corner.
Lure her away from where she was, then run over there to get the red key.
Open the middle room using the key, and read the pink book in the upper left shelf.
Get out of the room, and go right. Observe the man and get his key.
Go to the left and use the key on the door with a window.
Lure the lady in blue so it chases you to the door.
After getting out, wait a little until she crashes through the window. Get back inside.
Pick up the blue rose, get out again, into the middle hallway where the saving spot is.
Put the blue rose in the glass of water next to the ‘eternal blessing’ painting.
Give the rose back to the man, watch the cut scene.
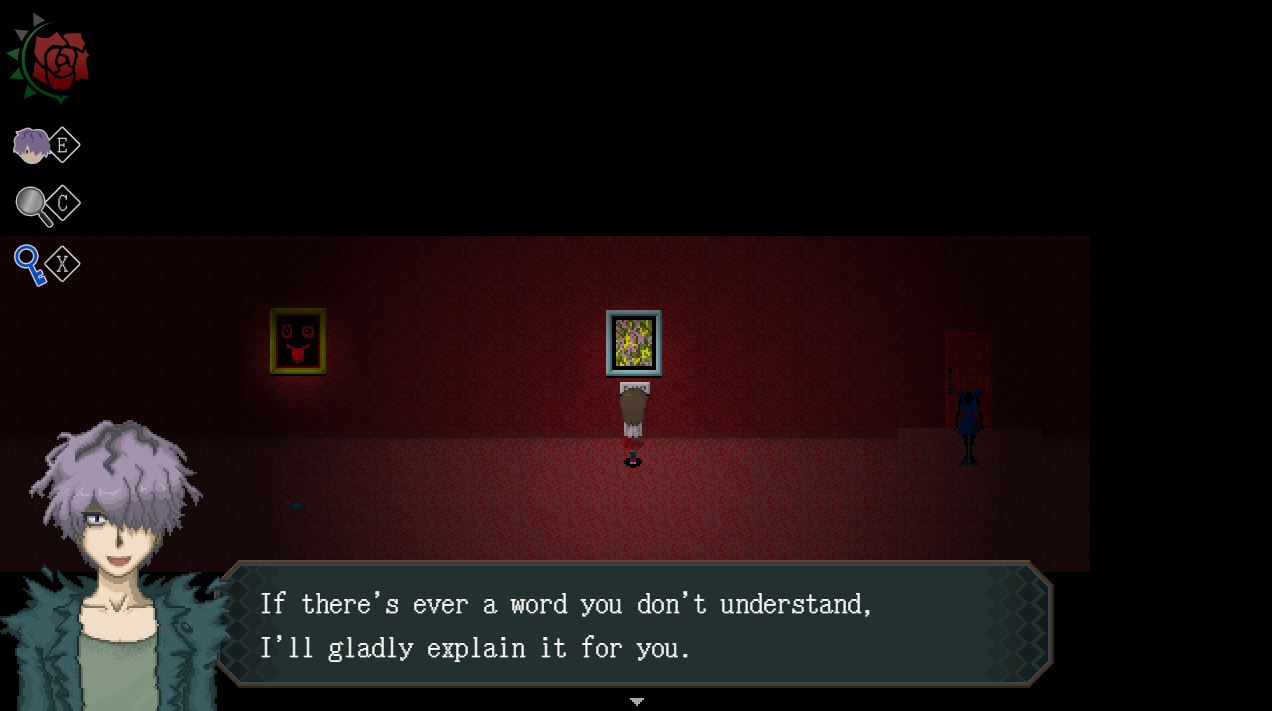
Look at the third painting in the same hallway; Garry will teach you words you don’t know.
* If you’re aiming to collect all the pieces, you’ll have to move with Garry so you can learn all their proper names. Go back all the way to the blue area if you’d like to.
[Gray Area]
[Teapot room]
Make sure the cups are right in front of the same colored teapots. Here’s how you do it;
1. Red cup, right.
2. Red cup, down.
3. Yellow cup, left.
4. Green cup, down.
5. Blue cup, right.
6. Blue cup, up.
7. Yellow cup, down.
8. Green cup, left.
9. Yellow cup, up.
[Canvas room]
Push the stools to get the eyedropper. Here’s how:
 Up, right, up, right, right,
up, right, right, up, up,
up, left, up, left, left,
left, down, left, left, up.
Get out and use the eyedropper on the bloodshot eye, on the left.
Look at the wall the eye looks at. Get in and get the red marble.
Use the marble on the snake painting. Note what the text behind the painting says.
Based on which one fell, the location of the next item becomes different.
[Sculpture room]
There are four; the wine, the head, the skeleton, and the tree.
If the first painting fell, the ring should be on the back of the white head.
If the third painting fell, it should be in the skeleton’s hand.
If the fourth painting fell, it should be in the tree.
Pick up the ring and leave.
Go back to the hands in the entrance.
Interact with the left hand and put the ring in the fourth finger.
Pick up the bouquet and feed it to the blue painting in the upper right corner of the area.
[Room with lots of Ladies in Colors]
Go to the far right and look at the hanging man’s painting.
The password is upside-down. It’s 2569.
Put the password in the middle of this area; use the yellow buttons on the up/down side of the numbers. Then look at the door on the upper side.
Get the golden fish, and look at the mirror. Get back out.
Go to the bottom right of the room, and pick up the ball in front of the Lady in Yellow.
You should now have a lamp, which you gotta give to the lady reading the newspapers.
You’ll get a golden elephant there. Bring that over to the “Noble Boasting of Gold” near the hanging man’s painting. Read his nametag, his text, and trade the elephant for the bird.
Use the golden bird on the birdcage in the bottom of the area.
If you want to, you can give your rose petal to the clock to make it stop time briefly later on.
You don’t really need to if you’re fast enough, though.
Get in the room.
Pick up the gray key on the picture (note that if you pick this up, you can no longer go back to the previous areas.)
Try to get out and wait till the wall breaks. Avoid the lady in blue and use the hole to get out.
Run over to the gray door to use the key.
Walkthrough Part 2: Violet and Brown
Go down, step on the blue triangle, orange circle, pink square, then the orange circle again to get out of the maze.
Go into the right room, get out and shove the sculpture to the left.
Go through the newly formed door on the top. Meet Mary.
Go to the right room, read the book from the left shelf.
Go near the green bunny and pick up the key.
Get out and into the left room. Look at all the brown boxes.
Try to push the head sculpture, then get out to the top.
Press Z on the blue rose.
Take Garry back to the ‘bunny room’ and push the right shelf.
Pull on the fourth string and switch back to Ib.
Let the girls cross and push the blue crescent down the hole.
[Brown Area]
Talk to the mirror. The first answer is ‘Heavenly Thread’, then the next one depends.
If it’s blue, it’s ‘Marvelous Night’ but if it’s red, it’s ‘Depths’.
Get in and pick up the rolled up painting piece in the corner of the room.
Read the pink book, J page to get a hint on what year it was painted.
Get out and use the piece of painting you got in that room on the snake piece, on its belly.
[Violet Area, Garry]
Fit the crescent into the hole.
Kick or move the doll aside and look at the door, then the new text, then back to the door.
Get the yellow paint ball.
Look at the snake piece’s belly to get a glass heart.
Give the glass heart to the piece that has hands sticking out.
Get in the library and pick up the umbrella.
Read the book on the right side of the eye painting, then pick up the green ball.
Get out and give the umbrella to the fishing hook.
Use the password 6223 on the Juggling painting to get a blue ball.
[Brown Area, Ib]
Get the umbrella from the fisherman.
Go down straight and get into a room to give the umbrella to the woman in painting.
Wait until the turtle crawls under the painting. Interact with the turtle and get on its back.
Interact with the Rotation painting twice so the green side is on the upper side.
[Violet Area, Garry]
Get in to the room beneath the snake piece, and pick up the violet ball.
Go down and look at the painting to flip it back, so the red side is now up.
Push the clover to the hole, so the thorns shrink down.
Go back to the library to pick up the pink ball.
Read the book on the right of the ear painting, M page.
(You can either switch back to Ib or continue with Garry at this point. Dialogues differ)
Get out and rip the doll to get the red paint ball.
Save, then follow the doll into the room.
Pick up the white ball, then attempt to get out.
Based on how the dolls are arranged, here are the two spots where you can find the keys:
 Read the red text, and find the key by interacting with the dolls.
If you succeeded, go up the stairs.
If you failed, get Ib to come find Garry.
[Brown Area, Ib]
Talk to Mary standing still, if you haven’t yet.
Go to the room on the upper left corner to pick up the brown key.
Get out and use the key on the door next to fisherman.
If Garry comes and saves you, just go back to the brown area.
If he failed, go downstairs to the doll room and talk to him.
Either way, go back to the brown room that has a headless mannequin blocking the way.
Go down.
[Sketchbook Area]
Among the two paths, choose the upper one if you want to talk to Garry more.
After entering the dark area, look at the map and go to the middle of the area, where the yellow building is. Read the blue text on the wall and go left.
Get in the house and pick up the blue bucket.
Go to the upper right corner to get water from the lake.
Go down and use the water on the cyan flower bud of the tulip.
Go to the upper left corner and use the mirror under the sunlit path.
Solve the puzzle; here’s how.
 Press Z on the grey circle to activate it. Pick up the pink crayon and get out.
Go right and use the pink crayon on the black part in front of the house.
Get inside and look at the blue toy box.
[Inside the Toy Box]
Based on which route you took, you might wake up on your own, or wake up with Garry’s help.
If you woke up on your own, you gotta find a key, your rose, and Garry.
If Garry woke you up, you can only find the key which is in the bottom right corner.
Below is the picture of where each items are, if you woke up alone.
 After finding the items, run upwards to exit.
If Garry is in a pinch, he’ll tell you to keep going.
When you get out of the room, you’ll see Mary snipping his rose away.
You can get back to Garry to get his lighter so you can burn her painting, but you don’t have to.
If you and Garry made it back out, burn the yellow rose with his lighter.
Go up and quickly interact with Mary’s painting to burn it down.
Afterwards, get out and head to the yellow building to unlock the door.
If this is your first run, just follow the black path and get to the third floor like you have in the beginning. Endings may vary based on your actions here.
If you go with Garry, you’ll get out fine. If you go with your mother, you’ll meet a bad end.
Walkthrough Part 3: Secret Area
If you came here alone, you’ll be able to see a bad ending.
If you came with Garry, you’ll be blocked from seeing that bad ending.
After entering the black area, there will be a new path leading downstairs, near the counter.
Follow the path down to enter the orange area.
[Orange Area]
Watch the cut scene and go up to talk to a white ant crawling on the floor.
Go to the door on the right and pick up the rightmost painting, get out and use it as a bridge on the hole in front of the ant. (Take note of the color of the paintings in there.)
Go around to the left and step on the black rose.
Go into the door on the clock’s right. Avoid the arrows coming from the upper side.
Pull the needles out from the butterfly and go down all the way until you see it in the bottom left.
Avoid the ‘Mistake’ as it can harm you; talk to the butterfly to make it follow you.
Get out and look at the painting in the upper left corner, with a candle.
Remove the painting and bring it with you.
Go into the door on the left of the clock.
The ‘clock hands’ is either on the bottom left corner, or in the bottom right corner of the room.
Reach out to it and get out of the room.
Match the color of the pieces to the ones you’d seen in the room on the right.
It’s red, blue, yellow, purple, green. Then wind up the clockwork next to the text, in front of the clock.
You can now exit the area by going through the door, behind the flower pieces on the top.
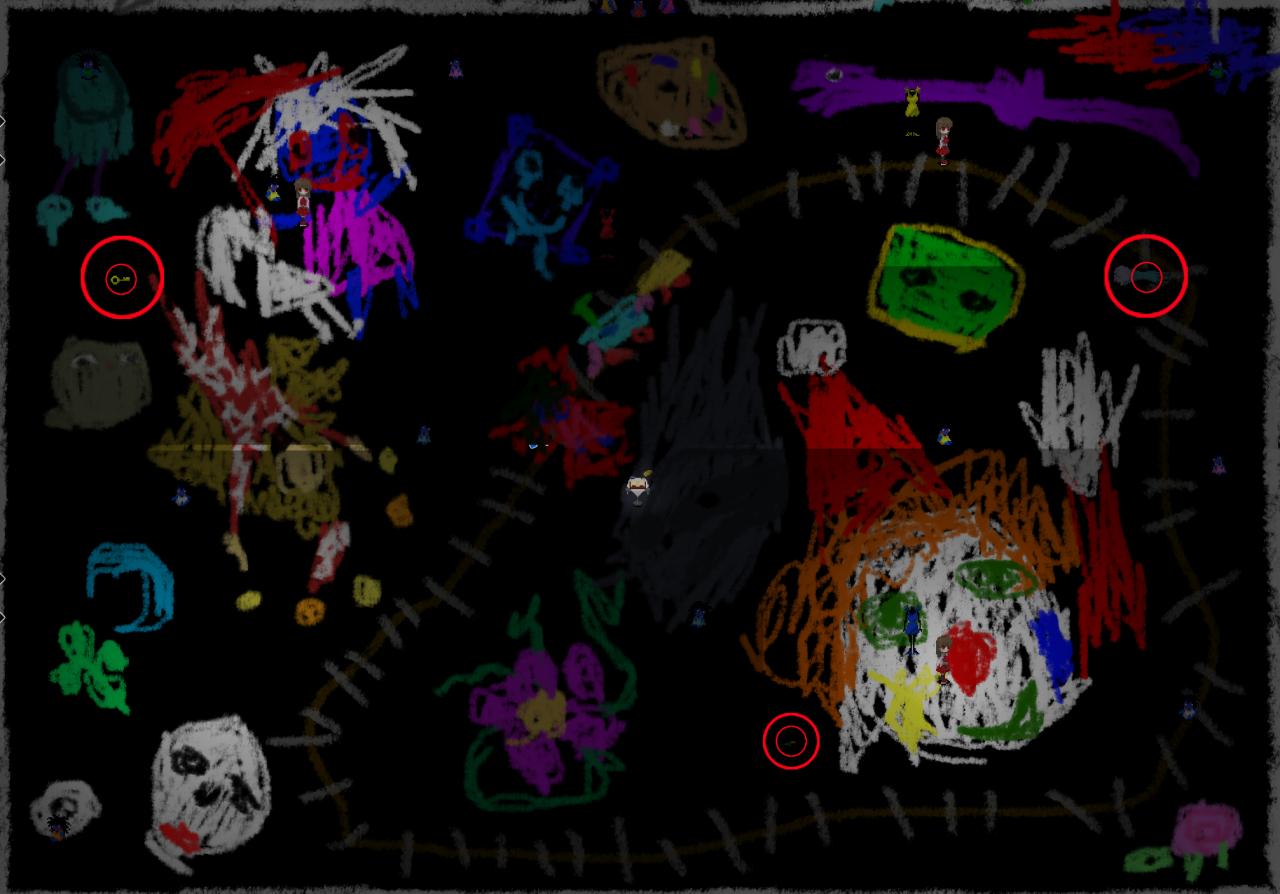
[Abyssal Space]
There are six tiles you need to collect.
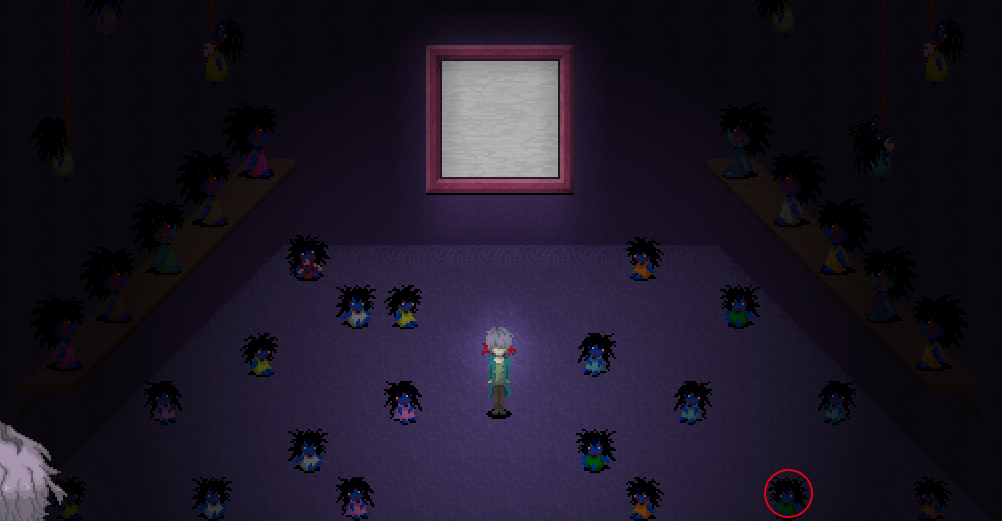
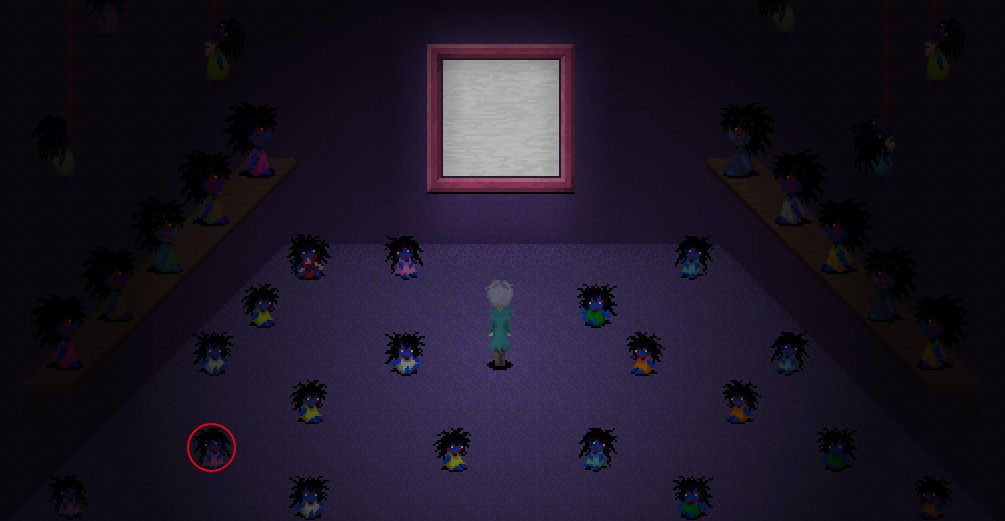
[Room with lots of cyclops paintings]
Read the text on the wall, then look for the one that is animated.
It’s either the middle one from the 2nd column from the left, or the middle one from the 4th column from the right.
The painting will shake and drop the tile; based on your route the painting might fall as well.
[Maze]
Avoid the red scribbles.
Collect all the black scribbles moving around in the maze.
After you get all of them, interact with the book at the entrance to put them in.
Get the tile and leave.
[Green bush room]
If you came with Garry, you can choose to let Garry do this, or go together.
Avoid stepping on the bushes and step on the black rose to get the tile.
[The library]
If you came with Garry, he’ll tell you he wants to take a rest.
Save before talking to him. Talk to him three times to see him fall asleep.
Right as the shelves start shaking, try to wake him up.
(I don’t know when this will be fixed, but if you let the shelves shake for too long, the game will crash out.)
Read the yellow book in the upper left corner, then jump into the painting on the upper right.
Though it looks like a puzzle where you gotta make them identical, you SHOULDN’T make them look the same.
There are two ways to solving this puzzle, and you have to make sure they have a TITLE.
Below is ‘Five Hours Earlier’
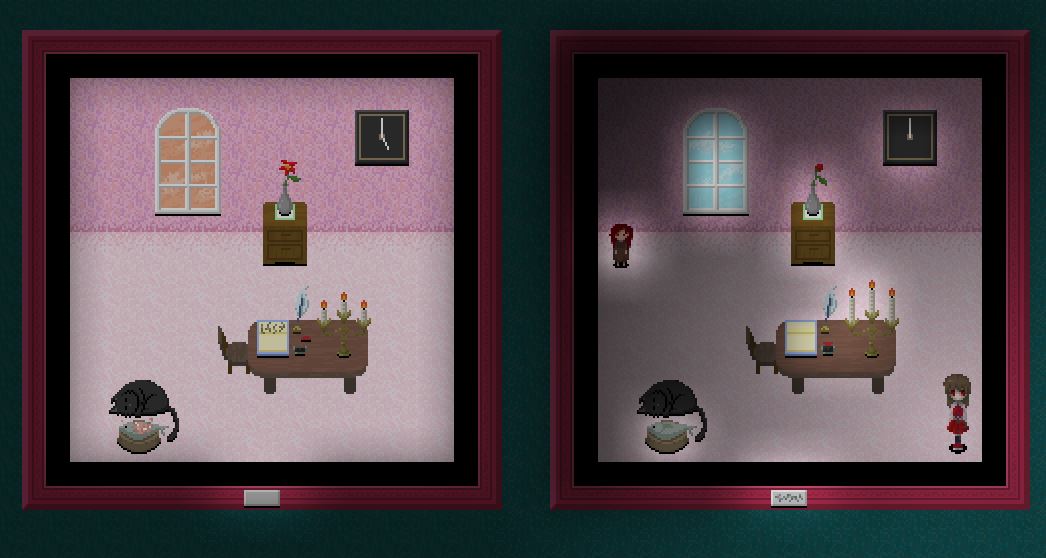
And this one is ‘Five Hours Later’
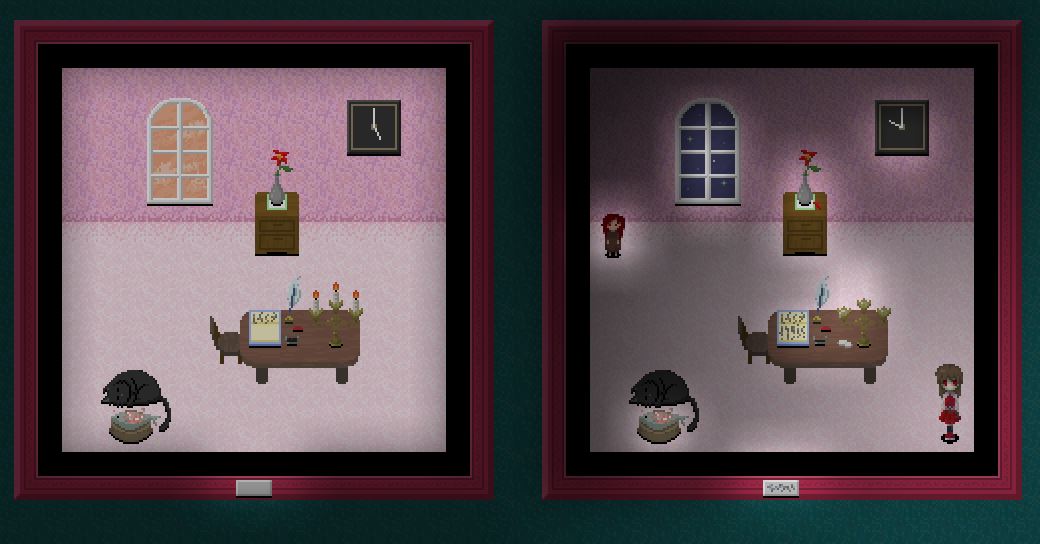
Either one will work and will be added to the collection.
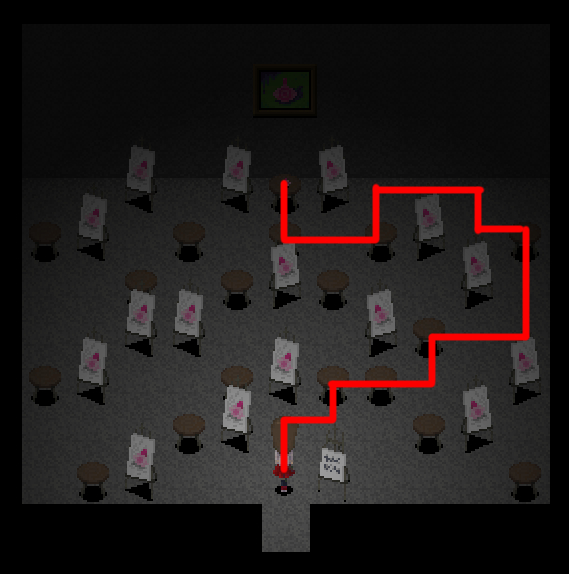
[Figure room]
Talk to the jewel box and look at the text on the wall.
The yellow dots between the paintings are buttons, so you can switch their places.
The brush painting however, cannot be moved.
Here’s how you solve it:
[Rightmost hallway with nothing inside]
After you solve the maze, the bird from that room will go running to the right side.
Follow it to see it jump into the frame.
Read its title and get the tile.
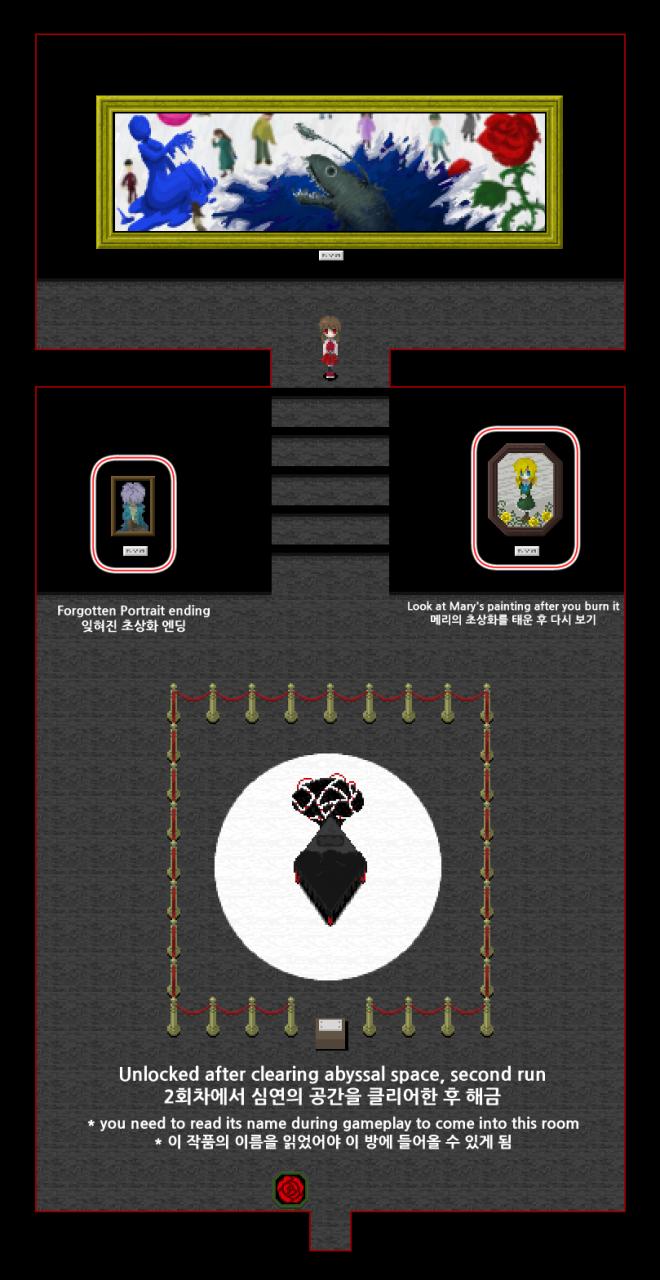
After you get all 6 tiles, look at the painting above the giant skeleton figure in the main room.
Go through to see the black bed art piece. Read the title.
If you got here alone, you can go to sleep in it and see a bad ending.
If you got here with Garry, he’ll say it’s too dangerous.
Go up the stairs to get back to the gallery and see an ending.
Conditions and Endings
[All Events]
[Overall gameplay]
– You can talk to Garry by pressing E, it’ll give you different dialogues depending on where you are.
If you saw 10~19 dialogues, you get (Garry’s bond meter +1)
If you saw 20 or more, you get (Garry’s bond meter +2)
– If your (Chat with Garry) meter is 7 or more, you get (Garry’s bond meter +1)
[Red Area]
– Talk about the third painting in the hallway where you first met him (Chat with Garry +1)
[Green Area]
– You can bring Garry back and talk to the ant in front of the insect paintings (Chat with Garry +1)
[Yellow Area]
– You might find a painting of you collapsed in the Hide-and-seek room (one of the conditions of Mary route)
– You can bring Garry back and talk to the walking stool in the storage room (Chat with Garry +1)
[Gray Area]
– Talk about the porcupuss piece in the Teapot room (Chat with Garry +1)
*Above becomes inaccessible after you pick up the key in the birdcage room in Gray Area.
[Gray Area]
– Picked up and gave Garry’s coat back after the nightmare (Garry’s bond meter +2)
– Talked to Garry after waking up from nightmare (Chat with Garry +1)
– When Garry tried to kick the mannequin head, you…
1. Closed your eyes (Garry’s death meter +1)
2. Stopped him (Garry’s bond meter +2)
– When being chased by the Lady in White, Garry asks if they should take a shortcut.
1. Take the shortcut (Garry’s death meter +1)
2. Other choice leads to no meters rising.
– When being chased by the Lady in White, the mannequin heads blocked your way near the painting of the Hanging Man.
1. Hurry…! (Garry’s death meter +1)
2. Other choice has no effect.
[Brown Area]
– Mary asks you who you’re going to get out with.
1. with Garry (Garry’s death meter +1, one of the conditions of Mary route)
2. with Mary (one of the conditions of Mary route)
3. no effect
[Violet Area]
– Talk about the milk puzzle with Garry (Chat with Garry +1)
– Garry may kick the doll off the door (Garry’s death meter +1)
– Garry may fail to escape from the doll’s room (Garry’s death meter +2)
…however, Ib and Mary may go and rescue him (Garry’s bond meter +3)
– When the room goes dark, you…
1. Told him you’re here (Garry’s bond meter + 1)
2. Told him you’re not here (Garry’s bond meter +1)
3. Didn’t say anything (no effect)
– Garry may pull the third thread in the room with 5 threads. (Garry’s death meter +1)
[Sketchbook Area]
– Choose the upper path at the entrance to get the treasure. (Chat with Garry +1)
– Talk to Garry under the sunlit path, at the upper left corner of the area (Chat with Garry +1)
– Looked at the pudding and say Yes to Garry’s question (Chat with Garry +1)
[Toy Box]
– If Garry’s death meter is 2 or below and you found him, you tell him…
1. That you’re okay (Garry’s bond meter +1)
2. That it hurts all over (Garry’s bond meter +1)
3. no effect
[conditions leading to Mary’s Route]
– Finished the game at least once
– Garry’s death meter is 7 or more
– You looked at Ib’s fallen painting in the hide-and-seek room in Yellow Area
– Choose either Gary or Mary when Mary asks who you want to escape with
– Garry fails to escape from the doll room in violet area
– With all of the above fulfilled, choose “Garry…?” when you talk to Garry in the doll room
[Bad Endings]
[Ib All Alone]
– Only available from second run
– Garry must’ve traded roses with Mary
After getting out of the toy box, go to the yellow building in the middle of the sketchbook area.
When you get into the black gallery, use the stairs leading down near the counter.
Solve all puzzles and fall asleep in the black bed at the end.
[Forgotten Portrait]
– Failed to fulfill at least one condition leading to Mary’s route
– Garry’s death meter is 3 or more
After Garry falls asleep, pick up his lighter and burn Mary’s painting.
When you try to get back to the real world, refuse to stay with Garry.
* This will add Ib’s Dad in the True Exhibit gallery
[A Painting’s Demise]
– Fulfill all the conditions for Mary’s route
– When Mary asks who you want to get out with, choose Garry
[Welcome to the world of Guertena]
– Fulfill all the conditions for Mary’s route
– When Mary asks who you want to get out with, choose Mary
[Normal Endings]
[Memory’s Crannies]
– Failed to fulfill at least one condition leading to Mary’s route
– Garry’s death meter is 2 or less
– Garry’s bond meter is 8 or less; or you chose not to give him your handkerchief
– Chose Garry over your mother at the end
* This will add Ib’s Mom in the True Exhibit Gallery
[True Endings]
[Together, Forever]
– Failed to fulfill at least one condition leading to Mary’s route
– Garry’s death meter is 3 or more
– Didn’t burn Mary’s painting and just left to the real world
* This will add Mary in the True Exhibit Gallery
[Promise of Reunion]
– Failed to fulfill at least one condition leading to Mary’s route
– Garry’s death meter is 2 or less
– Garry’s bond meter is 9 or more
– Gave him your handkerchief after burning Mary’s painting
– Choose Garry over your mother at the end
* This will add Garry in the True Exhibit Gallery
True Exhibit Gallery
Go and talk to the man in front of the counter to get hints.
He says you need to know the piece’s entire name for them to be added to the gallery.
As in, they shouldn’t just be read with purple question marks.
 ^ This won’t be added to the gallery.
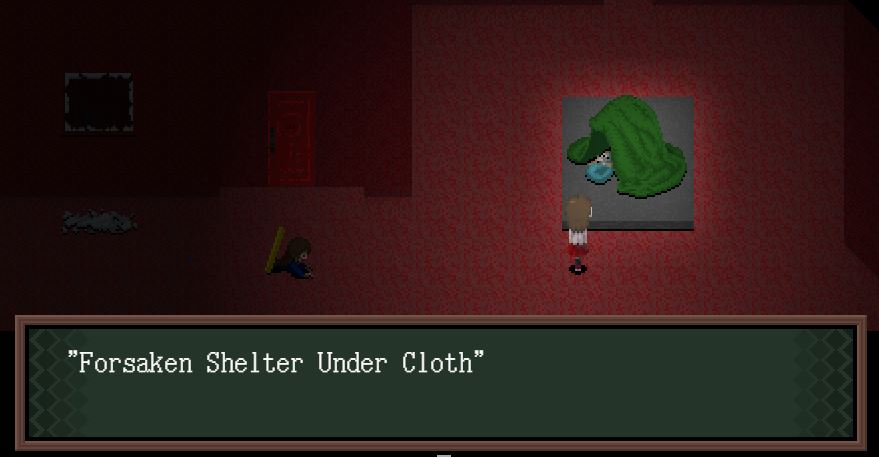 ^ This will be added, however.
The paintings also need to be looked at by YOU, not someone like Garry or Mary.
So, in order to complete the collection, you need to have Garry with you.
He drops hints as well when you look at the third painting in the hallway you met him at.
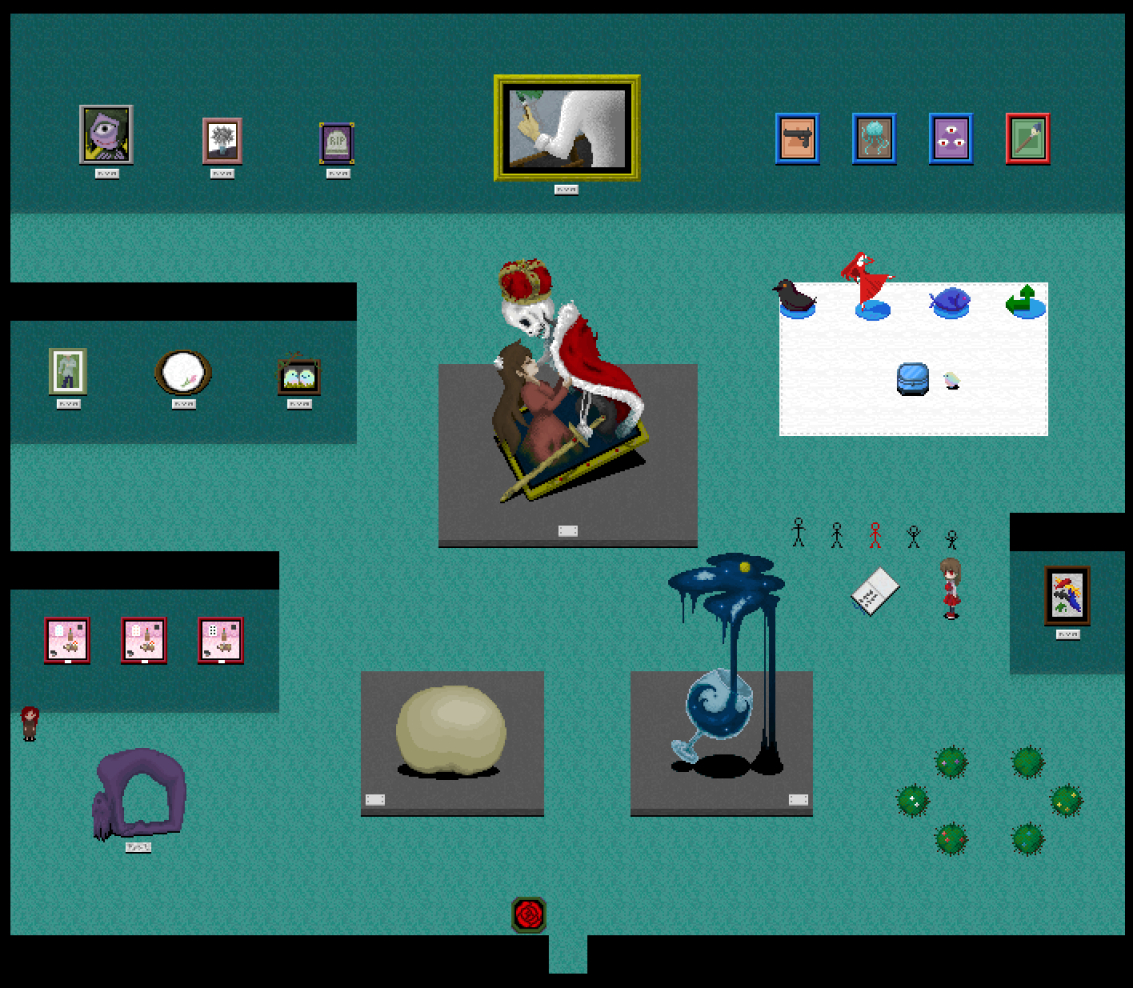
Here’re the pictures of the entire gallery.
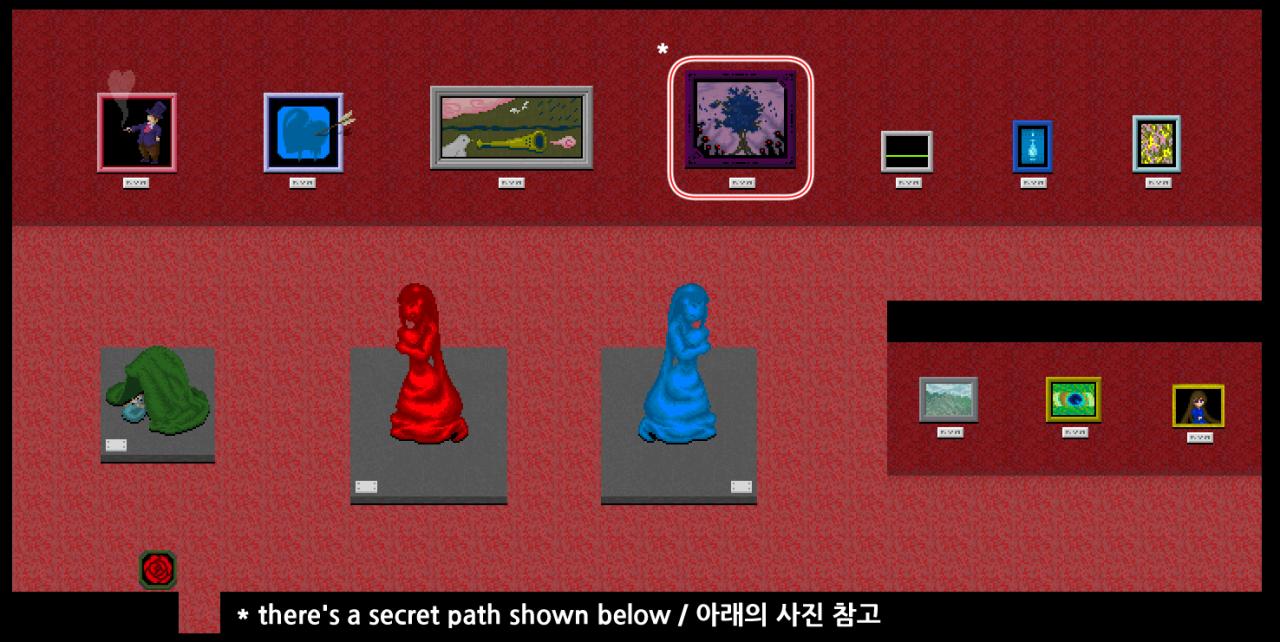
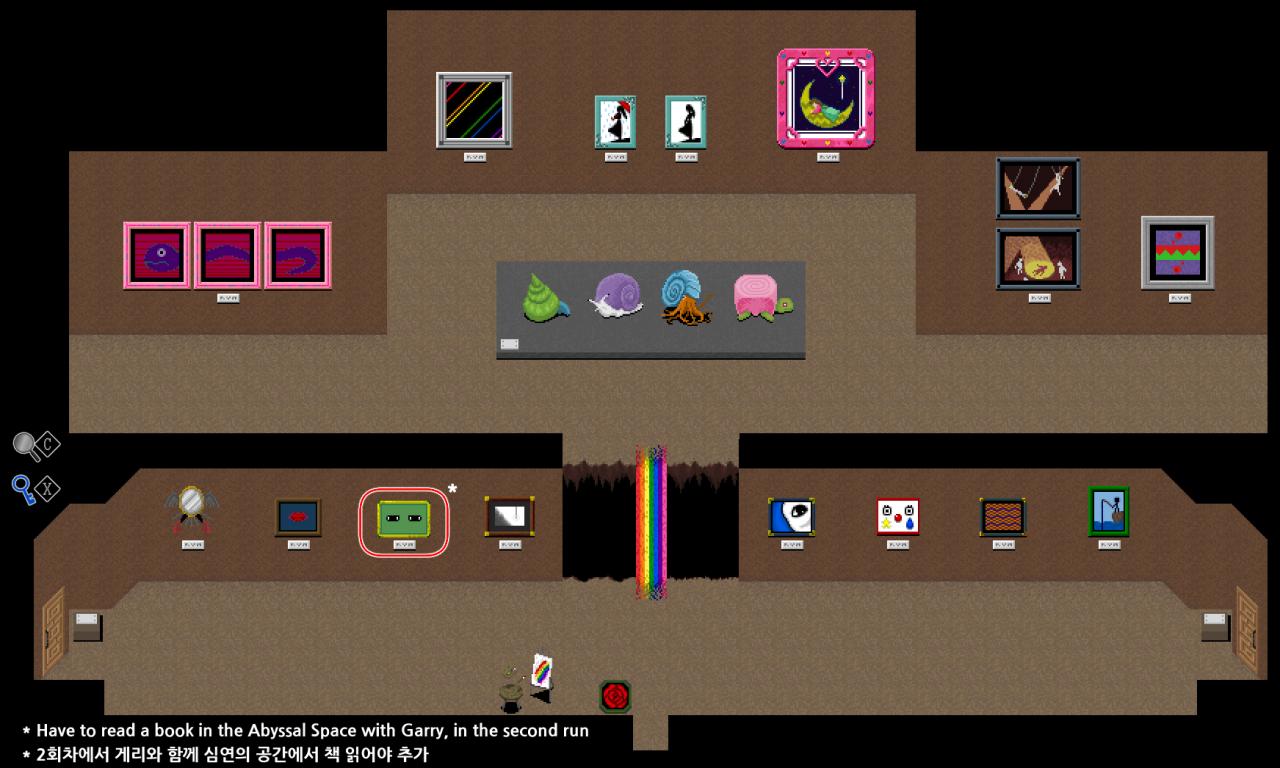
Main exhibition room:
 *The orange, cyan, and white doors are available from the second run.
Blue Area:
 You need to bring Garry with you to this area to add this painting.
Green Area:
Yellow Area:
Red Area:
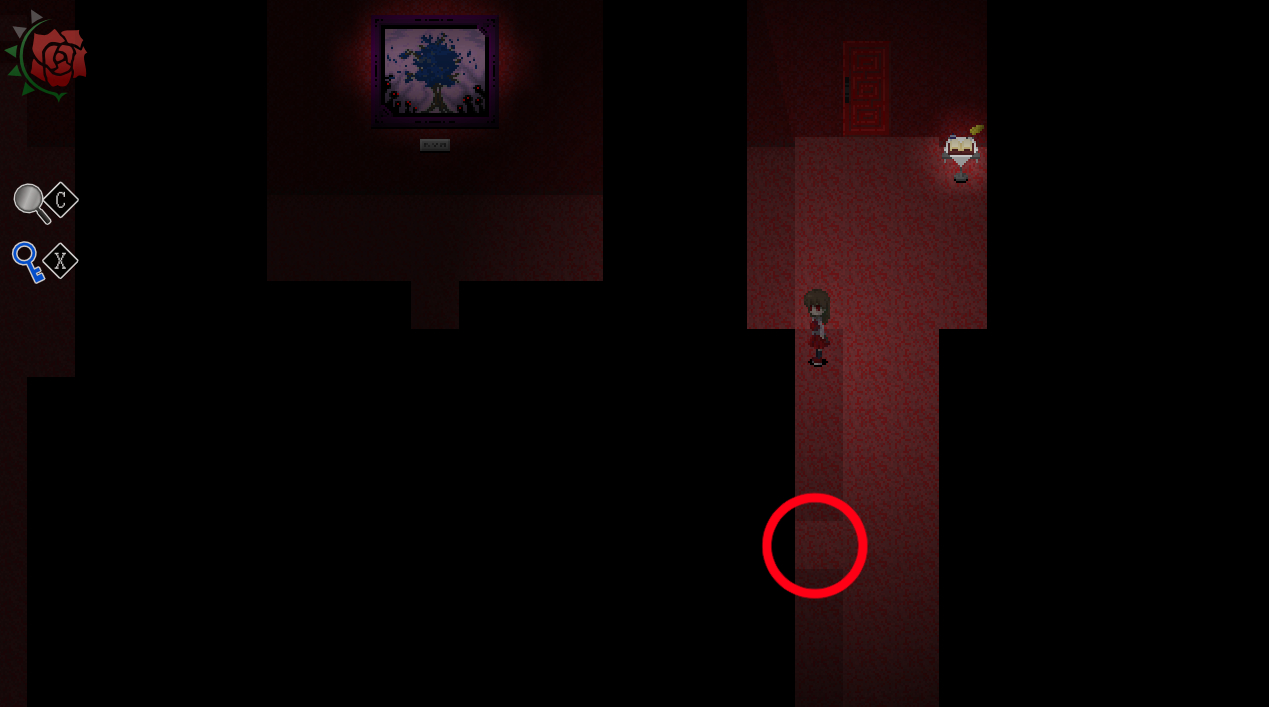 You can get to the painting if you take this secret route and go left, then up.
Gray Area:
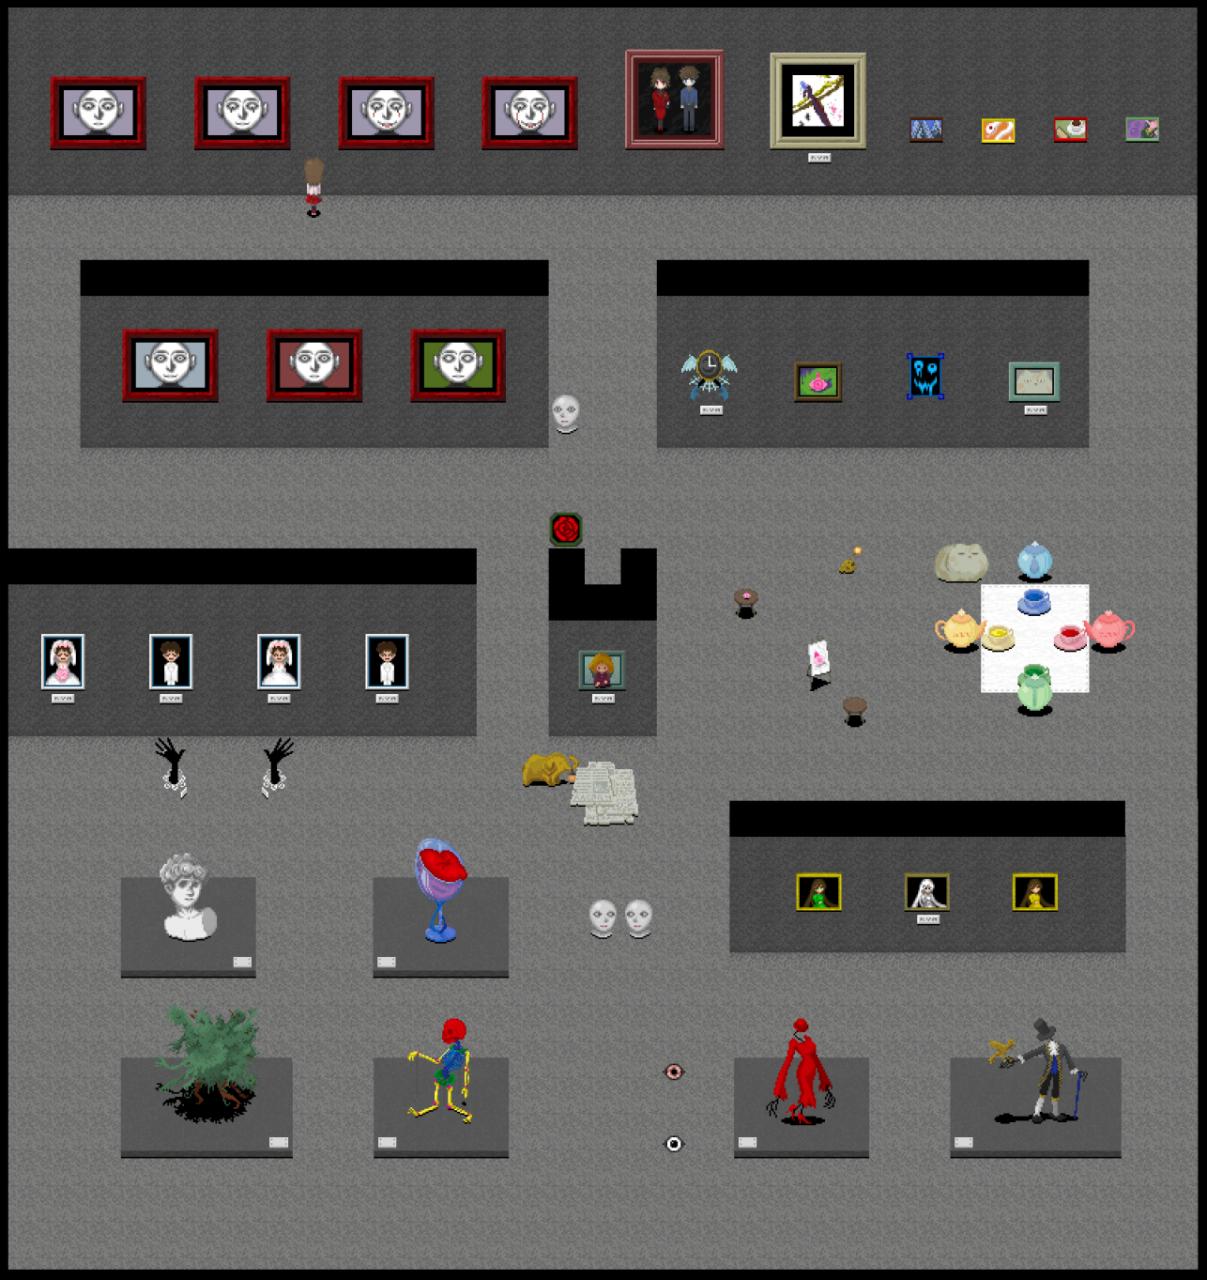
Violet Area:
Brown Area:
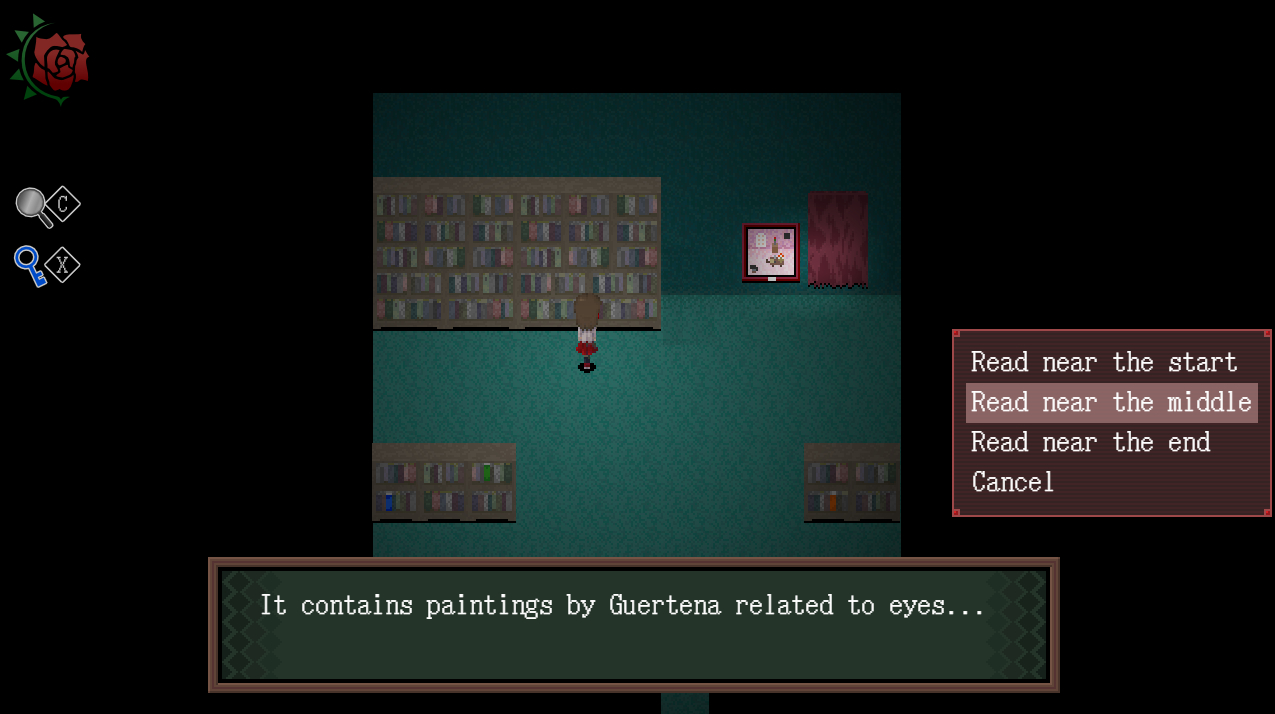
 The book you need to read is in the abyssal space; read the middle passage with Garry.
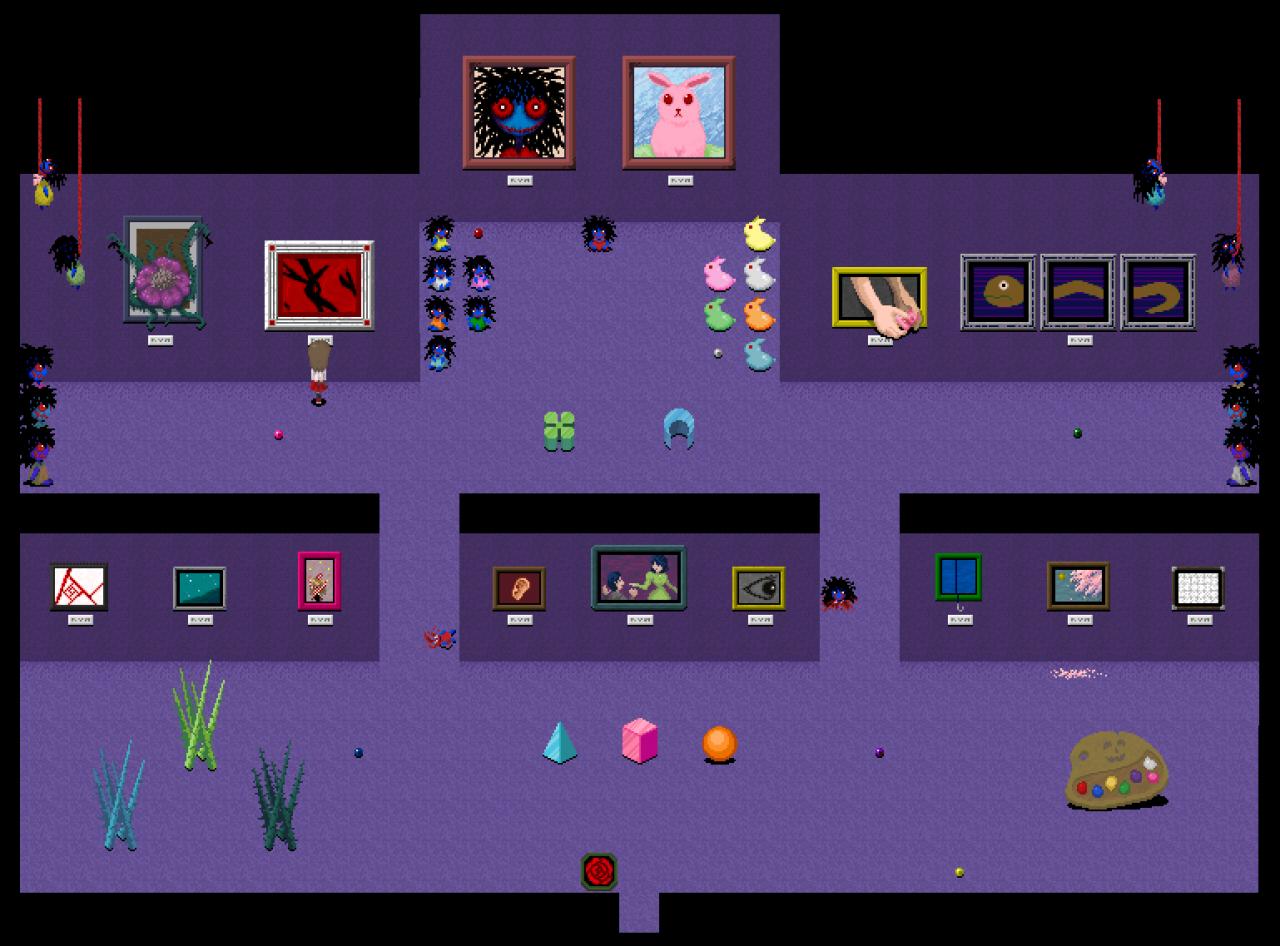
Orange Area:
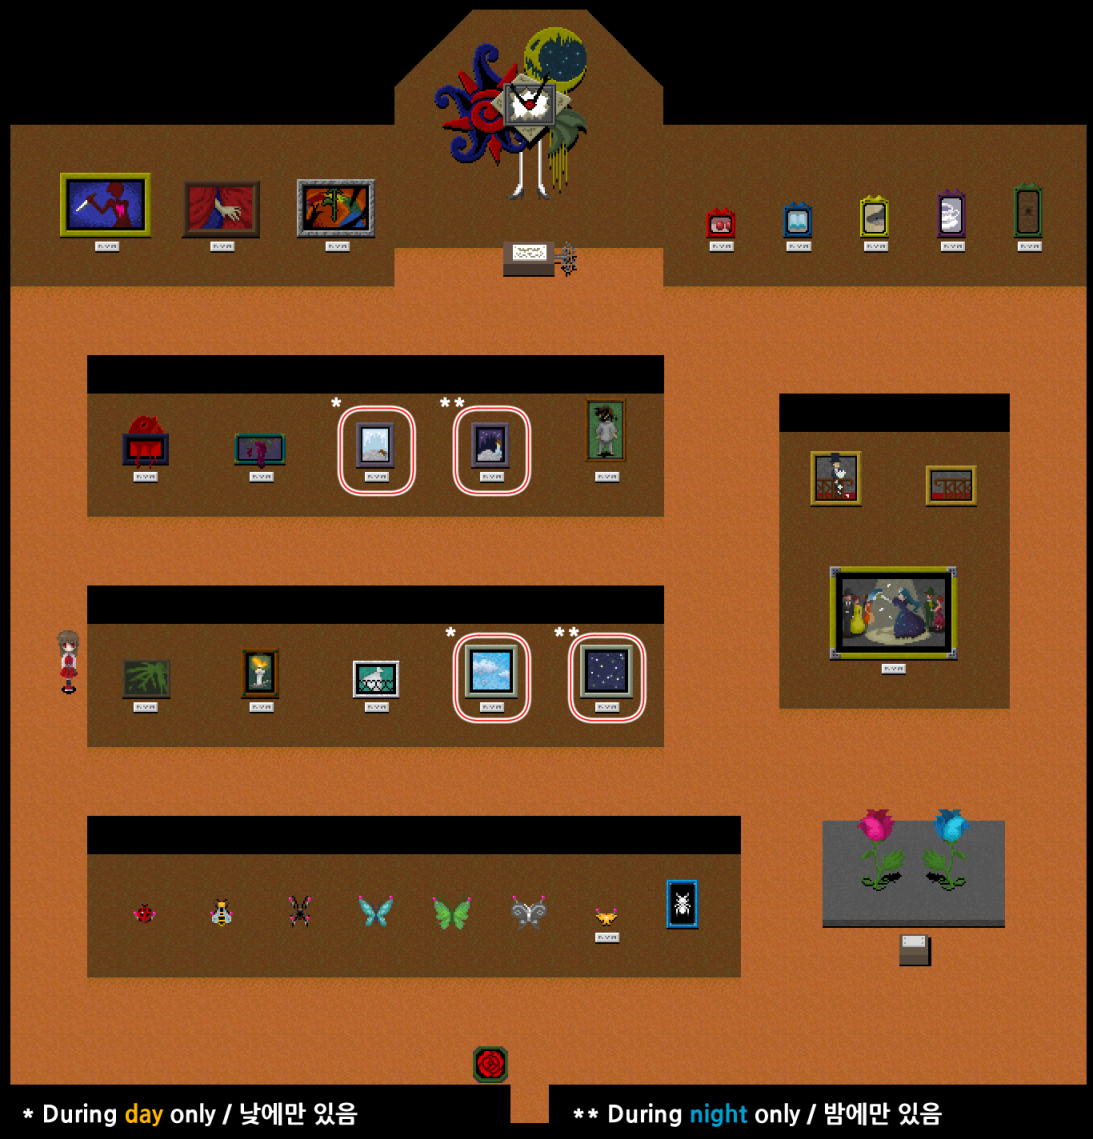 Some are available during day, while others need it to be night.
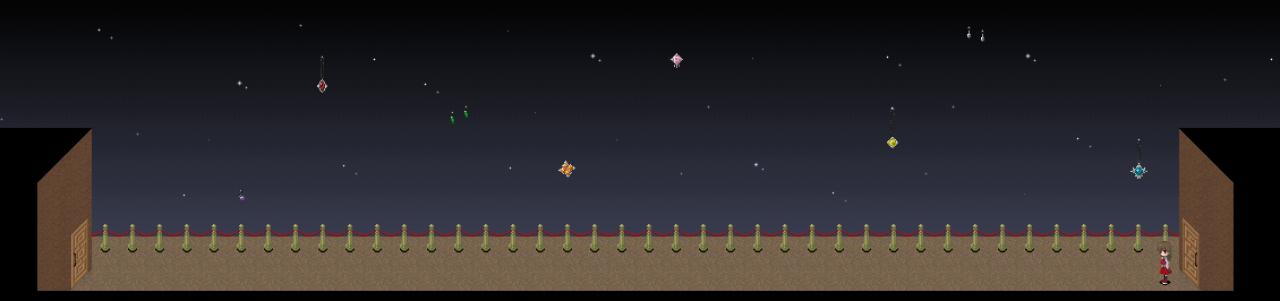
Abyssal Space (Cyan Area):
 Make sure to read the name tags of the pieces or they won’t be added.
???: