Some of these concepts are not made clear in the tutorial…
UI – command toolbar at the bottom & info-bar at the top right
UI is – if not from hell, then certainly from purgatory…
Mostly command is on the bottom – bot not always in intuitive order. Sometimes (Pipelines, Launch Rockets, Select Slots on Airfields/Landing Strips) it’s on the Right
Note: since Tooltips are pretty good, I will not repeat all of it – just important stuff/hints/concepts not made clear in tutorials
See here: Example-Tooltip for “Move-flavour”:
First group of buttons: Your type of Move commands:
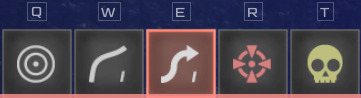
- Q. Point. Go to/Assemble at this point on the map
- W. Line -> assemble along this line
- E. Arrow -> follow this line
- R. Target -> Gather Units & Attack this building
- T. Crossbones -> Delete your units
- Arrows’/ lines thickness: click multiple times/keyboard-shortcuts): To move single-file vs. to move in X columns. Therefore also: To switch between selecting a few to more of the units in a command’s area
Next group of buttons: Move-directives to fine tune your move-commands:
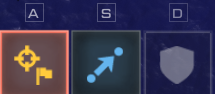
- A. Attack-move: Attack anything it sees/ Conquer territory, and move on only afterwards vs. Move:
- S. Move: only fire on the move/ the unit(s) blocking its way, and don’t stop to conquer territory
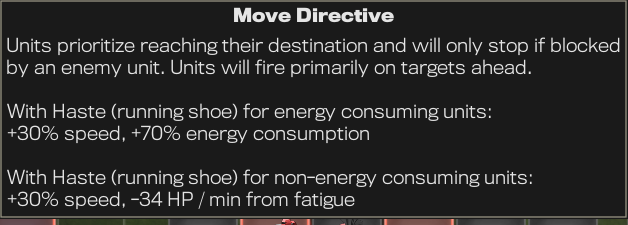
- “Flavour” of your move-command:
- normal (one click/keyboard-shortcuts on attack-move or move)
- haste (two clicks/keyboard-shortcuts on attack-move or move. 30% faster, but consuming more energy/ having lower HP while running
- D. Entrench: Only available on Lines – not arrows. Be careful to entrench in the proper direction. Sandsacks have to face TOWARDS enemies. Units have lower health only while digging – not after finishing. Infantery in the front line has only an EXTREMELY limited range of fire. Place artillery in a second line behind the “meat shields”
Next groups of buttons: Affected units on Land, in the air and on the sea
Since this screenshot serves as example – only air-units:
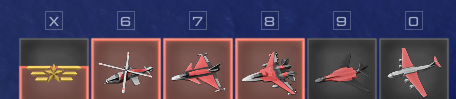
- Z. All Land, followed by each type (to switch on or off)
- X. All Air, followed by each type (to switch on or off)
- C. All Sea, followed by each type (to switch on or off)
- Switching units on or off fills a “shade” of your “all-type-of (land/air/sea)-button, so show that 1/5, 2/5, … of types of units are selected
- Sometimes you don’t want all types of your army to follow a move command (e.g. keep your SAMs near critical infrastructure…)
Last group of buttons – bottom right of the screen:
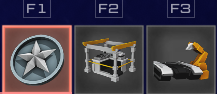
- F1: Move-commands: to move your units
- F2: Construct buildings: to construct different buildings. After each click on the map you have to select a building anew. Use shortcut to do this quickly. You cannot place multiple buildings with Shift (…at least for now…). Construct units inside them: see some lines below…
- F3: Manage production: production-stop. Importance: See next section of this guide
Production-buildings:

‘General’ buildings:

- Normally, you’ll select your Tab – F1 move or F2 production – then select your move directive A/S/D and its “flavor” (once or twice) – and then draw the arrow/line/target…
- Produce units: See next section…
Top of the screen:

- First group: Showing your Energy/Fuel: Current/max, and how much you gain/lose per minute
- Second group: Showing your Income Current/max, and how much you gain/lose per minute
- the bars show: Upper bar: how much you produce. Lower bar: how much you lose – in upkeep vs production
- on mouse-over you’ll get additional info
General info/hints
- Screen-scrolling: Already implemented on keyboard – via arrow-keys, not WASD. For the time being (!) you cannot reassign keys
- Train by playing against yourself/trying out troops in sandbox-mode. Select a starting-territory, then switch to the other player (upper left of the screen) and select up to 5 territories. They have to be adjacent to each other. Each territory gives you 4 infantry instantly – which is better than saving the money by not selecting territory. You don’t get ships on water-tiles. But sometimes it’s worth spanning 2 continents by using a land territory first, after which you may select water territory, and finish by selecting a territory on the other continent
- Assemble several units to scout/take over territory. Not only will they conquer territory more quickly – “blobs” also have a larger scouting range (…up to a limit)
- If you hear music playing for the first time: Your foe has been discovered!
- A units’ shade shows its health
- Towns are…nice. But if 3 industries are located in the vicinity & you build them up – then you can upgrade your town to a city, which will make you rich!!!
- Rockets: After building a rocket pad, rockets will be assembled – reeeally slowly. You launch them by selecting a pad with a finished rocket and clicking “Launch” on the right side of the screen or by clicking “k”
They are devastating against units and buildings alike – but not all buildings within the huge red circle will be completely demoslished. Furthermore, they can be taken down by being hit in flight by something like 5+ SAMs. Of course, having these SAMs positioned in the flight path is rather difficult. Addition: Follow up tactical strikes with an offensive! Otherwise, of course, feel free to target cities/harbors. You MonsterProduction: - Delete unusable units/ unsuitable fleets to reduce upkeep. While units only cost energy while moving, they always cost upkeep. They can even render your income to zero! To delete them: Move ONLY the type you want to delete, and ONLY the group/batch you want to delete, towards a skull&crossbones-marker
- For the same reason: unclick factories/shipyards/airstrips from making units. Infantery in baracks does not cost much – but other units could cripple your economy!
- F3 (lower right side of the screen) gives you the option to stop ALL production
- Every building costs upkeep as well
- Click on a production building to select which units will be build inside. For each type you select one unit will be produced (…if you have the money – otherwise it will be skipped) – then the next type will be produced
- Air strip: Can produce & hold up to 6 units
- Landing strips: Cheaper, stealthier, can only HOLD units. Use them to move your aircrafts closer to the front. And: to move land units faster. Move your units close to airstrips holding transports, and draw an arrow to the other airstrip/landing strip
Energy:
- It’s nearly impossible to have too many refineries! Otherwise you will quickly run out of fuel once you move tanks & have a sizeable, moving fleet!
- Oil rigs on land an on water are 3 times as productive as Power Plants
- Energy/Fueltanks: Have to be connected to Refineries/Power Plants to fill up. Press “k”/ click on the icon on the right side of the screen to build a pipeline (for free!). Refineries/Power Plants can be connected to only two pipelines, while Oil/Fueltanks have an unlimited (?) number of connections. If you don’t build AND connect tanks, each Refineries/Power Plant will only store 30 units each; while each Oil/Fueltank can hold 120 units
Units
Air:
- Striker: Medium Range. Versatile, can defend against other aircraft (though not as well as interceptor). Will take down buildings – but slowly. Can be shot at by infantry
- Interceptor: Medium Range. Excels at intercepting enemy planes. At least in theory…
- Bomber: Long Range. Cannot defend against other aircraft. Will take down buildings more quickly. Cannot be shot at by infantry.
- Heli: Short Range. Can land if running out of global energy/fuel – in contrast to other aircraft, which will be lost if flying while running out of energy/fuel*
* tanks and ships will stop and thus bring your fuel-consumption down. If that’s not enough – only then your planes will fall out of the sky - Transport: Long Range. Defenseless. Use it to transport units & to drop commandos
Land:
- Only tanks require fuel – and only while they are on the move
- Meat shields are cheap. Use them to fill your 1. line of defense, to conquer territory and to make human-wave-attacks. WWII-Russia-like
- Commandos take less damage from ‘friendly’ nukes
Sea:
- Merchant Navy: If you hold two territories being connected by a dotted line and having a town/city AND a shipyard adjacent, you can produce merchant ships on them
- Submerged submarines can only be attacked by Destroyers. But submarines only fire torpedoes if surfaced – then they can also be attacked by any (land) unit. Cruisers can never attack subs
- Subs take lesse damage from ‘friendly’ nukes
- Somehow subs are the fastest unit to conquer sea-tiles (see table. Link below)
- Move your land units to the shore. Draw a line from one coast to the other. If you have transports they will pick up up to 4 troops (2 min. to cross over) and deliver them to the other shore
- Missile ships in the lanes of enemie’s aircraft are fun (…at least for you!)