Comprehensive written guide to controls, units, eco, and basic strategies because nobody has time to watch videos.
Control Basics

The basic commands are
- Point – Straightforward, selected units will gather at the point until it is filled. This command is useful for creating ‘waves’.
- Line – Selected units will gather in a line as opposed to a point. This command also allows units to entrench, giving a defensive bonus after a setup time. This command is used often in chokepoints and in advance before an attack arrives.
- Path – Selected units will follow the path until the end. The attraction radius for this command is wide at the tail, but narrows the longer the path goes. This command is the most common, and is used to explore, scout, attack, and generally move units around.
- Target – Selected units will focus fire a building until it is destroyed. This is most useful for airstrikes or sniping buildings.
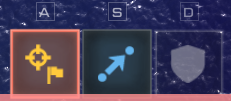
Commands are also set to the engage or move directive, which function similarly to an attack-move versus move command in other games. The defend directive is also in this section, but is only usable on line commands.
- Engage – “Attack Move” directive, units attached to the command will leave their position to attack nearby enemies. This command can be re-selected to apply the conquer or haste flags. With conquer, units will capture territory before resuming their path. Haste explained more below.
- Move – Units attached to the command will prioritize moving along the path, only shooting at enemies in the way. This command can be re-selected to apply the haste flag, and is useful for retreating or quickly getting units through an entrenchment.
Haste is a modifying flag that makes units move 30% faster, but consume hp/energy to do so. - Defend – Units assigned to this line will entrench over 5 seconds, costing hp/energy to do so, but granting a 20% attack and 30% armor boost in the direction of the entrenchment.
Control Tips/Unexplained Mechanics
- Units will prioritize filling defensive lines -> points -> paths. Units in the attraction range of multiple commands of the same priority will split between them.
- Most commands can be re-selected to widen them, allowing multiple units to engage at once rather than going in one by one.
- If no units are selected when drawing a command, it will default to artillery and infantry on ground and naval units except transport ships on water.
- Amphibious commands can be drawn from one shore to another, and transport ships in the attraction range will automatically bring units over.
- Drawing a path command through an entrenchment will cause entrenched units to make room for the path.
- Commado units can be combined with transport jets to parachute them without an airbase using a point command that affects those two units only.
- You can rally production structures to a command by selecting them both and using the connect button on the right.
- Rockets cannot be added to commands, they are launched by selecting the launchpad and hitting the Launch button on the right.
Unit Basics
- Land
- Air
- Naval
All air and naval units use energy to move, with the exception of the Tank, which also uses energy.
Land
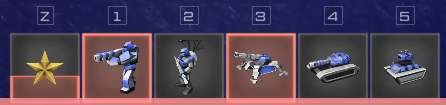
- Rifleman – Basic general purpose unit, most efficient unit at capturing territories. Always useful, not much else to say.
- Commando – More expensive infantry, same hp as rifleman but 40% more damage and about 20% faster. Has a larger vision range and smaller detection range. Useful for flanks and sniping structures.
Riflemen and Commandos get a 10% damage and 10% armor bonus in forests. - Artillery – Long range vehicle that’s slow and needs to set up before firing but has much more consistent dps. Strong when in entrenchments (especially on mountains) and in large blobs.
- Tank – Only land unit that requires energy to move, but is tanky and has high damage. Fastest land unit, moreso with haste, but has high upkeep and burns energy. Useful for flanking and pushing through entrenchments. Can only disembark in friendly territory.
- SAM – Pretty slow AA vehicle. Self-explanatory.
Air

All air units use energy and must refuel/rearm at an airbase with the exception of helicopters. Airbases can hold up to 6 units at once, and have circles around indicating how far a unit can travel before it needs to refuel. All air units have the same capital and energy upkeep, and similar health.
- Helicopter – General purpose air unit. Interceptors have higher AA dps, Strikers have higher surface dps. Can be useful when supporting land units or defending against harassment.
- Interceptor – Specialized AA unit with a large sight radius. Fastest unit in the game, moreso with haste. Useful for defending against air in places that aren’t easily accessible by SAM vehicles and scouting forests/mountains.
- Striker – Strong anti-surface air unit. Set of 5 strikers can snipe a structure in one round. Useful unit for defending, attacking, and harassing.
- Bomber – High altitude unit that can avoid general ground to air fire with AOE attacks. Almost always outclassed by Strikers, but can be useful against massed infantry/artillery without AA.
- Transport Jet – Moves ground units from airbase to airbase and can drop off paratroopers. Fun unit, but not too practical. Can be a little useful on large land maps with long travel times for land units.
Naval
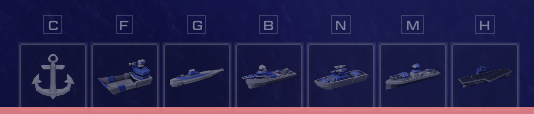
Naval units use energy and can capture sea territories. Not particularly complicated.
- Transport Ship – Transport ship that moves units across the water. Faster than submarines and cruisers, slower than destroyers. Pretty slow at capturing territory.
- Submarine – Strong anti-naval unit with low detection range. Cannot shoot land or air units, but beats or trades evenly with all sea units. Same speed as cruiser, slower than all other naval units. Most efficient sea unit at capturing territory.
- Destroyer – Fastest sea unit with higher vision range. Captures territory at a decent speed. Not much else.
- Missile Ship – AA naval unit, same dps as a SAM but more expensive and 50% more hp. Pretty self-explanatory.
- Cruiser – Long range naval unit with high HP and good surface dps. Can attack inland targets along shores. Loses to submarines or strikers.
Eco Basics
- Credits – Basic resource used to build units/structures and pay upkeep, generated from territories, industry/towns/cities/ports, and merchant ships. Having a high income is important, but spending it is just as important.
- Energy – Another resource (not a cap) that is produced by powerplants and refineries, and is consumed when moving tank/naval/air units. Energy is important only if you have units that require it.
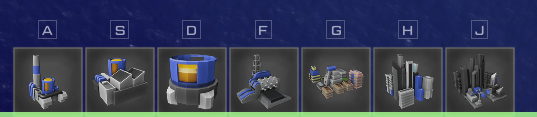
Economic Structures
- Industry – Built on industry sites and has a cost efficiency of .146
- Town – Built on town/city sites and has a cost efficiency of .150
- City – Built on a city site with a completed town and 3 completed industries and has a cost efficiency of .266
- Port – Built on a coastal town/city site and has a cost efficiency of .152. Can produce merchant ships if it has a trade route with another coastal town/city with a port. A fully saturated trade route provides as much capital as a city.
- Refinery – Energy production structure that must be placed on top of oil wells.
- Powerplant – Cost the same as a refinery, but with only 1/3 the production.
- Depot – Energy storage structure that links to nearby refineries/powerplants.
Economy Tips
- All economic structures take just under 7 minutes to breakeven after completion, except for cities which take just under 4 minutes. (Cities however, prevent town income while it is constructing, about 3 minutes)
- Claiming territories is the most cost-efficient way to increase your income, but is limited by map space.
- Prioritize refineries over powerplants.
- Depots are generally unneeded unless you have a lot of tanks/naval/air.
- Having a lot of idle or entrenched units will hurt your income; upkeep adds up!
Strategy Basics
- Greedy Play – Investing heavily into economy and expanding with the bare minimum of units (starting riflemen) gives you a much stronger mid/lategame than a safe player, but can be punished before you can build into a decent army.
- Aggressive Play – Investing heavily into military allows you to pressure the map and the enemy, but if you are unable to snowball your lead or gain an income advantage, you will have a weaker economy to support a mid/lategame army.
- Safe Play – Investing into a decent earlygame army while also investing in your economy to transition into higher tech units midgame allows you to contest aggressive players for map control, but will lose to strong lategame armies like arty blobs before you can counter it.
Choosing a playstyle depends on your location and the map generation.
Starting positions are very important, ideally you want a location that has a lot of room to expand to, has economic sites for the mid/lategame, has 1 or 2 oil wells to support energy units, and has access to the sea on maps with a lot of water.
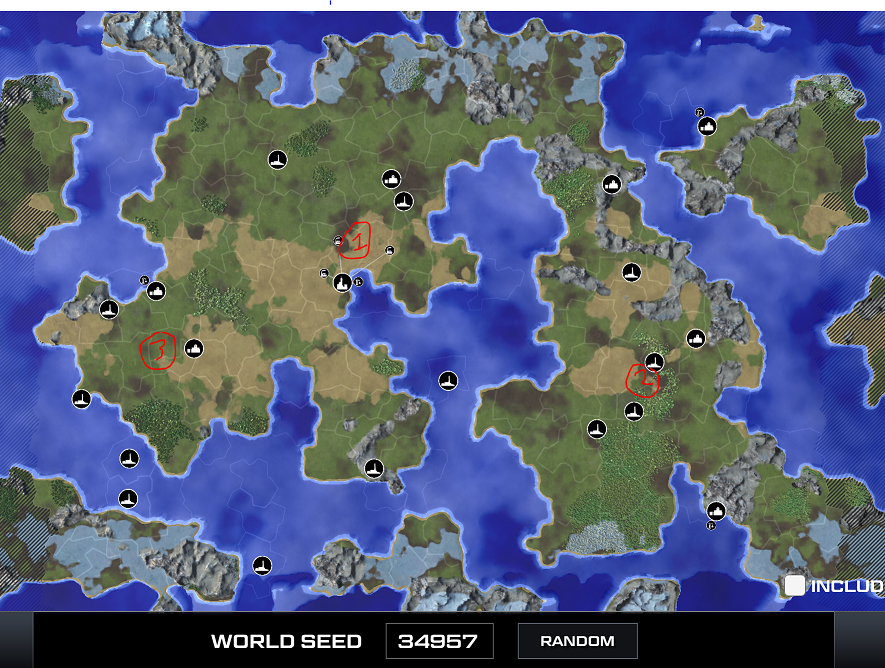
A strong play in the map above would be starting at location (1) and playing greedy until you scout the enemy, most likely at locations (2) or (3), and then going into a safe build while expanding in the direction opposite the enemy. The lack of city sites means that greedy play is disencouraged, and your starting position means that you have plenty of room to expand and outmacro your opponent.
Here are some common starts using your pre-construction capital.
- On maps with a lot of land, placing down early barracks and expand in all directons. This increases your income, scouts for the enemy, and sets you up for a safe but strong midgame.
- On maps with a lot of water, or maps where you are (probably) going to be separated by water, going into a shipyard and subpen gives you a lot of map control.
- If you know the enemy will spawn far way and that you’ll be safe, it can sometimes be worth it to heavily invest into economy before transitioning to a very strong midgame army (like an arty blob).
- If you know where the enemy will spawn (single best location), a decent cheese is to build 3 factories with your pre-con, and 2 refineries with your starting bank. If the enemy doesn’t react/scout fast enough, this is enough to end most games. Like all cheeses, this can easily backfire if the enemy doesn’t spawn where you expect them, or they have a safe opener.
- The enemy likely doesn’t have a factory or tanks out yet.
- The enemy has likely pre-constructed a shipyard that won’t help in the defense.
- The enemy is likely scouting and expanding much faster towards the South and East and won’t have all their units to defend.
- The enemy has likely invested into economy structures that will not pay off in time to be useful.
- The enemy has likely used up their pre-construction capital and has to wait for production buildings to finish before producing units.
Against better players however, it is important to choose your spawn to prevent being scouted before the conditions above have been met. If the game starts and your enemy sees that you spawned right above them, they will go into tanks themselves and outmacro you because of the better start.
Additional Useful Tips/Unexplained Mechanics
- 1 or 2 infantry will capture a territory too slowly, while too many will reduce efficiency due to travel time. Ideally, use groups of 4-6 infantry to expand in different directions.
- Vision and detection are additive, meaning that multiple units together can see farther and detect hidden units from farther.
- Cancelling unit production will refund it’s cost.
- Creating an entrenchment with multiple layers will assign units to different layers. An entrenchment with 3 layers containing riflemen, artillery, and SAM will place riflemen at the front, artillery in the middle, and SAM in the back.
- A narrow entrenchment that is filled is better than a wide entrenchment with gaps.
- Unit retention is important, especially in the early game.
- Rockets are inefficient, and should only be used against heavily fortified chokes, large blobs, and turtling players.
- A direct rocket hit will oneshot all structures except a city.
- Damaged units/structures will automatically begin regenerating HP after idling for a while.
- Oil wells are more important than you think.
- Oil wells really are more important than you think.
- Selecting an existing command will copy its current settings. This is useful for extending and splitting paths/lines.
Plug
Thank you for reading this guide and I hope it helped!
Here’s a neat seed I found! 27537
