A step-by-step walkthrough for constructing simple, automated hatch ranches.
1. Introduction
Right up front I’ll say that this whole guide might be a solution in search of a problem. Before I started experimenting on my own I generally used the ‘Francis John’ stable design: two feeders, a bin for storage, and limited to no automation. In my colonies I’ve never had issues with dupe labor using that approach. I tend to have extra supplier/runner dupes in the main base, and my ranchers will chip in and haul goods once all the critters are groomed. Even so, I thought it’d be fun to automate as much as possible about the ranching process, ideally everything but the grooming.
I’m by no means the first to try this, and I’ve borrowed and built upon bits from several other designs. I like what I came up with, and I wanted to share my results in case it helps anyone else.
2. Objectives
Most designs appeared to be intended for mid game deployment, constructed all at once from scratch after your base was established. I wanted a design with a natural evolution from early game fully-manual ranching through partial automation to final stage full automation. For these reasons I decided to experiment on my own, using existing designs as inspiration. My design objectives are listed below:
- Must be a “horizontal” stable
- This is just personal preference. I’ve seen some amazing “vertical” designs, but I like to use the empty space for farming in the early game until meat gets going.
- Must automate all required resource delivery
- Hatch Food (e.g. granite)
- Must automate all required resource extraction
- Coal
- Eggshells
- Meat
- Must automate population maintenance to keep eight hatches in each stable
- Removal of eggs
- Addition of new breeding hatches when required (e.g. after natural death)
- Must not allow hatchlings into the breeding population
- Hatchlings should grow to adulthood prior to being chosen as a new breeder or slaughtered for meat
- Must not use incubators (powered or unpowered) to manage eggs
- Again just a personal preference. They take up a lot of room, a lot of power, and require dupes to interact with them. We’re aiming for full automation.
- Should minimize time between breeder death and replacement
- i.e. should not wait 25 cycles for a new egg to hatch and grow to adulthood
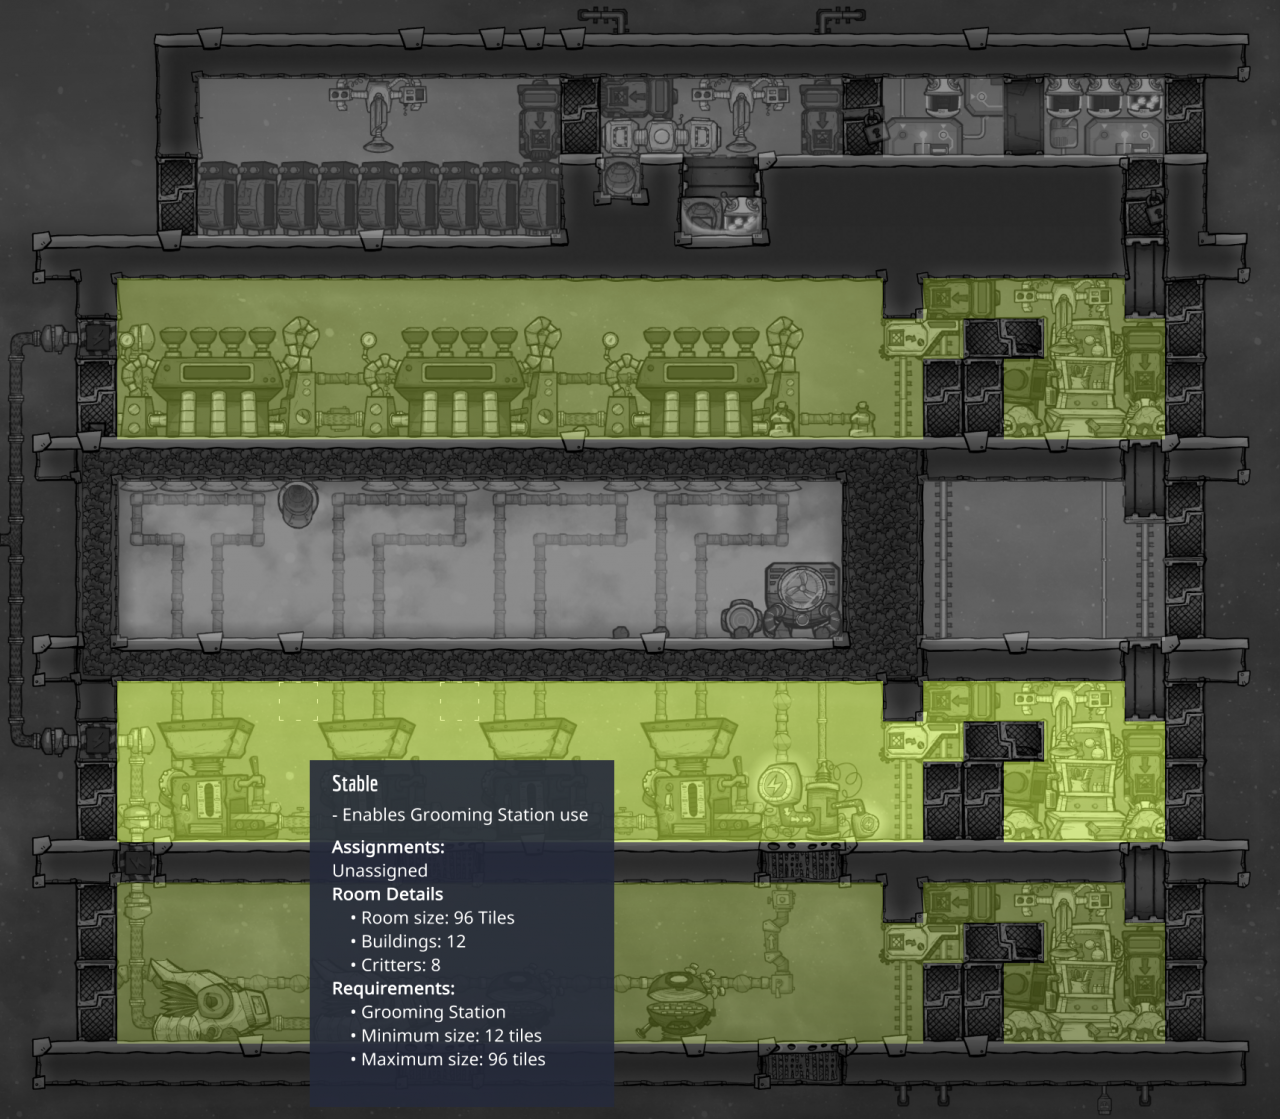
- Should confine hatches to a small area (≤6 tiles) to expedite grooming
- Should be a scalable design pattern that can expand and work for any number of stables
- Should be relatively easy to build, no tricky order of operations or dupe pathing
- Should try to keep automation requirements reasonable (subjective, I know)
3. Bottom Line Up Front – The Design
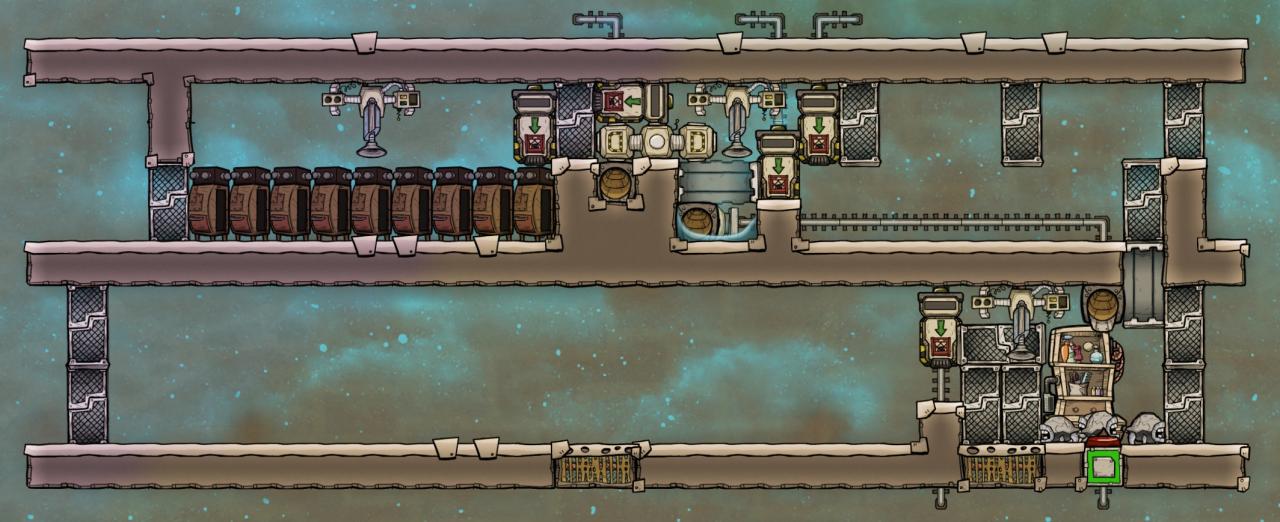
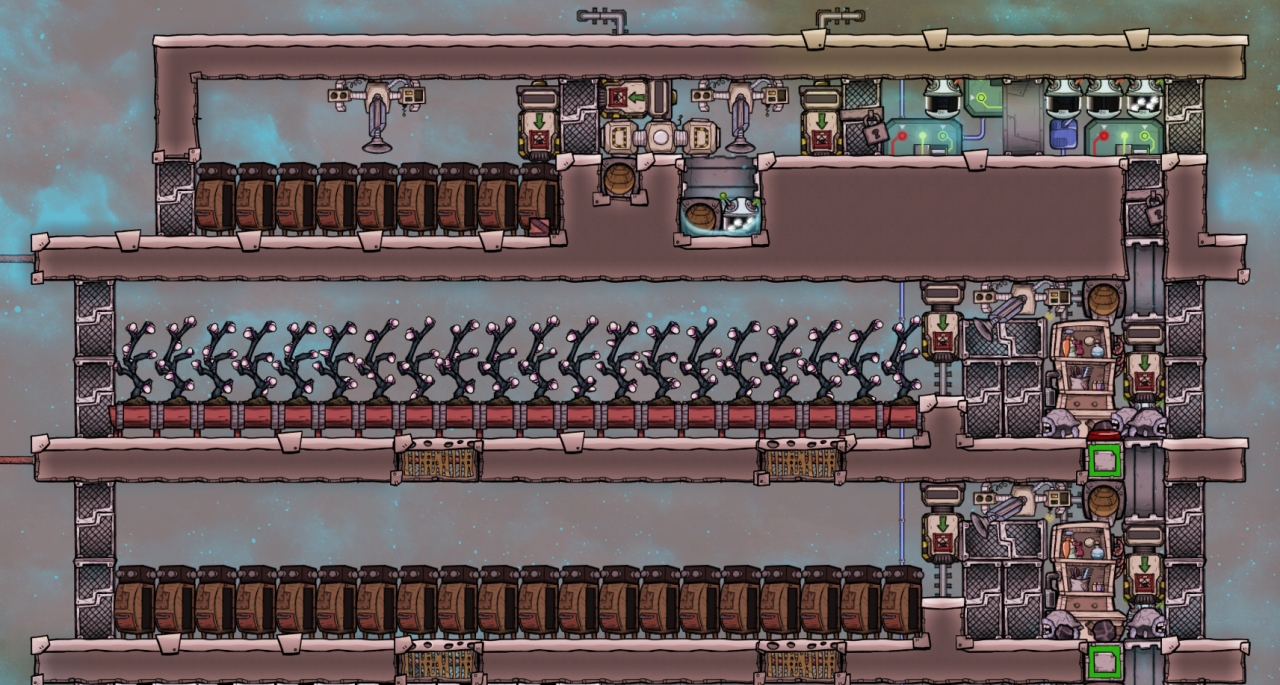
An example ranch with four stables would look something like this:
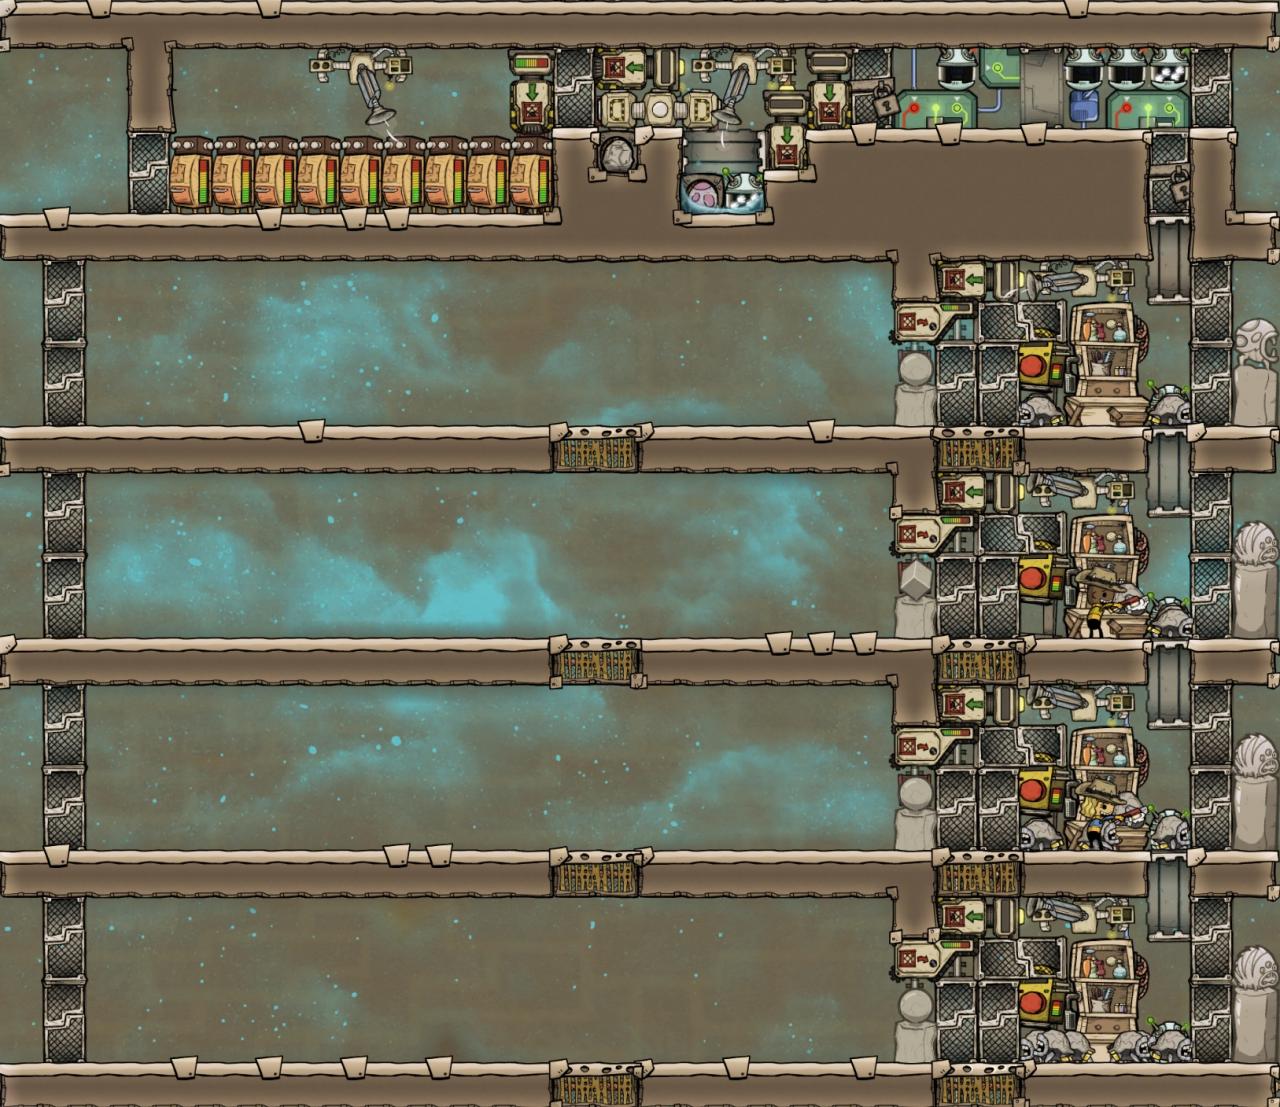
The control room consists of four chambers which I’ve labeled 1 through 4 in the screenshot below.
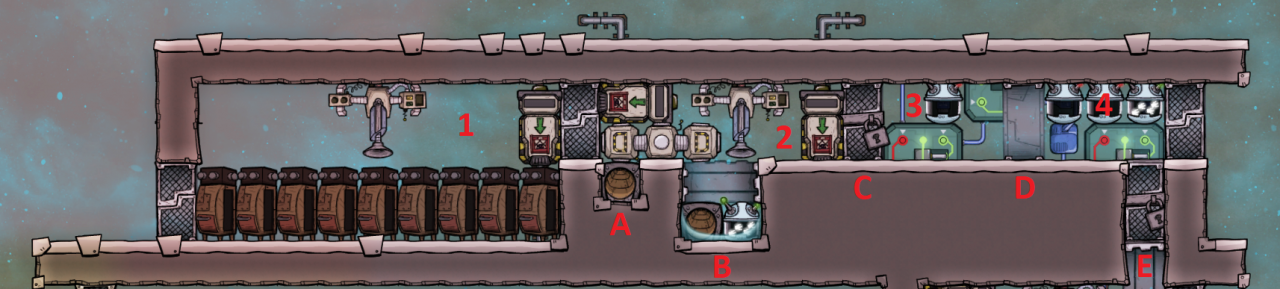
This area is simply storage for the hatch food. I tend to use granite for my stone hatches, but whatever you want to feed your hatches would be stored here and automatically delivered to the stables via the conveyor loader. The maximum storage with nine bins is 180,000 kg, which is 1,285 ‘hatch-cycles’ worth of food. With four stables of eight hatches each, that’s just over 40 cycles worth of food.
Once the control room is fully automated, I recommend that the door on the right of this chamber and the door on the right of chamber 4 be set with access restrictions to block all dupes from using them. This will prevent dupes from trying to do anything funny with the eggs, shells or meat produced in the core of the control room. In the early game the doors should be left open to allow dupes to collect these resources until the automation takes over. The door on the left of this room should always be left open, so dupes can restock the warehouse.
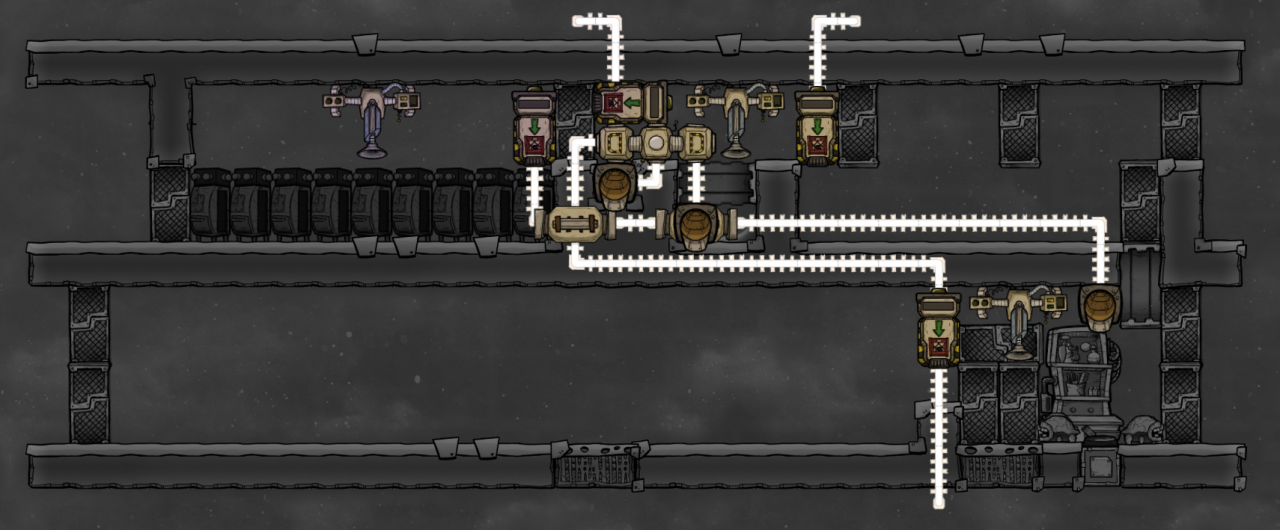
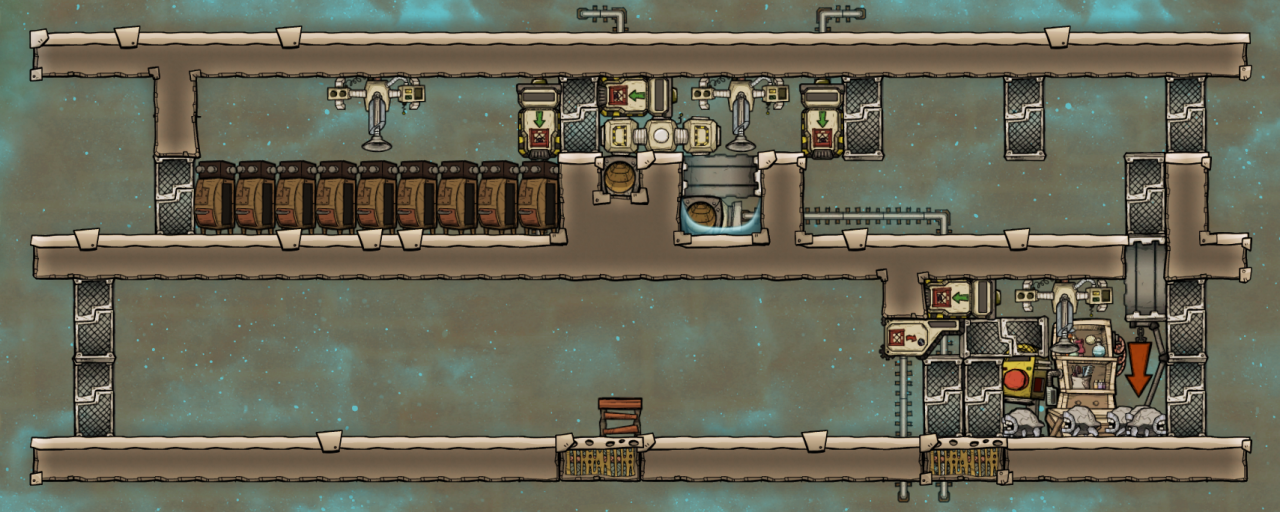
This is the core of the control room, where most of the action takes place. I’ve labeled three points of interest A, B and C.
Any eggs, shells or meat produced in a stable will enter this chamber via conveyor and go directly to the solid filter straddling the two pits marked A and B. The filter will separate out one type of egg of your choice (I use stone hatches) and deposit them in the chute marked A. All other eggs, as well as any shells or meat, will be deposited in the chute marked B.
The design behind this room is fairly standard. Eggs deposited in A will incubate and eventually hatch, and the hatchlings will not be able to jump up out of the pit. They will be stuck until they reach adulthood and are able to jump up and out. Once adult hatches can jump out of A, they’ll be presented with one of two life-altering scenarios. If any of the stables require a new breeder, the mechanized door above B will be closed and door C will be open, allowing the hatch to exit this room. If all of the stables are full, the two doors will be as shown in the screenshot instead. This will cause the hatch to eventually path into pit B, colloquially known as an evolution chamber. Once inside, the critter detector closes the door above and the surface tension of the water floods the pit and drowns the hatch. This unlocks the hatch’s final evolutionary form, better known as meat. Once there are no more critters in the pit, the mechanized door re-opens, resetting the trap. Eggs of the non-selected type are also routed to this pit, where they will eventually hatch, triggering the critter detector and drowning the hatchlings before they can reach adulthood and jump out.
The sweeper in this room can reach the bottom of both A and B and will extract both eggshells and meat. Each resource is deposited into one of the two conveyor loaders in the room, to be routed to your industrial block and kitchen, respectively.
The only purpose of this room is to prevent multiple hatches from entering the dropper room at the same time, and help prevent “double dropping”. If there is ever more than one critter in this room, door D is closed to prevent them from reaching the dropper room. Three tiles wide seemed to be the perfect amount to allow the sensors time to react and not catch the hatches in a closing door.
This is a fairly standard critter dropper, which allows hatches to fall through door E into the stables that require additional breeders. The specifics of the automation logic are described in the construction section.
4. Construction
– Early Ranching – Zero Automation
I offer two options on how to build the stable rooms. On the surface they start out very similar, and at the beginning of the game there won’t be much difference between them. However, the design chosen now will decide the future method of food delivery. I recommend reading through the entire construction section to see which version suits you best.
This option limits the grooming area, to which the hatches are confined, to only 3 tiles. I chose not to attempt a 2-tile design where the grooming station sits on a horizontal door, as I didn’t want the door’s operation to disable the grooming station, and I didn’t want the door opening to drop all food from the floor of the stable. Sticking with 3 tiles allows this to be a very easy build and will not negatively affect efficiency of the grooming animation.
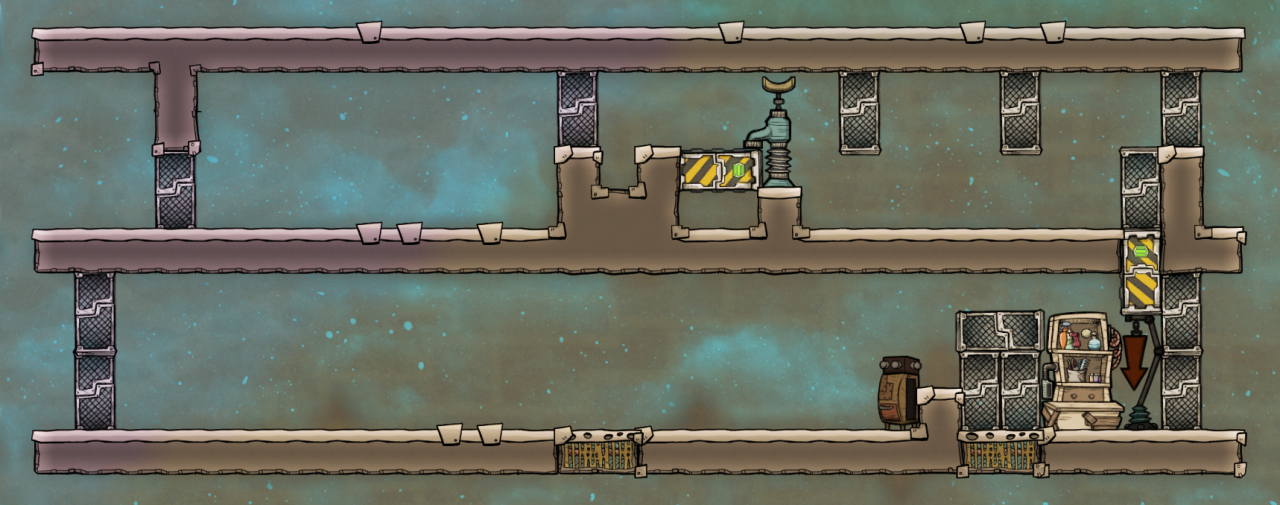
You may notice there is no critter feeder shown. The idea is to install a drop-off point, wrangle all the hatches around your starting base area into the stable, and then deconstruct the drop-off to install a critter feeder in its place. If you find that you need a critter drop-off later to fill the stable up, you can temporarily delete either the grooming station or the critter feeder to reinstall a drop-off, then remove it again once the stable is full.
In this design both the critter feeder and the drop-off will eventually be removed regardless, and food will be delivered by conveyor chute dropping onto a weight plate. The hatches will happily consume the food off the floor, and the system will maintain at least one cycle’s worth of food in the stable at all times.
This build allows the hatches one extra tile (total 4) in the grooming area, to allow starting out with both a critter feeder and drop-off in the stable. In this design the critter feeder will remain forever, and the drop-off will remain until the critter dropper in the control room is activated. Having both buildings present throughout the build makes the early game a bit more straightforward, and doesn’t appear to affect grooming efficiency. Food delivery will eventually come from a conveyor receptacle, to be auto-swept into the feeder rather than dropped on the floor.
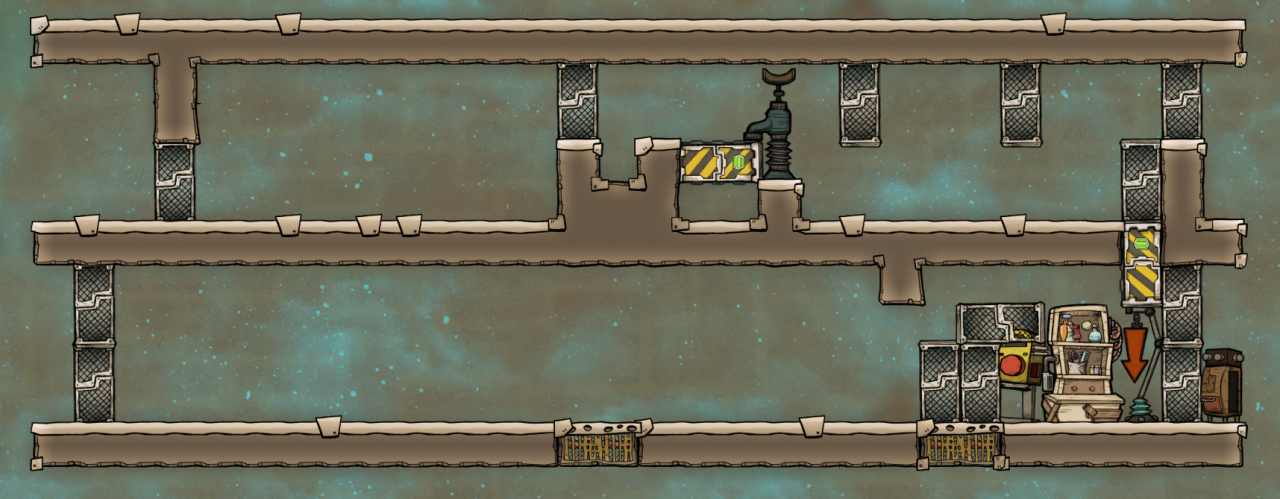
Note that the storage bin shown can alternately be placed under the protruding ceiling tile, just to the left of the pneumatic door. If you use 3-tile wide vertical corridors instead of the 5-tile wide design shown, or if you’re concerned about the negative decor in the corridor, the alternate location would be best for you. I generally place the bin outside the stable as shown to make it easier for dupes to top it off from the main corridor, but the future auto-sweeper will be able to reach either location. Eventually the storage bin will be removed altogether, so its placement now is not critical.
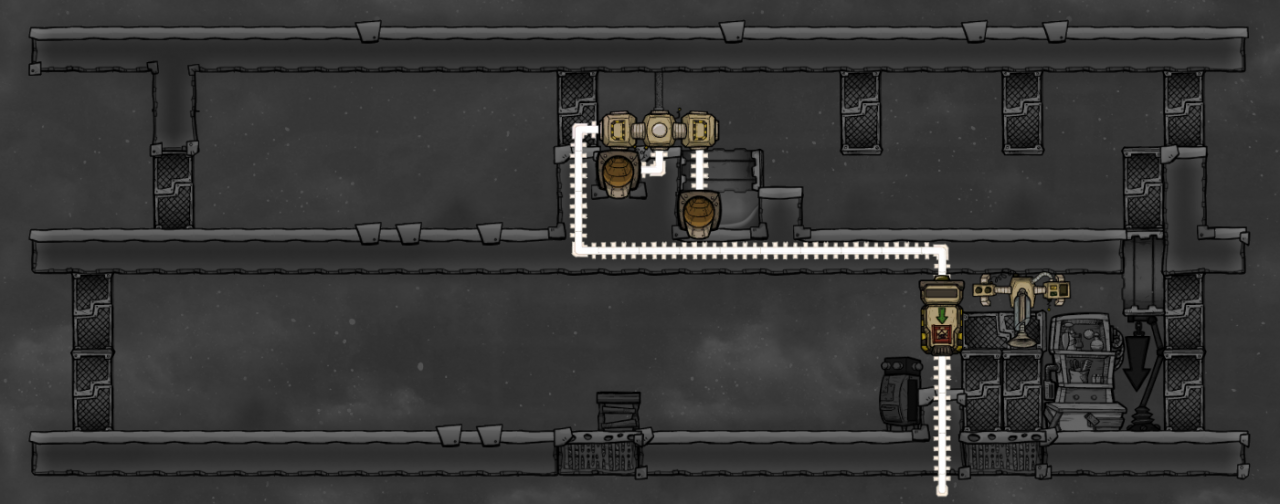
– 1st Upgrade – Egg Removal
Unfortunately, if you’re using the Spaced Out! DLC, the requisite research can take a while to obtain. The design requires either a solid filter (my choice) or both a rail element sensor and a conveyor shut-off, both options requiring ‘Solid Management’ research. This, plus the ‘Solid Space Transport’ prerequisite requires a total of 45 interstellar research and 10 atomic research. So you’ll need to build a small research rocket and collect a few radbolts before you can automate your ranching…
Once you have the research completed, this upgrade requires 400 refined metal to build one auto-sweeper and one conveyor loader in each stable. Note that the placement of the auto-sweeper varies by one tile, depending on which stable option you selected, and option 2 requires a conveyor bridge to jump over the chute in the evolution chamber. The loader should be set to allow critter eggs, meat (for hatches that die of old age) and eggshells (though those should never appear in a stable). I don’t generally use this loader for coal, however there’s no reason you couldn’t do that. I’ll comment on that option in the section on automating coal extraction. The conveyor rail is shown coming out the bottom of the stable, as it would continue straight down through as many additional stables as you choose to build. Don’t forget while installing the solid filter to set it to the type of hatch egg that you plan to breed long-term!
One last note: Once this upgrade is installed the auto-sweeper will also begin moving food from the storage bin to the critter feeder automatically, saving your dupes a small amount of time. Full automation of food delivery will come later.
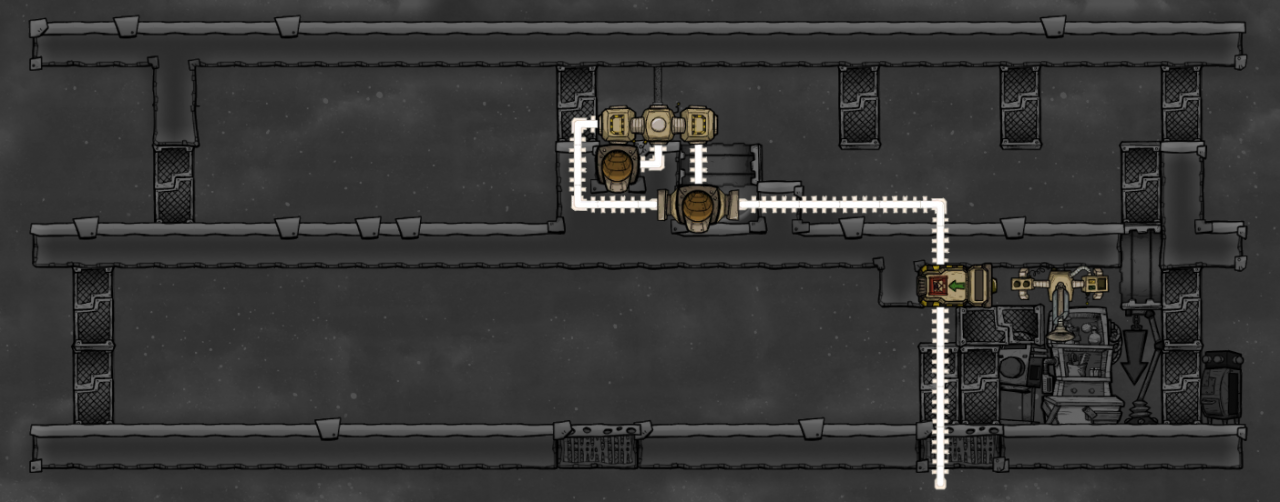
The only thing to note here is the single ladder tile in the stable, required to reach the conveyor rail construction directly above it. If this area is already in use, you could alternatively deconstruct some tiles below the left conveyor chute to gain access.
– 2nd Upgrade – Eggshells and Meat
– 3rd Upgrade – Hatch Food Supply
It is of course not necessary to install all nine storage bins in the warehouse at once, you can start with just a couple and add more as they become full.
In this stable the critter feeder and storage bin are removed and replaced with a conveyor chute for dropping food onto a weight plate. The weight plate should be set to send a green signal when below the maximum of 2,000 kg, and connected to the chute via automation wire. I won’t show that overlay since it’s a 5-tile straight vertical run.
 Note that the screenshot doesn’t show it, but the conveyor rail from the chute would run straight down through other stables and their chutes.
In this feeding system, the worst case scenario would be that all eight hatches decide to stand on the weight plate at the same time, counting against the food weight to be dispensed. Fortunately, hatches don’t like to stand still in the middle of rooms, they tend to path to a wall on either side then wait. In any case, 8 hatches weighing 100 kg each would cause the conveyor chute to be disabled with only 1,200 kg of food present on the weight plate, instead of 2,000 kg. As each hatch eats 140 kg of food per day, you require at least 1,120 kg of food on the plate to keep all eight fed. This design will remain well above that threshold at all times as the hatches walk on and off the weight plate.
In this stable the critter feeder is left in place, and the storage bin is replaced with a conveyor receptacle. The existing auto-sweeper will automatically move food from the receptacle to the feeder, just as it was doing from the bin.
Note that this stable option now requires the single ladder tile in the stable to reach the conveyor rail construction, or alternatively some minor deconstruction in the control room.
– 4th Upgrade – Coal Removal
As mentioned above, there is an option to not install this conveyor loader, and instead add coal to the allowed materials on the original loader to the left. The coal would enter the drowning trap, and would have to be sorted apart from the eggshells and meat. There are two main ways to do this:
- Send both the eggshells and meat to your kitchen area on one of the existing conveyors, and assign coal to the other. Presumably in this scenario you have a rock crusher inside your base, close enough to your kitchen, so the eggshells need to go that general direction anyway.
- Build a third loader in the control room, by removing the top right corner from the drowning trap (see screenshot).
The space in the stable can’t be used for anything else anyway, not even decor items, since the floor tile is a door and there’s no ceiling or wall to attach to (e.g. for a flower pot). There’s no real advantage to building the loader inside the stable unless you’re like me and the empty space bothers you.
There are, however, several advantages to building the loader in the control room instead of in each stable. Most obviously, you only need to build one of them, so you’ll save a few hundred refined metal. In addition, loaders give -8 to decor. So even though you can’t add decor items in its place, you’ll gain 8 decor in each stable through its absence. I really like this option by the numbers for min-maxing, I just don’t like the look of the empty space in the grooming area.
– 5th Upgrade – Repopulation
There is very little to add to each stable, as most of the automation is in the control room. You only need a critter sensor, inverter and a few tiles of automation wire, at a cost of 90-120 refined metal per stable, depending on which design option you selected.
The critter sensor in the stable should be set to send a green signal when above 7. This produces a “stable full” signal which has two purposes:
- It connects to the mechanized airlock in the floor of the stable, keeping it open so dropped hatches can fall through to other stables below. If less than eight hatches are detected in this stable, the door is instead closed to stop any falling hatches.
- It goes through an inverter and is connected with the same signal from all other stables, before routing up to the control room. Using OR gates to combine these signals is unnecessary, as a green signal from any stable will override the red signals from other stables. I refer to this inverted signal as the “breeder needed” signal, as if any stable is below 8 hatches it will trigger the control room to allow dispensing new breeders.
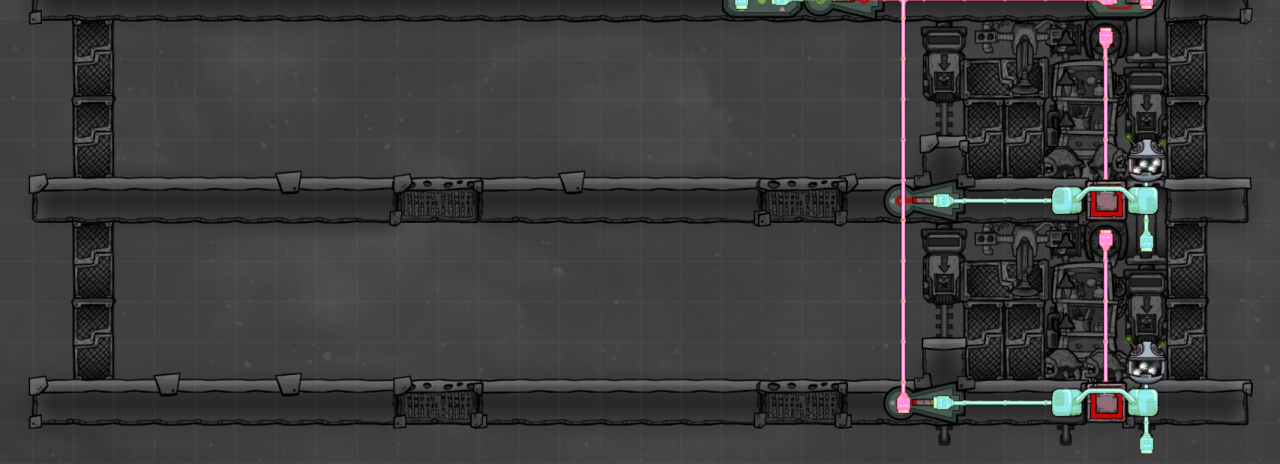

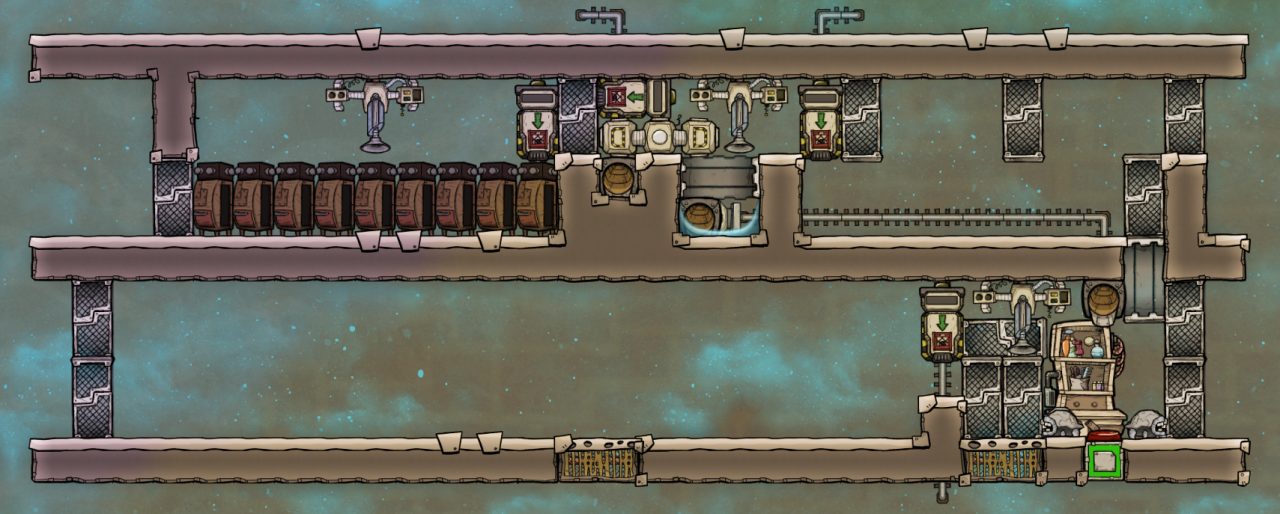
The upgrade to the control room requires five critter sensors, five AND gates, one OR gate, two inverters, a filter gate and a buffer gate. The total cost in refined metal is 375.

As this automation circuit gets built the doors in the control room will start to open themselves or lock. The only door that could give you any trouble, depending on the order dupes choose to build things, is the door to the drowning trap. It will likely lock itself, blocking access to finish building the critter sensor or some automation wires in the pit. Simply set the door to Open if this happens, and once construction is complete set it back to Auto, or else change the settings on the critter sensor (if it got built) to temporarily force the door open.
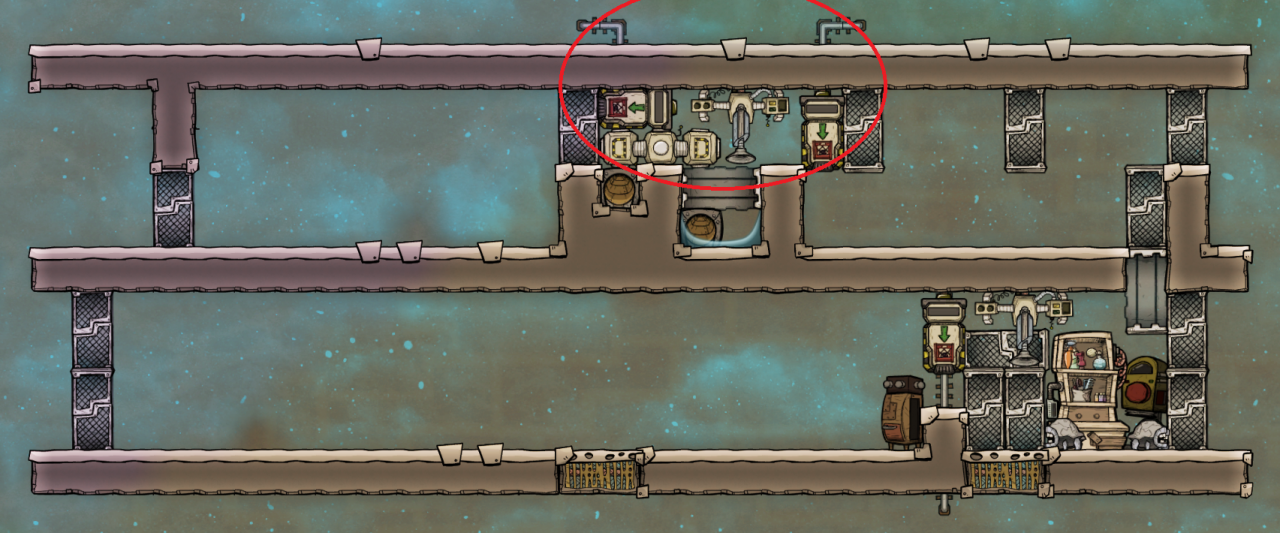
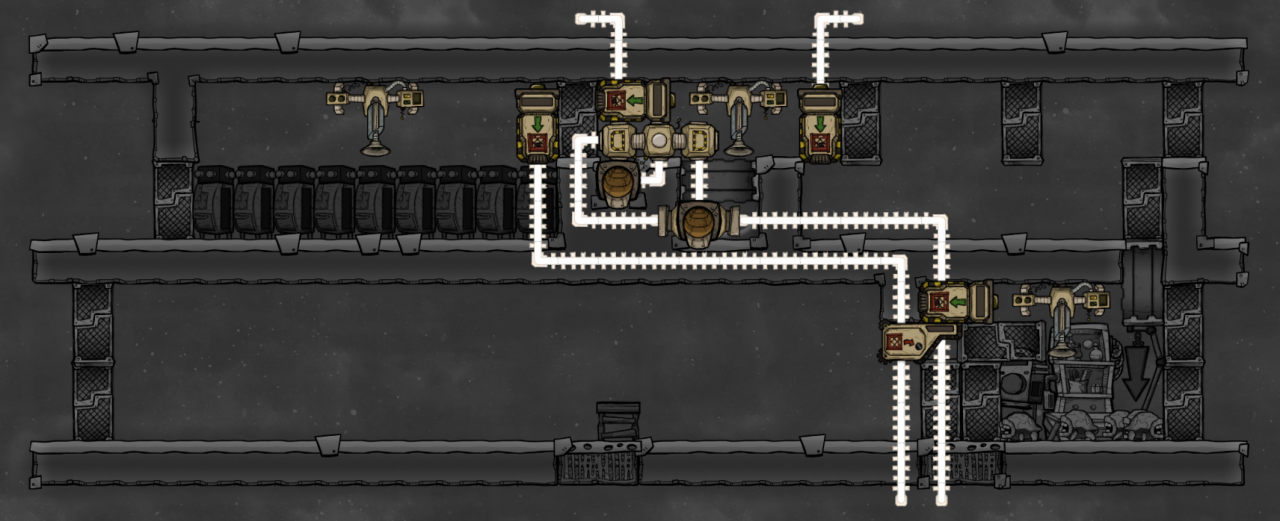
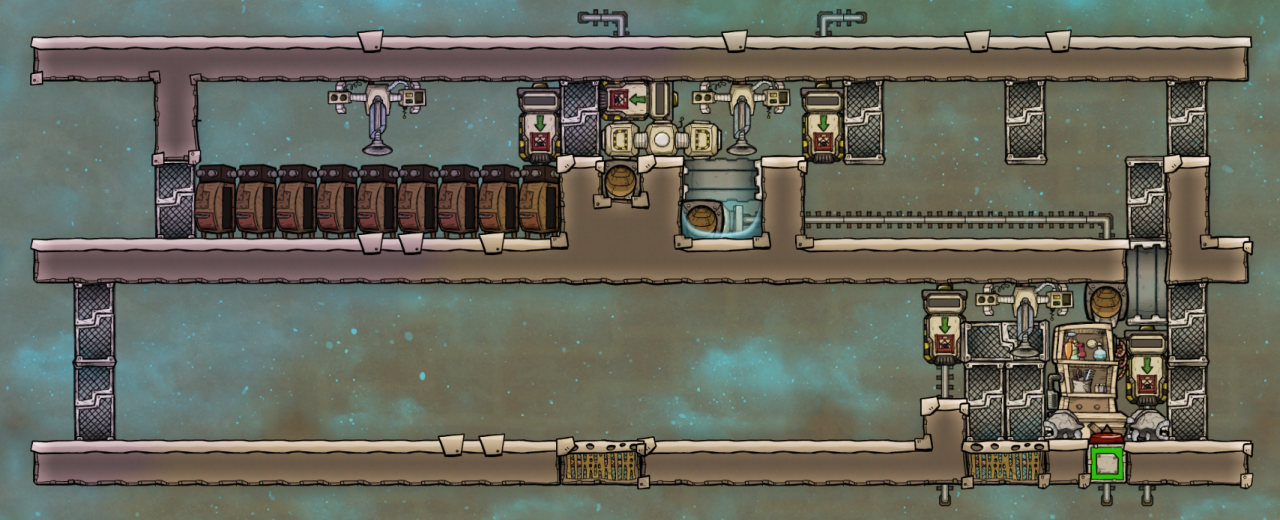
From left to right, the settings on the critter sensors should be: Below 1 (in the drowning trap), Above 0, Above 1, Above 0, Below 2. The buffer gate should be set to 2s and the filter gate to 15s. The following image shows the completed automation wiring.

– Explanation of Automation Logic
This door receives two signals through an AND gate, so it will only open when both conditions are true:
- None of the stables are driving the “breeder needed” signal.
- The critter detector in the drowning pit detects zero hatches.
If any stable drives the “breeder needed” signal, this door will close, preventing any hatches from falling in and drowning. Otherwise, if any hatches are detected in the trap the door will also close to drown them.
This door receives two signals through an OR gate, so it will open when either condition is true.
The first condition is that any stable is driving the “breeder needed” signal. Just as that signal will force the drowning pit door to close, it will also force this door open, allowing hatches to exit the hatchery.
The second signal comes from an AND gate and requires both of the following conditions to open the hatchery door:
- None of the stables are driving the “breeder needed” signal.
- One or more hatches are detected in chamber 3
- There is a 2 second buffer on this input, holding the signal true even after the hatch leaves the room. This is because the door space does not count as the room, and otherwise hatches may get stuck in the closing door when trying to exit.
It is common that when the control room is finished dropping hatches and all stables are full again, some hatches might remain in either chamber 3 or 4. Without the above logic, the lack of a “breeder needed” signal would lock door C, cutting off the hatches from returning to the hatchery, and thus the drowning pit. Eventually they would starve to death in chamber 3 or 4, and there is no auto-sweeper there to collect their meat. This would lead to spoilage, or require manual intervention by hauler dupes. By using the secondary conditions above, the hatchery door will remain open until all hatches have returned.
Note that the OR gate in this circuit cannot be removed and its inputs wired together as a single wire like we did for the “breeder needed” signals from the stables. This is because a loop would be created where the output of the AND gate would be connected to the input of the inverter, and the output of the inverter would be connected to the input of the AND gate, all on one wire. This causes the two gates to constantly toggle between on and off, so we use the OR gate to combine and isolate the signals.
This door receives three signals that all share the same wire, just like how the “breeder needed” signals from the stables were wired to the control room.
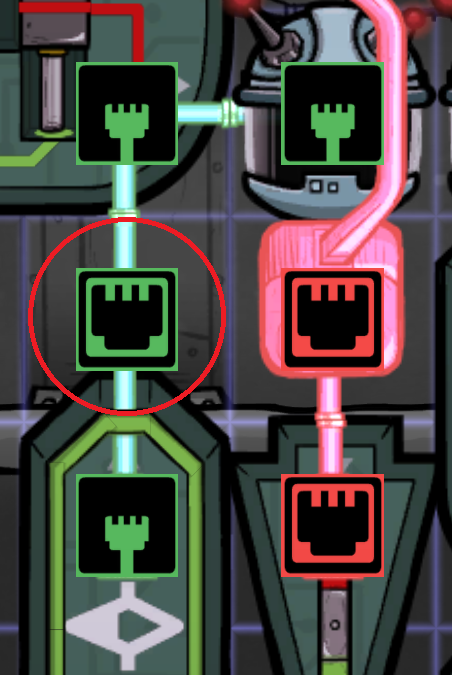
The door input (circled) is connected to the outputs of the filter gate, the AND gate and the critter sensor. If any of those outputs is true the entire wire will turn green and the door will open, without the need of extra OR gates. I’ll go through all three of those inputs.
The critter sensor is set to Above 1, and ensures that this door remains open if there is ever more than one hatch in the drop room. This allows the extra hatches to escape back to the left, and helps prevent accidental “double drops”.
The filter gate’s output is an inverted signal from the Above 0 critter sensor in the drop room. “Not Above 0” is the same as saying “Equals 0”, so this signal will open the door when there are no hatches in the drop room, allowing more hatches to enter. The reason for the filter gate is that as soon as a hatch enters the dropper door E it is no longer technically in the drop room. Without a delay on the sensor signal, the door would open immediately, more hatches could rush in, and an accidental “double drop” could occur. I set the filter gate to 15s to give ample time for the hatch in the dropper door E to be pushed out of the room completely before reopening the drop room door.
The final input to the drop room door comes from the AND gate just above it. The logic of this gate is identical to the AND gate on door C, it requires both of the following conditions to open the door:
- None of the stables are driving the “breeder needed” signal.
- One or more hatches are detected in the drop room.
Just like before, this allows leftover hatches to escape the drop room and return left to the hatchery after all stables are full. The only difference is that this door does not require a buffer gate to prevent hatches from becoming stuck in the door. The natural state of this door is to open 15 seconds after zero critters are detected in the room. So if a hatch does get stuck in the door, it will be released after 15 seconds automatically.
This door receives three signals through two AND gates, so it will only open the door when all three conditions are true. Once the door is open a hatch in the drop room may path into the space of the open door. If the door is then closed, the hatch will be trapped and pushed out the bottom to fall into one of the stables below.
The three conditions required to open this door are:
- At least one stable is asserting the “breeder needed” signal.
- The Below 2 critter sensor is true
- The Above 0 critter sensor is true
The combination of conditions 2 and 3 ensures that the dropper door can never be open unless there is exactly one hatch in the drop room. Once that one hatch paths into the open door it is no longer ‘in the room’, condition 3 will change to false, and the door will immediately close. Because of the logic on door D described above, no more hatches are allowed into the drop room for 15 seconds, allowing plenty of time to drop the trapped hatch and reset. These combined protections ensure that a “double drop” should never occur.
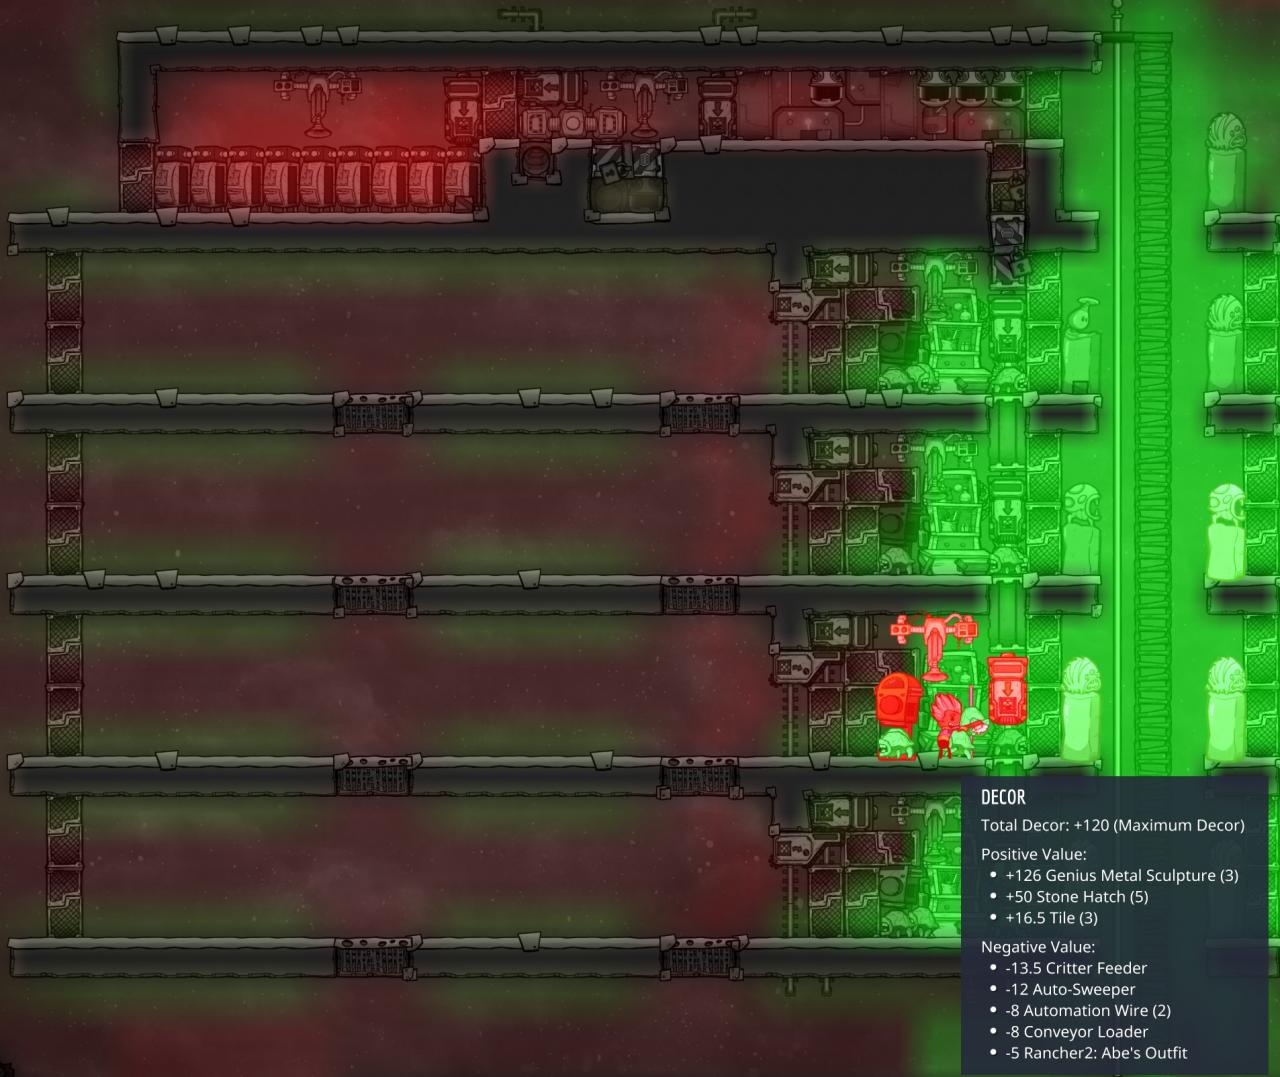
– Tidying Up

The only thing left to do now is add a bit of decor to the stables to keep your ranchers happy while they spend their days grooming critters. Unfortunately, neither stable design has a single spare tile of space to put in any kind of plant pot or moulding. The good news is that all hatch breeds are worth +10 decor each, so eight of them will more than offset the negative decor from the machinery while they run around the grooming area. If you are using the 5-tile main corridor design, statues on each floor are more than enough to exceed 120 decor at the grooming station.
5. Bonus Builds (All That Empty Space)
– Early Game Farming
Once you’re swimming in barbecue the planter boxes can be deleted, but then I’m back to not knowing what to fill the space with. More often than not I just fill it with storage bins set to collect (almost) everything, and this becomes the core of my in-base storage.
– Showers
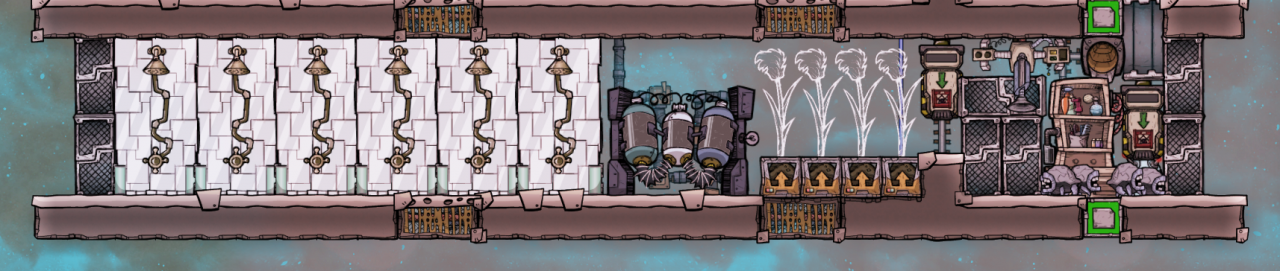
– Coal Plant
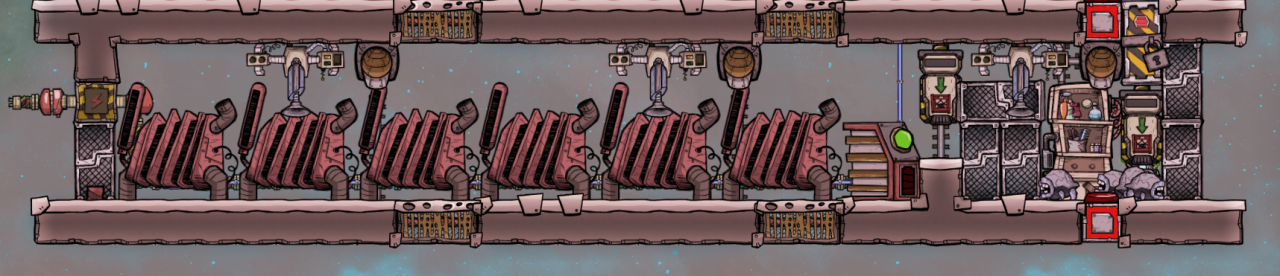
If you decide to do this you’ll want it to be your very bottom stable in the stack. The generators produce a lot of CO2 and heat which I’d generally prefer to locate outside the base (and couple with a power control station for 50% more output). Even so, especially in the early game, three generators, a carbon skimmer and a battery could work well in the bottom stable, and the skimmer pairs well with the showers and water sieve if those are placed on the level directly above. Until you get a proper power plant running, there are worse ideas for the extra room in your stables…
– Starter Industrial Block
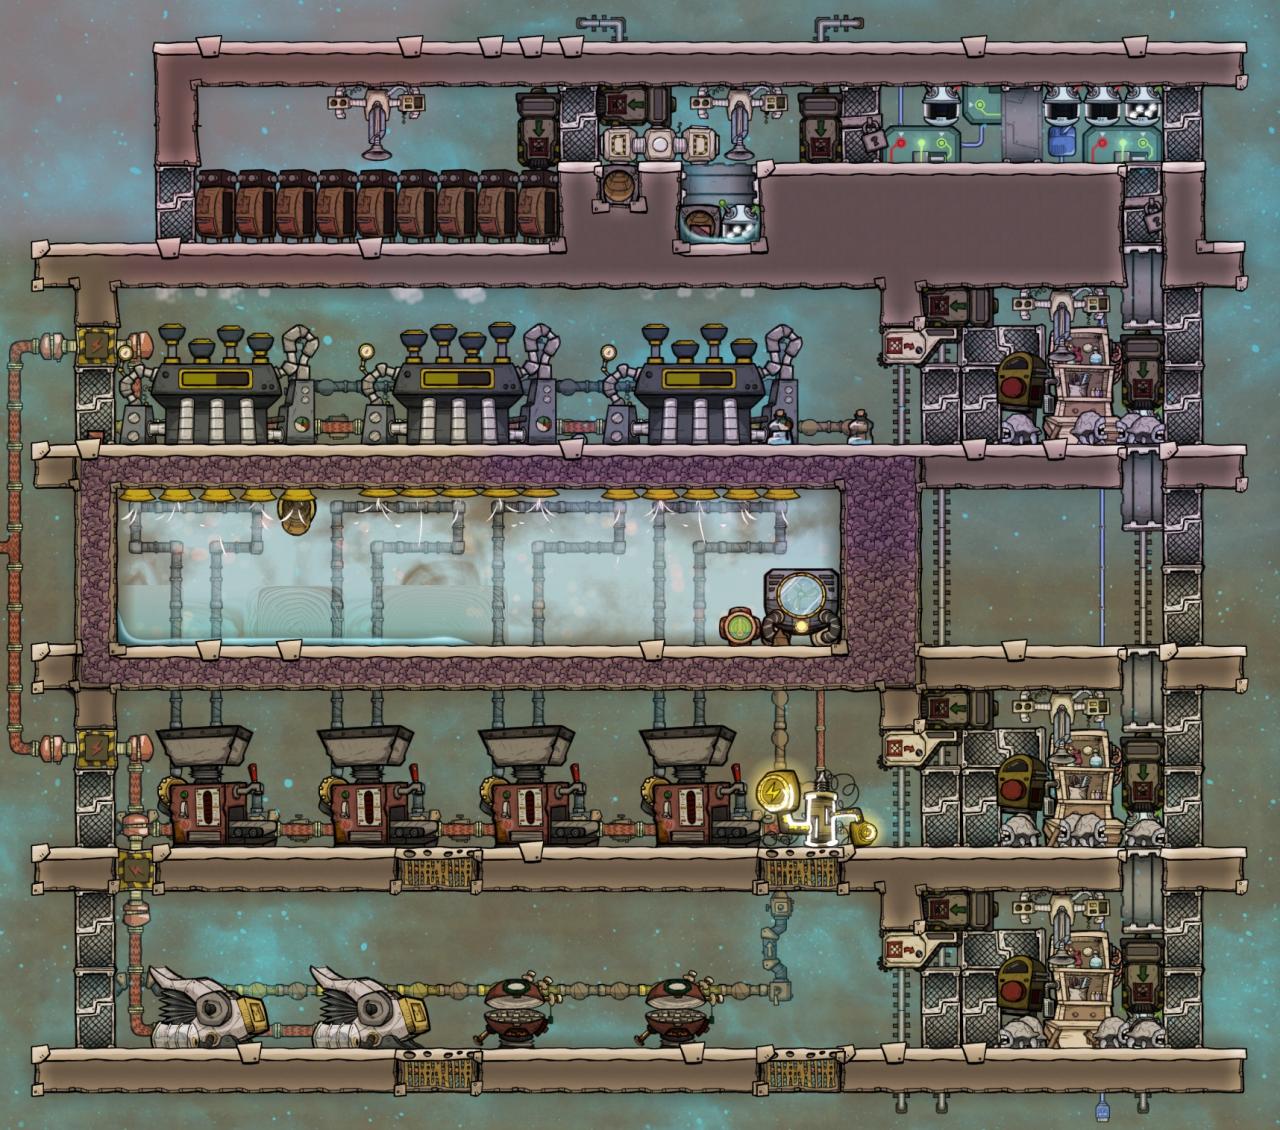
The screenshot is just an example of the concept. I didn’t spend time planning a “good” layout as personally I don’t think I’d ever do this. Note too that one stable level has to be removed from the stack in order to accommodate an insulated steam room, unless you have a different approach to removing heat.
I do think it’s humorous that if you add a fertilizer station or a power controller then somehow your room is not a stable anymore, but full-on refineries and steam turbines and these are definitely still stables.
6. Summary
Food for the hatches is delivered automatically, and all byproducts are extracted and sorted for distribution around the base. All your dupes have to do is groom the hatches and make sure the warehouse of hatch food doesn’t go empty. With smart storage bins you could even set up an alert if the warehouse gets low, and you’d have several dozen cycles to deal with the issue.
There are a lot of other partially and fully automated ranch builds out there, so this isn’t technically anything new or unique. I gave myself a set of design constraints to fit my playstyle and I like the design I came up with, but there are other designs available that accomplish essentially the same thing.
More Guides:
- Oxygen Not Included: Automatic Kitchen with Freezer
- Oxygen Not Included: Sustainable Pacu Ranching Guide (Packed Snacks Update)
- Oxygen Not Included: Air Conditioning Plant (Simple and Compact Design)