This guide will introduce to you the basic concepts and strategies of Shadows of Forbidden Gods, as well as a few tips and tricks to help get you that first win.
Introduction
If you’ve tried the game and found it difficult, or if you’re looking for a head start into your first game, this guide will teach you the basic strategy for Shadows of Forbidden Gods: cover everything with shadow and form the Dark Empire.
Know Your Gods
 When you first start the game the only god available to you will be She Who Will Feast. Unlike the other gods she has no unique mechanics layered on top of her, allowing you to focus on the basic systems at play in Shadows of Forbidden Gods. However, once you reach turn 375 and the final seal breaks, you’ll gain her as a commandable army on the map. Be careful though: she starts out weak, and if she dies you lose the game.
The next three gods are unlocked once you have beaten the game with She Who Will Feast.
 Iastur is a god of madness. His unique mechanics revolve around using his tome to spread Madness around the map, and his powers allow him to alter the personalities of heroes to make them prefer certain actions over others.
 Vinerva is a false fertility goddess. She can use her powers to offer gifts to rulers, then once her gifts are accepted she can poison their minds or their lands, or outright destroy their settlement once enough seals have been broken.
 Ophanim is a god of false light. As his agents spread shadow around the map he exploits fear of the shadow to spread his faith, eventually converting a kingdom of the faithful into his own theocracy.
Make sure you use your god’s Powers. You may start the game with just one or two spells (called Powers in the game), and just one mana to cast with (called Power), but as time goes on and the seals restraining your god break one by one you’ll gain both more Powers and a more Power. The rate at which you gain Power will also rise as more seals break.
If you’re reading this guide you probably haven’t beaten the game yet, and so will be using She Who Will Feast. Her most important spell is gained on turn 12, when the first seal breaks.
 Eyes in the Shadows will automatically infiltrate a single point of interest in any settlement where you haven’t infiltrated anything yet. A village’s Farming Community? Boom, infiltrated, whole village done. The capital city’s Library? Done, have your agent get the Market.
If you look at the list of Points of Interest at the very bottom of the city’s information window, Eyes in the Shadows always targets the point of interest lowest in the list—a helpful piece of information if you need a specific kind of point of interest infiltrated (each has their uses).
 The other Power you want to make sure you make use of is Split Shadow. It costs five Power, but will essentially copy one hero’s Might, Intrigue, Lore, and Command stats into an extra agent for you. It has to stay either on highly enshadowed tiles or near the host hero, or else lose HP, but having an extra pair of hands is always helpful, especially since the shadow is even more disposable than an ordinary agent.
Know Your Agents
 You are limited both in the amount of agents you can have at any given time, and the amount of agents you can call to replace those who have died. Both numbers will increase over time. As a general rule you should try to preserve your agents, but if you lose a few over the course of the game you’ll easily be able to replace them.
Agents are either generic or unique. There are only three generic agents in the game, but you can summon as many of each of them as recruitment points and agent slots will allow. Generic agents do not get unique traits, with Warlocks choosing a school of magic to start out knowing and the other two getting to raise a stat by one.
Unique agents, on the other hand, are one of a kind. Some of them have very specific requirements to summon them, and all of them can only be called once—if they are killed, they’re gone for the rest of that game. When you summon a unique agent you get to choose between their usually three traits, giving most of them additional flexibility.
As the game goes on and heroes fall, you’ll also get the option to corrupt any hero at 100% Shadow into an agent. Heroes gain Shadow every time they rest and recover at their home city, so if you have a hero you really want it’s just a matter of enshadowing their home city and making sure no other heroes heal them of their Shadow.
Every agent has four basic stats: Might, Intrigue, Lore, and Command. Each stat allows them to perform the challenges associated with it more quickly, and every agent can be loosely associated with a single stat.
Intrigue is probably the most important stat for a conventional playthrough. It is the attribute of stealth, of infiltration, of assassination. These agents are most heavily associated with Intrigue:

 Hierophants are a generic agent, and while they’re here in the Intrigue section they do well with Lore too; their unique ability to influence rulers’ personality traits is tied to Lore so they make great hybrids.
 The Trickster is a unique agent whose special abilities revolve around messing with heroes, either selling them false healing potions or stealing their items and then either framing the hero for another agent’s crimes with them, or handing them off to the Courtier or a blood mage to use.
 The Courtier is a unique agent who specializes in drama. He can steal an item belonging to the ruler of a city, and he can take any personal item in his possession and make the ruler of a city dislike the item’s owner.
Lore is likely the second most important stat. With it you can enshadow a city, create a shadow well to speed up the spread of shadow, and do other nasty things besides. Most of these do require you to have infiltrated the settlement already, but Lore also powers magic, which is powerful in its own right. These agents are most heavily associated with Lore:
 Warlocks are generic agents, and start at rank one in one of the three schools of magic. They don’t have any unique challenges available to them, but they start with a serious head start in the climb up the magical ladder compared to most other agents.
 The Survivor is a unique agent, and the only other agent to start with any magic. You can only summon him once World Panic is at 30%, but he comes pre-equipped with two ranks of Geomancy. He has more hit points than a typical agent, and a good Might as well.
 The Harvester is a unique agent with a choice of two special abilities. One drains the sanity of heroes in the same settlement as him, one increases the shadow of heroes in the same settlement, and both drain hero XP, give him XP, increase his Menace, and require he harvest human souls to power.
 The Plague Doctor is a unique agent who can only be summoned on a settlement affected by plague. Not only can he cultivate the plague quickly, he can actually reduce Plague Immunity (though the tooltip erroneously says Quarantine). He can also create Arcane Secrets for your magic users to study in plague-stricken areas.
Might is primarily used in combat, though can also be used to assassinate rulers in un-infiltrated settlements and to raid farms to limit a city’s food supply. These agents are most heavily associated with Might:
 The Cursed is a unique agent who specializes in harassing heroes and getting out alive. Once you use her to kill a specified character, who can be either a ruler or a hero, she’ll have 3 in each of the four stats, as well as her single starting trait that makes every hero she fights deal 2 less damage per turn.
 The Baroness is a certified hero killer. As long as she’s fighting in shadow she does extreme damage, and as long as she’s near the desecrated holy site you spawned her at she has ready access to three zombie minions and easy full heals.
Command has limited use beyond allowing you to hire more, better minions—except for two agents who use it to great effect. It can be used either to increase the Unrest in a settlement or to give a friendly army a major boost in battle (+7.5% damage per level of Command). These agents are most heavily associated with Command:
 Warlords are generic agents who can only be summoned onto Orc Fortresses. They could just as easily have been slotted in as Might heroes, since they start with a 4 in both stats, but two of their unique Challenges rely on Command and so do most challenges related to building up an orc horde. Still, if you need a strong generic agent for combat, a Warlord is certainly ready to do the job.
 The Monarch is a unique agent, and more unique than most. She is the only agent who can found your Dark Empire, and the only one with the right to command its forces (though a new ruler can be crowned if she is killed).
Basic Concepts
To win the game you need to get your score up. Everything you do should be to either increase this score, or put you in a position to better increase your score later. You can increase your score in the following ways:
- Destroy settlements
- Enshadow or drive insane rulers or heroes
- Nurturing Deep One Cults into Deep One Sanctuaries
Once you’ve pushed your score high enough, that’s it: you win. You’ve strengthened your god’s position to the point where their victory is inevitable.
 Challenges are the primary activities of your agents. Infiltrating a location, robbing a vault, spreading unrest, and learning magic are all examples of Challenges.
All Challenges have a Complexity value, affects how long the Challenge takes to finish; every point of Complexity means the Challenge needs one point of progress to complete. Most Challenges are tied to an attribute and color-coded accordingly, and you gain as many points of progress per turn as you have points in that attribute.
There are also some gray Challenges which you finish at the rate of one point per turn. These are simple things, like buying something at the market or recruiting a minion.
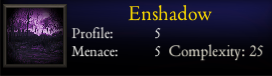
Each challenge performed will give experience points to your agent, eventually allowing them to level up, but they’ll also accrue Profile and Menace.
The higher an agent’s Profile, the more visible they are to heroes on the map. Every 10 Profile means heroes can see them from one more move away, meaning every 10 Profile adds more heroes who might choose to sabotage or attack your agent than the previous 10 before it.
The higher an agent’s Menace, the more heroes are going to want to interfere with them. When Menace gets too high, that’s how you lose agents.
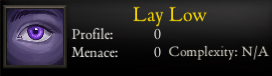
You can reduce Profile and Menace by using the Lay Low option, available in cities and towns, ruins, covens, and orc settlements. This will reduce both, though Profile decreases more quickly than Menace, each turn.
If a town or city is infiltrated or enshadowed by at least 50% then laying low will reduce Profile and Menace twice as quickly. If it is both infiltrated and enshadowed by at least 50% it will reduce both three times as quickly.
Not only can high Profile and Menace be dangerous, they are also to an extent permanent. An agent can never again get their Profile or Menace below one third of the highest they’ve ever been. If you get an agent up to 90 Menace, then even if you get them to safety where they can lay low in peace, they’ll never be able to go below 30 Menace again. Know when to consider an agent used up and just create another one after they’re killed (ideally after taking the Infamous trait on them, so their death takes the heat off of your other agents).
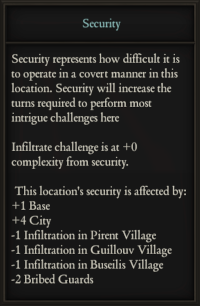
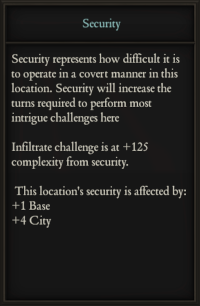 A location’s security is a representation of how well its guards are able to restrict your agents from operating, and adds to the time it takes to complete various challenges, most notably infiltration.
Security can be reduced in a few ways. Here are the most common ways you’ll see security lowered:
- Every full infiltrated settlement reduces all adjacent settlements’ securities by one
- Bribing the guards can be stacked as many times as you have the gold for and reduces the security by two each time for 25 turns
- Enshadowed rulers naturally decrease the security in their settlement, from -1 at 20% Shadow to -5 at 100% Shadow
Remember, you only have 500 turns to win, and things tend to go faster in a city with low or no Security.
You’ll spend most of your time looking at the Challenges window on the right side of the screen when at a settlement, but there are other windows there too.
- National Actions will tell you what that ruler’s king is planning to do next, and why
- Local Actions will tell you what the ruler is planning to do next, and why
- Quests tells you what heroes can do in the city
- Modifiers tells you all sorts of stuff about what’s going on in a city
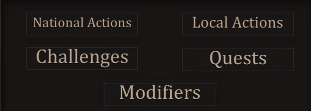
So many helpful things are tucked away under Modifiers. Remember those guards you just learned how to bribe? That results in a modifier on the city, and you can check the Modifiers window to see how much longer each bribe will be active for. Make sure you know where it is, because you’ll be checking here again and again.
Infiltrate and Enshadow
Heroes will see the spread of this shadow and push back against it as best they can. Rulers will see the shadow emanating from your strongholds and put up wards to try to block its spread. But all of this will only serve to slow you down. You are inevitable.
Your first step in spreading shadow will be to select a starting point. First, try to find the biggest kingdom on the map—this will be the kingdom you turn into the Dark Empire, and the stronger it is the more points you’ll get from subverting the kingdom and the easier a time you’ll have conquering more lands with it.
Then find a city or a town, anything large enough to have a City Palace as a point of interest inside it, decently central to the kingdom; the more connections to other settlements it has, the better. This city will be the first well from which your shadow will spread.
 After you’ve selected your target, you need to make it vulnerable. You can only enshadow a city after you’ve fully infiltrated it, and since Security makes infiltration take much longer you want to get its Security down to zero first.
Use every trick in the book: infiltrate outlying settlements, rob them for money to bribe the guards, maybe even bring in the Courtier with the Noble Connections trait.
Once Security is 0 you’ll be able to speedily infiltrate the city. You can only start infiltrating the City Palace once the other points of interest in the city have been infiltrated, but finishing it will give you full infiltration.
Next, use an agent with a good Lore skill to use the Enshadow challenge on the city. Once the challenge finishes it will be 100% enshadowed, and start increasing the Shadow of its ruler by 2% each turn, as well as increasing the Shadow of adjacent locations.
 Two things will speed up the spread of shadow:
- Shadow spreads more quickly to settlements which are infiltrated
- A Well of Shadows makes a place spread its shadow more quickly
So, once your city is enshadowed, have your Lore agent create a Well of Shadows. Wells of Shadow are not permanent—they drain over time, but can always be reinforced by performing the Challenge again.
That first city will be the first node in your network of shadow. As it enshadows the settlements next to it, they’ll start to enshadow the settlements next to them, and so on. You can exploit this Shadow – as a ruler’s Shadow increases the Security in their city decreases – or you can set up in another area a bit away and set up another Well of Shadows.
Whatever you choose to do with your network, don’t forget to keep one eye open on the rest of the world map. Making and executing plans is only half of the game—the other half is making sure the heroes can’t stop you. And there’s one thing that, if not managed correctly, can make your plans a lot more difficult: the Alliance.
The Alliance
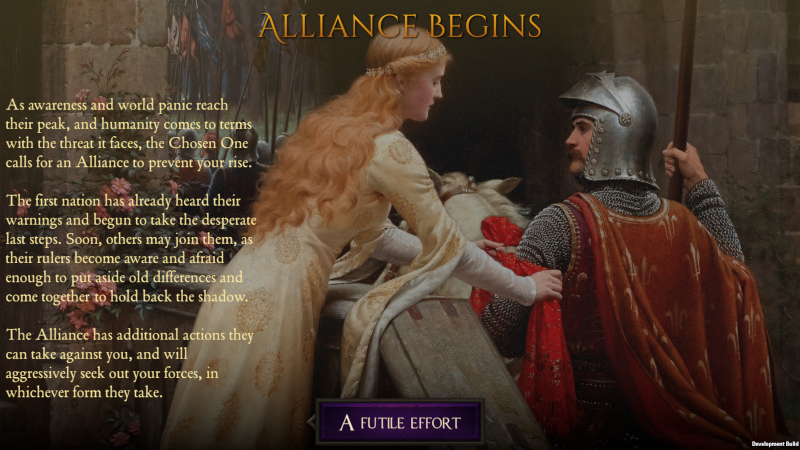
Any ruler who’s a part of the Alliance, however, is even more infuriating than a hero—simply for existing. Alliance settlements can’t be infiltrated; even if you infiltrated them before they joined the Alliance, they’ll quickly root out your cult and reduce infiltration to 0% in a single turn. They also aggressively push back shadow, and launch crusades into enshadowed kingdoms to free them from your influence.
Since Alliance settlements can’t be infiltrated, your options for dealing with them are very limited. Far and away your best option for dealing with the Alliance is preventing it from ever forming in any location that matters to you—if all the Alliance has is a one-city kingdom on the edge of the map, what good is it?
This means that you can’t just focus your agents on spreading shadow—you have to be ready to intervene in any important kingdom’s capital, which means one thing: it has to already be 100% infiltrated before things go wrong.
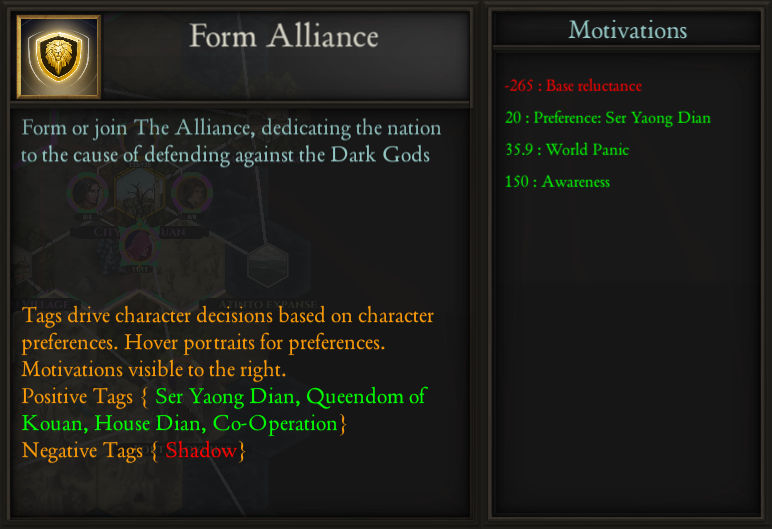
And you will have plenty of time to see the problem developing; the Chosen One can’t just call a ruler into the Alliance right away, there’s a buildup period first:
- The ruler must be made 100% Aware
- The ruler must “Like” the Chosen One
- The ruler must become “Obsessed” with the Chosen One
The Warn the World Challenge is how Awareness to spread. As for the ruler first liking then becoming obsessed with the Chosen One, that is a result of the Chosen One using the Form the Alliance Challenge; once he’s used it twice on a fully Aware ruler, that ruler is poised to form or join the Alliance—and you don’t want that.
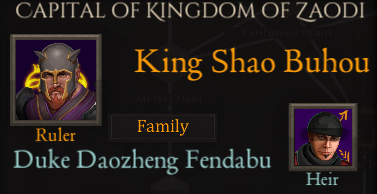 So if you see a fully Aware ruler that likes but is not yet obsessed with the Chosen One, you still have time. Check the stats on the ruler’s heir: they’re a lot less likely to be Aware than the ruler is, and they probably don’t have an opinion of the Chosen One either—putting them in power instead will buy you a lot of time.
The Chosen One won’t take this lying down: if a kingdom was big enough to be a priority for you, it’s going to be a priority for him. Even if the Chosen One turns right around and goes to work on the new ruler though, you’re using a single agent to lock him down, and since the Chosen One is the fountain from which all threat to you flows, that’s a good thing.
Just be aware: rulers that hate Shadow or like Cooperation will be more likely to join the Alliance, so pay extra attention to them. Check their National Actions and see how close they are to joining up, and if they’re getting too close make sure they don’t have a chance.
The Dark Empire
Now, it’s not mandatory to form the Dark Empire. If you’d prefer, you can use your fifth agent slot on a different agent and win another way. But the Dark Empire is the easiest way to win, so you should know how it’s done.
At the start of the game you will select the grandest kingdom in the world, with the most cities so it can support the most armies, and will task your agents with subverting its nobility until they all kneel before your chosen representative and follow her call to dark crusade.
 To form the Dark Empire you must first corrupt the dukes of the realm—everyone who rules a city or a town. If it has a City Palace, you want its ruler to reach at least 90% Shadow.
Thankfully, so long as you’ve been following the Infiltrate and Enshadow section you should enshadow them without any difficulty. A settlement’s ruler’s Shadow will rise by 2% each turn so long as his settlement is at least as enshadowed, so just re-enshadow a city if a hero decides to Drive Back Shadow there and things will take care of themselves.
Just make sure you get them all. Any dukes with less than 90% Shadow will, when the time comes, rebel against you and force your Dark Empire into civil war. Barons however, do not matter; they have no armies of their own, so will follow their dukes.
The Chosen One will let the enshadowing of the dukes pass without making any moves against you. Your enshadowment of the king, however, will call the Chosen One to action. You might find the Chosen One making his way to the capital, and then you’ll get the bad news.
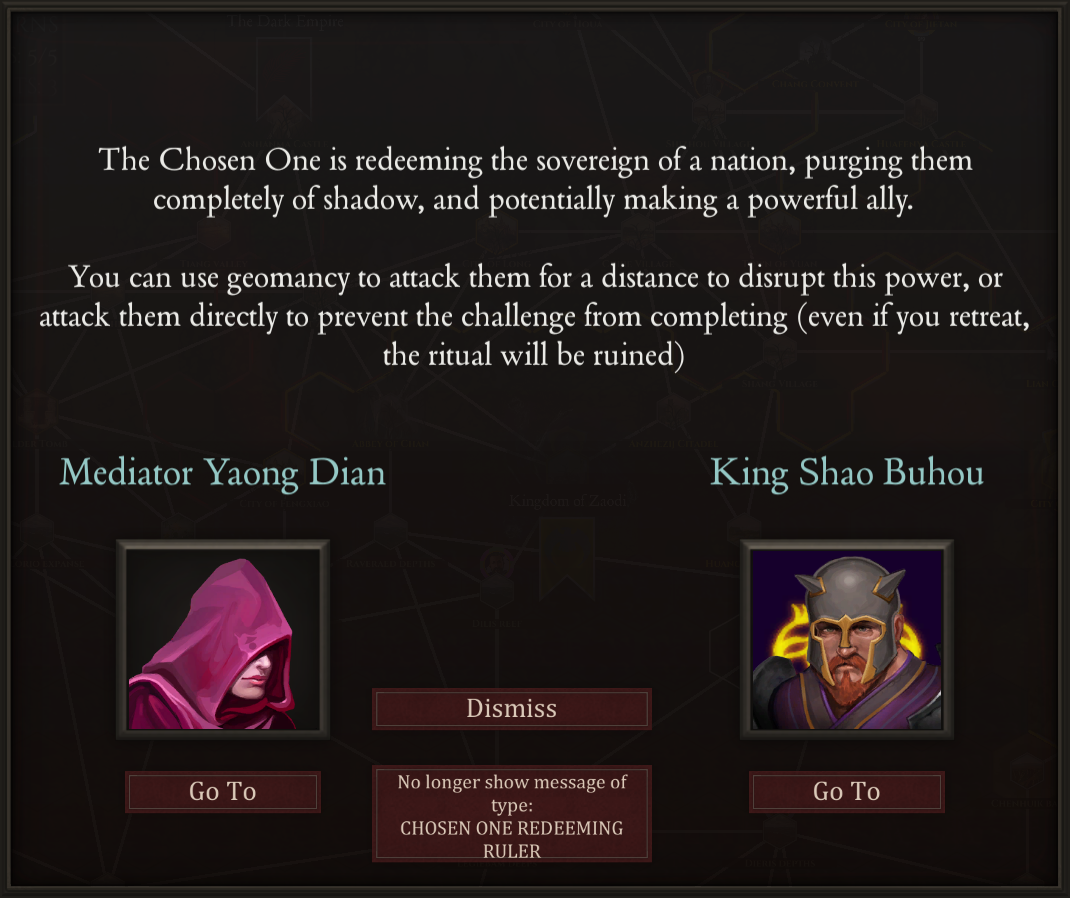
The Chosen One is redeeming a ruler. If he succeeds, he’ll reduce the king’s Shadow to 0%. He’ll also reduce the capital’s Enshadowment to 0%, and put up a powerful ward.
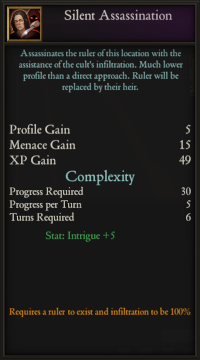
Of course the city will still be infiltrated; that ward can’t stop you from using Enshadow as soon as the Chosen One leaves, and waiting fifty turns for the king to be as enshadowed as his city. If that’s too long to wait, look at the king’s heir: he might be significantly enshadowed already, meaning a Silent Assassination will save you a lot of time.
Or, you can stop the Chosen One before he finishes the ritual. There are two main ways to do this:
- Attack him with an agent
- Hit him with Geomancy
Attacking with an agent will always stop the ritual, and so long as your agent has a full line of minions – even if they’re just rats you recruited from a town you infiltrated the sewers in – he’s likely to survive the first round and be able to flee.
You might have to deal with someone guarding the Chosen One though. The same rules apply there: even a single round of combat is enough to get him away from guard duty, after which a second agent can swoop in and disrupt the Chosen One.
 Geomancy can also stop the ritual. Any Geomancer of yours can use the Attack Channeller Challenge at a geomantic locus, and will magically attack a random character who’s channeling a spell—a spell such as the redemption of a ruler. If you can drop the Chosen One’s hit points low enough, he’ll no longer feel safe and will call off the ritual.
Be warned though, the Chosen One’s minions can absorb some of the damage for him. You might have to attack several times to lower his hit points enough. Don’t wait until you get the redemption notification to move your caster to a locus; always keep tabs on the Chosen One!
No matter how you stop the ritual, once it’s stopped the Chosen One will wait a while before trying again.
 Once all the prep work is done and all of the rulers are enshadowed, actually forming the Dark Empire is easy. Simply make sure you have an agent slot available, create the unique agent The Monarch in the capital of your empire-to-be, and have her use the action Dark Empire. It will take seven turns, then you’ll find the banner changes for your chosen kingdom to an aggressive red.
It’s more than just the color scheme. You now get victory points for every settlement in the Dark Empire—two per settlement, the same as if you had destroyed them, except they serve your war machine instead. Your agents can also hire Knights in Dark Empire cities, a powerful upgrade to the Sellsword that previously only heroes could include in their retinues.
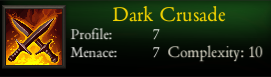 But the most crucial ability is on your Monarch: Dark Crusade. Use this Challenge inside any settlement in a kingdom you’ve targeted for conquest, and once it finishes the Dark Empire will immediately declare war and invade. Since you subverted the biggest empire around, and your agents have been keeping any other large empires out of the Alliance, the small kingdoms that are left should be easy pickings for your dread armies.
Your Monarch should be fairly safe as long as you make sure to Lay Low with her when you can; there are no special systems encouraging heroes to hunt her, just the basic Menace mechanics. Still, hiring a couple of Knights to guard her isn’t a bad idea.
Don’t forget, your Monarch has a good Command score and should level it up every chance she gets; you can use the Command Battle challenge in any settlement there’s a fight and give your armies a big advantage.
Advanced Methods
 If there’s a city with a large population that doesn’t produce much food on its own, it might be vulnerable to famine.
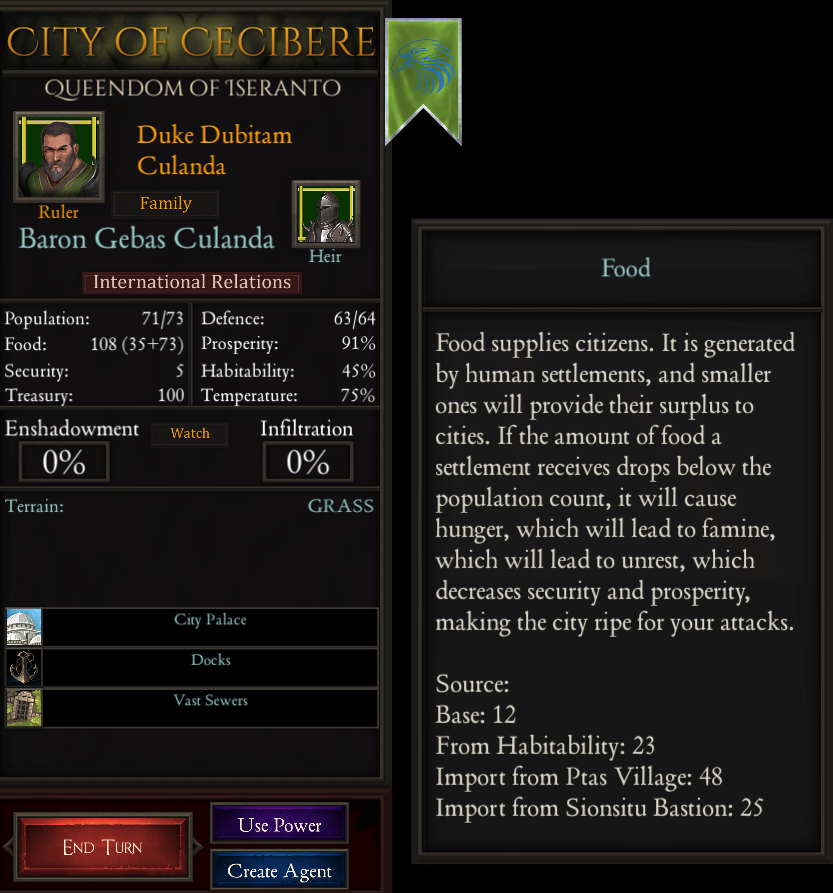 Look at the Food number on the city’s information window. It will break the food up, like 108 (35+73). The number you’re interested in is the first number in that pair, the 35 in this example. That’s the food produced in the city; if it’s significantly lower than the population, they might be vulnerable to a supply disruption.
Hover over the Food number to get a breakdown of where the food is coming from. Villages and abbeys have low Defense scores, which means they’re vulnerable. Castles can also provide food to a city, but with a much higher Defense score it would take too long to disrupt their supply.
If vulnerable target is feeding a vulnerable city, you can send in an agent with a good Might score. Use the Raid the Periphery Challenge and you’ll increase the Devastation of the unfortunate village or abbey. Their Productivity will drop, and so will their food production. You can raid each outlying settlement up to twice in a row to maximize the Devastation you cause.
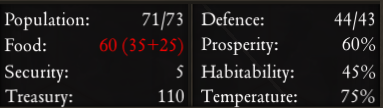 If you were able to reduce the city’s food supply enough you should see the shortfall on the information window. The Hunger modifier will rise, and soon so will Unrest and Death.
 Unrest is usually something heroes take care of, but it’s something a Command agent can exploit. Getting Unrest to 300% will automatically kill the ruler of a settlement; if it’s infiltrated you’ll even have the option of the city rebelling against its king.
If you want to raise Unrest make sure there’s something people are already upset about. Any ruler who uses Brutal Crackdowns to deal with Unrest will leave themselves open to you raising Unrest by 50 or 70% at a time, and famine also brings with it heavy Unrest.
A city suffering from plague has its own unique Unrest-increasing Challenge, which rises in potency as the plague in the city gets worse.
 A Lore agent can start a plague in any city where you’ve infiltrated the sewers. This will give the city a Plague modifier which will rise on its own, though you should help it along with the Cultivate Plague Challenge to get it spreading as quickly as possible. The higher the Plague modifier, the more people die every turn from it.
Don’t go too wild cultivating the plague though: your agent will accrue a lot of Menace very quickly this way, and while heroes will be quite busy trying to cure the disease they’ll always make time to cut down an agent who makes himself too obvious.
The plague will spread on its own; any settlement that reaches a Plague modifier of 100% or more will start spreading it to nearby settlements.
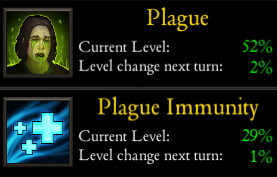
The natural growth of the Plague modifier is counteracted by the Immunity modifier. This goes up just by the presence of the Plague modifier, but rulers in stricken settlements will also make heavy use of the Immunize Population local action to raise the modifier artificially.
The Plague Doctor is a unique agent who specializes in the plague. He can start the plague in any settlement with any infiltration at all, sewers or no. He can also create Arcane Secrets in any plague-ridden settlement for your mages to learn.
Orcs are another tool you have to bring down a stubborn enemy, but they require a lot of gold to work.
 The first thing you must do with the orcs is kill an Orc Upstart. Once he’s dead, you can loot his banner and start subjugating the camps. This is a Challenge that works off of your agent’s combined Might and Command, and will both infiltrate the settlement and open up a lot more Challenges for you to use there.
To expand the horde you need armies, and for that you need two things: more orc settlements, and more Orc Industry in them.
Orcs can expand into any wilderness terrain tile with enough habitability if an agent uses the Expand the Horde Challenge.
These settlements start out as Orc Camps which don’t do much on their own, but they all produce Orc Industry, and they can also be upgraded.
 Orc Fortresses are what you’ll want the most of. Once you turn a camp into a fortress it will eventually raise an army, and that army’s maximum size will be determined by the total of the Orc Industry modifier in the fortress and every orc settlement within one move of it.
Orc Industry is not “used up” by fortresses! If you have three camps and a fortress where each was adjacent to the other, you could quadruple the size of your horde by turning the three camps into fortresses. Just make sure you use the Organize Horde Challenge to regularly increase the Orc Industry in the settlement and all adjacent settlements: it decreases 1% per turn on its own.
Orc Spellweavers make your orc armies stronger, and a camp can be upgraded to produce them by an agent with at least two ranks in one kind of magic.
The Menagerie provides access to some very good rare minions.
And a Shipyard is essential if you need your horde to attack over water. Once it’s finished, you’ll need to go to a human settlement with docks and have a Warlord generic agent use the Commandeer Ships Challenge unique to him.
 Deep Ones will probably never be a major part of your strategy, but if you see a Deep One cult on the map you can nurture it until they eventually take control of the settlement they spawned in.
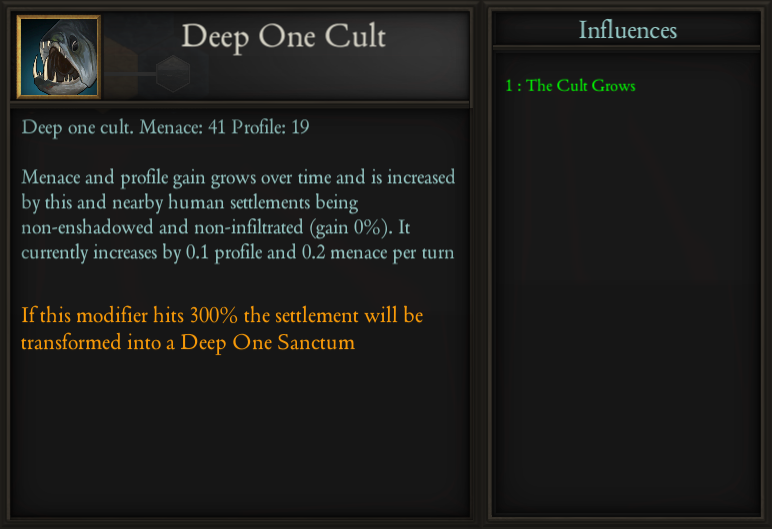
Check the Deep One Cult modifier on the city. It will tell you what the cult’s Profile and Menace are. Normally these rise unchecked, causing heroes to come and decimate the cult. Your agents can work to mask the cult’s activities though, and can also slow down the rate at which Profile and Menace rise by infiltrating neighboring settlements.
Finally, you can speed up the rate at which the cult matures (but crucially not the rate at which its Profile and Menace increase!) by either expending your Power or by providing them with gold. By keeping the Accelerated Maturation modifier active, you can quadruple the rate of growth of the cult.
And corrupted hero you turn into an agent also has the option of starting Deep One Cults, but more likely you’re going to rely on fostering ones that started on the map, and ones that Deep One Agents from fully matured cults start.
Advanced Concepts
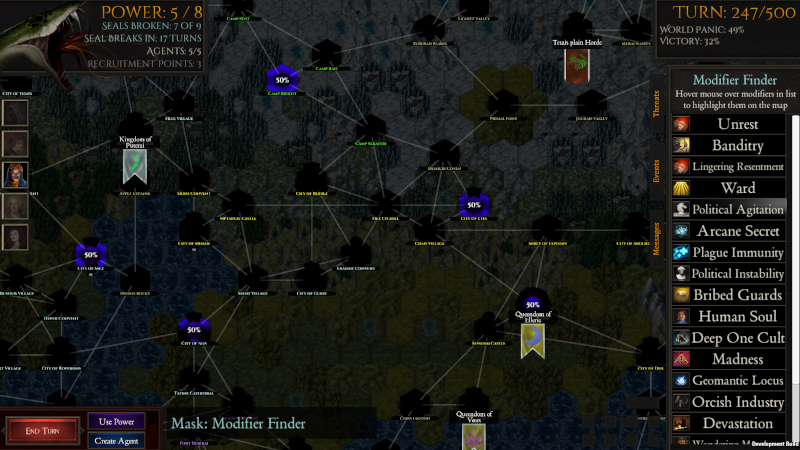
As you’ve already learned, Modifiers are used all the time. But did you know that you could easily scan the entire map for a modifier you need? Simply press the 6 key to bring up the Modifiers overlay and you’ll be able to select the modifier you’re looking for from the menu to the right.
There are three stats that matter in combat: Attack, Defense, and Hit Points.
- Attack: The agent or hero deals this much damage each round
- Defense: Damage is subtracted from Defense before affecting Hit Points; Defense starts full in every battle
- Hit Points: If these are reduced to zero by damage the agent or hero dies, and can only be healed by performing a Challenge to Rest and Recover
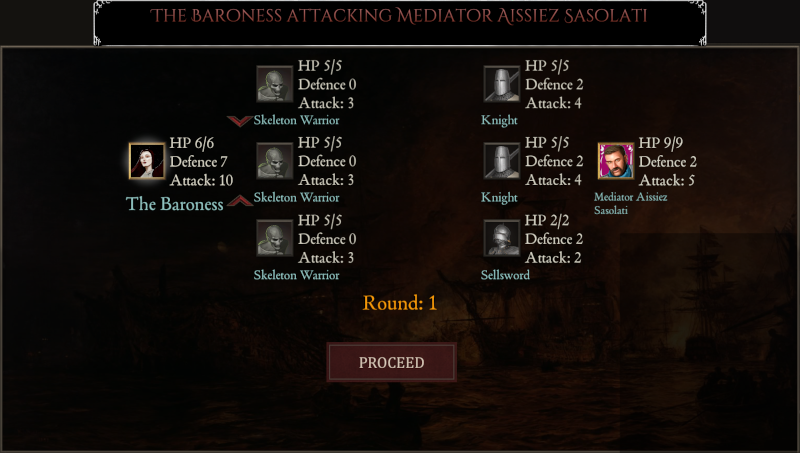
When an agent and a hero fight, they go in a very specific order.
- The attacking agent or hero
- The defending agent or hero
- Each minion in turn
All combatants will attack the target directly across from them if they can, meaning an agent or hero will always hit their enemy’s center minion first if they exist. Since you cannot do overkill damage, even a one-hp rat would take the entire hit from a 12-Attack monster of a hero.
If you flee after the first round of fighting is over you’ll lose all of your minions left alive, but you won’t take any more damage on your way out.
The quantity and quality of minions an agent or hero can include in their retinue is determined by their Command stat. Every minion has a Cost associated with them, and the total Cost of minions in the retinue may never exceed the agent’s Command, and they may never have more than three minions no matter how high their Command.
As the hint says, Magic is an optional tool for you to use. Each school of magic has its uses:
 Death is all about summoning. A level-one Death mage can summon Ghasts to run around enshadowing things for you, and at higher levels can summon small and medium-sized zombie armies. Death mages can also summon minions. All Death spells must consume the Death modifier of the location the spell is cast at, requiring spells be cast where a lot of people haved died from something like famine, plague, or a battle.
 Blood is all about messing with heroes. Disrupt a hero, possess them, curse their entire family to lower the Security of the town they’re in, or even turn them into a vampire. Blood is the easiest school to raise to max level, requiring only six Arcane Secrets to go from no knowledge to level 3.
 Gemomancy is about the world, and this is the school of magic all heroes know. Geomancers can affect habitability either locally or worldwide, lower the defenses of a city, and even detonate a volcano. All Geomancy must be done at a tile with the Geomantic Locus modifier, and your and heroes’ spells will drain the locus until it’s able to refill with power.

To level up an agent’s magical skills you need to collect Arcane Secrets. The most common way to do this is to go to a city with the Arcane Secret modifier. It will have a library, and if the library is infiltrated and no hero has started studying the secret before your agent you can learn the secret with the Learn Arcane Secret Challenge. These free secrets will refresh periodically, but you’ll want to study at several cities’ libraries.
You also have the option of spending 120 gold to Research an Arcane Secret at any infiltrated library instead, no modifier needed. This is expensive, but saves you the hassle of waiting and hunting those secrets down.
The other method any agent can use is harvesting a soul. Any time a character dies they leave a Human Soul modifier on the map for fifty turns. You can perform a Lore Challenge to exploit that soul and turn it into an Arcane Secret to be studied.