Tips and Tricks on not only how to beat the game but how to get a top spot on the new speedrun leaderboards.
The Jump Gate Speedrun
This guide contains not only spoilers about how to achieve fast speedrun times but spoilers for the story line and techniques for beating the various sections of the game. There’s even a few insider secrets on how the game works behind the scenes.
It’s not intended to be a guide on the most optimal possible speedrun strategies, but instead a guide to help anyone who is getting started with speedrunning the game for fun. It’s not that hard and anyone can do it.

(Useful for speedrunning):
Insider Tip: Holding down the F7 key for 5 seconds, while looking at the default main menu, will trigger a story reset. You will see the message ‘Invasion Mode Reset’, when this trigger occurs. It will reset the story to the beginning of Act 1 and Dave will forget he’s ever met you before. This is super useful for speedrunners who want to quickly reset the game after a failed speedrun attempt.
WARNING: This is a hidden option because Dave will also forget he’s ever met you in Survival Mode too.
Other than that, don’t worry, nothing else is reset. Your high scores are not affected, nothing else is changed for survival mode, and any permanent upgrades Bob has been awarded also remain. It’s simply a story reset option. It’s exactly the same as what happens when Bob beats the game in Invasion Mode normally. It simply resets everything ready for a brand new game. The only difference is that it also wipes Dave’s memory which may or may not be what you want.

This is the first and by far the easiest speedrun. Your only task is to reach the Jump Gate as fast as possible. That’s it. It doesn’t matter if you start your run in Act 1, Act 2, or at any of the checkpoints in Act 3. All that matters is the time on the clock (in the top right corner) when you pass through the Jump Gate.
The ability to complete the speed run in any Act may seem strange at first but whenever Bob travels through the Jump Gate time resets and so it makes no difference which objectives he’s already completed. The work he has to do to reach the Jump Gate remains consistent.
Tips and What to Do:
Make sure you start your game on the easiest difficulty. This has a 50% damage reduction and will make everything much easier.
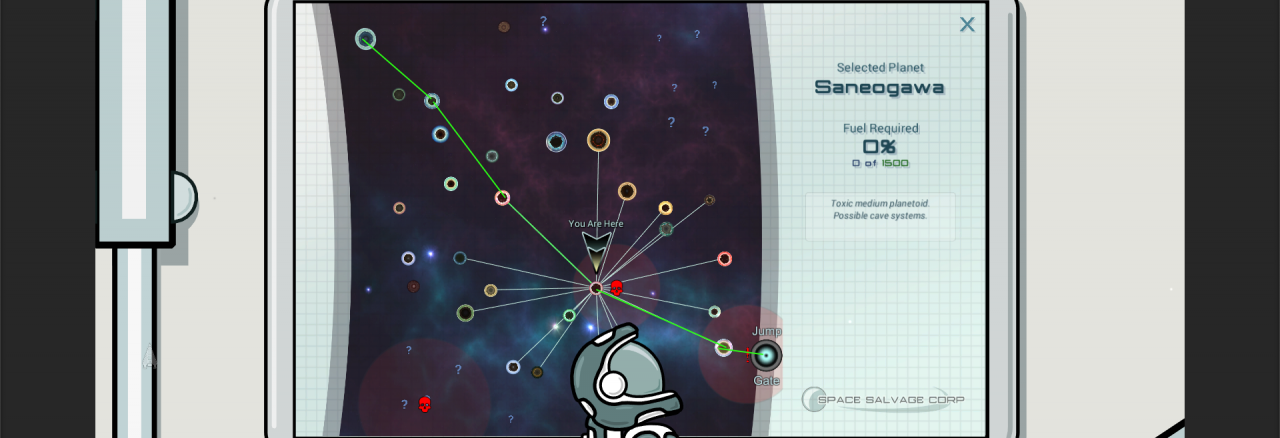
Don’t even think about collecting loot to upgrade anything. It’s all a waste of time. The only thing Bob needs in order to reach the Jump Gate is some extra hyper fuel. Usually 4-5 hyper fuel crystals will be enough to quickly jump across the entire distance. That’s it.
Ideally we need to find hyper fuel crystals that are easy to get to. We don’t want to travel deep inside caves, or to the far side of a planet; that’s a waste of time, fuel and energy. If you use too much fuel and energy collecting the crystals, you will end up needing to collect more fuel and energy to survive. If things go well you will need no more fuel and energy than the game gives you at the start. If you want to grab some more to play it safe that is up to you but will obviously cost time.
So, with that in mind, RNG is going to play a factor. If your first planet doesn’t have easy to access hyper fuel, jump instantly to the next one that is closest to the Jump Gate. If luck really isn’t on your side, kill Bob and try again. Or Quit and use the F7 key trick to reset the game.
Once you’ve managed to collect enough hyper fuel, jump instantly from planet to planet and directly to the Jump Gate. This will trigger the boss fight with the Replicon Base.

The Jump Gate Boss Fight:
Insider Tip: You will not waste any hyper fuel by selecting the Jump Gate as your destination rather than directly selecting the Replicon Base itself. The game calculates the difference in fuel. If you have enough fuel to get to the Jump Gate, you will always still have enough fuel to jump back to the Jump Gate again after your jump is intercepted by the Replicons.
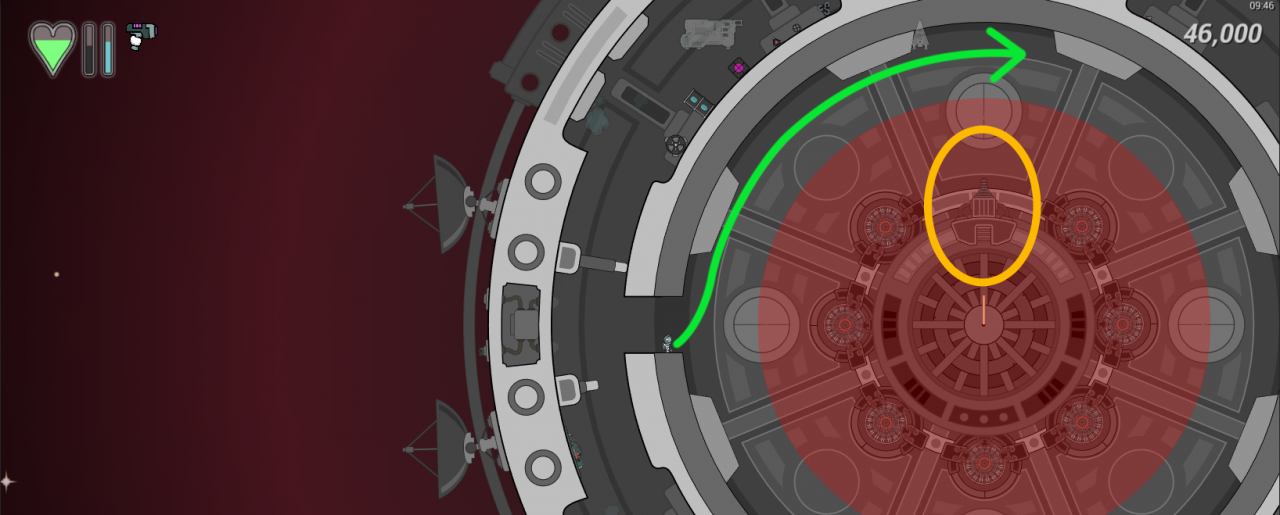
Once at the Replicon base, get immediately into your lander, and fly down.

The image above shows a great safe place to park your lander but it is unlikely to be the optimal strategy. No doubt shooting out the door locks while still in the lander will be optimal, but yeah, that’s neither easy nor consistent.
Standing where Bob is in the image above is also a semi-secret safe spot. (He’s inside the yellow ring) The big shock wave, that happens periodically, will not affect Bob if he’s stood directly on (or below) the level of the closed doors. Use this to your advantage while shooting out the door locks to prevent being blasted into space while trying to get inside.
If Replicons get close to Bob, it’s generally going to be faster to use your grapple gun to stick them to the scenery than it is to fight and kill them with your pistol. Killing them is unnecessary because we don’t have any need for the loot they drop anyway.
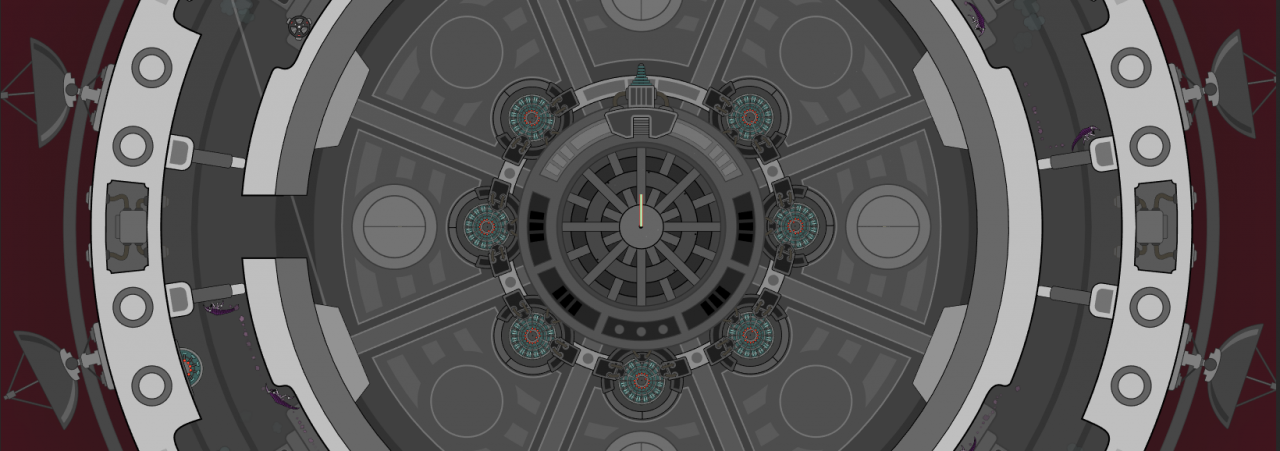
In order to beat the event and escape Bob needs to destroy the two pieces of machinery that power the disruption field blocking his escape to the Jump Gate. You don’t need to destroy anything else. The image above shows one of these machines circled in green. Both machines look the same and they are on opposite sides of the Replicon base.
So shoot out the door lock, destroy the first machine, get back in your lander, fly to the other side of the base, repeat the process for the other machine, get back in your lander, return to your refinery ship and use the system map to jump to the Jump Gate.
That’s it. Job done! Congrats on your new Jump Gate Speedrun record.
The speedrun time will be registered as the Jump Gate activates and a message will appear ‘New Speedrun Record’ if you have beaten your previous best. You can then go and see your time and position by viewing the speedrun leaderboards.
I suspect that anyone who has managed to travel through the Jump Gate before reading this will be able to use these tips to speedrun through it in under 20 minutes. With just a little practice and some good RNG sub 15 minutes should be quite easy for most players too. I suspect sub 10 minutes is very doable with great RNG and who knows how far the best RNG will let it be pushed.
Give it a try and once you’ve set a good time move on to the next section of this guide where we discuss beating the whole game and then speedrunning it.
The Full Game Speedrun (Part 1)
Needless to say this section is going to contain spoilers. You have been warned.
Okay, this one is a totally different kettle of fish and not for beginners. With that said, I’m going to share some fantastic insider tips and tricks to help you to beat the game along with relevant speedrunning tips to do it quickly.
A few years ago, I challenged Dr_Doof to do a Full Game speedrun and thought he could get sub 90 minutes. A couple of attempts later and he did just that with a time of 89 minutes. This guide will be using the tips and tricks he used to pull that off but I’m sure it can go a lot lower.
If you have never beaten the game before, I very strongly advise dropping the difficulty slider right down to the bottom while learning how to do it. That’s why the slider exists. The lowest difficulty reduces all incoming damage by 50% which makes a huge difference when learning. Many of the games challenges are tuned to be hard at 100% damage but become almost easy at 50% damage.
The second boss fight is a great example of this. That darned laser will kill Bob really quickly if he makes a couple of mistakes at normal difficulty but being able to get hit by it 4-5 times makes the whole thing easy. Then once you know what you need to do to win, it becomes much easier to slide the difficulty back up to normal when you are ready.
- Difficulty must be set to 100% incoming damage
- The central Replicon station must be destroyed
- The mothership must be destroyed
- Bob can not go through the jump gate until Steve takes him there. (So you can’t use the jumpgate to save progress. The entire game and all objectives need to be completed without using the jump gate.)
- You CAN save your game as normal as many times as you like via the quit menu. There is no need to do it all in a single sitting.
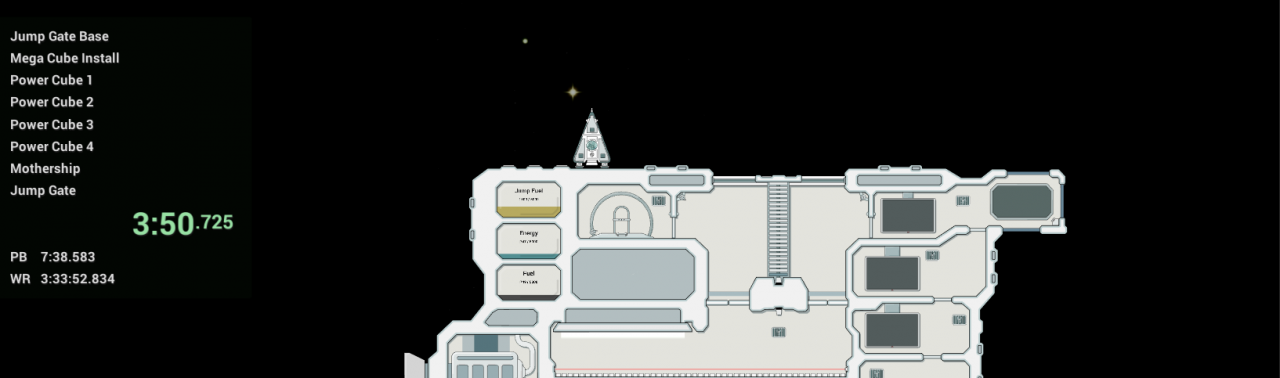
If you have watched anyone speedrunning games in recent years, you will be familiar with the use of speedrun overlays. These are used to record split times at various checkpoints during the speedrun, so the speedrunner can see how they are doing compared to their personal best split times. These are called overlays because they are usually not part of the game but Space Bob now has it’s own in game dedicated speedrunning overlay/panel.
It can be toggled on and off via the use of a hotkey. Go into Options/Controls and you will be able to bind a hotkey for it. It is really only designed to be used with the Full Game speedrun and not the Jump Gate only speedrun. That’s because the Jump Gate run has only one time we care about and doesn’t need split times. With that said, if you want to see the overlay while doing Jump Gate speedruns, you can do so but you’ll need to ensure the game is on 100% incoming damage difficulty or it won’t work.
The other big advantage of a speedrun timer built into the game is that you can pause the game whenever you want and the timer will stop too.
Handy tip: The speedrun overlay updates the World Record time whenever the overlay is toggled on and off. If it has no connection to Steam, it will show ‘Not Available’. This can be useful if you suffer from bad internet connections and you are about to complete a speedrun and you want to be sure the game is connected before finishing. You can save your game and fix your connection first.
Forget Act 1. There is no need to do it in a Full Game speedrun.
Do what, mate?
Yep, it’s not needed. Act 1 is about going through the Jump Gate for the first time, but we don’t need to do that. Once we save Steve from the mothership he jumps us straight to the jump gate which means we don’t need to disable the disruptors on the Replicon base next to it.
Because of this, we never actually leave Act 1 as far as the in game guide panel is concerned. We just ignore it completely when doing the Full Game Speedrun and do whatever we want.
You will likely notice that the speedrun overlay includes a split time for beating the jump gate Replicon station, but it’s entirely optional. It’s included because rushing there to get loot might prove to be a viable strategy but for this guide we will skip it.
Our first main objective, for the Full Game speedrun, is going to be defeating the Replicon station that appears in the center of the sector. We need to beat it to get the Mega Cube and meet Steve for the first time. He will then help us to get to the mothership.
So at the start of our run, we have fifteen minutes before that central Replicon station appears. That’s fifteen minutes to gather whatever resources we feel we need to complete the rest of the run as fast as possible.
It’s hard to say exactly what resources are needed because RNG is going to play a role in how many hyper jumps we will need to make in order to collect all the power cubes from the arenas. We also don’t know exactly how much energy or fuel we will need.
I’d suggest grabbing whatever energy, fuel, and hyperfuel that you find that is fast and efficient to collect. This speedrun is all about efficency not only with time but with resource usage, so it’s not going to be a good idea wasting time and resources collecting hard to get loot.
Be sure to grab at least two illmenite crystals and upgrade Bob’s suit and lander to titanium armor at the crafting screen. This means that if RNG is on our side and we later find an upgrade machine that gives us a suit upgrade we can go straight to carbon armor for free. There really isn’t enough time to collect enough carbon to craft it manually unless RNGesus is on our side. (It’s also worth mentioning that carbon armor isn’t necessary for the speedrun, and the ultimate world record will likely even skip crafting Titanium Armor, but this guide is aimed at a 90-120 minute speedrun, not a world record.)
Right, so our goal is to stock up on as many resources as RNG allows us to in the first 15 minutes, and be ready to Jump to the central Replicon station the moment it appears.
This base is no where near as hard to beat as you might think. Lots of players give up on the game at this stage after getting mauled to death by hyper fast rasks. It seems unreasonably hard at first but I promise you that the rasks are trivial to beat. The layout of the base was designed to make it that way. You may already have read or heard me say that every potential death in Space Bob was designed to be easy to avoid just as long as you know what to do. Great skill is never required. It’s all about knowing what to do, and I’ll share the secrets for this battle for the first time here.
At least, I’ll share them in the next section because this one has reached it’s max length.
The Full Game Speedrun (Part 2)
(They are the jumpy, rolly, super fast Replicons)
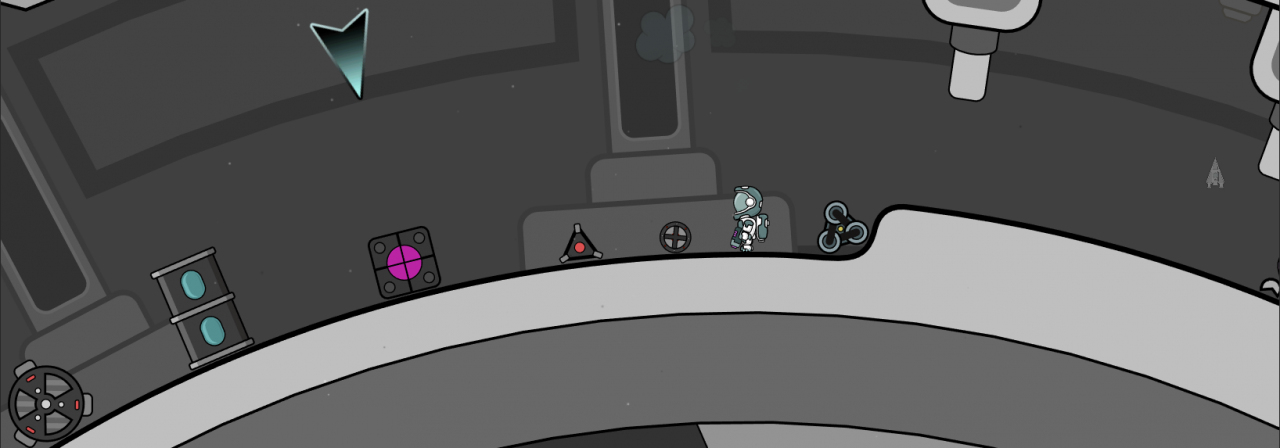
The image above shows how to beat the Rasks. You shoot at them from above the open doorway, and never go through. If you go through, the door closes and you are trapped in the large room with them. That is essentially a trap that is designed to kill Bob. If you don’t fall for the trap it becomes easy.
If you stay in the smaller entrance area, you can simply hover up in that corner, and shoot down at them while keeping them in a perma-stun. Ideally, you want to drop down and catch the attention of them one at a time. They will launch and roll in your direction, then you hover up into the corner, they slam into the wall, you shoot them and keep shooting them in perma-stun until they are dead. Rince and repeat. It might feel like cheese, but it was designed to be beaten that way.
Of course it’s possible to charge in gung-ho, and will likely be the fastest way to do it, but it’s also very dangerous, so I’m not recommending it here.
How do I beat that?
This event can be beaten without taking any damage but you would need to learn specific timings to do it. We don’t really need to do that.
Generally, we are going to expect to get hit by the laser once or twice. I’ll share the knowledge needed to do it without taking damage, but having titanium armor should be enough to beat it easily while still making a few mistakes.
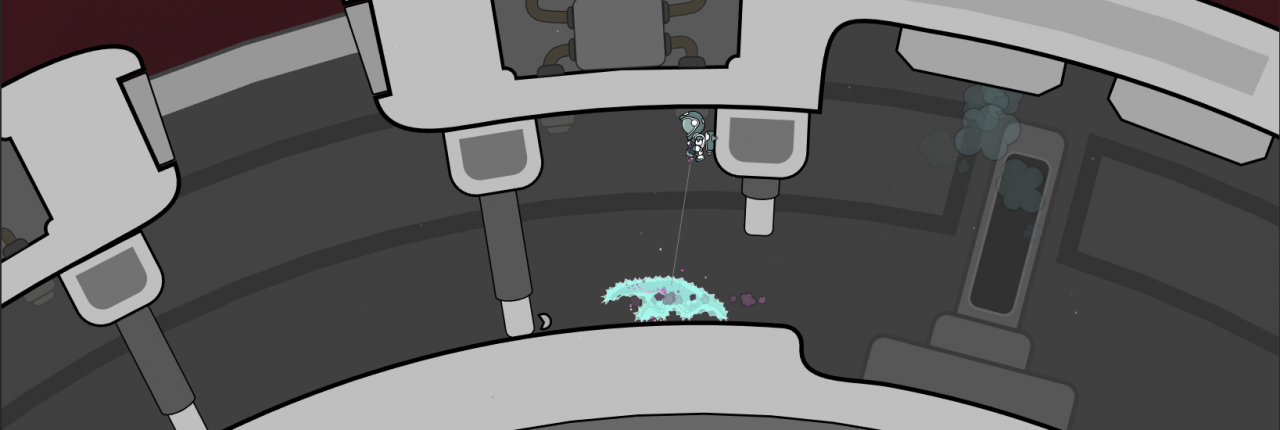
Insider Tip 1: You can control when the laser starts to move. In the image above, I’ve drawn a big red disc over the image. If you enter the area of that disc the laser will start to move. So first we want to get into position as shown by the green arrow. On entering the room, stay near the edge, and move around until Bob is at the position where the arrow points.
As long as you stayed near the edge, the laser will not have activated. Then drop down towards the center and the laser will activate and start rotating counter clockwise. Then all you have to do is chase the laser round in an anti-clockwise direction while shooting out the machines as they become exposed. As the doors open to expose each machine light green stripes appear next to it as seen in the image below. It’s circled in green.
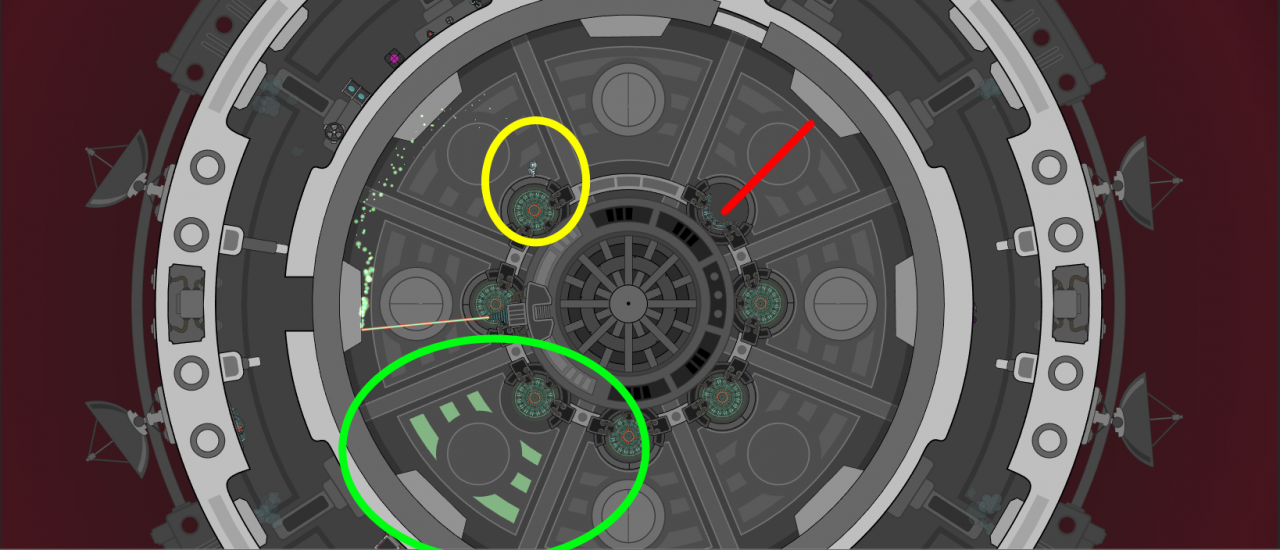 Insider Tip 2: The laser will initially activate and deactivate at the 12 O’ clock position, after one rotation, until we destroy the first machine. At that point a new machine will light up, the doors defending it will open, and we can destroy that machine. But the laser will then always activate or deactivate when it’s opposite the lit up machine.
In the example image above I’ve already destroyed the machine where I’ve drawn a red line, and the laser is just below the 9 O’clock position rotating anti-clockwise. Once the laser reaches the red line (opposite exposed lit up machine) it will deactivate. It will then do a full rotation and reactivate in the same place, and repeat this on and off cycle until I destroy another machine.
Knowing when and where the laser will activate or deactivate allows us to plan when to destroy machines to avoid all damage but we don’t really need to worry too much about doing that. As long as you have titanium armor, just plan to keep moving anticlockwise near the center of the room, shoot the machines as they open up, and don’t worry if you get hit once or twice. Most of the time that will be enough to destroy all the machines before the laser kills you.
The jetpack upgrades are very useful here to move quickly and outrun the laser. The plasma pistol is also a big help because you can destroy the machines with less shots which reduces the chance that you will fumble and fail to destroy one as you pass by. That kind of mistake generally causes another laser hit which could be the difference between success and failure.
Once defeated the loot room opens up, shown in the pic above. You will usually have a barrel of resources in that room, along with some engine room upgrades, probably a triangle key, and of course Steve in a box. The loot is randomized but it’s all chosen from a pool of loot that is most likely to help beat the next stage of the game. Most of the time, I’d suggest grabbing it all. Even the engine room upgrades could give you that extra jump distance or efficiency needed to get the job done faster.
In conclusion:
This whole base encounter is designed to kill Bob quickly, but once you know what to do it’s actually really easy, and now you know what to do, so problem solved.
The next section of the guide will deal with what is usually known as Act 3……
The Full Speedrun (Part 3)
Taking Steve’s cube up to our ship gives us the Mega Cube, and then Bob has to find the four Power Cubes to fill it. These are found in some of those mysterious blacked out caves that were inaccessible up until this point in the game. The doors to those caves will open automatically now. Once the Mega Cube is installed, any planet that is within jump range, that also has a power cube, will have a power cube icon on top of it in the system map. See pic below for an example.
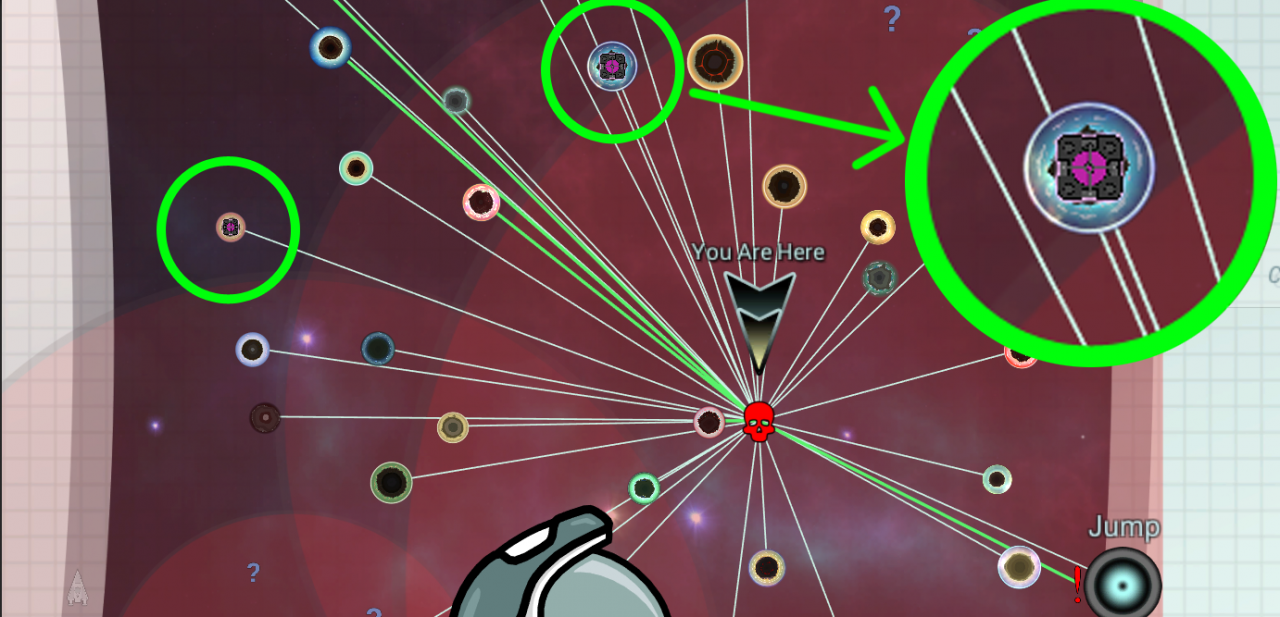
It’s a little hard to see the icon from the image but it’s not hard to see in game. Just look out for a purple blob over the planet icons. If you can’t see any icons like this over any planet, then RNG isn’t on your side. They only appear on planets within jump range. You will have to jump to reveal more planets but once you have collected two cubes, Steve will have regained enough power to highlight where the other two are at any range.
Getting the first two isn’t easy. Collecting the power cubes is designed to be the hardest section of the game. Collecting all four power cubes is much harder than defeating the final Mothership for example. This is mostly because collecting the power cubes suddenly forces you to learn a radically new skill set. Up until this point in the game, most players have relied on using their jetpack to move around, but it gets disabled in all the caves where you find the power cubes.
Learning to move around like Spiderman is an all new skill that most players haven’t learned yet and didn’t know they needed. It doesn’t take long to master and now that you know how to speedrun to this section of the game, in about 30 minutes, it makes practicing them much easier.
If you are struggling to survive in the arenas without your jetpack, I’d strongly suggest starting a new game and learning to do it in the first cave you find. It’s easier to learn to do it without the danger of being fried to death if you make a mistake, and you won’t be wasting time travelling all the way to the power cube arenas only to die soon after getting there. The skill can be learned anywhere and it’s really not that hard. It’s also super fun and incredibly efficient to move around that way once you get good at it.
Once you are a proficient Spiderman, the power cube arenas are still mini puzzles to be solved. Knowing where to grapple to and from makes a big difference, and some areas that seem incredibly challenging can be beaten easily with clever grapple placement.
While learning to beat them, I once again recommend playing on the lowest difficulty with at least the Titanium Armor upgrade. This will mean that you should be able to beat them even if you make lots of mistakes. Your goal should be to learn to do all four of them with at least 50% health left. If you can do that, you will be ready to beat them on 100% damage while wearing titanium armor.
Here’s a link to a couple of videos of Dr_Doof from his live stream a few years ago. I’m not sure why these recordings are so stuttery, I found them in an old video archive I had. Maybe someone could capture some better footage than I can add here. They are still worth watching though as they will give you the visual help you need to beat the arenas.
(NB: I still need to upload the videos and link to them here)
__________________________________________________________
Once you have all 4 power cubes, you will be able to visit the Replicon mothership and this is our final challenge.
I’m not going to go into any real detail on how to beat the Mothership because it’s more of a puzzle than anything else and not a particularly hard one. It’s not designed to be difficult to beat. I felt that collecting the power cubes should be the final big challenge of the game, and the mothership is a complete change of pace from that. Sure there are Dart Replicons all over it, but those guys aren’t really that much of a threat to someone who has reached this stage of the game.
I don’t think anyone has ever reached the mothership and then given up because it’s too hard. It’s simply not that type of a challenge. It’s still has an appropriately epic feel to it though.
So that’s it. Beat the mothership, free Steve, and he’ll do the rest to finish off your Full Game speedrun.
If you’ve never beaten the game before, I suspect the advice in this guide will help you to beat it relatively quickly now. It might take you a few hours of practice, but one of the sneakiest secrets about Space Bob is that you don’t need all the upgrades to beat it. It was designed to be beatable without any of them.
Travelling around collecting loot to craft upgrades, requires that you burn through huge amounts of extra fuel, energy and hyper fuel, which means you have to collect even more of that type of loot. It causes a gameplay loop that can last for hours. This can of course be really rewarding from a gameplay standpoint, but it’s ultimately mostly unnecessary for an experienced player whose only goal is to beat the game.
From the standpoint of a Full Game speedrun, you generally grab whatever you can during the first 15 minutes and then make do with whatever you find easily during the rest of your journey.
Before signing off, if anyone captures any gameplay footage that they think might help others, please share it in the comments and I’ll add it into the guide. I think it’s time to share some secrets and inspire some players who maybe gave up, or lost interest, to give it another playthrough.