Everything you could ever possibly want to know about how food works in Space Haven, and how to optimize it.
Foreword and Version Info
If you just want to be immersed in the gameplay, and aren’t OCD about min/maxing, then honestly none of this matters. Truly, it doesn’t. Stop reading and go enjoy the game.
This guide is current as of Alpha version 0.17.5 Build 2.
So What’s for Dinner?
For typical gameplay with crews of roughly 15 or less, a 100% viable approach is just to try something and make adjustments based on how things are going. At small crew sizes, inefficiencies usually don’t make a significant difference.
On the other hand, if you’re trying to build a functional endgame megaship with 50+ crew, then inefficiencies start to matter. The main issues you’ll run into are the sheer number of grow beds required to keep your crew fed, and the huge amount of water needed to grow the food. Unless you want to spend your entire game loop scouring the galaxy for ice, and have half your ship blanketed in grow beds, understanding how the system works so you can optimize things a bit better is crucial.
Note that throughout this guide, I only consider meals created with combinations of fruit, vegetables, meat, and nuts. Monster and Human meat are completely ignored because, aside from being less nutritious, there’s no way to reliably and sustainably source those in significant quantities – any given map has a finite number of warm (and cold) bodies in it. I guess it’s amusing, in a morbid sort of way, that you could technically eat everyone in the entire “galaxy”… Anyway, if you’re looking for a guide that goes into how toxins and vomiting work at large scales, this isn’t it.
Nutrient and Food Values
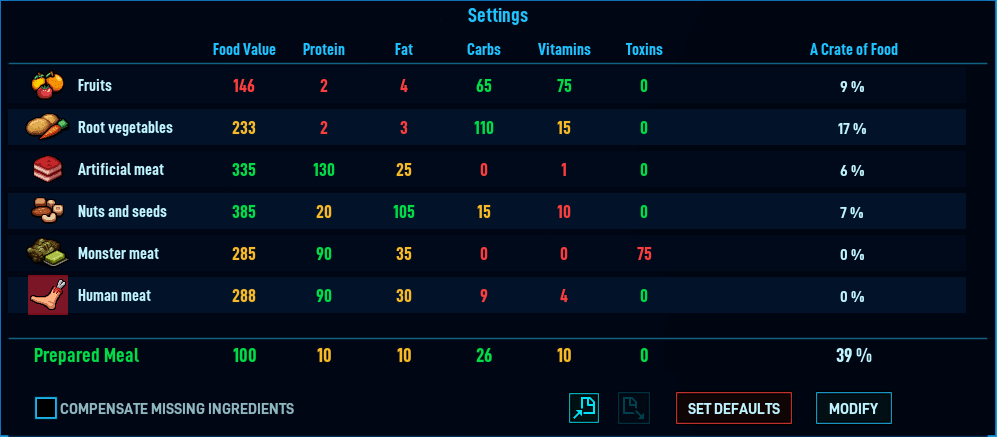
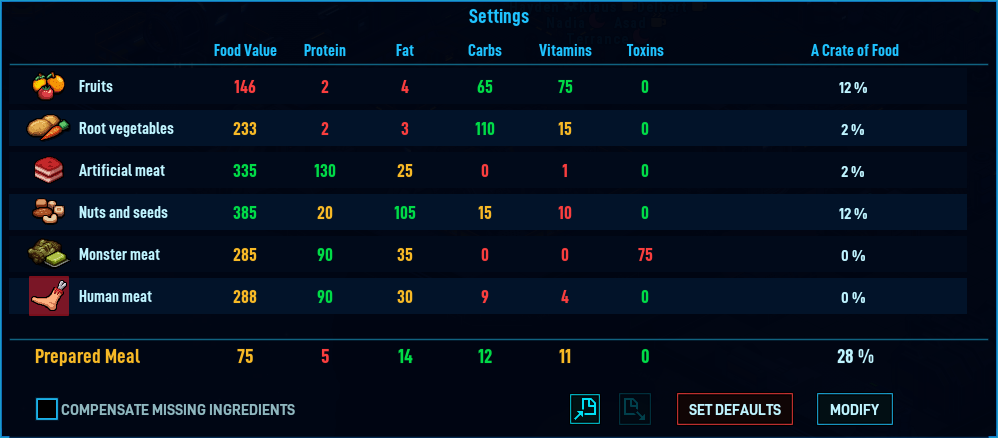
You can see this at work by simply doing the math: Pretty much anywhere you see protein/carbs/fat displayed, you can multiply each by 2/2/3 respectively and add it all up, and it will match the associated food value. For example, using the kitchen settings shown here, we can see that a full crate of root vegetables is 2 protein, 110 carbs, and 3 fat:
This matches the food value displayed.
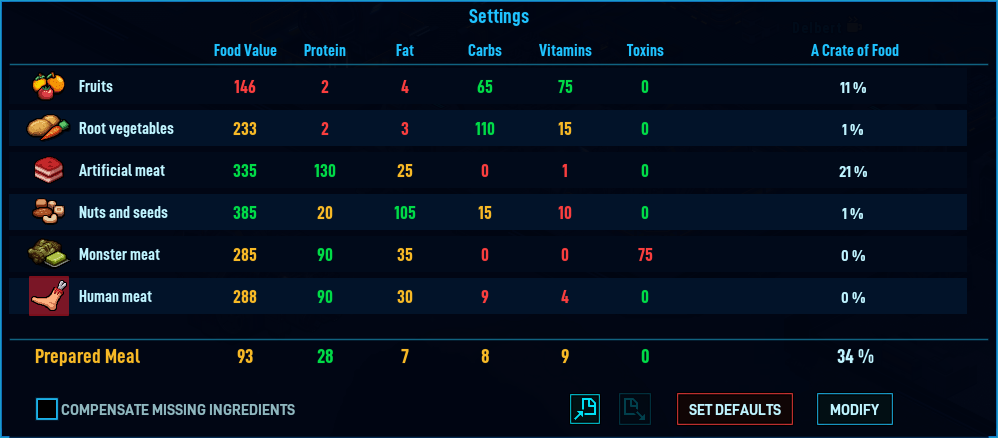
It’s important to note that the protein, carbohydrate, and fat values shown for a full crate of raw food in the kitchen UI are exact integer values. However, this is the exception rather than the rule. Internally everything is tracked using real numbers (with fractional values). This means that frequently the numbers shown in the UI won’t appear to add up. An example of this can be seen when looking at the default meal – 9% fruit, 17% vegetables, 6% meat, and 7% nuts – which claims to have 10 protein, 26 carbs, and 10 fat. Doing the math:
This doesn’t match the food value of 100 that’s displayed. So what’s going on here? It’s because the UI (for the most part) doesn’t display fractional values, and instead rounds everything to the nearest integer. In reality, the default meal has 9.72 protein, 25.6 carbs, and 9.72 fat, for a total food value of 99.8, because it’s made from fractions of food crates. I’m not going to show all the math here – the screenshot above gives you all the information needed to do this on your own if you’re interested.
UI quirks aside, the important point here is that, internally, the game operates almost exclusively in terms of protein, carbohydrates, and fat. The food value is derived from those as needed, mostly for things displayed in the UI. Why this is relevant will become more clear in the next section.
Digestion
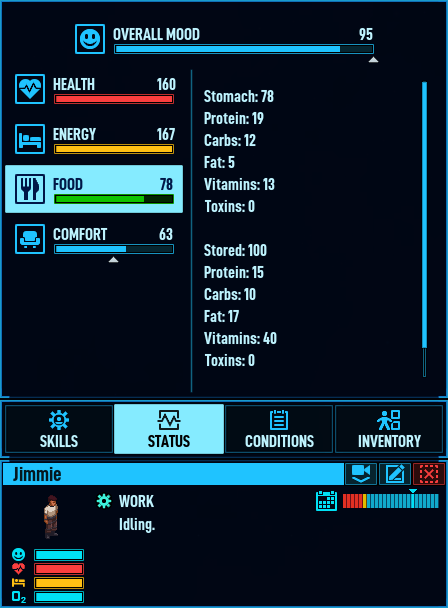
When a crew member eats a meal, the protein, carbohydrates, fat, and vitamin values from that meal are added to whatever nutrients were still present in their stomach. If their stomach was completely empty, then after eating the numbers here should match the nutrient values of the meal they ate.
Nutrients in a crew member’s stomach are digested gradually over the course of several hours and fully transferred to their stored nutrients; there are no efficiency losses like in real life. How much time this takes varies, depending on the size and composition of the meal. Protein and carbohydrates take 50% longer to digest than fat (per the game’s formula), so meals with higher protein and carbohydrate values tend to keep the crew member feeling “full” for longer.
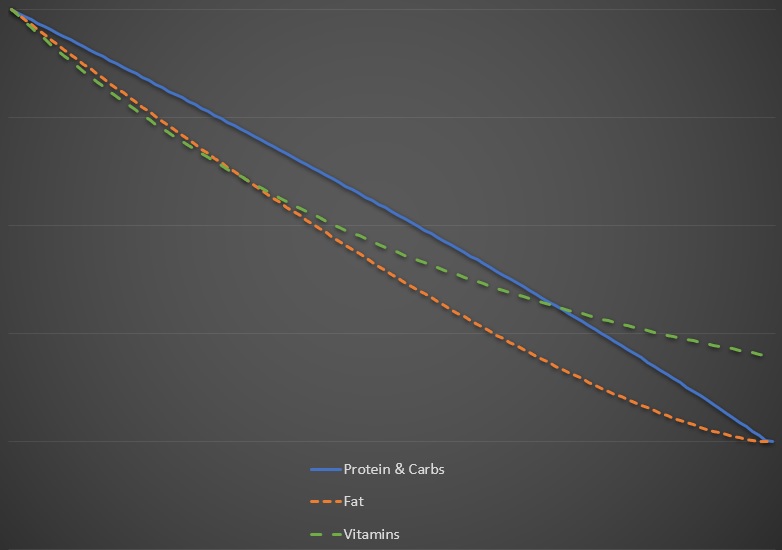
The formula used internally by the game to calculate the digestion rate is somewhat complicated, because it tries to ensure that uneven amounts of protein, carbohydrates, and fat are all digested down to zero at approximately the same time. Since fat digests at a different rate than protein and carbohydrates, this causes the digestion rate for the individual nutrients to be slightly nonlinear, per the graph below. The curve is minimal but it does mean that different meals with the same “food value” will take different amounts of time to digest, depending on their nutrient composition.
The digestion speed of vitamins is independent of the other nutrients, and follows a nonlinear formula. This formula results in a fairly low digestion rate, which is why you’ll often still see vitamins in a crew member’s stomach long after the other nutrients are gone. This is actually a good thing, because it means the next time the crew member eats a meal the vitamins in their stomach will be higher than just what the meal provides. This stacking continues until an equilibrium is reached with the digestion rate, but the overall side effect of this is that it helps crew members recover from vitamin deficiencies faster if they are eating regular meals.
As a final note, and to complete the digestive cycle, how often the crew members use the toilet is a function of the nutrient composition of the meals they eat. Meals that are high in protein will cause them to use the toilet more often, and meals that are high in fat will cause them to use the toilet less often. The frequency can range from at most once per meal, to as little as once every 3 meals in extreme cases. This is important because a relatively large amount of water is reclaimed via the toilet — much more than from composters or water collectors. The more often crew members use the toilet, the less net water it costs to grow food and produce oxygen.
Metabolism
Every game day, crew members burn 5 protein, 10 carbohydrates, 5 fat, and 10 vitamins. If they consume (on average) less than this amount of nutrients every 24 hours, they will eventually develop one or more nutrient deficiencies.
The metabolism rate is always slower than the digestion rate, no matter what kind of meal was eaten, so stored nutrients will always increase while a meal is being digested – even though stored nutrients are being burned at the same time.
The maximum amount of nutrients that can be stored is 15 protein, 10 carbohydrates, 16 ⅔ fat (which will round up to 17 in the UI), and 40 vitamins. Once these levels are reached, any additional digested nutrients are lost.
Nutrient Deficiencies
These debuffs do not stack, however they won’t be removed until the corresponding stored nutrient value goes back above 5. Note that this can be difficult to gauge from the UI, since displayed values are rounded to the nearest integer. For example, if a nutrient value is raised back up to 4.75, the UI will display a value of 5, but the debuff will not be removed.
Nutrient deficiencies are most commonly caused by not eating meals with a good nutrient balance for an extended period of time. They can also be caused by missing several meals in a row. Assuming a crew member’s nutrient stores are at their maximum values, the table below shows how long the crew member would need to go without eating to have a chance of developing a nutrient deficiency.
If the meals being served have less than the 5 protein, 10 carbohydrates, 5 fat, and 10 vitamins that the crew members’ bodies metabolize daily, you can calculate how long it will take for a nutrient deficiency to develop by multiplying the times above by the percentage of the deficiency.
In the early and mid game, nutrient deficiencies can be common until a stable food supply is established, especially if algae dispensers are being used. Once a reliable food supply is secured, and well-balanced meals can be eaten regularly, the most common cause of nutrient deficiencies is missed meals from crew members being drafted during their rest breaks. Depending on the meal being served, and the crew member’s schedule, this is often self correcting once the crew member is able to eat again. In extreme cases where the meals being served only have the bare minimum daily nutrients, or if rest periods are too infrequent, you might need to temporarily override the crew member’s schedule so they can eat an extra meal.
Food That’s Not From the Kitchen
Notes:
- The values above are for Processed Food that is salvaged, looted, bought, or traded for. Processed Food cooked by crew members at a kitchen will have the nutrient values shown in the kitchen settings.
- “Backer Beer” is only produced by the special Alcohol Beverage Machine that was a Kickstarter backer reward.
- IV Fluid is administered when a crew member is resting in a medical bed.
This information is provided for completeness, but as a rule you don’t want to make a habit of eating these things. In particular, beer uses up a lot of water for very little return in terms of increasing mood. You also have a 50% chance to get a “hungover” debuff that negates the mood buff from being intoxicated, so all you’re left with is attribute debuffs in both cases.
Space Food could be an exception to this, since just one of these will completely cure any nutrient deficiencies a crew member has. However, the game currently provides no way to force a crew member to eat a specific meal (without an insane amount of micromanagement disabling kitchens and changing storage settings). You’re better off just scheduling them some extra rest time once their stomach is below 40, and having them eat an extra meal from the kitchen.
Note that crew members can also eat raw fruits, vegetables, meat, and nuts directly from storages. Don’t do this. They can only eat an entire crate of food at a time, which causes them to massively overeat. It’s also incredibly wasteful, and doesn’t provide balanced nutrition. Make sure to select the toggle in the settings for each storage that prevents crew members from eating directly from them.
Hunger and Overeating
First off, it’s actually possible to overeat. Whenever the “food value” in a crew member’s stomach is above 120, every 30 minutes of game time there is a chance for a stacking “ate too much” debuff to be applied. This can happen either from eating a meal with a food value over 120, or by eating a meal when their stomach wasn’t empty yet and the new resulting total is over 120. This debuff can stack up to 3 times, and applies the following debuffs:
The overeating debuff isn’t crippling, but the energy and working speed penalties can be significant at larger stack sizes. Individually they may not look that bad, but together they really reduce the overall productivity of crew members. That’s because the energy debuff causes crew members to take rest breaks more often, and the working speed debuff means they get less done when they are working.
The bigger issue is that this debuff goes away rather slowly. Once the “food value” in a crew member’s stomach is below 100, every 6 minutes of game time there is a chance to remove one application of the debuff. That doesn’t seem so bad, but if the crew member has significantly overeaten then it could take as long as 4 hours to drop below the required 100 food value threshold, and then you have to wait for the RNG to start removing it.
On average, expect this debuff to stack 1-2 times and last for around 3-4 hours.
Second, being hungry is not without penalty. If the “food value” in a crew member’s stomach is below 20, every 30 minutes of game time there is a chance for a stacking “feeling a little hungry” debuff to be applied. This can stack up to 5 times, and applies the following debuffs:
The attribute debuffs are fairly minor, but the mood debuff can get quite high if the crew member is hungry for long enough. Fortunately, this debuff goes away very quickly once the crew member eats a meal. Once the “food value” in a crew member’s stomach is above 20, every 10 minutes of of game time one application of the debuff is removed (guaranteed). This means all the debuffs will go away soon after eating, often before the crew member’s rest break ends and they have to go back to work.
On average, expect this debuff to be applied roughly once every 2-3 hours, which means it takes a fairly long time to reach a full stack.
Great Meals
The great meal buff increases the crew member’s mood by 5 for 12 hours, and does not stack. Much more importantly, it doesn’t refresh. This means that if you already have the buff but it only has one hour left on it, and then you eat another great meal, the buff will still only have one hour left on it. To avoid this, you need to make sure that more than 12 hours elapses between meals.
Note that “Space Food”, despite having a really good nutrient composition, does not grant the great meal buff. Likewise, any “Processed Food” that is salvaged, looted, bought, or traded for also does not grant this buff. The great meal buff only comes from food made in the player’s kitchen.
Timing Is Everything
However, it’s even more complicated than that. That’s because a crew member will try to find a meal to eat during their next scheduled rest time, once the “food value” in their stomach drops below 35 (or 40 if you have overridden their schedule and forced them to take rest time). So you have to be careful to set the interval between rest times to ensure crew members don’t have any chances to eat until their previous meal has been fully (or at least mostly) digested. Otherwise, they will eat on a non-empty stomach and risk getting debuffs for overeating.
And, ideally, your crew members shouldn’t eat more often than every 12 hours to ensure they’re consistently getting the great meal buff.
Let all of those points really sink in for a minute, because when you do you’ll realize that the “optimal meal” is 100% dependent on your crew schedule; a meal that is optimal for one schedule is very likely to be sub-optimal for a different schedule. Unfortunately, trying to find a meal that fits your particular schedule will range from difficult to impossible. If you want to optimize your meals, your meals are really what’s going to end up dictating your schedule instead of the other way around.
Going With the Defaults

The default meal takes 15 hours and 10 minutes to completely digest, and lasts 11 hours and 50 minutes before crew members start being subject to hunger debuffs. The soonest a crew member will (normally) be interested in eating is 9 hours and 30 minutes after their previous meal.
The default schedule has alternating 17 and 7 hour intervals between meal opportunities. This means that if they eat in the morning, they’ll be hungry again in the evening. If they eat in the evening, they normally wouldn’t be ready to eat again in the morning. However, there’s an internal game mechanic where crew members will attempt to eat immediately after waking up if they have rest time scheduled and the “food value” in their stomach is below 60, which usually results in overeating.
The default meal and default schedule don’t work together well, and result in a lot of debuffs being applied. Over the course of 3 days, here’s how the crew members will fare if they start with empty stomachs:
The outcome of days 2 and 3 repeat indefinitely. This is pretty terrible, and very wasteful considering the high cost to grow the raw ingredients for this meal.
The best we can do to fix this is to change the schedule so the crew members have a rest period scheduled every 8 hours. That will cause them to eat this meal once every 16 hours, and be subject to 4 hours and 10 minutes of hunger debuffs every time prior to eating again. That’s not great, but it’s better than overeating, and it shouldn’t result in more than 1 or 2 applications of the hunger debuff each time.
The most important takeaway here, however, is that you really want to ensure your schedule and meal work together well if you want to avoid food-related debuffs as much as possible.
Flawless Victory?
Technically there are a small number of meals (755 to be exact) which, if scheduled properly, can result in always having between roughly 25 and 115 food value in the crew member’s stomach — just missing the debuff cutoffs on either side. The most efficient of these, in terms of grow beds, water, and fertilizer required to grow the meal, is shown below along with the schedule required to make it work.


The first thing you should notice about this is the overly complicated schedule. This is because the only way meals like this can work is to eat them once to “prime” the crew member’s stomach, eat them again after a specific amount of time to fill the crew member’s stomach the rest of the way (but without overeating), and then eat them at a different constant interval thereafter to maintain that fullness.
The meal presented above takes 12 hours to digest, can be eaten again after 8 hours without overeating, and lasts 9 hours until the “food value” in the crew member’s stomach drops below 20. Therefore, it needs to be eaten once, then eaten again 8 hours later, then eaten every 12 hours after that. That requires a schedule which allows the crew to eat on both 8 hour and 12 hour intervals. The only way to make this all work (mathematically) without micromanagement is to schedule rest time every 4 hours.
Note that it’s also necessary in this case to schedule at least one hour of work directly after the sleep period. The game has an internal mechanic where crew members will attempt to eat immediately after waking up if they have rest time scheduled and the “food value” in their stomach is below 60 (i.e. less than half full). To avoid this, you have to make sure they aren’t allowed to eat right after waking up, otherwise they’ll end up overeating.
The schedule above can be shifted by 6 hours, allowing for 4 staggered shifts and therefore only one bed is needed for every 4 crew members. However, that’s the only good thing about it.
This schedule is highly inefficient, and makes the crew members constantly run back and forth to the leisure area.
Another drawback of this meal is that it guarantees the crew members will eat twice per day. This is the least efficient of any meal plan in this guide, requiring more grow beds than the default meal (assuming the modified schedule with rest breaks every 8 hours is used), although it does require less water to grow versus the default meal.
But we did it – no debuffs, right? Well…
Failure Is the Only Option
The main problem with the “perfect” meal in the previous section (and others like it) is there’s basically no room for error. Crew members are required to make it to the kitchen on time, every time. If they are late for any reason and miss a meal, they’ll end up with hunger debuffs. This could be because you had them drafted, because their mining pod took too long to return, because they wanted to finish refining that energy rod, because they really had to poop… or dozens of other everyday reasons that are totally out of your control.
These things aren’t rare occurrences; they happen constantly. The only way you could semi-reliably avoid this is if your crew does nothing but hang out by the kitchen and sleep. And even if you could somehow prevent all of those things from happening, as seen above the specific schedule required to make these meals work is horribly inefficient.
Timing issues can cut the other way too: If a crew member is a tiny bit late to eat for one meal, then on time for the next, slightly less than 12 hours will have passed between meals. This will prevent the “ate a great meal” buff from being applied. The “perfect” meal above (and others like it) only work on a 12 hour schedule, so in the worst case you might only have 50% uptime on that buff.
It would be great if there were some way to completely avoid these issues without massive inefficiencies or excessive micromanagement, but currently there aren’t. I guess that makes sense, since this is more of a survival sim than a pleasure cruise sim…
Anyway, given that it’s unrealistic to 100% avoid debuffs, the next best option is to figure out how to keep them at a predictable and manageable level. This opens up a lot more possibilities, and lets us really start trying to optimize food usage.
Hunger is Your Friend
The hunger debuff on the other hand is mostly benign, since the attribute penalties are only single percentage points per application. In addition, this debuff is removed almost immediately after eating. The primary danger from the hunger debuff is the mood penalty, which can grow to a whopping -25 if you let it go long enough. So the real trick here is just making sure it doesn’t have enough time to get too big.
This is where the “ate a great meal” buff steps in to save the day. The +5 mood from this buff lasts for 12 hours, and works to offset the mood penalty from the hunger debuff. Essentially, it cancels out any long term effects from hunger as long as the average hunger mood debuff over a 12 hour period is -5 or less. This allows for bigger stacks of the hunger debuff than we’d otherwise be willing to tolerate.
The Optimal 16-Hour Meal
There are 83,435 meals that satisfy the criteria above, where the meal takes 16 hours or less to digest, but takes at least 9 hours to digest down to a food value below 35, and that won’t result in any long-term nutrient deficiencies. The most efficient of these, in terms of water and fertilizer required to grow the meal, is shown below along with the schedule required to make it work.

As mentioned earlier, the game has an internal mechanic where crew members will attempt to eat immediately after waking up if they have rest time scheduled and the “food value” in their stomach is below 60 (i.e. less than half full). So like the “perfect” meal presented earlier, we have to ensure that there isn’t any rest time scheduled immediately after sleeping, to prevent overeating.
Other than that, this is a fairly standard schedule with three meal breaks scheduled at 8 hour intervals. It can be shifted by 6 hours and overlapped, allowing for 4 staggered shifts. This in turn means that only one bed is needed for every 4 crew members, making it very space efficient.
Once eaten, this meal will keep crew members feeling full for 11 hours and 20 minutes. They are subject to hunger debuffs for the next 4 hours and 40 minutes after that, until they eat again. On average this results in 1-2 applications of the hunger debuff being applied, for a mood penalty of -10 or less and inconsequential attribute debuffs.
In terms of debuffs, this meal is comparable to the default meal, when using the same schedule. However, it is more efficient to produce, requiring 3% fewer grow beds, 76% less water, and 15% less fertilizer (assuming all biomatter is being composted). It also generates 39% less biomatter than the default meal, due to the high use of artificial meat. That means you only need about 60% as many composters, which saves more space.
The best part about this meal, however, is that it’s 100% maintenace-free. If a crew member misses a meal for any reason, the worst that happens is that they’ll end up with a couple extra applications of the hunger debuff. They will feed themselves again at the next meal break, and quickly recover from any nutrient deficiencies that were starting to accumulate. And at no point will any overeating occur.
The Minimal 24-hour Meal
The longest you can make crew members go without a meal is 24 hours, because that’s the limit of the scheduling tool. The schedule used for any 24-hour meal is the one below.

So what are you looking at here? 18 glorious uninterrupted hours of work time, which is the most you can possibly get while still getting enough sleep. In this case we will schedule the rest time directly after sleeping, to ensure the crew members always eat before starting their day. This also ensures no meals will be missed (unless crew members are drafted), because it should never take them more than an hour to walk from their beds to the kitchen.
As before, this schedule can be shifted by 6 hours and overlapped, allowing for 4 staggered shifts. This in turn means that only one bed is needed for every 4 crew members, making it very space efficient. It also has the additional benefit of ensuring 75% of your headcount is on an active work shift at all times.
So what about the meal itself? As it turns out, there are 72,733 meals that provide enough nutrients to be eaten only once per day, without developing any long-term nutrient deficiencies, and still have under 120 food value so they don’t result in overeating. That’s a lot to choose from. Let’s start with the absolute most efficient meal, in terms of grow beds required, as shown below.
The main issue with this meal is that it’s very high in fat. This means the crew members will use the toilet much less frequently – only once every 3 meals – meaning you won’t be able to reclaim as much water. Compared to the optimal 16-hour meal, this requires 47% fewer grow beds and 42% less fertilizer, but requires 97% more water. (However, it still requires about half as much water as the default meal.) With this meal, you’re essentially trading water efficiency for space efficiency.
The other problem with the high fat content of this meal is that it doesn’t keep your crew members feeling full for very long. They will only feel full for 6 hours and 40 minutes after eating this meal, which means they’ll be subject to hunger debuffs for 17 hours and 20 minutes. This pretty much guarantees a full stack of hunger debuffs, for a -25 mood penalty. If you’re in the endgame and have comfort maxed out in the rest/sleep areas, you can probably weather this without issues. But it’s something to be aware of.
The other option is to aim for the best possible water efficiency, which you get from the meal below.

Compared to the optimal 16-hour meal, this meal requires 36% fewer grow beds, 38% less water, and 32% less fertilizer. This is 21% more grow beds than the previous 24-hour meal, but significantly less water. In general, this is the better choice for larger crews, since you’ll probably have the room to spare. This meal requires 3 large (5-bed) grow tables for every 10 crew members, which should be manageable.
This meal is high in protein, which means it will keep your crew members feeling full for a little longer – 10 hours and 50 minutes. However, they will be subject to hunger debuffs for 13 hours and 10 minutes, which is still long enough to pick up a full stack of hunger debuffs. So, like the meal above, you should only use this meal if you have all other aspects of your crew’s comfort maxed out.
The biggest drawback to both of these meals is that, although they are highly efficient, they are only providing the bare minimum daily nutrient requirements. If a crew member misses a meal because you have them drafted during their rest time, they will have to wait a full day for another opportunity to eat which will take a big bite out of their nutrient stores. But since these meals don’t provide any surplus nutrients, that deficit will literally take months to recover from.
This means you either have to pay very close attention when drafting crew members to ensure they don’t miss a meal, or you’ll have to manually override the schedule after drafting them and give them rest time to make up their missed meal. This should really only ever be a problem for your boarding parties, but it can also affect injured crew members that miss a meal due to being in a medical bed (because IV fluid doesn’t provide enough fat to cover a crew member’s daily metabolic burn rate).
Trying to increase the nutrient content of these meals to work around this ends up negating their space and resource efficiency, and doesn’t significantly reduce the hunger debuffs. Only use these meals if you’re willing to micromanage a little bit to squeeze out the extra efficiency. Otherwise, just use the optimal 16-hour meal shown earlier.
Refugees and Prisoners
Not only is feeding proper meals to your refugees and prisoners the humane thing to do, it can also cost a lot less water. Plus it’s key to increasing your chances of convincing prisoners to join your crew (if that’s something you want). But mostly it’s about keeping them from starting fires everywhere.
Unfortunately, refugees and prisoners have a completely unworkable schedule (that you can’t change) as shown below.

This schedule basically allows them to eat pretty much whenever they feel like it. Given that, the best meal you can feed them is the cheapest one, and that’s the second minimal 24-hour meal from the previous section:
They will fall into a pattern of eating this meal twice per day, which will prevent them from developing any nutrient deficiencies. Best of all, it will result in them using the toilet twice per day, so you’ll get a fair amount of water back out of them. If you’re composting all of their biomatter, this meal ends up costing 72% less water than an algae dispenser.
The only thing you’ll need to do extra is to keep a surplus of fruit, vegetables, and meat in your storages, so your refugees don’t eat all your crew’s food. It also means you might want to ensure your farms can slightly overproduce versus just what is needed to feed your crew, so you can replenish that surplus.
Final Thoughts
If you’re wondering where all of my numbers came from, and how I determined which meals are the “best”… well, it’s complicated. What started out as a couple spreadsheets eventually evolved into a computer program that could crunch through the ~60 million permutations in a much more complex way. I’m not keen on turning this into a web app, so for now you’ll just have to trust my math. I might revisit this decision when the 1.0 version of the game releases, and there’s less chance of major changes, but we’ll have to see.
If you have any questions, feel free to post them in the comments and I’ll do my best to answer.
Dear Sir,
Your invesigation is astonishing! It’s been quite interesting and revealing, and immensely helpful to read. In my plays I just set a 14-9-7-9 on the kitchen, as it made all colors pop green, ~100 with a schedule where they slept for 6 hours, and rest immediately before (2) and after sleep (3). Looked good on paper, now I understand this is quite the disaster, but I was never really bothered by those debuffs. Just cursed the water requirements, always trading water and ice whenever possible. And that was for 32 crew members.
I wonder, has there been changes since the article? Not 1.0 yet but almost there! 1.0 is on the Beta branch, after all.
Thank you for your time and effort spent on this, it mist have been an exciting project!
I’m gonna load my play and adjust it all now.
Wow, huge thanks for the info, far more detailed dive into food mechanics than I could find anywhere else!
Any chance you could tell what the formula for toilet use is? seems very important for water efficiency, yet I couldn’t find it anywhere.
Thanks!