Basic concepts and tips to help understand the basics of this awesome game.
Introduction
Then I found out it was made by the same developers of many “Tropico” games and “Surving Mars” (I played over 220 hours of that one), Haemimont Games, and I knew that if this is a great game now, even in early access, I can imagine it will be even greater later and it also gave me an idea of what to expect.
I explain this ’cause when I started reading the forums looking for tips I read too many people complaining about “bugs” that really aren’t once you understand how the game works.
So, first of all you need to play the tutorials and pay attention to them, many things are explained there. There are also tooltips for everything in game,
Another thing you need to take into account is that, like in most survival games, everything (people, activities, resourses, etc.) have pros and cons. You can’t have it all, you need to learn what to prioritize, what things are essential, and what things can be sacrificed or put on hold, at least at the start. Once you get late game you can have everything you want, but you need to get there.
I’m aware there’s a lot that’s not plainly explained in the game nor in the tutorials (it’s in early access afterall) and that’s why I wanted to write this guide. To share everything I learnt so far so everyone can enjoy this game instead of complaining it’s bugged.
Version
Starting a game
But as in “Surviving Mars” I can expect that later on there will be many options to choose from to set your games.

I wanted to make this clarification ’cause people seem to keep forgetting (and i’ll remind this lot in this guide) this is an early access game. Some people complained that after all you survived, expanded and built, the end game is to get rescued and leave everything behind.
Yeah, it’s said right there at the beginning when you start a game.
That’s the only scenario we have so far, but I can imagine there will be others like colonizing or settling down.
Survivors
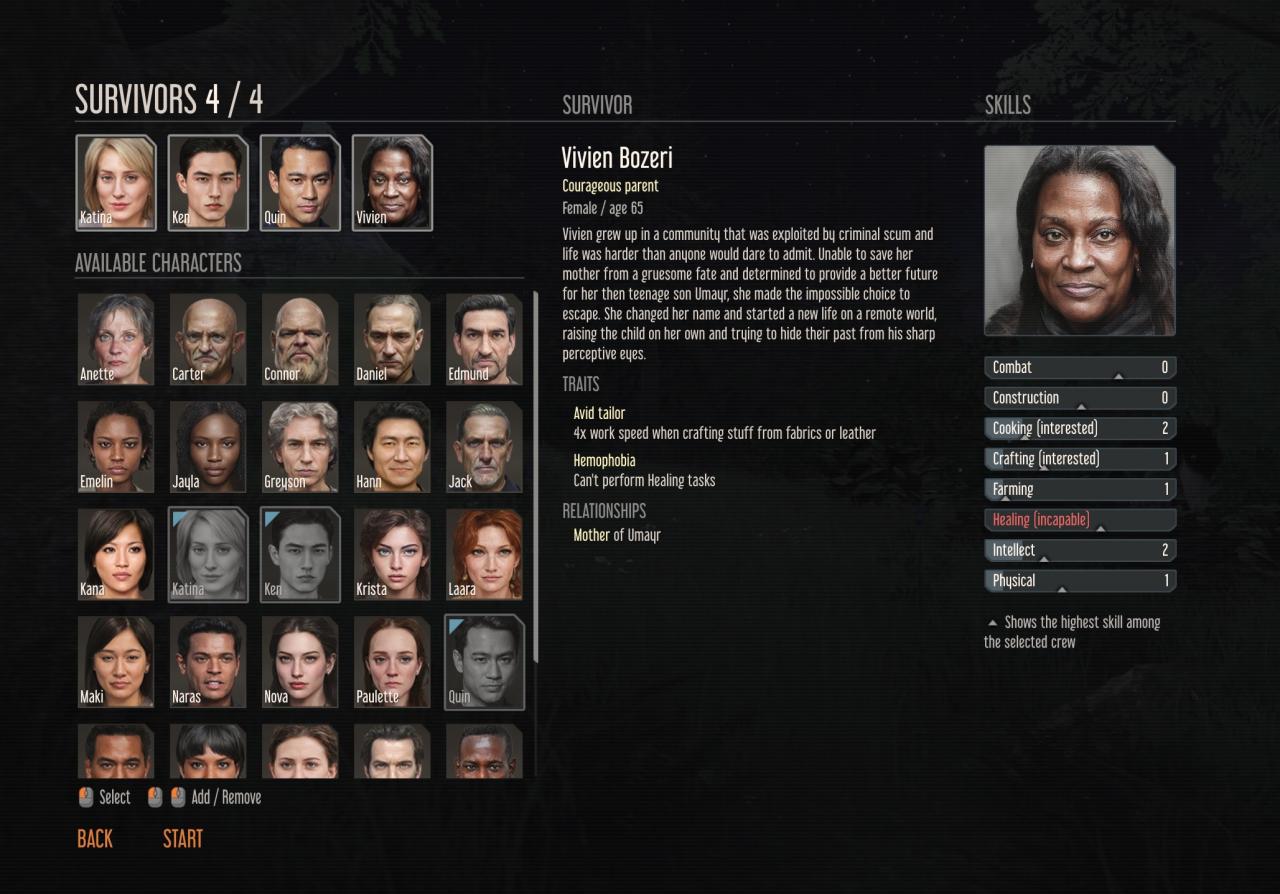
Every survivor has pros and cons, you can read them in their bios, traits and skills. Some are plainly explained, like Connor’s eye implant; and others you’ll see later on, like Jack cirrhosis that will hindered him late game.
So just experiment with it, there are no wrong choices.
This is what I’ve learnt so far:
- “Interested” means the skill will be learned faster, “Indifferent” means he’ll learnt it slower.
- Traits can’t be modify, so try to avoid negative traits as much as posible, unless you believe the positive traits are worth it (for example Vivien can’t heal, but 4x tailoring speed when crafting takes so much time is really good and you can have other survivors to work as healers).
- Be carefull with traits that are “too good to be true”, like Connor double attack speed and Jack improving combat of others just being near. (I used the examples I used before ’cause I don’t want to spoil much and let you experiment for yourselves).
- Since all skills can be learned / improved by doing them, it’s not hugely important to have a perfectly balanced party in terms of skills of your survivors.
- However, in my opinion, some core skills are important to have at least one of your survivors with high level at game start: combat, healing and physical.
- Most “happiness boost” traits (cooking, writting, music playing) help with keeping your survivors happy having less often mental breakdowns.
- Take into account that you will most likely find other survivors during gameplay, you will have more hands to help you and you’ll need to adapt the activities and workloads according to that.
I have found some traits to be a little op over others, but again, you can’t have them all, so feel free to experiment yourself:
- Ken “Experienced scavenger” trait helps a lot since metal alloys is the most valuable late game resource and that’s made from ore or scrap. And Ken can bring twice that much more scrap.
- Vivien “Avid Tailor” trait makes a difference in tailoring since it takes so much time to craft clothes and armor.
- Quin “Explorer” trait makes expeditions so much more viable since you’ll be expeditioning a lot in late game.
- “Natural curiosity” trait helps a lot if you don’t seem to find all plants you need nearby in your map. On one playthrough I couldn’t find clothblossom (cotton) anyware, but I got it through this trait.
- Higher movement speed and Handling are some of the most valuable late game traits since:
- Resources will be farther as you deplete the deposits nearer you.
- As you expand your base there will be an increasing number of devices (barrels, torches, stoves, smelters, 3D printers, etc.) to handle to keep them running.
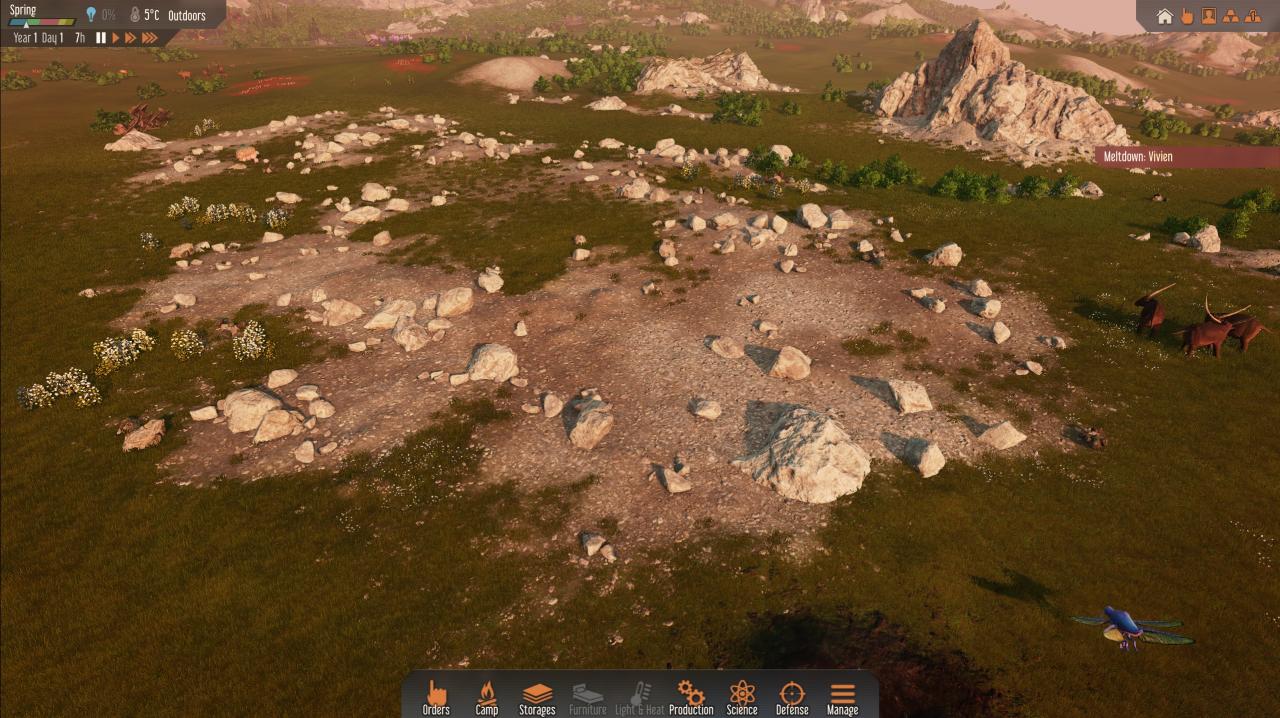
Crash landing starting tips
For example, if there is not hay in sight but much debris focus on scrap shelters or vice versa, if there are lots of trees and few stone, plan to focus on wood buildings, furniture, etc. for later on.
You will also need to pay attention to what plants you have nearby.
If you are on your first playthrough it will be hard to know what plants are important, so you need to prioritize research and have, at least, 2 survivors identifying plants, and animals to a lesser extent. This is important threefold:
- You can’t harvest plants untill you have identify them, you can only “cut” them and that “erases” them, you get nothing from them (trees and bushes are safe to cut to get wood and sticks).
- As soon as you identify a plant you can make farms and plant it if they are in short supply.
- Many crafting recipes, furnitures and techs unlock with this early identifications.
Focus the other 2 survivors on resource gathering (scavenge, cut, mine, harvest) and construction. You can live with emergency rations the first couple of days.
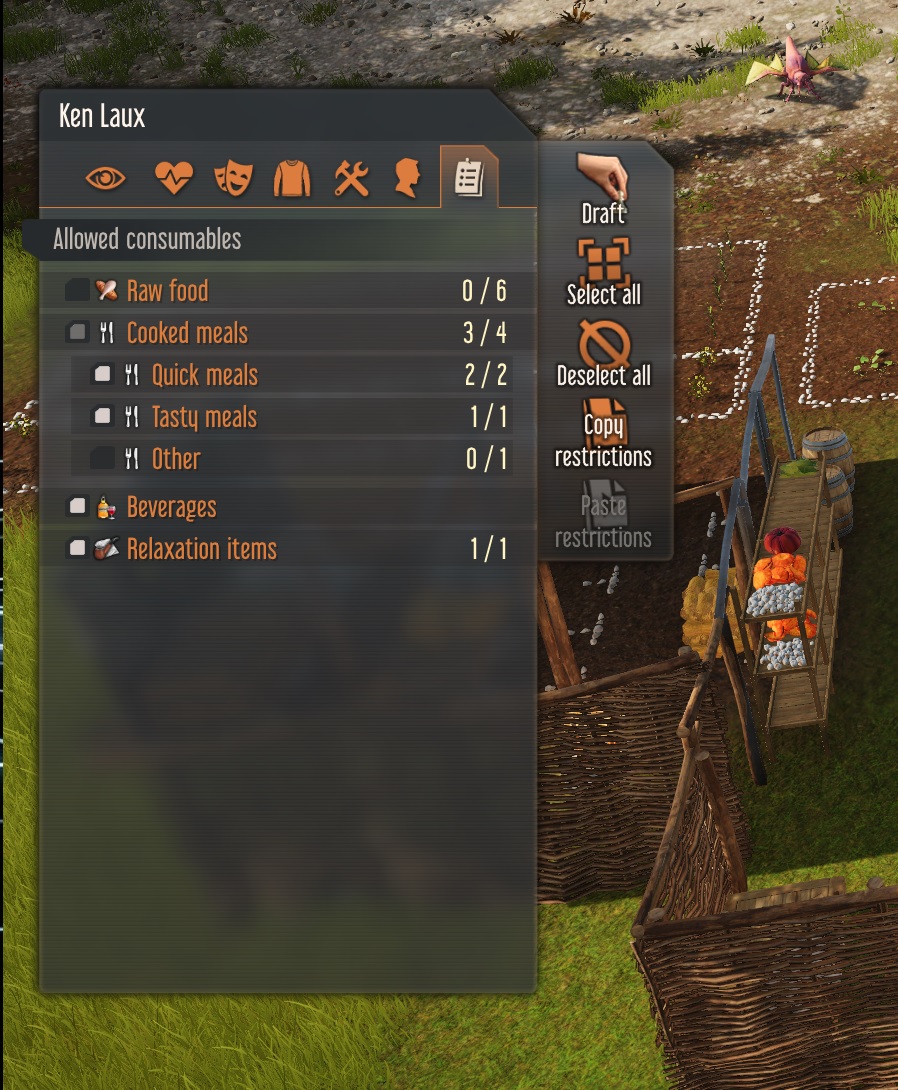
Always uncheck the “Raw Food” from the consumables tab on your survivors. Unless you are having a food crisis and people start to starve, they should never eat raw food, it creates too many health problems and you can start a snowball effect where no one can properly work and it’s even harder to get proper food.
Now to the tips themselves:
- Put a roof over your storage (stockpiles and shelves) as soon as posible. Resourses last longer, or indefinitely under roof.
- Always read the resourses tooltips to know what they can be used for, how long they last and under what storage conditions.
- Build a fireplace or cook stove to cook emergency rations (they give happiness bonus) and your first alien meals.
- As soon as you can cook with local ingredients (veggie soup, meat soup) save your emergency rations for, well, emergencies.
- Don’t overcook. Cooked meals spoil in a couple of days, so have only 1 meal per survivor premade (you can set the kitchen stove to have someone cook veggie soups until you have 3 or 4).
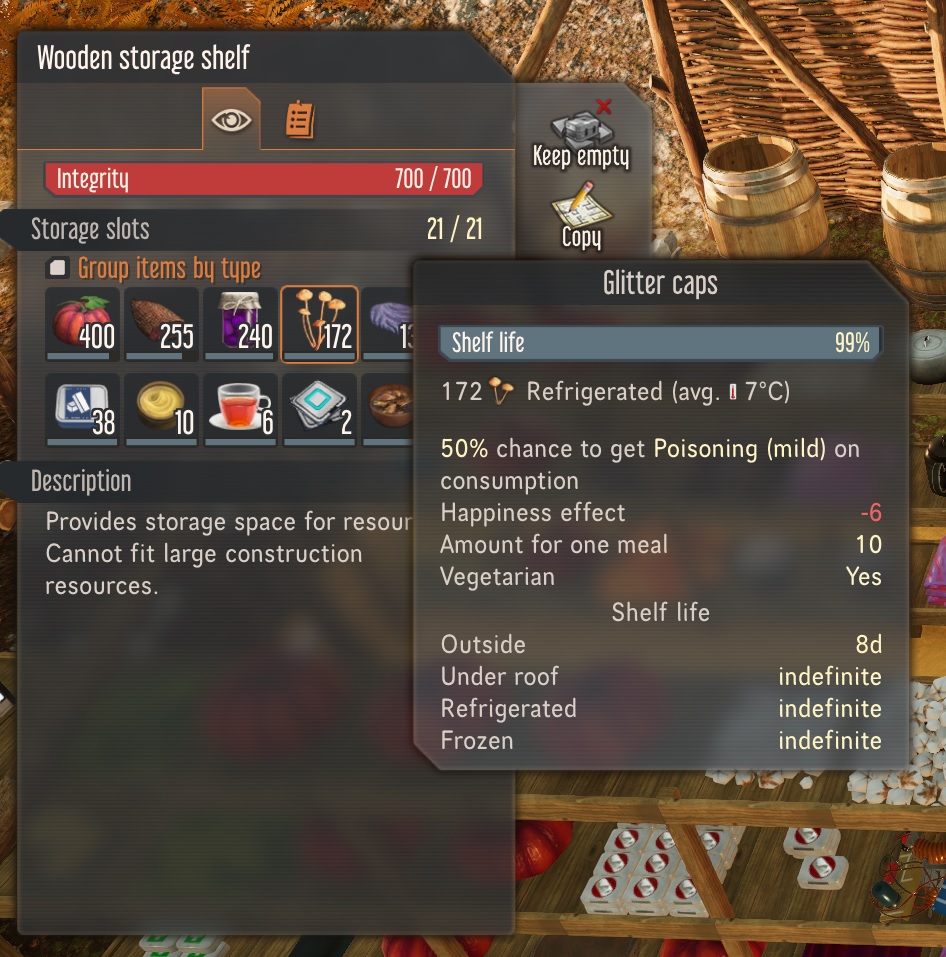
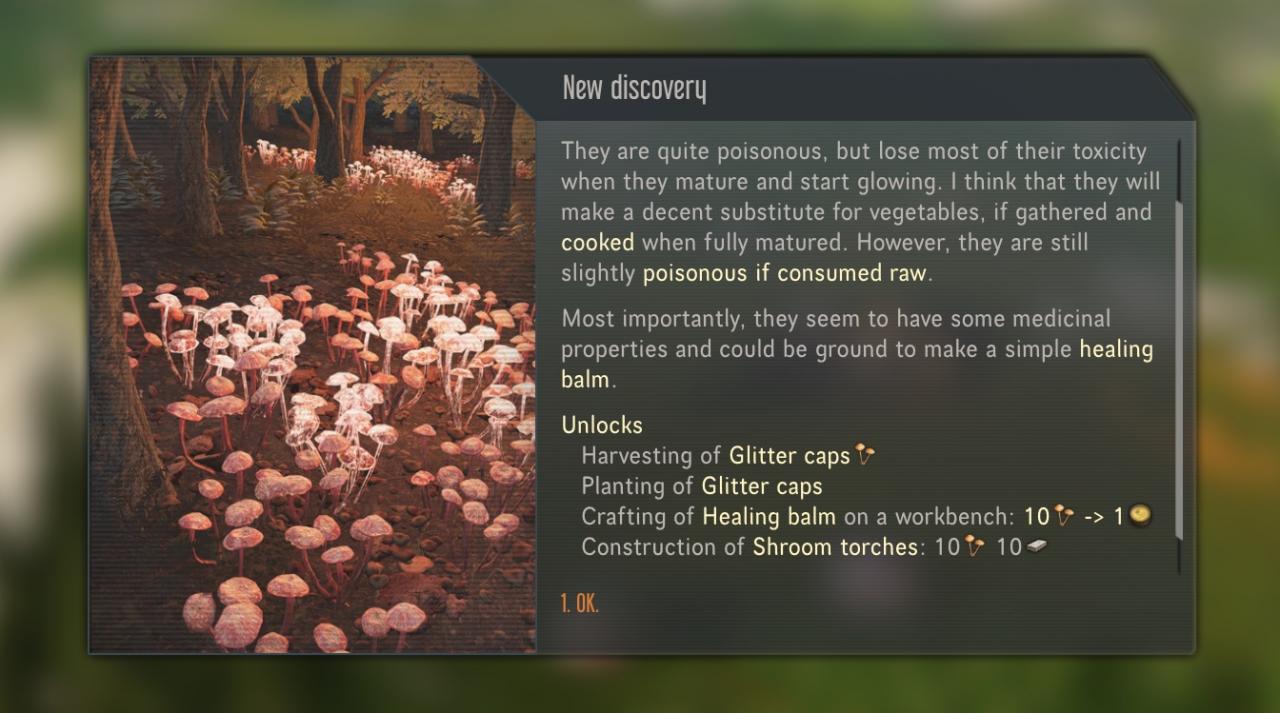
- The most important early game resource are the Glitter caps (luminous orange mushrooms). Harvest them and set a small farming field as soon as you can. They can be used to cook food, make medicine, long lasting lamps, and they can be store on shelves under roof indefinitely.
- Your best early game tailoring material is animal leather. Can be used for clothing (armor) and bandages. You get them from hunting Ulfen (the “big horned” animals) and just letting the hides on a drying rack. Cotton (if you happen to land near any) can’t be used for armor and veggie leather needs a 2 steps man dependant process, first harvesting the skinbark (big purple plants) and then having someone make it on a workbench.
- The best early game meat is red meat (hunted from Ulfen and Drakka). It can be dried to last for a very long time. Insect meat can’t be preserved for long without refrigeration.
- Your survivors get a small happiness penalty, and a huge working penalty (movement and manipulation) when “It’s dark”, either during nightime or during the day inside a building without light. So always have artificial lights on your first shelters. Shroom torches (the ones made from Glitter caps) last way longer (10 days) than common torches, meaning your survivors have to spend less time “refueling” them.
- By the start of autumn, and later winter, you need to have stockpiled on food (preserved if you can), medical supplies and fuel (mostly sticks) since plants stop growing, and working in the cold without proper clothing will hinder your survivors a lot.
- You’ll have a much easier time if you have and “enclosed” building (foundation, walls and roof) finished by the first winter. Winters are really harsh and without heating from stoves or fireplaces your survivors can suffer a lot. Specially since they will have to work outside for resource gathering on those cold days. The choice of material will depend of what you have in abundance on your starting area.
- Use guerrilla tactics for your firsts combats. They’ll consist of some black bugs. As soon as you get the first warning (the “aggressive animals” one), equip the laser pistol on the survivor with the highest combat skill, draft him, and move him closer to the bugs. Shoot one bug (some of the rest will start to follow you) and start getting back while the gun reloads. When it’s ready fire again and start moving back again. Do this ’till they are all dead.
- Never wait for the “Animal attack” warning. When that happens they’ll attack all at once and overwhelm you.
- Avoid melee combat at all cost. Can cause a lot of health issues and you’ll need a lot of medicines if someone gets seriously hurt.
Activities and skills
Why? What’s the most valuable resource you have? Your survivors skills and work time.
You start with no more than 4 survivors (you can get more later, although there’s some rng involved, so you can never be sure). They have to do everything, gather resources and food, cook, craft, build their houses, research, etc. And they need, to sleep, eat and relax too.
I read people complaining about:
- Resourses not being moved from deconstructing storages to new storages: that’s probably because there are no survivors with high priority on “delivery”
- People not being healed although medicines were available: that’s probably because there are no survivors with high priority on “heal”.
- Torches, stoves, smelters, etc., not being refuled: that’s probably because there are no survivors with high priority on “handling”.
- Buildings layed out, but not being constructed: that’s probably because there are no survivors with high priority on “construction”, or their construction skill is too low to build that building.
- Work desks being activated but no one crafting: like with “construction” that can be because there are no survivors with high priority on “crafting”, or their crafting skill is too low to craft what you have in queue.
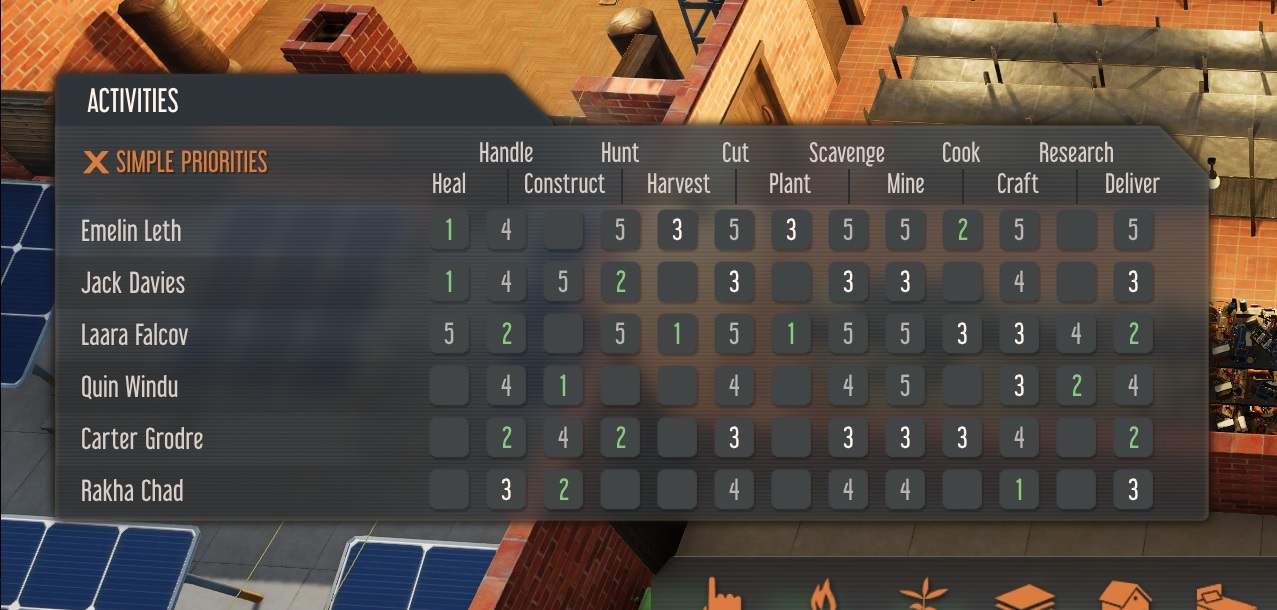
So the activities panel is THE most important tool you need to know how to use in this game to take advantage of your survivors skills. And what’s even more important, is to untick the “simple priorities” and get your hands dirty in organizing your survivors.
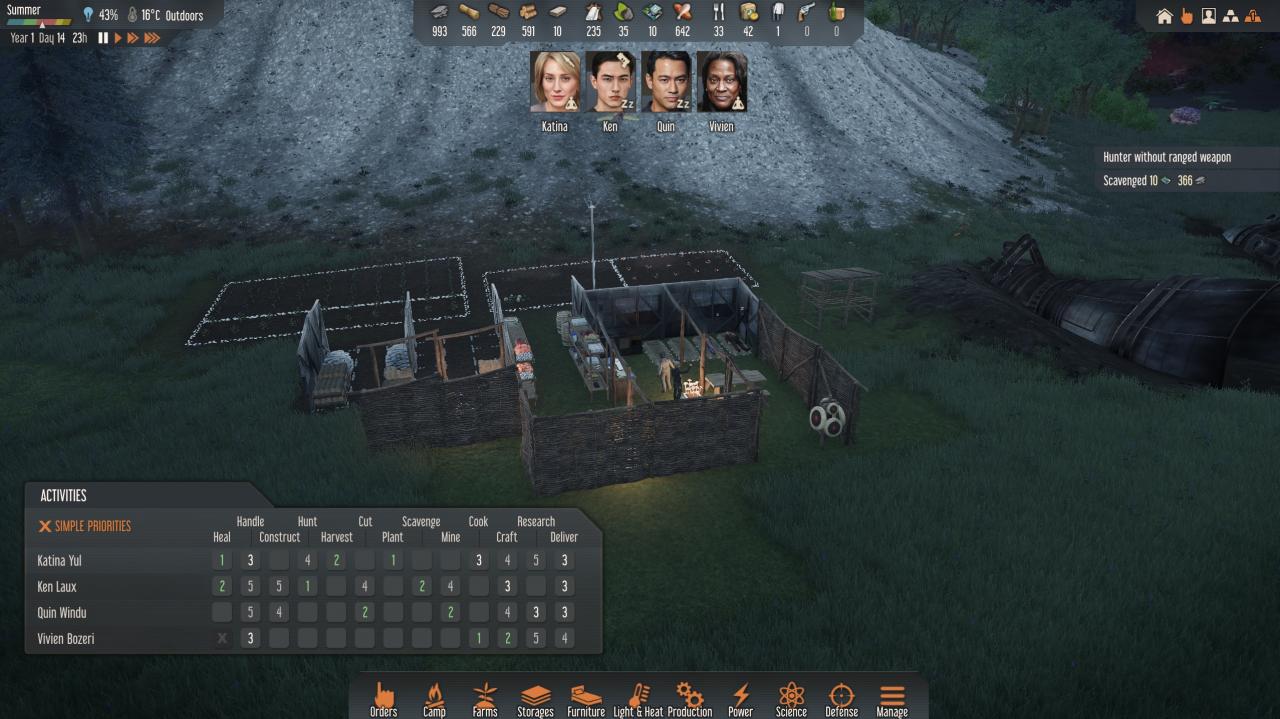
The lower the number in the activity the more priority it will have to be done above all others.
For example, they will always check if they can do the activity with the number 1, if there’s nothing to do with the 1, they’ll try the one with the 2, and so on.
So, you can always have at least one survivor with priority 1 on “heal”, and no other with 1. That way when someone needs medical attention and gets to his bed, they will drop everything they are doing and will go heal their companion.
One thing that is important to notice about medical attention is that if all your survivor are ill, they will all go to bed. In this scenario you can, either untick the “wait for medical attention” on one of your healers so they can heal the others, tick it again and then someone else will heal them; or you can command (with a mouse right click on them) to heal themselves. It will take a little longer, but if they have the highest lvl heal skill is better that way.
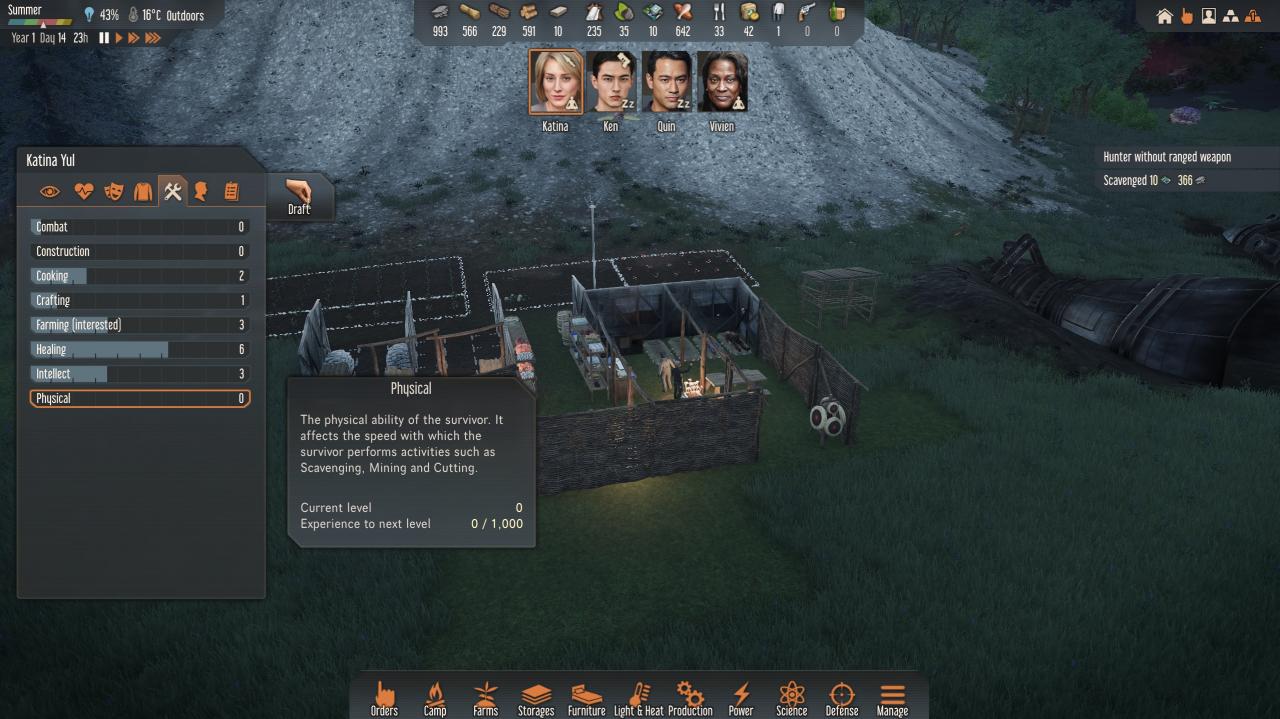
You know what skills your survivors have more developed either, from the survivor pick screen before beginning, from the ingame characer sheets, or from the activities panel that gives you a tooltip of the skill level of each or your survivors for every work.
Every skills has it’s tooltip explanation. What’s important to know about skills is that their level determines some things:
- If some works can be done at all. For example, you need level 3 farming to be able to plant clothblossom (cotton) or smokeleaf, you need a level 3 crafting to make fuel out oil, or level 2 in construction to build wood structures, etc.
- The chance of failure at some works. Chance of failure means someone does the work and uses the resources, but when fails, all resourses on the work are lost. For example, you need level 5 crafting, not to fail when building a crossbow, if someone below that level does it, there’s a chance all materials and time doing it are wasted.
- The speed at which work is done. I haven’t seen much difference yet, but survivors with higher leveled skills are suppose to do those jobs faster.
- Physical skill affects the amount of scrap that a survivor brings from successful expeditions. I don’t know if it affects the amount of scrap from scavenging.
It’s really important to understand there’s no need for every survivor to be a “jack of all trades” and do everything. If you set them to do everything they’ll end up doing almost nothing.
Focus each of your survivors in one or two activities (the ones they have higher level skill) and to help in a couple of others if they are not busy with their main ones.
In the “early game activities managment” picture of this section (that one is from my fifth playthrough) you can see how some activities are only assigned to one person or two. That way if, for example, Ken is away hunting, he will not rush back and let the Ulfen to rot just because there’s farming, cooking or research to be done, and if there’s constructing or crafting, there are 2 other people with highest priority that will try to do those things before him.
But, as your game progresses, you’ll have more things to do and different priorities, or you’ll get more survivors, so you will need to constantly balance, tweak and adjust the activities panel. Like I said before, this panel is a tool, not something to do once and then forget.
This picture is from a late game activities panel. See how cutting, scavenging, mining and research take lower priority overall, and handling, delivering, crafting and constructing take higher.
That’s because, once you have a large enough base, and many electric devices, you’ll need:
- Someone focusing on keeping things fueled, furnaces and 3D printers stuffed, distilleries and barrels fermenting etc. HANDLING.
- Someone moving resources to different storages or devices, getting the havested crops to “freezers” (more on that on the food section), etc. DELIVERING
- Someone crafting keeping up your stocks of medicines, cloth, armor, weapons, materials and oil (the oil press goes into the crafting category, remember to always read the tooltips). CRAFTING
- Repairing all the electric devices that keep braking down. CONSTRUCTION
Schedule
Some survivors need more sleep time, others less, others need more relax time and one even works better at night.
(On one playthrough I had a “breakthrough technology” that made the survivors rest more with less hours of sleep, so I adjusted the schedule and gained more work hours.)
So, about the schedule, the ingame tooltips says it all:
- Grey hours (Anything): survivors can do whatever they want.
- Yellow hours (Relax): survivors will only relax and eat, they will not work and will only sleep if overly tired.
- Pink hours (Work): survivors will only work, but they will eat if hungry or sleep if overly tired.
- Blue hours (Sleep): survivors will only sleep, not work nor relax.
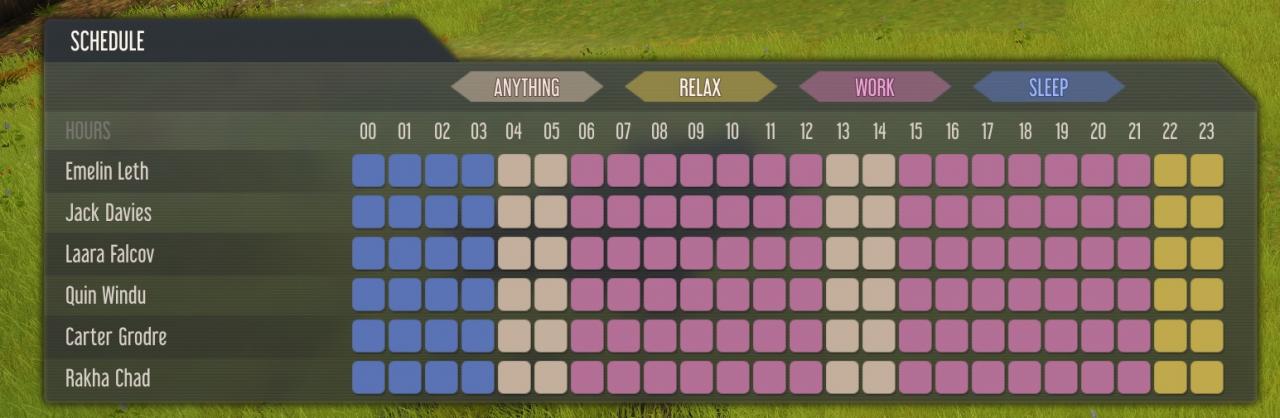
- It’s important to notice that survivors will try to wait till Anything (grey) or Relax (yellow) hours to eat (that’s how I get some lovely family dinners with that schedule). But, no matter what colour of the hour they are in, if they are getting really hungry they’ll drop whatever they are doing and go eat. So don’t overthink the schedule for meals.
- I don’t recommend to have everything in Anything (grey). It’s really inefficient to have everyone do whatever they want at whatever hour. All but one survivors get huge penalties for working in the dark and much of the work is done outside (farming, scavenging, mining, cutting, etc.) where is harder or impossible to keep lighted so it’s better to have them working during the day and sleeping during the night.
- I found helpful to put some relax hours prior to the sleeping hours. That way if someone is far away from the base, they’ll drop everything and will start to come back at the relax hour and arrive on time to sleep. Otherwise they will start returning the moment they should be already sleeping and by the time they arrive they’ll have fewer hours to sleep and recuperate.
- Depending on several factors (traits, how tired they were, distance between work and bed, at what time they actually went to sleep, etc.) people will be fully rested at different times. The grey (anything) hours in the morning between sleep and work served me as a buffer. That way if someone is already rested they can wake up and start working, and if someone needs more time to sleep, will keep sleeping ’till rested.
- Those middle of the day hours are an ongoing experiment. 14 hours of straight work caused a lot of stress. I tried them on relax, but people just dropped whatever they were doing and some were too far away, others didn’t even want to relax. So now they are another grey (anything) buffer. The ones that don’t need to stop working can keep doing it and the ones too stressed can relax a bit before going on with their day.
Resources
All non food resources last forever in storage under roof. So all you have to do is keep them under those conditions.
You can arrange your resources anyway you want. But one important thing to help efficiency and work times, is to keep the resources of a production chain, close to each other. Meaning to keep “source resources” close to where the “producers” will need them. For example, it helps to keep the shelves with cloth and leather close to the tailor bench.
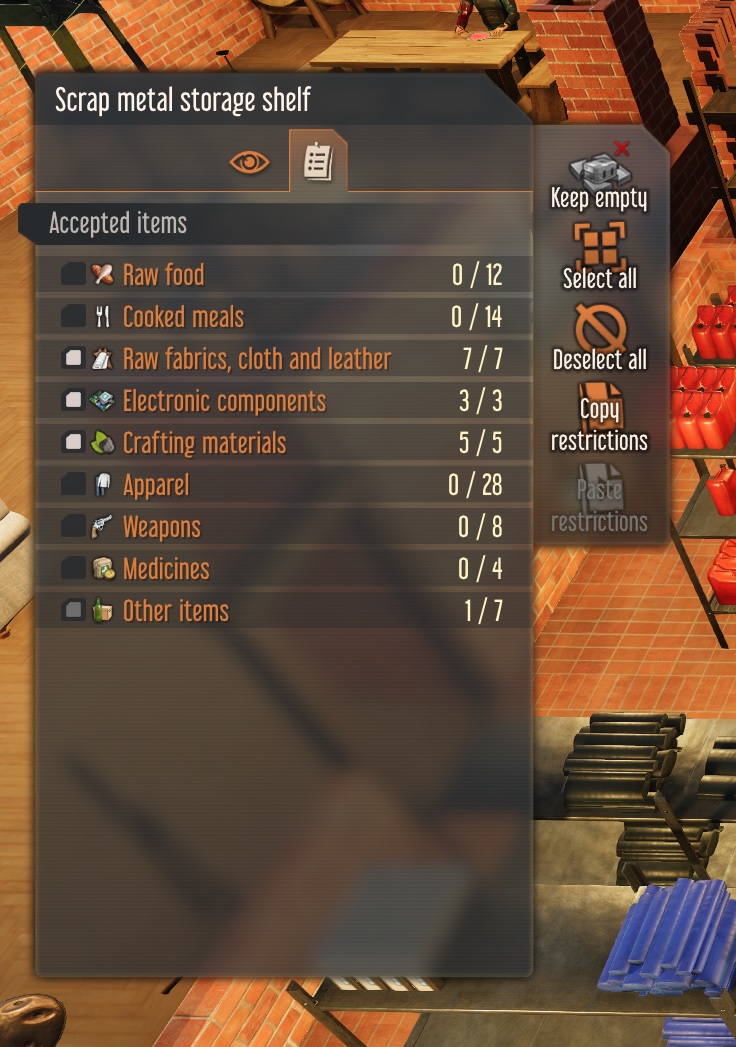
You can easily organize that by checking what resources are allowed in each storage container “Restrictions” panel (stockpile, shelves, etc.)
Many times you will be expanding your buildings, researching new technologies that open new production chains, etc., and you will need to move the resources and the storage they are in.
You need to take into account the following:
- In order for survivors to move resources, first you need to deselec them (untick) them from the storage of origin.
- And then, there needs to be another storage available and allowed to receive them. Survivors won’t take resources and put them on the floor, they will only move them if they can store them somewhere else.
- Lastly, it was explained in the “Activities and skills” section but, survivors won’t move resources if they have other priorities before “delivering”. So, you can either wait, or you can go the activities panel, put someone delivery on high priority, and after everything is moved you can switch back the priorities.
The most valuable resource in the whole game so far is this:
Rocks, and the stone you get from them, are the only non renewable resource at this stage of the game.
Animals keeps spawning, scrap and ore keep falling from the sky and can even be obtained through expeditions, and the rest can all be planted, farmed and harvested.
So, depending on the amount of rock deposits you can see around your initial crash site, you will need to ration them, or not, prioritize other renewable construction materials and so on.
One important thing about stone is that another construction material, cement, is made from it, at a 1:1 ratio. Meaning, it’s better to craft your stone into cement, and from the same amount you’ll get a better material. (Yes, I know is pain how crafting cement works right now, but, again, this is an early access game, it’s obvious that later on we’ll get some kind of device to make them easily, like a cement mixer or something, just like we have the electric furnace for bricks).
The second most important in game resources are metal alloys.
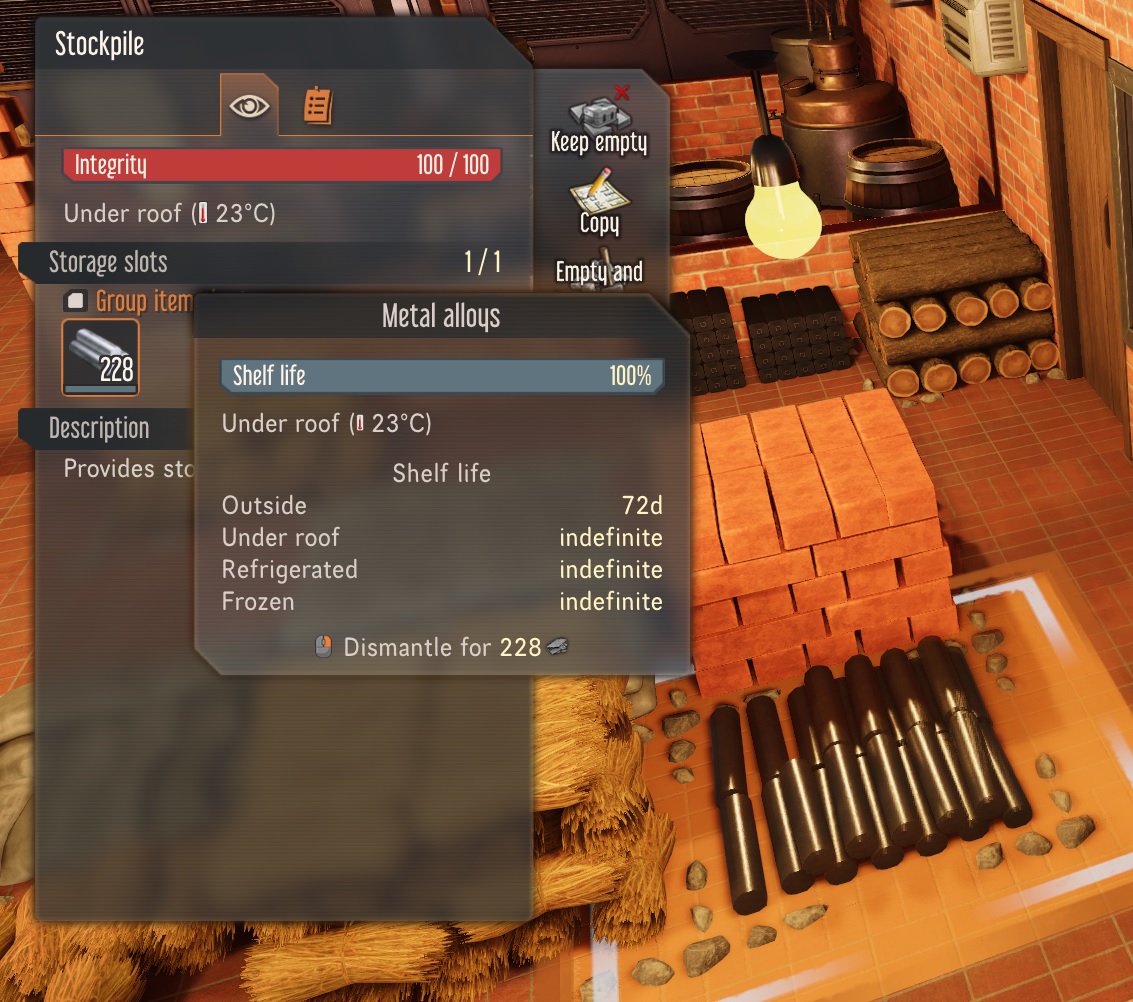
It’s not ’cause they are finite, like rocks, but because they:
- Can be very time consuming to obtain.
Metal alloys are made from ore or scrap. Two resources that will be farther away each time you deplet a deposit near your base, unless you have a meteor rain or debris falling close to you.
My advice would be to stockpile as much as you can metal alloys and scrap before starting the full electricity age of your camp. On one playthrough I had over 1k metal alloys, and over 2k scrap. Once I started building batteries, solar panels, freezers, electronics, cpu cores, etc., I got it down to zero, and struggled hard just to keep up production to maintain everything that kept breaking down. - You need them for everything late game.
Metal alloys are used for most electicity devices (producers, batteries, lights), fridges, synthetic armor, benches, etc., and most important for electronics, cpu cores and power cells, which are needed for freezers, batteries, air conditioners, weapons, sensors and turrets. That means all your late game hangs on the edge of having enought metal alloys to sustain it.
Having said that, electronics, cpu cores and power cells are all crafted at the soldering bench, another very time consuming endevour. You’ll probably need at least 2 people on 2 benches working around the clock just to keep things running ….. unless you got this:
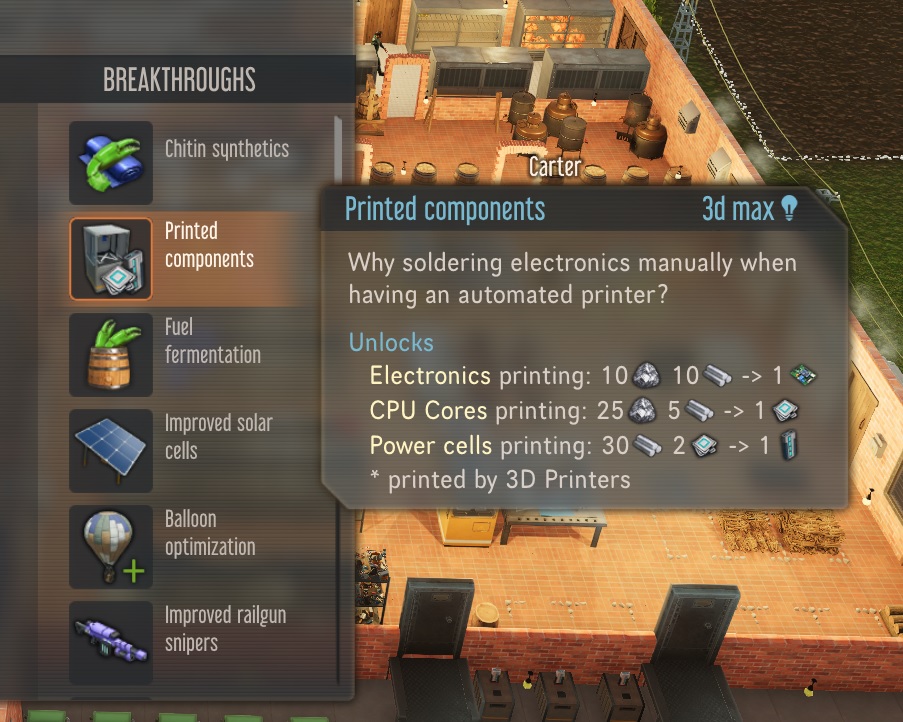
This breakthrough technology allows you to make electronics, cpu cores and power cells on 3D printers, which only require someone to “handle” them by putting stuff inside and the rest is done by the machine.
You get a certain number of breakthrough technologies at the start of each game, but you can obtaint more by expeditions. So far I got this one only at game start, so I can’t say if you can get it from expeditioning, but I’ve got other technologies that way, that on others playthroughs were part the game start ones.
Food mechanics and vomiting
Like I already said in the “Crash landing starting tips” two of the most important things are:
- To untick (not allow) the option for your suvivors to eat raw food.
- And to not cook too much food.
Raw food always has a chance to make your people unhappy, sick, or both.
As always, read the ingame tooltips, they have a lot of valuable information, like this, and like how long the food last under what conditions.
To consider a food “refrigerated” it has to be between 0°C and 10°C.
To consider a food “frozen” it has to be below 0°C
However, those “expiration dates” can be misleading. That period of time is what the resource (food in this case) will last ’till it dissapears completely. Way before that, that food will start to rot. Meaning it will have a chance to make your people sick (and vomit) if they eat it or it’s used for cooking.
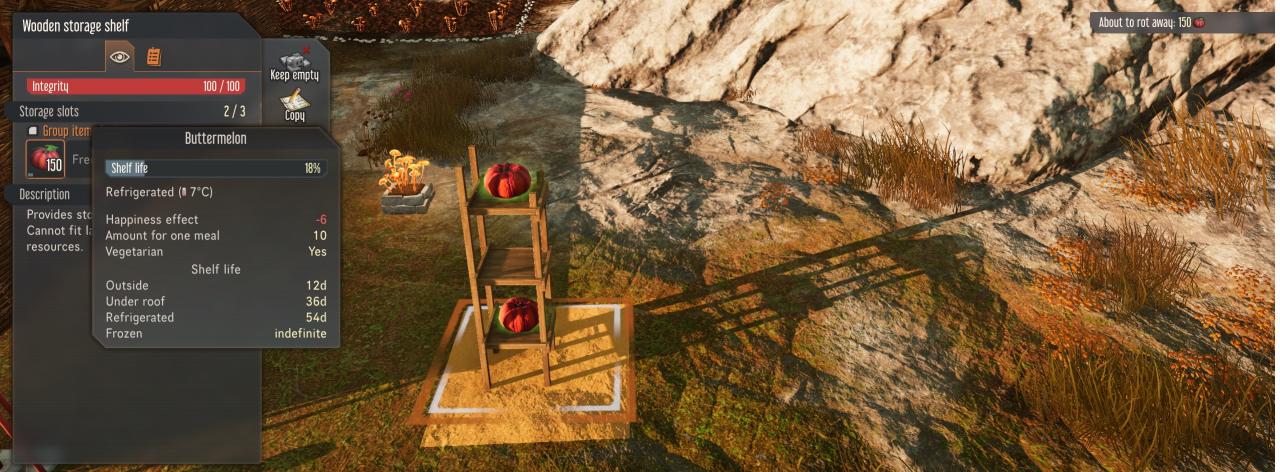
Your food will star to show flies surrounding it below 30% shelf life (I think) and will start to rot below 20% shelf life. When rotting you’ll notice a greenish colouring and smoke coming from it. (What I’m not sure yet, is if it makes your survivors already sick with the flies or only after rotting.)
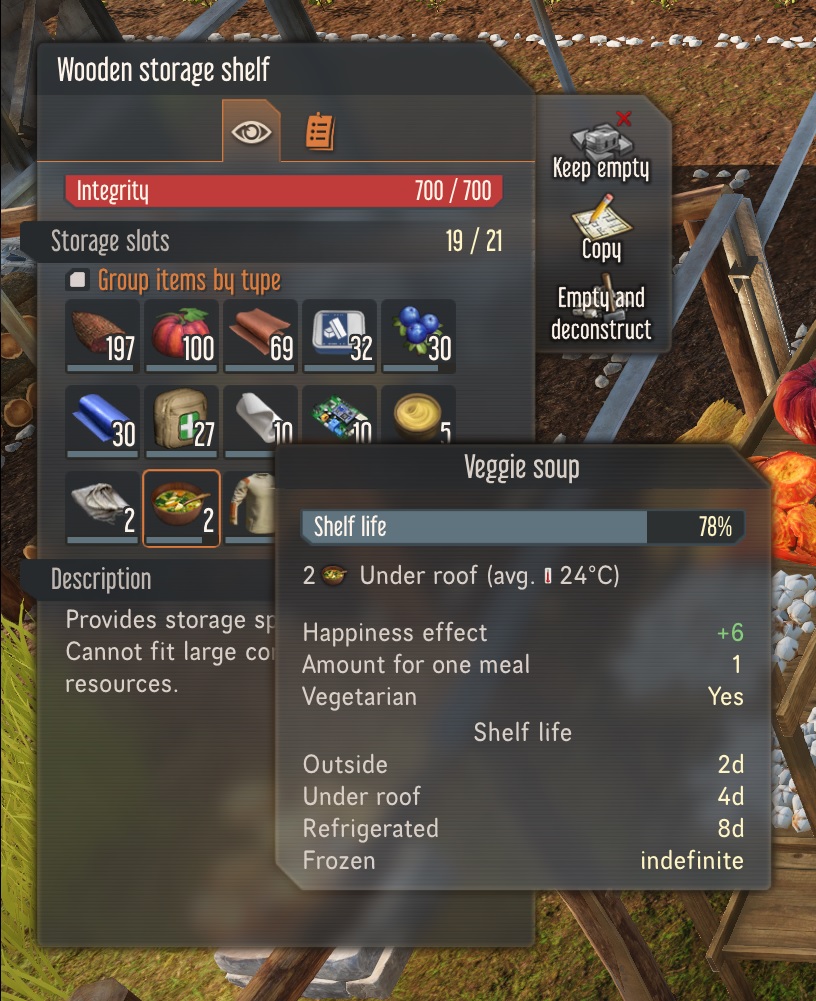
Cooked meals have even lower shelf lives, so if you take into account that 30 or 20 % less life, those 4 days under roof actually are a little more than 3.
That’s why you should not cook more meals than you have people in your camp. Four survivors, four meals cooked at all times, no more than that. Otherwise you risk food going bad rapidly.
Now, is there a solution to the rotting food problem? Not really. It’s not included yet, as a game mechanic to dispose of rotten food, or have some kind of slider to tell survivors not to use resources below certain shelf life.
But, there are some workarounds I can give you as tips:
- Early game, focus on glitter caps. You can use them as vegetables to make both quick meals and tasty meals. And they last forever just on shelves under roof without refrigeration.
- When you get the warning that any food is rotting, go to the kitchen and deselect it from any recipe it might be used for. Once it’s completely rotten and gone, enable it’s use again.
On one of my first playthroughs I didn’t understand the difference between fridges and freezers. Afterall, why would I waste resources on fridges when it said right there that food lasted forever on freezers.
So I rushed the research, skipped the fridges and put everything on freezers, cooked meals included.
On that game I had the famous “vomiting epidemic”. Everytime someone ate, they vomited. Nothing was rotten, everything was well preserved.
Until I realized it was because they were eating frozen food. Again, it isn’t a bug, is a game mechanic not properly explained.
From that I understood why I needed fridges, to store cooked food. Now all raw food goes to freezers, and cooked food to fridges.
Will they last forever there? No. And that’s why have to keep low the number of cook meals at all times.
Did that stop vomiting entirely? No. Because cooked meals still decay and sometimes someone ends up eating something that’s starting to rot, and there other factors to the vomit mechanic, like sickness, drunkness, food binges (is a type of meltdown) and walking through a pile of dead insects that just attacked you.
But never again I had those problematic “vomiting epidemics”, just someone barfing on the side from time to time.
The more complex is a meal recipe more happiness it will bring.
There are two boosts to that:
- There’s a trait on Emelin that when she cooks, her meals will produce the highest happiness score.
- The other is to cook foods that are the favorites of the survivors.
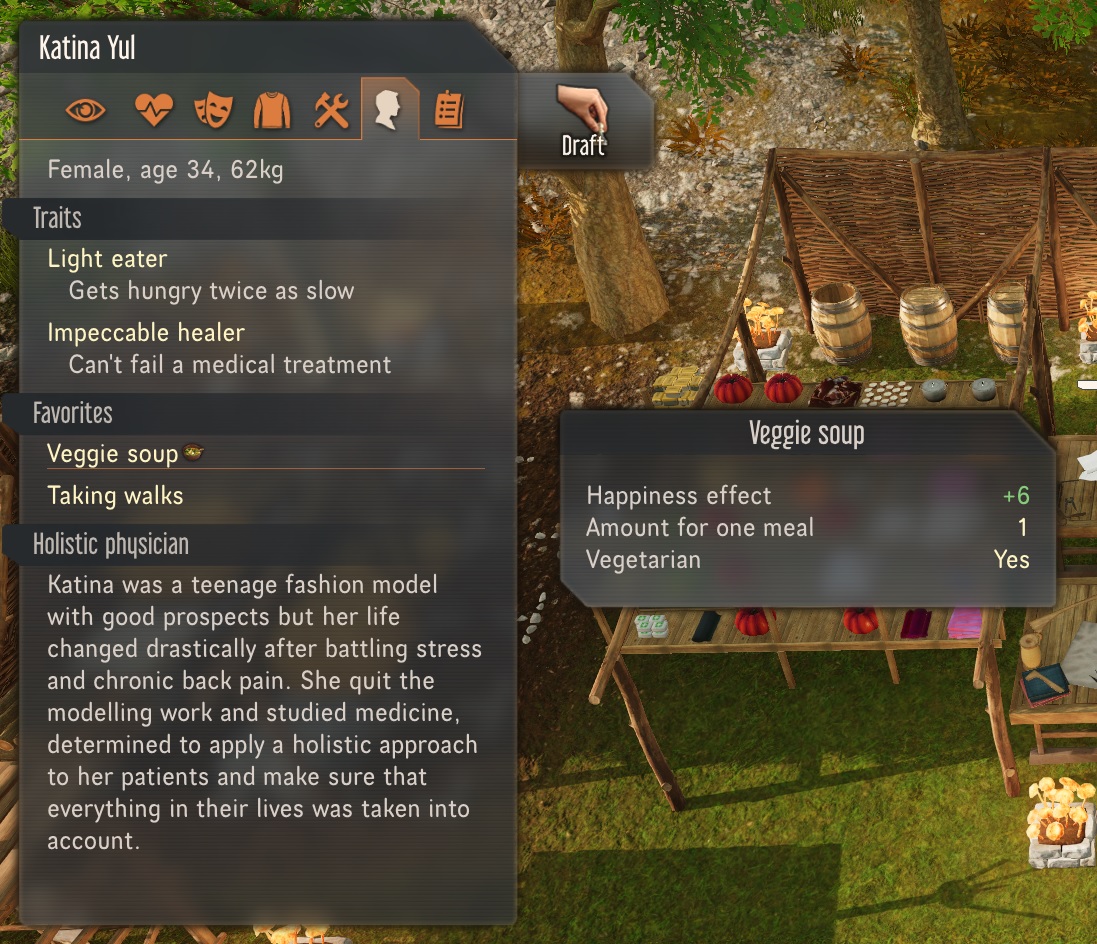 In the character sheet you can see your survivors favorites foods. (What I usually do is to only keep on production 1 of the favorites foods of each survivor, that way you make them happier if they eat them and get the food variety happiness boost too).
Combat and base defense
- On all games, no matter the difficulty, you’ll get a laser pistol. Always equip it on your survivor with the highest combat skill level, and use only that survivor to hunt.
- You won’t be able to make those high level weapons ’till late game, you can only get them if you find them during scavenging. So, don’t be so hasty to equip them. All cloth, armor and weapons equiped by a survivor decay and eventualy break down and disappear. But if you keep them stored, they will last forever and you’ll have a replacement when the main one on your warrior breaks down. And you can always equip them on other survivors prior to an attack and then store them again after the attack.
- Avoid melee combat at all costs. Your survivors will always get injured and will need medical attention and medicines, some of which are hard to replace in the early game.
- The best way to fight those first waves of animals attacks is with guerrilla tactics: As soon as you get the first warning (the “aggressive animals” one), equip your survivors with the highest combat skills with whatever range weapons you have available and draft them. Move them closer to the animals. Shoot one of the animals (some of the rest will start to follow you) and start getting back while weapons reload. When they are ready, fire again and start moving back again. Do this ’till they are all dead. Never wait for the “Animal attack” warning. When that happens they’ll all attack at once and overwhelm you.
- Melee weapons: there are only 2, common spear and laser spear. They do the same, getting you injured and killed, only that one does more damage than the other.
- Basic ranged weapons:
- Bow: medium range, low damage.
- Crossbow: shorter range, higher damage.
- Advanced ranged weapons:
- Laser pistol: single target, short range, high rate of fire, medium damage.
- Pulse rifle: area target, short range, medium rate of fire, very low damage. It’s a sort of shotgun, it’s advantage is that attacks in area and stuns the targets. So when you have a big wave of animals attacking you can have one survivor stunning them while others attack from behind with the higher damage weapons.
- Railgun sniper: single target, very long range, low rate of fire, high damage.
All advanced weapons have an ugraded version (2.0) that can be obtained through breakthrough researchs and expeditions.
Not much to say here yet.
- Leather armor (both animal and veggie): basic protection, both provide the same bonuses.
- Synthetic armor: offers better protection and insulation but requires synthetic textiles and metal alloys.
- Carbon armor: only obtainable as breakthrough research and expeditions, best protection and insulation. If you get this, your survivors will be almost unkillable and impervious to freezing temperatures.
This is plainly explained in the tutorial.
I truly don’t understand people that complain animal attacks are too difficult.
You don’t need electricity nor fancy weapon turrets. Automated weapon turrets are very late game defenses. You won’t need them for a veeeery long time.
All you need are this two technologies:
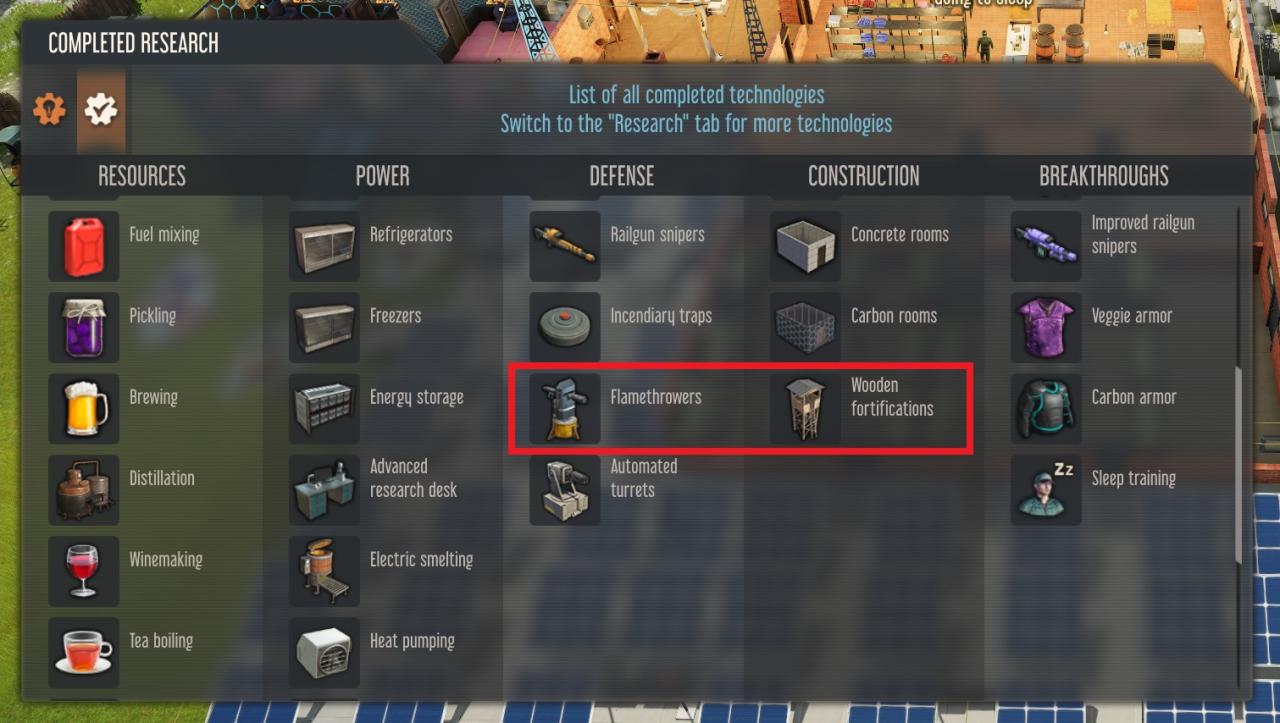
Wooden fortifications are unlock just from chopping wood. To unlock flamethrowers you need fuel (usually obtained from scavenging the ship you crashed on) and metal alloys obtained from researching “metal refinement” and smelting ore into alloys.
Once you have those, all you need to do is to inclose your camp, let one open chokepoint for animals to go through when they attack, put four flamethrowers, some traps and you’ll be safe almost forever.
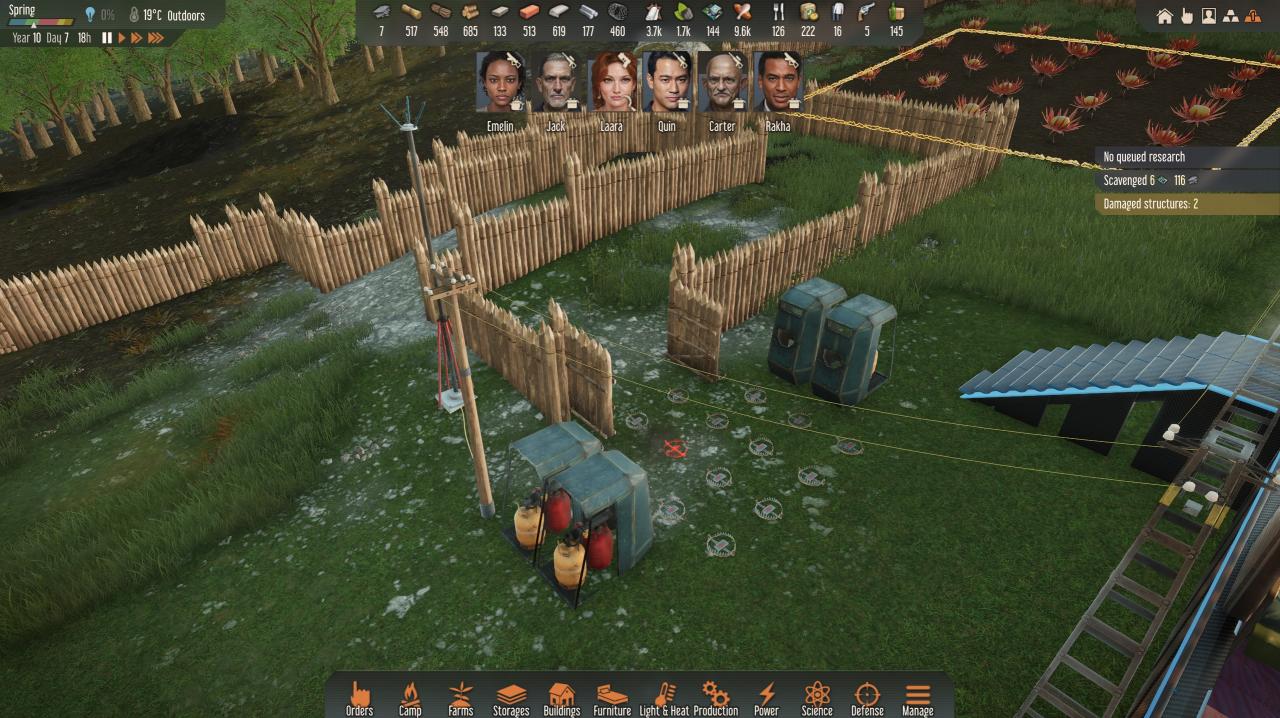
Here’s a secuence of and attack on the year 10 of this playthrough (that chokepoint was the first I built and didn’t change it in the whole 10 years):
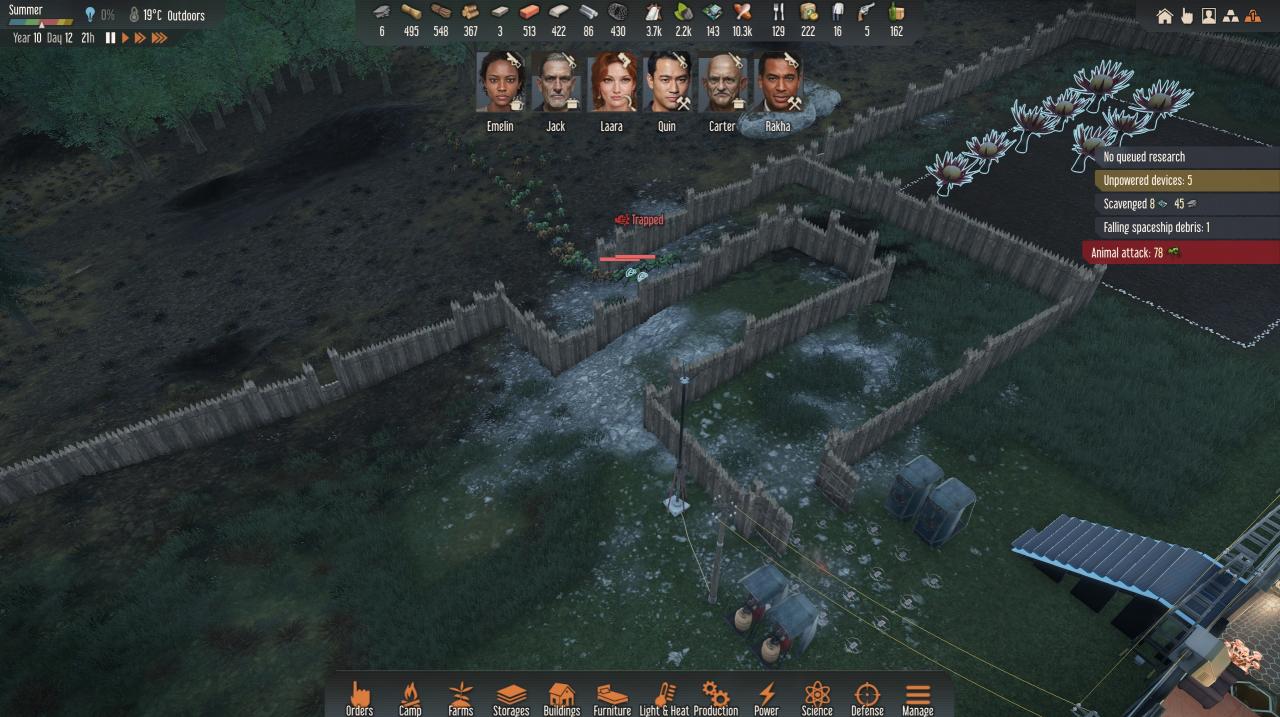
As you can see, 78 praying mantis attacked this side of my base.
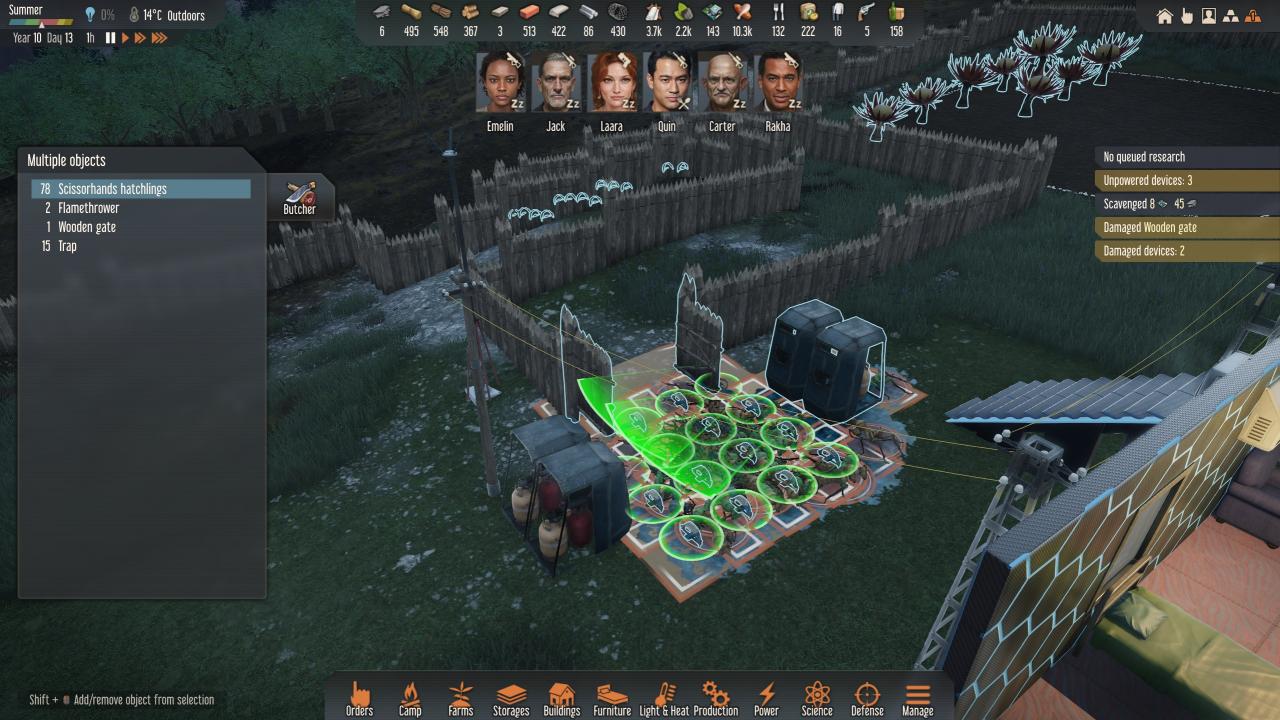
All but one of them got totally fried by the flamethrowers. One got through and I had to send someone to finish the job. That’s why the first upgrade to the chokepoints should always be single turret after the flamethrowers to take out any stragglers
When you are starting your base and it’s small enough, one chokepoint may be enought. But as you grow and expand, hostile animals will start to get lazy and won’t surround all your base just to get slaugther and they may attack your walls. So, you’ll need to make more chokepoints.
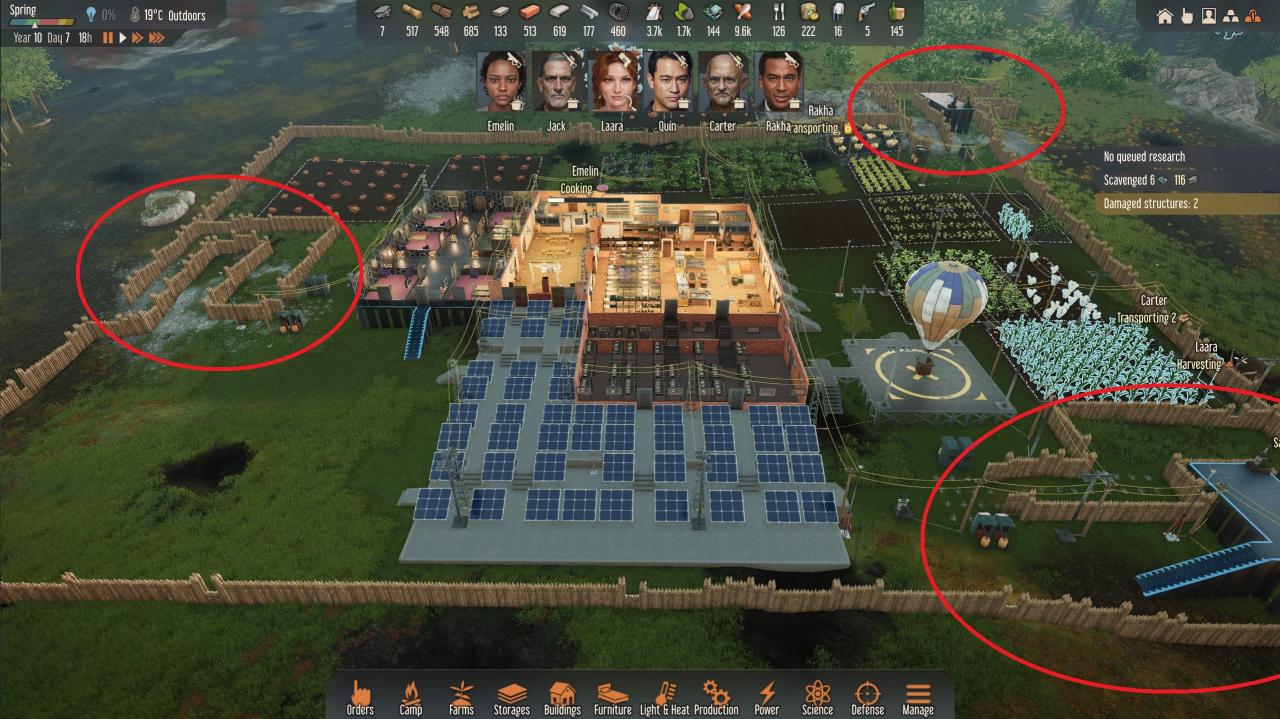
The chokepoints on the right are newer so I incorporated one turret behind the flamethrowers, and some elevated turrets for support at the entrance.
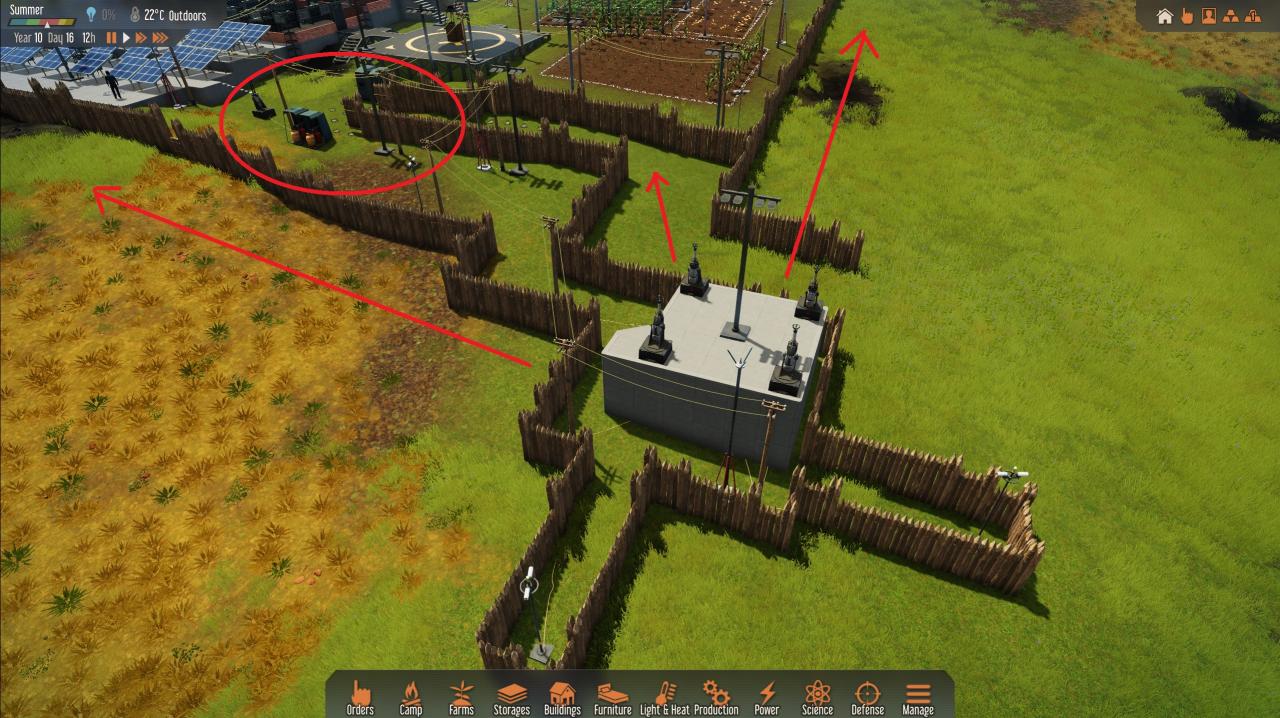
There were 2 reasons for that:
- The first was that common animals (Ulfens and Drakkas) will try to eat your crops, sometimes they’ll go through the chokepoints and die, and other times they will just batter at your walls closest to the crops. So, as you can see from the arrows in the picture, the turrets have line of sight of the walls bordering the base. (Keep in mind turrets can’t fire through walls, but can fire above them if you elevate them).
- The second, and most important, was a kind of late game animal attack, Hummingflies. Those are flying insects, so they go above the walls and the flamethrowers. You can only defend yourself with survivors or turrets.
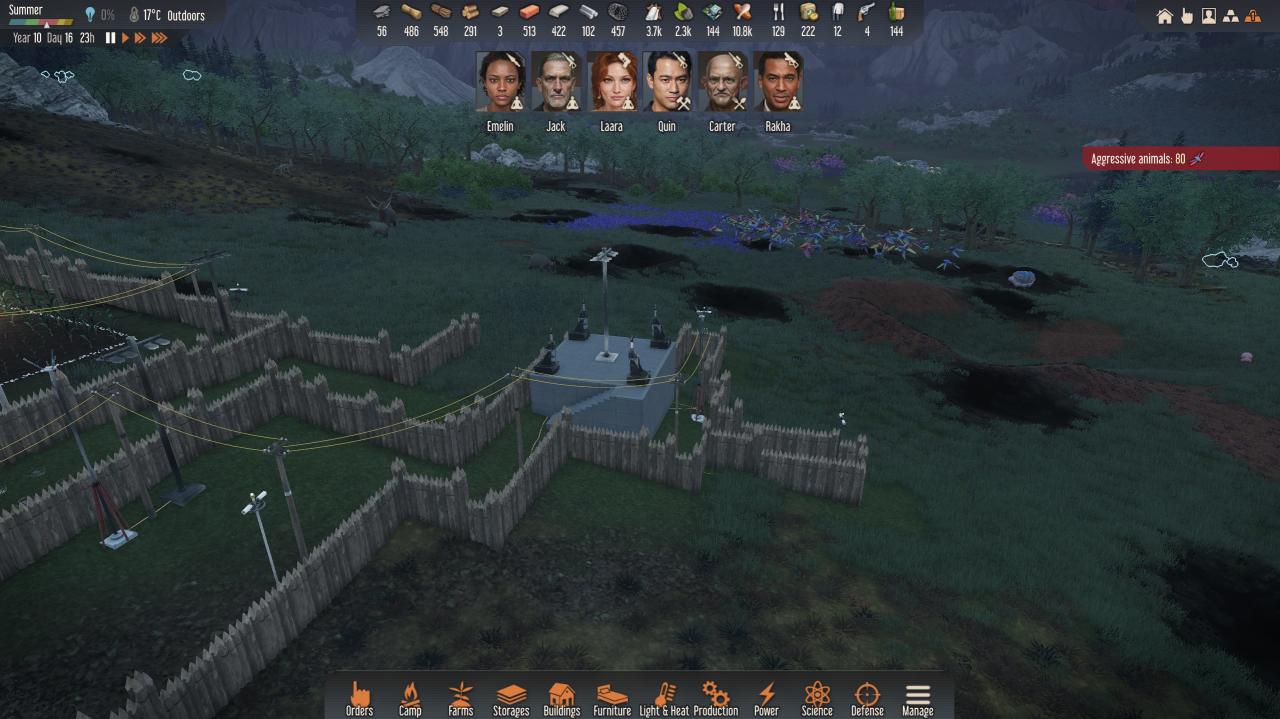
Here 80 hummingflies attacked this defenses. Once detected (the motion sensors are further out to take advantage of the longer range on laser turrets), the turrets activated and made short work of those giant mosquitoes.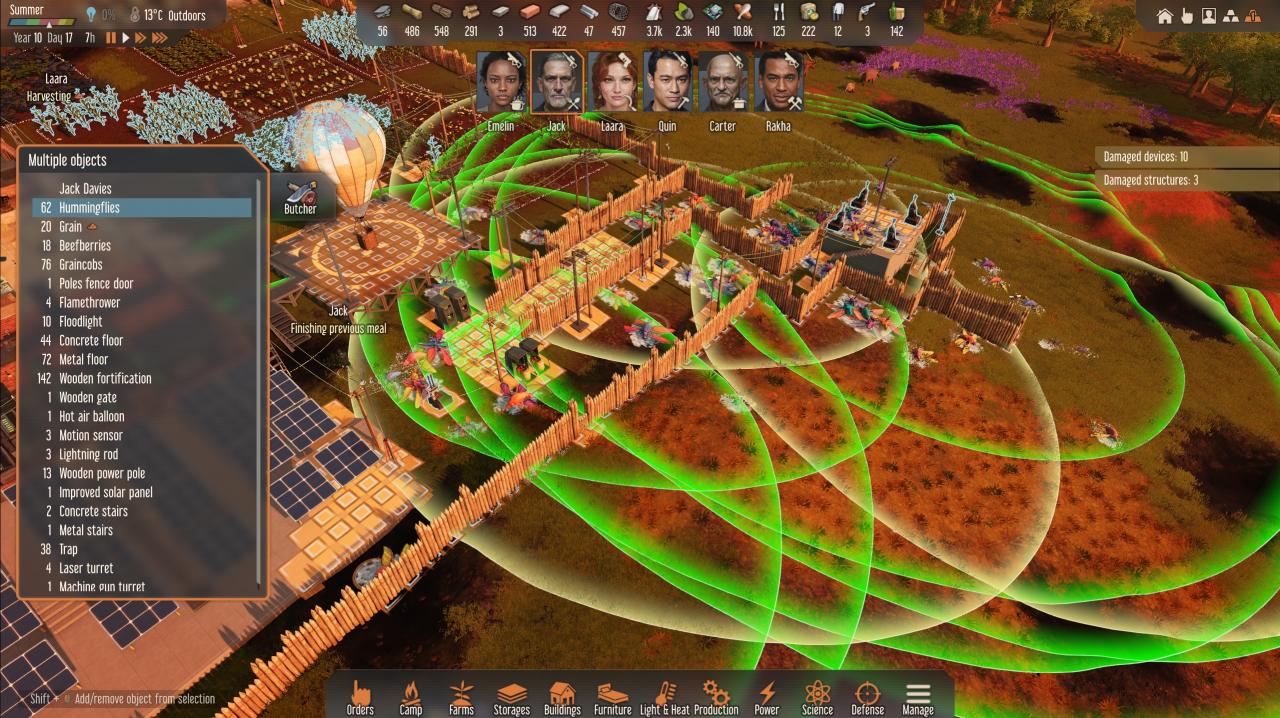
However, only 62 were taken out by the turrets, the rest had to be killed by drafting my survivors.
So for this late game scenarios you’ll need full turret coverage of your base. And that can take a long time, work and resources, depending on the size of your base.
General information and tips
- There’s a sort of rhythm to the year and what kind of work you should prioritize in each season. during the hotter half of the year plants and crops will grow and you should focus your surivors on harvesting and conserving food. On the colder half of the year there will be no farming whatsoever so it’s the perfect time to focus on crafting, going out scavenging, mining, foresting, etc.
- Early game, glitter caps are the holy grail of resources. You can use them as vegetables to make both quick meals and tasty meals, to make medicines, and as lamps to light your rooms that last 10 days without refueling. And they last forever just on shelves under roof without refrigeration.
- Always keep an eye on your survivors character sheets, they give vital information like the temperatures they can withstand with their current clothes, happiness (or unhappiness) reasons, medical conditions, food likes and dislikes, etc.
- Just because something can be harvested doesn’t mean it should. There’s and option on farms to not harvest. If you have enought of that resource, why should you waste your survivors limited time doing that.
- It’s important to keep the lights on. Almost all your survivors get penalties for being in the dark. When indoors, windows help during the day (or no windows and only artificial light), but you’ll need artificial light during night time. Unless you intend to have them sleep like 12 hours a day, there will be many hours of work time left in the night.
- However, when you start the “electricity stage” of your game don’t go crazy putting electric lights everywhere. They brake down regularly and it cost like 2 metal alloys to repair each time. On one playthrough I had over 50 lights indoor my base, so even with a 2% chance of breaking per day (I don’t know if that’s the chance), I had a light breaking down every single day. And those 2 metal alloys start to add up when many things start to break down and ore and scrap starts to be farther away to have a steady supply. Not to mention that you have a survivor almost constantly having to be on repair duty and can’t do any other task.
- So, I recommend to use shroom torches (the mushroom lamps) whenever posible. They don’t brake down, only need a refill every 10 days and glitter caps can easily and constantly be farmed. Use ceiling lamps strategically in cramped rooms where space is limited and already used.
- When you want to keep frozen food stored, an alternative to freezers is to build a room with the best insulation material you have (carbon nanotubes are the best so far), put some shelves in it and couple of air conditioners set to -10°C.
Freezers are more storage efficient as they can store 2000 food in three squares, while a row of five shelves can only store 1500 resources on that same 3 square space.
The advantage of the room setup is that when air conditioners break down they can be fixed with only metal alloys, and if you have at least an extra one, the temperature will not rise. But, when freezers break down you will also need electronics to fix them and food will start to decay the moment the freezers goes down.
Suggestions
I won’t rant about things I believe will be added later from my experience with “Surviving Mars”. Like different game scenarios, more plants and animals, more devices and advanced devices for crafting materials, more construction materials options for buildings and defenses. Nor I won’t rant about balancing things like crafting taking too much time, or research taking too little.
Specially because I said a million times already, this is an early access game. It’s normal some things are missing or unbalanced.
I will only adress things that I think are missing from the core mechanics of the game:
- There needs to be some sort of disposal mechanic, so we can throw away rotting food or other resources we have too much of. For the food, other option could be some kind of configurable slider for the condition of the resources survivors could use.
- There needs to be so sort of option to “upgrade” some things, in particular building materials. If I could later on upgrade my wooden walls to bricks or cement ones, without having to take down the whole thing I wouldn’t try so hard to skip wood and stone overall. The same goes for torches, which already use a wall space, they could just be just upgraded to wall lights.
- With such huge maps, as the game progresses and resources start to be farther away there needs to be some sort of transportation mechanic, either for the survivor themselves or for carrying resources. Hey, they already have diesel engines for electricity, common sense tells me you just put four wheels on that and they should have a working car.
- Tutorials and tooltips need to be expanded to explain many core mechanics not totally clear right now.
Disclaimer
Too many people complaining the game is bugged. This game is in early access so that shouldn’t have to be and issue. But, from my part, I haven’t found a single bug yet, well only the Skarabei that attack you every now and then 😛
Must “bugs complains” are actually missunderstood game mechanics.
Do the developers need to expand the tutorials, tooltips, etc.? Yes, of course.
But again, this is and early access game and somehow people expect to find a fully finished and balanced game.
One change for your guide..
“Indifferent” means he’ll learnt it slower.”
There is more to it than that, if you look at the background of the item that is marked Indifferent you will note that there will be a colour change in the bar so far along – that is the max limit for this skill, so while it is learnt less quickly – the maximum value for that skill is also capped and can never go higher than that point.