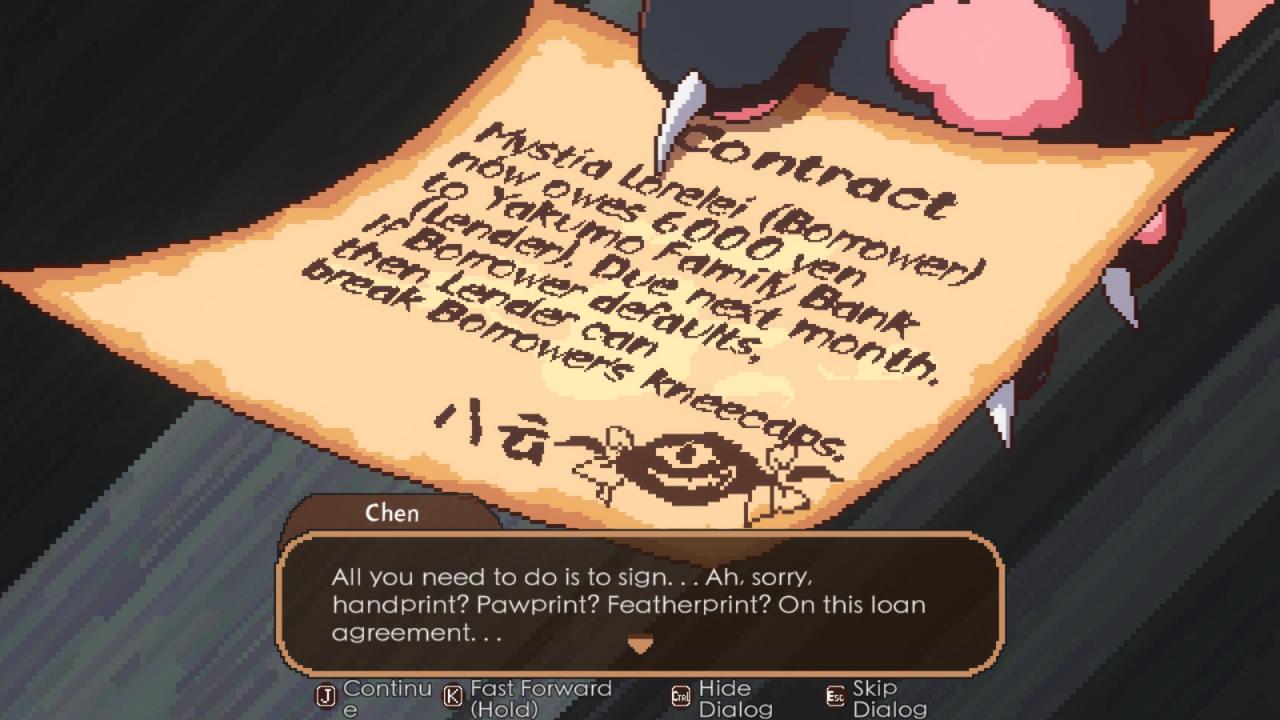
Intro

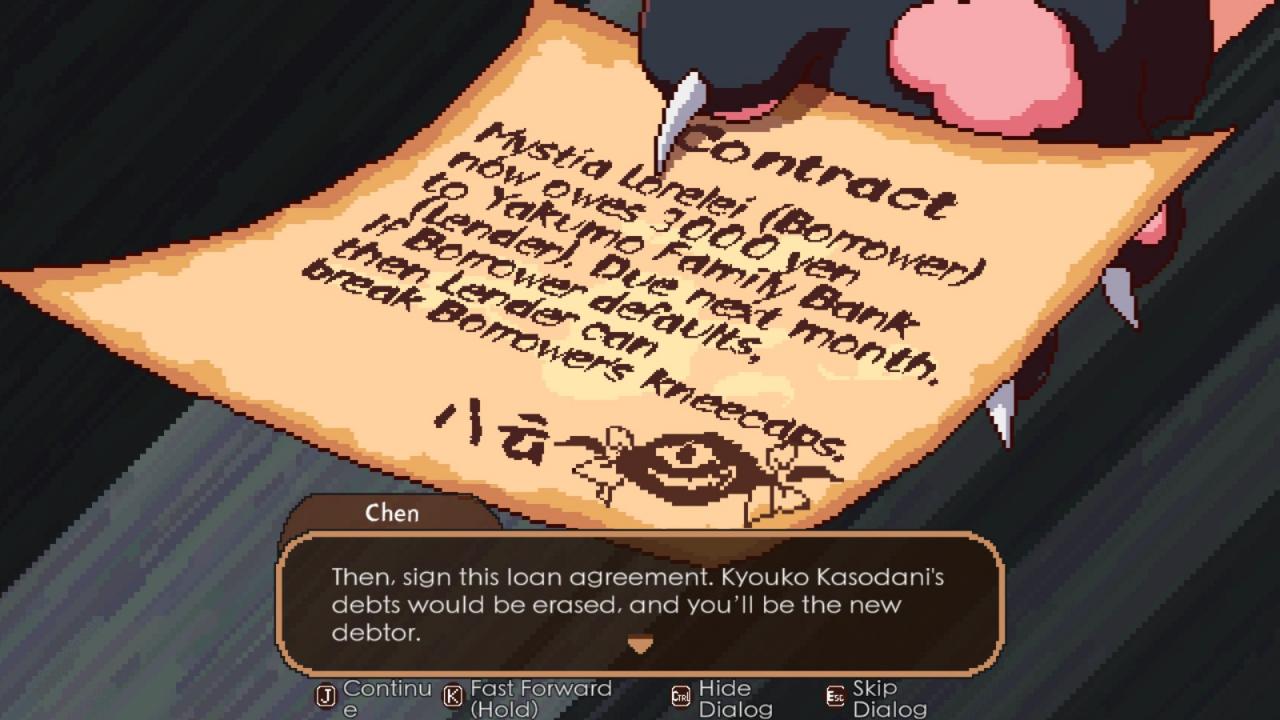
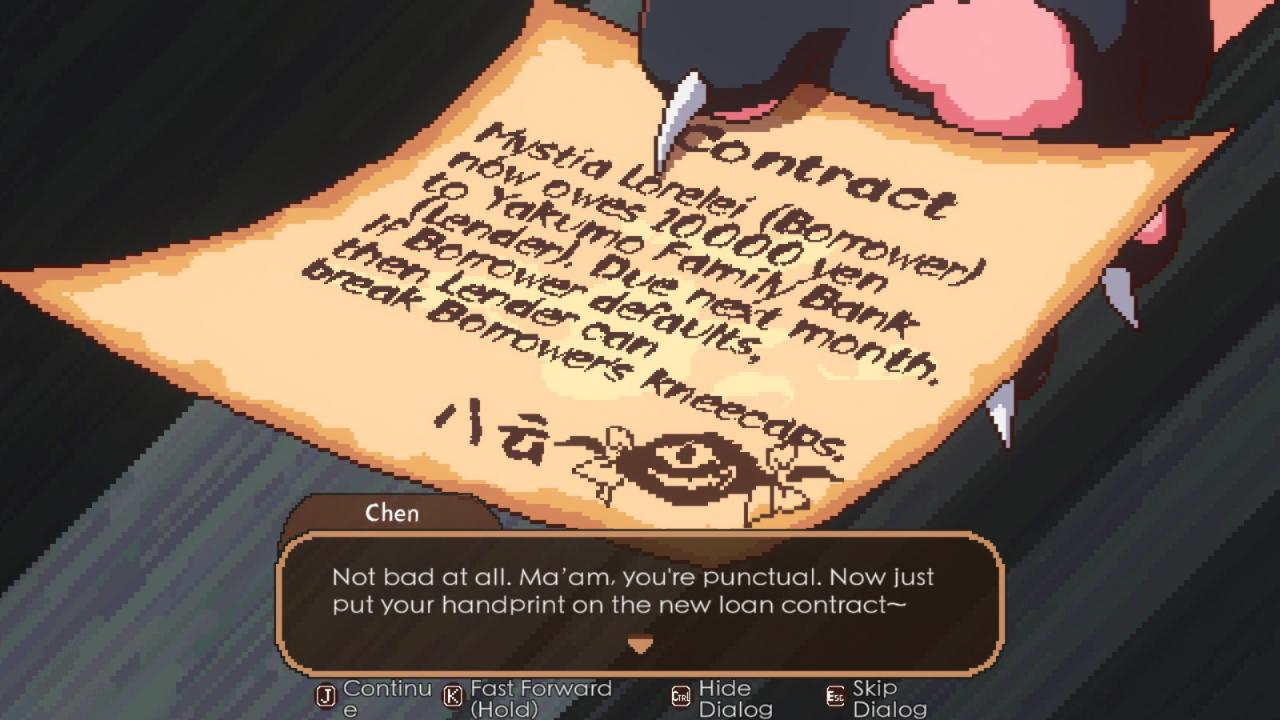
You run in like the protagonist you are and now here you are, with a debt to pay off before your kneecaps get broken too.
My hopes is that this guide will help you to pay off your debts like a good person, build your credit, and run your Izakaya efficiently! Many of the guides here are in Chinese, which while informative, is difficult for us non-speaking foreigners to actually read. I hope that this English guide will serve to help you not only survive the debt collections, but gain the skills necessary to overcome many of the challenges the games provide.
This will only cover the base game up to the 3rd area and not the DLC as once you’re on the 3rd area and DLC, you will have already gained the skills to overcome most challenges. If there’s further interest, I guess I might finish writing up to the end of the game. I believe that by the 3rd and even 4th area, most players have a firm idea of how to navigate.
PLEASE keep in mind that everything here is basically a spoiler! Read at your own discretion!
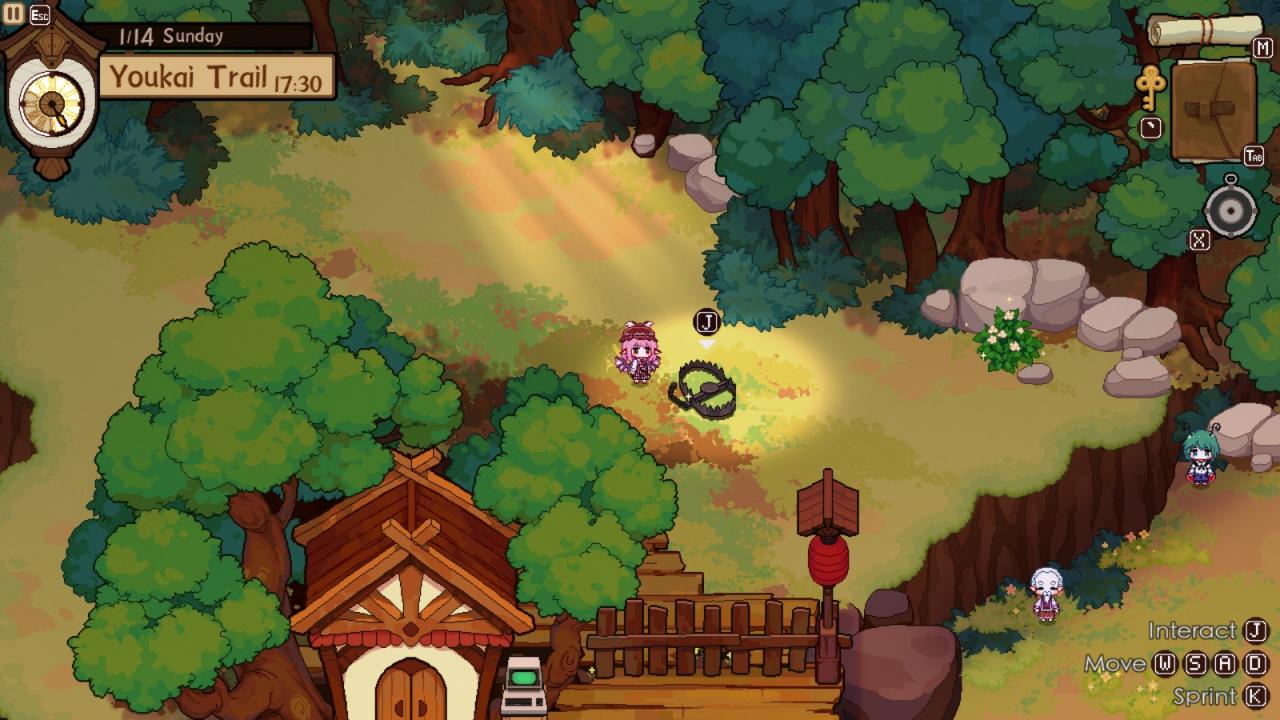
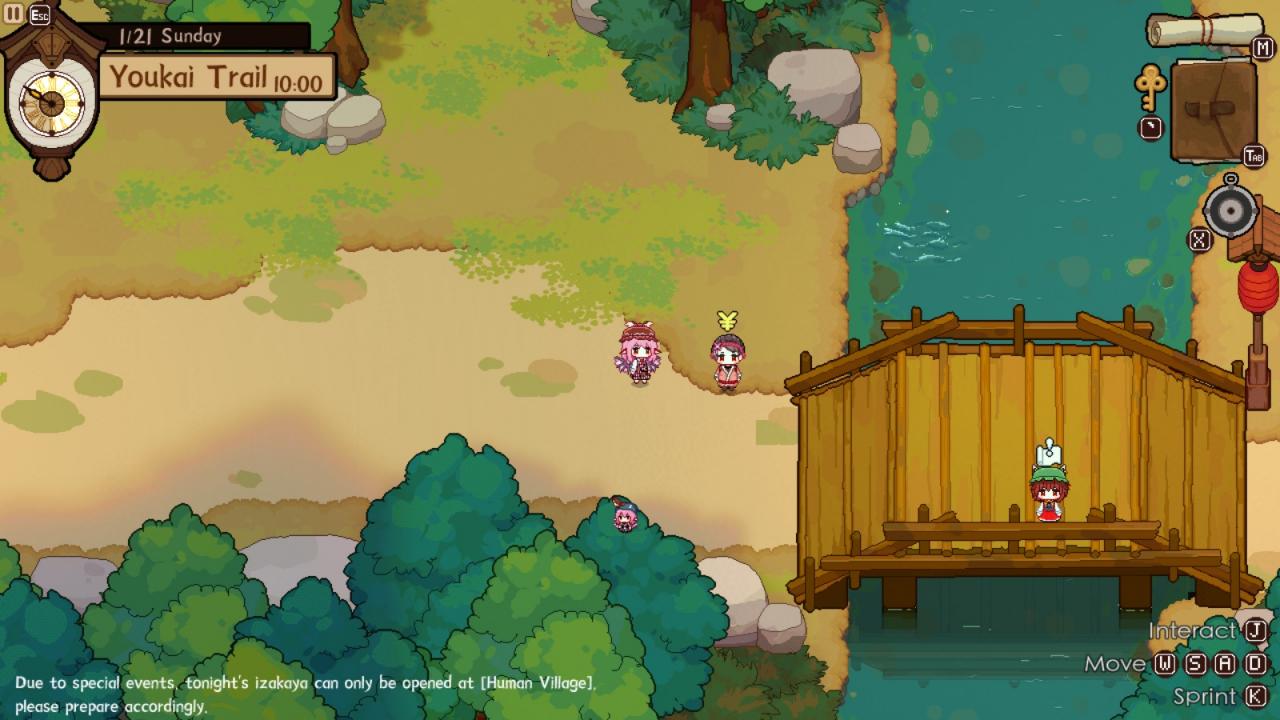
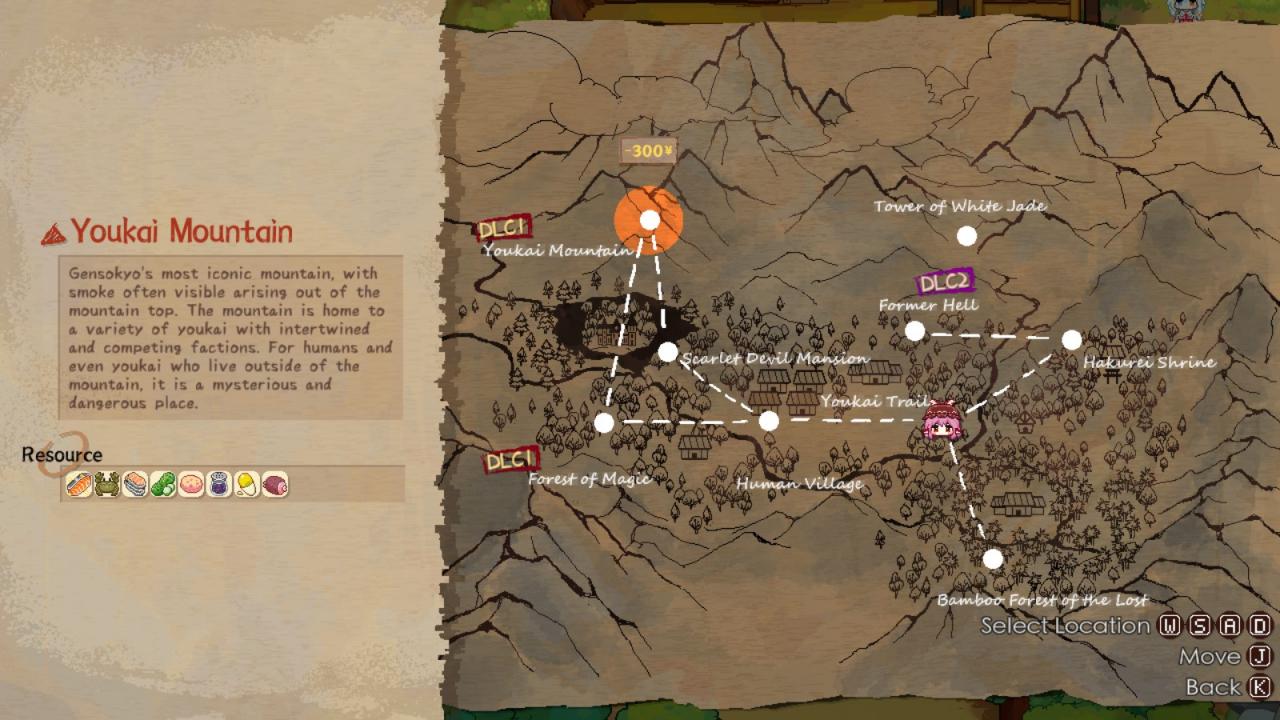
Youkai Trail
Kyouko and Mystia do a great job explaining on what gathering ingredients is like. Just in case however, important materials you’re going to want are the following:
Sparrow Sake – Found in the lower right corner of the map. Appears once in a while and gives about 5-7 on average. A 50 yen sake drink that you can use for early cash. You can’t buy or gather this anywhere else, so making sure you get these as much as possible is important. A lot of later Rare Guests like this drink as well.

Iberico Pork – Found on any of the bear trap locations on the map. They have a chance to yield the Iberico Pork, a very important rare ingredient for a lot of complex recipes later on. One of the quests later requires this, so having this is a good idea.

Lamprey– Found at the river ingredient spots around 1:30 PM ish until 6 PM. Many of the guests at Youkai Trail love lamprey, so this will be one of your pricier recipes that will sell like hot cakes. Making sure you’re full up on this will make your life easier until you transition out of Lamprey recipes to other areas. It also is the only ingredient that gives the “signature” tag, so having a good stock of these isn’t a bad idea later on.
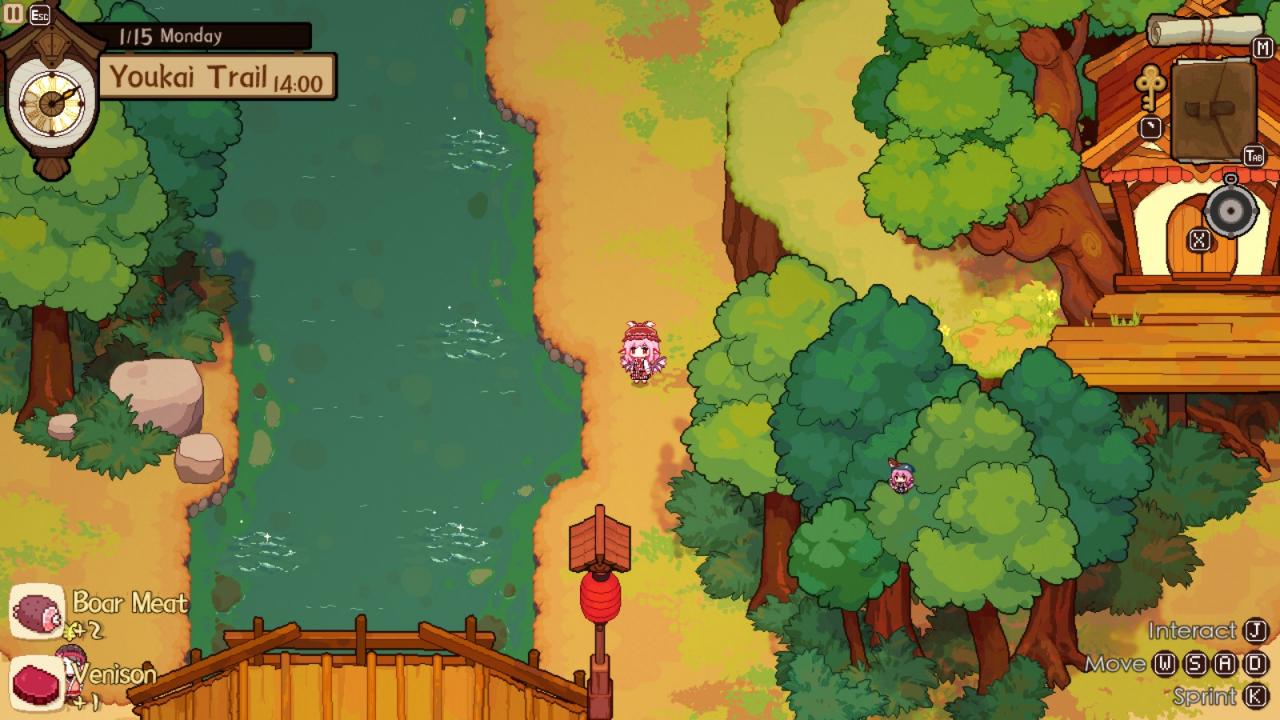
Trout– Found at the river along with lampreys at the same time. You’ll naturally get these while looking for lampreys. These are primarily for Chen’s recipes and orders. Early on, this is a solid ingredient that you’ll want quite a few to help keep up with these orders as you don’t want to be selling Miso Soup and Rice balls forever for a piddly 6 and 8 buckaroos.
Honey – VERY common ingredient needed for lots of recipes later. Also used currently to fulfill both Wriggle’s and Chen’s preferences.
Primarily, the Lamprey, Sparrow Sake, and Lamprey/Trout ingredients are time locked, so you’re going to want to gather these when you can. Dew can also only be gathered in the morning, but isn’t necessary in the early game, so you can skip this if you’d like.
There’s only one merchant here and as Mystia says, he’s pretty much a scam, but he is the only way you will have the drinks necessary for rare guests like Wriggle and T-Poser Rumia. His other ingredients are helpful overall to fulfilling many of their tags, such as his meats and his eggs. Tofu is a very important ingredient later on towards the next area, so if you can afford, grab it. If you want to be stingier, buy only the drinks and the eggs. The meat can be used for all the Rare Guest tags in Youkai Trail, but with the bear trap gathering points and Rumia’s reward Spell Card, you might be able to get away with not needing it depending on your luck.
Youkai Trail: Rare Guests
It is extremely important that you raise the bond levels for each Rare Guest/Friend here as quickly as possible. They not only provide recipes for you, which are very helpful, but also give you a reward at Level 5. Each map will always have 1 of 3 rewards. A new set of clothes, the ability to gather all ingredients on the map for you, and an item for permanent use. Once you have max hearts for a required level, that bond cannot progress without doing the requisite quest. Therefore, it is important to fulfill a Rare Guest’s quest as soon as possible so that you can continue building their bond.
Wriggle:
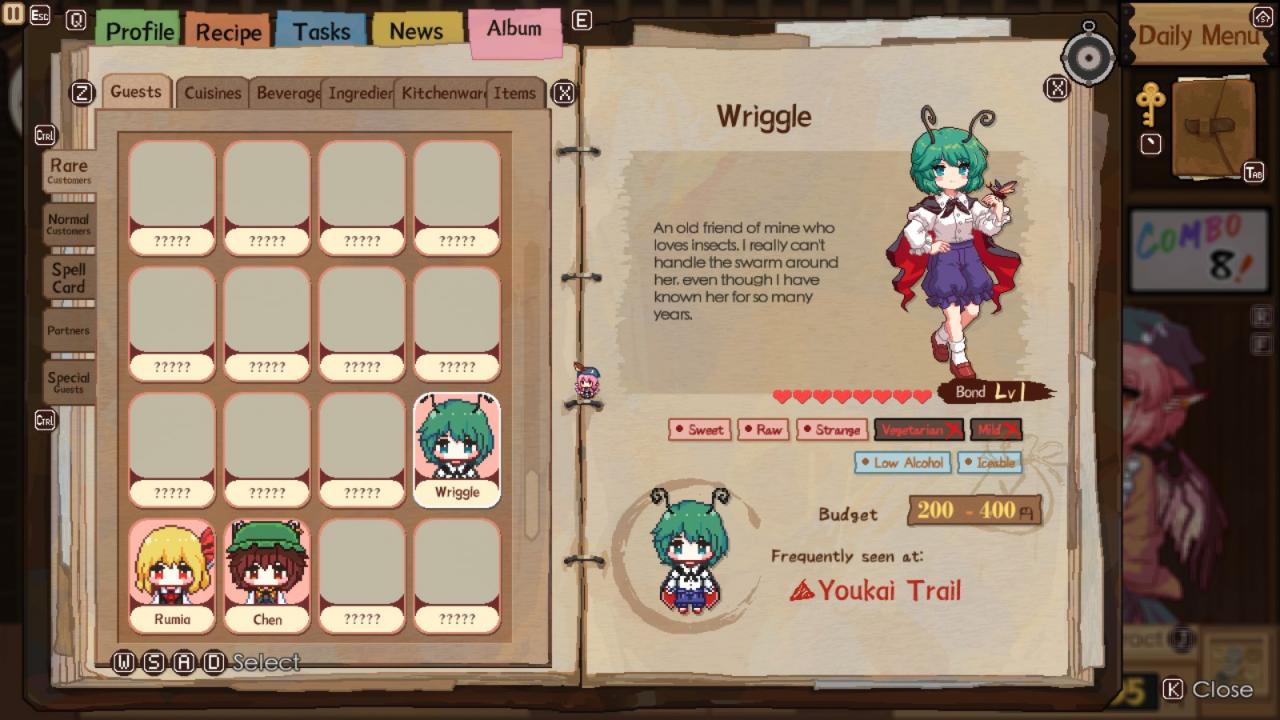
Arguably the most important Rare Guest alongside Chen. Raising her Bond to Level 5 as quick as possible is supremely helpful, as she comes with the ability gather the entirety of Youkai Trail’s ingredient spots for you all for only 30 minutes, ignoring the time requirements for ingredients spawning. The difficult portion is her Level 3-4 quest involving the Udumbara flower, a very rare ingredient. However, luckily for us, one of the sidequests for us gives us exactly 2 of them. One to turn in to her, and one to make a recipe for her when she arrives. It’s a good idea to either field the Steamer Pot on the Izakaya Night, or premake her required recipe at your house. If she doesn’t show up, reset and see if she arrives. If you happen to reach max hearts at level 3 by the end of debt day, you will be quest locked until the sidequest to get the Udumbara as a reward appears, so there’s no major rush.
T-Poser Rumia: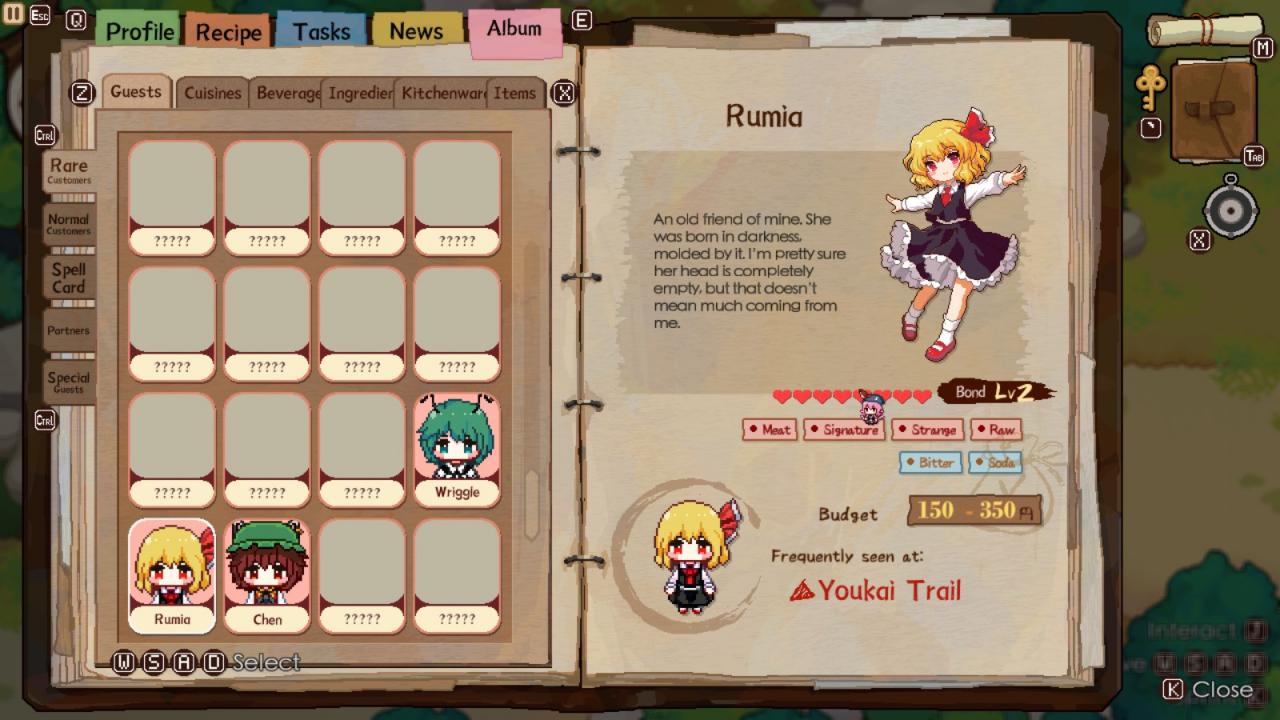
The worst Rare Guest to bond support practically speaking due to her lackluster reward, giving you new clothes. Her Spell Card reward is good at this point of the game as she gives you 3 random meats, all of which can be reused to keep earning more rewards from her. Her recipes aren’t impressive except for the Fried Lamprey recipe which is much more versatile than the grilled lampreys as you cannot add meat or fish to the grilled lampreys. Maxing out her bond level isn’t necessary unless you want the completion or achievement. Rumia will also give you the Stinky Tofu and Imitation Bear Paw recipe, both underwhelming recipes which aren’t worth making at this point in time, due to how rare the ingredients currently are. Requires 2 Iberico Porks, 2 Pufferfish, and 2 Bamboo shoots at least at level 3-4.
Chen:
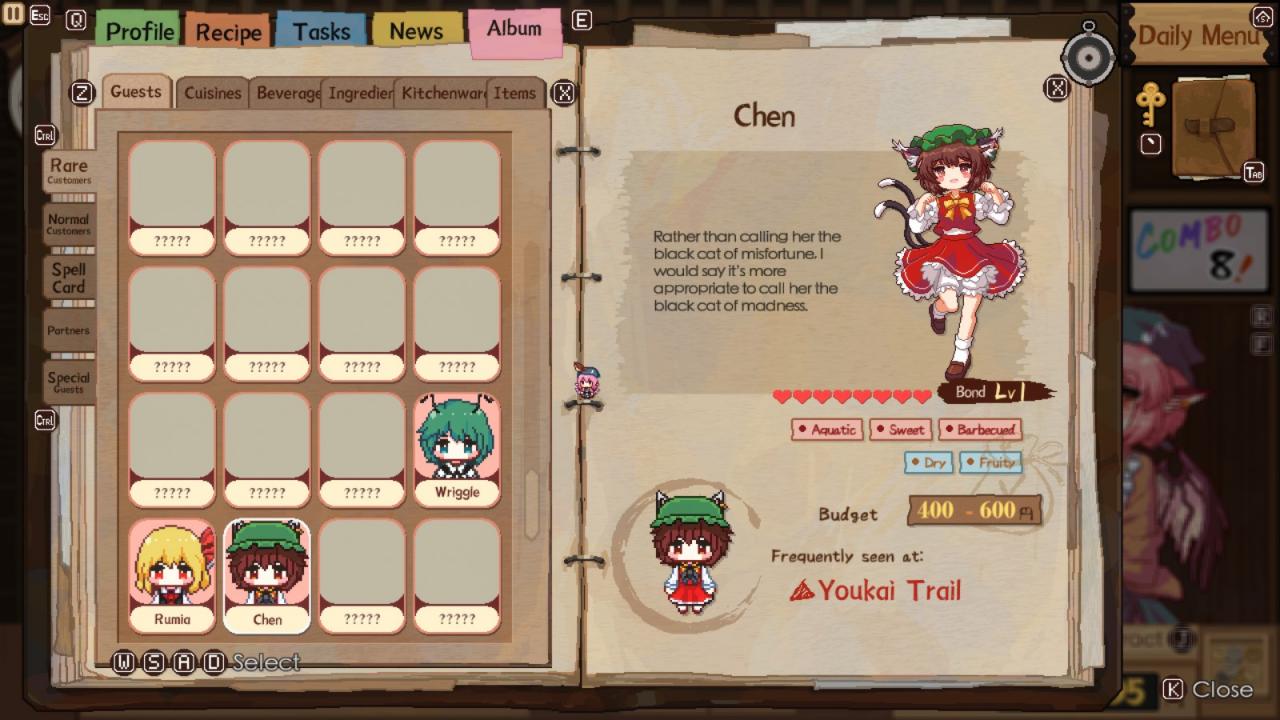
One of the most important Rare Guests alongside Wriggle at Youkai Trail. At level 5, she gives you an item for your Izakaya that boosts your tips received by 5%. This doesn’t sound like a lot initially, but will scale pretty heavily once you are able to serve guests quickly with Hyper mode. Her tags are easy to fulfill, and her budget is way higher than Wriggle and Rumia. Her spell card gives you more fish to use, which is easy access to her Spell Card to loop. Her recipes involve more fish and pork, which can easily be used for again, making Chen relatively easy to max out so long as RNG is in your favor on her staying longer after meals. The Secret Dried Fish Crisps is also a very popular recipe both in Youkai Trail and in the human village later. You’ll also get the Pork and Trout skewer, a decent recipe albeit rather costly on ingredients at this current point. Lastly, you’ll get the Power Soup, a rather good and easy recipe to make for later Rare Guests.
Overall: If you had to pick someone to max first, even if it’s determined heavily by RNG sometimes, pick Wriggle as you can easily invite Chen to the next “area” Izakaya to finish maxing her. That way, you don’t have to spend as long gathering ingredients as Wriggle will do that for you. Later on especially, time is going to be the most valuable resource for you and not necessarily the money other than buying ingredients and not having your kneecaps broken from Chen.
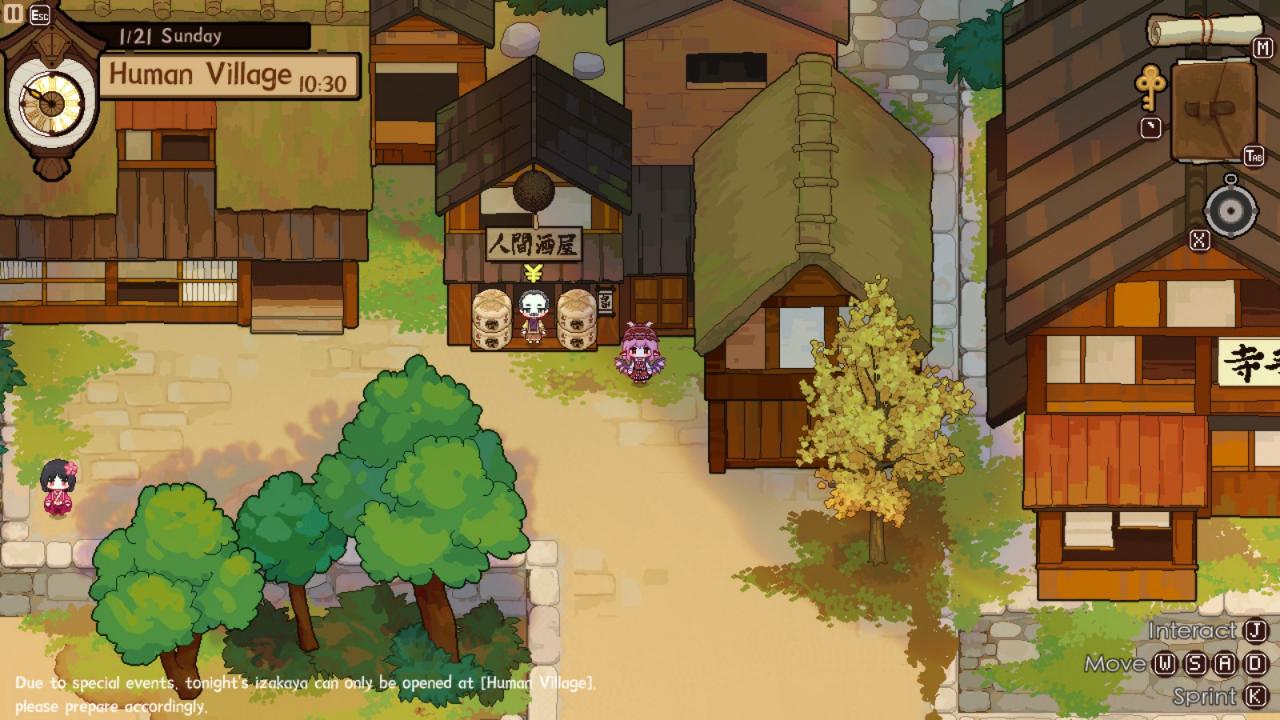
Human Village
Note: It is highly recommended that you upgrade the Human Village Izakaya to level 2 as soon as possible, or you will not make the income required to prevent your kneecaps from being destroyed, as well as pay for ingredients.
Ginkgo Nut – Found at the tree with golden/yellow leaves in the Northwest. You’ll likely only get 2 or 4. This won’t do much for now, but is used for one of Keine’s recipes later, as well as several recipes in the future.
Tuna – Found at the Northwest at the river. This is still a rare ingredient though it’s not classified as one. This will be used often later, but you don’t need to grab it now if you don’t want to.
Ringo
Sells the Lunar Dango and Ramune. None of these are useful for now except for the Ramune. You might want a few Ramune, but the Lunar Dango is overpriced and not worth buying as you can’t even make it, and it will go bad at the end of the day. Keep a note of this however, as it is an important quest item in the future.
Seiren
Sells Mochi, Milk and Grapefruit Juice. The mochi is completely useless at the moment as you can’t even make it and it will go bad at the end of the day. The other drinks are cheap and more important. Milk will be one of your first “Neat” drinks that Kasen requests every once in a while. This will at least catch one of her beverage preferences.
Farmer
Sells incredibly cheap vegetables, meat, and tofu. Highly recommended to just buy out his stock nearly every day as his rates are a bargain compared to the scam merchant at Youkai Trail. If not, at least get the tofu and chili regularly.
Alcohol Guy
Sells the ZUN Beer, Umeshu, Sangetsusei, and Mio. The ZUN beer isn’t very popular with guests and its sole use is just to satisfy Rinnosuke if he shows up at your Izakaya. Everything else is worthy buying, even if they are pricier. All three are still used for regular guests and Rare Guests like Keine who can frequently ask for a Liquor beverage, which you won’t have unless you buy the Umeshu or Sangetsusei.
Rinnosuke
Sells completely random ingredients on a day-to-day basis which you likely won’t buy. However, he sells upgraded and extra kitchenware to use, including the very important Night Sparrow Kitchenware, an incredible tool to begin efficiently Bond farming. This is a good point in time to begin upgrading your kitchenware, but wait until you are able to activate his Reward Spell Card to receive a 30% discount on his prices, then buy any upgrades you’d like the next day. The extra Kitchenware requires a different kind of currency received from sidequests and do not need money.
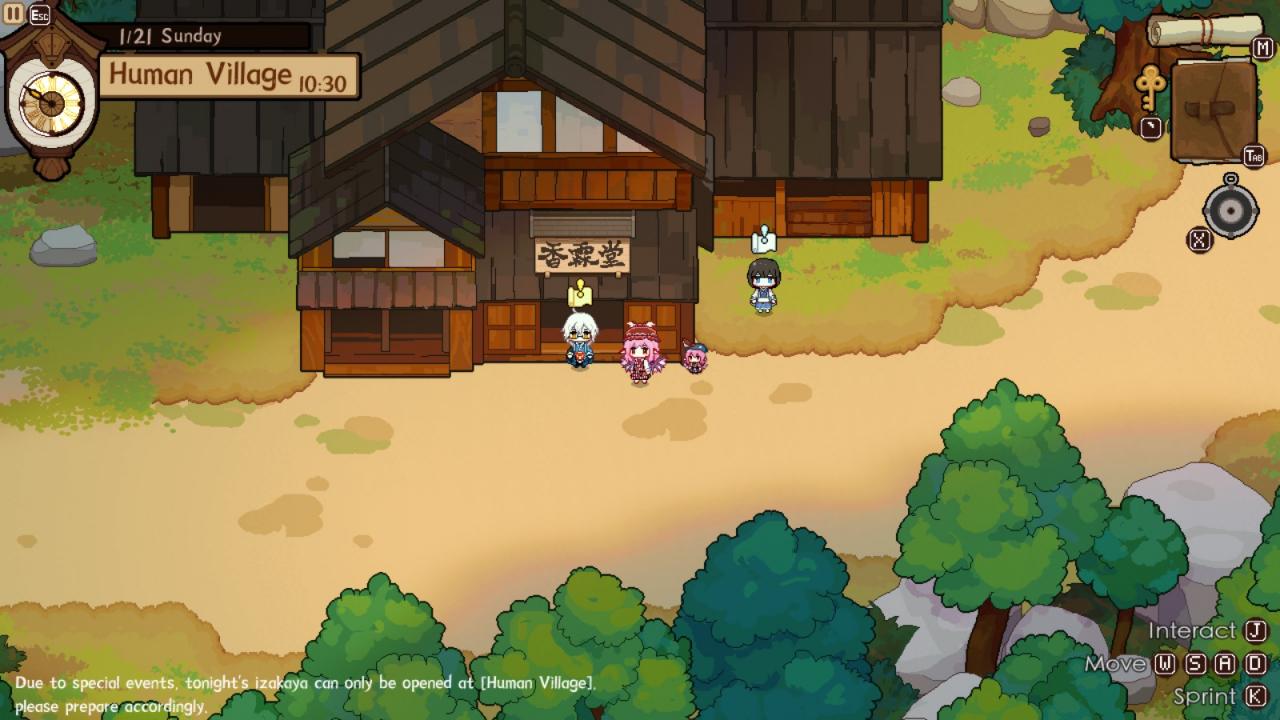
Human Village: Rare Guests
At this point in time, you should be either level 3 or on the verge of level 4 for most of your bonds with Rumia, Wriggle, and Chen. If not, you can invite them to your Human Village Izakaya and they’ll have a good chance at coming. Continue finishing any quests you have for them ASAP.
Hieda no Akyuu:
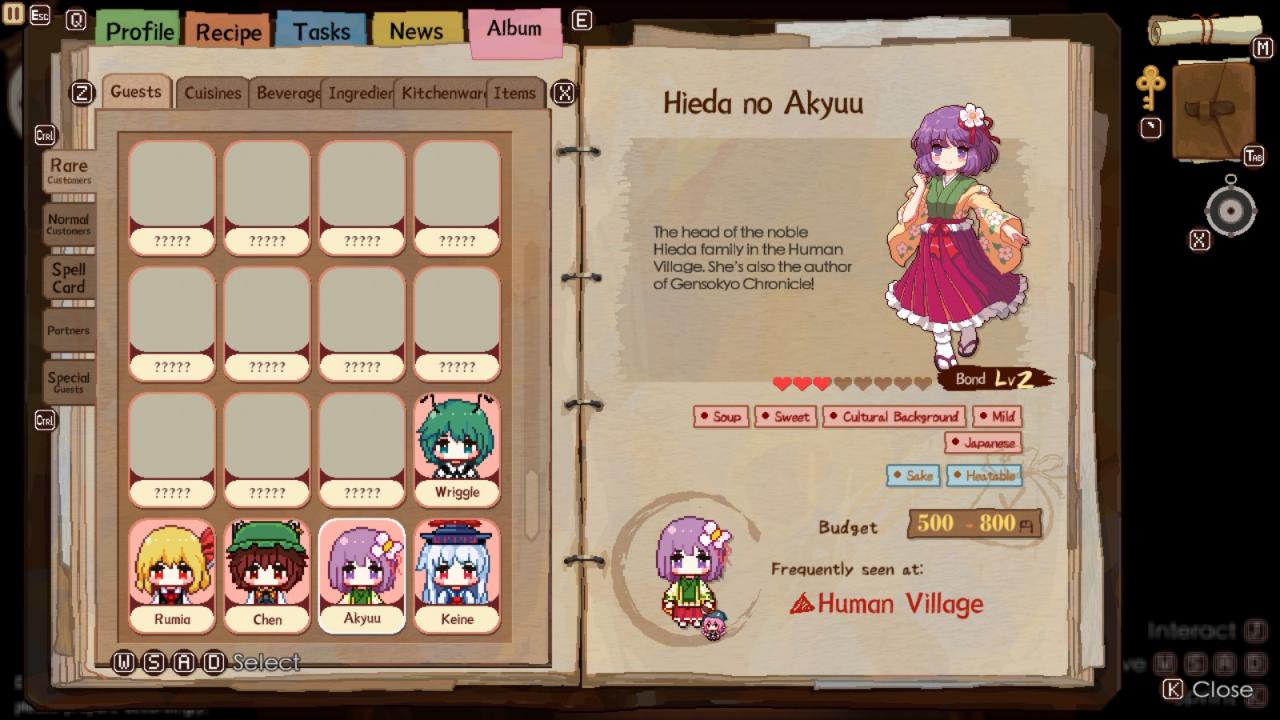
A very important Rare Guest. Akyuu is the equivalent to Wriggle, in that at a level 5 bond, she will gather all ingredients in the Human Village for you, regardless of the cooldown timer. It is important to reach a level 2 bond with Akyuu ASAP, as she will give you the incredibly busted “Miso Tofu” recipe. The Miso Tofu recipe fulfills EVERY Rare Guests’ order in the Human Village either by default or with one extra ingredient, so long as you are in Hyper Mode and use the Night Sparrow Kitchenware, with the exception of Rinnosuke who’s even easier to satisfy. Not only that, Miso Tofu is an incredibly popular recipe for the regular guests, and is an excellent recipe to transition to from Lamprey recipes. You also get the Vegetable Salad, a pretty costly, but very effective and easy item to make. The ingredients to make it are extremely easy and net you a ton of money, especially in the Human Village. Lastly, you’ll get the Falling Blossoms, an expensive sushi for this point in the game. However, to progress Akyuu from level 3 to 4, she requires at least 1 Premium Tuna, which you cannot buy at this point. You’ll need to get Chen to give it to you via her spell card unfortunately, which requires RNG. Akyuu’s Spell Card gives you an item that you need 3 of to exchange for a continuous quest for rare ingredients and drinks.
Keine Kamishirasawa: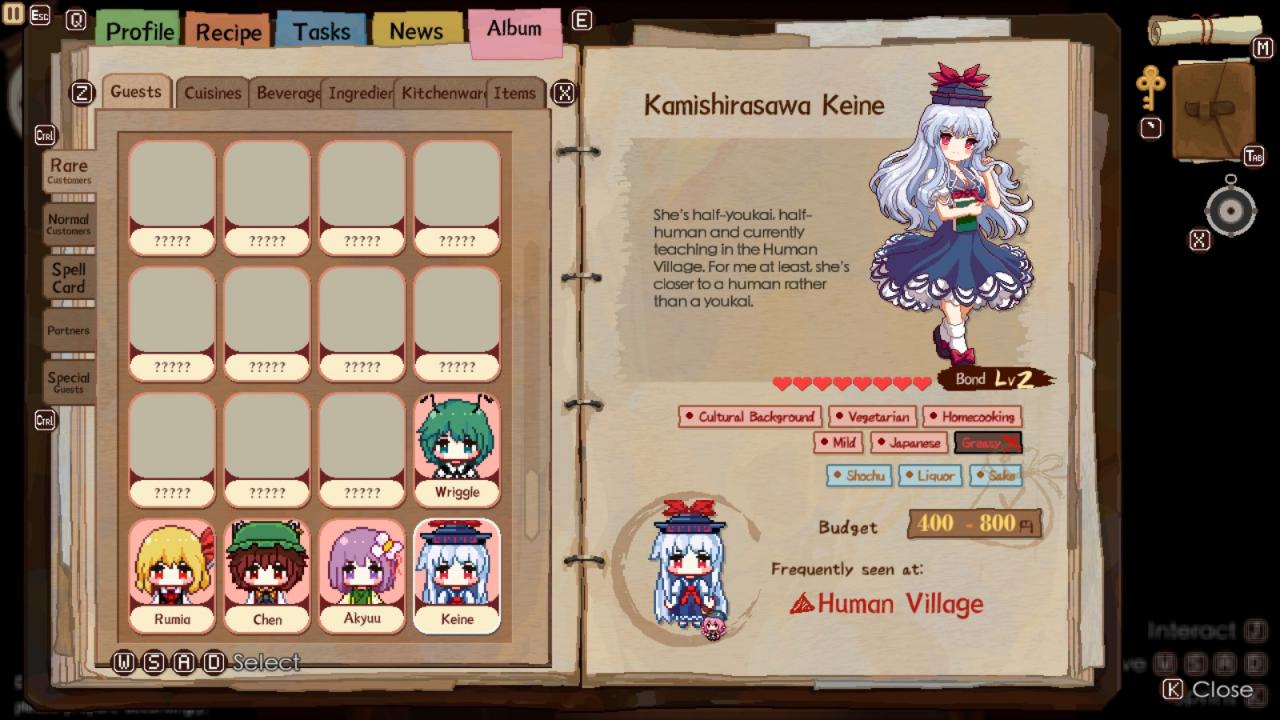
Much like Rumia, not as useful as the others at the end. Her level 5 bond reward is a new set of clothes, though her recipes aren’t too bad. The Shirayuki is a decent recipe for a later certain guest, though it has the requirement of needing a Pufferfish, a rather rare ingredient currently. You can get it from the sidequest of the Rich Merchant’s Daughter, though the rewards are fairly random, or have Chen give it to you via spell card. The Deep Fried Tofu recipe is easily retrieved at level 2, a recipe that Marisa loves and can be spammed along with any fungus ingredient tag whenever she shows up. Scholar’s Gingko is also decent, but the gingko nut ingredient is rather difficult to come by at the moment with a high respawn timer. Keine is easily satisfied with Miso Tofu, though you could be unlucky and have her ask for a Cultural Background or Chinese preference. In which case, use the Night Sparrow Kitchenware to avoid these, as other than the Stinky Tofu recipe from Rumia, you’re not likely to have any recipes with this tag until progressing. Her Reward Spell Card is complete RNG on whether it will be beneficial for you, or be completely useless.
Kasen Ibaraki:
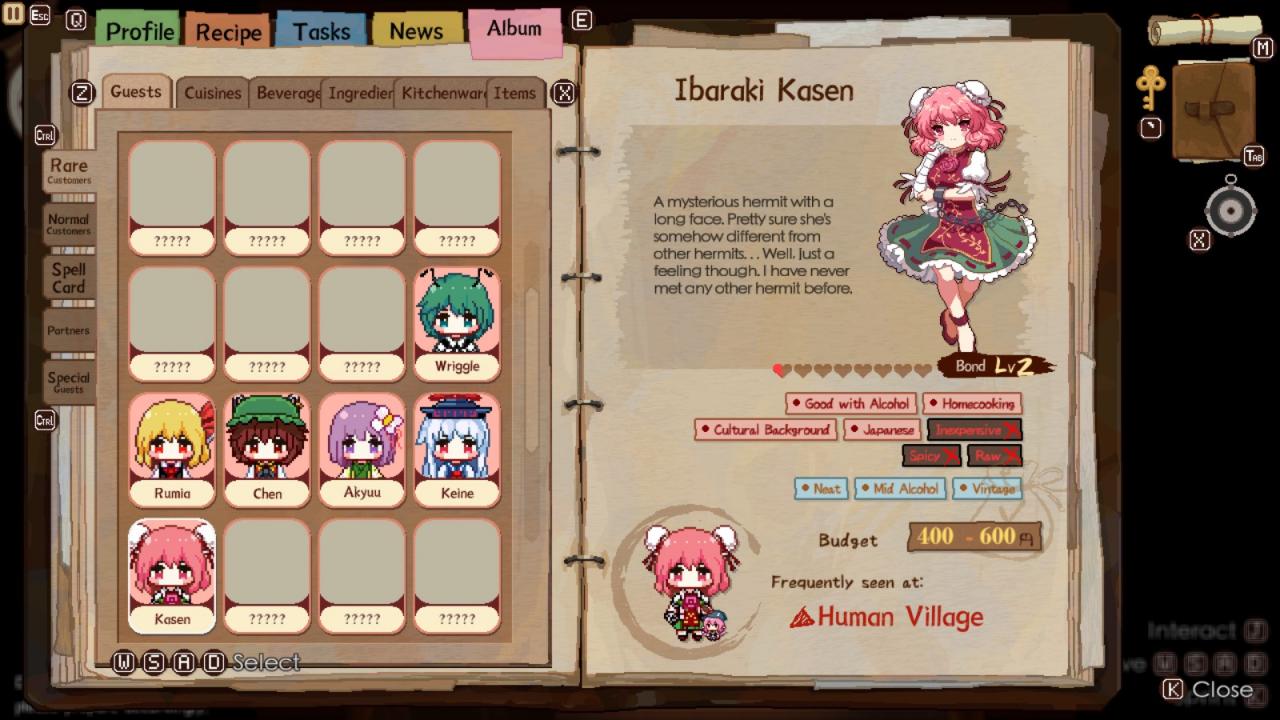
Kasen’s recipes aren’t very impressive, as they use the same materials as the already overpowered Miso Tofu. However, she gives an incredibly powerful item at level 5 bond that increases Guest Satisfaction by about one bar so long as the guest finishes a cuisine, increasing your overall tips. She’s easy to satisfy once you get access to Akyuu’s Miso Tofu, and her reward Spell Card makes it easy to farm money. Her Spell Card also stacks, meaning it lasts longer if you can continue satisfying her requests. You also get the Beef Bowl, a decent recipe. Lastly, you will get the Hunter’s Casserole which also isn’t very useful. It uses the Iberico Pork, but there’s much better recipes to use and is not very cost effective for the materials provided.
Rinnosuke Morichika: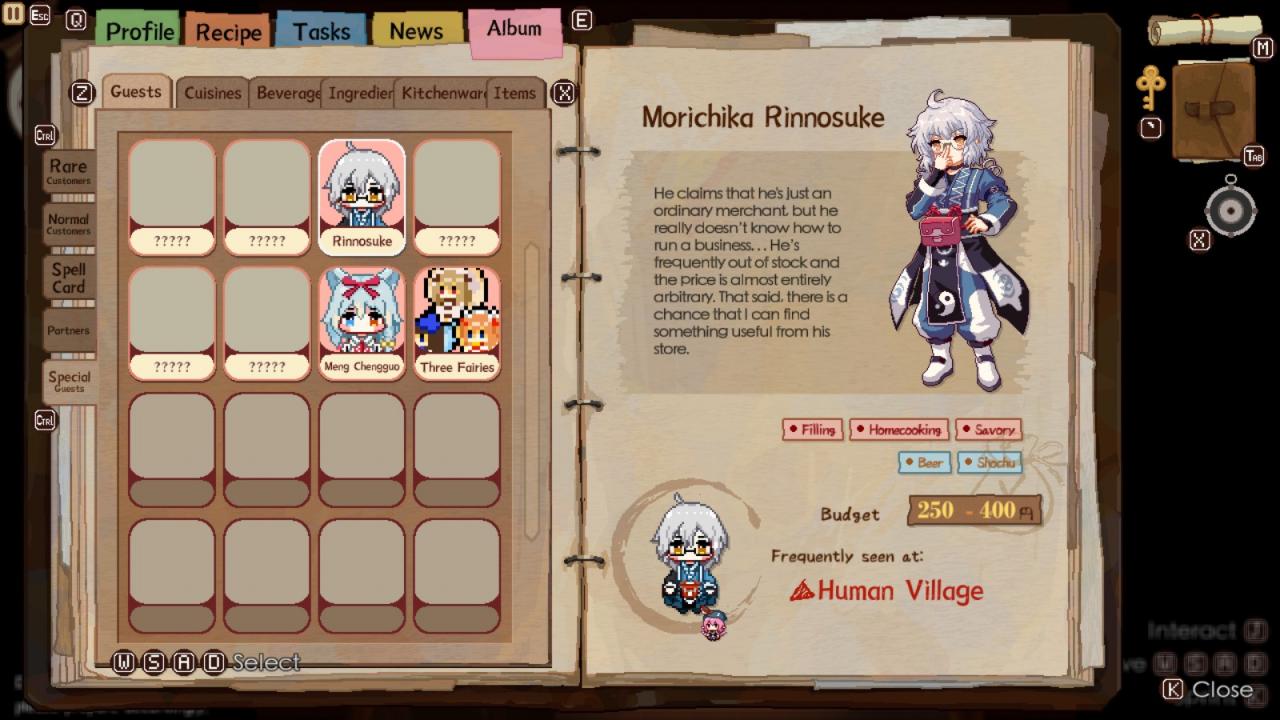
You’re unable to level Rinnosuke’s bond levels. However, Special Guests like Rinnosuke still come with both Reward and Punishment Spell Cards. Rinnosuke’s Reward Spell Card currently is extremely useful at this point in the game, as he begins selling you upgrades to your base kitchenware equipment. His Reward Spell Card gives you a 30% discount to all his wares the following day. Take advantage of this to buy his upgrades, as they are pretty costly otherwise. If you’re short on money, the Pot, Pan, and Cutting Boards are generally excellent upgrades which will see the most use with the Steamer and Grill not seeing as much use with recipes except rare ones. You can always come back when you have the funds to spare to buy it later. Rinnosuke is the easiest to satisfy, simply requiring a Rice Ball recipe with an extra seaweed for a full positive review. He is also the only named character who would like a Beer Beverage for some reason, unlike the rest of Gensokyo.
Overall: This section of the game can be easygoing with the right conditions. Kasen’s and Keine’s spell card can net you a ton of money if you happen to be pretty lucky. Miso Tofu and the Vegetable Salad recipes are high demand recipes from regular guests, and will be easy to make given the merchants and ingredient gathering. Again, if you haven’t finished maxing Wriggle or Chen yet, it’s a good idea to do so by inviting them to the Human Village Izakaya. It’s not a guaranteed 100% they’ll come, but it’s important so you don’t have to go back to the Youkai Trail Izakaya. Make sure that you upgrade the Human Village Izakaya to level 2 ASAP so that you can field more Kitchenware, otherwise it’s not worth going there until you’re able to upgrade it.
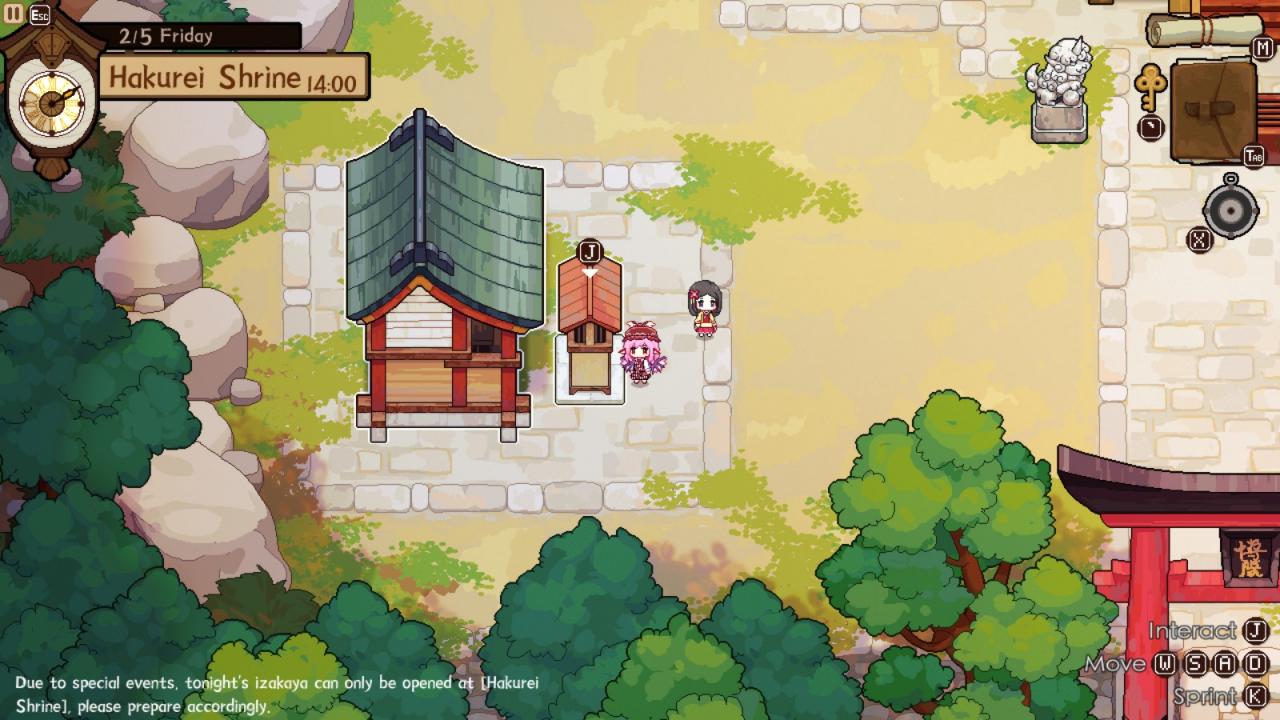
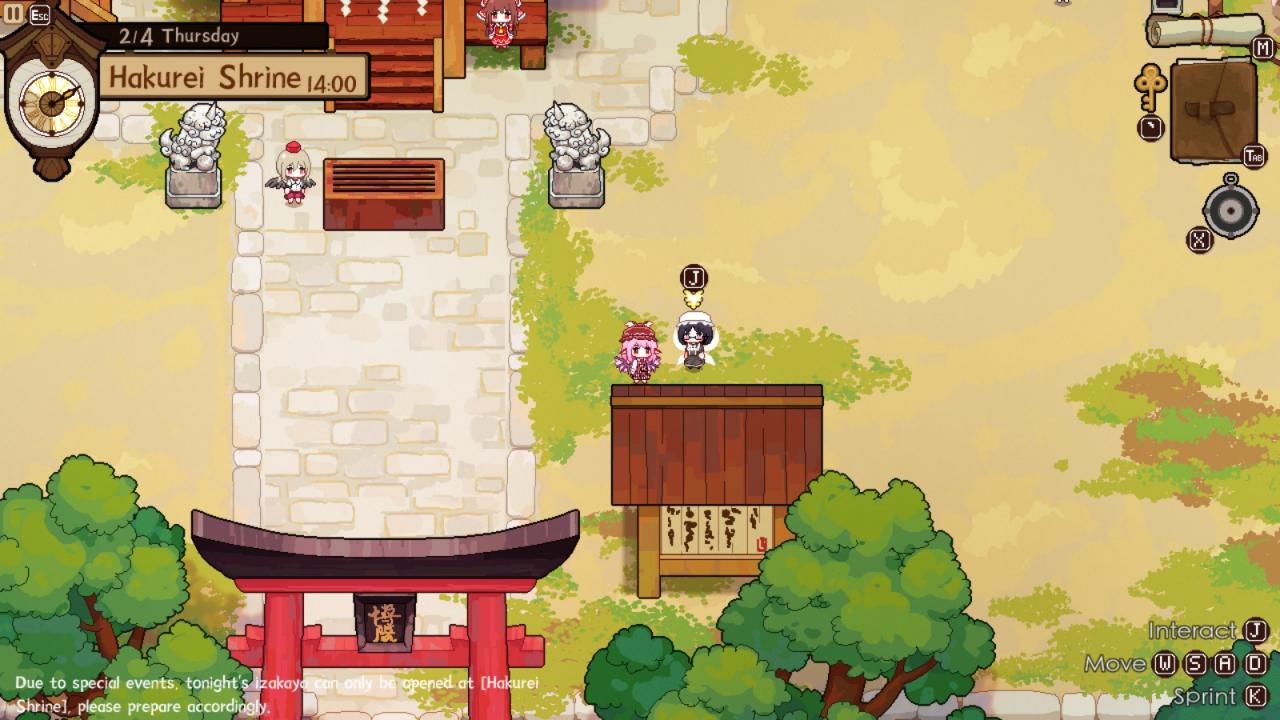
Hakurei Shrine
Reimu is all for it though as your next destination is going to be her shrine. We’re beginning to enter the mid-game and we’re going to start having access to the rare materials via merchants. If you were unable to complete any of the Human Villages’ Rare Guests, you can still invite them to the Hakurei Shrine to finish up. The initial days at the Hakurei Shrine will be mandatory and you won’t be able to upgrade the Hakurei Shrine Izakaya Cart to Cabin level until after the 1st day. It is a very good idea to upgrade to the Cabin Level (2nd level) as soon as you can since like before, you will have mandatory days.
After a couple days at the Hakurei Shrine, you will be able to donate to Reimu via the donation box. 200 is the minimum you can donate and gets you nothing. 500 will activate her Reward spell card at the beginning of an Izakaya night and 1000 activates her spell card, along with giving you a buff that reduces the cooking time of inexpensive items to 0.8 seconds.
Additionally, the shrine on the lower left will begin yielding Silver Froggy Coins. Furthermore, it has a chance of giving you 1 of 4 things. It will always give you a coin, along with random food, the Wind Priestess beverage, an extra coin, or some money. The Silver Froggy Coins are required to exchange for some of the DLC music, as well as extra costumes from Rinnosuke’s store. You can only use the lower shrine 4 times per day and each time uses 30 minutes, so keep that in mind.
At the end of the Human Village arc, you will receive a new partner, Kosuzu Motoori. This is likely a good time to talk about the various partners you will receive throughout your gameplay. The Partner System is meant to help ease your day-to-day gameplay so you aren’t as stressed trying to do everything yourself. These come into three roles: Drink Server, Assistant Cook, and Waitress. By default, Kyouko will automatically serve drinks to the guests, though you could have changed that earlier if you had liked. From general experience, assistant cook is typically the worst as partners who do this will only cook the food instead of serving it directly. Additionally, there’s the distinct possibility that they’ll be using the kitchenware you intended to use, or a recipe you intended to make. Keep in mind that Partners can never handle Rare Guests, so you still need to take care of those yourself.
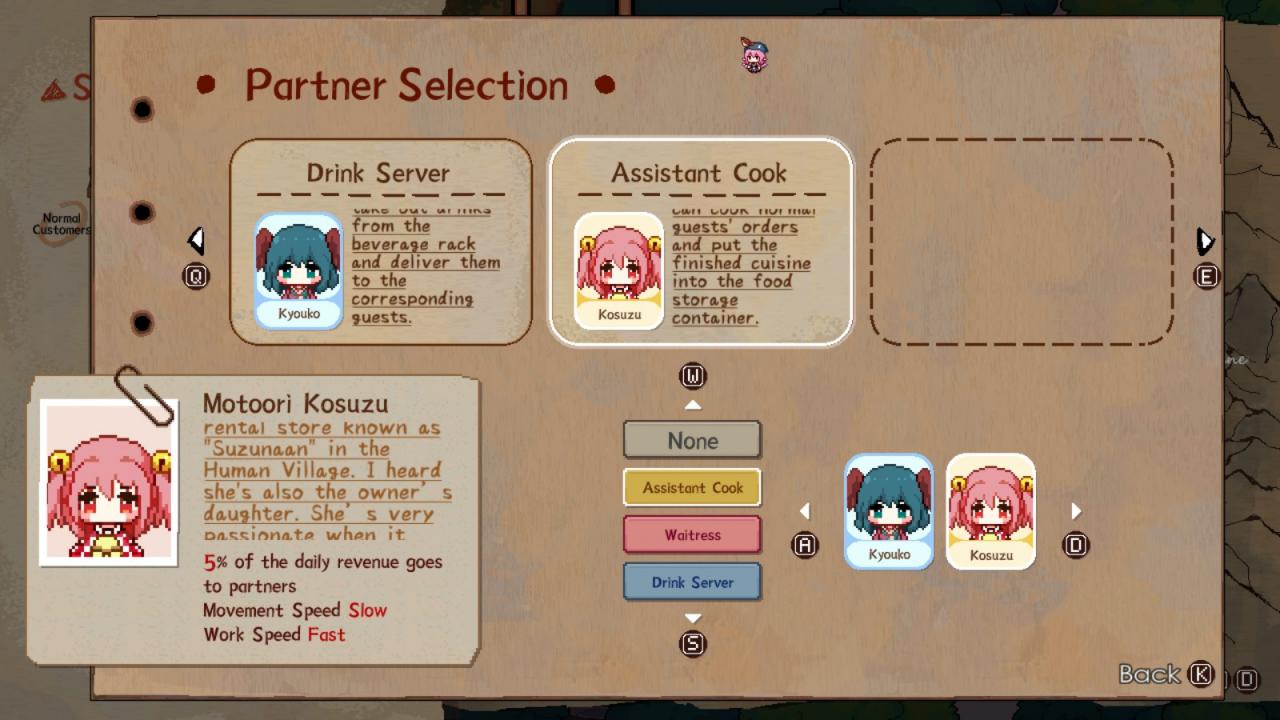
Work speed is how fast it takes for a partner to cook something while movement speed is how fast they move. The difference between fast and medium is drastic, as Kyouko cannot feasibly serve a whole order of drinks herself with a full Izakaya, so higher movement speed is valuable. Partners also typically take 5% of your income, up to 10% for certain others, so if you’re a big spender, be careful. Assistant cooks lower your chances of entering Hyper Mode as well, seeing as they’re handling cooking duties rather than you doing most of it. Waitress has a partner take a stored food to take to a designated order listed. Waitress can be trivialized from the Toss Serving buff from the minigame.
TL:DR: If you wanted to play efficiently, you can ignore the Partner System and just field Kyouko to help you as it does drain your funds using it. If you like it or feel lazy, go ahead and use it as the game can play itself primarily except for Rare Guests.
Peach – This is the only fruit you will have access to at the moment, so picking up as many of these as possible is a good idea. You will also need these for some of Tenshi’s recipes.
Mushroom – Other than DLC 1, this is the only area where you can get mushrooms for a while. There’s a future area that yields mushrooms, but waiting that long isn’t a good idea.
Fairy Maid selling Leftovers
Sells rare materials to you for a high discount. It’s a pretty good idea to buy this merchant out as this is the cheapest you will reliably get rare materials at a low price. If it’s too costly, you can be stingy if need be. It’s a good idea to keep a good stock as later and even the current area will begin requiring rare ingredients such as the Iberico Pork.
Kappa Selling Tea Merchant
Currently, this will be the only merchant to sell you a High Alcohol Beverage, the Tengu Tango until you reach later areas. She won’t appear for a couple days however, and she requires a very easy sidequest to finish. It is a very good idea to stock up on Tengu Tangos as she typically doesn’t have very many of them, but several of your Rare Guests will begin wanting High Alcohol drinks such as Suika. The Divine Wheat Beverage is also cost effective as guests typically like this drink.
Hakurei Shrine: Rare Guests
Similarly to before, it is important that you try and max Akyuu and Kasen here if you haven’t finished them yet, as they will save you a lot of time in the future.
Reimu Hakurei:
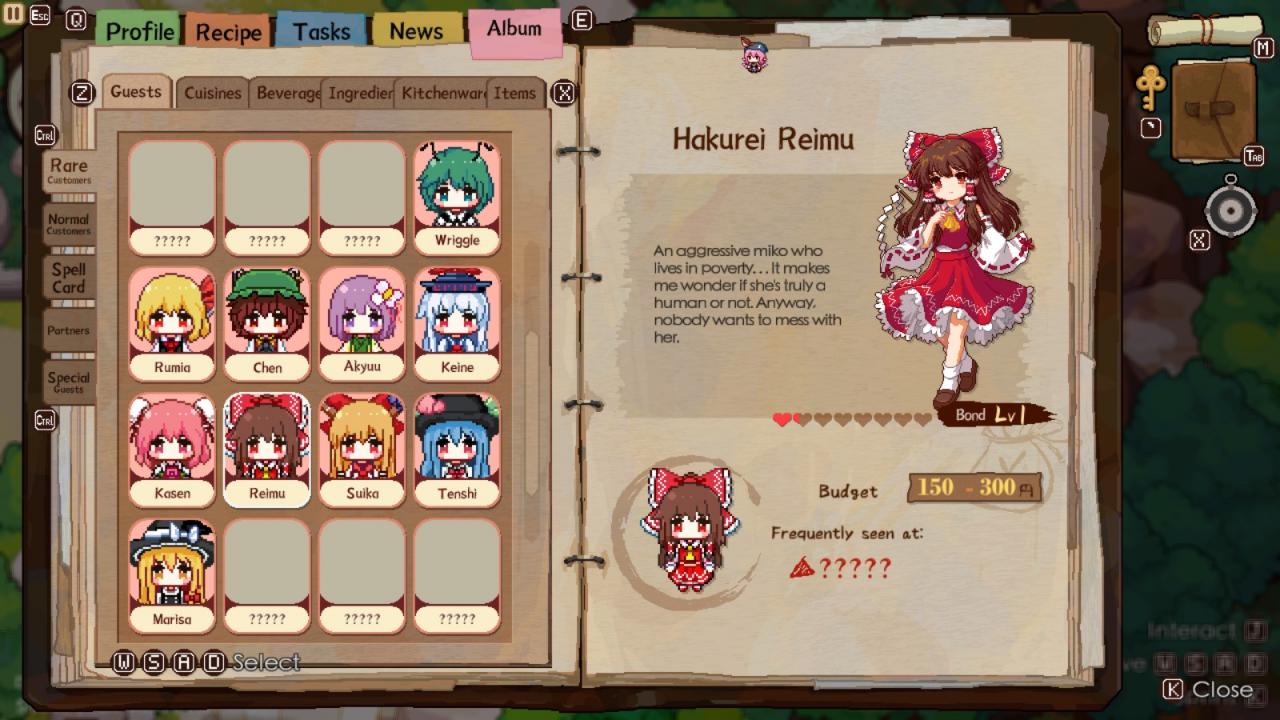
Reimu is the equivalent of Keine and Rumia in that all she will give you are clothes. Her recipes aren’t bad and sell decently, though most of them use at least 3 or more ingredients. You will get the Pink Rice Ball, Hodgepodge, and Daimyo’s Feast from Reimu. The only one that’s not even remotely worth making is the Daimyo’s Feast as the ingredients it uses are not only tough to get, but not worth the price. Reimu’s tags aren’t too hard to fulfill, unless she asks for something with premium in it. Her budget is also low, as expected of an impoverished shrine maiden. Still, you want to trigger Reimu’s Reward Spell Card as often as possible, especially once reaching the Hakurei Shrine. Why will be discussed in a moment. Reimu’s preferences are easy to fulfill despite her low budget. The easiest way to trigger her max satisfaction is to use the Night Sparrow kitchenware, then make a Rice Ball with honey in it so long as she doesn’t ask for anything premium.
Tenshi Hinanawi: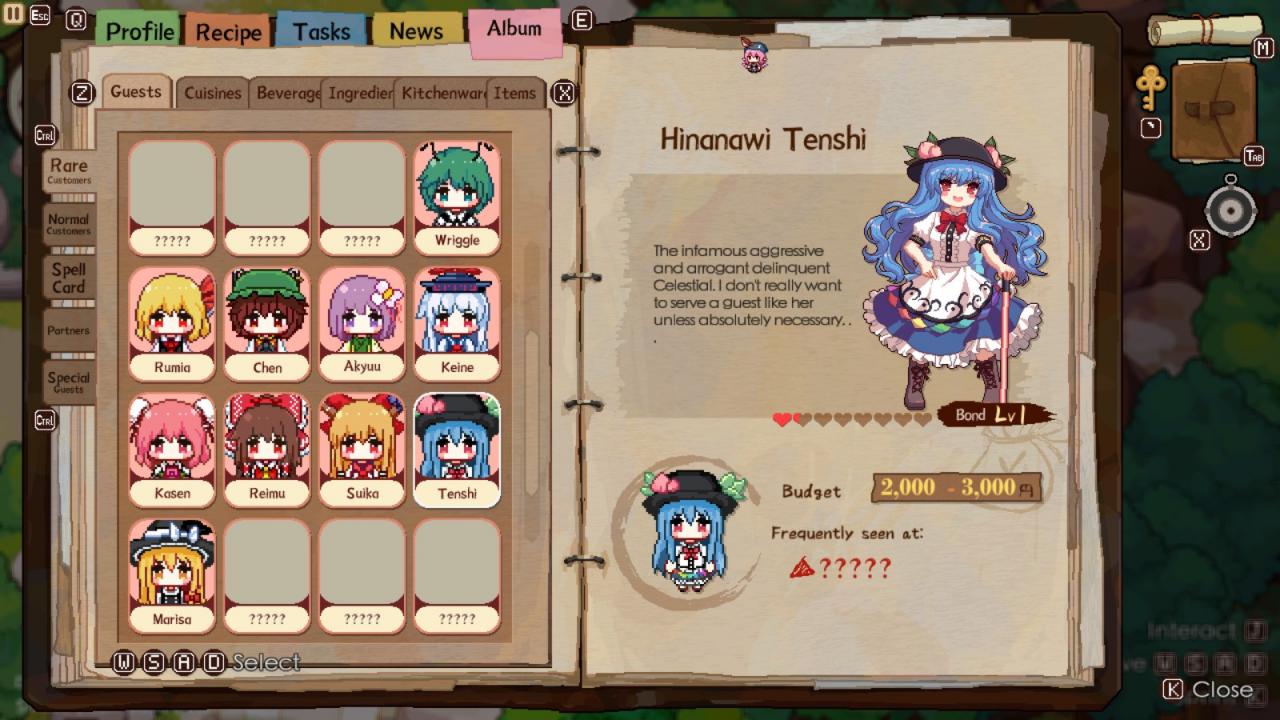
Tenshi, much like Akyuu, gives a very strong recipe at the end of her level 1 quest. For 1 radish, a very easy recipe to get, you get the Rose-Like Daikon Salad, a practically overpowered recipe at this current stage. Similarly to the Miso Tofu, this sells incredibly well, along with the vegetable salad and is very effective at fulfilling the majority of Tenshi’s preferences, outside of wanting something premium or fruit. Regardless, the Night Sparrow Kitchenware avoids direct orders, so it will always work unless the Daikon Salad gets the popular tag. Her later recipes, the Peach Tapioca and Peach and Shrimp Salad also fulfill all her preferences, though the peach ingredient is a lot harder to come by as it only has one spawn point with a high respawn timer. Feel free to throw all your expensive drinks at Tenshi, as her budget is so high that you will likely never drain her funds anyway. Tenshi will give you the Fortune Peach item, an item that has a 15% chance for a customer to give a max satisfactory review, which increases your tips. Tenshi’s Reward Spell Card raises all current guests seated at the tables satisfaction to 80%, increasing your tips.
Suika Ibuki:
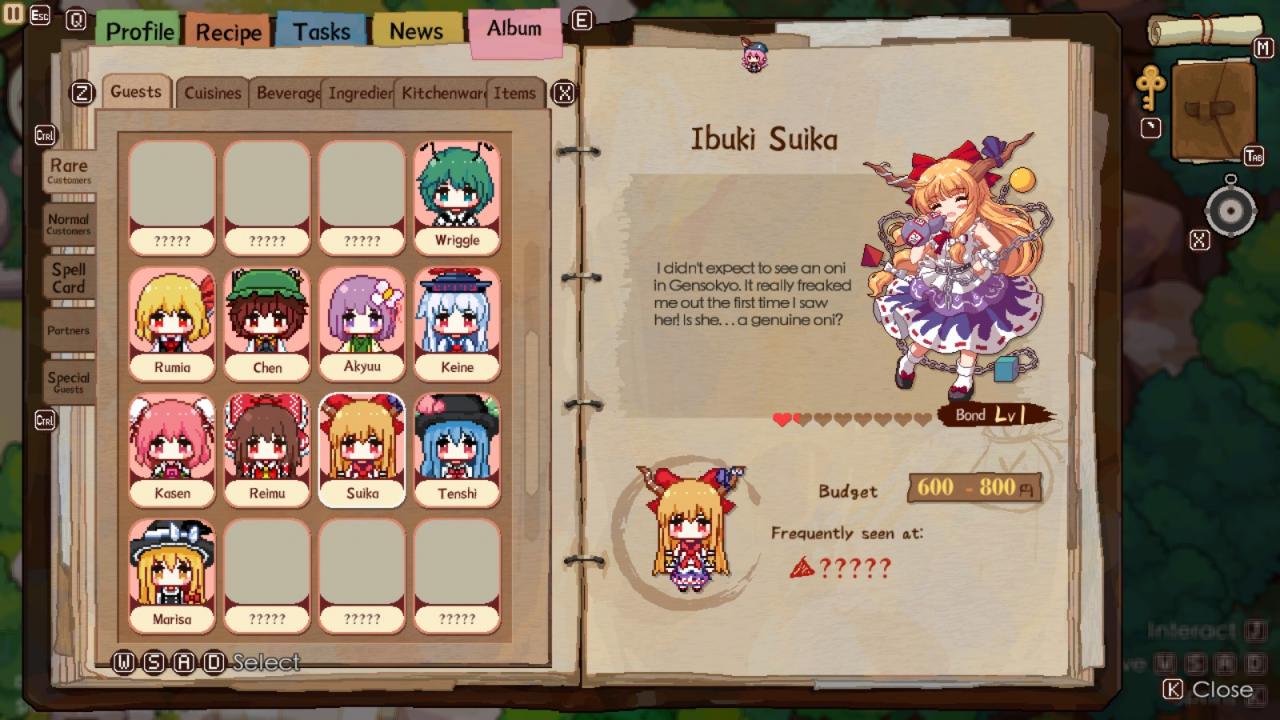
Likely your most troublesome Rare Guest other than Tewi. Suika gives recipes that range in terms of popularity, but many of them don’t even fulfill her own tags unlike Tenshi’s or Akyuu’s. Additionally, Suika tends to want Neat and High Alcohol beverages. You won’t have any High Alcohol beverages until the merchant appears to give to Suika, and the only Neat beverage you will have is Milk. You can give her Milk which will still satisfy her, so long as your cuisine fulfills the rest of her preferences. Her Reward Spell Card gives you 1-3 random Beverages ranging from Mid to High Alcohol. Suika’s Level 5 Bond will grant you access to having her gather all ingredients on the map for you, regardless of spawn times which is always useful. Suika gives you cost effective recipes, including the Fried Pork Cutlet, as well as the Energy Skewer and Niten Ichiryu. The Niten Ichiryu can be pretty popular, especially later, though it is of one of the many recipes that uses the Iberico Pork. Suika’s preferences can be tricky to manage by default, but the Night Sparrow Kitchenware proves its value again by avoiding her orders directly. Her preferences can range from Small Portion, but also Japanese, meat, Power Boosting, and Good with Alcohol. There’s no Power Boosting Recipe at this point that you can give Suika except Power Soup, but it is by no means, Japanese and Small portion at the same time.
Tewi Inaba:
The worst Rare Guest to finally begin appearing. It may be confusing why Mystia begins complaining about Tewi appearing, but the latter may not show up at all. However, Tewi’s unique mechanic is that she has a 30% chance of appearing in any of your Izakaya’s. When she is done eating, she will immediately pull up a buy list with completely overpriced, but rare ingredients. If you refuse to buy anything, she will reset your combo count and prevent you from gaining any new ones for 30 seconds, a complete detriment to your profits and tips. You can prevent this from occurring by multiple methods. The first is to have Reimu trigger her Reward Spell Card either by donation or by getting a max satisfactory review from serving her to block Tewi’s Punishment Spell Card. The second is to trigger the Infinite Patience or Hyper Mode buff to stall Tewi out if she is seated until she is the very last guest, preventing Tewi from doing any damage until the very end where you will have no guest anyway.
Note: While not a Rare Guest, one of the sidequests which requires 2 Power Soups yields the Pork Stir Fry recipe! Make sure you pick this up!
Overall, if you’re trying to do absolutely everything possible, such as donating to Reimu while getting the Silver Froggy Coins, this area can be pretty tough. However, once you get into the swing of things of how to manage your money and figure out how to prevent Tewi from affecting you overly much, you can get through this place with relative ease. The guests here don’t enjoy greasy food as much, preferring more mild or vegetable related recipes though any recipe you serve, so long as it isn’t cheap, will serve you well. If you’re beginning to struggle with money, go back to the Human Village and try to get Kasen to appear, or invite her to your current area in order to help rebuild your funds ASAP as with good RNG, she can net you over 2000-3000 yen from Guests.
Tips & Tricks 1
As the technique says, you attempt to enter Hyper Mode as soon as possible. You essentially use any of the current kitchenware you’re fielding to make the cheapest recipe possible, such as a Miso Soup or a Rice Ball, then playing the “Song of the Night Sparrow” minigame in hopes of getting all 3 buffs through repeated play. You can also use recipes you’re currently fielding for the night, then store the food for later to throw at customers/guests when they ask for it.
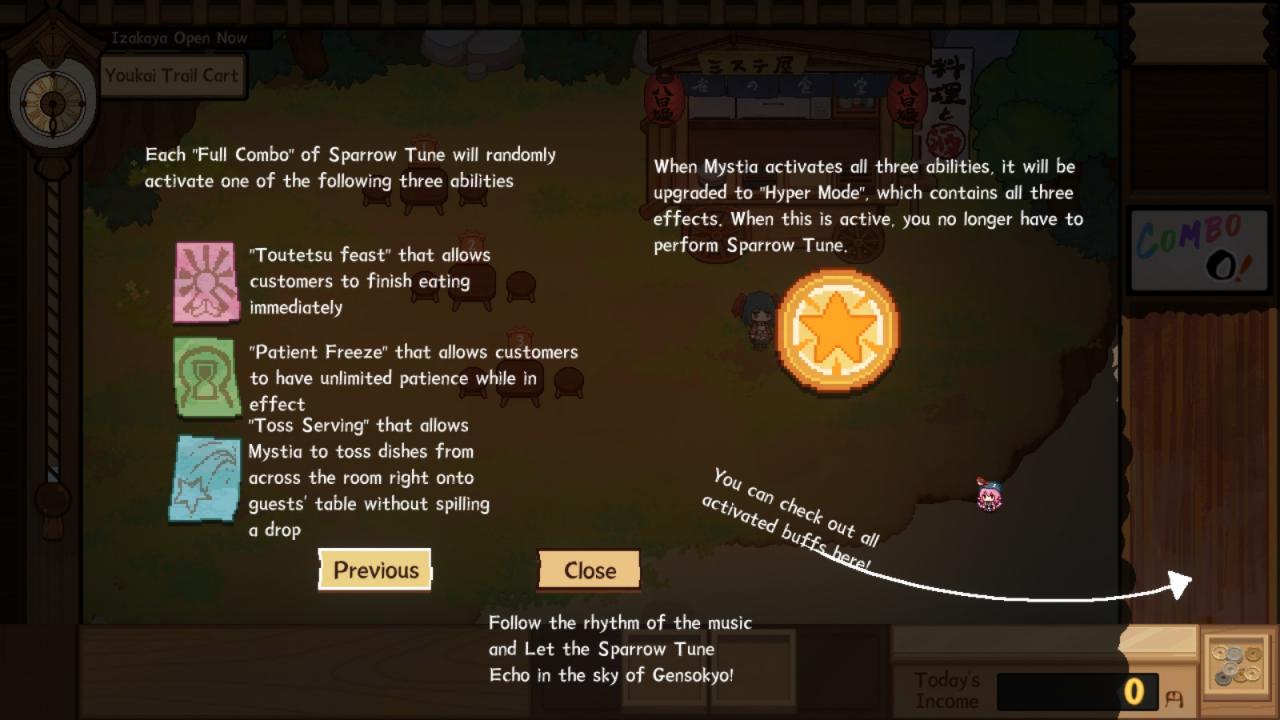
- This technique allows you to enter Hyper Mode as fast as possible to not waste any time having to bring orders to any guests. With this, you won’t need any help bringing anything to guests. You can still use Kyouko to bring drinks to guests so you can focus solely on cooking and throwing food at them if you’d like. This works with drinks as well, so if there is a long list of orders, you can help Kyouko out by throwing drinks at guests she’s not currently taking.
- You can do this incredibly early, though your chances of getting a buff through the “Song of the Night Sparrow” minigame are initially low at 15%. It’s not as useful early, but will quickly gain viability and usefulness as you level. As you level up, this will increase upwards to a maximum of 80%.
- On any “Boss Battle,” going quickly is essential to winning. If you waste time bringing orders to each “clone” or confronting Rare Guest orders, you will lose just due to your downtime running around. The only real downside is that it requires active thinking on your part more, so if you feel like being lazy, you won’t do this as often.
Overall, this technique is extremely useful to not only on daily Izakaya nights to increase profits, but towards many of Youmu’s trials as well the final boss of the base game. Additionally, this not only minimizes the downtime of not cooking and moving towards guests to serve, but increases profits as you’re doing less of all of the above while getting guests to eat faster to bring in more guests to be seated.
A derivative of Hyper Mode Rushing. This only requires the Toss Serving Range buff acquired from the “Song of the Night Sparrow” minigame during Izakaya nights. This allows you to not only serve food/drinks from afar, but check Rare Guest orders from range too, allowing you to stall in front of a kitchenware while you think of what to make.
- Once again, you can just try and “fish” for this buff by making the cheapest recipe possible just to play the minigame, or make an actual order and store it for later. The difficulty of the minigame rises as your recipes become more complex however, so keep that in mind as well. However, the buffs you get are random from the minigame, so you may just end up in Hyper Mode instead.
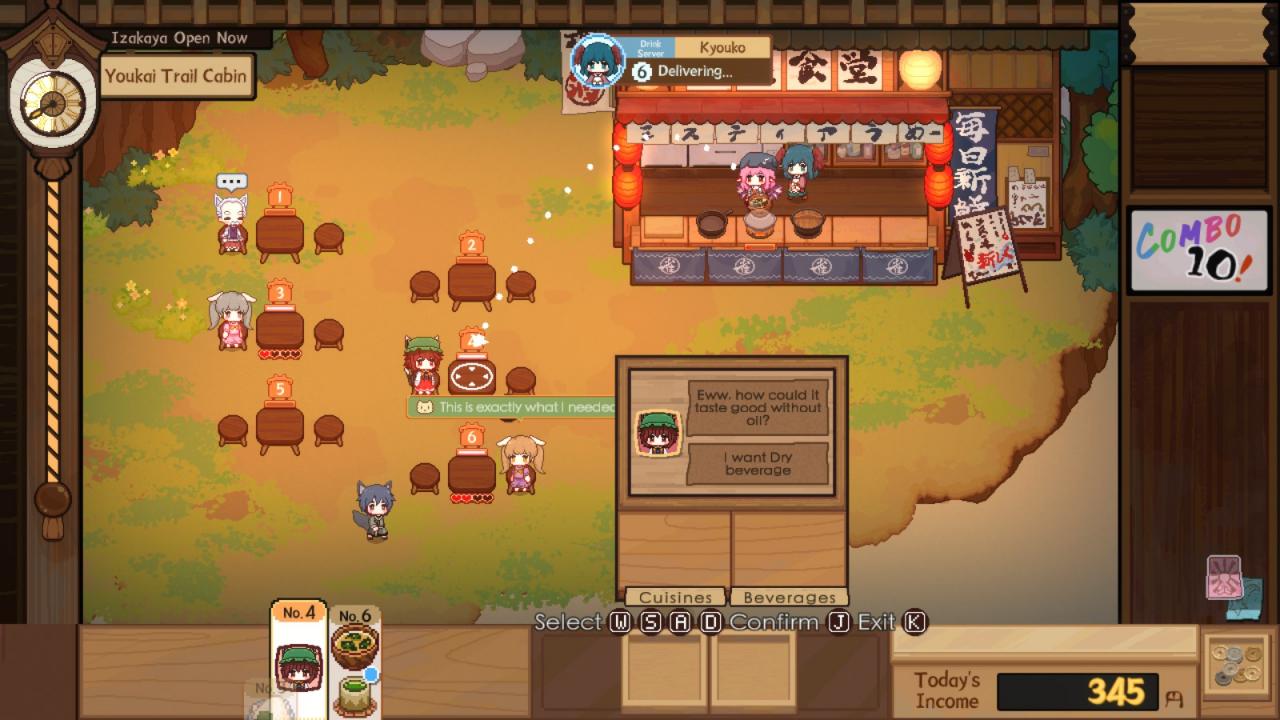
- From the screenshot, this allows you to check Rare Guest orders from a distance. Normally, you’d have to run to each Rare Guest to figure out what they want, meaning you have to memorize what they want. When there’s too many, it’s much harder to remember, especially when you have to figure out what recipe to use for each of them. Going into your notebook via “Tab” on keyboard does not allow you to see what a Rare Guest wants either on the spot either, only their preferences.
- You can stop the timer from progressing to think while having their order pulled up to figure out what recipe to use for them while in the kitchenware already without having to run back to them. If you can’t think of a recipe, you can quickly pull out your notebook to look for a recipe that fulfills a Rare Guest’s preferences and tags.
- Minimizes the downtime running back to a rare guest to double check an order, through the use of the buff and you can alternate between notebook and order request quickly. If you have solid memory, you won’t need this, but it gets much harder if there’s 4-8 rare guests whose wants vary. On any boss battle, if your memory is as bad as mine, this is mandatory to catch multiple orders at once from Rare Guest variants and find a recipe for each of them that works with all their required tags.
Another derivative of Hyper Mode Rushing. In the case you happen to have the Infinite Patience Buff at least, you can use this to stall the patience of certain guests who are undesirable currently.
- There are definitely some Rare Guests that you would not like to see at all appear in your Izakaya at certain points. Or you would not like to serve them until the end because you don’t want to activate their spell card. Tewi is the biggest example as finishing her order, regardless of however well you did, will trigger her scam and refusing to buy anything from her will wreck your combo, which is integral for keeping up strong tip incomes from guests unless you have Reimu’s reward Spell Card active.
- Another example, Keine’s spell card can randomly generate 20 guests for you which sounds great! However, if you’re Rare Guest bond grinding, this might be terrible for you as any Rare Guest that shows up afterwards will have to wait in line in front of all those 20 guests you just summoned. If you’re already done Rare Guest Bond Grinding or just farming more money, you can freely trigger Keine’s spell card.
Tips & Tricks 2
This is a pretty multilayered tip with tons of additional things you can do to really help yourself. While I could add all these as a separate suggestions, I’ll leave it here as it’s all relevant to this one.
- It’s a pretty solid idea to find a recipe that has many tags as possible for rare guests with the most cost-effective ingredients possible. In general, most recipes will target at least 2 of a preference for a Rare Guest and you need 3 to ensure the best review possible in addition to fulfilling whatever the Rare Guest requested. You can always add an ingredient to fulfill the last preference as needed. You can get away with 2, but you’ll be relying on some RNG then. You can ignore the Rare Guests’ request by using the Night Sparrow Kitchenware as needed if their order preference is undesirable to target other preferences instead.
- Every Rare Guest is going to have a different budget and serving the most expensive recipes to them as possible isn’t always the best idea. If you can remember their budget, great! However, any Rare Guest will leave once they finish a meal and the game calculates that they are at 0 or below on their budget. They’ll also leave a comment about their budget in some manner as they exit your Izakaya unless your Marisa with her stupidly high budget of 3000 for some reason. For guests like Tenshi who are filthy rich, you can serve whatever as long as you fulfill her preferences.
- Keeping Rare Guests around and continuously providing good service increases tips, which is the majority of your income later on. Some can even stay an upwards of 5-6 cuisines if you’re really lucky. If you’re unlucky, they just might leave after 1 cuisine.
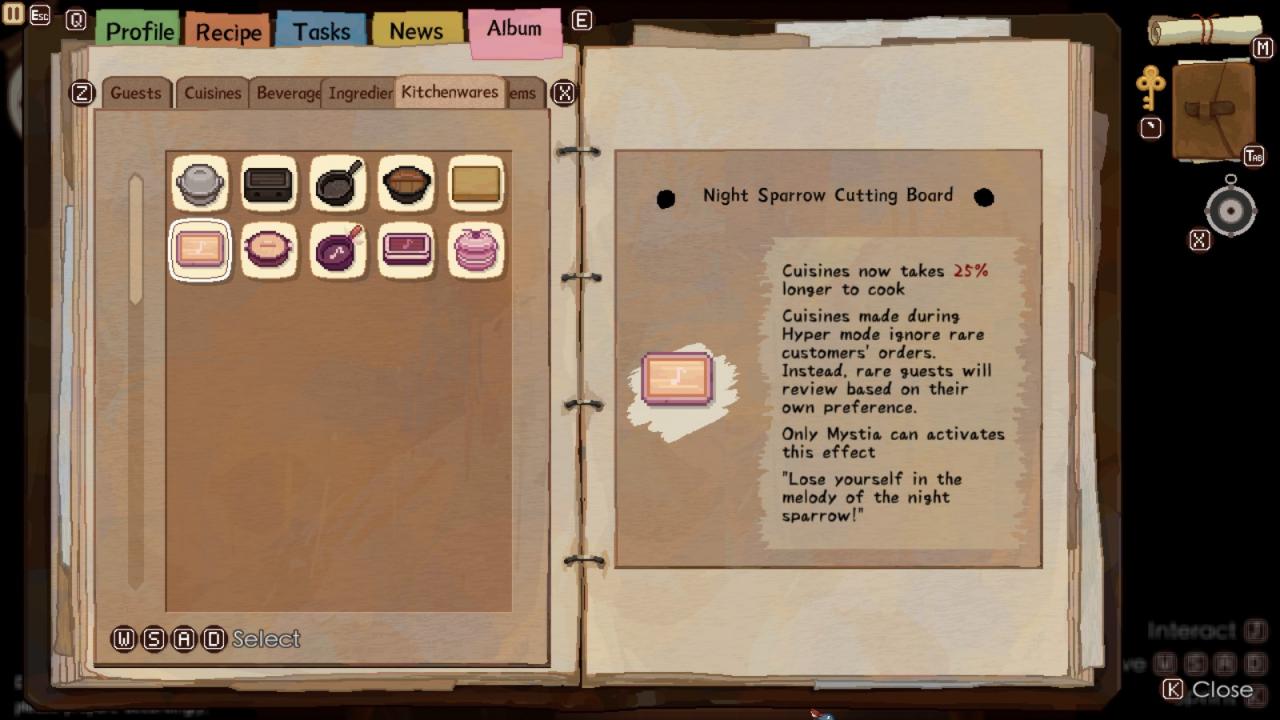
- The Night Sparrow Kitchenware isn’t explained well, but it allows you to ignore a Rare Guests’ direct orders and instead, target their preferences so long as you are in Hyper Mode. In most cases, so long as you serve a cuisine that has 3 of their preferences, you’ll almost always get the best review possible.
- An example might be Reimu that requests a “premium” cuisine, but only has a budget of 150 yen, as expected of an impoverished shrine maiden. However, her other preferences are “filling,” “sweet” and “inexpensive.” As a result, we can simply serve her a Rice Ball with an additional Honey ingredient on the Night Sparrow Kitchenware in Hyper Mode to fulfill 3 of her preferences while ignoring her “premium” request that you couldn’t do had you used other kitchenware. Not only would she be more likely to stay due to keeping within her budget, but you’ll increase your bond level with cost-effective recipes and materials required.
- The “downside” is that you need to be in Hyper Mode in order to trigger the equipment’s upsides, though if you’re actively using Hyper Mode Rushing, this will not be a problem for you at all. While the stated downside of cooking slower is present, this won’t matter much since you must be in Hyper Mode to trigger the positives of this regardless and it allows all guests to instantly finish eating once served, making up for the time spent cooking.
- From experience, the Legendary, Premium, Chinese, and Cultural Background tags are typically the most troublesome early on as you will not have many, if any, recipes involving these until much later. If a rare Guest orders a Legendary, Premium, or a Cultural Background item as well, you will have to find a recipe to target these or add ingredients that you could have ignored had you used the Night Sparrow equipment.
- Overall, this is one of the best equipment possible for Bond Level grinding for characters, as you may not always have the ingredients or even recipes on hand to target a Rare Guests’ specific orders.
- After every Bond Level where hearts are maxed, you will need to fulfill a quest in some manner. It is always a good idea not to stall on these and finish these ASAP. Otherwise, you will not be able to progress their bond levels, regardless of however many max reviewed cuisines you serve.
- The Quests start easy that become increasingly tougher, requiring premium or legendary ingredients or cuisines later on, and follow a structured format. At level 1 to 2, they will give a recipe to you to simply serve to them at your Izakaya. At level 2 to 3, they might require a material from you, then give a recipe to you to serve them. At level 3 to 4, they might require a legendary or premium material to give to them, then to serve another new recipe to them. Allocate the time necessary as needed.
- For quests involving recipes to turn in to the quest, you can turn in the food to them via the quest log in the notebook instead of giving it to them in person. This doesn’t affect much other than preventing your premade cuisine from spoiling the next day, as you need to talk to the Rare Guest anyway to progress your quest, but just in case you need to do something else after turning it in.
Tips & Tricks 3
Hidden pretty well is the reward for constantly donating to Reimu’s donation box a couple days after her Shrine is unlocked. By donating 25,500 yen to Reimu, you can unlock ????’s teleportation service. If you’re familiar with Touhou, you already know who this is.
- The Teleportation Service allows you to teleport anywhere on the map screen to an area without using any time. There’s a small fee of 100 yen for each 30 minutes you would have saved had you flown instead. However, as ???? rightfully says, money will not be an issue in the mid-late game and time will be much more valuable instead.
- You can only donate 1000 yen per day to Reimu, meaning you need at least 26 days of donating. If you plan to get ????’s teleportation service, plan to do this early to get the most benefit possible as map traveling really does consume a lot of time.
If you have a ton of recipes for an Izakaya night that use a certain kitchenware, don’t be afraid to use two of the same kind. For example, if you have a lot of recipes that use the same kitchenware or know that guests will order a lot of the same thing, field two of the same kitchenware for the night. This will speed up cooking and decrease downtime waiting times for cuisines to finish. The more orders you finish, the higher combo you will get and the more money you will make.
The recipes you put on the menu are super quick ways to begin cooking for regular guests. However, if you put a harder or expensive recipe while you’re trying to conserve it for Rare Guests, regular guests might start ordering it a ton, causing you to run out of ingredients for it. Therefore, it’s a good idea to remember what recipes you’re using for Rare Guests and what materials are needed, so you don’t need to shortcut it by putting it on the menu. This is a very valuable skill to have, especially as you take on extra trials/bosses later. You won’t remember every recipe, but knowing key ones is always helpful so you don’t have to pull out your notebook every time you need to look something up.