A list of all console commands and instructions on how to use them.
Accessing the Game Console
Using the F1 key is slightly preferred as pressing ~ to exit the console as it will try to execute a command with that keypress and show up in your command history. In actuality, the command that is shows is the ` key and ~ is only accessed by pressing shift, but colloquially people always say ~ (tilde) because it is easier to discern. Long story short, press F1 to open and close the console to avoid these issues and never use `/~.
List of Commands
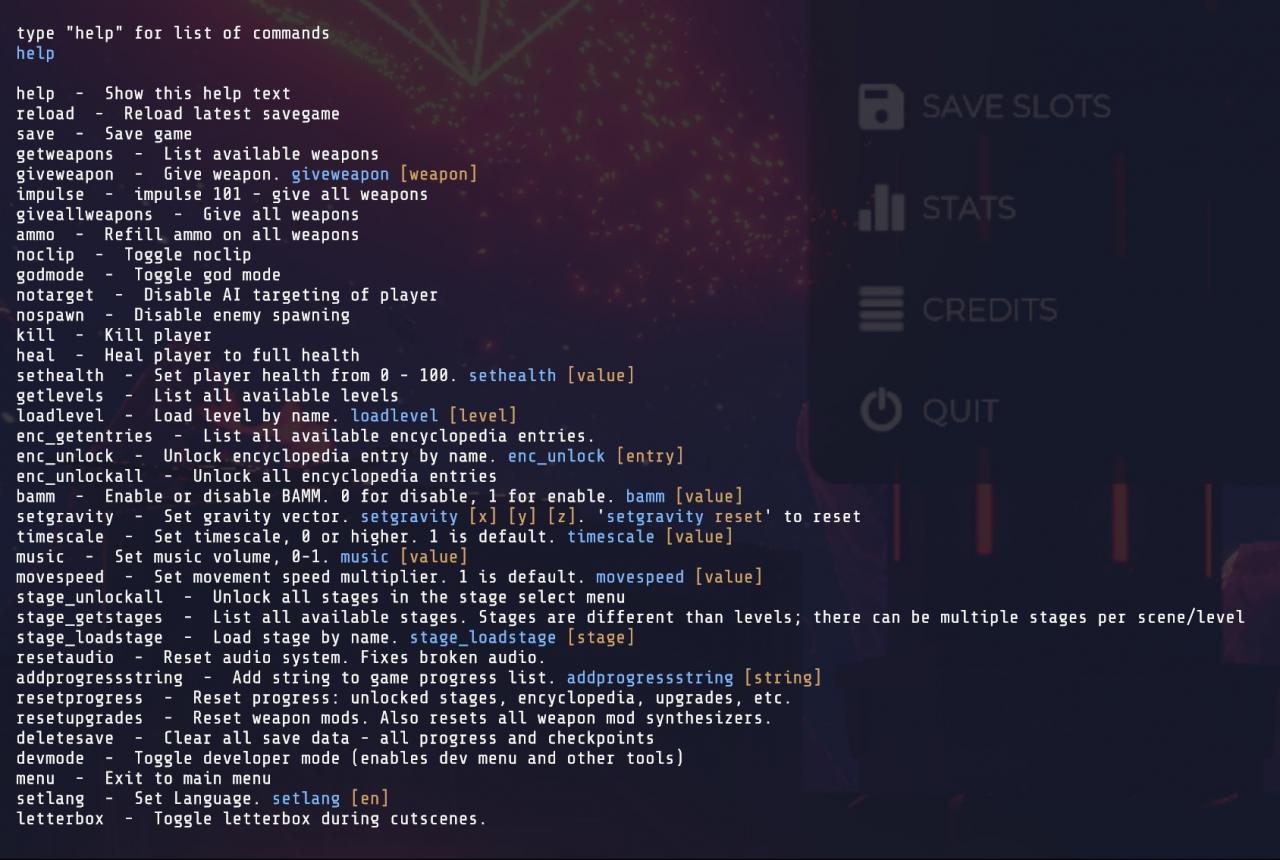
Description of Each Command
Help – Lists all commands
Reload – Does the same as the menu command to load the last checkpoint
Save – Creates a manual save which can be useful if you are having trouble in a sticky situation and don’t want to wait for the next autosave
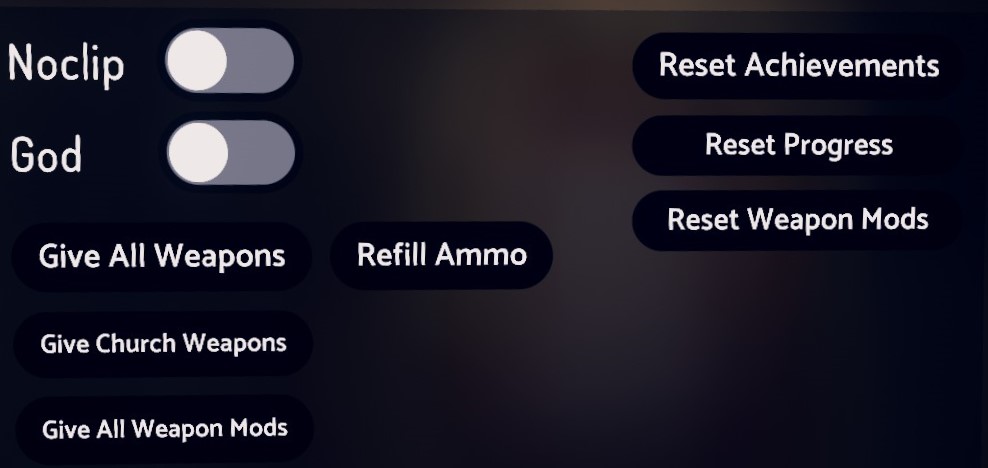
Getweapons – lists all of the available weapons in the game
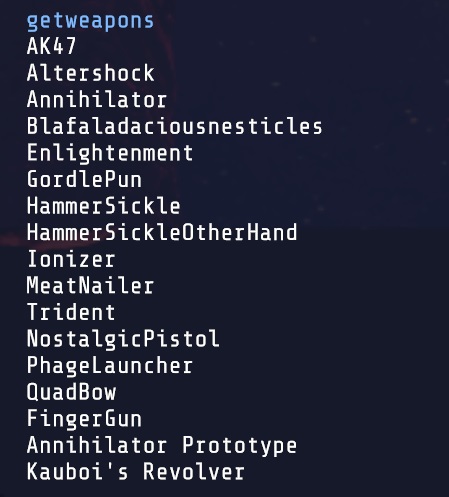
Giveweapon – Grants you the specific weapon of your choice (e.g. “giveweapon f AK47”) – This command is currently broken unless you put a random argument in between giveweapon and the weapon you are choosing, hence the random “f” I put in the example command.
Impulse – Grants you every weapon in the game except for the Church weapons (use devmenu command to get access to them and they will replace the Rebel weapons)
Impulse 101 – Same as Impulse
Giveallweapons – Same as Impulse
Ammo – Fully replenishes the ammo supply in your backpack for all weapons, but will not load any empty weapons
Noclip – Allows you to fly and pass through any solid objects which is useful for cheesing through parts of the game
Godmode – You cannot take damage or die which is useful for the Immortal achievement
Notarget – Enemies will no longer target you including bosses
Nospawn – Enemies not already spawned in will not appear (likely to break scripted sequences in the game though I can confirm that the Security Stronghold ones work fine)
Kill – Suicides the player
Heal – Heals you to 100 health
Sethealth – Sets your health to a specific value (e.g. “sethealth 1” which can be useful for the Close Call Achievement)
Getlevels – lists all available levels in the game including custom Sandbox levels. Levels are any places where you get a loading screen and there can be multiple levels within a stage.
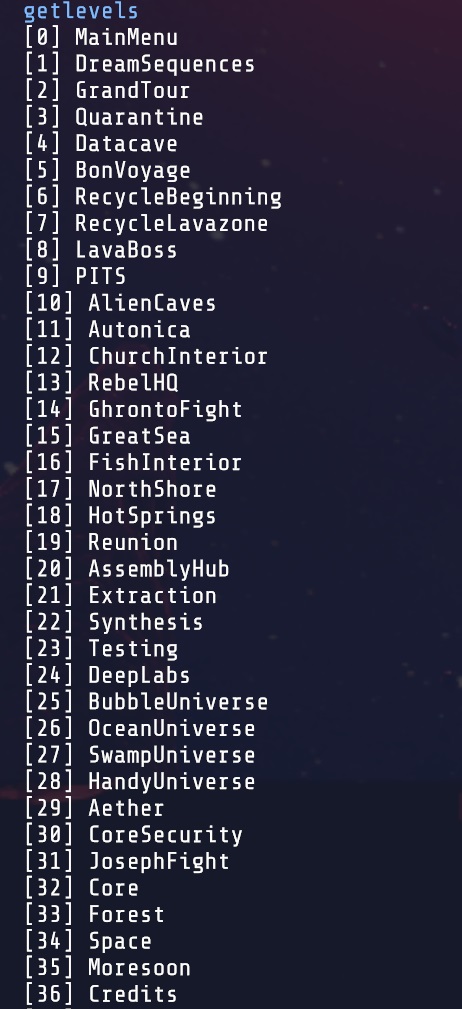
Loadlevel – Loads a level by name (e.g. “loadlevel core” which you can use to take you to the final level). Note that you will retain your inventory and weapon loadout, and will earn any weapons you would have gathered along the way (e.g. skipping from stage 5 to 7 will grant you the Trident) though you will not earn any of the faction weapons from Chapter 10. This command may lock up the game if you haven’t already progressed there once normally, but it’s sometimes worked properly even then.
Enc_getentries – Lists all of the encyclopedia entries but the top section will be cutoff as the list is too long to fit in the scroll area of the window
Enc_unlock – Unlock an encyclopedia entry by name (e.g. “enc_unlock bonehead”) – This command is currently broken
Enc_unlockall – Unlocks all encyclopedia entries (you can use this to get the Big Nerd achievement but I personally recommend doing this the old-fashioned way)
Bamm – Adds or removes your BAMM device. When removed, you cannot store items, get healing up to 50%, gather new encyclopedia entries (even though they may pop on screen), and you’ll have no flashlight. There may be other restrictions I haven’t found as well.
Setgravity – Allows you to adjust the gravity on any vector from the default of 0, -9.8, 0 which is Earth-normal gravity (e.g. “setgravity 0 -1.6 0” which will set it similar to lunar gravity. Use “setgravity reset” to bring it back to normal. I am not sure what setting the x and z axes do for this but feel free to experiment and comment below.)
Timescale – Allows you to change the speed of the game which affects all actions such as firing rate, movement speed, enemy movement speed, dialogue, but not music playback (e.g. “timescale 2” will set the gamespeed to 2x and all dialogue will sound like Alvin and the Chipmunks)
Music – Sets the music volume from 0-100% (e.g. “music .5” will set it at 50%)
Movespeed – Set the movement speed of the player (e.g. “movespeed 2” will allow you to walk twice as fast while all enemies and other actions remain at the default unlike with timescale changes). This is a popular way to speed up your movements and eliminate the need to teleport in combat situations.
Stage_unlockall – Allows you to select any stage from the Level Select screen in the main menu. When using this you will have the weapons you are supposed to have at that stage of the game and any secret weapons and weapon mods you have already earned on your save slot, but your BAMM inventory will be empty.
Stage_getstages – Lists all of the 18 Stages (AKA Chapters) in the game.
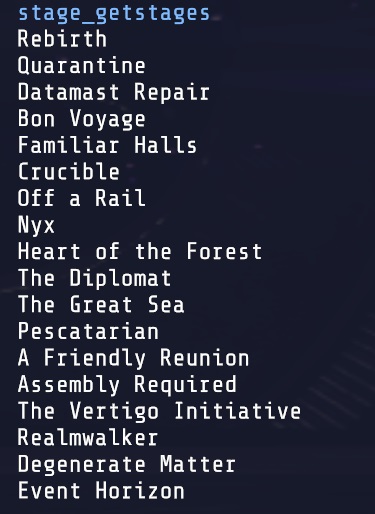
Stage_loadstage – Use this to load into any stage in the game (e.g. “stage_loadstage Crucible” to load into Chapter 6). Note that it is case-sensitive unlike loadlevel and that unlocking the levels is also not required here. I recommend just using loadlevel unless you run into the crashing issue.
Resetaudio – Use this if you’ve encountered an audio issue of any sort and it should be corrected without restarting the game
Addprogressstring – Add any string to your game progress thus far – This command currently doesn’t work and has dubious value regardless
Resetprogress – Removes all unlocked progress from your save slot such as stages you have reached, encyclopedia entries and mod upgrades
Deletesave – Deletes all of your game progress, encyclopedia entries, weapons/mods, and checkpoints from the active save slot. Likely better to just create a new save slot.
Devmode – Activates the dev menu which you can access while paused in game. Also allows you to swap out your faction weapons between Rebel and Church weapons, though to get the Rebel weapons back you have to select Give All Weapons.
Menu – Brings you back to the main menu
Setlang – set the localization language of the game (e.g. “setlang en” to set it as English)
Letterbox – Toggles letterbox view on and off during cutscenes
Save
Noclip
Be sure to turn noclip off before riding in a vehicle such as the Iron Chub or you will see it fly off without you.
Loadlevel and Stage_loadstage
The Annihilator Prototype (Super Shotgun) is an often missed secret weapon. While you could use the “giveweapon f annihilator prototype” command to get it immediately, that skips the associated mission to earn it. The fastest way to do that is to use the “loadlevel bonyoyage” command right from the menu screen, grab the secret key from Room 1, then use the “loadlevel northshore” command to quickly get you to the inside of the dead fish. Proceed to the beach and then you can unlock the chest and fight to earn the weapon. You must use the loadlevel command for the second step or your inventory will be cleared and you won’t retain the special key. It’s best to do this on an already completed game slot as issues with the loadlevel command may occur otherwise.
Timescale
Another usage of timescale is to speed along certain unskippable sections like the first flight on the Iron Chub and some of the long speeches in the game.