A guide to creating custom Incursion Defense maps in Wildermyth, and a general guide for using the Site Editor.
Introduction
Site Lab
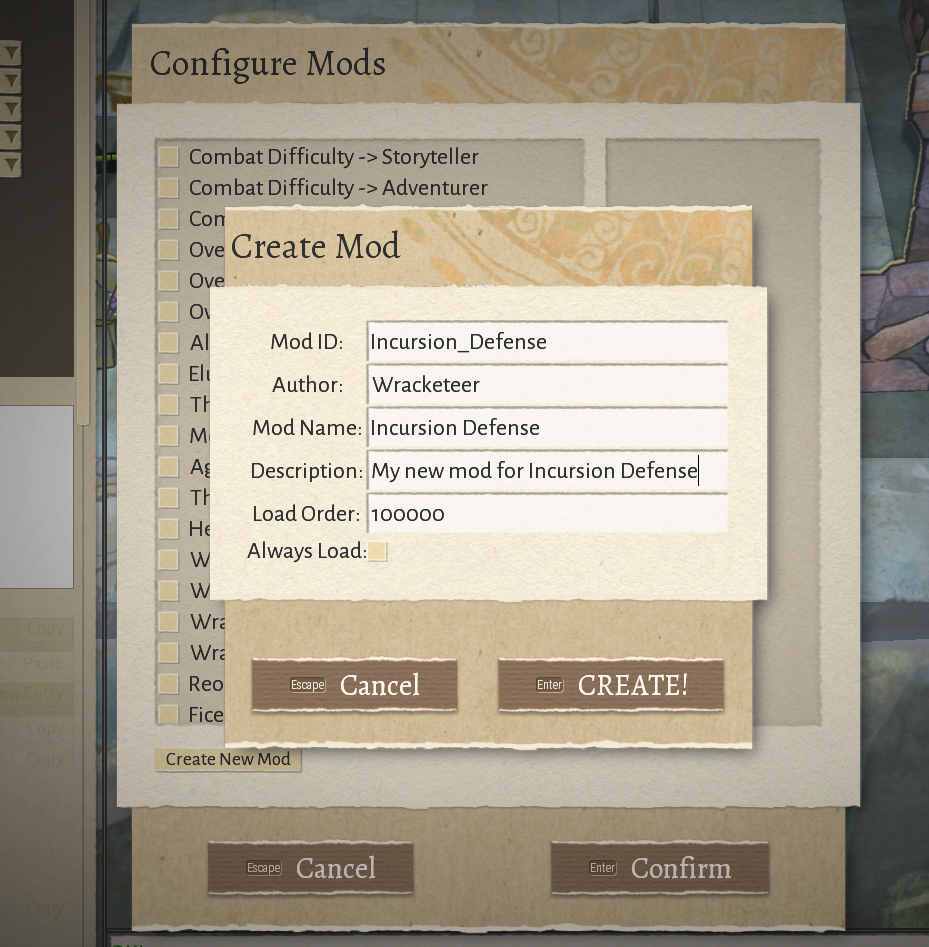
Once you create your mod, it’ll be automatically selected in the mod list. Click Confirm to exit.
The basic layout of the Site Editor has a main window where you view the map itself, and the left panel where we can manipulate the components of our map. At the top of this panel, we have a variety of editor options, but the only one we are concerned with is “Plan”. Plans are the specific data about your map layout and object placement. We’re going to create a new one, so click New Fight (CTRL+N).
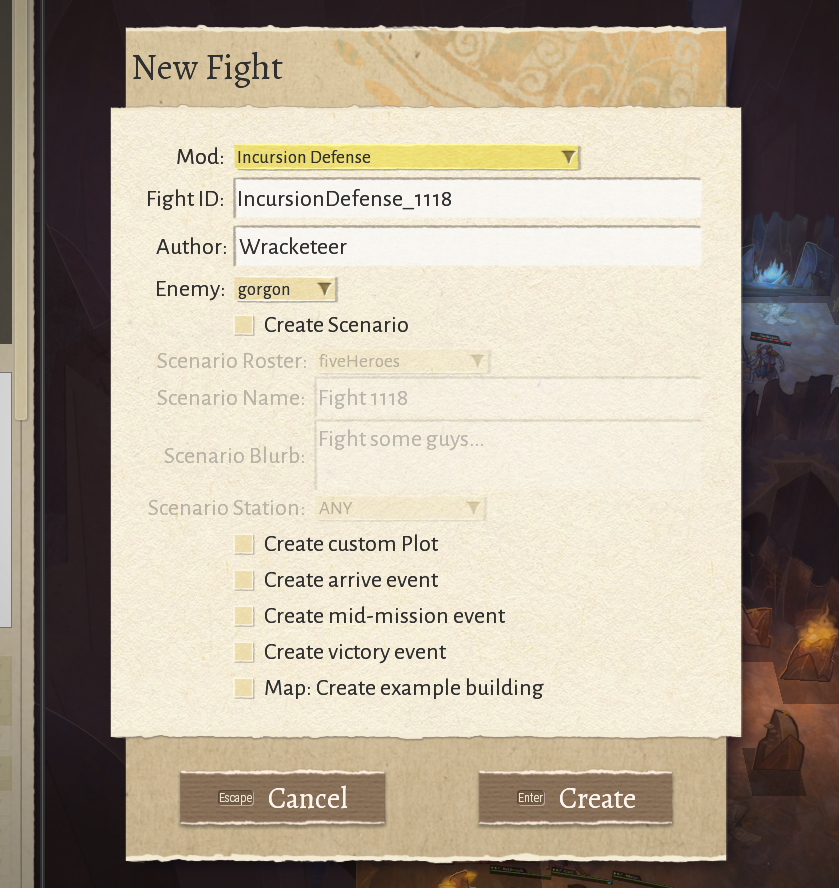
Go ahead and enter a memorable ID for your fight. Everything else on this screen can be safely disabled or ignored. As you’ll see later, all the logic for Incursion Defense maps is already handled for us.
Once you’ve created your fight, search for it in the Plan dropdown and select it.
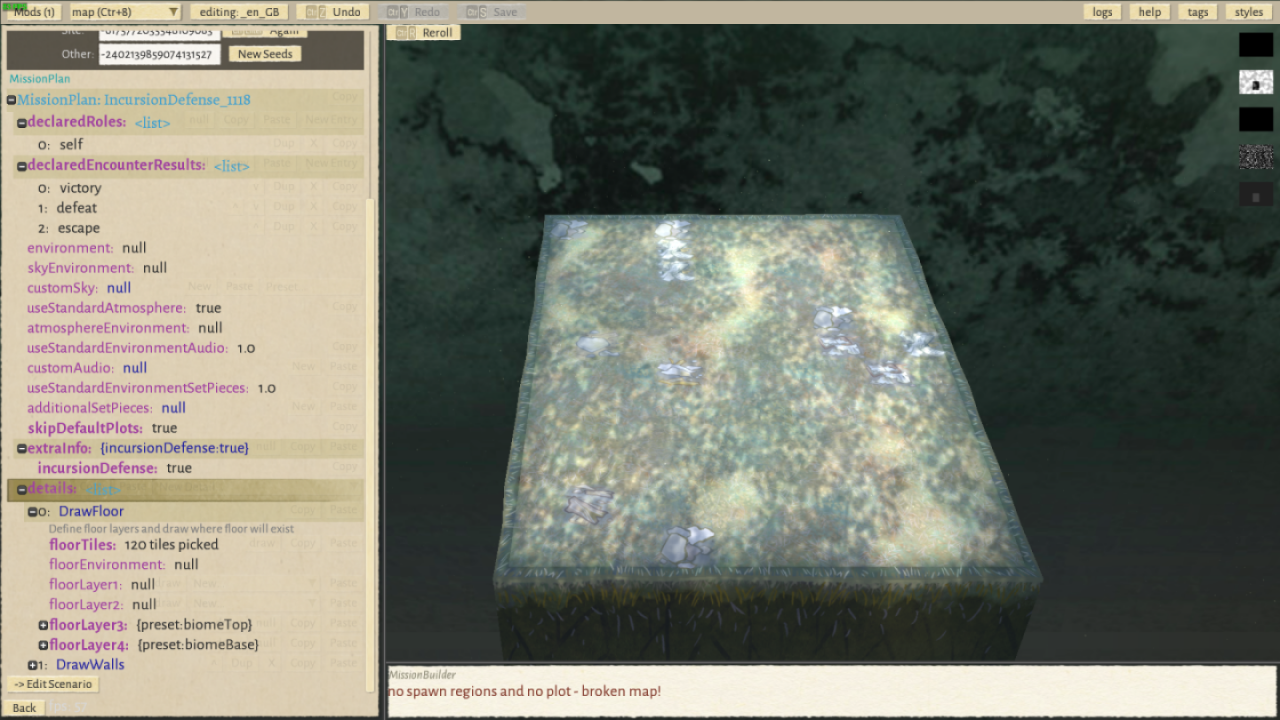
Finally, uncheck the checkbox labelled “Set Pieces”. This will remove the background objects from the environment so they don’t obscure our vision of the map.
Note: You may be tempted to select “incursionDefense” from the Format dropdown. Changing the Format will change the game logic behind our map in the editor. In the case of incursionDefense, the game logic ignores our currently selected Plan and instead chooses a random Plan from the incursionDefense pool, meaning that every time you reroll the editor it will load a different map. While editing, the Format should be left on “assault” so that the game logic doesn’t interfere with our editing.
Mission Plan
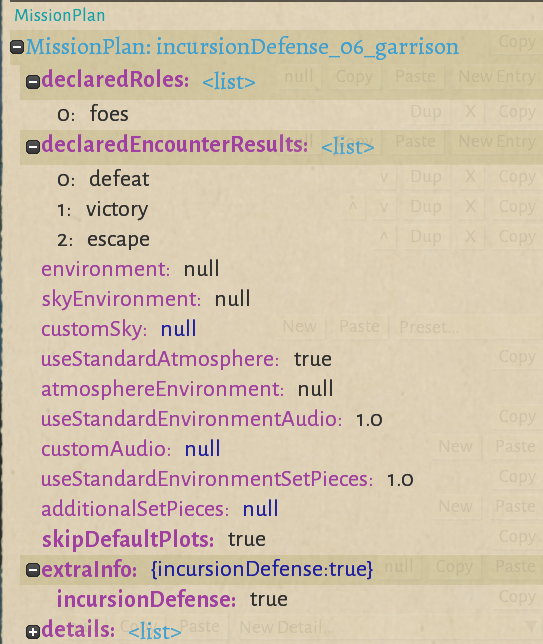
If you don’t understand these settings, that’s okay. This is just information the game needs to properly set up our map.
First, click the New Entry button next to declaredRoles. Only one option needs to be set here, which is “self”.
Next, click the New Entry button under declaredEncounterResults three times. The set the options to:
0: defeat
1: victory
2: escape
These are the three ways an Incursion Defense mission ends: Either the heroes defeat all the enemies, the enemies defeat all the heroes, or the heroes escape the map without killing all enemies.
Click on skipDefaultPlots and set the checkbox to True. Since the logic for Incursion Defense maps already exists, we don’t want any other logic to interfere with it.
Click the New button next to extraInfo. This will add an option named “incursionDefense”. Set this to true. This option is very important; it adds our map to the pool of incursion defense maps that the game picks from when the player defends a town against an incursion.
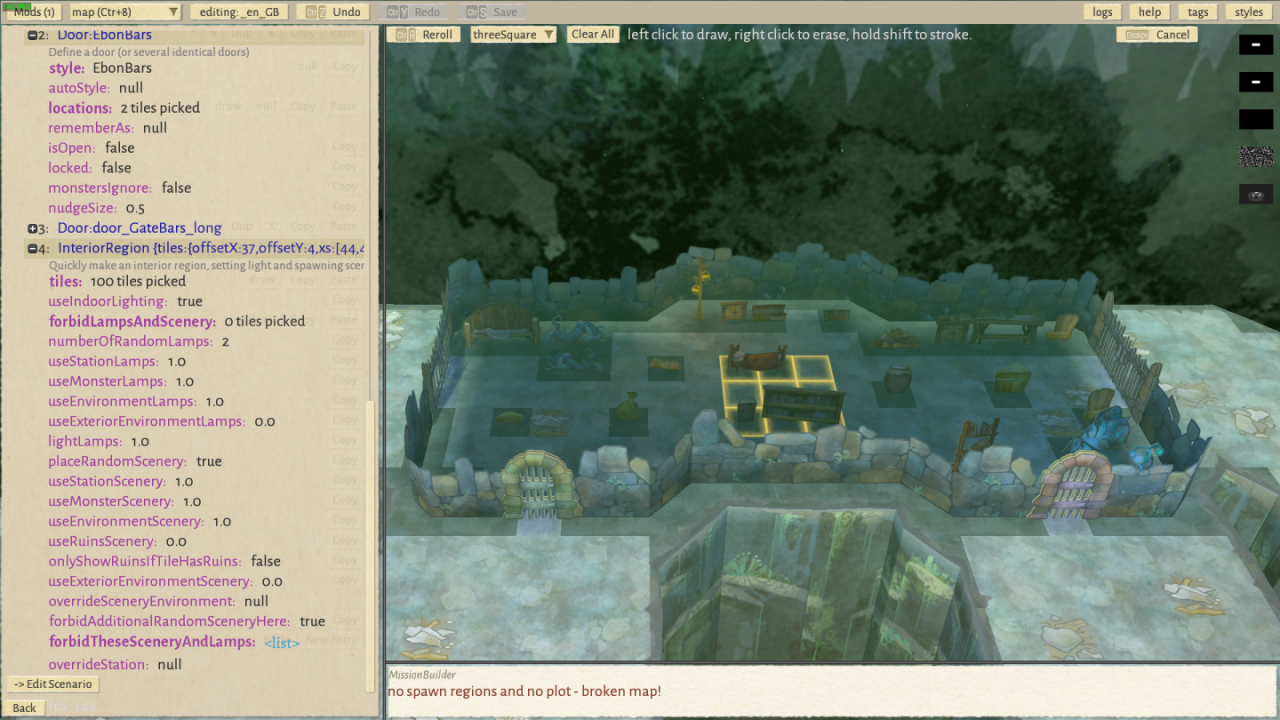
Under the details list, we can add the various features that make up our map. In the next section we’ll go into more detail about each one, but to begin with there’s one detail we need to add. Move your mouse over details, then click “New Detail…” and add MapDetail_Plot. At the bottom of the details list, you’ll now have an option labelled Plot {}. Expand this option and click the plotId field. In the list that appears, select M_incursionDefense as your plot. This contains all the logic necessary for incursion defense maps.
Note: Be aware that if your mod is loaded when playing a campaign, and you haven’t finished building your incursion defense map, the game will throw an error and return you to the main menu if it tries to load this map when defending a town. Make sure to disable your mod in your campaigns until it’s finished and ready to use!
Floors, Walls, Doors
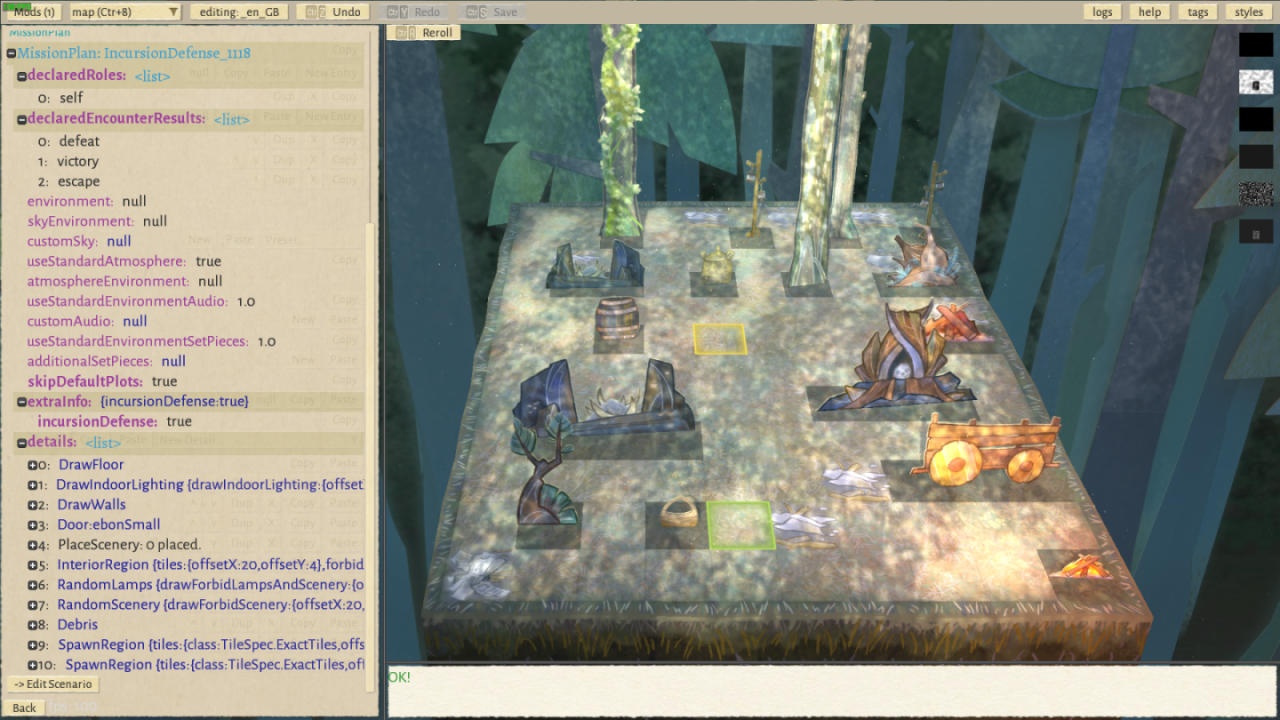
The new map comes with a couple of commonly-used details, like floors, random scenery, and spawn regions. For now, Let’s delete all except the floor, walls, and the plot we just added. To delete an entry, just move your mouse over it and click the X button. We’ll add these back in later.
You’ll notice that as you delete these entries, they don’t disappear from the map. This is because the map is only generated once, when loaded. In order to generate the latest changes, we need to Reroll, either by clicking the Reroll button in the top left corner of the editor, or by pressing Ctrl+R.
Much better!
Expand the DrawFloor detail and click on floorTiles. The grid that appears in the editor shows you each floor tile in the map. To add more, click on an empty tile, or right-click to remove an existing tile. Holding shift will let you click and drag to draw multiple tiles, and the dropdown in the top left of the editor will let you set the size of the brush. As before, any changes you make won’t be visible until you Reroll the map.
Build your floorplan however you like. Personally, mine looks like this:
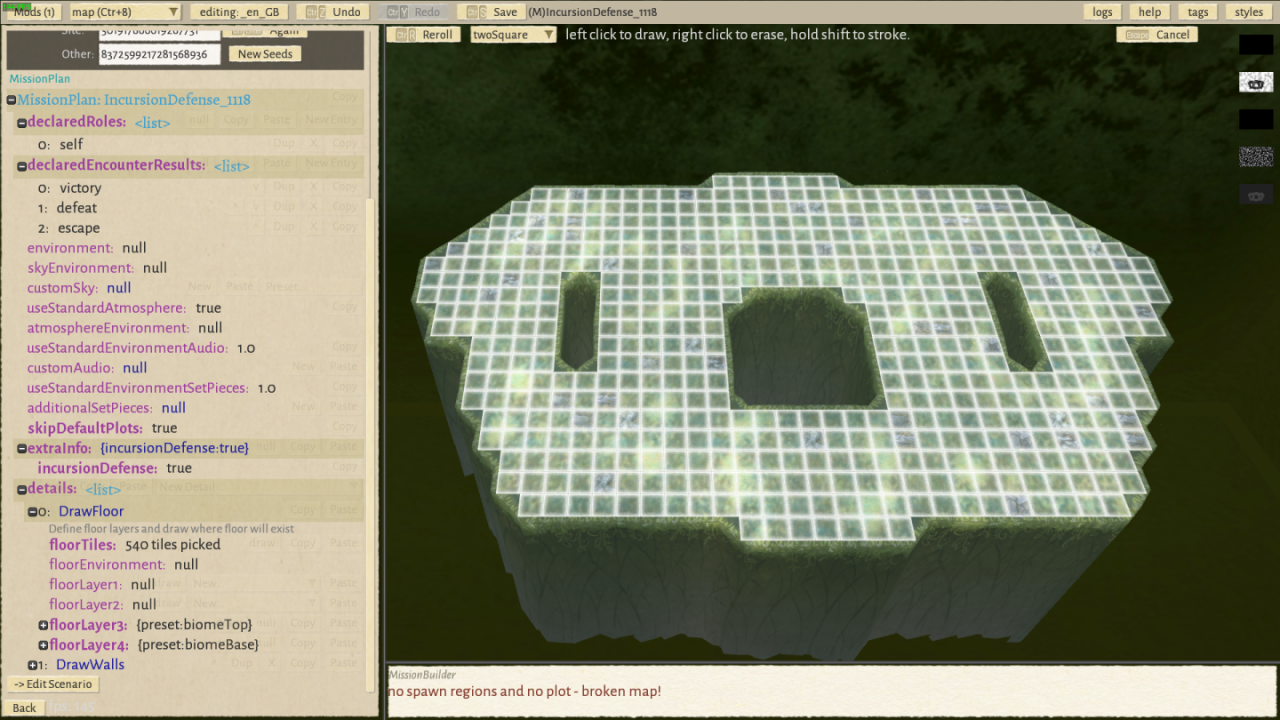
Press escape, or click the floorTiles option again to disable drawing.
You may notice that the DrawFloor detail has a few additional options. Mostly you won’t want to change these as you want the floor to match the biome, but in some cases you may want to change the floor texture (i.e. if you want to add a different floor inside a building). To do this, select one of the empty floorLayers and pick the texture you want. Then, with the mouse cursor over the floorLayer, click the draw button. You can even swap out the texture of that floorLayer for a custom texture, by including a JPG in Wildermyth\mods\<modname>\assets\sites\images.
Walls are drawn the same way as floors. Expand the DrawWalls detail, then click tiles and draw where you want your walls. Just like floors, the shortBiome, midBiome, and tallBiome presets will use whatever biome your map is generated with, but you can also choose specific walls depending on your desired effect. Most of the wall settings shouldn’t be changed, but options like hasWallsCaps and isBoundary might be useful. Mouse over each option to see a description of it.
If you want multiple types of walls, you can create additional DrawWalls details for each wall type. To do this, mouse over the details category, and select MapDetail_DrawWalls.
Walls are great for stopping people (or monsters) from passing through an area, but what if we want to let them through anyway? We can do this with an incredible new technology called “Door”. Add MapDetail_Door to the details list, then click on locations under the Door entry to place doors. Placing doors on existing walls will automatically remove the wall so that the door can be passed through. Doors can take up a single tile, or scale to fit multiple tiles (although some door styles have a minimum size). The style option determines the appearance of the door, and like walls, if you want different styles of doors then you can create multiple MapDetail_Door details.
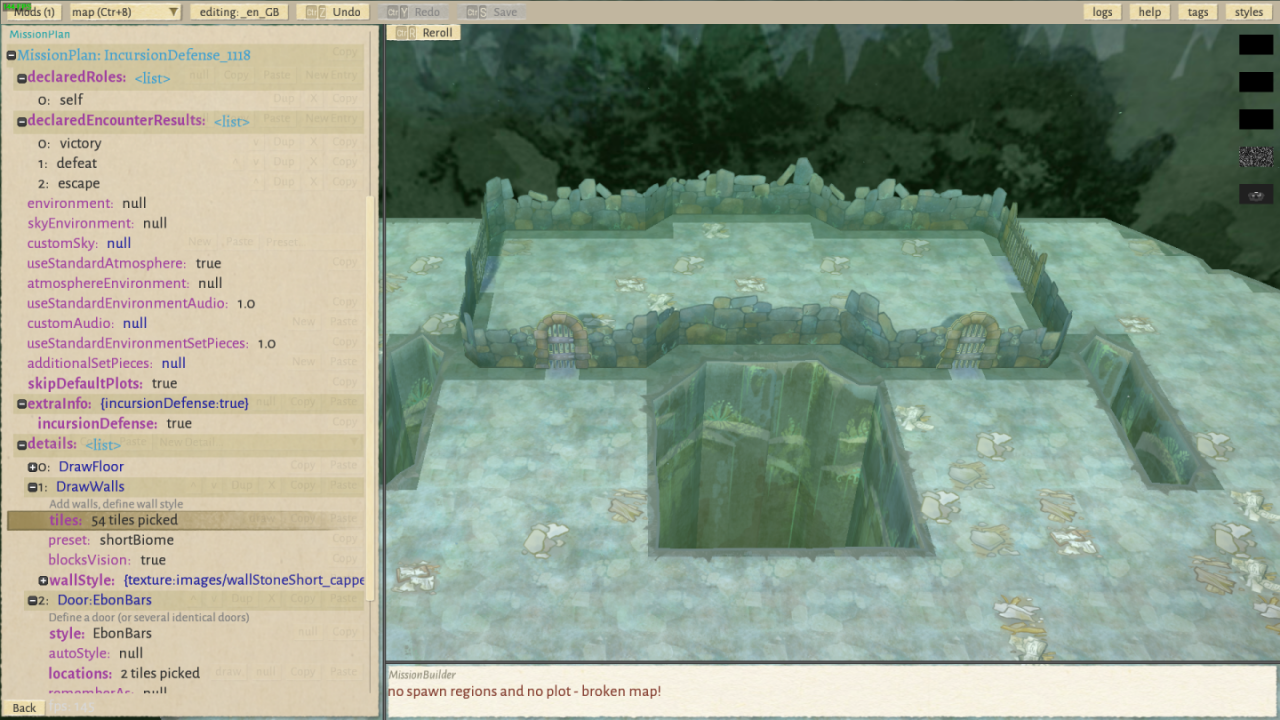
Doors have a couple of useful options: isOpen lets you set the door to already be open when the mission starts. Locked will stop players or monsters from being able to interact with the door (this can be combined with isOpen to make a door that is permanently open).
Lightning, Scenery, Lamps, Debris
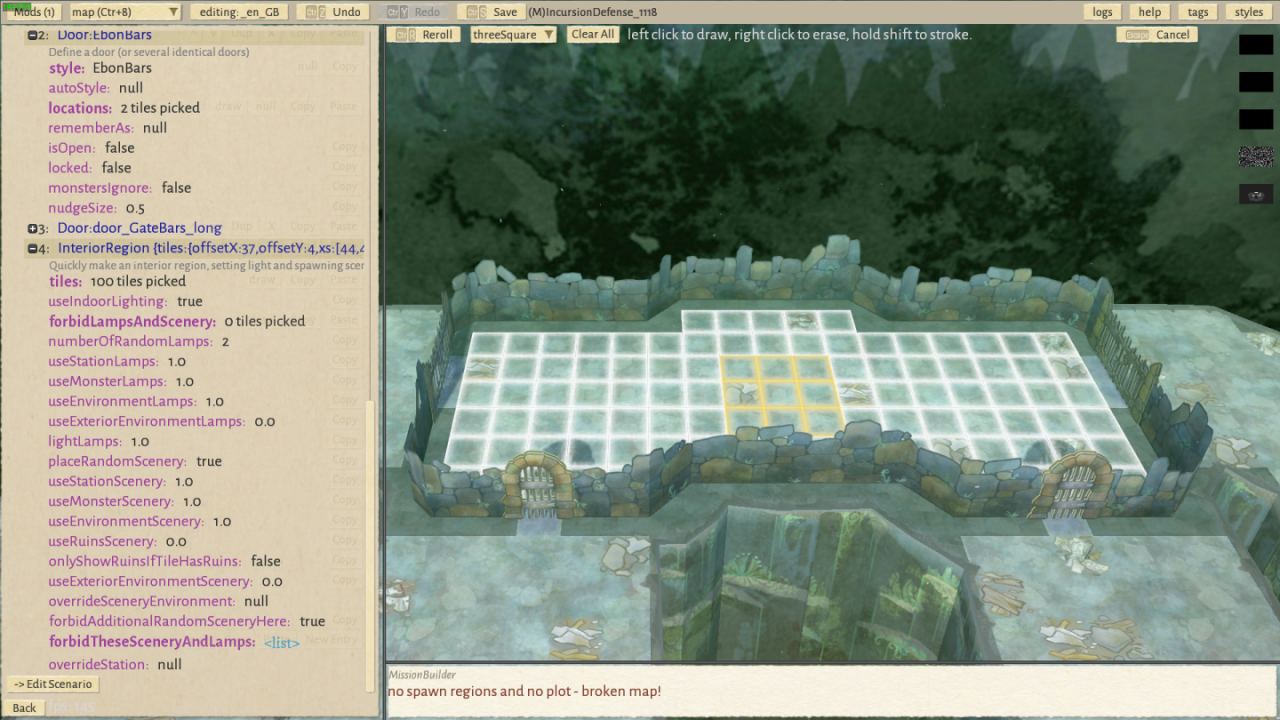
In the last section, you may have placed some walls to make an enclosed building. Using MapDetail_InteriorRegion, we can quickly populate your building with lighting and scenery. Simply add MapDetail_InteriorRegion, select tiles, and paint the area inside your building.
Reroll your map…
And just like that, your building has interior lighting, and randomly-placed scenery! But we’re not done yet. For one thing, you may have noticed that there are objects that don’t match your intended structure. We can control these with some of the InteriorRegion settings.
Many of the options in InteriorRegion let you control what type of scenery can spawn and how frequently, using a number between 0.0 and 1.0. For example, setting useMonsterScenery to 0.0 will mean that this region never spawns scenery objects that were created by monsters (such as the blue Gorgon tentacles). Modify these settings to your liking, and reroll to see the changes. You can also use forbidLampsAndScenery to stop any objects from spawning on certain tiles while still having the interior lighting effect. Finally, you can use forbidTheseSceneryAndLamps to specify exact pieces of scenery that you never want to be randomly selected.
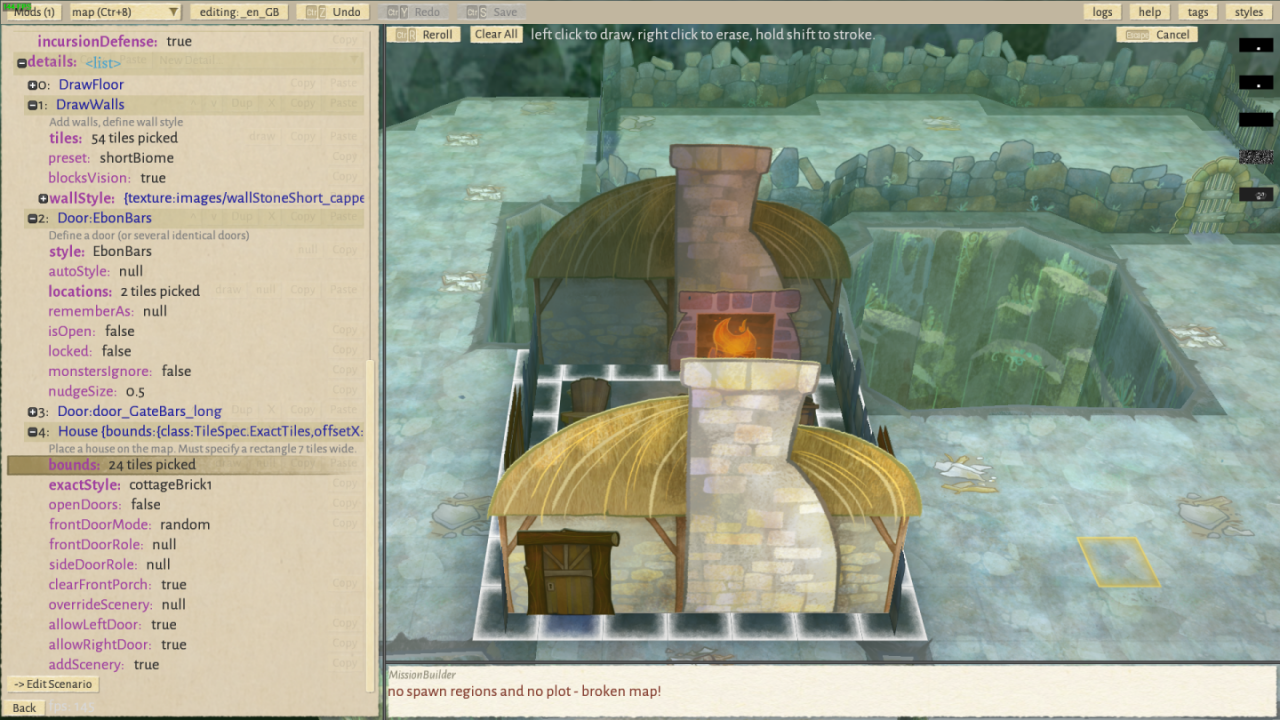
For an even faster method of creating interior spaces, you can use MapDetail_House. Add the detail to your map, draw a rectangle seven tiles wide, and the editor will instantly create a cosy cottage. This tool gives much less control than other methods, but the results are very quick.
Note: The side walls of the house are defined by whatever DrawWalls detail comes first in the details list. To change the style of the walls, create a MapDetail_DrawWalls, set the wall style you desire, then click the up arrow on that detail until it moves above all the other DrawWalls details in your map.
The above options will let you quickly add detail to your map, but there are additional options for those who want more specific control. For lighting, you can use MapDetail_DrawIndoorLighting. This works in a very similar way to InteriorRegion, but allows you to set a specific amount of light per tile.
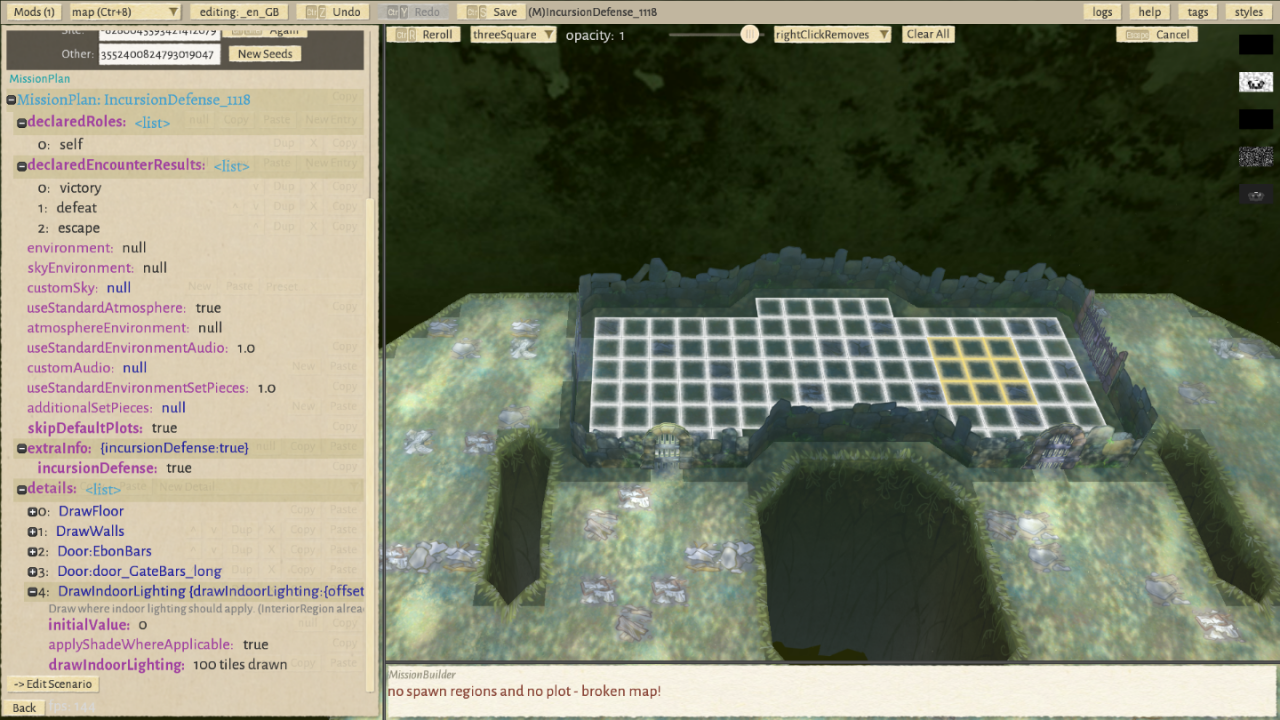
When drawing tiles with DrawIndoorLighting, you’ll notice an opacity slider at the top of the screen. This lets you set how much light is applied to a specific tile. You can also draw over tiles to add more opacity to that tile (i.e. with opacity set to 0.1, clicking on a tile twice will set its opacity to 0.2).
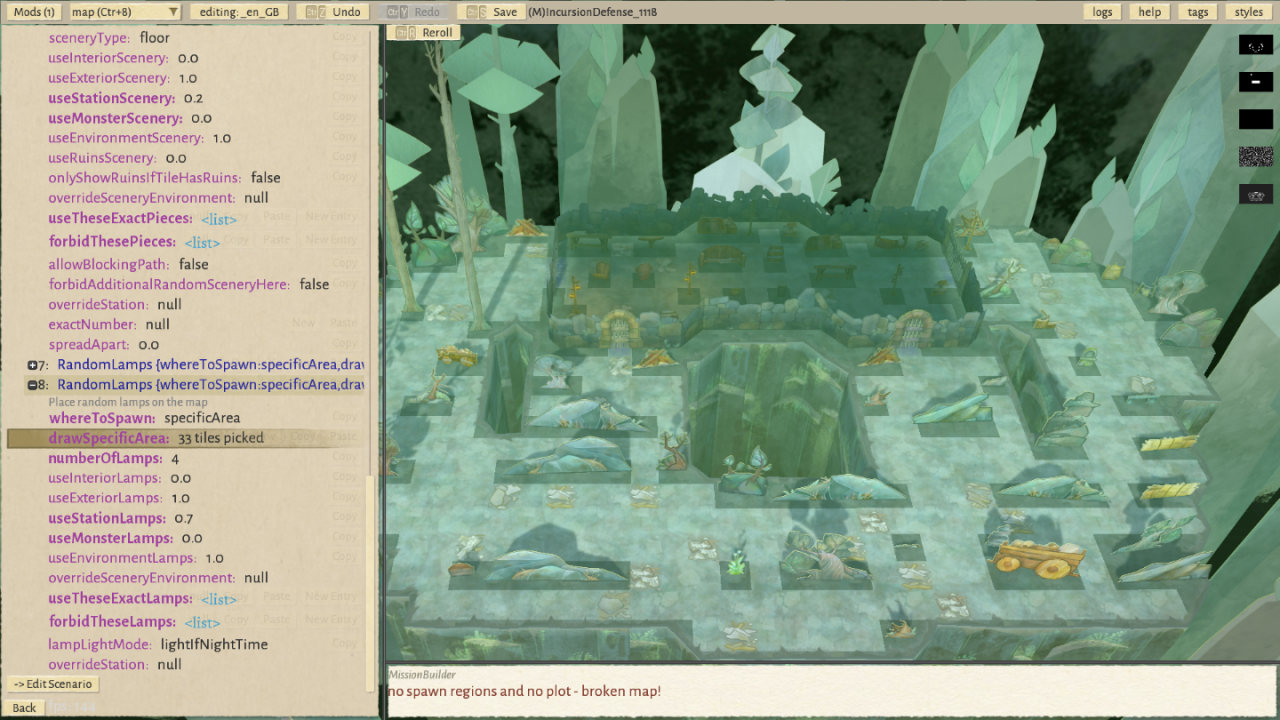
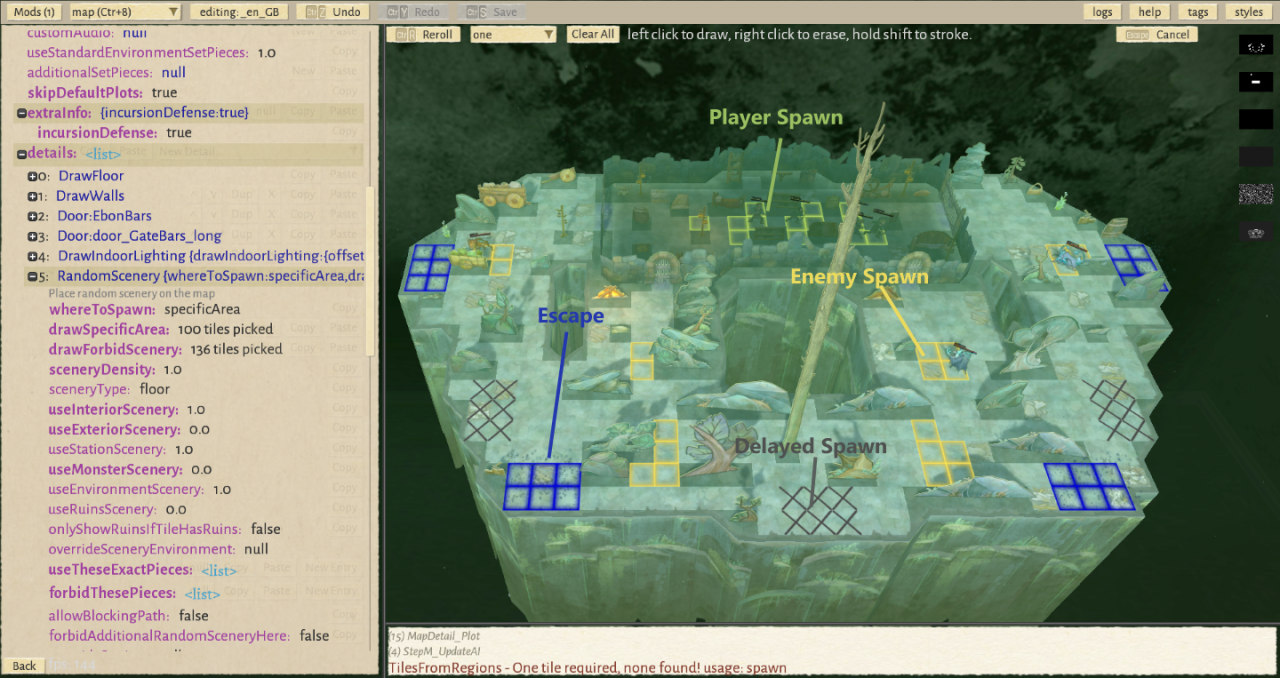
There are also a number of tools to create scenery and lamps, with more control than we had in the previous step. The most in-depth of these is MapDetail_RandomScenery. Add this to your map now.
Note: Be careful not to use any Map Detail with the word “Deprecated” next to it. In game development terms, “Deprecated” means that this option is no longer supported and has been replaced by something else. Some of the deprecated map editor functions are still present, but this tutorial will only focus on the ones still intended to be used.
The first setting in RandomScenery is whereToSpawn, and there are three options:
- everywhere will spawn scenery across the entire map.
- specificArea lets you define an area where random scenery can spawn (just like InteriorRegion)
- exactLocations lets you pick specific tiles where scenery will always spawn.
This tool is very similar to InteriorRegion as explained above, but contains a few additional options. Most notably, sceneryDensity lets you set a number between 0.0 and 1.0 to control how much random scenery is placed in your spawn area. There is also the drawForbidScenery setting, which lets you define tiles where scenery should NOT spawn. Be careful using this option, as it will block scenery generated not just by the current MapDetail, but also all MapDetails below the current one on the details list.
How you set up your scenery is up to you. For demonstration, I’ve added a RandomScenery detail to generate interior scenery inside my structure, and a second RandomScenery detail to generate exterior scenery on all the outdoor tiles. I’ve also drawn a path of forbidden tiles through the major lanes of the map layout to avoid them becoming too cluttered.
Additionally, I’m going to add a RandomLamps detail to spawn lamps inside my structure, and a second RandomLamps detail to spawn some outside by the doors. This works just like RandomScenery.
Our map is now looking pretty good! But before we move on to spawn regions, let’s quickly look at Debris.
What’s Debris? Well, it’s this stuff:
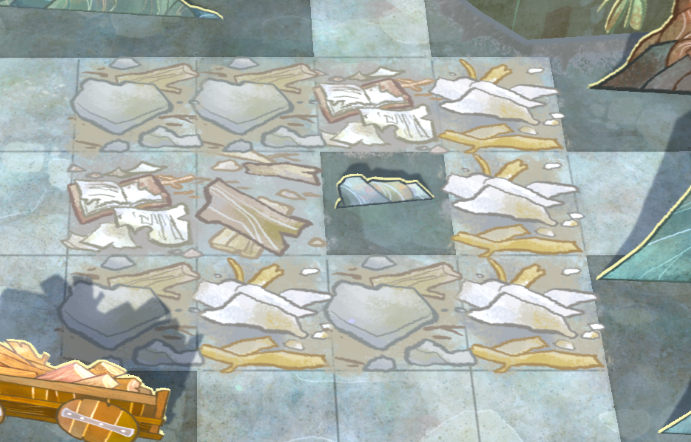
While it might not seem important, some abilities can set it on fire, and fire will spread between debris tiles, so it does have gameplay implications. Using MapDetail_Debris, we can have some control over it. MapDetail_Debris gives us two options: globalDebrisChance and drawDebrisChance. The former defaults to 0.1 and can usually be left at that. drawDebrisChance lets us paint tiles with debris; similar to when we draw lighting, the opacity can be set to define how likely debris is to spawn on that tile. This is mostly useful when creating the appearance of something that has been destroyed (i.e. a collapsed section of wall).
All about Spawn Regions
Create a SpawnRegion and set tiles to exactTiles, then draw where you want hero characters to spawn. To make heroes spawn here, set role to “attacker” (while this might seem wrong for a defense mission, in all mission types the player is always considered the attacker).
You can choose to draw one large, connected spawn area, or multiple disconnected areas. If you do the latter, you’ll notice that all heroes spawn around the same group of tiles instead of spreading out to all of them. To fix this splitGroupsIntoSeparateRegions should be set to false. This also seems counterintuitive, but there seems to be a bug with player spawns where splitGroupsIntoSeparateRegions does the opposite of what it says.
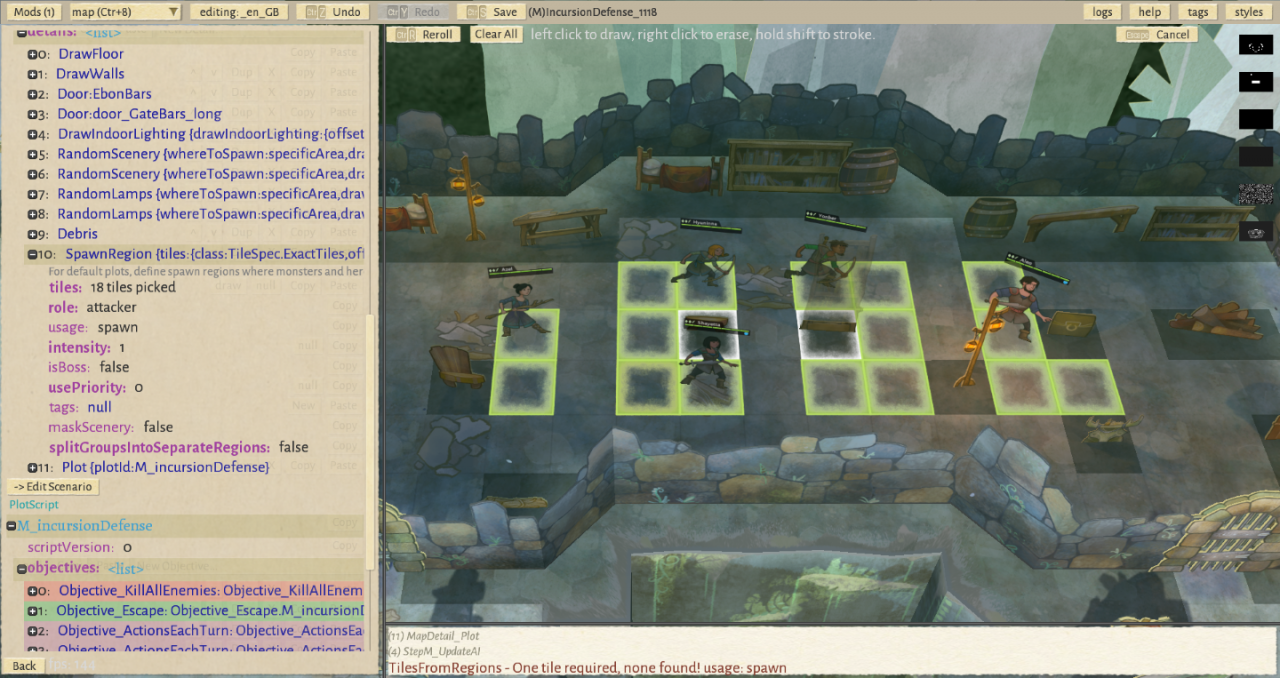
Next, create another SpawnRegion, set tiles to exactTiles, and set role to defender. This will be the spawn area for the enemies. Then, click the Dup button on this spawnRegion to duplicate it. Set the usePriority of the new spawnRegion to 1. This will let you define a spawn area to be used less frequently, only when there are more enemies than there are spawn areas.
Note: The tooltip for usePriority says that higher priority is used first. While this is true for most mission types, a bug in incursion defense missions causes it to use the opposite order. Zero is the highest priority, and each subsequent number is lower in priority.
When there are more enemies in a mission than would be fair to fight, those enemies will be kept in reserve until some of the existing enemies are killed. These enemies will spawn from a SpawnRegion with the delayedSpawn usage. Go ahead and create another SpawnRegion, set its role to defender and usage to delayedSpawn. These areas should generally be around the edge of the map, reasonably far away from the player spawns.
If the heroes are losing the fight, they have the option to retreat by reaching an escape tile. Create a SpawnRegion with the role set to attacker and the usage set to escape. These tiles are often usually found at the edge of the map, and their distance from the player spawns will determine how difficult it is for a hero to reach them.
Note: You can use the drawForbidScenery option in your RandomScenery detail to stop scenery being placed on top of these tiles.
Conclusion
- Test your map: It’s important to get a sense of how your map feels to play. Even if it looks great from the editor, there might be problems you encounter when playing it. Use the Wildermyth Wiki guide on testing to learn how to ensure your map appears in a campaign. https://wildermyth.com/wiki/Testing
- Learn from the best: All the maps you play in the game are available in the editor. If you’ve seen a certain effect or situation in a map that you want to use in yours, load up the existing map in the editor and see for yourself. It’s also just a great way to learn how the maps are made; everything I wrote in this tutorial I learned by looking at the existing maps and using that as a reference for making my own.
- Leave feedback: If I missed anything, or made a mistake, or you have any further questions, please ask below! I’m happy to update this guide if there’s anything I can do to make it more useful.
Happy building!