A guide dedicated to explaining the Create a Game Style menu and detailing all predefined game styles present in Worms Ultimate Mayhem.
Explanation of Game Settings
- Number of Rounds:
[1 / 2 / 3 / 4 / 5 / 6 / 7 / 8 / 9]
Self-explanatory; this setting refers to the amount of rounds that will be played as part of one match under this ruleset. - Turn Time:
[15 / 20 / 30 / 45 / 60 / 90]
The duration of each player’s turn in seconds. - Round Time:
[0:00 / 5:00 / 10:00 / 15:00 / 20:00 / 25:00 / 30:00]
The amount of time (mm:ss) before Sudden Death kicks in. Setting this to 0:00 makes the game start in Sudden Death mode. - Worm Health:
[50 / 100 / 150 / 200]
The amount of starting health for each worm in the match. - Worm Select:
[No / Yes]
When this is set to Yes, each turn starts with the player being able to choose a worm for free, just like they would when using the Worm Select utility. - Sudden Death:
[1 Health / Raise Water / Draw Round]
This setting decides what happens when the round timer gets to 0:00.– “1 Health” sets each worm’s health to 1 point. This option can (but doesn’t have to) be combined with the water rising on each turn.
– “Raise Water” will make it so the water level will start rising on each turn.
– “Draw Round” simply ends the round with a draw, leaving no one as the winner. - Water Rise Speed:
[None / Slow / Medium / Fast]
This setting controls the rate at which the water will climb each turn after the round timer runs out. The “None” option is only available if Sudden Death is set to “1 Health”. - Wind:
[Off / 1 to 5 / 1 to 10]
Toggle the severity of wind conditions in the match. This affects some weapons in the game, most famously the bazooka. - Telepads:
[No / Yes]
When this is set to “Yes”, a number of telepads will spawn on the map, letting players travel randomly between each pad. - Mine Factory:
[No / Yes]
When this is set to “Yes”, a mine factory will spawn on the map, putting more mines on the battlefield between turns. - Mine Fuse:
[0 / 1 / 2 / 3 / 4 / 5 / Random]
This setting controls the length of the fuse for each mine placed on the map by the game. - Assisted Shot:
[Beginner / Standard / Pro]
Unfortunately I couldn’t find too much information on this mechanic. From what I could find (and test by myself), this refers to the game “correcting” your shots, sometimes redirecting them away from your crosshair if the game thinks it would result in more damage. If you have more information on this, please feel free to leave it in the comments!
- Chance of Crate:
[increments of 10, from 0% to 100%]
Describes the chance of the game spawning a crate inbetween turns. If this is set to 0%, the following 4 settings responsible for crate type probabilities are disabled.– Weapon Crate – The probability of the crate holding a weapon.
– Utility Crate – The probability of the game spawning the toolbox-looking crate with a utility.
– Mystery Crate – The probability of the crate yielding a random “mysterious” effect.
– Health Crate – The probability of the crate being of the healing type.(Note: When creating a custom style, the total amount of bars between each option will add up to 10, which corresponds with 100%. The built-in styles will often ignore this, having a non-standard amount of total bars, ranging from 7 to 13. I can suggest treating this less as percentages and more as fractions or “weight”.)
- Health Crate Amount:
[25 / 50 / 75 / 100]
The amount of health which will be given to a worm that collects a health crate. - Land Objects:
[None / Mines / Oil Drums / Full]
This setting controls which objects will be allowed to spawn on the map at the start of the round. “Full” simply refers to both landmines and oil drums being allowed to spawn. - Additive:
[Additive / Normal / Limited]
How the game is meant to treat leftover items in the inventory between rounds. “Additive” means unused ammo will carry over to the next round, “Limited” will make it so the game won’t refill ammo between rounds, and “Normal” will simply start each player with the same starting amount of ammo each round. Obviously has no effect in 1 round matches.In this guide this setting is listed as “Cross-round Equipment” for the sake of clarity.
- Artillery Mode:
[No / Yes]
When this is set to “Yes”, worm movement is disabled. Worms can only be moved through the use of the grappling hook or weapon knockback. Curiously, it also removes the Icarus Potion from the weapon list. - Retreat Time:
[0 / 3 / 5 / 10]
This setting dictates how much time for movement each worm gets after using a weapon. Choosing “0” will mean no time to move away – using the Dynamite in a game style with 0 retreat time is a dangerous combination.
If Artillery Mode is turned on, this setting gets locked in the menu and the retreat time is, by definition of the mode, automatically 0. - Fall Damage:
[No / Yes]
Self-explanatory; when this is set to “Yes”, worms will receive damage when falling from heights.
These pages allow you to customize the availability of each weapon and utility in that style.
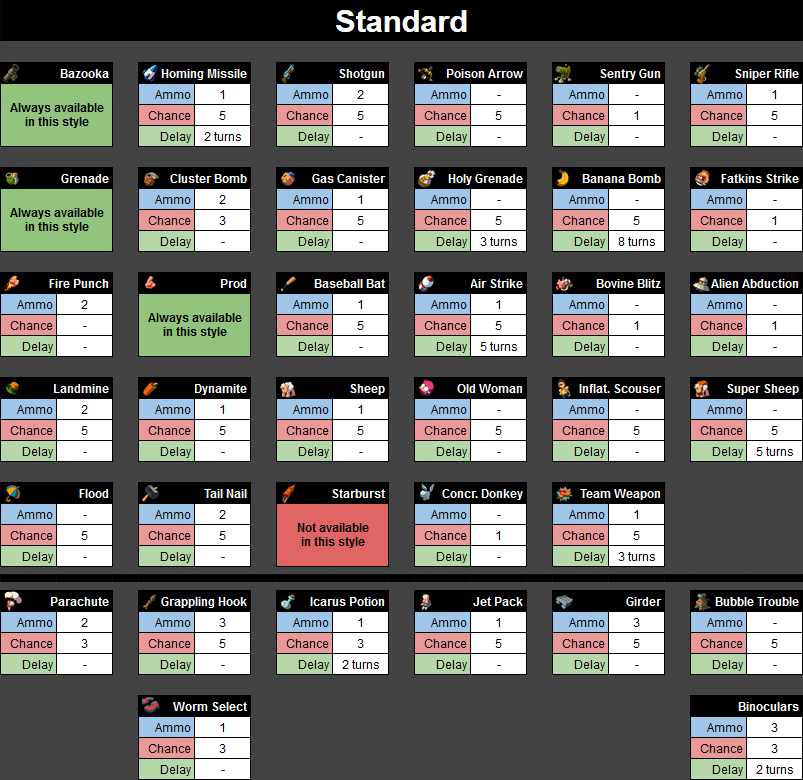
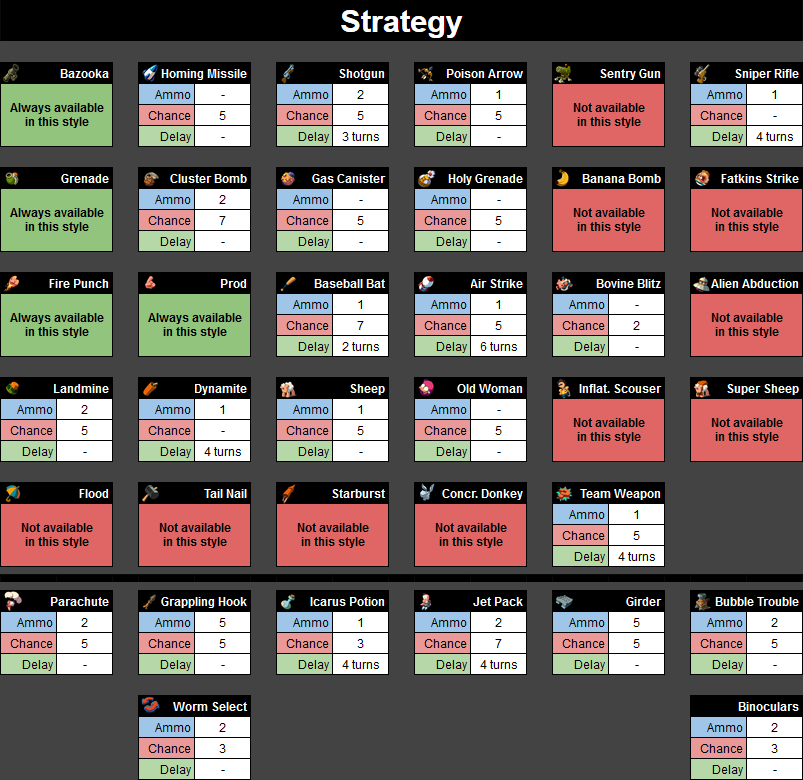
This guide will include all the information from pages 3–7 in the form of a table in each style’s respective section. “Ammo” will indicate the amount of uses the item starts with, “Chance” will indicate that item’s chance of being in a crate, and “Delay” will list the amount of turns that have to pass before the item becomes usable.
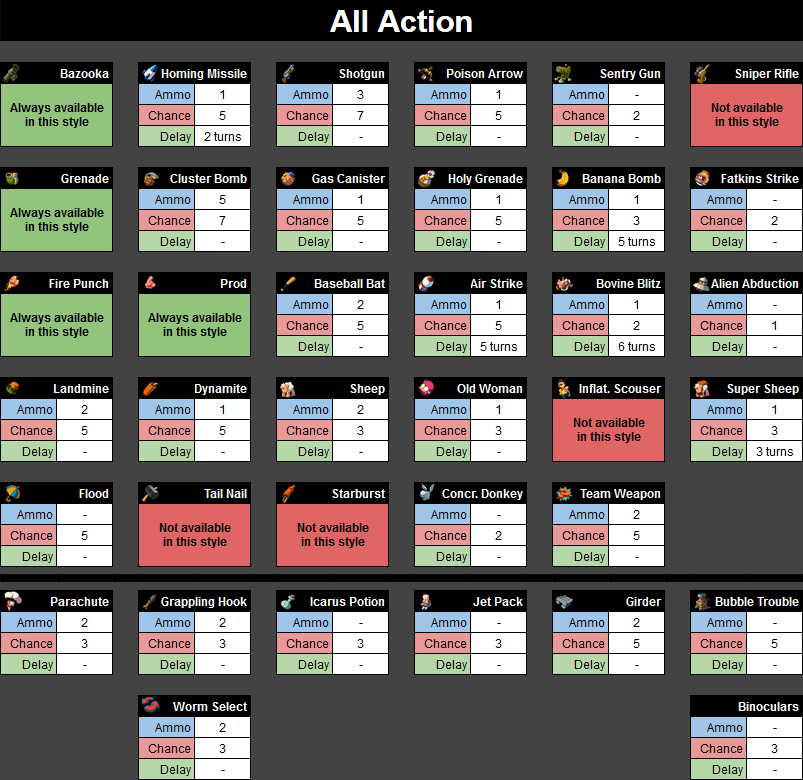
* All Action
A style focused on delivering exactly what it promises in the title: lots of action. With only 10 minutes before the water starts rising, a very short fuse on wild landmines, only a few weapon bans, and a bit of everything in the inventory and the weapon crate loot-table, the tides of victory in the match are certain to shift quite dynamically. As each worm gets 200 health points, a lot of that equipment is sure to come in handy in terms of dishing out pain.
2 rounds, 10:00 round time
Sudden Death: Raise Water (slow)
30s turn time, 5s retreat time
200 worm health, worm select off
Crate Chance: 40%
3/10 weapon, 2/10 utility, 2/10 mystery, 3/10 health (25 HP)
Objects: Mine Factory, Mines (1s fuse), Oil Drums
World: 1 to 10 wind, fall damage on
Artillery Mode: OFF
Assisted Shot: Beginner
Cross-round Equipment: Additive
- Permanent items: Bazooka, Grenade, Fire Punch, Prod
- Banned items: Sniper Rifle, Inflatable Scouser, Tail Nail, Starburst
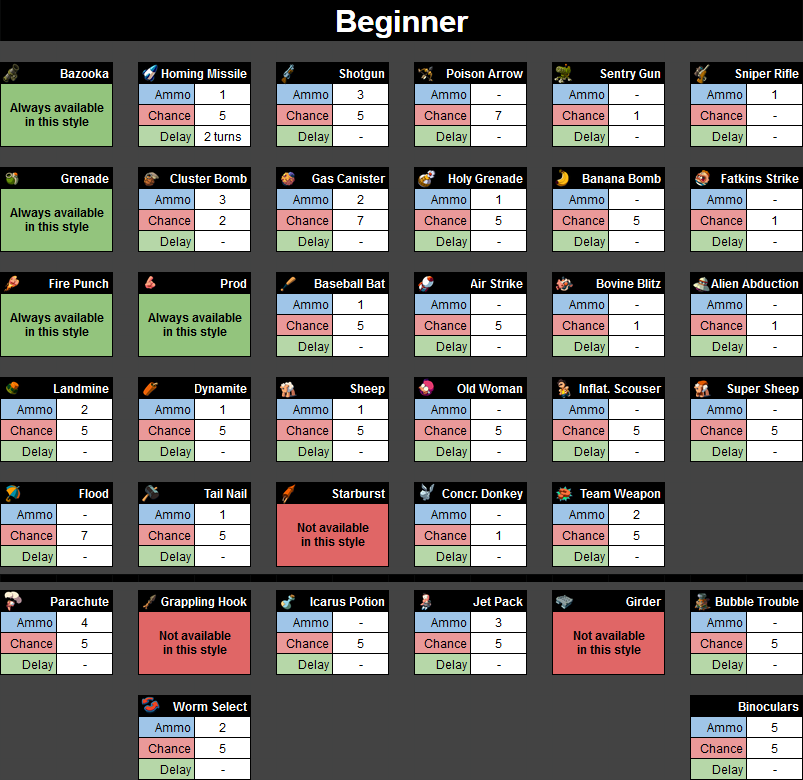
* Beginner
This style, as the title suggests, tries to be a not-too-complicated entry point for 3D newcomers and other beginners. Unfortunately, this one will feel too restrictive to the more experienced players, as evidenced by shot assist being turned up, and some trademark options like the Grappling Hook and the Girder being unavailable. Still, might be an interesting option if you don’t want to be overwhelmed, I suppose.
2 rounds, 20:00 round time
Sudden Death: 1 Health + Raise Water (Slow)
90s turn time, 5s retreat time
100 worm health, worm select off
Crate Chance: 50%
3/8 weapon, 2/8 utility, 3/8 health (50 HP)
Objects: Mines (5s fuse), Oil Drums
World: no wind, fall damage on
Artillery Mode: OFF
Assisted Shot: Beginner
Cross-round Equipment: Normal
- Permanent items: Bazooka, Grenade, Fire Punch, Prod
- Banned items: Starburst, Grappling Hook, Girder
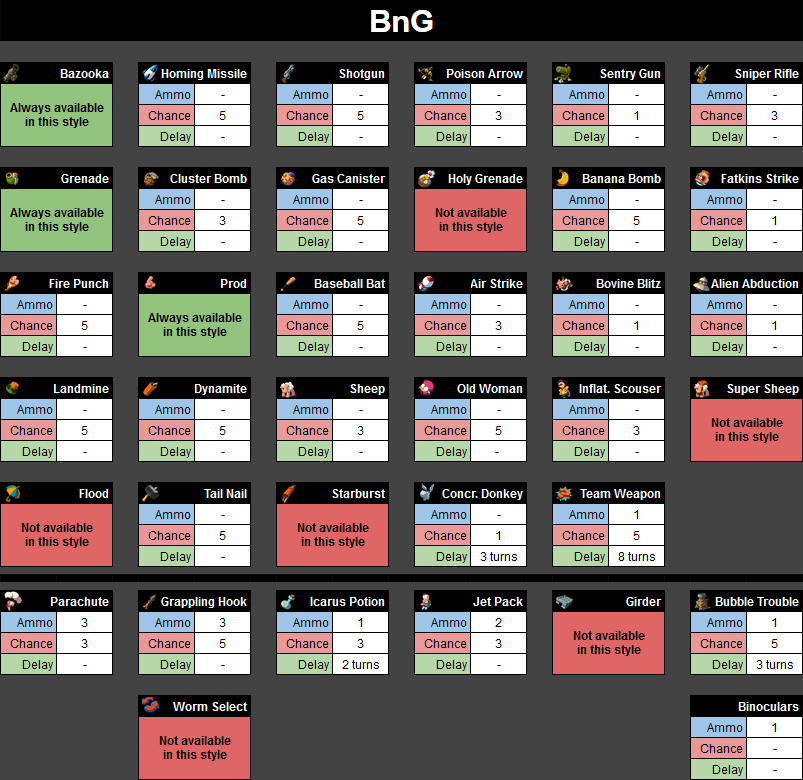
* BnG
Can’t go wrong with the good ol’ Bazooka and Grenades – hence the style name!
This ruleset gets about as strict as it can, with your only options at the start being the titular two weapons. If you want to use something else, you’ll have to pray for it to drop in a weapon crate. Other than that, well… you’d better commit to your turn and put the time to good use, as turns are only 30s long in this 10 minute match, and you can’t switch to a different worm.
2 rounds, 10:00 round time
Sudden Death: Raise Water (Medium)
30s turn time, 5s retreat time
150 worm health, worm select off
Crate Chance: 40%
4/9 weapon, 4/9 utility, 1/9 health (25 HP)
Objects: Mine Factory, Mines (5s fuse), Oil Drums
World: 1 to 10 wind, fall damage on
Artillery Mode: OFF
Assisted Shot: Standard
Cross-round Equipment: Normal
- Permanent items: Bazooka, Grenades, Prod
- Banned items: Holy Grenade, Super Sheep, Flood, Starburst, Girder, Worm Select
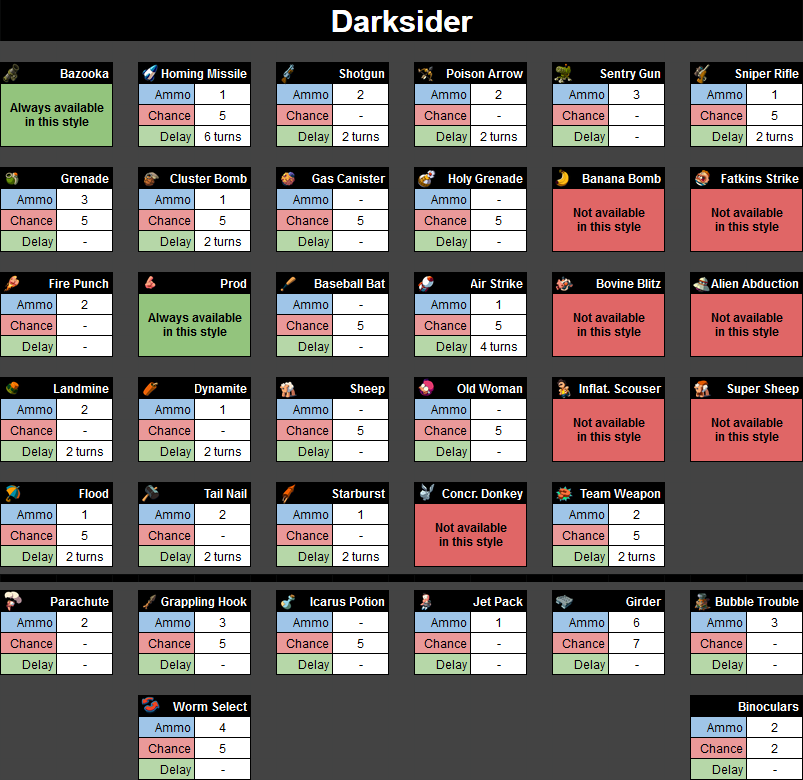
* Darksider
This style’s name references Team17’s philosophy of there being two distinct styles of playing Worms: the offensive Lightside which takes pride in mass destruction, and the more defensive Darkside which would rather take some time to bunker itself down and then attack. Fittingly enough, this game style is missing most of the Superweapons… and starts you off with enough girders to create a mighty fortress.
2 rounds, 30:00 round time
Sudden Death: 1 Health + Raise Water (Slow)
45s turn time, 5s retreat time
100 worm health, worm select off
Crate Chance: 50%
1/7 weapon, 5/7 utility, 1/7 health (25 HP)
Objects: Mines (5s fuse), Oil Drums
World: 1 to 10 wind, fall damage on
Artillery Mode: OFF
Assisted Shot: Standard
Cross-round Equipment: Normal
- Permanent items: Bazooka, Prod
- Banned items: Banana Bomb, Fatkins Strike, Bovine Blitz, Alien Abduction, Inflatable Scouser, Super Sheep, Concrete Donkey
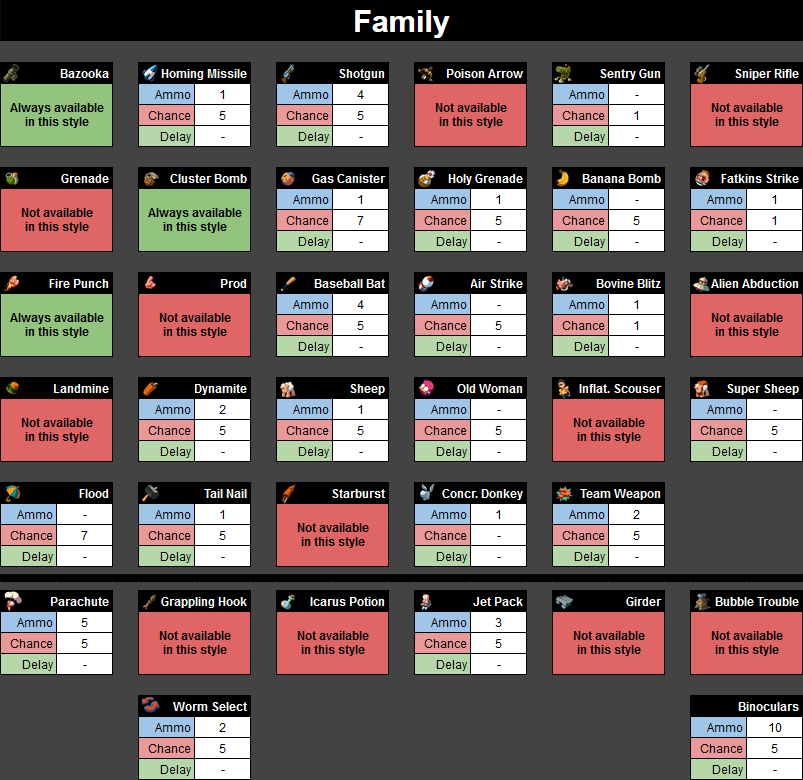
* Family
If the Beginner game style is supposed to be a soft introduction to the 3D Worms gameplay, the Family style is that except even more oriented towards a casual player who’s just looking for a silly game to play with friends on the couch. A lot of weapons are banned, Superweapons are available through crates… but everyone starts out with a Concrete Donkey with no delay for some reason. Assists are on, worms have plenty of health, and all the timers are pretty lengthy.
1 round, 20:00 round time
Sudden Death: 1 Health + Raise Water (Slow)
90s turn time, 8s retreat time
150 worm health, worm select off
Crate Chance: 50%
3/8 weapon, 2/8 utility, 3/8 health (50 HP)
Objects: Mines (random fuse), Oil Drums
World: no wind, fall damage on
Artillery Mode: OFF
Assisted Shot: Beginner
Cross-round Equipment: Normal
- Permanent items: Bazooka, Cluster Bomb, Fire Punch
- Banned items: Poison Arrow, Sniper Rifle, Grenade, Prod, Alien Abduction, Landmine, Inflatable Scouser, Starburst, Grappling Hook, Icarus Potion, Girder, Bubble Trouble
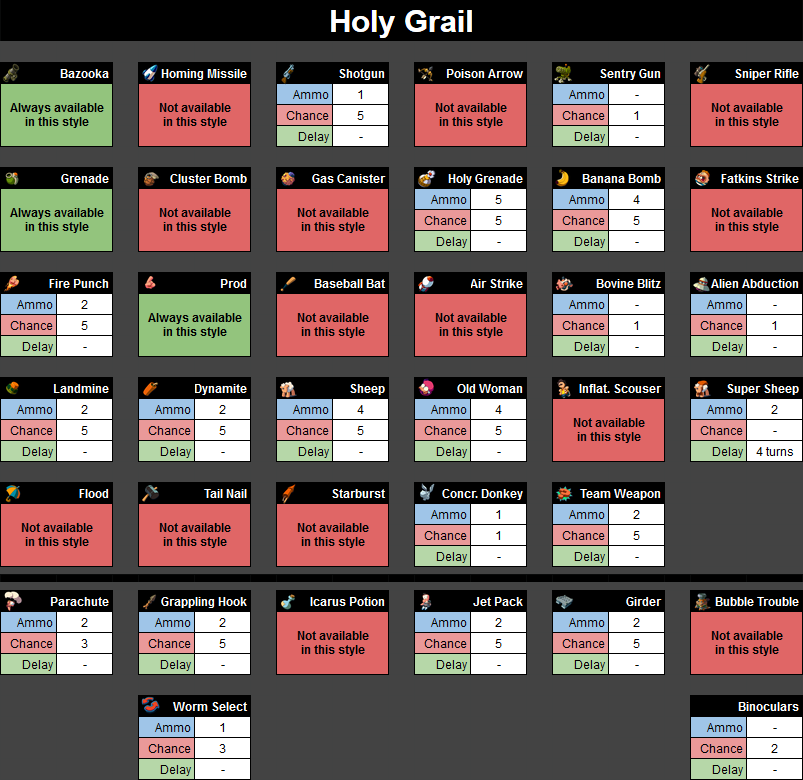
* Holy Grail
One of the more explosive game styles available. A lot of weapons are banned… but the ones that aren’t still pack a massive punch. Don’t expect the round time to run out before all the worms die – everyone gets 5 Holy Hand Grenades, 4 Banana Bombs, 4 Sheep, and 1 Concrete Donkey straight away, all of them without any delays, no questions asked. Look no further if you want to fill a map with more holes than there are in a wire fence.
2 rounds, 30:00 round time
Sudden Death: 1 Health + Raise Water (Medium)
45s turn time, 5s retreat time
100 worm health, worm select off
Crate Chance: 60%
3/9 weapon, 3/9 utility, 3/9 health (50 HP)
Objects: Mines (1s fuse), Oil Drums
World: 1 to 10 wind, fall damage on
Artillery Mode: OFF
Assisted Shot: Standard
Cross-round Equipment: Normal
- Permanent items: Bazooka, Grenade, Prod
- Banned items: Homing Missile, Poison Arrow, Sniper Rifle, Cluster Bomb, Gas Canister, Fatkins Strike, Baseball Bat, Air Strike, Inflatable Scouser, Flood, Tail Nail, Starburst, Icarus Potion, Bubble Trouble
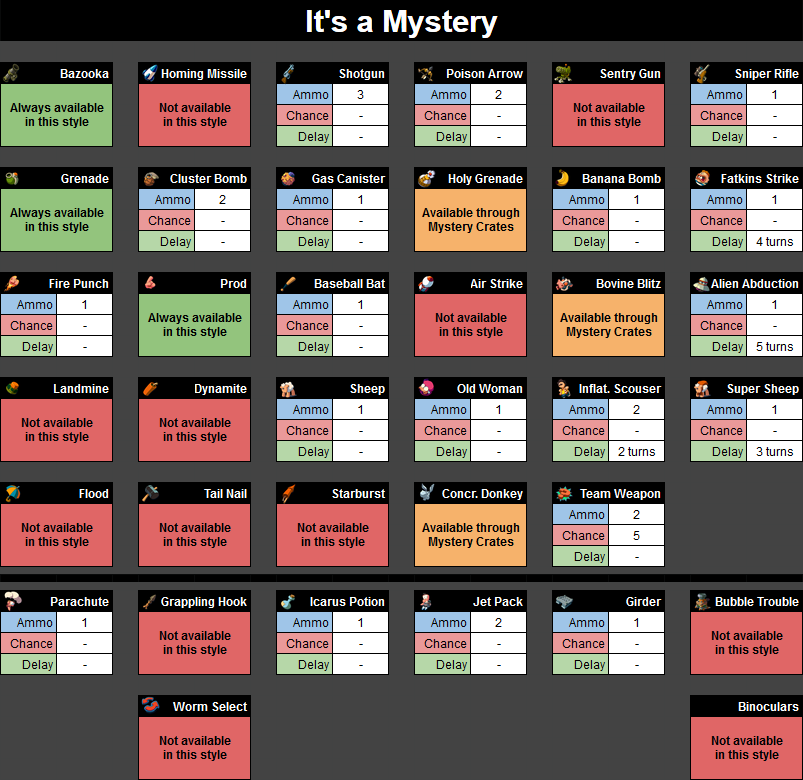
* It’s a Mystery
A confusing spectacle that relies on making itself even more confusing through a downpour of unpredictable mystery crates. A lot of weapons are banned, those that aren’t will usually have one unit of ammo, and the match itself will quickly get spruced up by random effects from the aforementioned crates. It’s just as confusing to play as it is to explain, as this game style – more than any other – allows a single crate to completely turn the whole match around.
2 rounds, 20:00 round time
Sudden Death: Raise Water (Slow)
60s turn time, 0s retreat time
150 worm health, worm select off
Crate Chance: 70%
2/10 utility, 8/10 mystery
Objects: Mine Factory, Mines (random fuse), Oil Drums
World: 1 to 10 wind, fall damage on
Artillery Mode: OFF
Assisted Shot: Standard
Cross-round Equipment: Normal
- Permanent items: Bazooka, Grenade, Prod
- Banned items: Homing Missile, Sentry Gun, Air Strike, Landmine, Dynamite, Flood, Tail Nail, Starburst, Grappling Hook, Bubble Trouble, Worm Select, Binoculars
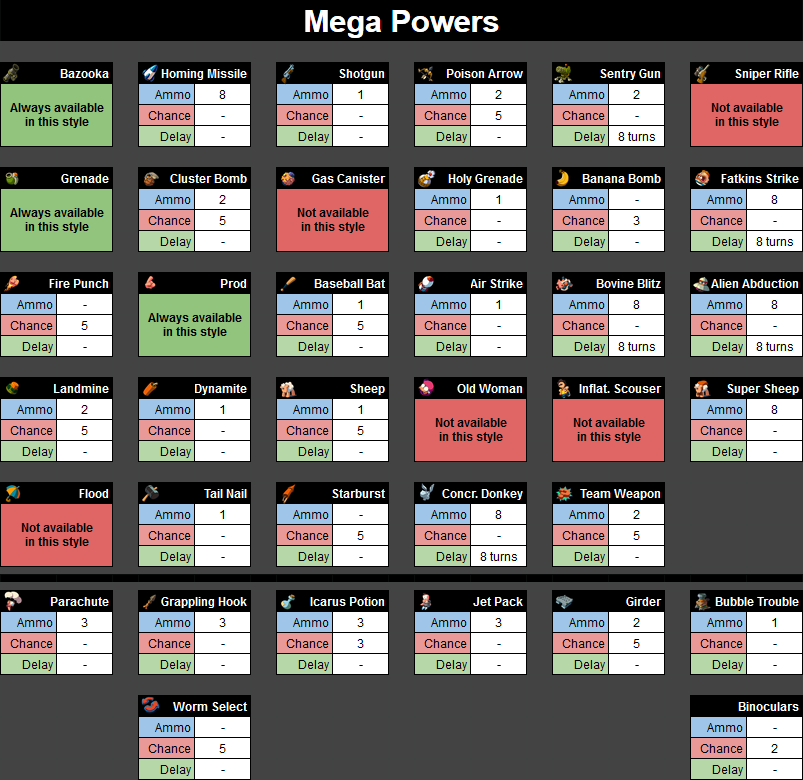
* Mega Powers
An interesting spin on the usual combat formula. Time is as much of a friend as it is a foe, as the entire round of quick 30s turns happens with a bigger threat looming in the background. Worms have tons of health and they can boost it even further through health crates… but within merely 10 minutes the water will start rising. If the frantic escape for the heights doesn’t decide the winner, the Superweapons that unlock after each player’s 8 turns will make someone the victor.
2 rounds, 10:00 round time
Sudden Death: Raise Water (Slow)
30s turn time, 5s retreat time
200 worm health, worm select off
Crate Chance: 50%
4/13 weapon, 2/13 utility, 3/13 mystery, 4/13 health (100 HP)
Objects: Mine Factory, Mines (random fuse), Oil Drums
World: 1 to 10 wind, fall damage on
Artillery Mode: OFF
Assisted Shot: Standard
Cross-round Equipment: Normal
- Permanent items: Bazooka, Grenade, Prod
- Banned items: Sniper Rifle, Gas Canister, Old Woman, Inflatable Scouser, Flood
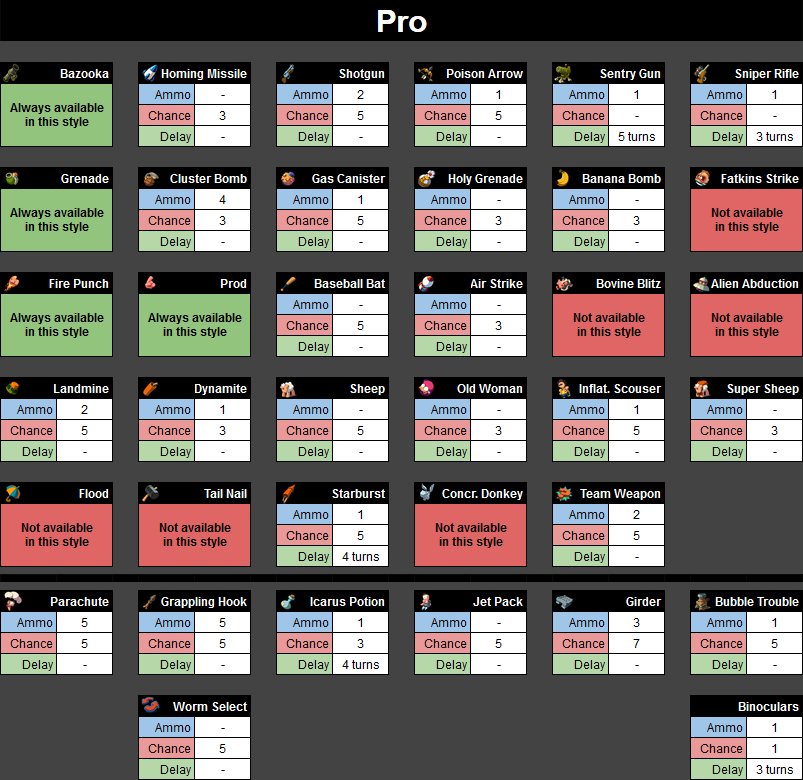
* Pro
Just about the closest to a challenging and competitive game style from the bunch of pre-made ones, Pro puts a lot of pressure on its players, allowing rounds to conclude really quickly if one doesn’t focus on the game. Superweapons are banned almost entirely (leaving only the HHG as a rare crate drop), health is a more valuable resource than ever, and the plentiful utilities allow the more resourceful players to shine bright in the fight.
2 rounds, 20:00 round time
Sudden Death: Raise Water (Fast)
30s turn time, 0s retreat time
100 worm health, worm select off
Crate Chance: 30%
1/9 weapon, 5/9 utility, 3/9 health (25 HP)
Objects: Telepads, Mines (random fuse), Oil Drums
World: 1 to 10 wind, fall damage on
Artillery Mode: OFF
Assisted Shot: Pro
Cross-round Equipment: Normal
- Permanent items: Bazooka, Grenade, Fire Punch, Prod
- Banned items: Fatkins Strike, Bovine Blitz, Alien Abduction, Flood, Tail Nail, Concrete Donkey
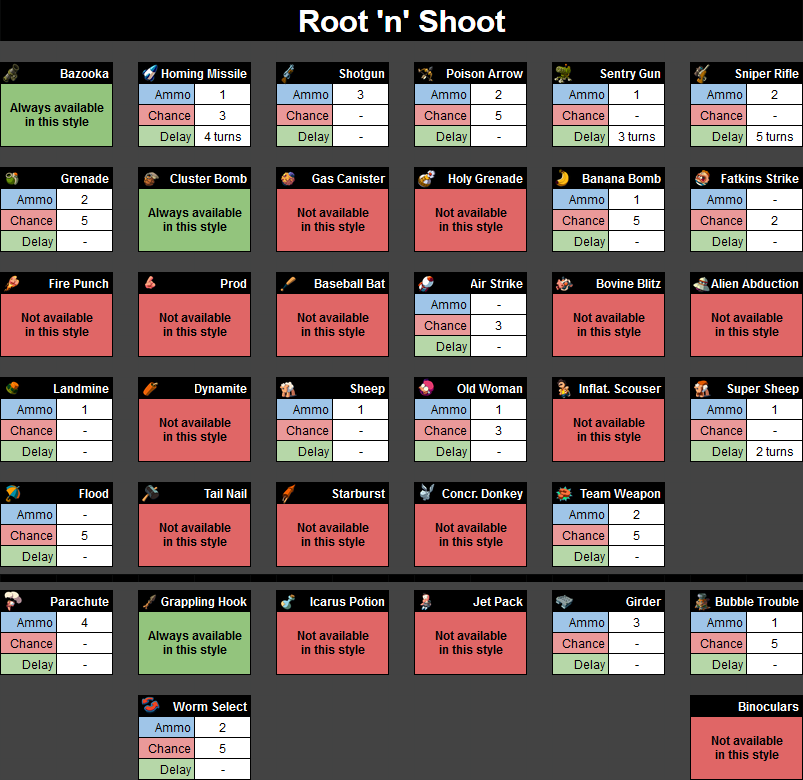
* Root ‘n’ Shoot
The game’s flagship Artillery style, for those curious as to what the game would look like if movement was taken away. Players are allowed infinite uses of the Grappling Hook to move their worms around on the battlefield (or drag crates towards themselves). The style bans many weapons, a lot of which (for example, Dynamite) would be too destructive or too difficult to use given zero retreat time and the requirement of spending time on using utilities just to move.
2 rounds, 20:00 round time
Sudden Death: 1 Health + Raise Water (Slow)
30s turn time, 0 retreat time (Artillery Mode)
100 worm health, worm select off
Crate Chance: 40%
3/8 weapon, 2/8 utility, 3/8 health (25 HP)
Objects: Mines (5s fuse), Oil Drums
World: 1 to 10 wind, fall damage on
Artillery Mode: ON
Assisted Shot: Standard
Cross-round Equipment: Normal
- Permanent items: Bazooka, Cluster Bomb, Grappling Hook
- Banned items: Gas Canister, Holy Hand Grenade, Fire Punch, Prod, Baseball Bat, Bovine Blitz, Alien Abduction, Dynamite, Inflatable Scouser, Tail Nail, Starburst, Concrete Donkey, Icarus Potion, Jetpack, Binoculars
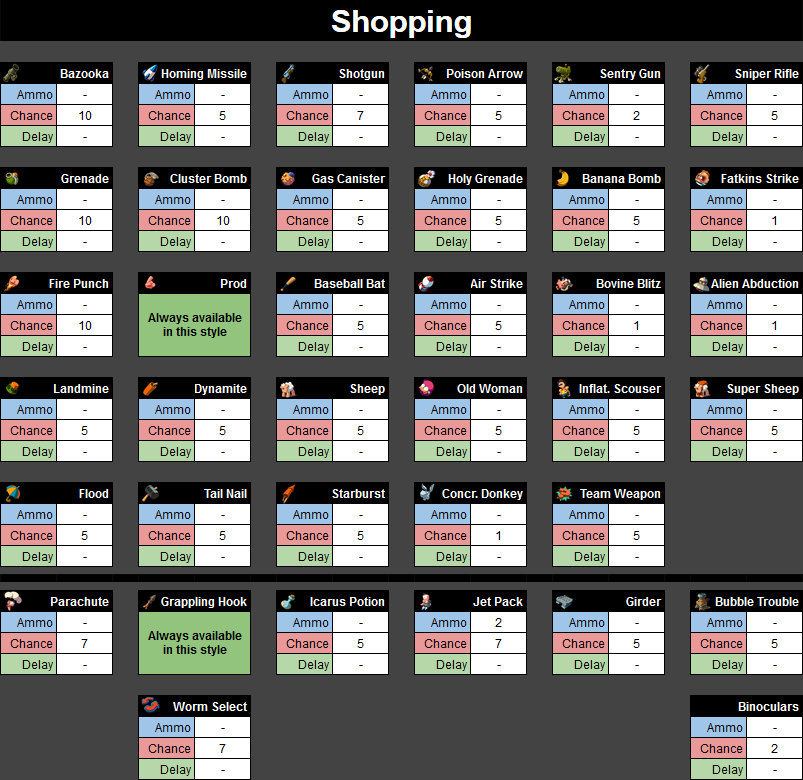
* Shopping
The bad news: in terms of starting weapons you get nothing except for the Prod. The good news: every single round there will be a new crate on the battlefield up for grabs. Better news: nothing is banned and there are no delays. Whatever you get, you are completely free to use however you want (or even carry into the next round). Just don’t think of this game style as of “shopping”. This experience is closer to garbage diving, as you desperately try to make do with what you find.
2 rounds, 20:00 round time
Sudden Death: Raise Water (Slow)
60s turn time, 5s retreat time
100 worm health, worm select off
Crate Chance: 100%
6/10 weapon, 2/10 utility, 2/10 health (25 HP)
Objects: Oil Drums
World: 1 to 10 wind, fall damage on
Artillery Mode: OFF
Assisted Shot: Beginner
Cross-round Equipment: Additive
- Permanent items: Prod, Grappling Hook
- Banned items: –
* Standard
Can’t go wrong with classics, huh? This game style’s title actually does a fine job of describing what to expect from it: a standard, tested and true, It Just Works™ combat experience. No gimmicks, no strange demands, just a little bit of everything coming together to create a match that will suit most tastes.
2 rounds, 20:00 round time
Sudden Death: Raise Water (Medium)
45s turn time, 5s retreat time
100 worm health, worm select off
Crate Chance: 40%
3/8 weapon, 2/8 utility, 3/8 health (25 HP)
Objects: Telepads, Mines (3s fuse), Oil Drums
World: 1 to 10 wind, fall damage on
Artillery Mode: OFF
Assisted Shot: Standard
Cross-round Equipment: Normal
- Permanent items: Bazooka, Grenade, Prod
- Banned items: Starburst
* Strategy
Perhaps the most subdued game style in Ultimate Mayhem. This style bans almost all Superweapons, takes away the ability to retreat after an attack, and leaves only the more subdued options, forcing the players to – you guessed it – strategize in order to come out on top.
2 rounds, 30:00 round time
Sudden Death: 1 Health + Raise Water (Fast)
30s turn time, 0s retreat time
100 worm health, worm select off
Crate Chance: 40%
1/7 weapon, 5/7 utility, 1/7 health (25 HP)
Objects: Mines (5s fuse), Oil Drums
World: 1 to 10 wind, fall damage on
Artillery Mode: OFF
Assisted Shot: Pro
Cross-round Equipment: Normal
- Permanent items: Bazooka, Grenades, Fire Punch, Prod
- Banned items: Sentry Gun, Banana Bomb, Fatkins Strike, Alien Abduction, Inflatable Scouser, Super Sheep, Flood, Tail Nail, Starburst, Concrete Donkey
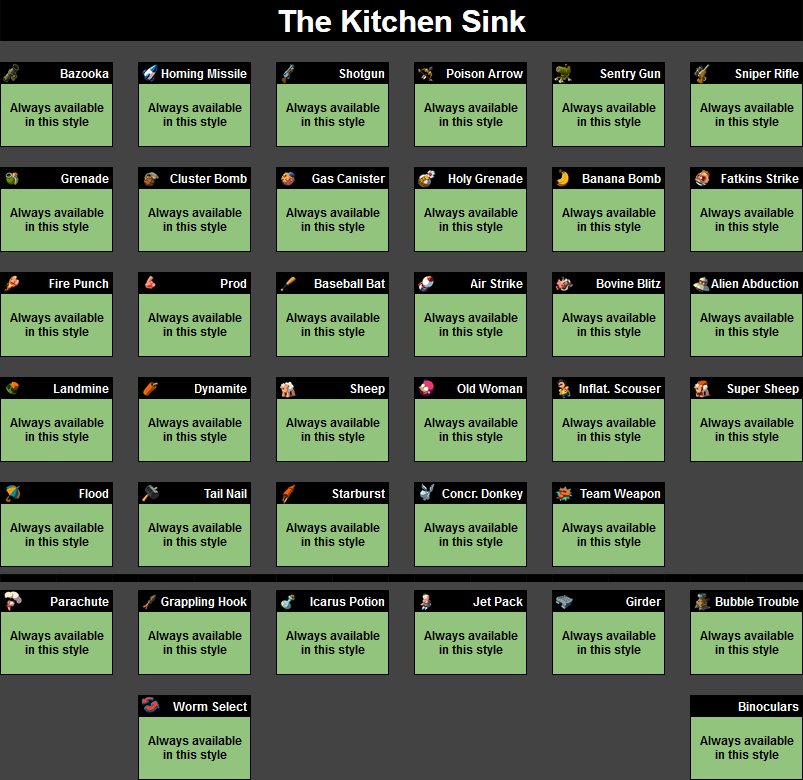
* The Kitchen Sink
An odd reward for unlocking all of the character sets in the Item Shop. If you remember the phrase “everything but the kitchen sink”, this game style is literally giving you everything and the kitchen sink. All the weapons and utilities in the game with infinite ammo and no turn delays, no questions asked. Not even nearly as riveting as it may sound – just ask the CPU teams, which will inevitably use the opportunity presented by this style to unleash the Concrete Donkey on everything. Oh well.
2 rounds, 30:00 round time
Sudden Death: Raise Water (Slow)
60s turn time, 3s retreat time
200 worm health, worm select off
Crate Chance: 30%
3/10 weapon, 2/10 utility, 2/10 mystery, 3/10 health (50 HP)
Objects: Mine Factory, Mines (random fuse), Oil Drums
World: 1 to 10 wind, fall damage on
Artillery Mode: OFF
Assisted Shot: Pro
Cross-round Equipment: Normal
- Permanent items: Everything.
- Banned items: –