Annotated beginner’s guide to Yggdra Union, covering some mechanics and concepts that aren’t readily covered by the tutorial.
Intro
That being said, some stuff in this game is absolutely impenetrable and it can behoove you to know it, so I hope this will help you out a bit. The game does have a very comprehensive tutorial, but some things still slipped through the cracks.
Game Basics
The map screen looks like this.
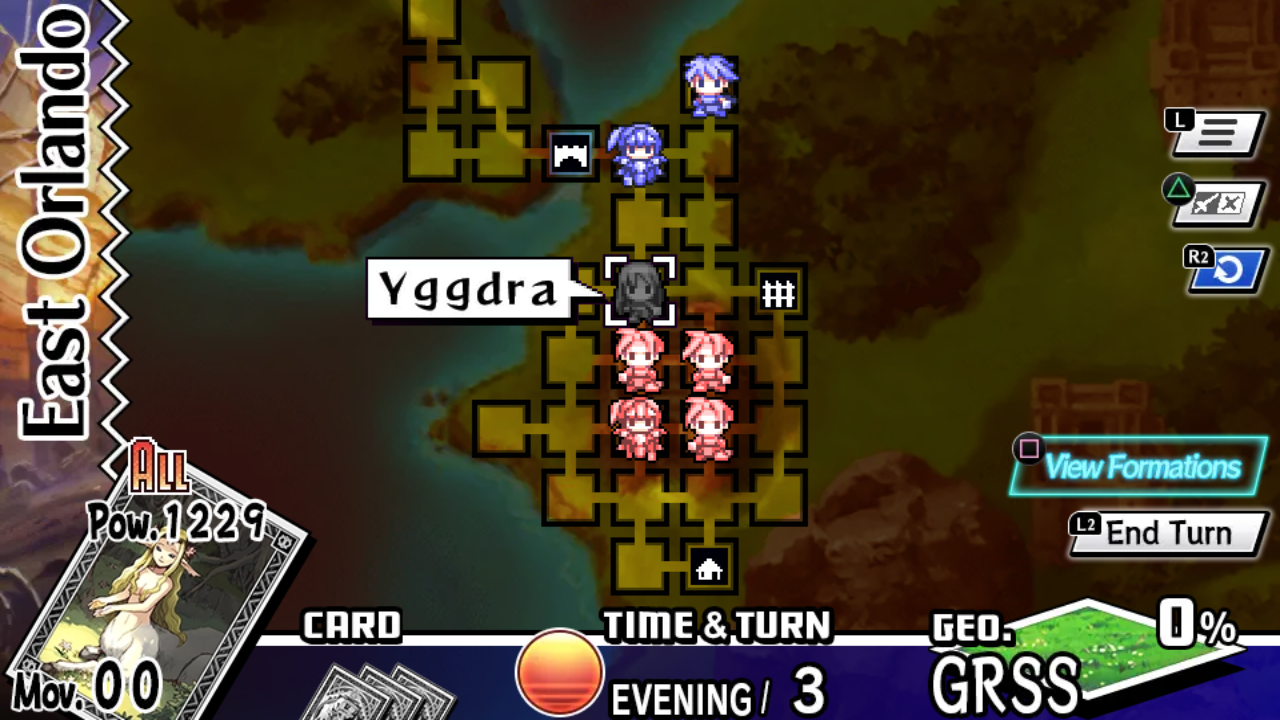 Red is enemy units, Blue is your units. The little black boxes represent terrain features like villages; the hash icons are gates, which are impassable terrain. The bottom UI tells you which card you picked, how much move you have left, what time of day it is and what turn it is, and the GEO effect of a panel you’re passing over (typically this will be expressed as a % modifier to the unit’s morale defense). On this screen you’ll move around and organize for Unions.
It’s worth pointing out that some items are hidden on the map and will only be found if a unit stops on their square. Since you can have a unit stop and start moving as often as you like during a turn, if you really feel like it, you can have them stop on every panel you intend to walk them across; this is probably more effort than I usually care to put in, but you totally can do it.
Unions are this game’s namesake and whole gimmick. Only one character per faction can ‘attack’ per turn, but attacking will drag in all characters in the ‘union’. You can see this here:
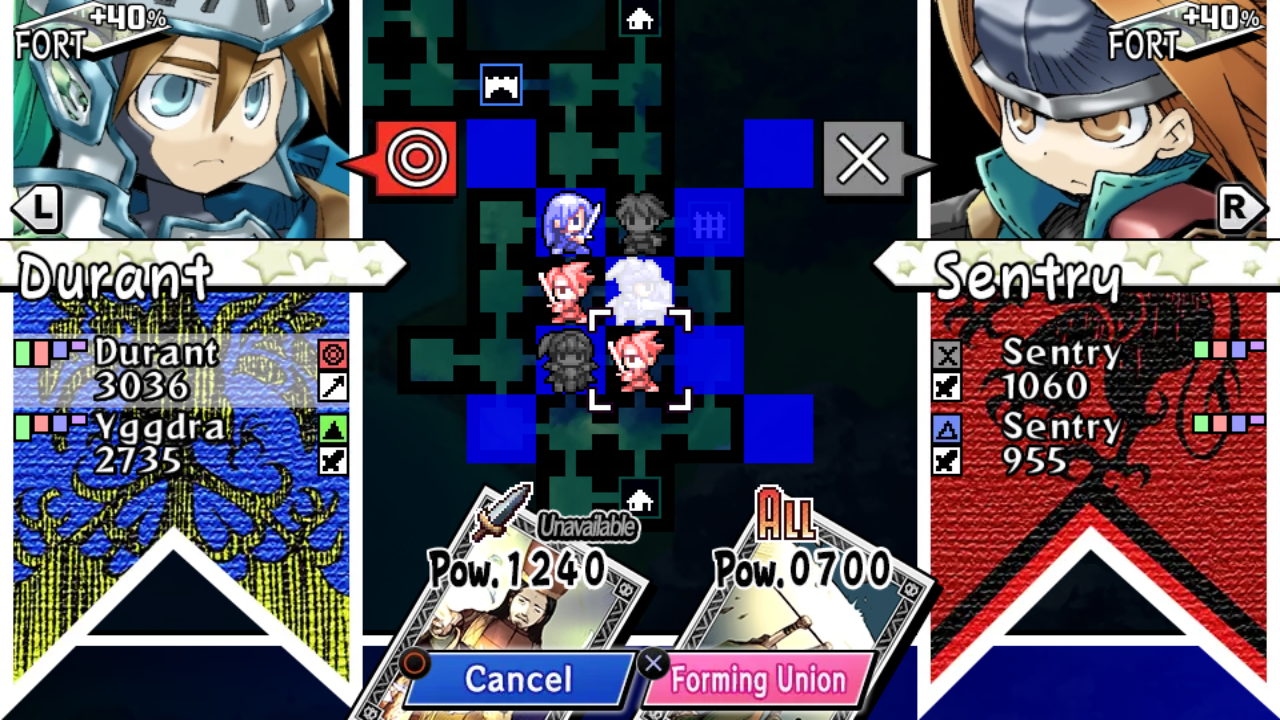
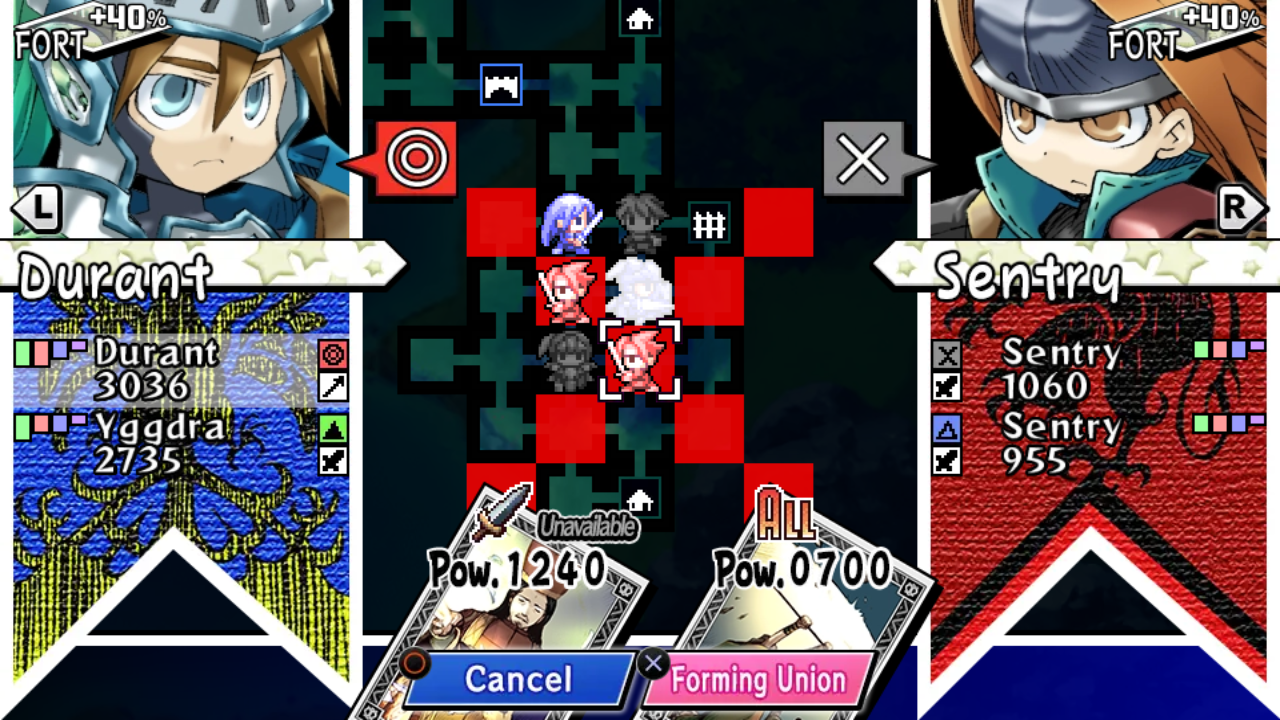
Durant is attacking the Sentry and bringing Yggdra into his Union, while the Sentry defensively drags another Sentry into his own Union. Union shapes are determined by the character’s sex: male characters use an X-shaped Union, while female characters use a +-shaped union. As you progress through the game, the Union mechanic will be expanded such that characters in the Union will project a 1-panel ‘mini union’ of their type, allowing you to construct more complex formations that bring in more characters.
Combat
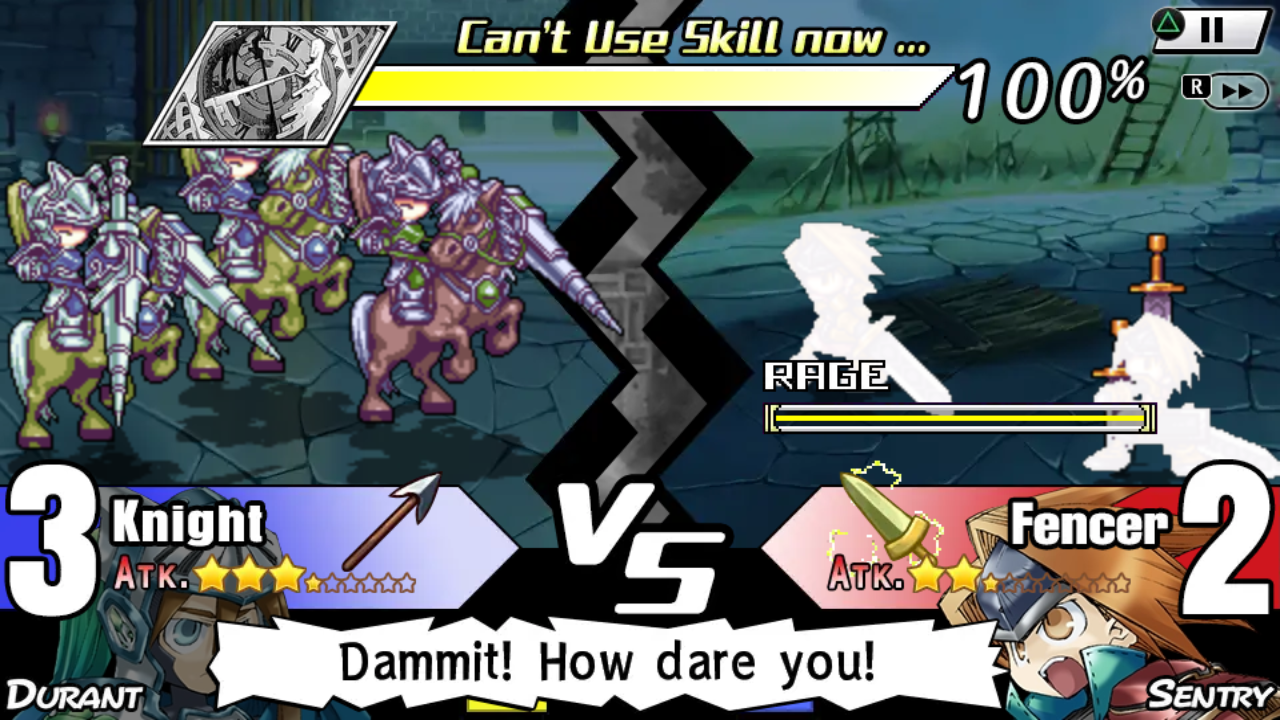
This is the combat screen. Combat begins with a Charge by the attacking side, followed by a Counter by the defending side, and then combat is joined in melee.
The very top of the screen shows the skill bar or, if the skill bar is not full, will show the Passive and Aggressive indicators.The bottom corners show the battling characters along with some flavor dialogue; the large number is effectively the unit’s “HP”. Above the AI’s portrait is the Rage meter, which we’ll discuss shortly.
Battles are won when one side runs out of HP.
By holding left or right, you can change the combat mode of your character (only after this feature is introduced – the very first map doesn’t feature it). Being Passive will fill the skill meter; being Aggressive will deplete it. Additionally, being Passive will reduce your Combat Advantage by one step, and being Aggressive will increase it. When the gauge is maxed out, you can no longer be Passive; conversely, if the gauge is zeroed out, you can no longer be Aggressive. Finally, if a character has an elemental trait (e.g. Yggdra = Holy), that element will be applied while in Aggressive mode.
Rage is the AI’s equivalent of the Combat Mode mechanic, although it actually works fairly differently. The first time a unit is engaged during a battle, its Rage meter will start at the minimum.

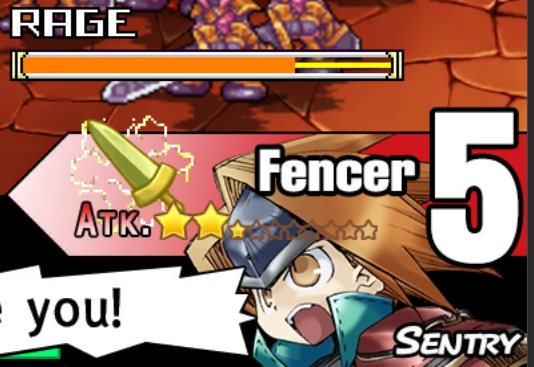 The mid-point of Rage is the most interesting part, because if an enemy has an element, it will be applied during this stage of Rage only. In this image, the enemy Fencer is applying Lightning (shown by the yellow crackling effect). This element is based on unit class. Valkyries do Holy, Undines do Ice, and so on. This is important because depending on your unit that is battling, they might suddenly take huge amounts of damage if they’re vulnerable to the element (for example, Yggdra is weak to Dark, so keep her away from Assassins), or might take no damage at all during this phase (for example, Nietzsche is immune to Ice, so she can facetank Undines in mid-Rage).
Once you unlock the ability to use skill cards, you need to meet some certain requirements, other than just maxing out the skill gauge by using Passive Mode:
- The Union Leader must match the Ace type written on the card. (ALL can be used by anyone as leader.)
- Other conditions on the card must be met. (Some cards only work at specific time of day or on specific tiles.)
- Some cards can only be used by specific leaders. (For example, Revolution can only be used by Yggdra.)
- Some cards, especially cards that deal direct damage, require that the user’s TEC exceeds the target’s GEN, or else they will have no effect.
- Finally, some cards have special effects when used by a specific character, even if they can be used by other characters.
Once you’ve maxed out the gauge, you can then hold the select button to charge up and release it when the gauge is free to “Break Out!” and cast the card’s ability. There’s a solid guide on this already so I won’t go into it too much here, but good use of skill cards can easily make or break a battle.
Note that enemies can interrupt your gauge charge if they land a smash hit (they will glow white) during your charge up, and enemies can cast their own skill card (once that functionality is unlocked) when their Rage gauge is maxed out.
Combat Advantage is the little symbol that appears next to each character and basically shows how much damage they’re dealing. There’s a tutorial that explains the order of this, so I won’t go into it in detail here, but remember that you should always keep in mind what your combat advantage is like. If the symbol is greyed-out, it means you’re dealing no damage at all.
You’ve probably noticed by now that the gauge fills in Passive mode about half as quickly as it depletes in Aggressive mode, making charging the gauge to use it for aggression in the same battle a losing proposition (you’ll spend twice as much time with your Combat Advantage reduced one step than you will with it increased one step). Raising the gauge to use skill cards is obvious, but how should you go about using it before those are unlocked or when they aren’t relevant?
There’s a few interlocking mechanisms here. First, it’s important to understand how the gauge’s base works: the initial gauge is based on on the specific card being used and the TEC of the character in battle. As a rule, higher movement cards, and cards with high base power and strong effects, tend to have a low base gauge, while cards with low movement or lower base power tend to have a high base gauge.
If the gauge has been raised during one battle in a Union, then it will remain at that value during the next battle. If the gauge has been lowered below what would be the initial gauge for the next character, then it will be raised to that level instead.
This has a few implications for putting unions together:
- Characters with high TEC benefit from going either early in the union to quickly use a skill, or late in the union after the skill would be used.
- Characters with a huge TEC vs GEN advantage make great chargers, as they will get a huge advantage on the opening charge, giving them an opportunity to charge up.
- Characters with an advantage against a target should be placed before characters with a disadvantage, allowing them to use their advantage to build gauge in Passive mode so that the weaker character can follow up in Aggressive mode, helping to offset their disadvantage.
If you win, your card will also gain a permanent bonus to its power value. This persists between maps, so your most-used cards will become very powerful!
Combat In-Depth/Miscellaneous
As far as I understand, the ATK stat is modified by your Combat Advantage and output directly to the enemy’s invisible HP bar. There doesn’t seem to be an actual ‘defense’ stat that makes your units ‘tougher’, but Combat Advantage has a big effect on the fight.
The Head represents the main character in a unit, a ‘leader’ of the unit; the other members are ‘flunkies’, essentially. This is not an exact science but the Head is roughly worth 2 of one of the flunky units.
Large-sized units only bring 4 members to fight with them instead of 8, but each unit is worth roughly 2 normal-sized units. A Large Head is therefore worth roughly 4 normal-sized units; this actually maths out to be slightly stronger overall than normal-sized units (Large units, with this napkin math, have the equivalent of 10 units, while normal units have the equivalent of 9).
This is also important for a specific interaction with Chariot, a skill card which reduces the enemy’s numbers to exactly equal your own; this is a very winning proposition for a Large unit, which is worth more per-unit than a normal unit.
A Critical Hit can only occur on a Charge, and results in the Head instantly being KOed. For a brief period of time, called Panic Time, the attacker will get to deal damage ‘for free’ (without taking any in return), and there will be no Counter-Attack; further, the Skill and Rage gauges are disabled. Critical Hits also give a huge bonus to morale damage if the attacker wins (which is almost guaranteed).
The basis for Critical Hits seems to be LUK, but don’t rely on it too much.
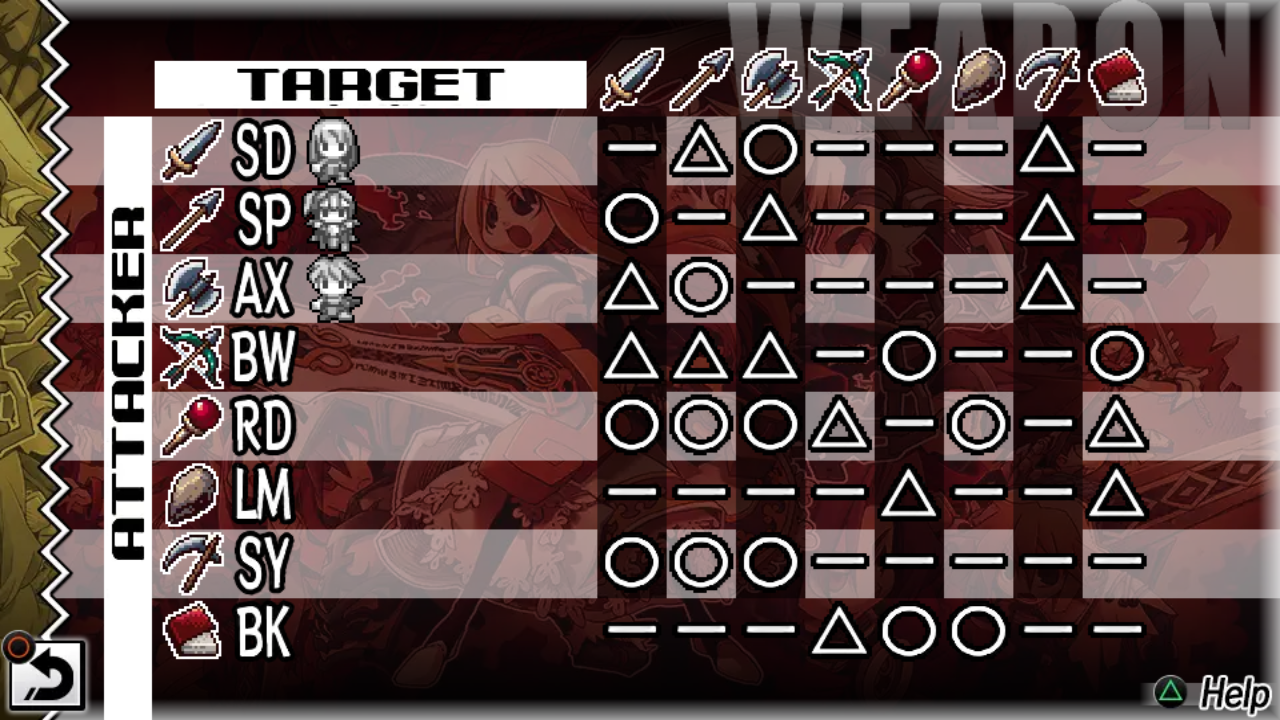 Weapon Advantage is slightly more complicated in this game than in Fire Emblem, but it’s also not nearly as crippling in most circumstances. Note that Scythe is only available to the player through Mistel, a secret character added to the PSP version; normally it is the signature weapon of Guscal, as if he needed any help. Fortunately you can check this chart in-game at any time.
If the same unit participates in more than one battle in a Union, they will lose one flunky each time they participate (I believe it’s for every two participations for Large units but I need to double-check that). Note that Milanor begins the game equipped with an item that negates this penalty, so don’t get too complacent about it.
Using this mechanic is one of the best ways to wear down tough enemies.
Character Screen, Equipment, and Morale
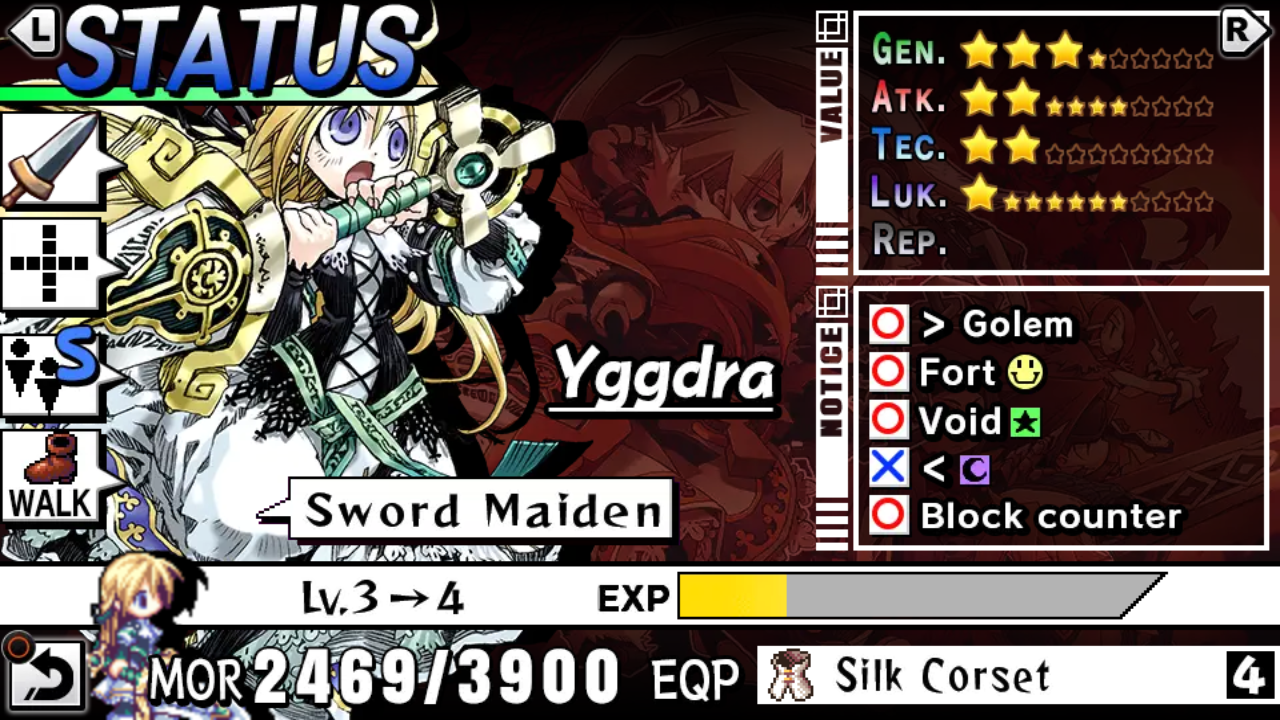
You’re given a lot of information on the character screen! The left side shows you character’s weapon, union type (+ or X), the unit’s size and type (S or L, and whether they’re infantry, a golem, etc.), and their movement type.
At the bottom you have the character’s current and maximum Morale (more on that below), as well as their currently equipped item.
At the top right are the character’s stats. Note that only big stars count! Little stars appear each time the character gets a +1 to their stat, and when all little stars are full, you get a new big star (and some little stars disappear). This has the very cursed side effect of causing your effective stats to rise faster the higher they are.
- GEN: This value reduces the damage done by enemy Charges and Counter Attacks, as well as how much Morale Damage you take when you lose a battle. It’s also used for defending against skill cards: some won’t work at all if your GEN is higher than the enemy’s TEC, while others will deal much less damage if you have high GEN.
ATK: This is how much damage is done to enemies in-battle, as well as influencing how much Morale Damage is done to enemies when you win a battle. Remember that this value is heavily influenced by Combat Advantage. - TEC: This is how much damage is done to the enemy by Charges and Counter Attacks, and can also be thought of as a magic stat: high TEC will cause your gauge to start higher, having a higher TEC than the enemy’s GEN is necessary for some cards to work, and high TEC will increase the damage done by direct damage cards.
- LUK: Appears to influence the rate of Critical Hits both outgoing and incoming, not sure what else it does.
- REP: This is an odd stat that is capped at 6, and rises by 1 every time the character wins a battle; if the character loses a battle, all REP is lost. REP is mostly used to find certain items, and in some cases which item you get is determined by the REP of the character who would get the item.
Below that is a list of effects that are present on the character. In the case of our Yggdra screenshot up above, we can see that she’s strong against Golem enemies and does well on Town terrain, as well as voiding Holy damage. On the other hand, she’s very weak against Dark damage. She also has Block Counter, preventing all damage from Counter Attacks; this is a property of her starting equipment, the Silk Corset.
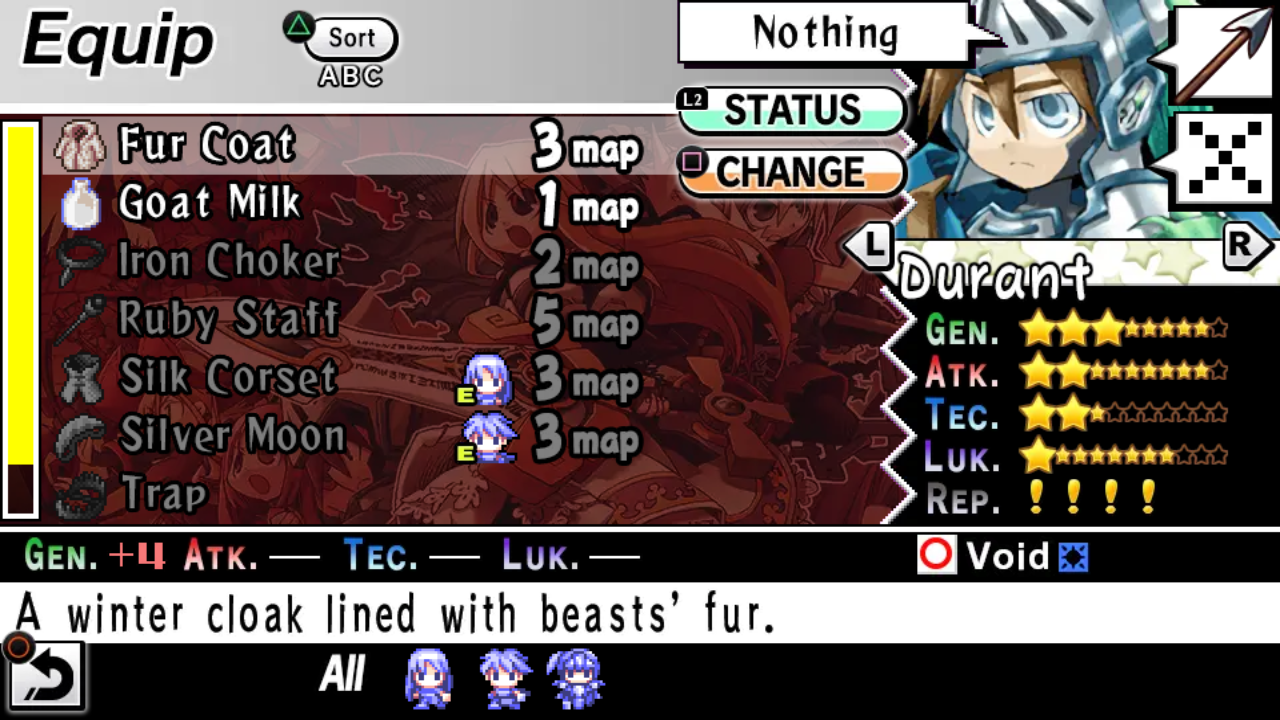
Equipment can be assigned to characters between battle. Once on a character, the equipment is glued to them until the requisite number of battlefields have passed; it is then permanently lost. In addition to typically having a stat benefit, most equipment has some kind of special ability – for example, Yggdra’s Silk Corset, mentioned above, gives her Block Counter, causing her to take no damage from Counter Attacks. Don’t get mislead into thinking this is an innate ability she has!
Note that items that are “broken” by the appropriate Skill Card are not actually destroyed, just rendered unusable for the rest of the map.
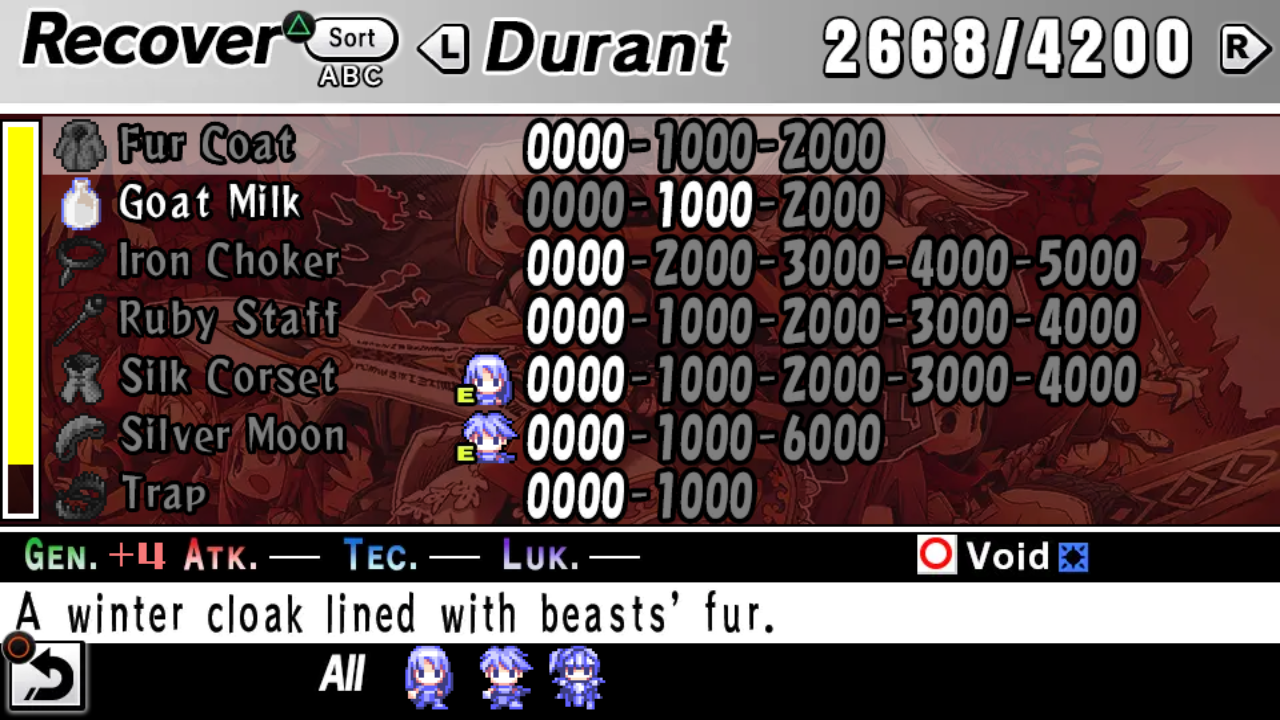
Items can also be consumed between battles to give characters a Morale boost. Medallions restore 20% of a unit’s max Morale, while other items vary depending on the character they’re being consumed by.
Morale will be restored by 25% when a character levels up in Normal mode (not on Hard mode).
Especially on Hard mode, this means you need to be careful about taking a lot of Morale damage, since it won’t be refreshed between stages.
Note that for “Edible” items that give permanent stat bonuses, they must be equipped on the unit, not consumed for morale! Equip the unit with the item and the first time they stop on the map, they’ll consume it and gain the benefit.
Miscellaneous Info
Milanor is your Hector type of FE Lord; he’s likely to be your heaviest hitter throughout the entire game, and unless you get mobbed by swordsmen, he’s not likely to lose many fights. He also gets a benefit from Wasteland tiles, which are very common, and is the only person who can use Steal. He’s also a forced deploy on many maps so you might as well get used to using him.
Note that early in the game, Milanor’s default equip gives him “No Continuous Battle Penalty”, allowing him to be used multiple times in the same Union without losing flunkies.
Earlyish in the game you’ll have the opportunity to recruit one of these spellcasting units. If this is your first time through, I recommend Rosary. Roswell is very useful for collecting certain secret items because of his unique movement mechanic: at night, he ignores terrain but can only step on every other panel. This mechanic can be quite complicated to use, though, so I don’t recommend it for beginners.
That being said, Rosary’s unique gimmick of being able to summon Golems is not super useful because Golems are limited to moving at one panel per turn and their unique ability to destroy bridges is normally more trouble than it’s worth, especially since without using their special Earthquake card, the only way to destroy a bridge is to suicide a Golem on top of it (they will destroy the bridge and sink to their death). Roswell’s skeletons, on the other hand, can use Poison Breath, which is actually quite strong; however, they can only move at night. (But most late-game maps are locked to night.)
This is more important than it might seem. Many villages will not give you anything if you visit them at night (everyone is sleeping). Certain classes do better at some times of day than others (Hunters do better at noon, Assassins do better at night), or have certain special abilities (Skeletons can’t act during the day; Roswell can teleport at night). Ice will melt when it becomes Noon, causing any non-swimming, non-flying unit standing on the ice to instantly die (they sink in the water and drown). Lots of skill cards can only be used at a specific time of day, including particularly potent ones like Mirage and Refreshment.
A lot of the late-game maps are locked to night, so be aware of that when picking your card loadout.
Chariot is an interesting card: it’s Spear ACE (but only Durant can use it) and reduces the target’s number of units to exactly equal the user’s. This is particularly valuable for Durant, as Large-type units are already worth more than normal-type units. With Durant on favorable terrain (a Bridge or Road tile), it’s entirely possible for him to solo unions by using Chariot. This is a bit of a niche strategy but it might save you if you get caught up.
If Nietzsche uses the skill card “Blizzard”, she will perform a unique incantation and attack. More importantly, she’ll also turn all the water tiles on a map to Ice – this can really let you hoof across a map if you time it well. Just make sure not to leave anyone standing on the ice tiles when noon comes around, especially Milanor or Yggdra!
In the JP version, the “Crusade” card is called “Jihad”.