
The Outpost and the Research Station are the two cornerstone progression systems in ARC Raiders, and leveling both is one of the highest-value investments you can make as a Raider. The Outpost expands your effective storage, gives you a customizable home base, and is positioned to become a social hub in future updates. The Research Station unlocks the ability to craft missing blueprints, furniture designs, and—most importantly—amplified weapon modules such as drum magazines, incendiary rounds, and scopes that give you a real combat edge.
This guide walks you through every unlock step, every upgrade tier, and the exact locations for every material you need, from your first photo objective at the Ruined Homestead all the way to the Level 4 upgrades that demand ARC Data Modules and Frigate Inductors. It also covers the single most efficient farming method in the game for rare upgrade materials: storm shelters during blizzards.
By the end of this guide, you will know exactly where to go, what to loot, and what to avoid so you can push both facilities to maximum level without wasting raids.
Prerequisites & Requirements
Before you can begin the Outpost unlock chain, make sure you meet the following conditions:
- Character level 18 — required to start the quest Research Topside Living Conditions.
- A camera — either given to you during the quest or purchased from a vendor. Do not sell it.
- Access to the Blue Gate map — the first objective takes place there.
- Basic raid supplies — you will need to deal combat damage to flying ARC and Bullies, so bring appropriate weaponry (details below).
- Trade access to Celeste — several materials (sheet metal, planks, steel cables) can be purchased from Celeste using seeds, which is often faster than looting.
- Patience for multi-raid material grinds — higher-tier upgrades (Level 3 and Level 4) require rare items that typically take several raids to accumulate.
All Upgrades & Material Locations
Why You Want to Level Up the Outpost
The Outpost is your personal base of operations. Upgrading it delivers three concrete benefits:
- Storage expansion — you can build and decorate your outpost, place items inside it, and construct weapon racks to store weapons. This effectively saves stash space, which becomes critical as your loot collection grows.
- Customization — each upgrade tier lets you select a room type, dramatically changing the look and layout of your base.
- Future social functionality — the Outpost is designed to eventually become a social hub where you can explore your space and invite friends. Investing now prepares you for that content.
Why You Want the Research Station
The Research Station is your crafting and blueprint hub. Its core functions:
- Craft missing blueprints you have not yet found in the world.
- Unlock furniture designs for Outpost decoration.
- Unlock amplified weapon modules, including drum magazines, incendiary rounds, and scopes. These modules are direct combat upgrades and are the primary reason to push the Research Station to higher levels.
Unlocking the Outpost, Part 1: Take a Photo at the Ruined Homestead
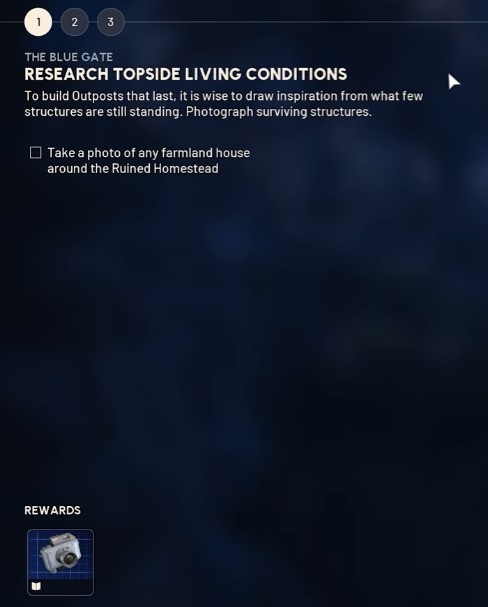
- Reach level 18.
- Start the quest “Research Topside Living Conditions.”
- Obtain a camera — it is either given to you by the quest or can be bought from a vendor. Keep it in your inventory.
- Deploy to Blue Gate.
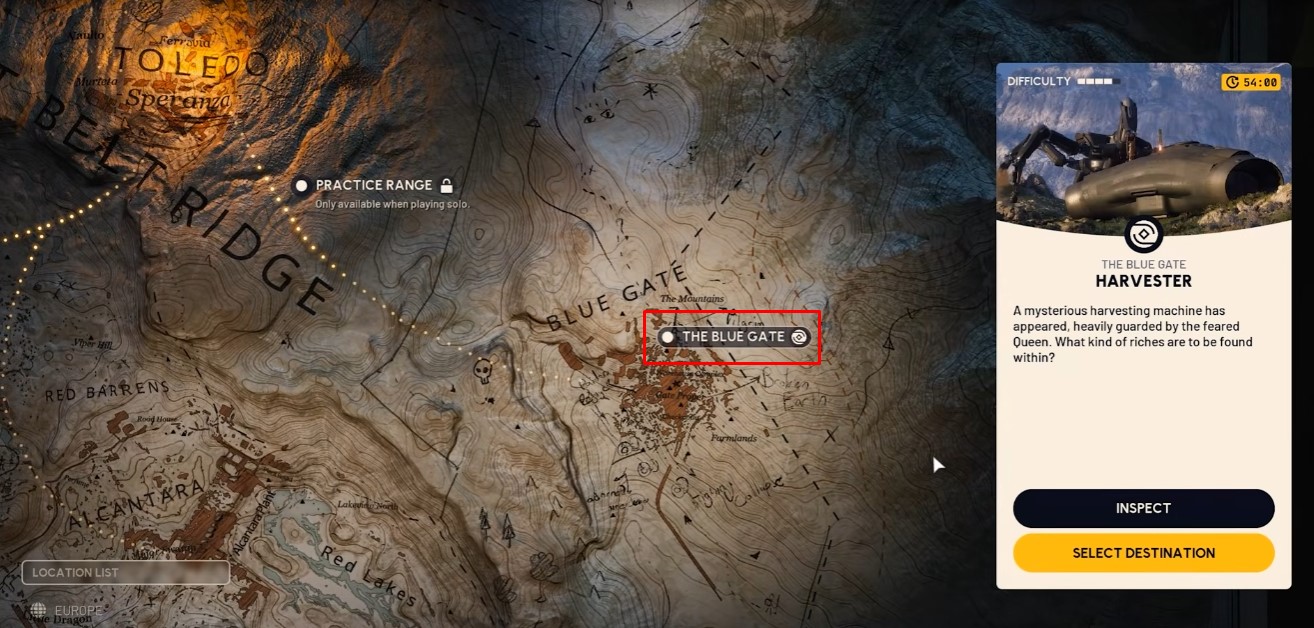
- Navigate to the ruined homestead area.
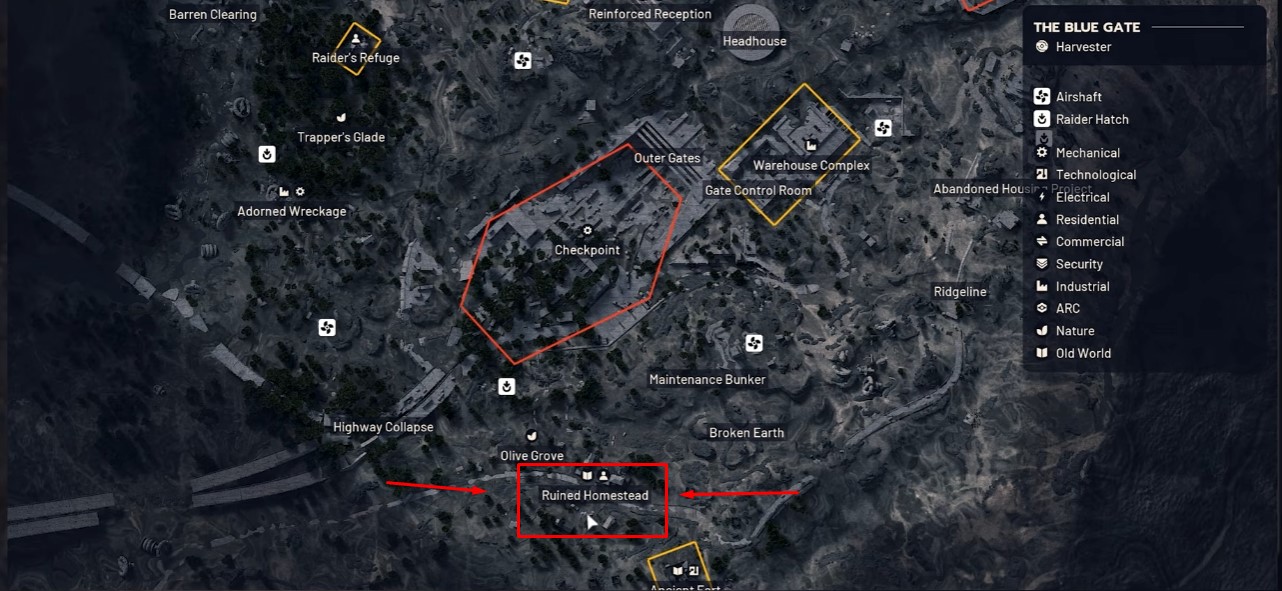
- Take a picture of the farmstead building with stables. Frame the building clearly in your shot; the objective registers once the correct structure is captured.
Unlocking the Outpost, Part 2: Trade Materials
Return and trade the following materials to complete the unlock:
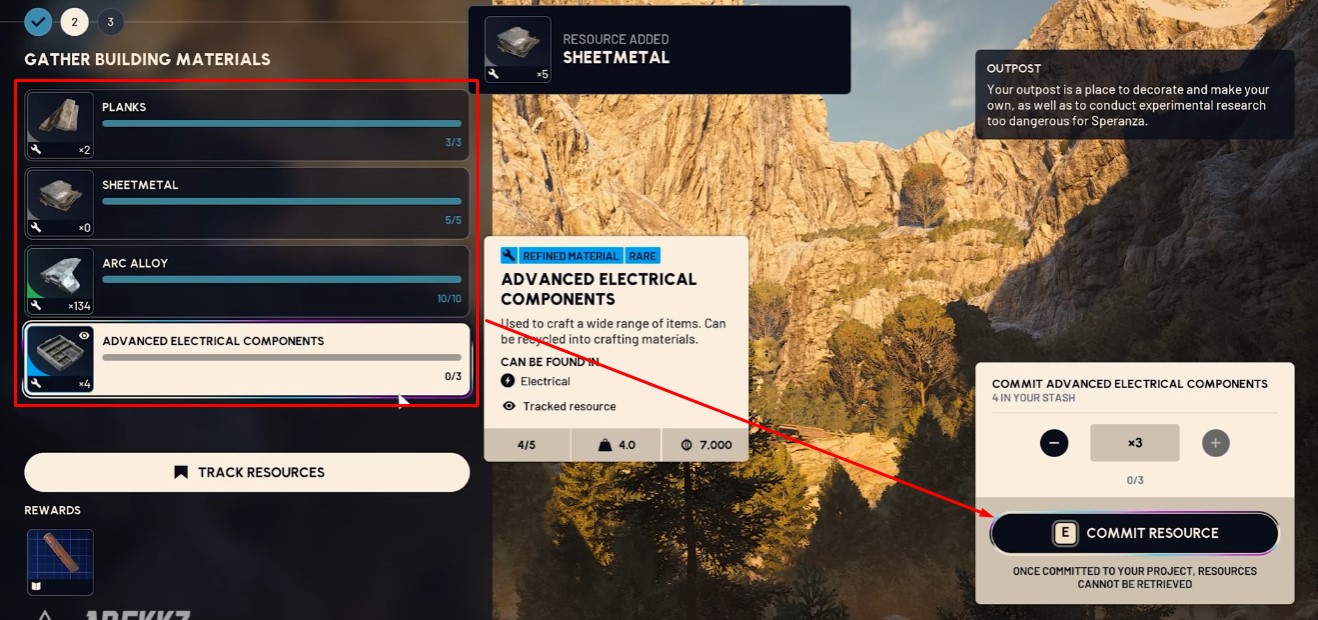
- Planks
- Sheet metal
- Arc alloy
- Advanced electrical components
Sourcing tip: Buy sheet metal and planks from Celeste using seeds, or loot them during raids. This is generally faster than farming them purely through world drops.
Unlocking the Outpost, Part 3: Deal Damage to Flying ARC and Bullies
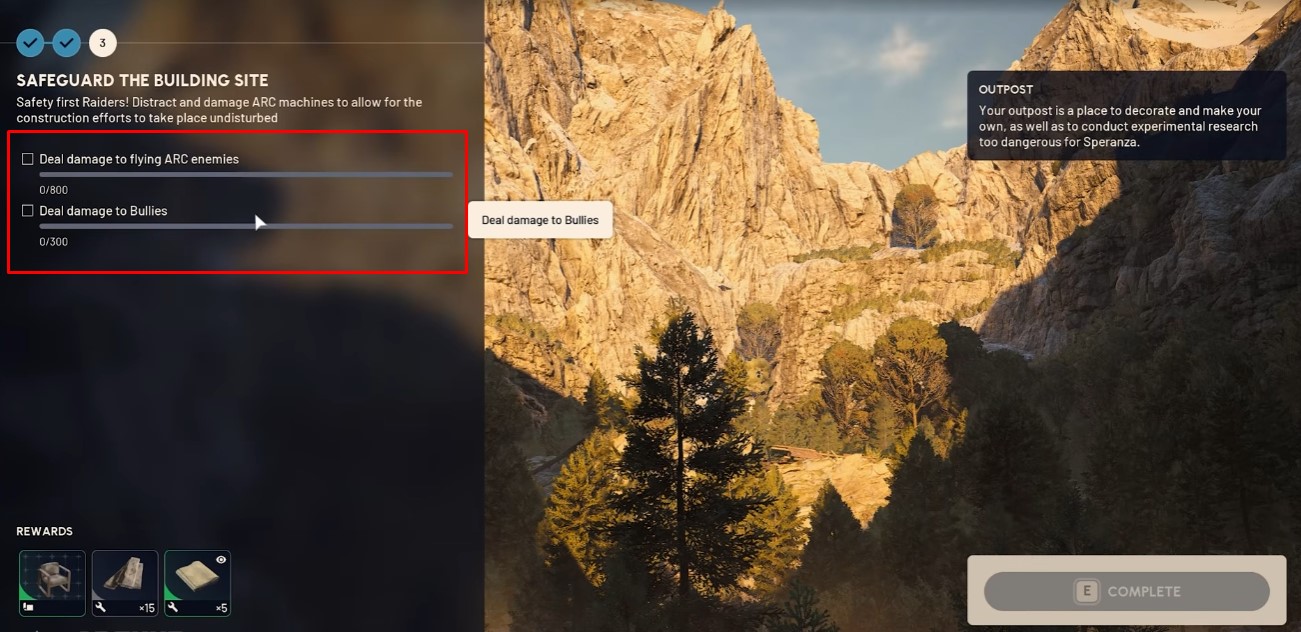
This step requires two separate damage objectives:
- 800 damage to flying ARC enemies — wasps, hornets, and drones.
- 300 damage to Bullies.
Recommended tools:
- Seeker grenades and wolf packs for general damage.
- Hullcracker — after its buff, this weapon is extremely effective. It one-shots wasps and two-shots hornets, making the 800 flying damage trivial.
Bully location: Bullies are found on Pendola Pass. Kill them and loot the purple items they drop, which you will need later for Research Station upgrades as well.
Building the Research Station, Level 1
Once the Outpost is unlocked, build the Research Station at your Outpost. Level 1 requires:
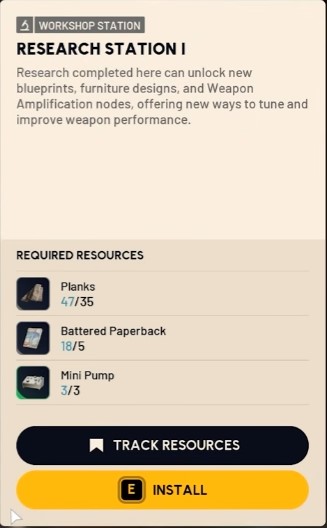
- Planks *35
- Battered Paperback*5
- Mini Pumps *3
Battered Paperback & Mini Pump Locations
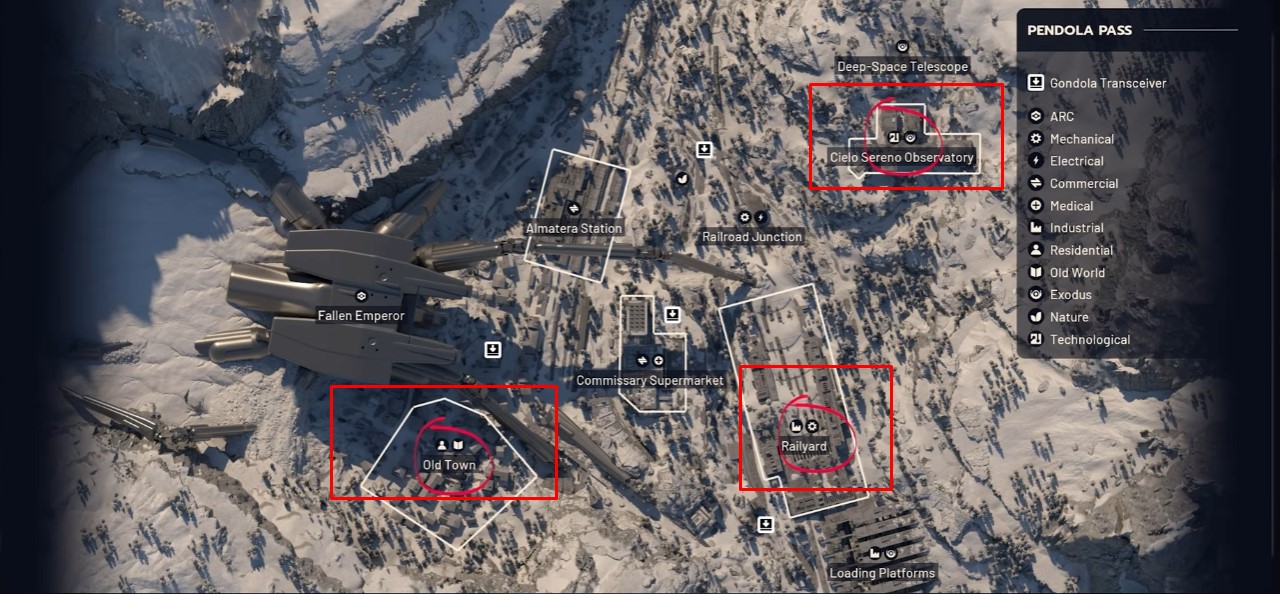
- Battered paperback books: Common in Oldtown. Loot houses thoroughly.
- Mini pumps: Abundant in the Observatory. Check shelves, desks, lockers, and bins. The Observatory is the single best source for this item.
Upgrading the Outpost to Level 2
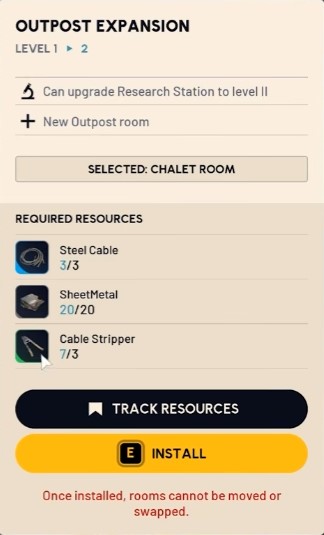
Outpost Level 2 requires:
- Steel Cables *3
- Sheet Metal *20
- Cable Strippers *3
Sheet Metal & Steel Cables Locations
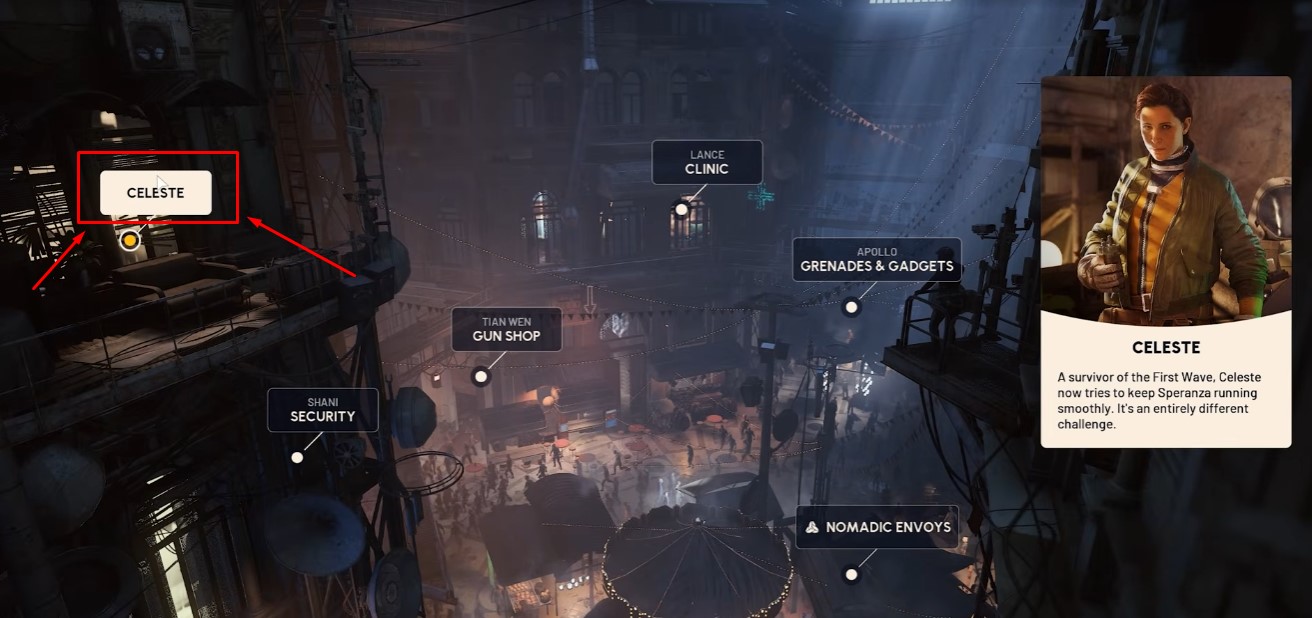
- Trade for seeds with Celeste to buy these directly.
- Loot them in most areas of Pendola Pass.
- Also obtainable from the storm shelter farm later in your progression.
Cable Stripper Location
Cable strippers spawn in three reliable locations:
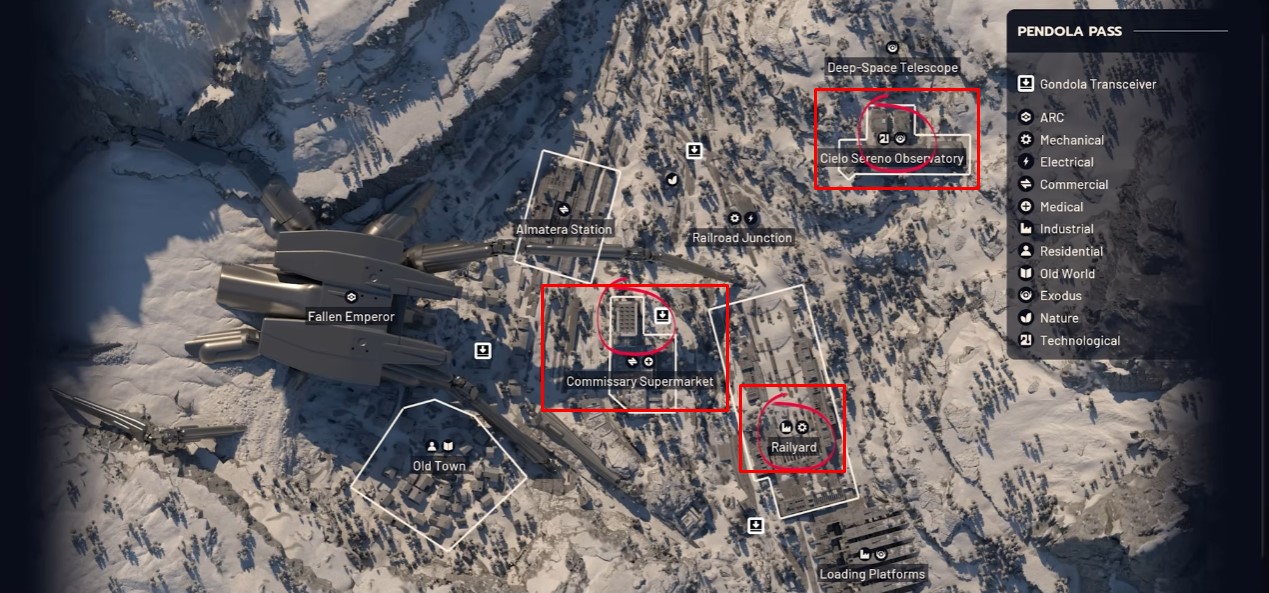
- Railard
- Supermarket — check the shelves.
- Observatory — check breachables.
They also drop from the storm shelter farm once you have that route established.
Every Outpost Room Type
After upgrading, you choose a room type for your Outpost. The options are:

- Main Outpost Room
- Chalet
- Timeless
- Panoramic
- Studious
Each is covered below with practical notes on layout and aesthetics.
The Main Outpost Room
A multi-story room featuring shelving units, pianos, chairs, and lights. It offers plenty of space to decorate and serves as a solid default hub with basic workbench and stash access.
The Chalet Room
A plaster-and-wood design with a rustic look. This is widely considered the best-looking room in the game, giving off a Hobbit or Lord of the Rings vibe. Recommended if aesthetics matter to you.
The Timeless Room
A post-apocalyptic look with worn paint and segmented small rooms. It has very few windows. This is generally the least appealing option due to the chipped paint and lack of natural light — not recommended unless you specifically want the gritty theme.
The Panoramic Room
A large open space with panoramic windows on the ceiling. The concept is strong, but camera angles currently limit how much you can actually see. It feels lackluster now but may improve substantially once the explorable aspect is added in a future update.
The Studious Room
A big circular room with large windows and a skylight rooftop. This is the final upgrade option and is quite nice visually — a strong choice for players who want an open, well-lit research-focused space.
Upgrading the Research Station to Level 2
Research Station Level 2 requires:
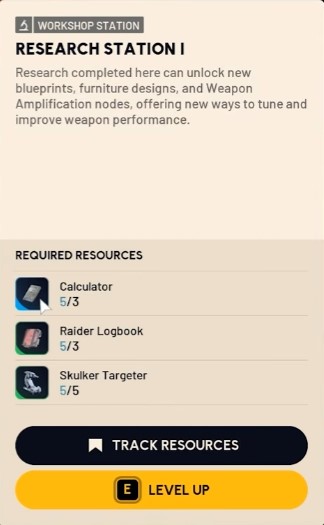
- Calculators
- Raider logbooks
- Skulker targeters
Calculator Location
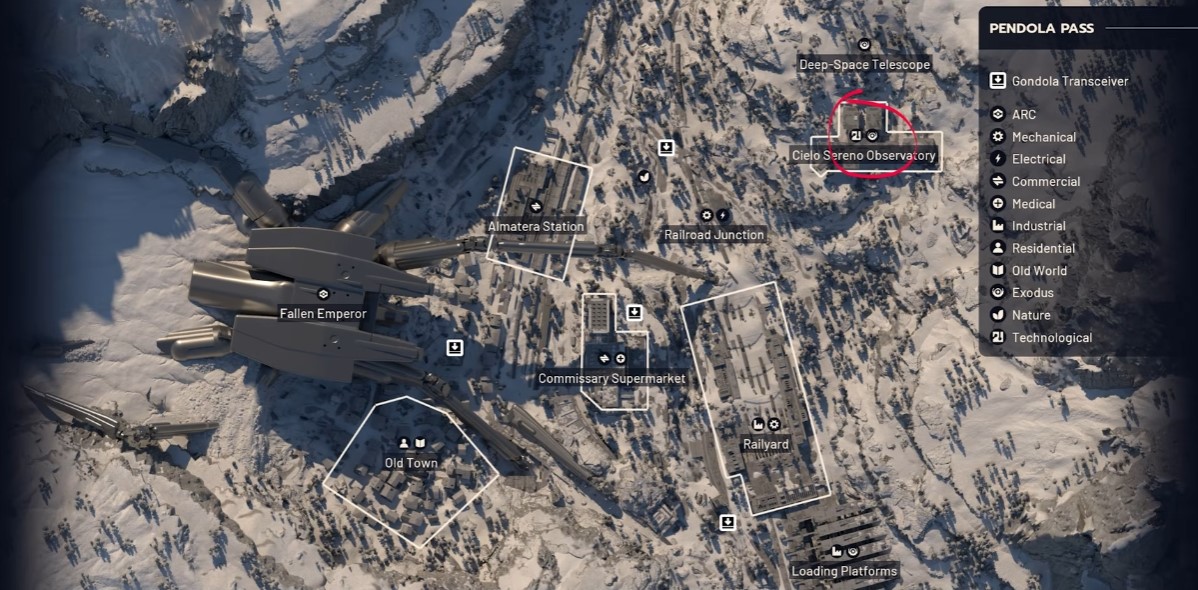
Calculators are best found in the Observatory on shelves, desks, and in the kitchen area. They are very plentiful — a single Observatory run can often cover the full requirement.
Raider Logbook Location
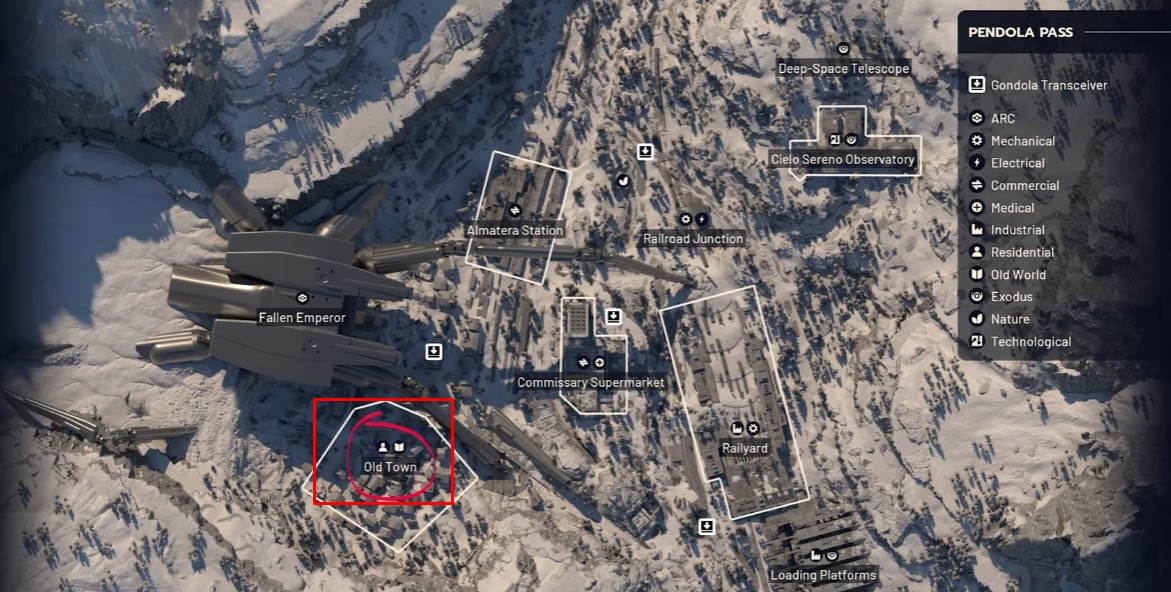
Loot houses in Old Town to get raider logbooks easily. This pairs well with farming battered paperbacks for the Level 1 build.
Skulker Targeter Location
Skulker targeters come from destroying Skulkers. When killed, a Skulker splits into a body and a gun. You must loot the gun part (the pointy bits) to get the targeter. You need 5 gun parts total.
Combat note: Skulkers are annoying — they run, hide, hit hard, and are low profile. Stay mobile and watch for their repositioning.
Upgrading the Outpost to Level 3
Outpost Level 3 requires:
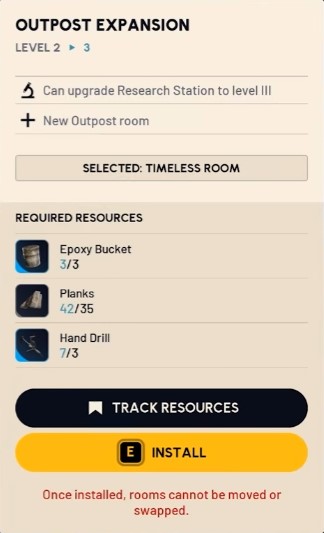
- Epoxy Bucket *3
- Planks *35
- Hand drills *3
Epoxy Bucket Location
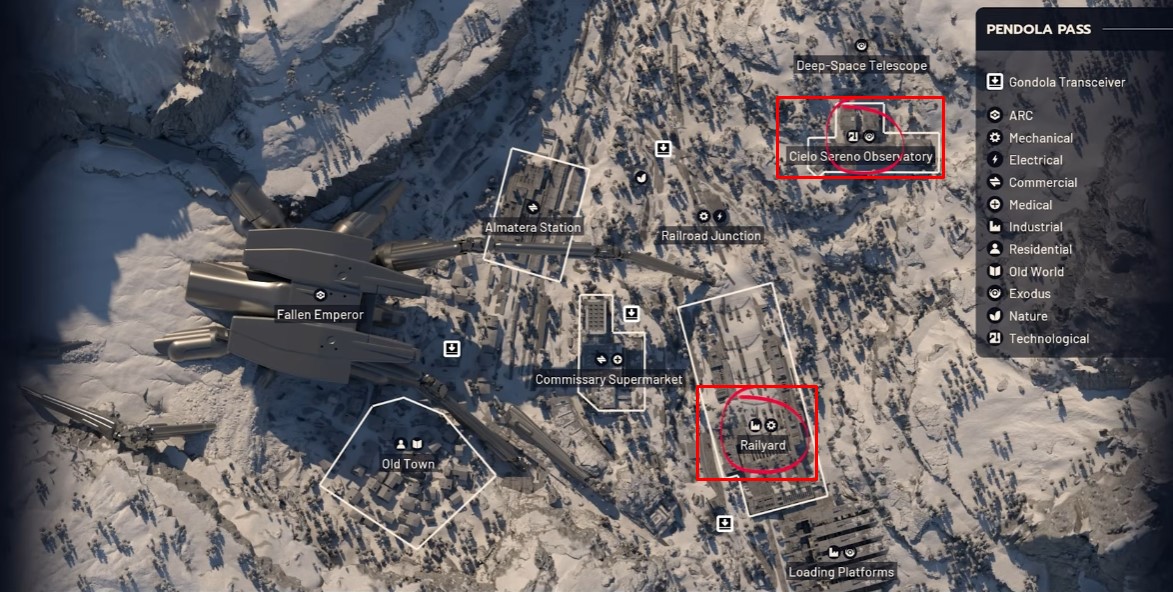
Epoxy buckets are best found in Railard or the Observatory. In the Observatory, check desk drawers and bins, and loot everything you pass. The Observatory is the better of the two locations for this item.
Hand Drill Location
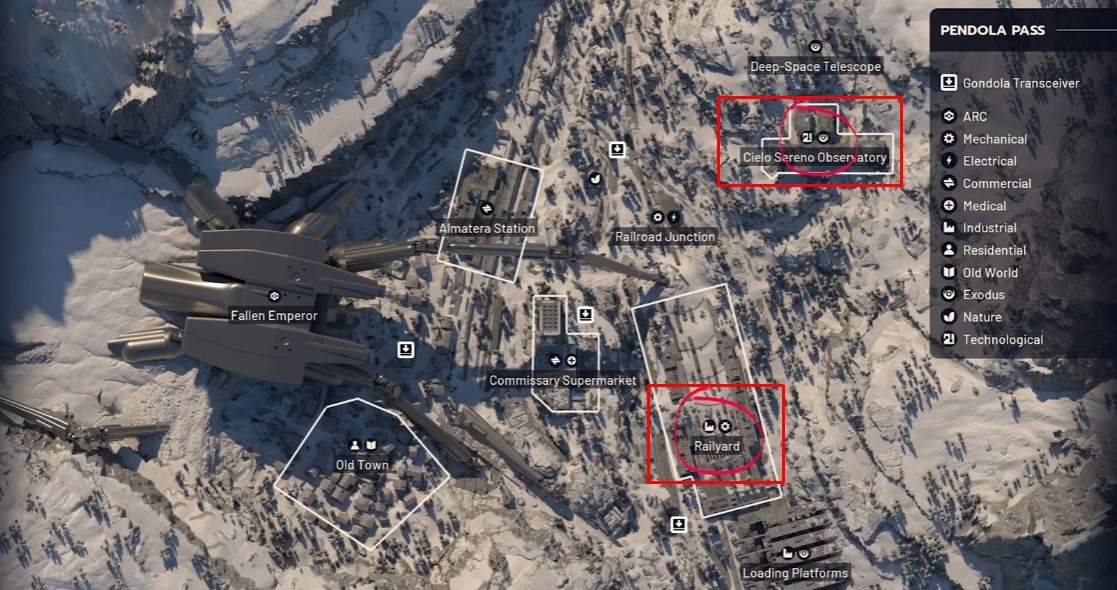
Hand drills are found in Railard and the Observatory, along the same route you use for epoxy buckets. They also drop from the storm shelter farm later.
Upgrading the Research Station to Level 3
Research Station Level 3 requires:
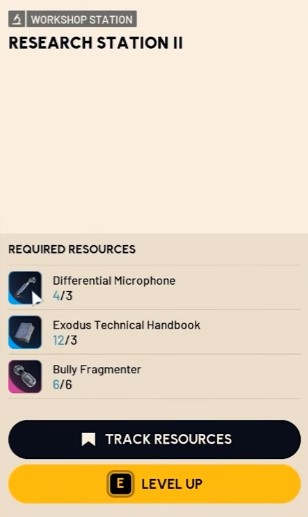
- Differential Microphones *3
- Exodus Technical Handbooks *3
- Bully Fragmenter *6
Differential Microphone Location
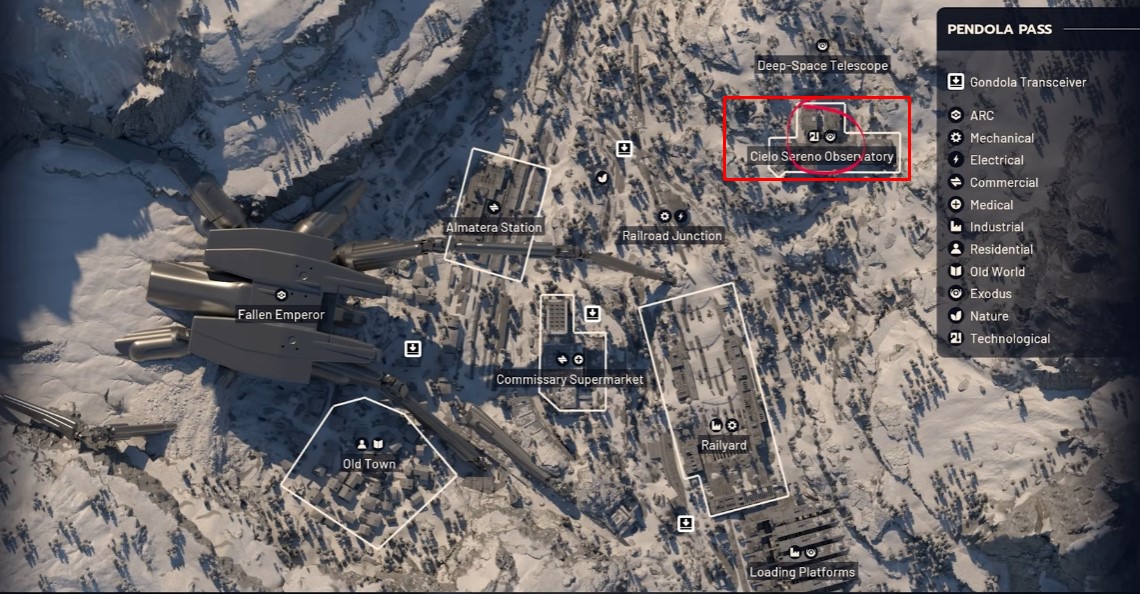
Best found in the Observatory. Also obtainable from the storm shelter farm later in your progression.
Exodus Technical Handbook Location
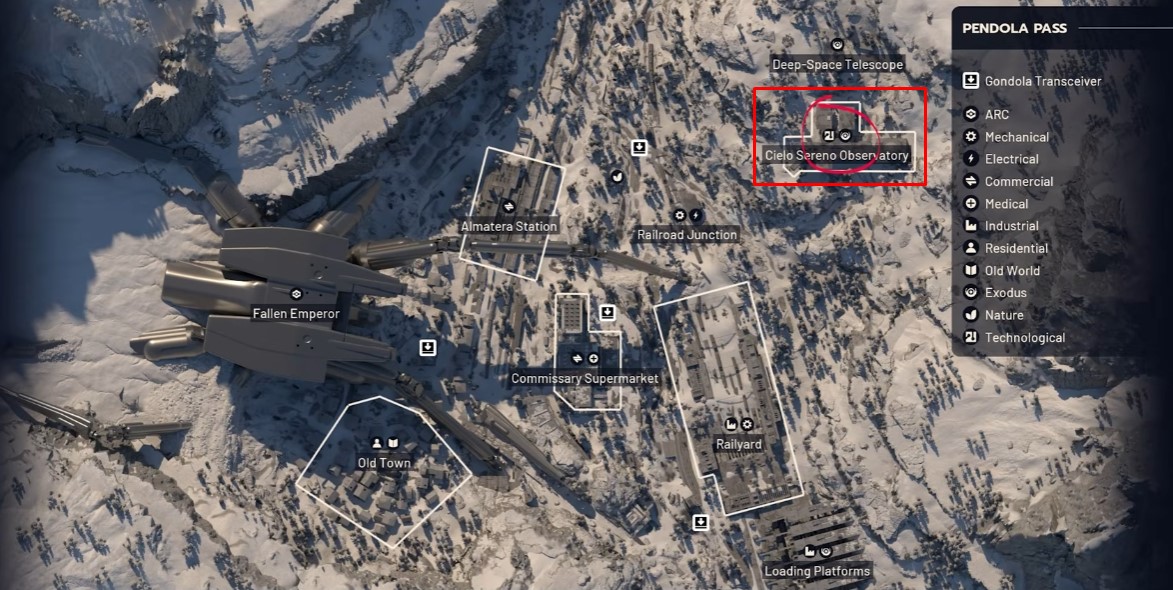
Found in the Observatory in searchables. Plan to loot the Observatory over a few raids to accumulate the required amount.
Bully Fragmentor Location
Bullies are found on Pendola Pass. To farm fragmentors efficiently:
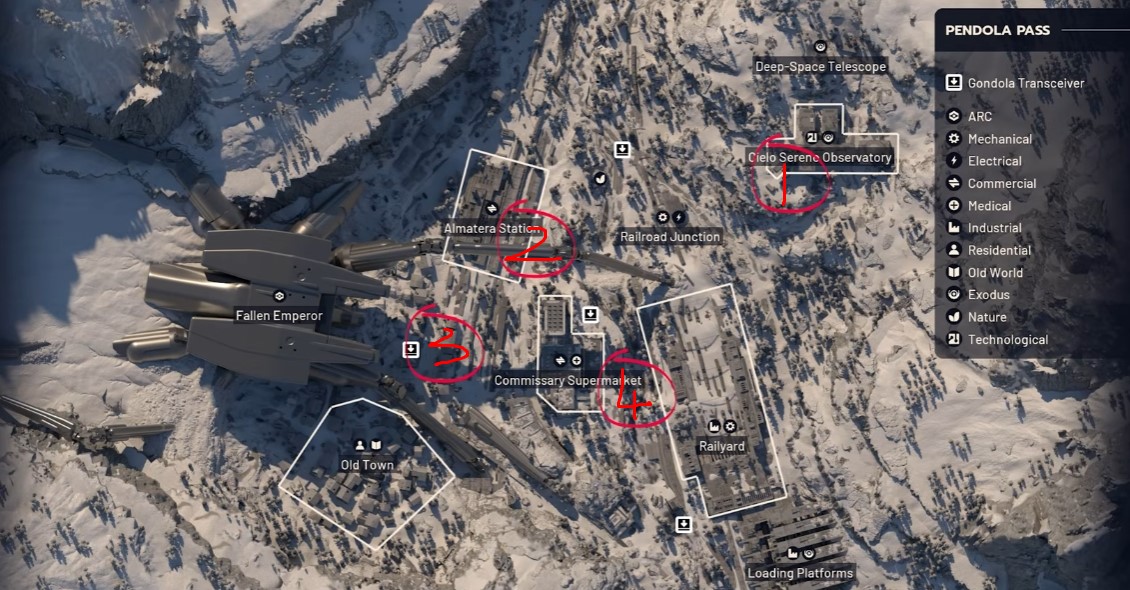
- Bring a Hullcracker with 1–2 stacks of ammo.
- Aim for the legs or body.
- Loot both the main chassis and the smaller piece for the purple fragment.
The Hullcracker after its buff is extremely effective against Bullies — this is the fastest known method.
Upgrading the Outpost to Level 4
Outpost Level 4 requires:
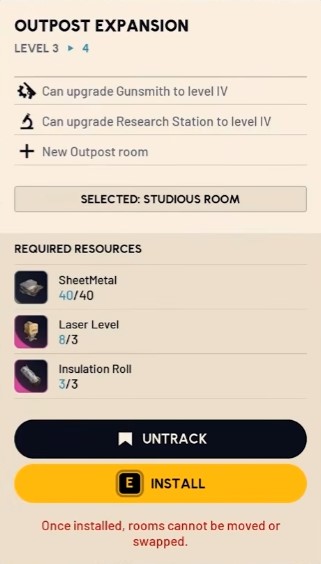
- Sheet Metal *40 — trade for seeds with Celeste.
- Laser Levels *3 — rarer; use the storm shelter farm.
- Insulation Rolls *3 — rarer; use the storm shelter farm.
Upgrading the Research Station to Level 4
Research Station Level 4 requires:
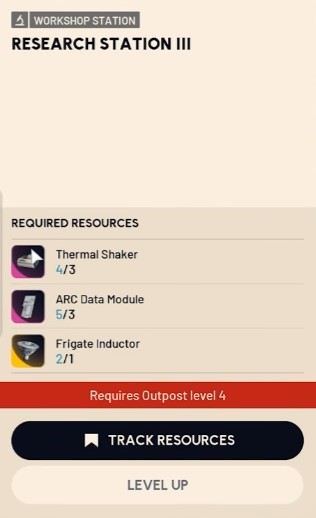
- Thermal Shakers *3 — from the storm shelter farm.
- ARC Data Module *3 — from the new frigate event.
- Frigate Inductors *1 — from the new frigate event.
ARC Data Module & Frigate Inductor Locations
Both items come from the new frigate event, which is a map condition that can appear across:
- Blue Gate
- Pendola Pass
- Dam Battlegrounds
- Buried City
When the frigate event is active, loot the spaceship for both ARC data modules and frigate inductors.
BEST FARM: Insulation Roll, Laser Level & Thermal Shaker
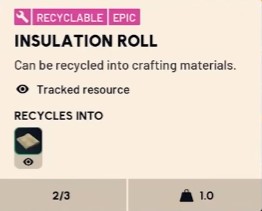
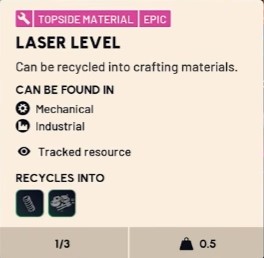
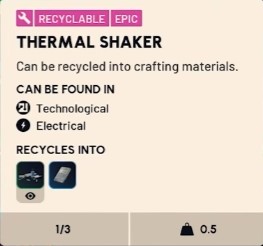
These three items are the bottleneck for Level 4 upgrades. The storm shelter farm is by far the most efficient source.
Farm Storm Shelters for Rare Items
Farm storm shelters — the pod-shaped buildings — to get insulation rolls, laser levels, thermal shakers, and other rare purple and blue items needed for upgrades. A few raids typically yield most of what you need.
Farm Storm Shelters During Blizzards
This is the core farming loop:
- Load into Pendola Pass.
- At the 28-minute mark, a blizzard spawns somewhere on the map.
- Open your map and locate the storm hut icon — it is a global icon visible even across the map.
- Ping it and run there as fast as possible.
- Be the first squad to arrive and close the door behind you. It locks from the inside, keeping you safe from other players while you loot.
- Inside, loot rare high-tier upgrade materials: thermal shakers, insulation rolls, presses, hand drills, steel cables, and weapon boxes.
Why this beats normal looting: Storm huts have much higher spawn rates for rare items than locations like the Observatory. They respawn every 2–3 minutes during a blizzard and generally stop around the 10-minute mark, so farm them repeatedly for the full duration.
Melt Ice to Loot Frozen Rooms
Watch for small rooms covered in ice. To open them:
- Use fire, such as blaze grenades, to melt the ice, or
- Repeatedly melee the ice to break it off.
Loot the objects inside, including back-corner items that can contain the insulation roll. The insulation roll appears to be the rarest item of all and can spawn in these ice-covered loot rooms — not just storm shelters — so check them while running around the map.
Boss & Mechanic Tips
Bullies (Pendola Pass)
- Use the Hullcracker with 1–2 stacks of ammo.
- Aim for legs or body for efficient damage.
- Loot both the main chassis and the smaller piece — the purple fragmentor comes from the smaller piece, and it is easy to miss if you only loot the chassis.
Skulkers
- They split into body and gun on death. You must loot the gun part for the targeter.
- They are low-profile, fast, and hit hard. Stay mobile and avoid standing still in open ground.
- You need 5 gun parts for the Research Station Level 2 upgrade, so expect multiple Skulker kills.
Flying ARC (wasps, hornets, drones)
- The Hullcracker one-shots wasps and two-shots hornets, making the 800-damage objective fast.
- Seeker grenades and wolf packs are solid alternatives if you do not have a Hullcracker.
Storm Shelter Blizzard Mechanic
- The storm hut locks from the inside once you close the door — this is your protection against other squads.
- The hut respawns loot every 2–3 minutes during the blizzard, so do not leave after one pass.
- Loot stops around the 10-minute mark of the blizzard.
Ice-Covered Rooms
- Blaze grenades are the fastest way to melt the ice.
- Melee works if you lack fire tools but is slower.
- Always check back corners — the insulation roll frequently hides there.
Conclusion
Maxing out the Outpost and Research Station is a long-term project, but every tier you unlock pays off immediately — more storage, better room options, and access to amplified weapon modules that directly improve your combat performance. The progression path is straightforward: unlock the Outpost through the photo and damage objectives, build the Research Station, then push both facilities through Levels 2, 3, and 4 while farming materials from the Observatory, Oldtown, Pendola Pass, and the storm shelters.
The single most important habit to build is the storm shelter blizzard farm. It solves the hardest material bottlenecks — insulation rolls, laser levels, and thermal shakers — and it is repeatable every raid. Combine that with Celeste trades for common materials and targeted Observatory runs for mid-tier items, and you will reach Level 4 on both facilities far faster than players who loot randomly.
Get your camera, hit level 18, and start the chain. Your future self — with a fully decorated Outpost and a rack of amplified weapons — will thank you.


