Directionally challenged? Get lost easily? Just want to triple check you’re on the correct path? This guide is for you!
I’ve edited the game’s Diving Map to give a visual guide for which path to take to minimize back tracking while cleaning the ocean <3
Intro
Additionally, I advise to never play without sound &/ headphones on, as there is an audio cue when an orb is discovered. It’s an integral indicator for you to stop moving, use your cursor to find the orb, and activate the orb via its interact prompt.
The intended feature/design is such that if you discover an orb but leave without activating the orb, the orb will be swept away by the current & will need to be discovered again. (If this happens, you will have to wait for trash to respawn, which on average requires one in game week for best results)
So, with this in mind, as soon as you discover an orb, activate it right away. As long as the orb has been activated, you’ll be able to pick up where you left off next time.
If you ever run into an area where you have not been able to find the orb, do a very thorough scan with your cursor, moving close to all large set items (as most will go transparent when you are behind them), checking for the ‘activate’ prompt from the orb along all edges, set dress/decor, oil spills etc.
If the above (in combination with following along the noted paths of this guide) is unsuccessful, exit your game & reload to try again. Do not go to sleep & save game – players have reported success in finding the orb after exiting & reloading to replay the day & retry the area.
The Auto Trash Collector, which cannot be unlocked within the Lab’s R&D until Town Rank C, has caused issues with orb spawns in v0.5. It’s possible this may not be an issue anymore when 1.0 releases, however, to be safe I recommend that you do not place the item anywhere unless you have already restored all the shrine sites in the area which you’d like to place it.
Stamina – Early game you will run out of stamina fairly quickly. There are a few chests you’ll find in the ocean as you progress through the start, these contain consumables which will aid your stamina regen. Outside of these freebies, I tend to just snack on the various sea scavenge you can find while diving – they all have rather low sell price so I prefer to eat them early on vs keep them to sell (just remember to offer the applicable items to the Altar)
If you can afford it (&/or you can utilize some of your freebie ones from Mining chest rewards) Jamu, which can be purchased at Fishensips for $600 (during Spring, Summer, & Fall) is the ideal consumable for stamina.
After you’ve progressed elsewhere in the game, specifically once you’ve completed any 6 offering bundles at the Altars, you will unlock access to the Mid Forest. Within this new area you can forage Ginseng – put these into a Mason Jar! When needing a consumable for stamina, Pickled Ginseng is equal to Jamu (& at some qualities, better than Jamu)
Ocean Info
The ocean is divided into 4 unique diving zones, with the Merfolk Kingdom separating the Deep Ocean (Gold & Osmium kelp zones) from the starting half of ocean (Bronze & Silver kelp zones) and has a total of 85 shrine sites to heal:
- Se Pulu (10m – Bronze Kelp) 20 sites
- Dua Pulu (20m – Silver Kelp) 20 sites
- Empat Pulu (40m – Gold Kelp) 22 sites
- Lima Pulu (50m – Osmium Kelp) 23 sites
Once all sites are healed in a zone, you will unlock access to that fast travel waypoint – you can check your total # of sites healed per zone via the in game diving map. Detailed info and edited maps (pathing & labelled spawn zones) for navigating each area are outlined in sections below. For gathering respawned kelp, I advise using a zone’s waypoint once a week to return & gather the respawned resources (Sunday would be best available day for this, as it is the last day of the week, because the spawns reset every Monday & spawns build up over the week)
My Edits
Spawn zone maps are included for ease of reference when writing out pathing notes – the spawn zone maps align with the ocean critter catch conditions (info available on the Wiki[coralisland.fandom.com] &/ Coral Guide[coral.guide]) & No, I do not know why certain areas are labelled as they are, that is simply what the game has them set as internally.
All information within this guide, as well as the map which I edit, has been completed based on the latest game version in Early Access (v0.5) – I do not anticipate any significant changes to occur when 1.0 releases on November 14th. That being said, any relevant required updates will be completed ASAP once I have access to 1.0 game version. (It’ll be completely reliant on how much or little pain &/or symptom flare ups will be happening for me during launch week, as I am disabled & when symptoms & pain flares up enough, I am unable to be at my PC)
The earliest you can begin your diving journey is Spring 8th, when Ling sends you the letter inviting you to meet her at the diving pier, which initiates the Ocean’s Diving questline. You will need to complete 1 bundle at the Lake Temple altar in order to receive the ‘Goddess Blessing’, as the Goddess Blessing is one of the requirements to access the Merfolk Kingdom. The simplest bundle to complete will be the ‘Essential Resources’ bundle – there are 7 accepted items, you will need to submit 5 in order to complete the bundle:
- Wood (10)
- Stone (10)
- Fibre (10)
- Sap (10)
- Pinecone (5)
- Maple Seed (5)
- Oak Seed (5)
The other requirement to access the Merfolk Kingdom is to have the Diving Suit 2.0, which you will receive via progressing the Ocean’s Diving questline:
- Complete 20/20 sites in Se Pulu (10m – Bronze Kelp)
- ‘Inspect the Source of the Shake’ = cutscene at 10m fast travel waypoint
- Exit diving via the anchor
- Cutscene with Ling on the diving pier
- After waiting a few days, Ling will visit player on farm = cutscene to give player the newly upgraded diving suit 2.0
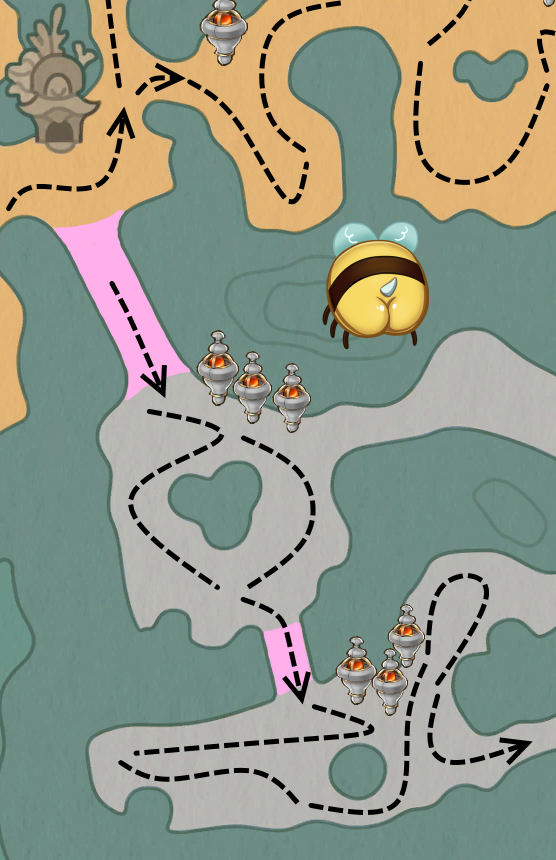
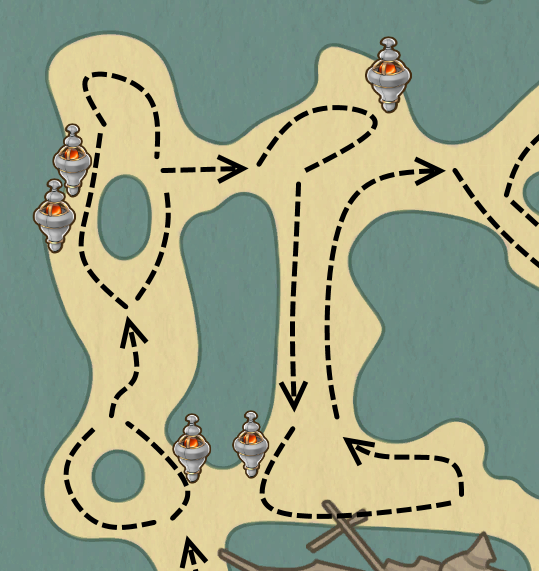
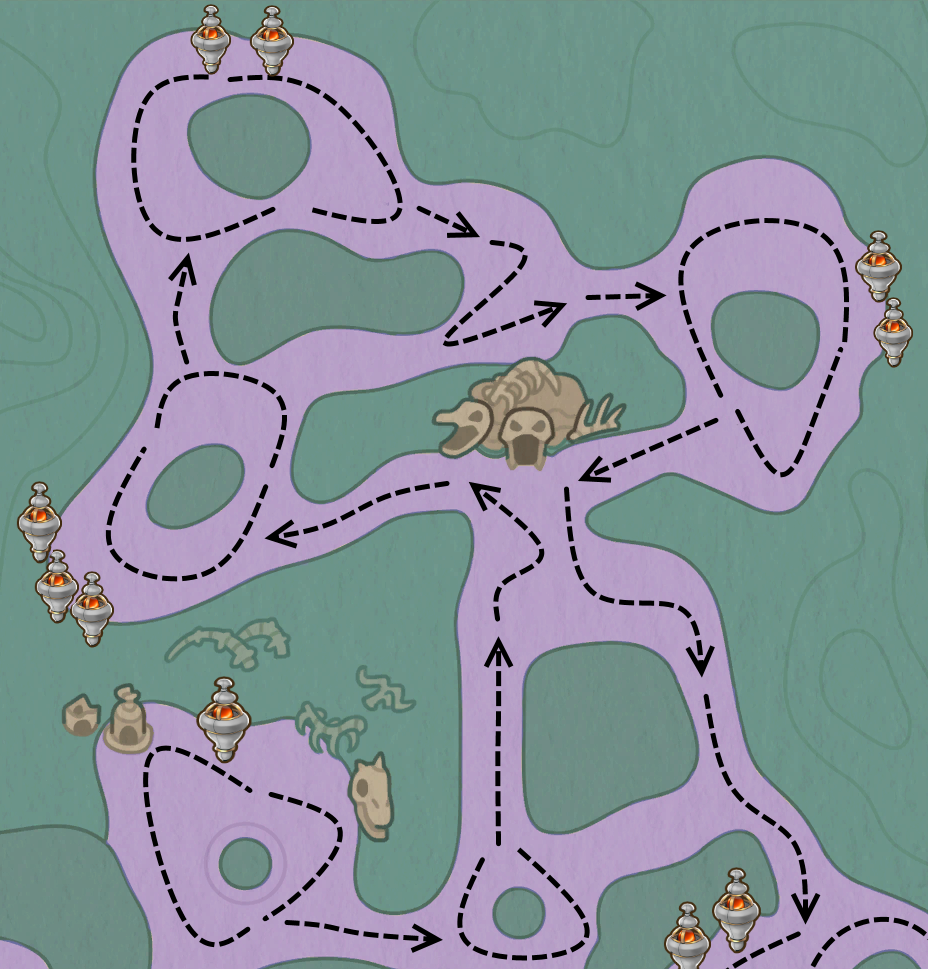
Se Pulu (10m – Bronze Kelp)


Once you’ve visited Ling on the pier, you receive the Dive Suit & can now go diving. As you clear trash, solar orbs will spawn in – you must activate these as soon as you find them.
Once activated, the orbs will follow set paths which you will need to clear in order for the site to be healed.
After your 5th site is healed, exit diving and visit Ling at the Lab (open Sunday – Thursday 08:00-17:00 /8AM-5PM & Friday 08:00-15:00 / 8AM-3PM) for a cutscene. After this cutscene you can continue with your diving.
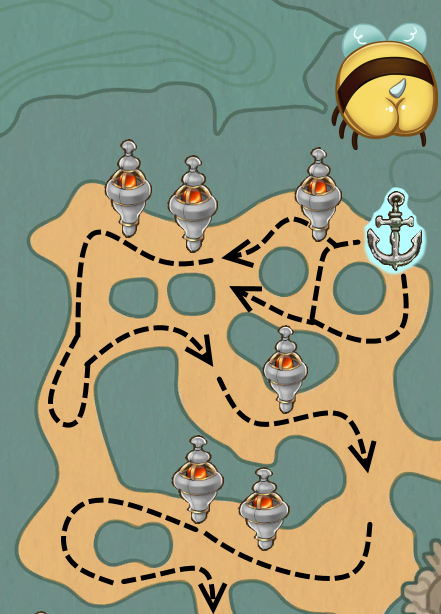
- Anchor = start point (& location anytime ‘Reset Anchor’ is selected before diving)
- The first 5 sites are in the top half of the 10m Natural Area (4 sites) & the 10m Mid Area (1 site)
Progressing is as follows: - 1 site at anchor start point opens access to the 2 sites to the left
- Complete both these sites to the left, before progressing to the site directly south of anchor start point
- This completes all 4 sites available in the top half of 10m Natural Area. Continue south to the site in 10m Mid Area
- At this point you will be prompted to go visit Ling at the Lab. However, if your stamina allows it, you can complete the one additional site to the left of 10m Mid Area, thus 100% completing both 10m Natural Area & 10m Mid Area (resulting in all 6 sites accessible from the start to be completed)

- After completing the cutscene with Ling at the Lab, you can now progress to the 10m Herding Area
- Upon entering the 10m Herding Area, you will need to clear the left side (2 sites) before moving down (2 sites)
- After all 4 sites from directly within the 10m Herding Area are healed, there is 1 additional site to the right to clear, bringing your overall sites healed to 11/20
At this point (at the 10m waypoint/Se Pulu Cave – both of which are not yet unlocked) there is a split in the road, as there are 2 paths leading to the final sections you must clear. Regardless which path you choose to take first, you will be backtracking once you’ve completed all 20/20 sites & the quest instructs you to ‘Inspect the Source of the Shake’.
- Northern Path / going up = 10m Jellyfish Area (5 sites)
- Eastern Path / going to the right = 10m Orchestra Area (4 sites)
My preference is to go to the right & clear the 10m Orchestra Area first, and then go up north to the 10m Jellyfish Area.
- First site is straightforward
- There are 3 sites in a cluster all the way to the right. 2 orbs will be found in the main larger area you’re in. The final orb will be found in the smaller rightmost area, which will open up after you have found the previous 2 orbs
- Finding the orb in the smaller rightmost area will open the top side access of a staircase which connects to Dua Pulu (20m – Silver Kelp). However, this staircase will remain blocked at the bottom until you heal the sites on the lower side of it
- Once all 4 sites are healed, back track to the split in the road at the ocean cave
- There will be a fair bit of trash in the path leading up to the 10m Jellyfish Area – while you will not find any orbs in this, I do prefer to clear at least some of this trash so that it is easier to navigate the path
- Once you’ve reached the 10m Jellyfish Area, you will need to clear all 3 sites in its main area in order to open the path up to its final 2 sites
- With all 5 sites healed, go back down to the split in the road at the ocean cave
With all 20/20 completed, your quest will progress to ‘Inspect the Source of the Shake’. The 10m fast travel waypoint will also now be unlocked. For the quest progress, as noted in Overview:
- Complete 20/20 sites in Se Pulu (10m – Bronze Kelp)
- ‘Inspect the Source of the Shake’ = cutscene at 10m fast travel waypoint
- Exit diving via the anchor
- Cutscene with Ling on the diving pier
- After waiting a few days, Ling will visit player on farm = cutscene to give player the newly upgraded diving suit 2.0
You do not need the diving suit 2.0 until you reach the Merfolk Kingdom entrance gate, so after both the cutscene at 10m waypoint/ocean cave, & exiting via anchor for the cutscene on the pier with Ling, you are free to return to diving right away to start clearing the next area.
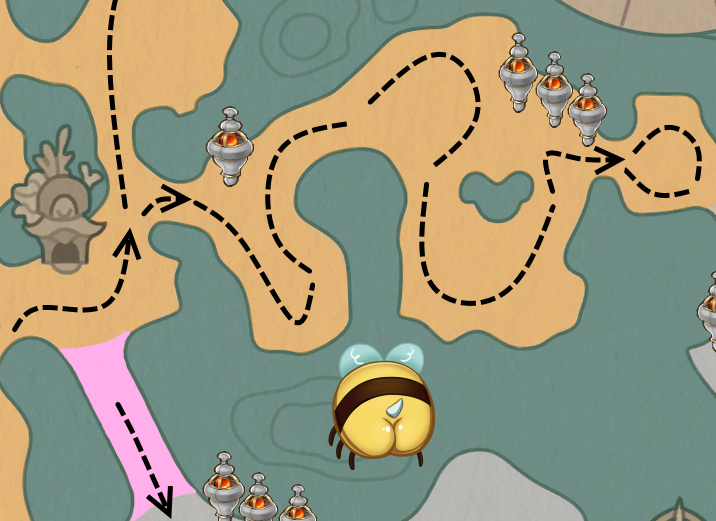
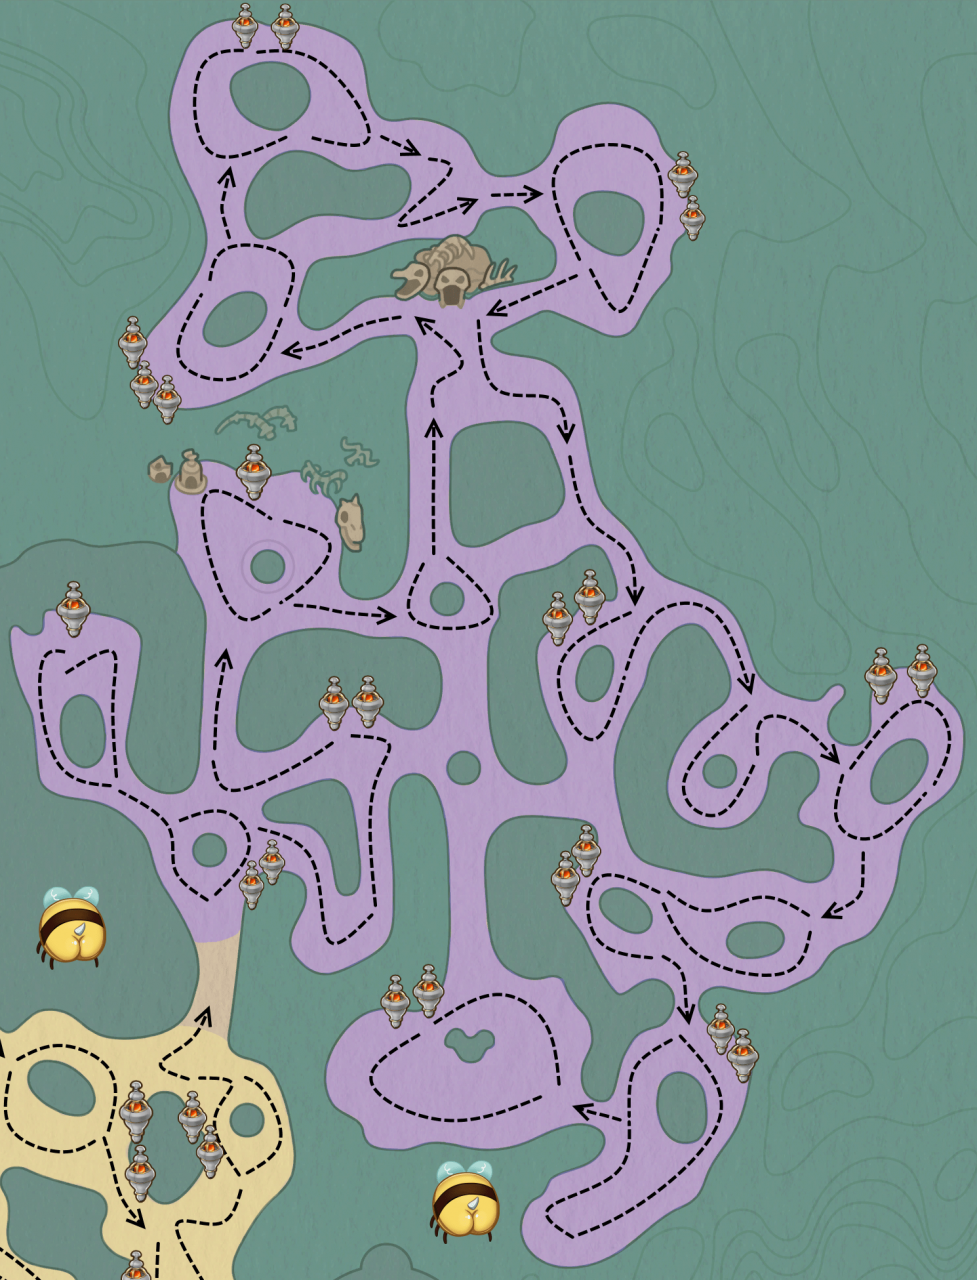
Dua Pulu (20m – Silver Kelp)

There are a few paths within Dua Pulu which, during your initial clear, are simply dead ends. For these areas (the sections of my edited maps which have no pathing lines indicated) I advise saving your stamina & simply ignoring, as there are no orb spawns within those paths. I do a final full clear for these other paths (which are helpful shortcuts) once I have all 20/20 sites completed/later when I have the stamina to use for them.
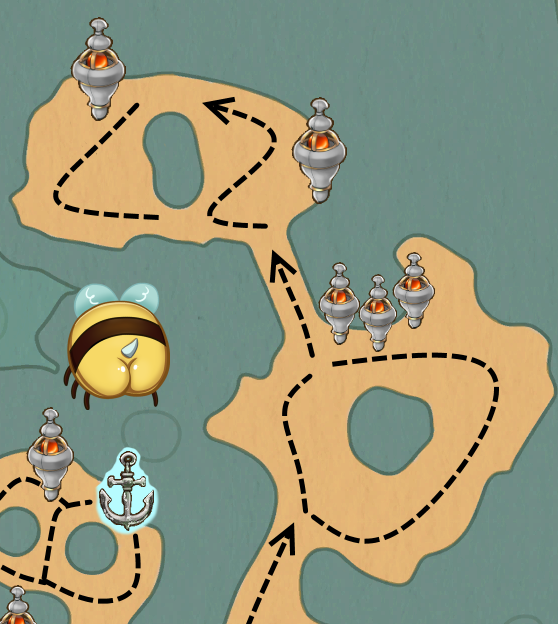
- Access by descending the staircase located at the 10m waypoint / ocean cave (staircase marked in pink)
- For these 3 sites, the orbs will all be found in the immediate area
- Ignore the path which opens to the right of the sites – it leads to a dead end, it is a shortcut path for you after the areas are restored later
- Once all 3 shrines are restored, you MUST descend the next set of ‘stairs’ (also marked in pink). These “stairs” are made of corals and can blend in with the set dressing. (Players have nicknamed these the “pancake stairs” as visually, the stacking of the corals can look similar to a stack of pancakes. During earlier development versions, there were no in game ocean maps, so the “pancake stairs” came to be.) This path is a must know area!
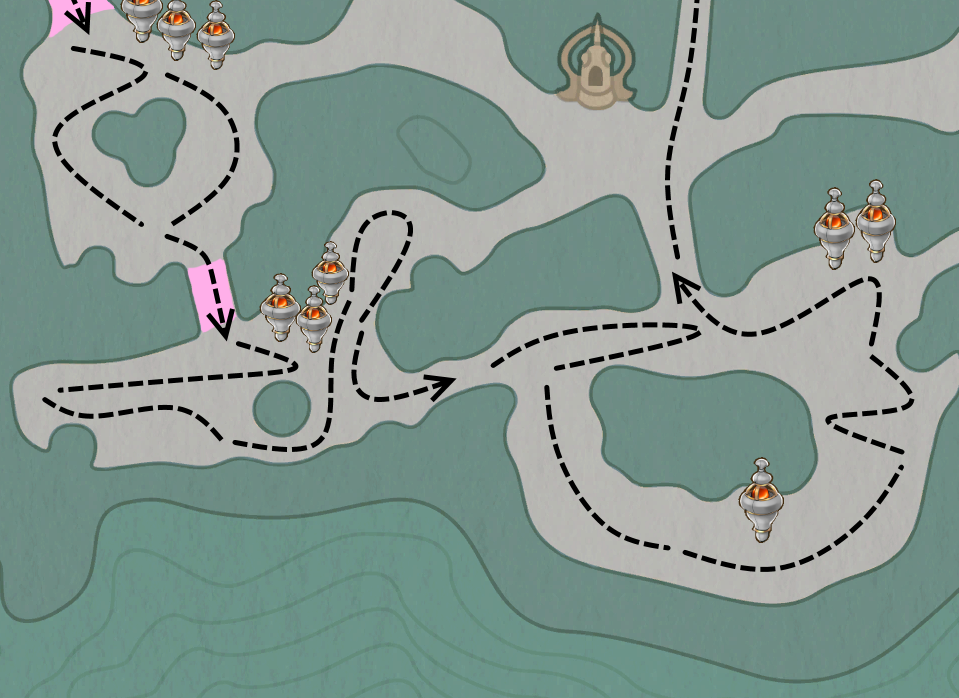
- Once you’ve descended the coral ‘pancake’ staircase there are 3 additional sites. For the first 2, the orbs will spawn in the immediate area. (Be sure to clear all the way to the left!) The 3rd orb will spawn in the top right. The vines blocking it will disappear once the first 2 orbs are found
- I clear everything to the left, then return to the area directly by the shrines, after which I go into the top right spot for the final orb
- Ignore the path which opens in at the top right section – again, just like the first path, it leads to a dead end
- The path at the bottom right is the next path forward, into the 20m Herding Area spawn zone
- For each of the 3 orbs found in the 20m Herding Area, the end of each path you clear for one orb, leads you very close to the spawn spot for another orb
- I clear in to the right until I hit the Northern exit path (which is also one of the critter spawn points within this zone). After that, I return to the left to enter the loop of this area by going down its left side
- I follow the loop down & around, until I have returned to the critter spawn point at the Northern exit path, as this is the next path forward to continue progress
- I have followed this pathing every file I play, as this pathing results in the least backtracking required, especially if/when I can complete this area all in 1 day. This path goes well even splitting across 2 game days, as there is little trash that respawns in a single night, so returning the next day rarely requires too much work

- Taking the Northern exit path out of the 20m Herding Area, continuing past the 20m waypoint & cave, and going up the stairs will bring you to the 20m Kelp Forest, which has 5 total sites
- For the first 3 sites, you will need to loop around the area at the top of the stairs you entered from
- A staircase to the left will be opened up – you can ignore this for now – it is a shortcut path between 20m Kelp Forest & 10m Orchestra Area
- Take the path to the right to access the last 2 sites in this area
- This area can again be looped however you please, just ensure you clear all trash to find these final 2 orbs
- After these are restored, you can descend the staircase & continue south to the 20m Orchestra

- The 20m Orchestra Area is split into 2 halves, both which have 2 sites – you cannot access the bottom half until you’ve completed its top half
- Complete the loop in the top half however you choose, just ensure you clear all trash to find both orbs here – the path to the left in the top half can be ignored right now, it connects to the 20m waypoint & cave
- The same can be applied to the bottom half – loop as you please, as long as both orbs are found. The path to the left is to be ignored, it is a shortcut between 20m Orchestra Area & 20m Herding Area
- After completing the bottom half of 20m Orchestra Area, return to its top half & follow the path to the right to reach the final 2 sites in Dua Pulu
- In this final section, I clear the loop to the right before proceeding to the left
- Once these final 2 sites are completed, the path to the left leads you to the entrance gate of the Merfolk Kingdom
By this point you likely will have received your upgraded diving suit from Ling with which, alongside the Goddess Blessing, means you can now approach the gate!
Merfolk Kingdom
‘Find a Way to Open the Gate’
- Must have both the Goddess Blessing & Diving Suit 2.0
- Approach the gate to automatically activate your suit’s translator – symbols will appear on the gate
- These symbols match to the tiles on the ground at the gate. Activate the tiles by swimming over them in the order indicated
- Order = Right, Left, Down, Up
- You’re in, cutscene time!
- You can now explore the Merfolk Kingdom & you’ve unlocked its fast travel waypoint!

The questline will require you to visit a few key locations for story cutscenes in order to unlock access to the Deep Ocean:
- Naga Palace = 2 cutscenes; the first is just outside the Palace, the second is inside the Palace – you will be in the Barracks when the second cutscene ends
- Check your new mailbox in the Barracks before leaving – Cho Oyu wants to see you!
- Visit the Oracle Chamber for a cutscene. Cho Oyu will grant you access to the Ocean Caves = 4 total, located at the 10m/20m/40m/50m waypoints – these Ocean Caves serve as an endless source of trash, a must have resource, & its applicable loot drop table (coffer drops will be the same chances as what is found in the diving zone the cave is located in)
- Continue to the left of the Oracle Chamber to reach the entrance to the Deep Ocean for one final cutscene before you embark on your journey to heal the Deep Ocean (cutscene = receive a stamina fruit)
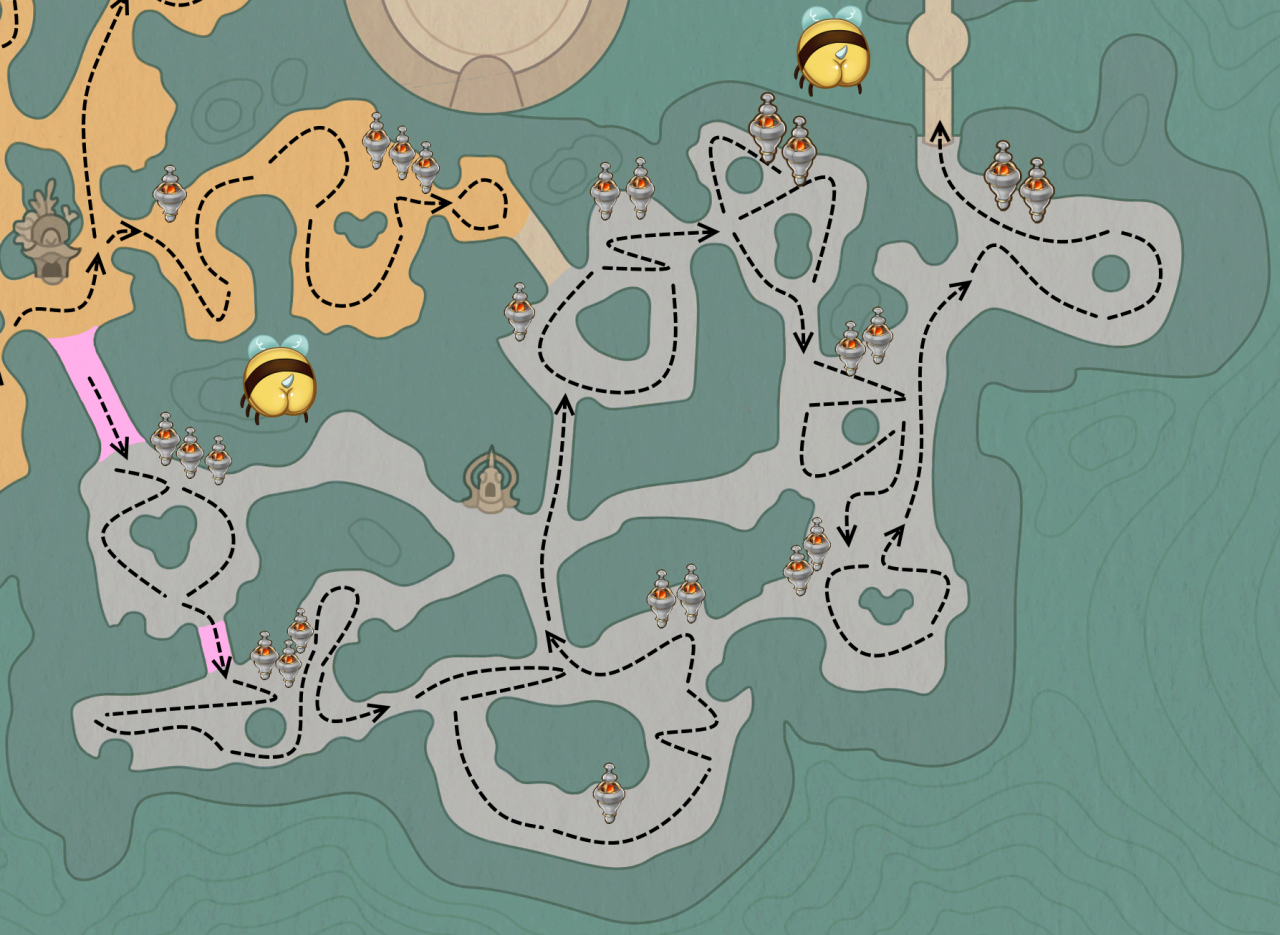
- You can now enter the Deep Ocean! Head up north into Empat Pulu (40m – Gold Kelp)
Do not read until you’ve completed both Empat & Lima Pulu – all shrine sites must be complete before these next points can be done
After you’ve healed all 85 sites, you’ll have a couple more letters sent your way with quests that wrap up the Ocean’s Diving questline & get you your final Ocean Rank points (you will end with Ocean Rank A, 0/200)
- Main final quest instructs you to visit the Coral Tree after 18:00 / 6PM
- After you’ve completed the Merfolk’s Coral Tree quest (must wait at least 1 day) go visit the Beach too for a cutscene with the townies! (You may not be able to view the cutscene if there are ongoing events at the beach. If this is the case, wait for them to be over.)
- A few days after completing the Merfolk’s Coral Tree quest, you’ll receive a letter from Cho Oyu – this will give you the ‘One of Us’ quest
- ‘One of Us’ quest instructs you to visit the Oracle Chamber – once there you’ll have a cutscene with Cho Oyu, after which you will be tasked with bringing Cho Oyu some items 5 Osmium Kelp Essence & any 5 Osmium quality crops
- Return to the Oracle Chamber with the requested items for another cutscene to complete the quest CONGRATS – From now on, when you are in the Ocean you no longer use your Diving Suit, its replaced by your new Merfolk form! You can pay to change your tail appearance via the ‘shop’ in Oracle Chamber at any time 🙂
- The day after you complete ‘One of Us’ quest, you will have access to the Merfolk General Store – in here you can purchase a top for your Merfolk form & change it anytime 🙂
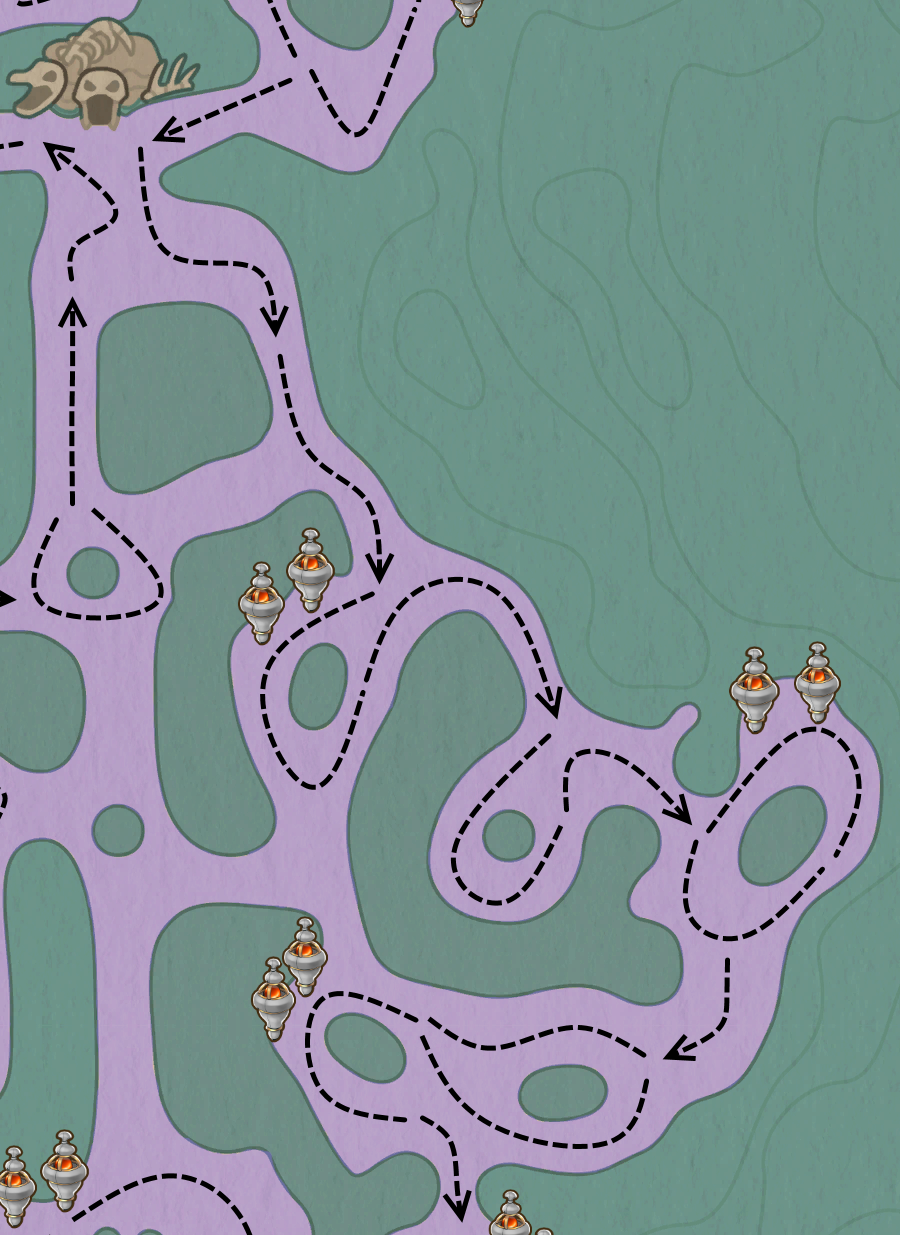
Empat Pulu (40m – Gold Kelp)
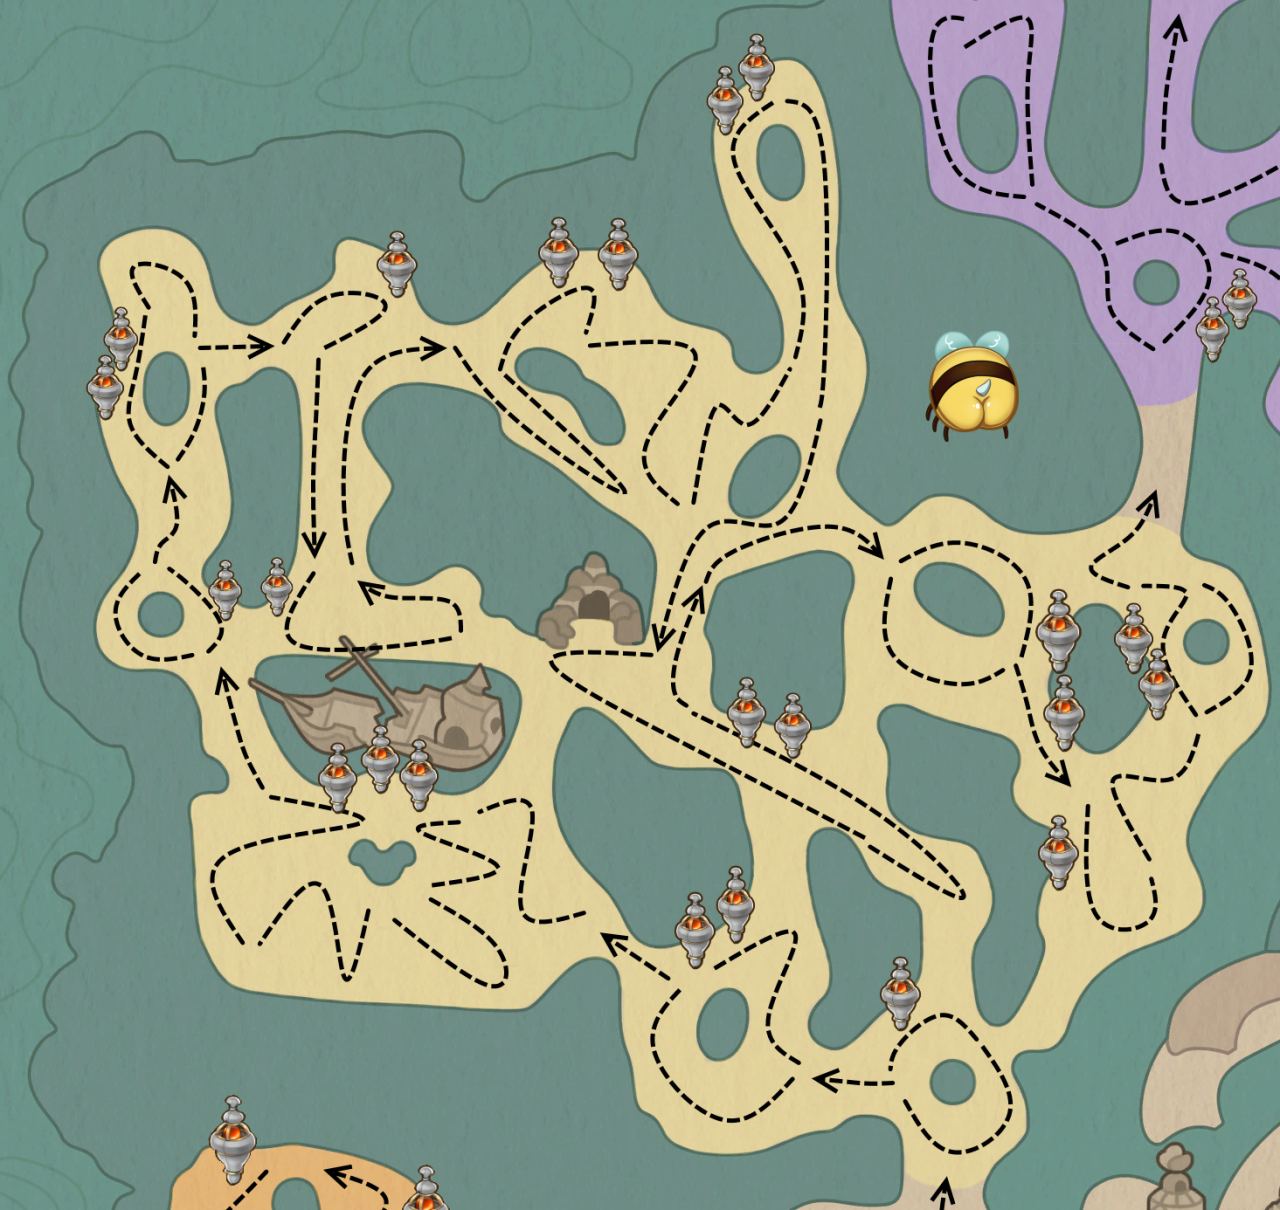


- 40m Zone 1 has 3 total sites, split between 2 halves – complete the first one (right side) to open access to the others (left side) – you can loop these sections however you choose
- All of the paths in the top &/right corners of 40m Zone 1 can be ignored – they connect you to 40m Mid Area and are shortcut paths for you after the areas are restored later
- With the 3 sites of 40m Zone 1 completed, you will follow the path to the left into 40m Orchestra Area
- The 3 sites in 40m Orchestra Area require a fair bit of zigzagging in this ‘loop’ – while it is one large open area, the vines here are split into smaller segments
- I clear up its right side, then move into the middle (toward the shrines), then go down the middle to the bottom. Clear the bottom from right to left, then go back up to the middle/the shrines
- Ignore the path in the top right corner – it’s another shortcut to 40m Mid Area that will open up later
- Follow the path to the left to access the next area
- In this next area, you will start in the left half of the 40m Mid Area. However, only the 1 leftmost site for 40m Mid Area will be accessible
- The orb spawn in this area can be difficult to spot, due to its small size. The orb spawn can more easily be ‘hidden’ &/obscured by oil spill, set dress, etc. – pay close attention for its spawn!
- Continue up north into 40m Zone 5. It has 3 total sites & is split into 2 halves – you’ll enter into its leftside half – loop it up however you choose to find its 2 orbs, then continue over to the right
- Clear this rightside half (1 site), then head down south to get the last orb (for the second site in the leftside half of 40m Mid Area)
- With these complete, leave 40m Mid from the path you just took (from rightside of 40m Zone 5), then follow the path to the right to reach next area (40m Yoga Retreat)

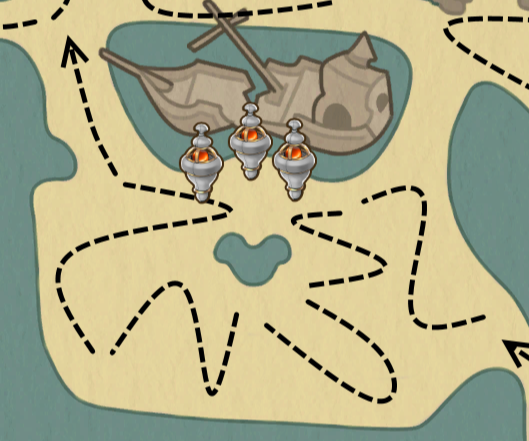
- 40m Yoga Retreat is another area in which there is a larger open area with multiple segments of vines that clear in stages. I view this as having 3 ‘sections’ – the leftside section (2 sites), the top section (2 sites), and the bottom section (no sites, but 2 paths into nearby areas)
- (This area is one which is difficult to put into words, so if the notes here don’t make sense, just refer to the map edit as to the path to follow)
- When we enter this area, we enter into its leftside section – I clear the ‘lower half’, then return up toward its shrines, and then clear the ‘upper half’, which brings me from the leftside section into the bottom section
- For the bottom section, I clear a path from left up until I’ve reached the top section & its 2 sites
- After I loop the top section & clear all trash there, I go back down into the bottom section to access the path forward into my next area
- Ignore the path to the right (we’ll come back to it shortly). Instead, go all the way down south to the path directly beside the cave (into the 40m Mid Area once again)

- The right half of 40m Mid Area is the next to clear after you’ve finished 40m Yoga Retreat. This includes everything from in front of the 40m waypoint & cave, and all the way right over past the 2 sites
- In this area (right below the cave, before moving to the right to the sites) you will find a port for the Manta Ray Express – this spot connects you to the 10m Jellyfish Area via a special travel method
- For these 2 orbs, I clear the area in front of the waypoint & cave, then I clear all the way to the far right before looping back. Once these are restored, I return back up into the bottom of 40m Yoga Retreat and follow the path to the right, into 40m Zone 3
- 40m Zone 3 has 5 total sites, and its vine segments split it into 3 sections – leftside (2 sites), bottom (looks like 1, technically can be considered 2), and rightside (looks like 2, technically can be considered 1)
- We enter into the leftside section, and you can loop this however you choose for these 2 orb spawns, after this I then continue down south and clear the bottom most site.
- With bottom most site completed, I continue back up and to the right, where 1 site is accessible, and the other is waiting behind the vines. Clear the second last site & final vines, then loop the last section in this right side.
After completing your 22nd & final shrine, you will trigger a cutscene, after which you can proceed into Lima Pulu (50m – Osmium Kelp)
Curious about what you saw in that cutscene? You can head back into the Merfolk Kingdom and take a look around for the sea dragon, Naga, you just freed!
Lima Pulu (50m – Osmium Kelp)
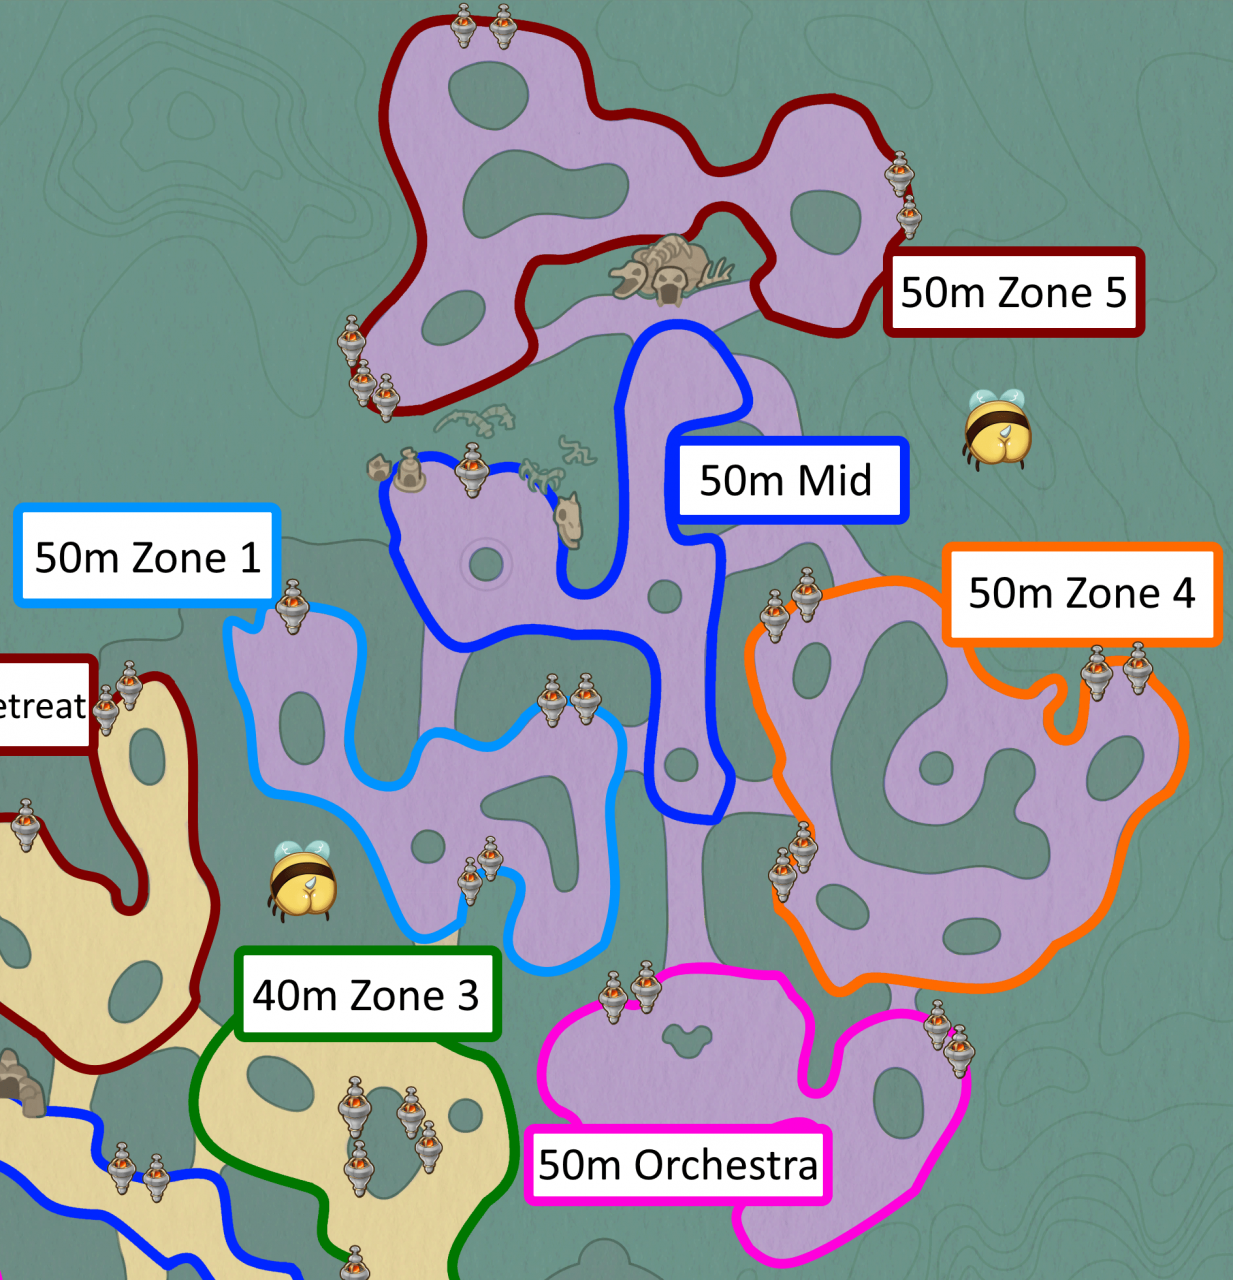
There are a few paths within Lima Pulu which, during your initial clear, are simply dead ends/trick paths. For these areas – the sections of my edited maps which have no pathing lines indicated- I advise saving your stamina and simply ignoring, as there are no orb spawns within those paths. I do a final full clear for these other paths once I have all 23 sites completed, as they’re helpful shortcuts and one area specifically is a critter spawn point.
- We enter into 40m Zone 1, which has 3 sections, with 5 total sites
- I start by looping the immediate middle section, after which I move into the left section and complete its loop
- Once the left side is complete, I pass through the middle to enter the right section via the bottom right path (path directly to the right of the shrines in the middle). From here, I follow the right section loop up and around, until I’m back in the middle again
- Once back in the middle, follow the path up north, which you will have to clear, as an orb’s path tracks through here
- This path brings you into the beginning of the 50m Mid Area (its leftmost section). Said section is the only spot for 50m Mid Area which has a site, and you can loop it as you choose
- Once this site is complete, continue forward via the path to the right
- The very middle of 50m Mid Area, considered the middlemost spot in Lima Pulu, can technically be ignored – as via map edits, we already ignore the very bottom section. However, I clear this small mid section when doing this first clear
- Continue up north. You must clear this area (directly below the 50m waypoint and cave) – while there is not a shrine site here, there is an orb spawn
- After finding the orb spawn below the cave, take the stairs to the left of cave and go up into 50m Zone 5
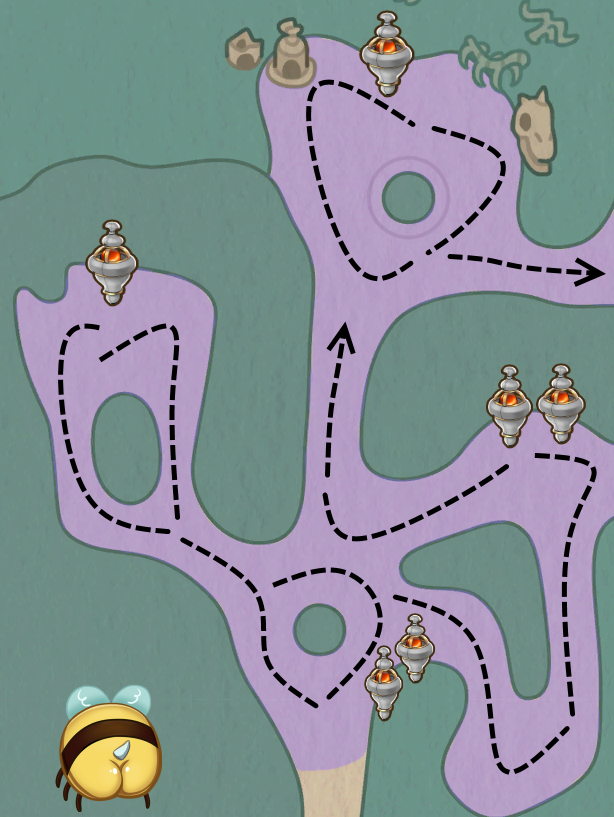
- 50m Zone 5 has 3 main sections – left, top, & right – with 7 total sites. We enter via the left, which undeniably has the most wibbly wobbly, timey wimey orb spawns
- There are 3 sites in the leftside section; 1 orb is found before entering this section (as noted above), the next orb is found within its immediate area, and the 3rd/final orb is on the opposite side of 50m Zone 5
- After looping the area in the leftside section and having 2 of its 3 sites restored, follow the path up north into the top section
- Loop the top section to complete its 2 sites, and then continue forward via the path to the right. Before you can reach the final 2 sites you will clear a small mid-right section (this has a path which connects directly back over to the leftside section). Here you will find the 3rd and final orb for the leftside shrines
- With the above completed, continue into the right & loop this section for the 2 sites located here
- This completes 50m Zone 5 – descend the stairs back down to below the 50m cave, then take the path down to the right to continue
- You must clear the trash as you enter 50m Zone 4 via the path from the 50m cave/waypoint – there are 6 total sites in this zone and one of the first orbs spawns within this entrance path
- Once you’ve reached the first 2 sites, loop the area, then continue forward via the path to the right. Along this path there will be a small area for you to loop. After that, continue to the right for the next 2 sites. Loop the area, then continue via the path down south
- The final 2 sites are in this bottom-most section, which I mentally split into left & right halves. We enter in the right half, which I loop. Once I am in the middle, I specifically clear the left half by its topside, down left past its shrines, and then go along the bottom, back to the middle
- This looping returns to the path down south which is the next way forward, into 50m Orchestra Area

- 50m Orchestra Area is the final zone for the entire ocean. It has 4 total sites split evenly across 2 halves (left & right)
- We enter into the right half – I like to loop the immediate area up top near the shrines, then go down and loop the bottom. (The bottom right corner has a port for the Manta Ray Express – this spot connects you to the Merfolk Kingdom via a special travel method)
- The way I loop returns me to the middle so I can continue into the left half, which can be looped however you would like, to complete the final 2 sites
- With all of the above completed, you will trigger another cutscene
CONGRATS – You’ve now restored all 85 shrine sites!
I am very much an out of sight out of mind player, so to avoid forgetting about the paths I skipped during my first clear, I exit 50m Orchestra Area via its path up north. This leads into the 50m Mid Area and connects with every path which was previously ignored/skipped. (The areas within 50m Mid Area specifically are best to clear, as they have critter spawn points)
There will be a few more things to do in order to wrap up the Ocean’s Diving questline – refer back to the ‘Merfolk Kingdom’ portion of this guide, its final segment has all relevant notes.
By Bee, averne, and sailorvogue
More Guides:
- Coral Island: How To Unlock The Orchestra Sites (V1.1)
- Coral Island: Heart Event Guide (V1.0)
- Coral Island: Guide for Steam Deck Users
- Coral Island: Manual Cooking Recipes
- Coral Island: List of Upgrades & Constructions of 2024