This guide will cover the basics of SAR and more. Weapons, items, fighting techniques… (almost) everything.
The Basics
Basically, your goal is to be the last animal (or team) alive. First, you need to know important controls and actions you can perform.
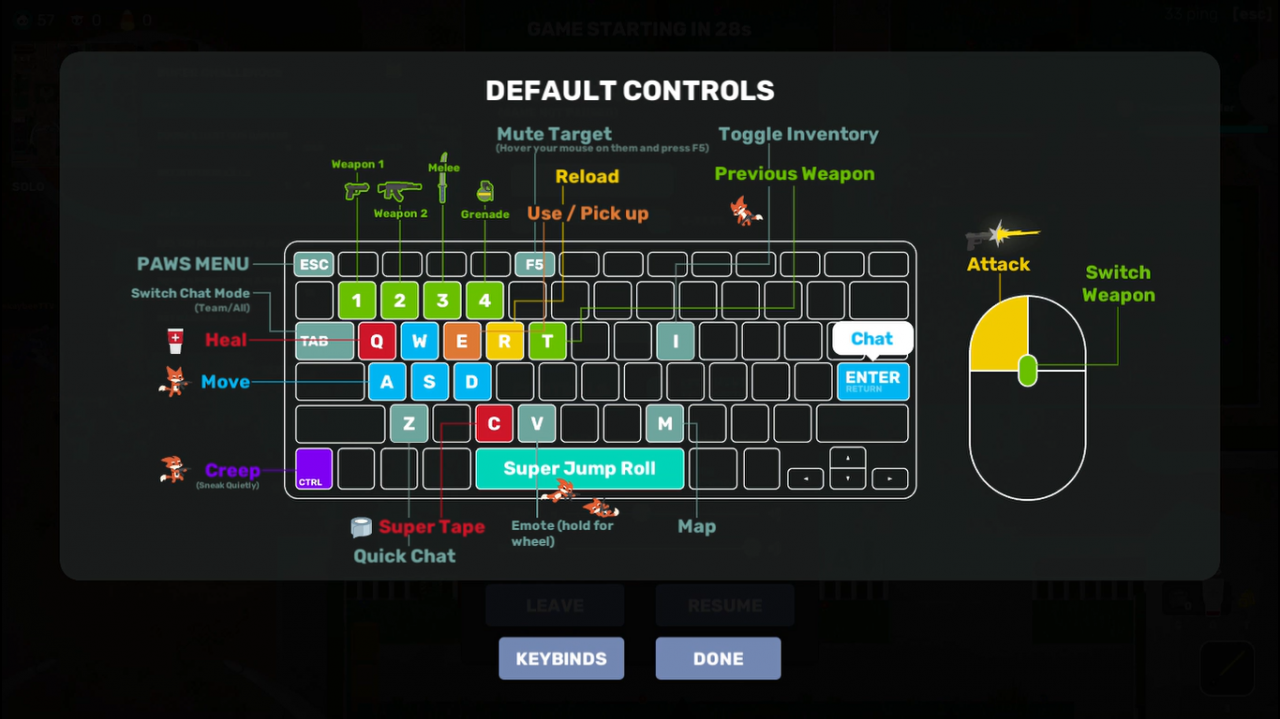 Jump-Roll:
The one action you will perform the most (probably even more than attacking); pressing space bar allows you to perform a roll that is faster than walking. Doing so makes it hard for others to shoot you, but you cannot shoot or reload while doing it. If you press space again within 0.1 second of your last roll, you get a small speed boost.
Keep in mind that Jump-rolling will cancel any action you are performing, such as reloading or healing.
Creep
Holding Ctrl will slow your walk speed and jump speed, but walking will be silent and jumping will be significantly quieter. Useful for getting through areas where you don’t want to be heard.
Use/Pick Up
Pressing E while standing over a gun, throw-able, or armor will pick up the item. You can only hold 2 guns and 1 type of throw-able. Pressing E will also open up crates.
Heal
If damaged, you can press Q to start drinking health juice and recover HP. Drinking health juice reduces your speed and your ability to shoot, so get to safety before healing. Must have health juice.
Tape
Pressing C will repair your armor with super tape. Must have Super Tape.
1,2,3, and 4
1-2 equips the gun in the 1 or 2 slot. 3 equips your sword. 4 equips your throw-ables (grenades, skunk bombs, or bananas)
Reload
Pressing R will reload your equipped gun.
Previous Weapon
Pressing T will equip your last equipped weapon.
Toggle Inventory
Pressing i will allow you to drop guns, ammo, armor, and other gear. To drop, drag the item you want to drop onto the ground. Pressing L Shift will drop half.
Emote
Holding V will open a wheel of all of your equipped emotes. Select one to perform it. This has no use to you while in battle.
Map
Pressing M will open the map. Press M again to close the map.
Chat
Pressing Enter will open the chat at the bottom left corner. Press Enter again to send the message. Pressing Tab will swap between team chat and public chat (only on duos and squads).
Quick Chat
Holding Z will open a radial of quick chats, similar to emotes. Pressing Z while hovering your curser over an item/crate will send a message to your team of that item. Using this on duos or squads will help cooperate better with your team members.
Attack
Left clicking your mouse will attack. The roller on your mouse will allow you to quickly switch between your 1-4 weapons.
Solo; Choosing a Start Location
As mentioned above, pressing M will open the map. When the round first starts, everyone will be inside of the Giant Eagle, ready to sky dive into the map. The map shows the Eagle and its path until it leaves the island.
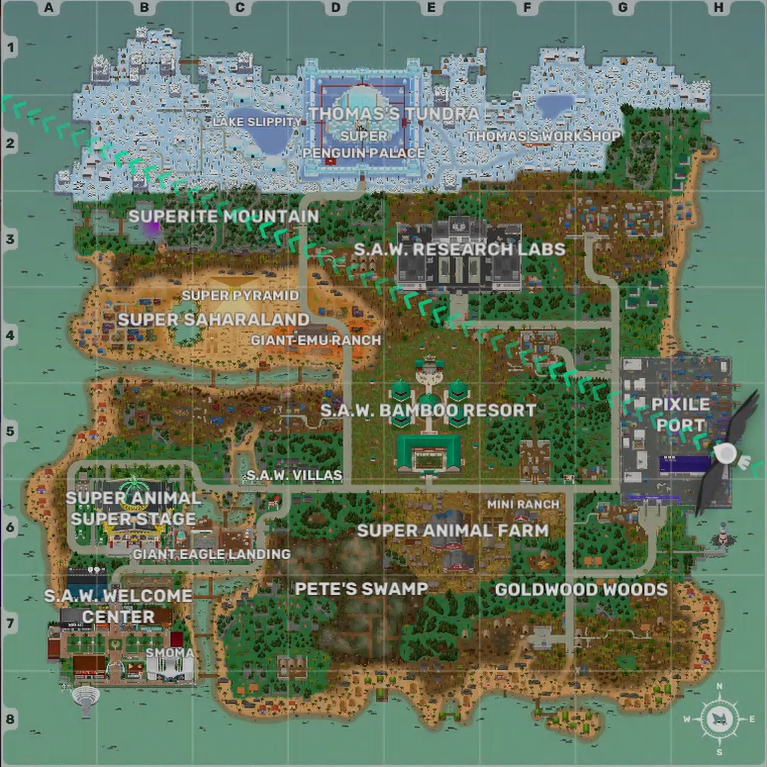
You have plenty of time to choose where you want to land. For beginners, some good places to drop would be the swamp, forest areas, and small areas of cargo containers. If you see some good weapons below and nobody else is going for them, go ahead and drop there to grab them.
If you want to go aggressive and get some good weapons early, the labs, farm, stage, and pyramid would be for you. Beware, as many players tend to drop there.
For solo, some good middle-ground areas to drop would be the lighthouse, Thomas’s Workshop, Pixile Port, and the shore. Thomas’s Workshop generally has several guns and some armor. Pixile Port is big enough that you can stay away from people usually, and has tons of crates for plenty of gear. The shore doesn’t have many guns, but clam shells can be opened, which drop tape, grenades, skunk bombs, ammo, and I think bananas. The lighthouse generally has some pretty decent weapons, sometimes even an epic weapon. There is also a possible rebel cache there.
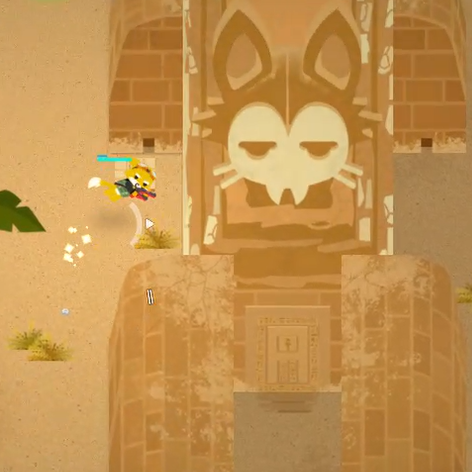
 There are three (I think. Let me know if there are more. An area in the Pyramid might have Epic weapons too.) locations with a possible epic weapon (not counting rebel caches.) 1. Lighthouse, 2. Northern part of the barn (only accessible by pressing a button), and 3. the Skull cat statue in the desert area.
Solo; Picking up Gear
Also, don’t lose track of where you are when gathering items. Be sure not to let the skunk gas catch up to you, as I have had happen many times to myself.
Guns
First, you should probably grab a gun before looking for anything else. Since you can hold two guns, I personally have my primary gun (1) as a short ranged, fast shooting gun, like the SMG or Pistol. My secondary gun (2) is generally a long ranged gun with a slower fire rate, like an AK or Magnum. If it is coming down to the final circle with very few people left, I will pick up a shotgun or jag-7 to replace my long-range. Check the stats while waiting for a match to begin in the shooting range to see what you like best.
Armor
There are 3 tiers of armor in the game; tier 1 (1 protection) tier 2 (2 protection) and tier 3 (3 protection). Pretty simple. The better the armor, the more rare it is. Most guns generally only remove 1 protection with each shot, but some guns, like the Magnum, damage more. Make sure you have easy access to some armor when choosing where to land.
Super Tape
Super Tape is used to repair broken armor (by pressing C). 1 tape repairs 1 armor protection. Super tape can be found in wooden crates, rebel caches, mole crates, sea shells, and random places around the map.
Health Juice
Health juice is used to heal lost health (by pressing Q). It can be found in wooden crates, rebel caches, mole crates, grass, and random places around the map.
Ammo
Bullets are found with guns, in wooden crates, in sea shells, and in grass.
Grenades, Skunk Bombs, and Bananas
What these do will be explained later. Grenades and Skunk Bombs can be found in wooden crates, sea shells, and random places around the map. Bananas can be found in wooden crates, rebel caches, grass, and random places around the map.
Be sure you have a stash of Super tape and plenty of health juice and ammo before the circle of life gets small. Grenades and Skunk bombs also become more useful, as there is not much space to move around for everyone.
Fighting Other Players

Being Prepared
Be ready for an attack from others at any point in time. You should have a gun equipped at all times, unless you are cutting grass/destroying crates, or are trying to move quickly (holding a gun slows you down. Bigger guns generally decrease your speed the most. Holding your melee weapon allows you to move the fastest).
When entering a building where you will encounter others in close-quarters, equip your fastest shooting gun or a shotgun/jag-7. Most fast shooting guns don’t have very much range, but range is not needed when close up. A Pistol, Duel Pistols, Silenced Pistol, SMG, or a Thomas Gun would be ideal (besides a shotgun). Note that shotguns and jag-7s will 1-shot non-armored players if every bullet hits them in one shot, so they are very useful in close-quarters. This also why armor is a vital piece of gear.
I would not recommend using a Minigun inside of a building, since it takes around 0.5 seconds to actually start shooting. This is enough time for an enemy to land enough hits on you to get the upper hand. The minigun is a long range weapon in my book.
If you are running around outside, I would equip a long-range weapon, such as an AK, M6, Magnum, Deagle, or Rifle (Hunting or Sniper).
Also, make sure each gun is loaded at all times and your armor is repaired.
Fighting Techniques
So, when the situation arises, what do you do when battling?
-Don’t be afraid to Jump-roll, even if you aren’t retreating. In fact, there is enough time in between two jump-rolls to fire a shot and still get a speed boost when jumping. This is a good maneuver to practice in round intermission. Jump, shoot, and quickly jump again. This allows you to chase an enemy (or run away from them) while still shooting. Jumping from side to side and shooting in between each jump is also extremely effective.
-Don’t click too fast. If you are using any kind of Pistol (fast firing gun but not automatic) don’t click faster than the RPM. Practice shooting the Pistol and seeing how fast it shoots. Clicking too fast can cause some clicks to not “register,” resulting in some shots not being fired. You can shoot faster by clicking slower in some scenarios. This rule fits especially with your melee weapon. You should be able to use it 2.5 times a second, but rapid clicking will result in fewer hits per second.
-Use the correct weapon. If the subject is far away, don’t use an SMG, since the bullet speed is fairly slow. A magnum shot is significantly faster, making it harder for the target to dodge the bullet.
-Use throw-ables. Many times, I have engaged in battle with somebody, lost, and realize that I never touched my 5 skunk bombs. Every throw-able can be used to get away from an enemy or to attack them.
Grenades
Once a grenade leaves your hand, a timer starts (something around 1.5 seconds) before it explodes. Regardless of when it hits the ground, it will always explode at the same time. Grenades do tremendous amounts of damage and also damages armor. Throwing them into houses where other Super Animals are hiding can be extremely effective. Beware, as you can hit yourself with your own grenades. Team members are immune to grenades you throw (I think). You can hold 4 Grenades at a time.
Skunk Bombs
Skunk Bombs explode as soon as they hit the ground. Skunk Bombs form a cloud of green gas wherever they land, gradually dealing damage to anyone inside. Basically a grenade but deals damage over a larger period of time. The gas remains in place for several seconds before disappearing. Team members are immune to Skunk Bombs you throw. You can hold 5 Skunk Bombs at a time.
Bananas
As a rather comical way of sabotaging other players, bananas on the ground will slip anyone that walks over them, causing them to be immobile for around 2 seconds. Very useful for trying to run away from other players. Team members are not immune to bananas and will slip on them too. You can hold 10 bananas at a time (making a giant mess of bananas on the ground in the final circle of life is very effective; just don’t slip on them yourself!)
-Actually, a useful strategy is to simply hide. Shooting at players that don’t see you can quickly give you an upper-hand. I annihilated this player in less than two seconds by catching them off-guard.
-Use lots of throw-ables in the final circle. Drown everyone else in skunk gas and leave an air pocket for yourself to gain an edge.
Recovering
After engaging in combat with another player, recover as quickly as possible. Find some shelter first; don’t start drinking health juice in the middle of a road where everyone can see you easily. Standing behind an emu or a hamster ball is really effective, since any enemy bullets will hit the emu/hamster ball and not you. You cannot health or use tap inside of a hamster ball or on top of an emu though.

Once you are safe, use super tape first, since one piece of tape will block an entire bullet, no matter how much damage that bullet originally would have done. Once your armor is fully repaired (or repaired as much as you possibly can), reload a gun if necessary, then drink health juice. When you are fully recovered, gather some more gear to resupply your inventory.
Beware, as healing inside of a house can be dangerous in some cases. Others can hear you healing or using tape from outside, and can toss a grenade in without warning.
Eating
If you are on the beach or in the forest, you can eat mushrooms or coconuts to receive and instant 5 health. Useful for tight situations where you are low on health and running away from somebody.
Rebel Caches and Mole Crates
Rebel caches are the red crates that make a faint siren noise when you get close to them. Opening them will drop either a rare-epic grade weapon, a tier three armor, or ten bananas. They will also drop either twenty health juice or a super tape. Dropping onto one of these at the beginning of a round is not a bad option (unless you get stuck with ten bananas).
Mole Crates
Twice a game, the Delivery Mole will appear somewhere in the circle of life. The map will show a marker for where he is for a while, then I think it goes away when he drops the mole crate (or when somebody opens it). The mole will sit in place for around five seconds before he goes underground, digs for a ways, and then comes back to the surface to drop a crate. The mole crate will drop 1-2 legendary weapons guaranteed. It can also drop skunk bombs or grenades, health juice, super tape, and tier three armor.

While mole crates are very rewarding if you can get your hands on them, many players will be going after it, so watch out. If you do not want to deal with other people, don’t go for mole crates. If you do go for mole crates, watch out for skunk bombs and grenades thrown by other players. Feel free to throw skunk bombs and grenades yourself at people trying to open it. Once you equip the items you want from the crate, get away immediately.
Power-ups
-Increases health regeneration speed when drinking health juice
Belt I forget what it is called
-Increases inventory capacity; you can hold more super tape, throw-ables, and ammo than normal
Claw Boots
-Automatically cuts grass
-Drops more items with each patch of grass
-Prevents sliding on ice
Ninja Boots
-Increases speed when creeping
-Jump rolls make no noise while creeping
Banana Forker
-Allows you to eat thrown bananas. Each banana gives 15 health. Cannot eat rotten bananas (bananas in skunk gas)
You can only have one power-up equipped at a time. Having any power-up is useful, so you might as well pick one up if you happen to see one. However, using claw boots can give away your location when walking through grass, so don’t have it equipped if you don’t want to be seen.
The Final Circle of Life
Using Guns
Use fast firing guns in the final circle of life, since the area is getting quite small. Shotguns are really powerful at this time too. Never go to the center of the circle; stay on the edge near the skunk gas. Going to the middle creates a bigger chance of being attacked by more than one player. If multiple players are targeting you, get away. Throw grenades, skunk bombs, or bananas to distract them. If you get out of the way, they might start attacking each other. Let others fight it out and come in late for the W.
Using Health Juice
Occasionally, final circle will be completely covered in skunk gas, but players are still alive. If you don’t know where the last player(s) is/are, then stop shooting and start drinking Health Juice ASAP. Now, it’s a chugging competition; whoever has the most health and health juice will win. This is where marking the nearest campfire is key. If possible, walk over to the campfire while drinking the juice. Since even with a cupgrade, you will still be losing health faster than you are regaining it, using a campfire will stop health loss. Actually, you will be gaining health very slightly when using a campfire. 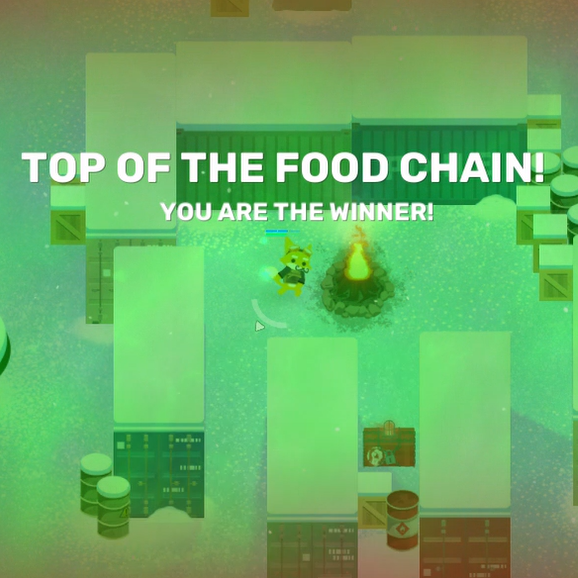
Recovery
In the final circle, you have very little time to recover from any hits. Use tape when you can, and reload your guns before drinking health juice. Remember that everyone else is also in a tight situation, so choosing to drink health juice instead of reloading your guns could cost you the game. Most others will probably not be 100% recovered, so you should be ready to finish them if they start shooting at you. Using campfires at this time is useful, but also remember that they are even more useful when the skunk gas takes over and you need to drink heath juice.
Duos: Choosing a Start Location
Cooperation is key to winning games in duos. Communicate with your partner well. Notify them of armor, guns, and skunk bombs/grenades by hovering your curser over the item and pressing Z (The quick chat button). Pressing Z without choosing any options on the radial will leave a marker on the map wherever your curser was. It will also notify your partner of the item if you mark an item.
Place a marker on the map of where you want to land. Your partner can see your marks, and you can see theirs. Be sure to choose any area that will have enough gear for you and your partner, so choosing the lighthouse might not be a good option. While there are sometimes two weapons there, there is sometimes only one.
If you are playing with a random partner and they happen to drop without notice, go ahead and follow them. If your partner won’t cooperate with you, still cooperate with them.
Duos: Working Together
As mentioned above, notify your partner of items whenever possible. Also, ask for supplies that you don’t have and need. You can do this by toggling inventory, hovering over the item you need, and then pressing z. For example, pressing z while hovering over the super tape will say, “Need Super Tape!” You can drop items by toggling inventory and dragging out the item you want to drop. Holding left shift will drop half.
Communication
Try to memorize where quick chats are on the radial, since you might need to use them quickly in tough situations. If you see enemies, use the “Danger!” quick chat to notify your partner. Also use the Help quick chats if you are low on health or have been knocked down.
Healing Each Other
When you lose all of your health, you do not immediately die on duos as long as your partner is still alive. You get knocked down, and must be revived by your partner. You have another health bar when knocked down that gradually decreases over time, and if that health bar is depleted, then you die, dropping all of your stuff. Your partner must stand next to you and revive you for 6 seconds to get back into the game.
Dogna’s Dart Gun can be used to heal each other. Although it poisons enemies, shooting teammates will gradually regenerate their health. Only two or three shots are needed to fully heal a team member. Don’t shoot them all at once; shoot them around four seconds apart, since the healing does not stack.
Playing Squads
Stick Together
Since the winning team will likely be a squad of four or three players cooperating together effectively, you won’t get very far by yourself or with an incomplete squad. Don’t stray from your group.
Communicate
Still use quick chats and mark items using Z. If all four players use quick chats and mark items, the entire squad will be fully loaded and ready for battle in no time. Even if you are the only person using marks and chats, the team will still end up working together significantly better. Also, ask for items frequently since somebody probably has what you are looking for.
More Guides:
- Super Animal Royale: How to Eat Bananas
- Super Animal Royale: Power Ups Guide
- Super Animal Royale: Gift Codes 2021 (How to Redeem)
- Super Animal Royale: FREE items Codes