Defenses are a key part in They Are Billions.
If you leave an entry point of your colony unguarded, you will die.
If you are unprepared for a raid, you will die.
If one of the sections of your colony has weak defenses for the final raid, you will die.
In this guide I plan on giving you tips and general principles to build strong defenses: choosing the correct places to build defenses, maximizing the efficiency of your towers, and pairing buildings and walls with units
Watching your colony: sentinels and patrols
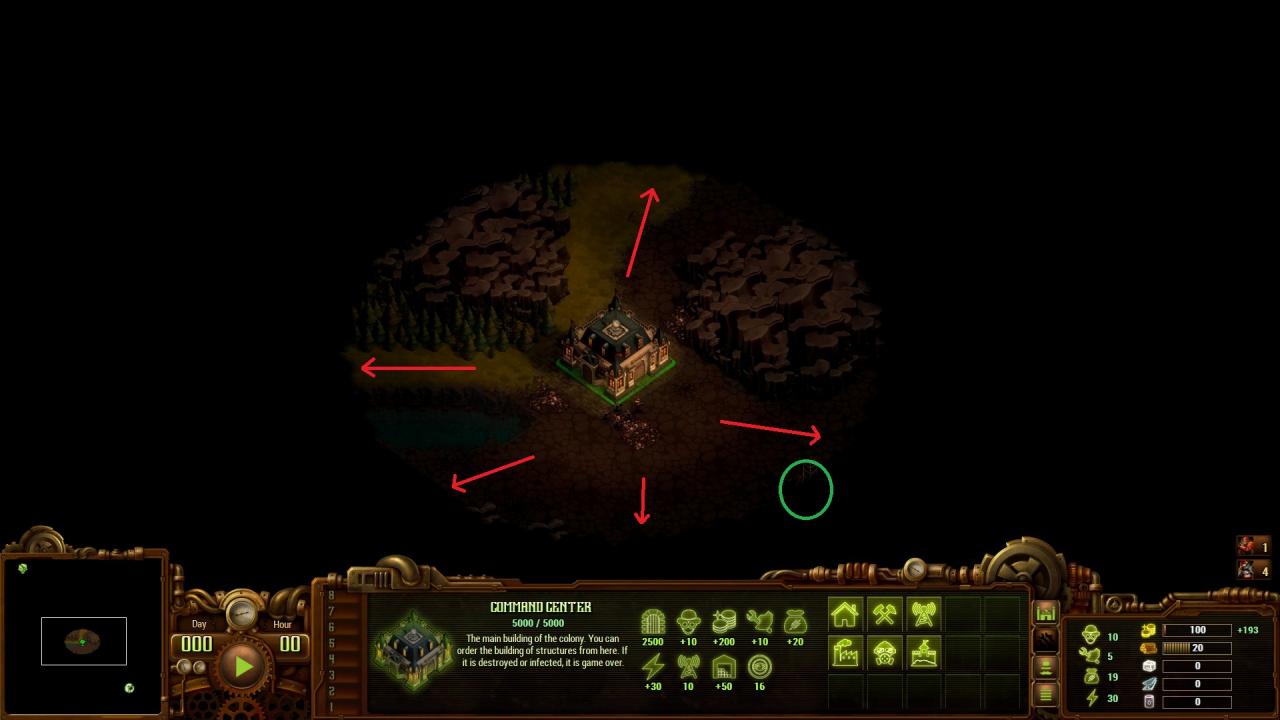
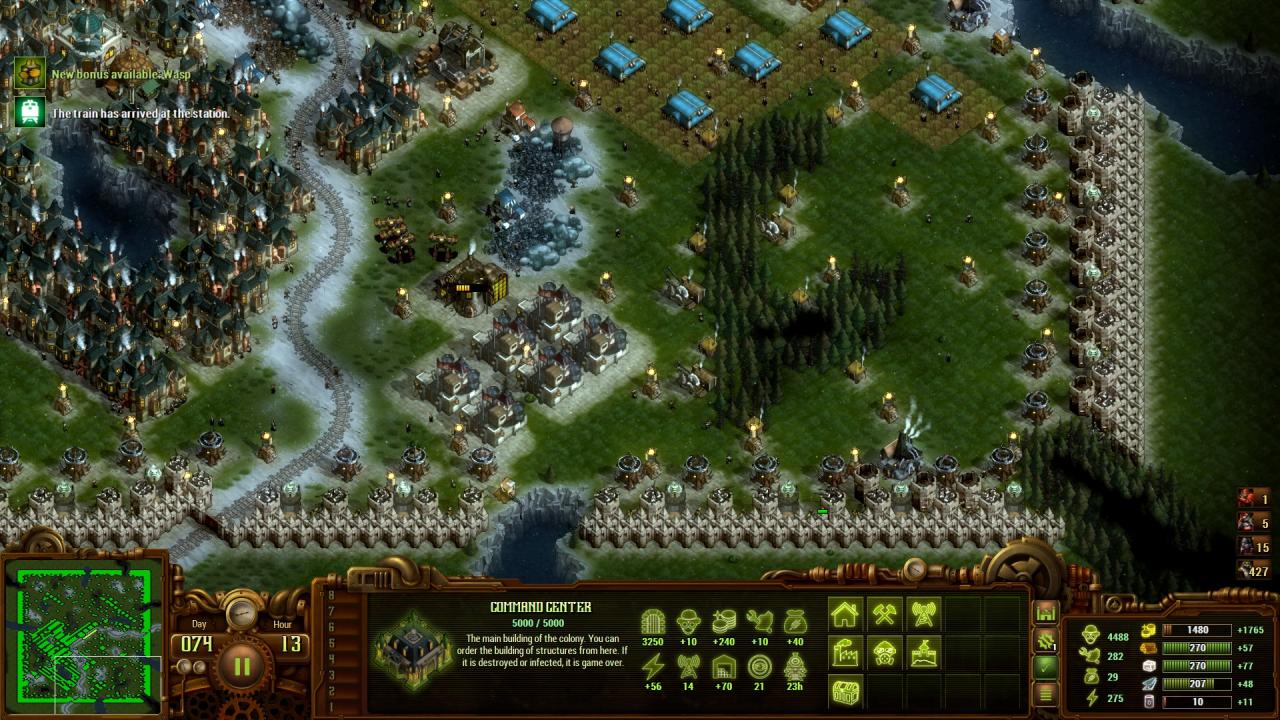
At the beginning of the game, use your 4 Rangers and your Soldier to quickly get a look of your surroundings and identify potential threats. On this screen, you can see the possible directions for exploration. Circled in green is a ruined pylon – it’s always interesting to check those, as they offer a natural wall and often have batteries at their feet.
You want to identify a zone in which to expand, and use one or two Rangers to clear that zone. The others will have to watch entry points of your colony.
Do not use the Soldier to clear a zone. Leave him to watch an entry point, or on patrol. His gun will make noise and attract other enemies faster than the Rangers’ bows. In the early game, you don’t have enough soldiers to handle a sudden rush of Infected Colonists attracted by gunfire.
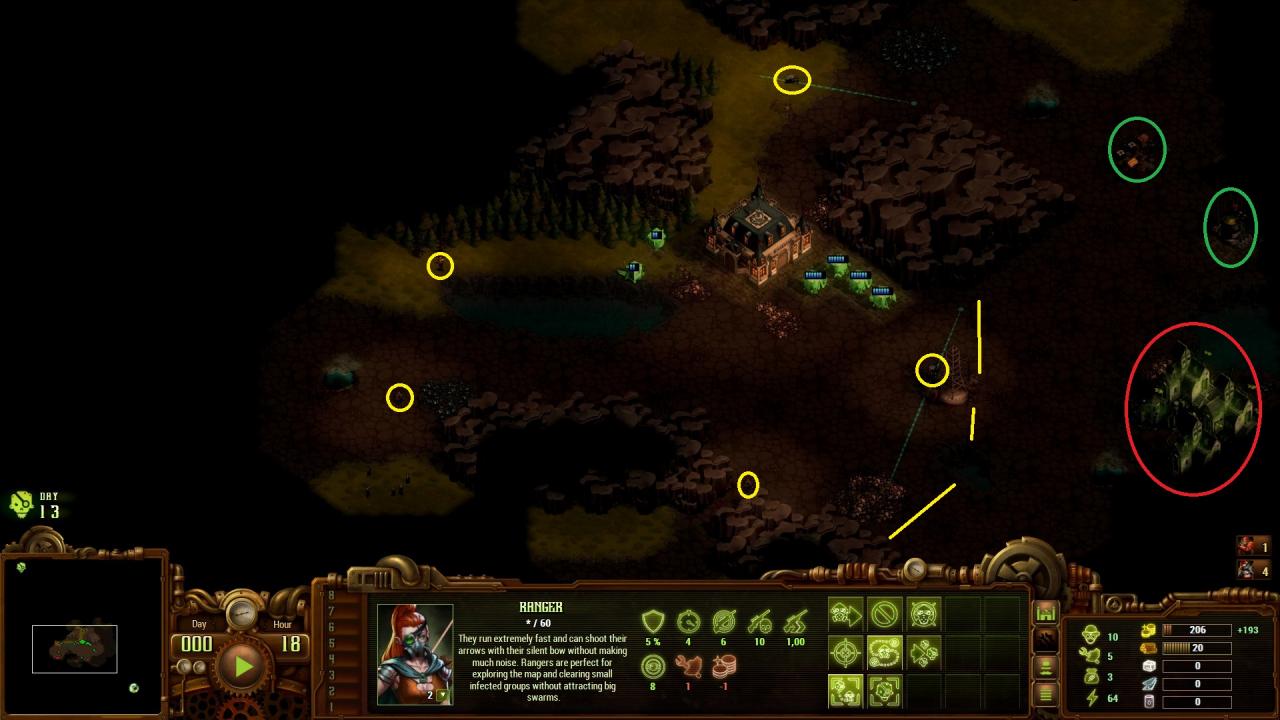
On this screen you can see my soldiers circled in yellow, some abandoned resources and buildings in green, and a village of doom in red. This is a big problem, as the East is a very good direction to expand (stone, and a lot of room to place dwellings). That means I have to leave a Ranger on permanent patrol in this area, and prepare to wall (see the lines in yellow).
Another Ranger is patrolling the two entry points North of my colony. The Soldier is guarding the West, and my last two Rangers are watching South and slowly clearing out zombies. There is no entry point unguarded, and that’s what you always have to aim for.
Use patrols. This is a very effective way of watching two entry points (or more, but don’t split a single unit between too many entry points) with a single unit. This is something you can afford when you’re near your colony – when exploring further in more hostile areas, it’s better to have several units on patrol.
Don’t forget you can see the view radius of your units (just look at how the fog of war disappears or reappears when moving a unit) to know whether a spot is fully covered or not.
Using and expanding towards chokepoints
You can’t wall the whole map: that would be a big waste of resources, as you can’t predict where the enemy hordes will arrive exactly (which means a big portion of your walls will be useless).
Instead, what you want to do is building walls where the enemies will have to pass to get to your base. Not only will you spare resources (using forests, mountains, water and even sometimes oil pits as natural walls that can’t be attacked or destroyed), you also are a lot surer the enemies will go this way. Bear in mind, the larger your colony is, the more choke points you will have to cover – which means you have to be wary when expanding and set up defenses for each one, even if they are not all likely to be targeted by hordes.
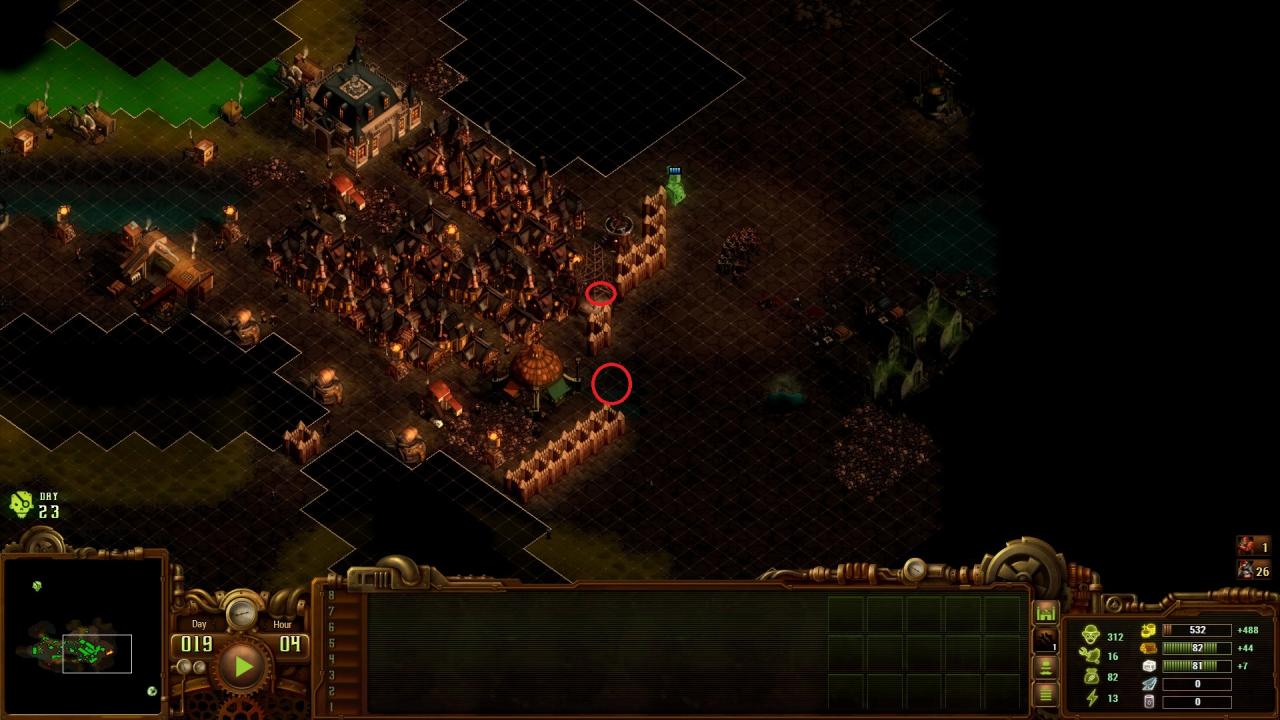
Here, you can see that I expanded a lot towards the Village of Doom, covering the area with a free ballista I received from a mayor. While it is not exactly a chokepoint, you can still see natural obstacles circled in red (water and a pylon) I used to spare some wood.
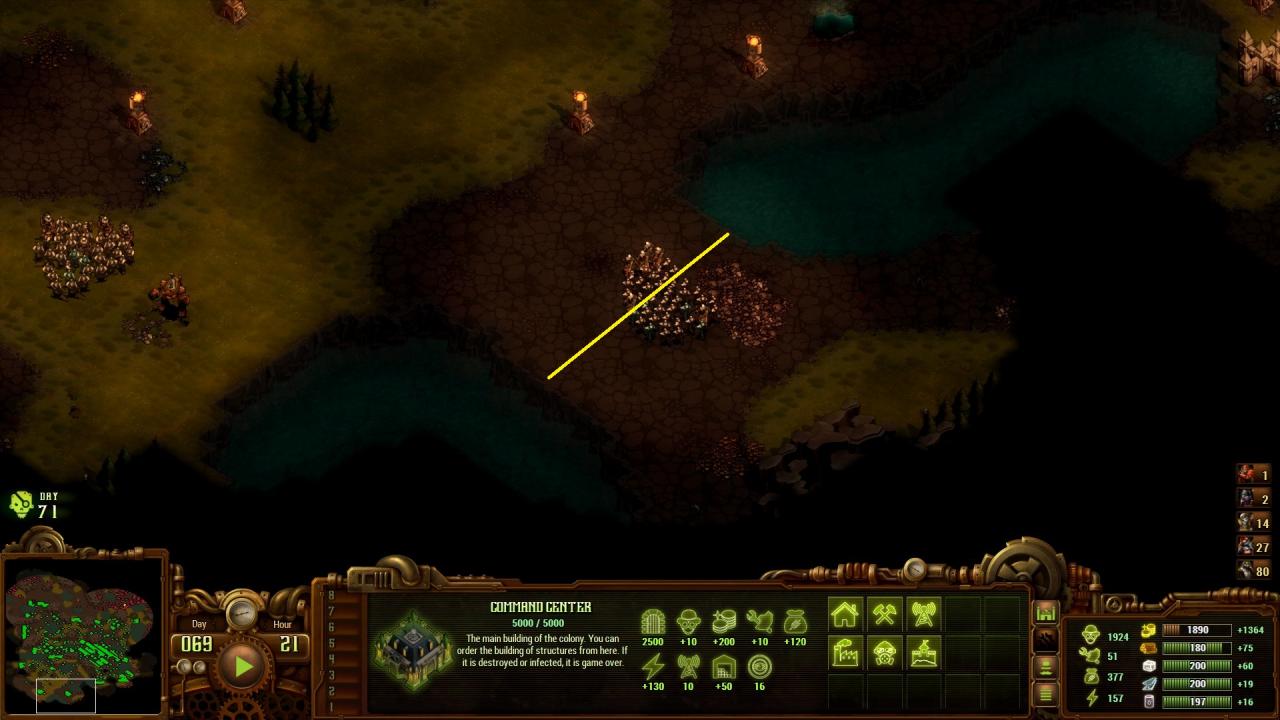
A lot later in the game, I found this excellent place to build defenses (see the yellow line). First, there you can see there is water on both sides, and the zombies can come from both South and South-East, which makes it a great chokepoint for holding the southwestern part of my colony. Second, it is large enough for me to place some actual defenses.
Keep in mind that you don’t want to use very small chokepoints (less than 10 cells wide), for you won’t have enough space to build defenses there. Your shocking towers especially will have a very low value in such places – you want them to reach as far as possible.
Another point is that you want the terrain to be as clean as possible. You can’t build on natural resources. A place can be a wonderful chokepoint in terms of placement and width – but if there is iron, stone and gold all over the place, you won’t be able to build good defenses. On my screen, you can see there is a stone mine. I will have to build my wall behind it in order to be able to place towers behind my wall.
How to build walls
The game typically doesn’t let you build more than two consecutive layers of wall, but there is a way to bypass that : the diamond wall formation.
Basically, if you’re walling in a diagonal, you can only put two layers of walls. But if you’re walling vertically or horizontally, you can place three! Your walls will look like diamonds, hence the name. See the screen below:
Ignore the fact that I basically walled the whole map – this was a campaign missions, one of the easiest ones. In a survival game, you don’t really have enough time and resources to do that.
Obviously, you still want to make good use of chokepoints. Because of that, you will sometimes have to make do and use a diagonal two-layer wall. That is fine, as long as you still put good defenses behind it, obviously. It is also fine to mix diamond and diagonal walls – if you do so, your wall will look like a giant arrow; always have the arrow tip pointing the exterior of your base, as it will allow a shocking tower to reach a lot more space (see the screenshot below).
As much as possible, especially mid and late game, try to avoid having dwellings near your walls: if a breach is made and the zombies make it to your dwellings it’s likely a death scenario. If they make a breach and infest a quarry, it’s not the end of the world.
The stone wall upgrade is a must have once you get the Stone Workshop and have already researched the priorities (that would be Stone House, Shocking Tower, Power Plant and Bank).
Traps
- Stakes traps
- Wire fence traps
- Land mines
These traps are probably the best in the game. They are accessible early through the Wood Workshop, and are cheap to research and to build. They slow down both units and zombies, and deal damage to the latter. What makes them really worthfile is that one trap costs only 30 gold (the other two cost 100 each) and uses wood rather than iron.
As explained above, they’re not really worth the investment. One wire fence trap is equivalent to approximately three stake traps in gold – not to mention wire fence traps need iron, which is a late game resource you will need a lot for other buildings and units.
Even if you are swimming in gold and iron, train snipers rather than upgrading to wire fence.
They have the same problems (and costs) as the wire fence traps do, and more. They explode on impact, which means they have to be rebuilt every time; also, they obviously have friendly fire, which means you can’t build them near one another, and absolutely not near your walls.
The only reason I see for using those would be being caught off guard by a raid (which is bad already) and need to quickly add some damage output to your defenses. Even then, it’s better to build a shocking tower (which you will have to develop anyway), especially since you likely won’t research land mines at all or until the very late game.
Which towers to use and how?
The first attack tower you have access to is the Great Ballista. It is great for the early game hordes – with one of these, some walls and the support of one or two dozens archers, you’ll handle the first raids easily. But after a while (in Challenging difficulty, roughly day 40), the hordes start getting bigger and you’ll need the Shocking Towers. Those monsters can wipe dozens of zombies in one hit. Yes they use a lot of energy, but it’s worth it.
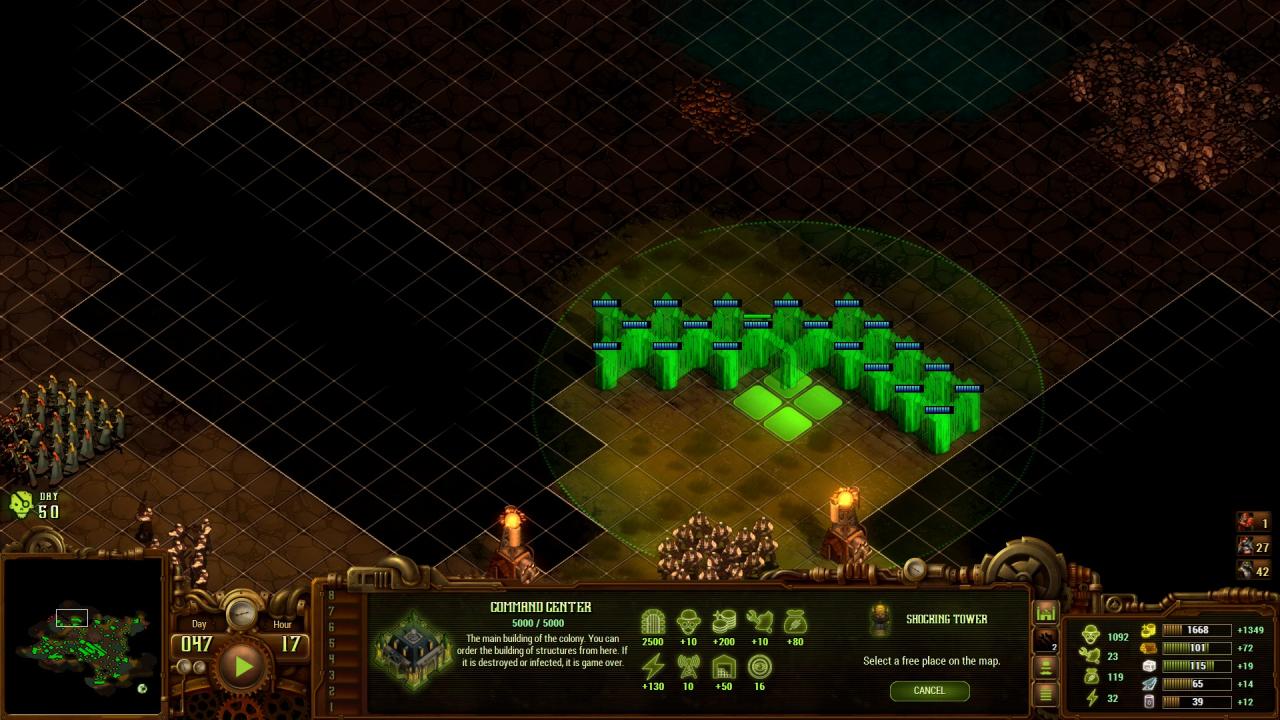
When placing a shockign tower, you can see its area of effect. To make the maximum use out of those, you want at least half of the circle to be outside of the walls (again, see the screenshot above). Basically, the more area outside of your walls the Shocking Tower can hit, the better. And that is also why you want to avoid small chokepoints.
The entirety of your walls should be covered by Shocking Towers (redunduncy is fine).
In the early game, ballistæ are good when your troops are needed elsewhere. A lone ballista (without walls) can watch a chokepoint on its own in the early game (unless a raid goes through there, in which case you want to have some walls), which allows you to use your troops to clean and expand, rather than using them to watch the spot where the ballista is.
When placing walls, you don’t want to put too many ballistæ behind for two reasons:
- they take a lot of room and you already have to fit shocking towers in;
- their upkeep is high (upgrading to executor is super expensive as well).
Keep in mind that you also have to train units continuously to be able to clean up the whole map. You want to have some ballistæ supporting your Shocking Towers, but keep in mind they are not the priority. You don’t need to upgrade all of them to Executor (unless you’re feeling nervous for some chokepoints). Usually, for 2 Shocking Towers, you have 3-4 Ballistæ and upgrading 1-2 of them to Executor is enough.
For the late game, you want to have two wood towers filled with troops for each Shocking Tower. Stone Tower upgrade isn’t really worthwhile.
Which troops to use for defense?
In the early game, you want to have Barracks between day 3 and 6 and start training Rangers (one at a time, continuously). Soldiers are not bad, but they’re too noisy for the early game; and once you get to the Wood Workshop tech tree, Snipers are just plain better.
Once you have Farm and Cottage, you’ll want to research Snipers. Once it’s done, forget about Rangers and start training Snipers (again, one at a time, continuously until the end of the game). You’ll want to have Wood Towers full of snipers on each wall at the end of the game.
Once you get to the late game, you’ll want to train Thanatos units (keep training Snipers, too). They are basically a mini, mobile Shocking Tower, especially in groups. They’re a great complement to Snipers for cleaning up the map. They also excel at holding chokepoints, especially smaller ones with only one Shocking Tower – they will provide great support.
Forget about the others. Lucifers are amazingly tanky, but can’t shoot through walls. Titans and Mutants are way too expensive. I only take those units if they come from a mayor bonus and the other alternative is bad.
A typically good defense layout
Diamond walls, protected by redundent Shocking Towers. Snipers in Towers besides those, and Ballistæ behind to cover them. Only the Stakes traps are missing – and they clearly are the least important.